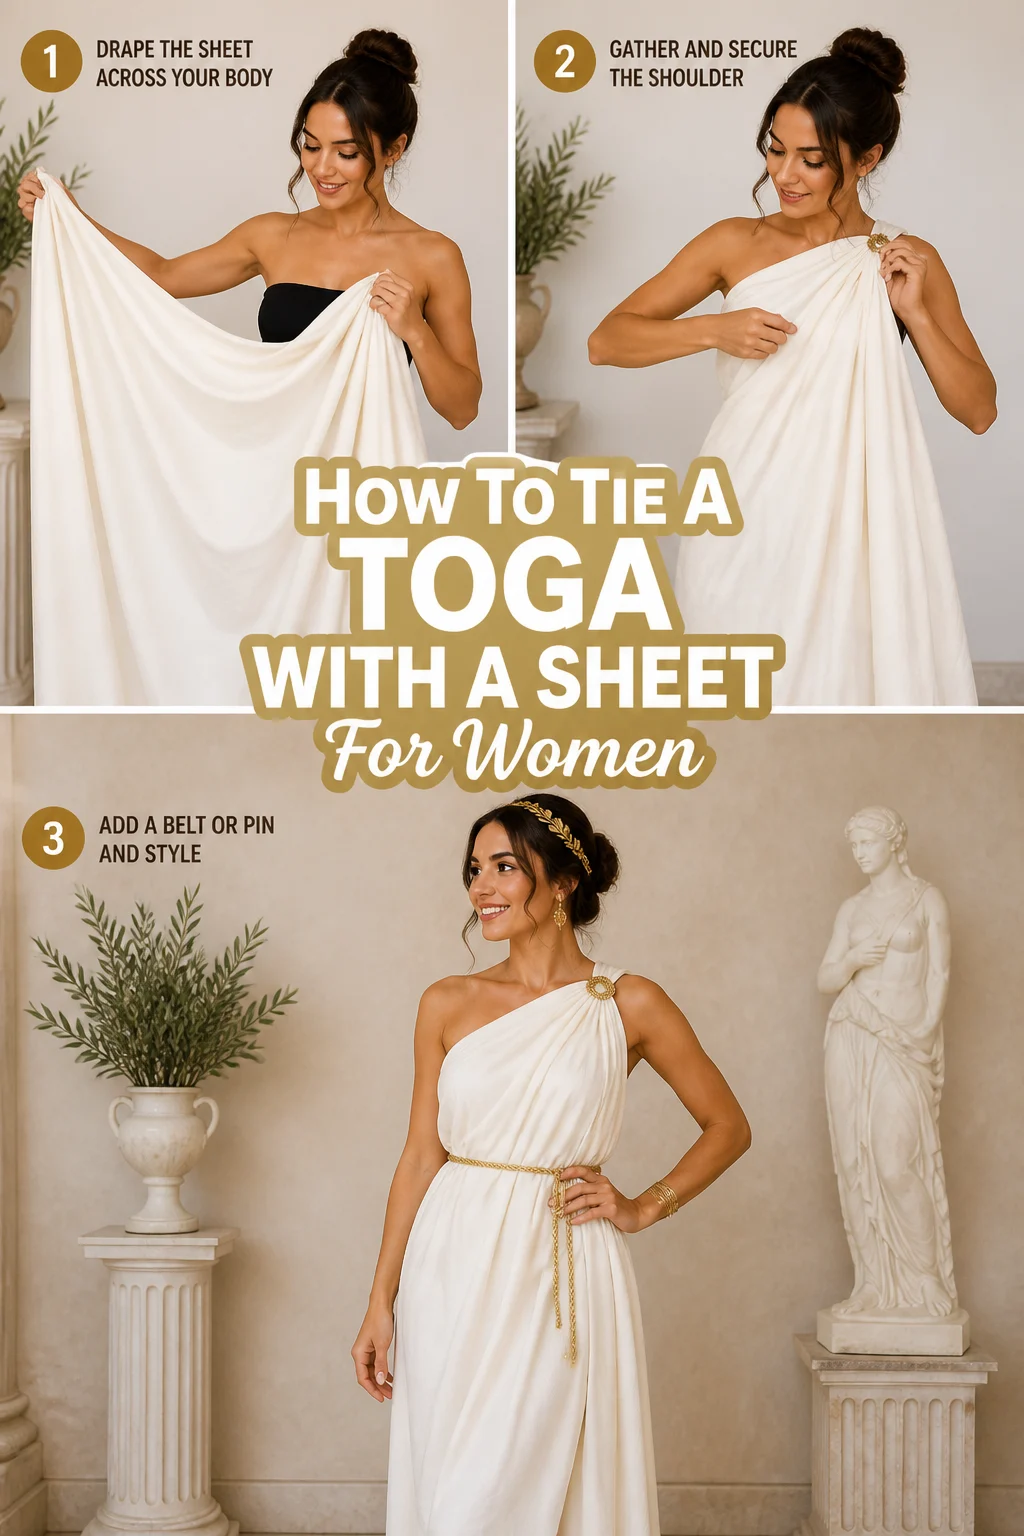
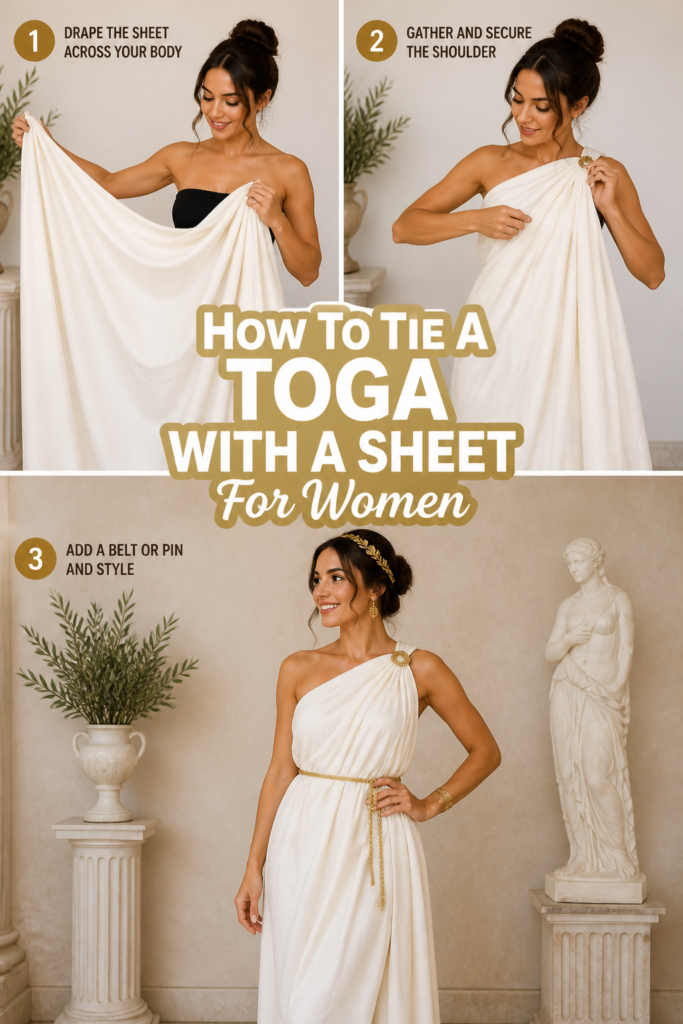
🩱 How To Tie A Toga With A Sheet For Women
I remember scrambling for a last-minute costume, staring at a pile of sheets and wondering how on earth to transform them into something wearable. It felt like a secret art, passed down through generations of college party-goers and costume enthusiasts. This guide shares the practical method I perfected, ensuring your toga is both stunning and secure.
You don’t need ancient Roman tailoring skills to achieve this classic look. With a simple sheet and a few key techniques, you’ll create an elegant, comfortable, and truly head-turning toga. Let’s get started on your transformation.
Quick Overview
Transforming a flat sheet into a flowing toga is surprisingly simple and creates a timeless, elegant silhouette. You’ll master the art of draping and securing fabric to craft a comfortable and stylish costume.
- Time needed: 15-25 minutes
- Difficulty: Beginner
- What you’ll need: One flat bed sheet (twin or full size recommended), safety pins, optional: decorative rope or belt, brooch, strapless bra.
Step-by-Step Instructions
Step 1: Choose Your Sheet and Undergarments
Select a flat sheet that offers ample fabric. A twin or full-sized sheet works best for most body types, providing enough material for generous draping. Avoid fitted sheets as their elastic edges make them unsuitable.
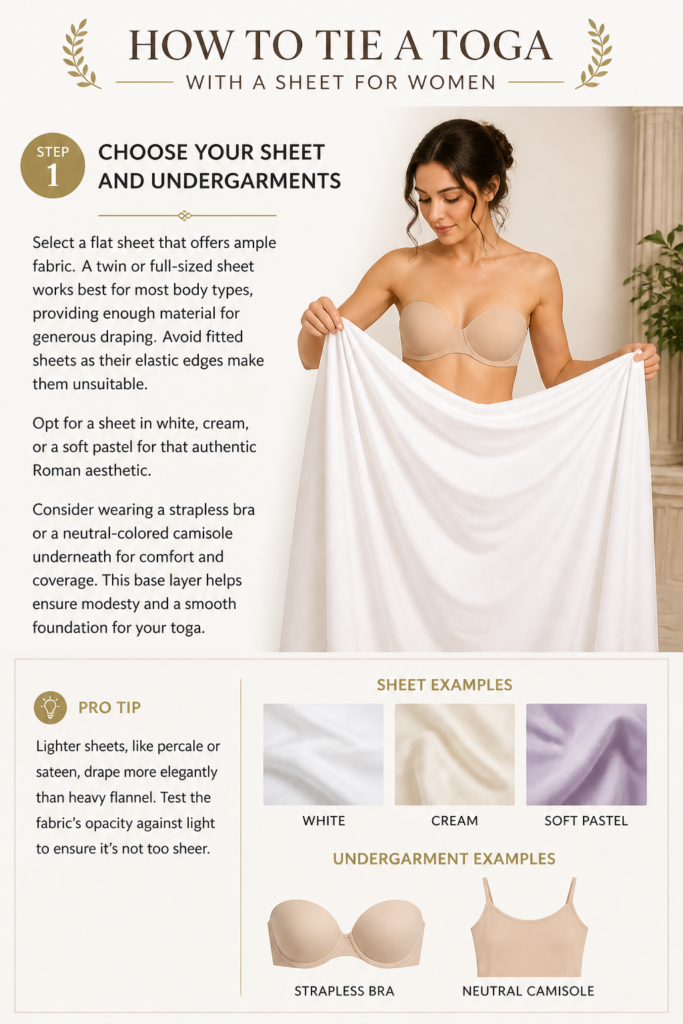
Opt for a sheet in white, cream, or a soft pastel for that authentic Roman aesthetic. Consider wearing a strapless bra or a neutral-colored camisole underneath for comfort and coverage. This base layer helps ensure modesty and a smooth foundation for your toga.
Pro Tip: Lighter sheets, like percale or sateen, drape more elegantly than heavy flannel. Test the fabric’s opacity against light to ensure it’s not too sheer.
Step 2: Prepare Your Starting Position
Stand tall and centered in your space, holding one corner of the sheet. You’ll begin by wrapping the sheet around your body to establish the initial anchor point. Ensure you have enough room to move freely and drape the fabric.
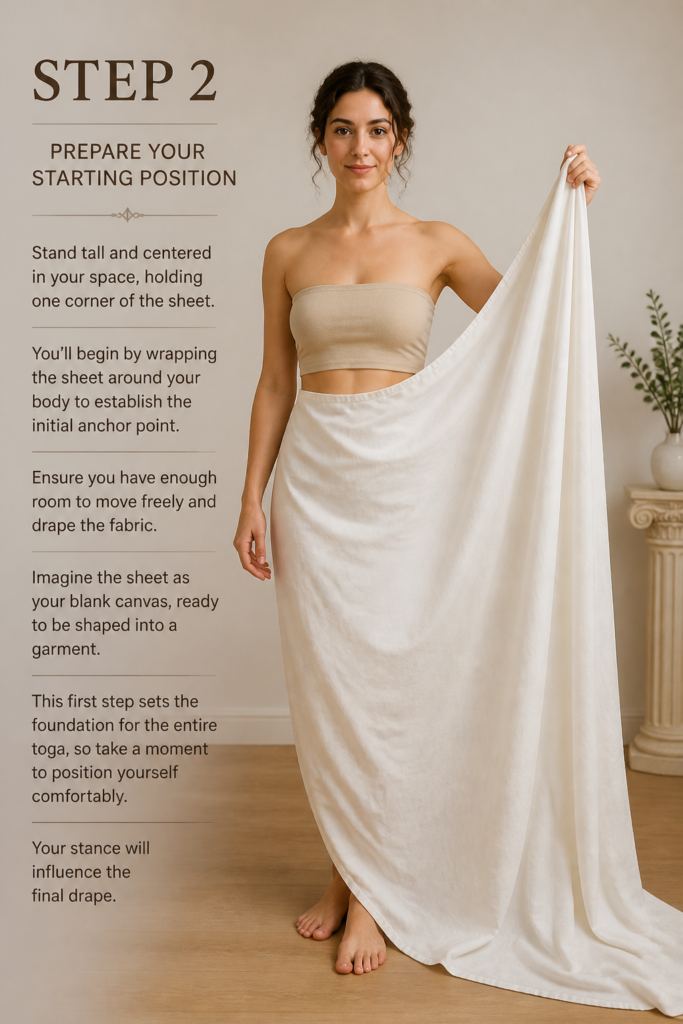
Imagine the sheet as your blank canvas, ready to be shaped into a garment. This first step sets the foundation for the entire toga, so take a moment to position yourself comfortably. Your stance will influence the final drape.
Step 3: Create the Initial Wrap and Anchor
Hold one corner of the sheet at your right hip, positioning it just above your waist. Bring the sheet across the front of your body, under your left arm, and up over your left shoulder. This creates the first diagonal drape.
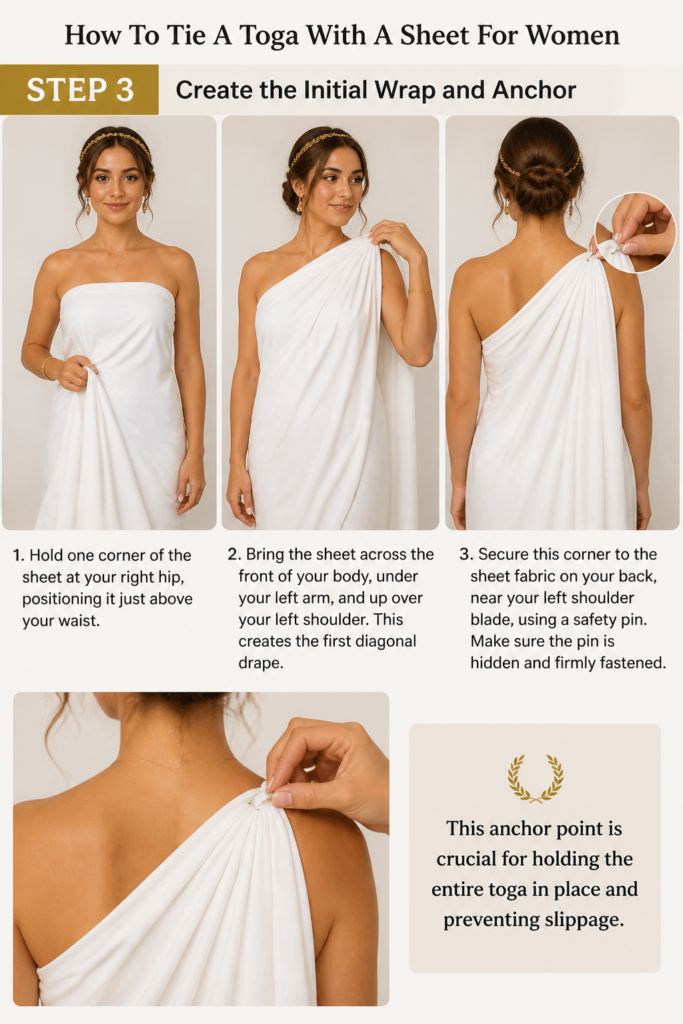
Secure this corner to the sheet fabric on your back, near your left shoulder blade, using a safety pin. Make sure the pin is hidden and firmly fastened. This anchor point is crucial for holding the entire toga in place and preventing slippage.
Step 4: Drape Across the Back and Front
Take the long end of the sheet, which is now hanging down your back. Bring this fabric across your back, under your right arm, and up over your right shoulder. This creates a second diagonal line, crossing the first.
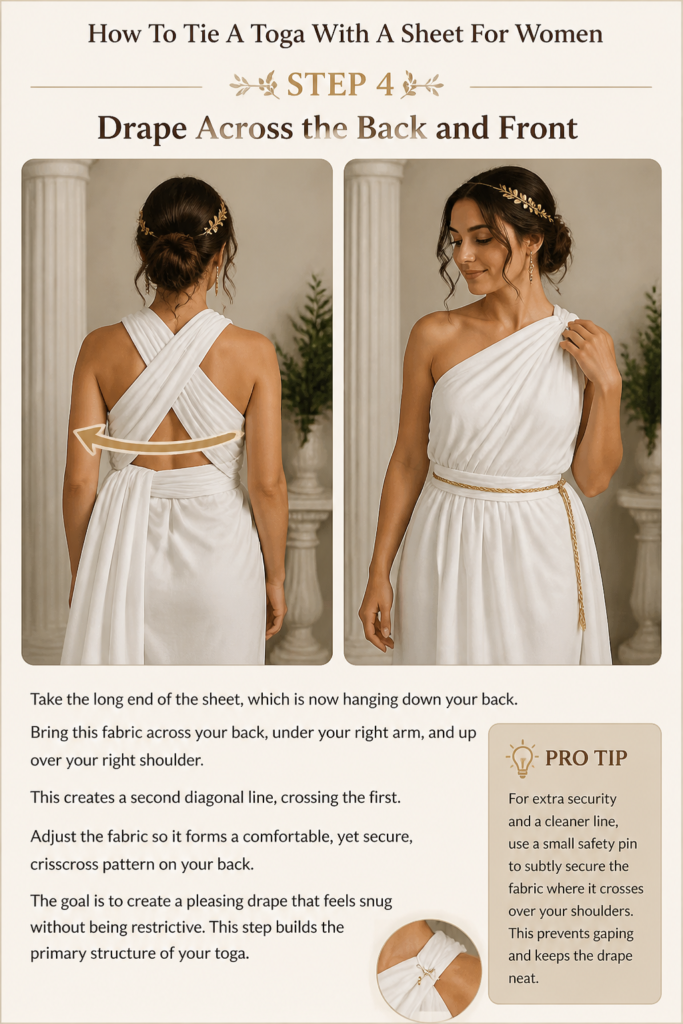
Adjust the fabric so it forms a comfortable, yet secure, crisscross pattern on your back. The goal is to create a pleasing drape that feels snug without being restrictive. This step builds the primary structure of your toga.
Pro Tip: For extra security and a cleaner line, use a small safety pin to subtly secure the fabric where it crosses over your shoulders. This prevents gaping and keeps the drape neat.
Step 5: Form the Waistline and Volume
Gather the remaining fabric from the long end of the sheet. Bring it around your waist, adjusting the fullness and drape to your liking. You can create pleats or simply let it flow naturally. The goal is to define your waist.
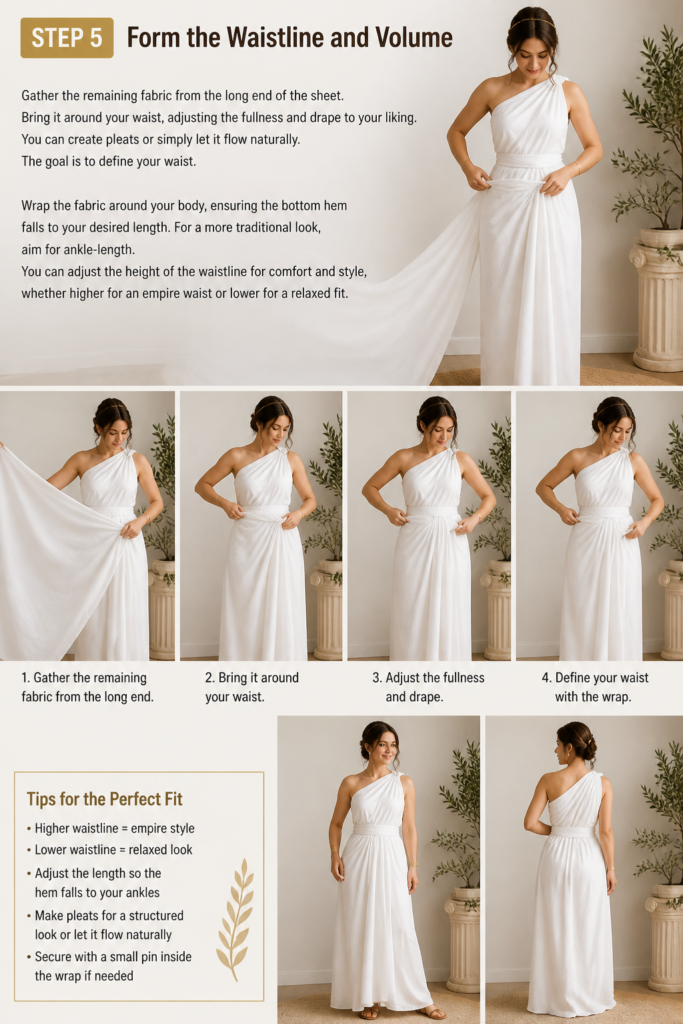
Wrap the fabric around your body, ensuring the bottom hem falls to your desired length. For a more traditional look, aim for ankle-length. You can adjust the height of the waistline for comfort and style, whether higher for an empire waist or lower for a relaxed fit.
Step 6: Secure the Waist and Final Drape
Pin the gathered waist fabric securely to itself and to the underlying layers of the toga. Use multiple safety pins if needed, ensuring they are well-hidden. This creates a defined waist and prevents the toga from unraveling.
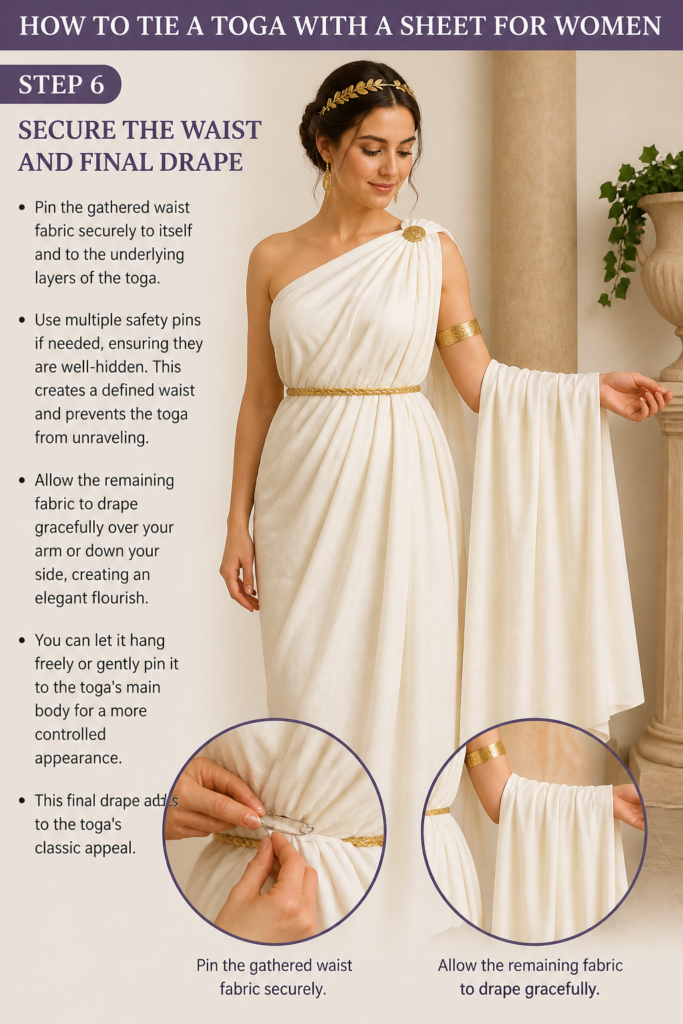
Allow the remaining fabric to drape gracefully over your arm or down your side, creating an elegant flourish. You can let it hang freely or gently pin it to the toga’s main body for a more controlled appearance. This final drape adds to the toga’s classic appeal.
Step 7: Refine and Accessorize
Adjust all the drapes and folds until you are happy with the overall look. Check for any loose spots or areas that need further pinning for security. A quick spin in front of a mirror helps ensure everything is perfectly aligned.
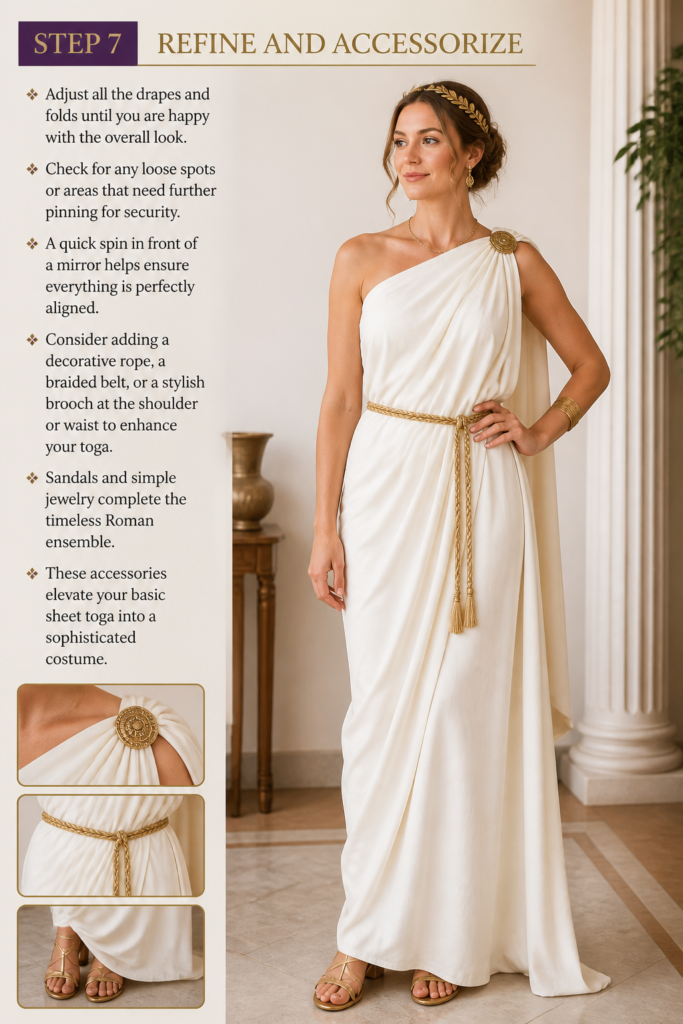
Consider adding a decorative rope, a braided belt, or a stylish brooch at the shoulder or waist to enhance your toga. Sandals and simple jewelry complete the timeless Roman ensemble. These accessories elevate your basic sheet toga into a sophisticated costume.
Common Mistakes to Avoid
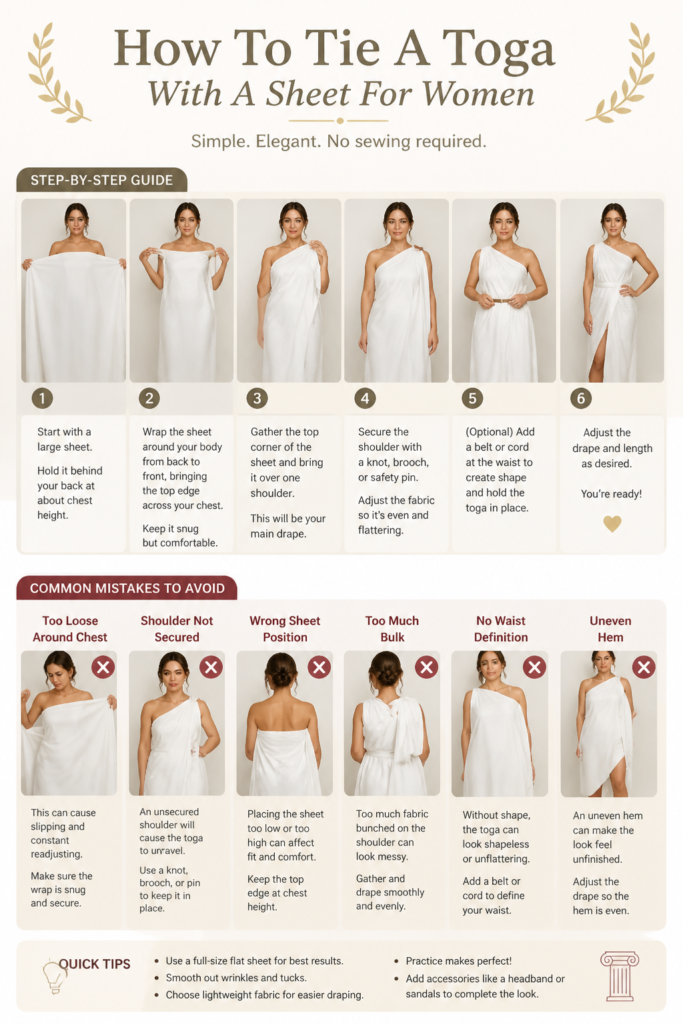
Using a Fitted Sheet
Many people grab the first sheet they find, often a fitted one. Fitted sheets have elastic edges and awkward seams that simply won’t drape properly for a toga. The elastic creates unsightly bulges and makes it impossible to achieve the smooth, flowing lines characteristic of a toga. Always choose a flat sheet for best results.
Not Enough Safety Pins
Underestimating the power of safety pins is a common pitfall. A toga relies on clever draping, but it needs firm anchors to stay put. Skimping on pins leads to a toga that slips, sags, or even unravels completely during wear. Use enough pins, strategically placed and well-hidden, to secure every crucial fold and overlap.
Overly Tight Wrapping
While you want your toga to be secure, wrapping it too tightly restricts movement and can be very uncomfortable. It also distorts the natural flow of the fabric, making the toga look less graceful and more like a bandage. Aim for a comfortable, snug fit that still allows the fabric to drape and move with you.
Ignoring Undergarments
Some assume the sheet provides all the coverage needed, but this isn’t always true. Depending on the sheet’s opacity and your movements, gaps can appear. Neglecting a strapless bra or neutral-colored shorts can lead to unexpected exposure. Plan your undergarments to ensure comfort and confidence throughout your event.
Troubleshooting
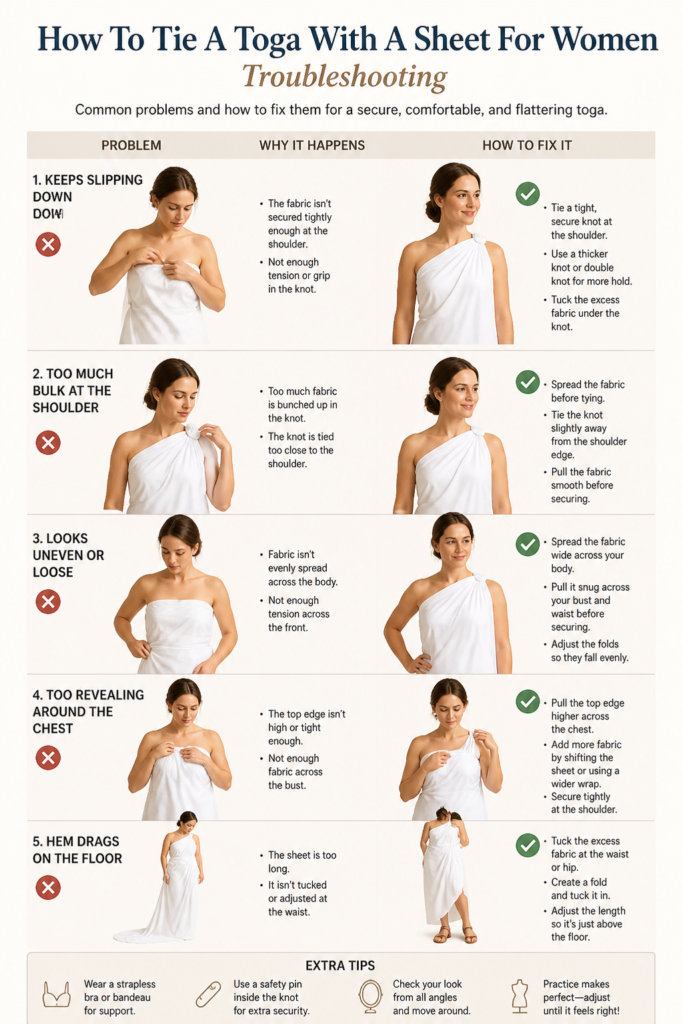
Toga Feels Like It’s Slipping
If your toga feels like it’s losing its grip or sliding down, the initial anchor points are likely not secure enough. Re-pin the corner over your shoulder, ensuring it’s firmly attached to the fabric on your back. Add an extra safety pin where the fabric crosses over your shoulders, hidden from view. Reinforce any areas that feel loose around the waist with additional pins.
Fabric Gathers Awkwardly or Bulges
Awkward gathering often happens when the fabric isn’t evenly distributed or when you’ve wrapped it too tightly in one area. Gently loosen the wrap and redistribute the fabric more evenly around your body. Smooth out any wrinkles and adjust the folds until they lie flat. Sometimes, a larger sheet can help prevent excessive bunching, allowing for a smoother drape.
Toga is Too Long and Tripping You
If the hem of your toga is dragging on the floor, you can adjust its length by raising the waistline. Simply pull the entire toga up slightly from your shoulders and waist, then re-pin it to hold the new, shorter length. You can also discreetly fold the bottom edge inwards and secure it with a few hidden safety pins, creating a temporary hem.
Key Takeaways
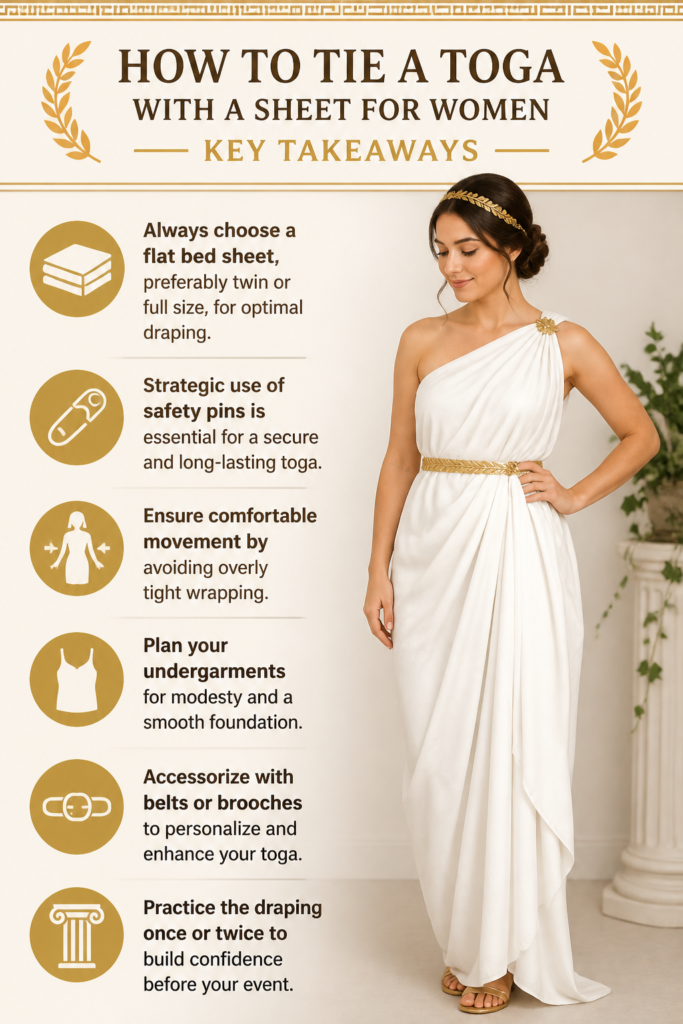
- Always choose a flat bed sheet, preferably twin or full size, for optimal draping.
- Strategic use of safety pins is essential for a secure and long-lasting toga.
- Ensure comfortable movement by avoiding overly tight wrapping.
- Plan your undergarments for modesty and a smooth foundation.
- Accessorize with belts or brooches to personalize and enhance your toga.
- Practice the draping once or twice to build confidence before your event.
Frequently Asked Questions
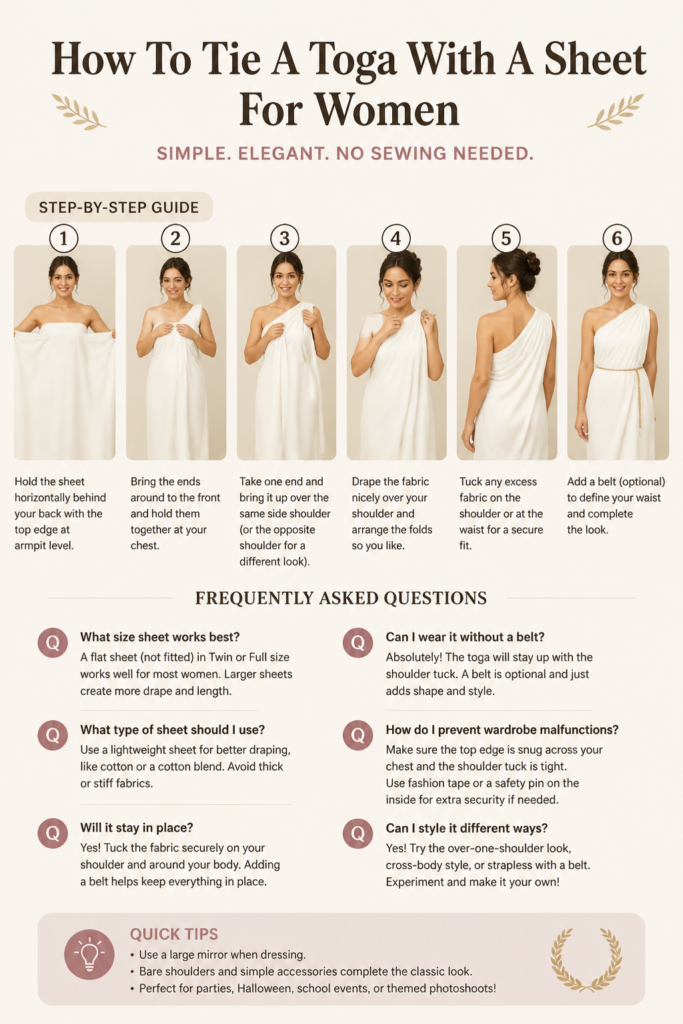
What size sheet is best for a toga?
A twin or full-sized flat sheet typically works best for most women. These sizes provide ample fabric for draping without being overly bulky. If you’re taller or prefer a very voluminous look, a queen-sized flat sheet could also be an option.
Can I use a patterned sheet for a toga?
While traditional togas are often white or cream, you can absolutely use a patterned sheet if you prefer. Choose a subtle pattern that won’t distract from the elegant drapes. Geometric or simple floral patterns can add a unique touch to your Roman look.
How do I make my toga more secure for dancing?
For active events, security is key. Use extra safety pins at every crucial intersection: shoulders, waist, and anywhere the fabric overlaps. Consider wearing a fitted slip or shorts underneath to prevent accidental exposure during movement. A sturdy belt or rope tied firmly around the waist adds another layer of stability.
What if my sheet is too thin and see-through?
If your sheet is too sheer, wear a neutral-colored slip dress or a camisole and shorts underneath for complete coverage. You can also try folding the sheet in half lengthwise before you begin draping, effectively doubling the fabric thickness. This provides more opacity but also adds more bulk.
Our Top Recommended Finds
- Large Safety Pins: Essential for securely fastening the sheet without tearing. Look for sturdy, rust-resistant pins.
- Decorative Rope or Braided Belt: Perfect for cinching the waist and adding an authentic, stylish touch to your toga.
- Strapless Bandeau Bra: Provides a smooth foundation and ensures modesty, especially with lighter colored or thinner sheets.
Embrace Your Inner Goddess
You now possess the knowledge and practical steps to transform a simple sheet into a stunning toga. This skill is perfect for costume parties, themed events, or just a fun creative project. The elegance of a well-draped toga is timeless, and now it’s a look you can easily achieve.
Don’t let another costume opportunity pass you by. Gather your sheet, grab your pins, and confidently create your own magnificent Roman attire today. Your personal style, combined with these techniques, will ensure you stand out.