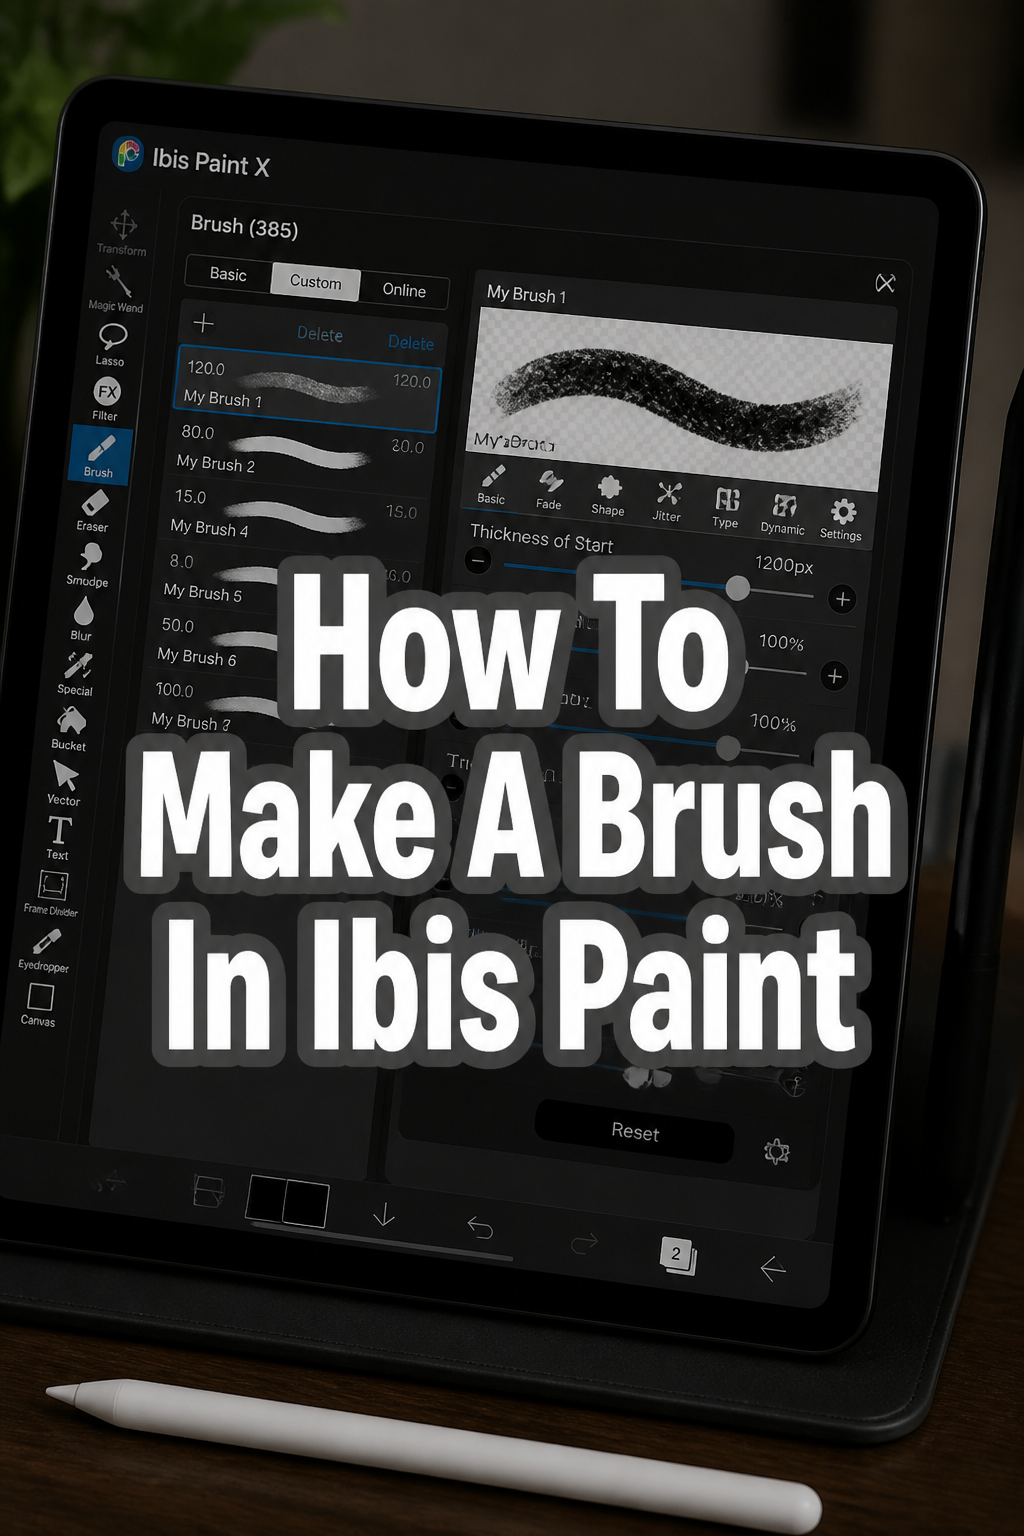
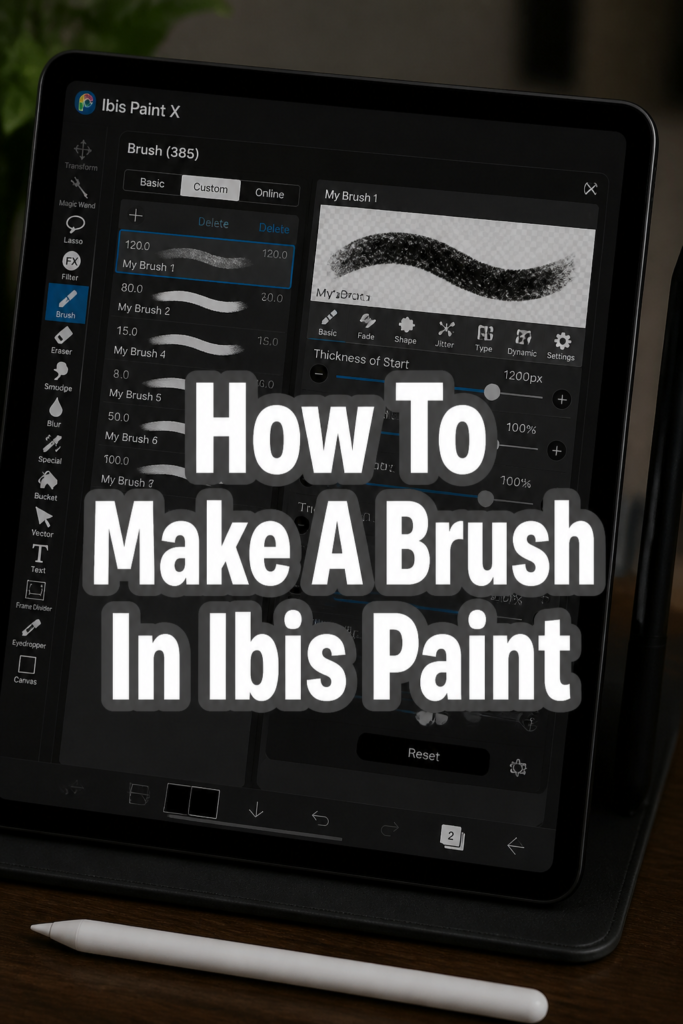
🖌️ How To Make A Brush In Ibis Paint

& Painting
No rigid rules or pretension. Just practical guides, medium comparisons, and encouraging tips to help you enjoy the drawing & painting process.
Ever wished your digital art could have that unique touch, something truly ‘you’?
I’ve spent countless hours experimenting in Ibis Paint, discovering how custom brushes can transform a piece from good to absolutely stunning.
This guide distills all that hands-on experience, showing you precisely how to craft your perfect brush, step by step.
Quick Overview
You’re about to learn how to create your very own custom brush in Ibis Paint, tailoring every aspect from its shape to its dynamic behavior. This process empowers you to design tools that perfectly match your artistic vision.
- Time needed: 30-60 minutes (depending on your level of experimentation)
- Difficulty: Intermediate
- What you’ll need: Ibis Paint X app, a compatible device (phone or tablet), a stylus (optional but highly recommended), and a basic understanding of the Ibis Paint interface.
Step-by-Step Instructions
Step 1: Access the Brush Window
Open the Ibis Paint X app on your device. Once you are in a canvas, locate the brush icon at the bottom of the screen.
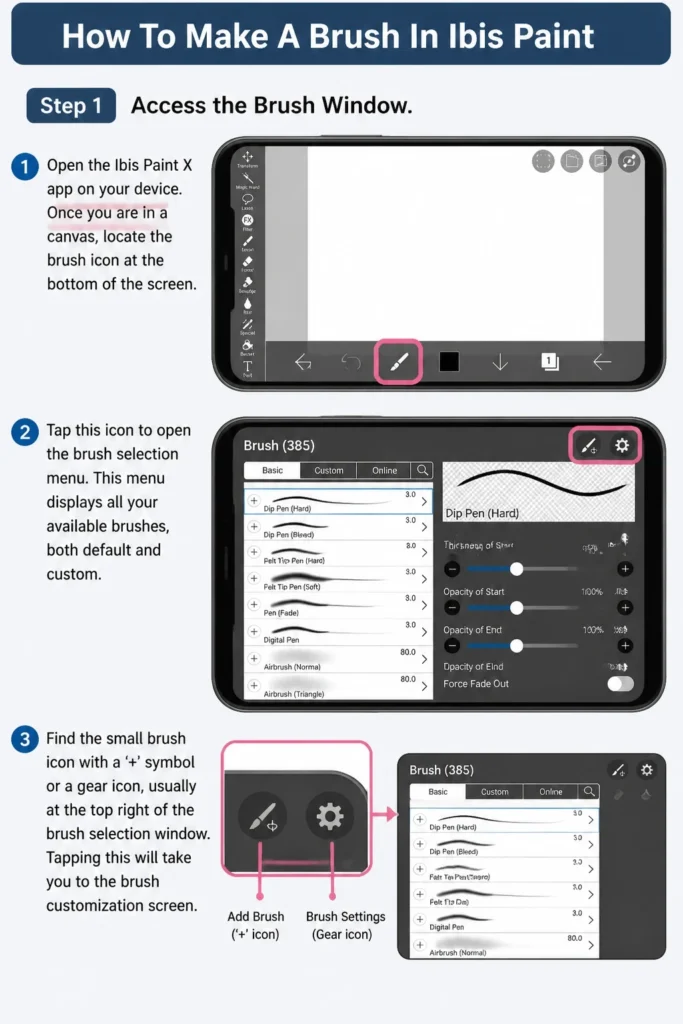
Tap this icon to open the brush selection menu. This menu displays all your available brushes, both default and custom.
Find the small brush icon with a ‘+’ symbol or a gear icon, usually at the top right of the brush selection window. Tapping this will take you to the brush customization screen.
Step 2: Start a New Custom Brush
Look for the plus (+) icon at the top of the Custom Brushes list. This button is your gateway to creating a brand new brush from scratch.
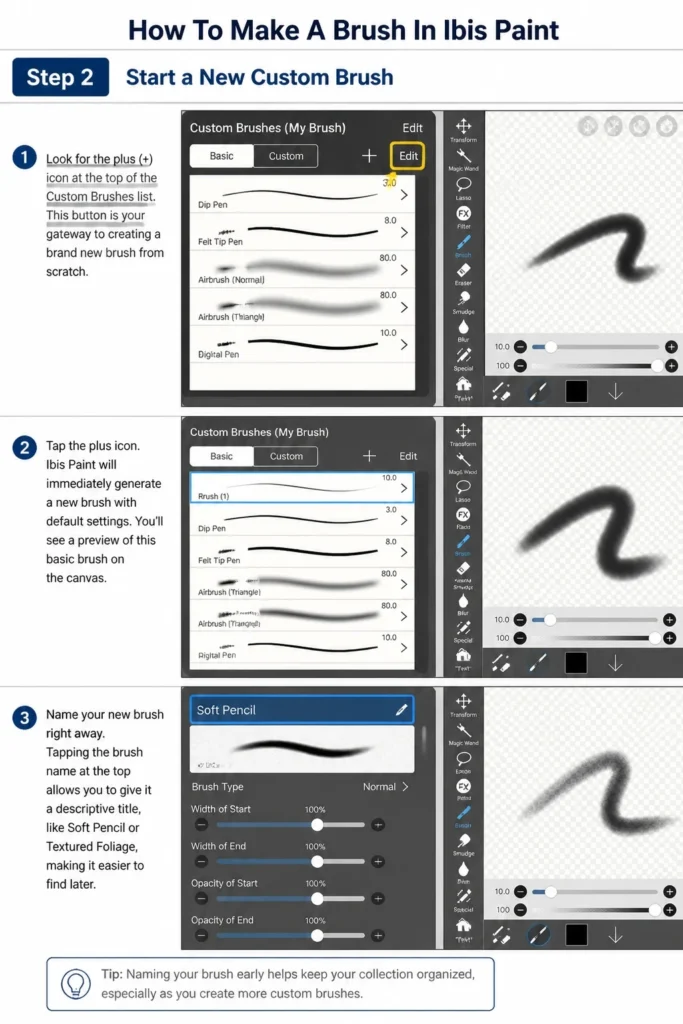
Tap the plus icon. Ibis Paint will immediately generate a new brush with default settings. You’ll see a preview of this basic brush on the canvas.
Name your new brush right away. Tapping the brush name at the top allows you to give it a descriptive title, like “Soft Pencil” or “Textured Foliage,” making it easier to find later.
Step 3: Define the Brush Shape (Tip)
Scroll down to the “Shape” section within the brush settings. This is where you determine the fundamental form of your brush stroke.
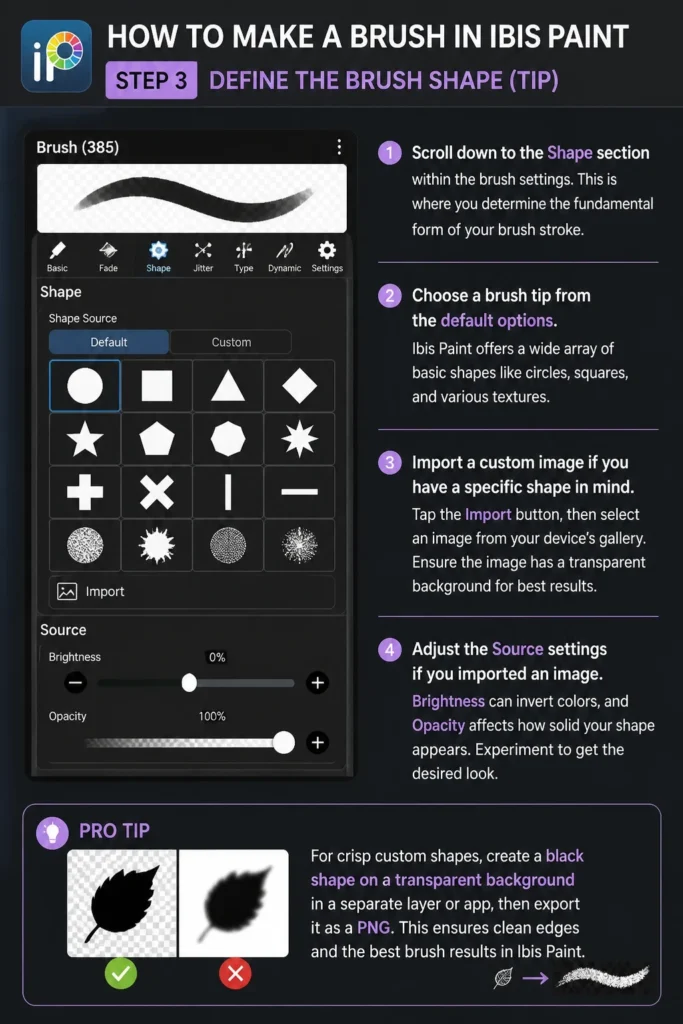
Choose a brush tip from the default options. Ibis Paint offers a wide array of basic shapes like circles, squares, and various textures.
Import a custom image if you have a specific shape in mind. Tap the “Import” button, then select an image from your device’s gallery. Ensure the image has a transparent background for best results.
Adjust the “Source” settings if you imported an image. “Brightness” can invert colors, and “Opacity” affects how solid your shape appears. Experiment to get the desired look.
Pro Tip: For crisp custom shapes, create a black shape on a transparent background in a separate layer or app, then export it as a PNG. This ensures clean edges when imported.
Step 4: Add a Texture (Grain)
Navigate to the “Texture” section, just below the “Shape” settings. Textures add depth and visual interest to your brush strokes, simulating paper or other materials.
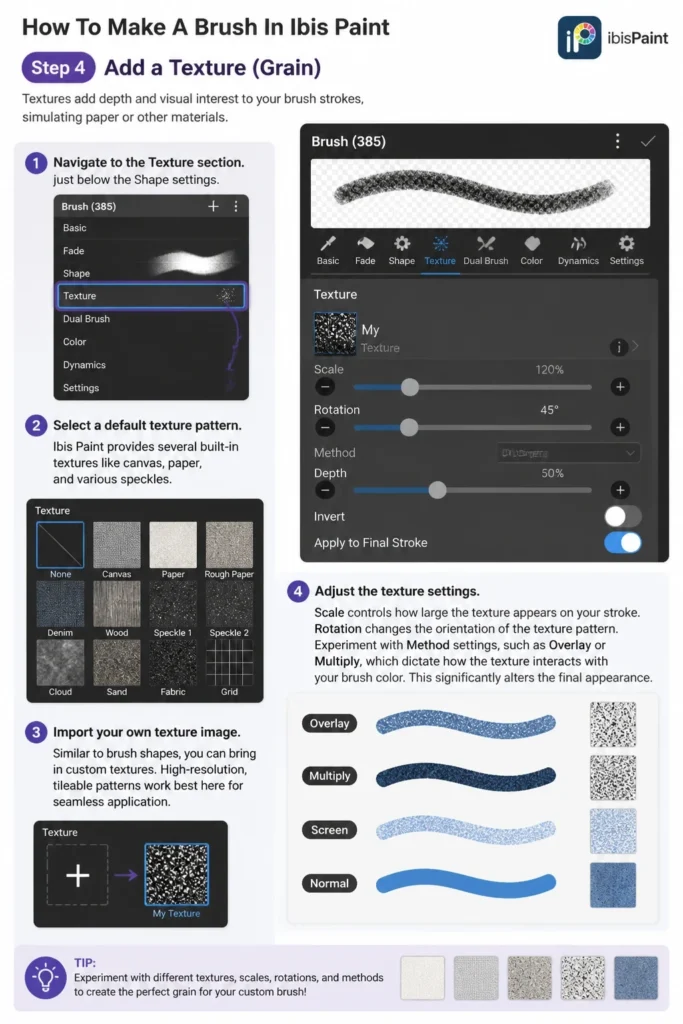
Select a default texture pattern. Ibis Paint provides several built-in textures like canvas, paper, and various speckles.
Import your own texture image. Similar to brush shapes, you can bring in custom textures. High-resolution, tileable patterns work best here for seamless application.
Adjust the texture settings. “Scale” controls how large the texture appears on your stroke. “Rotation” changes the orientation of the texture pattern.
Experiment with “Method” settings, such as “Overlay” or “Multiply,” which dictate how the texture interacts with your brush color. This significantly alters the final appearance.
Step 5: Adjust Basic Brush Settings
Find the “Basic” section. These settings control fundamental aspects of your brush’s behavior.
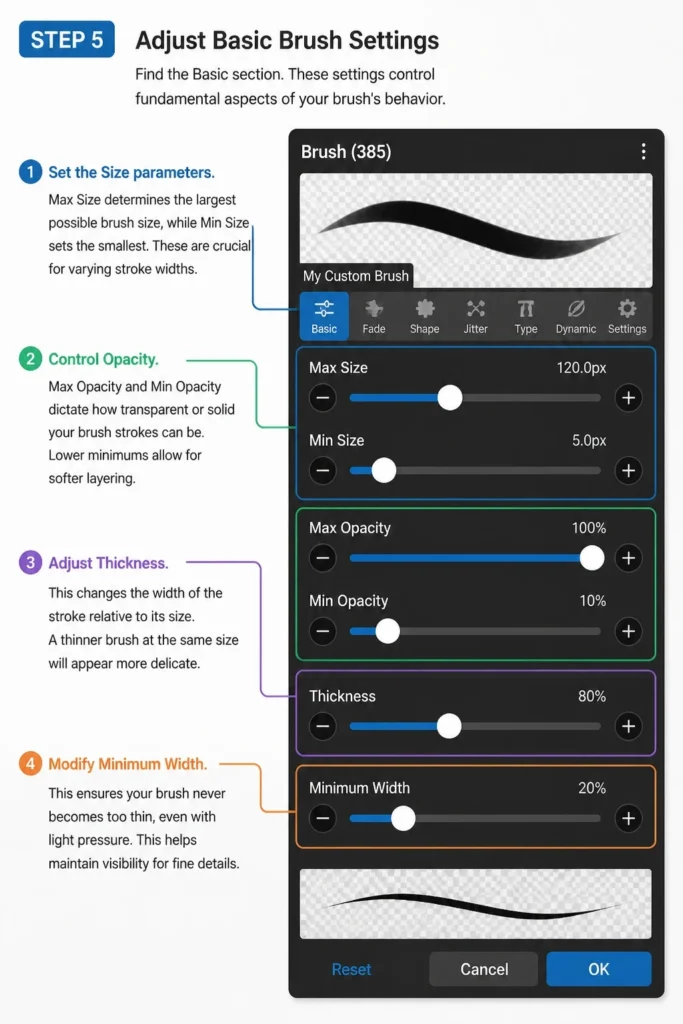
Set the “Size” parameters. “Max Size” determines the largest possible brush size, while “Min Size” sets the smallest. These are crucial for varying stroke widths.
Control “Opacity” with “Max Opacity” and “Min Opacity.” This dictates how transparent or solid your brush strokes can be. Lower minimums allow for softer layering.
Adjust “Thickness” to change the width of the stroke relative to its size. A thinner brush at the same size will appear more delicate.
Modify “Minimum Width” to ensure your brush never becomes too thin, even with light pressure. This helps maintain visibility for fine details.
Step 6: Explore Dynamic Settings
Dive into the “Dynamics” section for the most expressive controls. These settings make your brush react to drawing speed, pressure, and randomness.
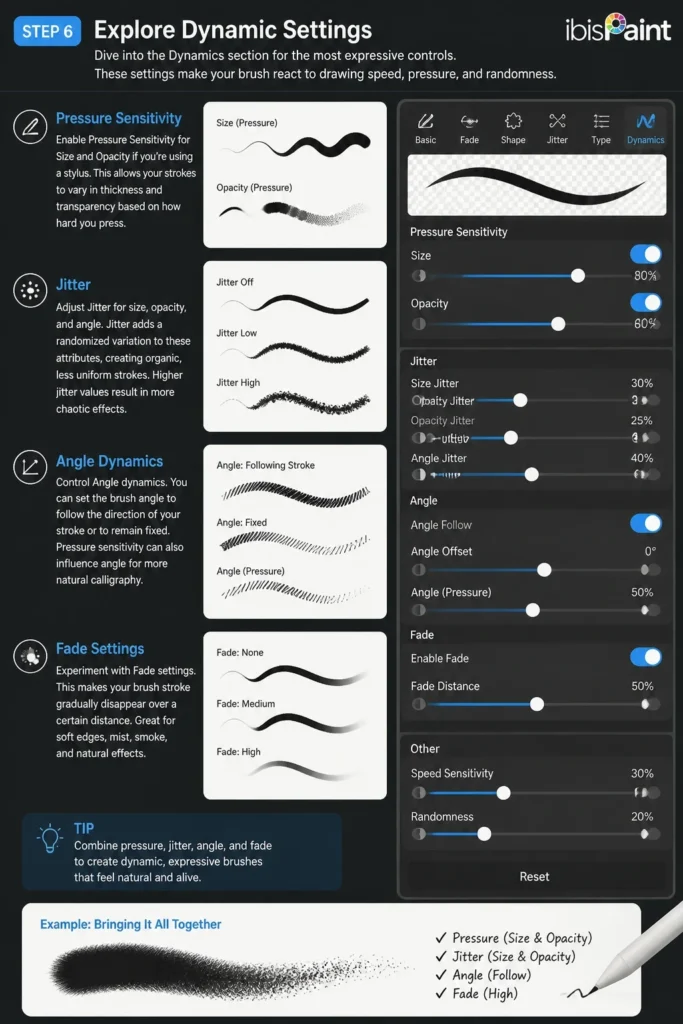
Enable “Pressure Sensitivity” for Size and Opacity if you’re using a stylus. This allows your strokes to vary in thickness and transparency based on how hard you press.
Adjust “Jitter” for size, opacity, and angle. Jitter adds a randomized variation to these attributes, creating organic, less uniform strokes. Higher jitter values result in more chaotic effects.
Control “Angle” dynamics. You can set the brush angle to follow the direction of your stroke or to remain fixed. Pressure sensitivity can also influence angle for more natural calligraphy.
Experiment with “Fade” settings. This makes your brush stroke gradually disappear over a certain distance or time, useful for tapered lines or blending effects.
Pro Tip: Pressure sensitivity is key for natural-looking strokes. Spend time fine-tuning the curves for size and opacity to match your drawing style and stylus responsiveness.
Step 7: Master Blending and Stroke Settings
Move to the “Stroke” and “Blending” sections. These affect how individual brush marks appear and how they interact with existing colors.
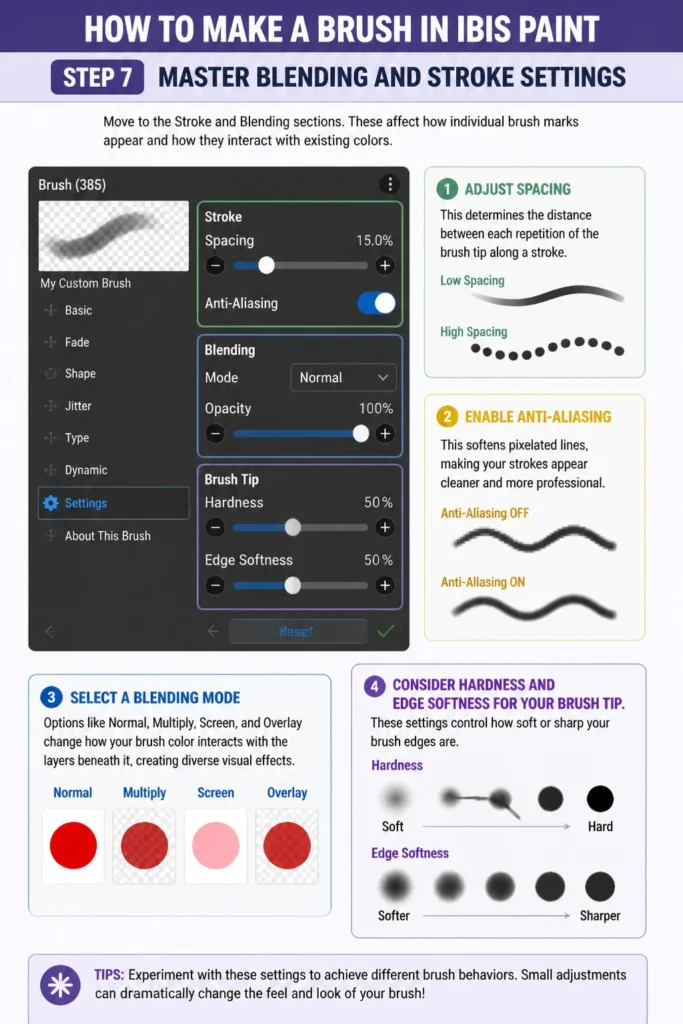
Adjust “Spacing” in the “Stroke” section. This determines the distance between each repetition of the brush tip along a stroke. Lower spacing creates a continuous line, while higher spacing results in a dotted or dashed effect.
Enable “Anti-Aliasing” for smoother brush edges. This softens pixelated lines, making your strokes appear cleaner and more professional.
Select a “Blending Mode” in the “Blending” section. Options like “Normal,” “Multiply,” “Screen,” and “Overlay” change how your brush color interacts with the layers beneath it, creating diverse visual effects.
Consider “Hardness” and “Edge Softness” for your brush tip. These settings control how sharp or feathered the edges of your individual brush marks are, affecting blending quality.
Step 8: Test and Refine Your Brush
Utilize the “Working Canvas” at the top of the brush settings menu. This small preview area lets you draw with your brush in real-time as you adjust settings.
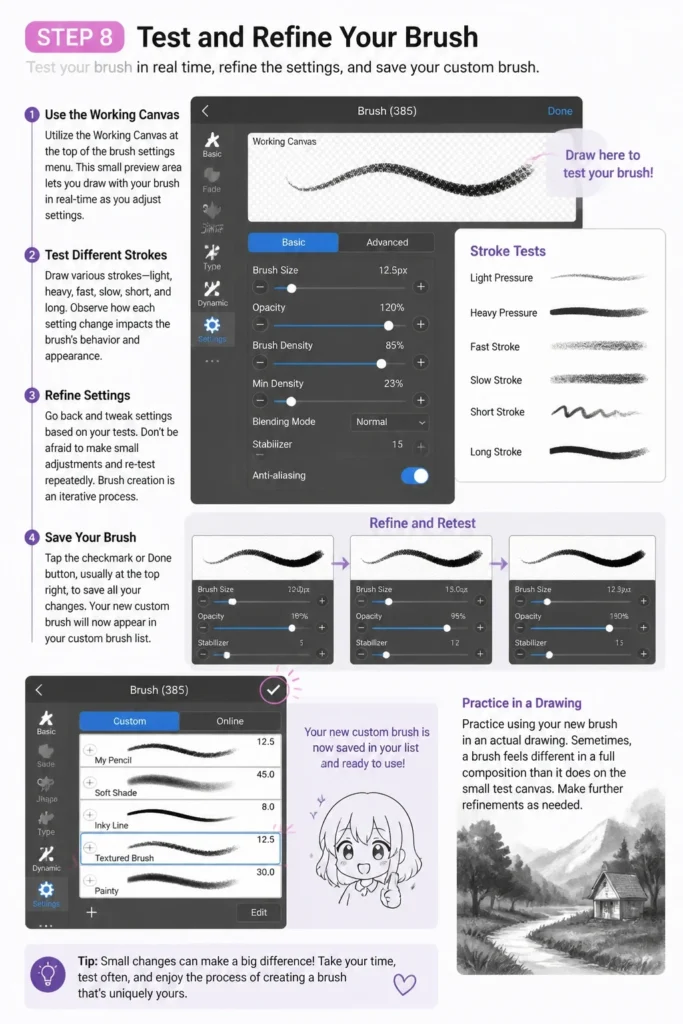
Draw various strokes: light, heavy, fast, slow, short, and long. Observe how each setting change impacts the brush’s behavior and appearance.
Go back and tweak settings based on your tests. Don’t be afraid to make small adjustments and re-test repeatedly. Brush creation is an iterative process.
Tap the checkmark or “Done” button, usually at the top right, to save all your changes. Your new custom brush will now appear in your custom brush list.
Practice using your new brush in an actual drawing. Sometimes, a brush feels different in a full composition than it does on the small test canvas. Make further refinements as needed.
Common Mistakes to Avoid
Not Testing Enough on the Working Canvas
Many artists rush through the settings without thoroughly testing their brush. The small working canvas is there for a reason – it provides immediate feedback.
Failing to test different pressures, speeds, and stroke lengths can lead to a brush that doesn’t behave as expected in a real drawing. Always draw extensively on the preview to ensure it feels right.
Overlooking Pressure Sensitivity Settings
For stylus users, neglecting pressure sensitivity robs your brush of its expressive potential. A brush that reacts to pressure feels much more natural and dynamic.
Remember to enable and fine-tune pressure curves for both size and opacity. Even slight adjustments can make a huge difference in how your brush feels and performs.
Forgetting to Save the Brush
It’s easy to get lost in experimentation and forget the final step: saving. If you exit the brush settings without saving, all your hard work will be lost.
Always confirm your changes by tapping the checkmark or “Done” button. Consider saving periodically if you’re making extensive modifications to avoid losing progress.
Using Low-Resolution Texture Images
When importing custom textures, using a low-resolution image can result in pixelated or blurry brush strokes. This detracts from the professional look of your art.
Always source or create high-resolution texture images. Ensure they are clean and ideally tileable for seamless integration into your brush design.
Troubleshooting
My Custom Brush Isn’t Showing Up in the List
This usually happens if you didn’t properly save your brush after making changes. The “Done” or checkmark button is crucial.
Go back into the brush customization menu, find your brush (it might still be there with unsaved changes), and ensure you tap the save button before exiting.
The Brush Feels Choppy or Pixelated
Several factors can cause this. First, check your “Spacing” setting; if it’s too high, your brush will look like a series of dots instead of a continuous line.
Second, ensure “Anti-Aliasing” is enabled for smoother edges. Also, if you used a custom brush shape or texture, verify that the source images were high-resolution.
Pressure Sensitivity Isn’t Working
First, confirm your device and stylus actually support pressure sensitivity with Ibis Paint. Not all styluses are active and pressure-sensitive.
Next, in the brush settings, check if “Pressure Sensitivity” is enabled for “Size” and “Opacity” under the “Dynamics” section. You might also need to adjust the pressure curves.
Key Takeaways
- Custom brushes are powerful tools for unique artistic expression and personal style.
- Defining the brush shape and adding a texture are foundational steps for any custom brush.
- Dynamic settings, like jitter and pressure sensitivity, create realistic and expressive strokes.
- Thorough testing on the working canvas and refinement are crucial for a perfect brush.
- Don’t hesitate to experiment with every setting; small tweaks can lead to significant improvements.
- Always remember to save your custom brush to preserve your hard work and creativity.
Frequently Asked Questions
Can I share my custom brushes with others?
Yes, Ibis Paint allows you to export your custom brushes as QR codes or brush files. This makes it easy to share your unique creations with friends or the wider Ibis Paint community.
How do I delete a custom brush I no longer need?
To delete a brush, go to the custom brush list. Tap and hold (or long-press) on the brush you wish to remove, and a delete option should appear. Confirm your choice to remove it permanently.
Can I import brushes from other drawing apps?
Ibis Paint primarily uses its own brush format. While you can import custom shapes and textures as images, directly importing brush files (like .ABR from Photoshop) is not natively supported. You’ll need to recreate similar brushes within Ibis Paint’s settings.
What if I want a very specific brush shape or texture?
The best approach is to create your desired shape or texture in a separate drawing app or even Ibis Paint itself. Draw a black shape on a transparent background for a brush tip, or a seamless pattern for a texture, then export it as a PNG and import it into your brush settings.
Our Top Recommended Finds
- Active Stylus: An active stylus, like an Apple Pencil or a Samsung S Pen, provides invaluable pressure sensitivity for dynamic and natural brush strokes. It truly elevates the digital drawing experience.
- Drawing Glove: A simple drawing glove reduces friction between your hand and the screen, allowing for smoother lines and preventing accidental palm touches while you draw. It’s a small investment with a big impact.
- Tablet with a Responsive Screen: While Ibis Paint works on phones, a larger tablet with a responsive, high-resolution screen offers more canvas space and a better drawing experience. Consider devices like iPads or Samsung Galaxy Tabs.
Your Canvas Awaits: Bringing Your Vision to Life
Creating your own brushes in Ibis Paint isn’t just about technical skill; it’s about empowering your artistic voice. Each custom brush you craft becomes an extension of your unique style, ready to bring your imagination to life.
Now that you have the knowledge and the steps, the only limit is your creativity. Use these tools to explore new textures, perfect your lines, and make every stroke uniquely yours.
Start experimenting with your first custom brush today. You’ll be amazed at how quickly your digital artwork transforms, reflecting more of your personal vision with every stroke.
& Painting
No rigid rules or pretension. Just practical guides, medium comparisons, and encouraging tips to help you enjoy the drawing & painting process.