👗 How To Draw A Skirt Step By Step

& Painting
No rigid rules or pretension. Just practical guides, medium comparisons, and encouraging tips to help you enjoy the drawing & painting process.
Learning to draw clothing can feel intimidating. Fabrics seem to have a mind of their own, defying simple lines.
I remember my own frustration trying to capture the flow of a skirt. It often ended up looking stiff or unrealistic.
But with a clear, step-by-step approach, you can master drawing dynamic and natural-looking skirts. This guide will show you exactly how.
Quick Overview
This guide breaks down the process of drawing a skirt into manageable steps. You will learn to create volume, movement, and realistic fabric folds.
By the end, you’ll have a solid foundation for drawing various skirt styles. You’ll be confident in making your fashion illustrations truly stand out.
- Time needed: 30-60 minutes (depending on detail)
- Difficulty: Beginner to Intermediate
- What you’ll need: Pencil (HB, 2B), eraser, paper, reference images (optional)
Step-by-Step Instructions
Step 1: Establish the Figure’s Base
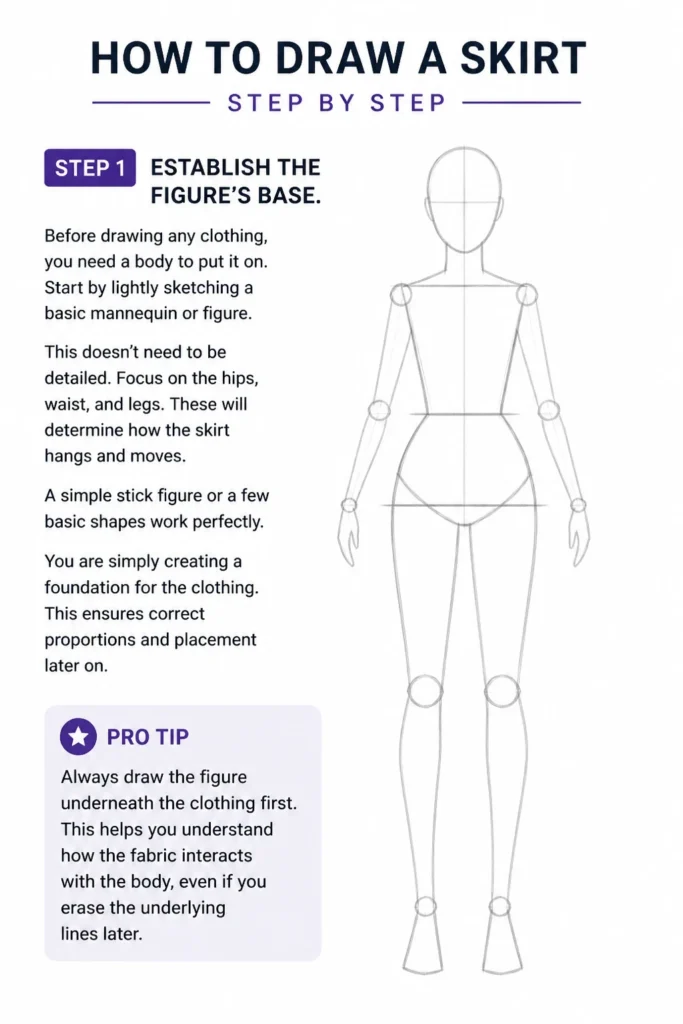
Before drawing any clothing, you need a body to put it on. Start by lightly sketching a basic mannequin or figure. This doesn’t need to be detailed.
Focus on the hips, waist, and legs. These will determine how the skirt hangs and moves. A simple stick figure or a few basic shapes work perfectly.
You are simply creating a foundation for the clothing. This ensures correct proportions and placement later on.
Pro Tip: Always draw the figure underneath the clothing first. This helps you understand how the fabric interacts with the body, even if you erase the underlying lines later.
Step 2: Define the Waistline
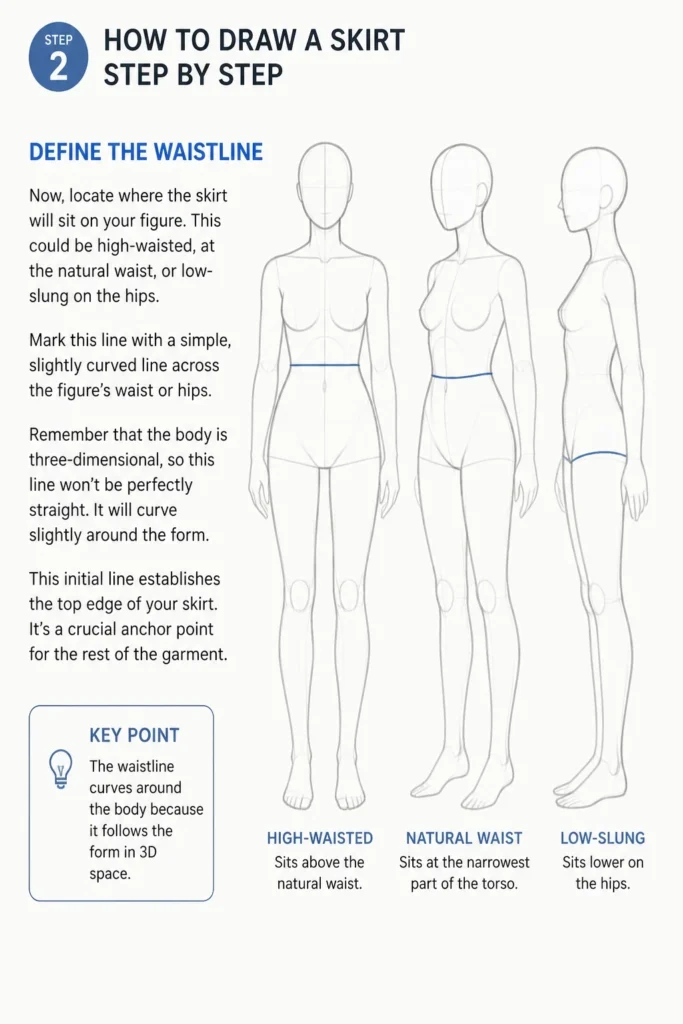
Now, locate where the skirt will sit on your figure. This could be high-waisted, at the natural waist, or low-slung on the hips.
Mark this line with a simple, slightly curved line across the figure’s waist or hips. Remember that the body is three-dimensional, so this line won’t be perfectly straight. It will curve slightly around the form.
This initial line establishes the top edge of your skirt. It’s a crucial anchor point for the rest of the garment.
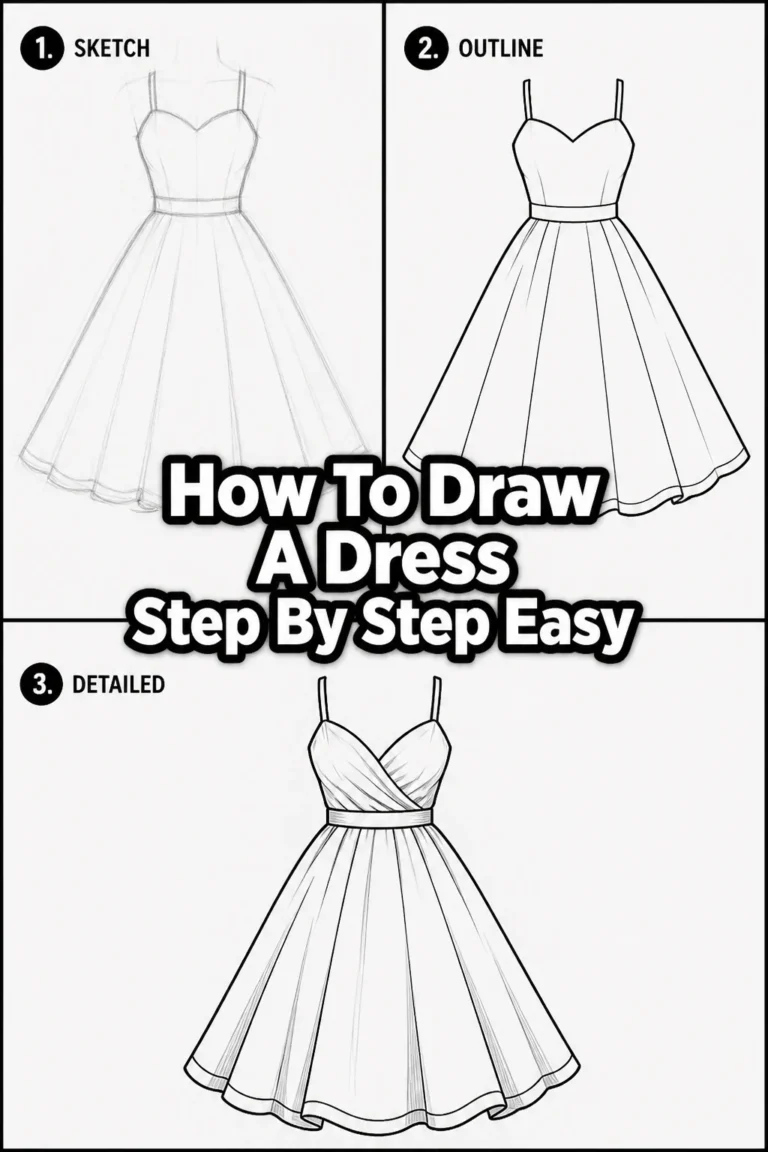
Step 3: Sketch the Basic Skirt Shape
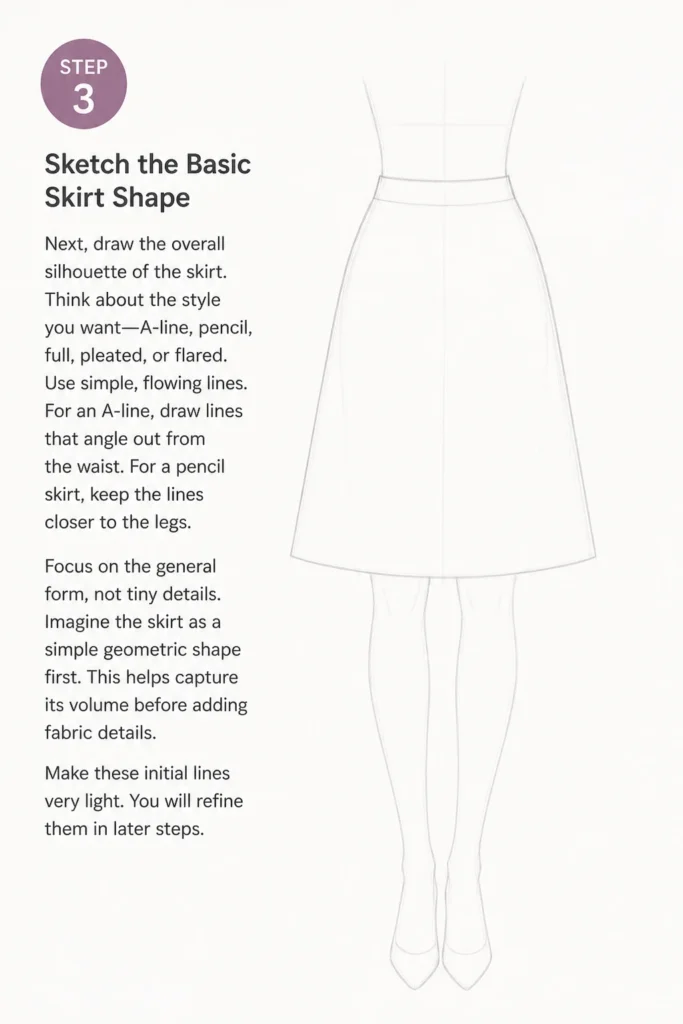
Next, draw the overall silhouette of the skirt. Think about the style you want: A-line, pencil, full, pleated, or flared. Use simple, flowing lines.
For an A-line, draw lines that angle out from the waist. For a pencil skirt, keep the lines closer to the legs. Focus on the general form, not tiny details.
Imagine the skirt as a simple geometric shape first. This helps capture its volume before adding fabric details.
Make these initial lines very light. You will refine them in later steps.
Step 4: Add Volume and Flow
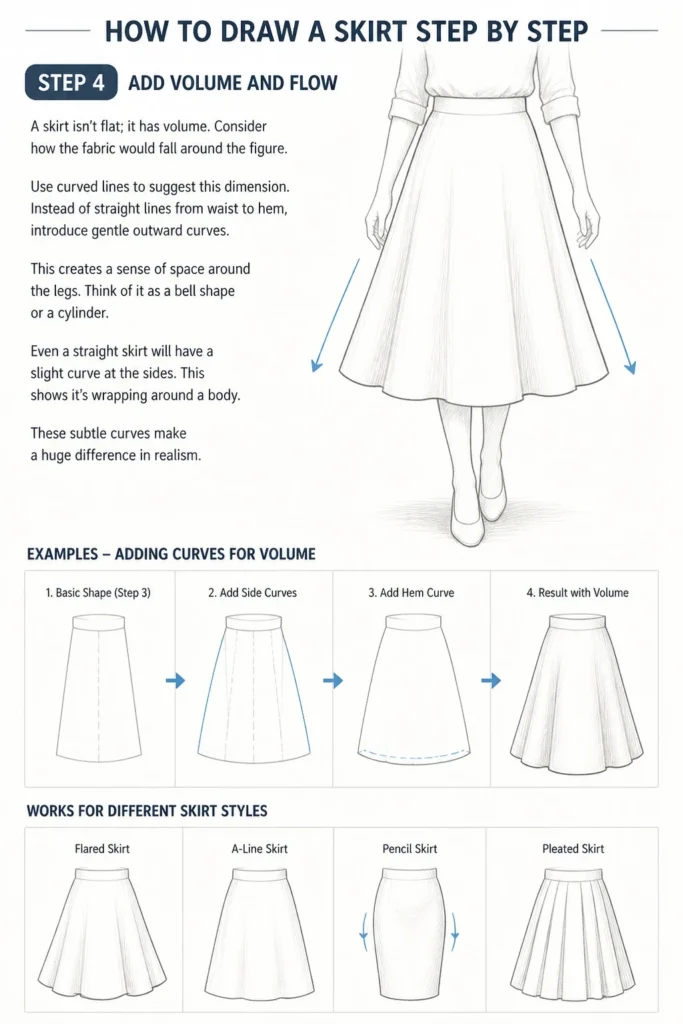
A skirt isn’t flat; it has volume. Consider how the fabric would fall around the figure. Use curved lines to suggest this dimension.
Instead of straight lines from waist to hem, introduce gentle outward curves. This creates a sense of space around the legs. Think of it as a bell shape or a cylinder.
Even a straight skirt will have a slight curve at the sides. This shows it’s wrapping around a body. These subtle curves make a huge difference in realism.
Step 5: Introduce Fabric Folds and Drapes
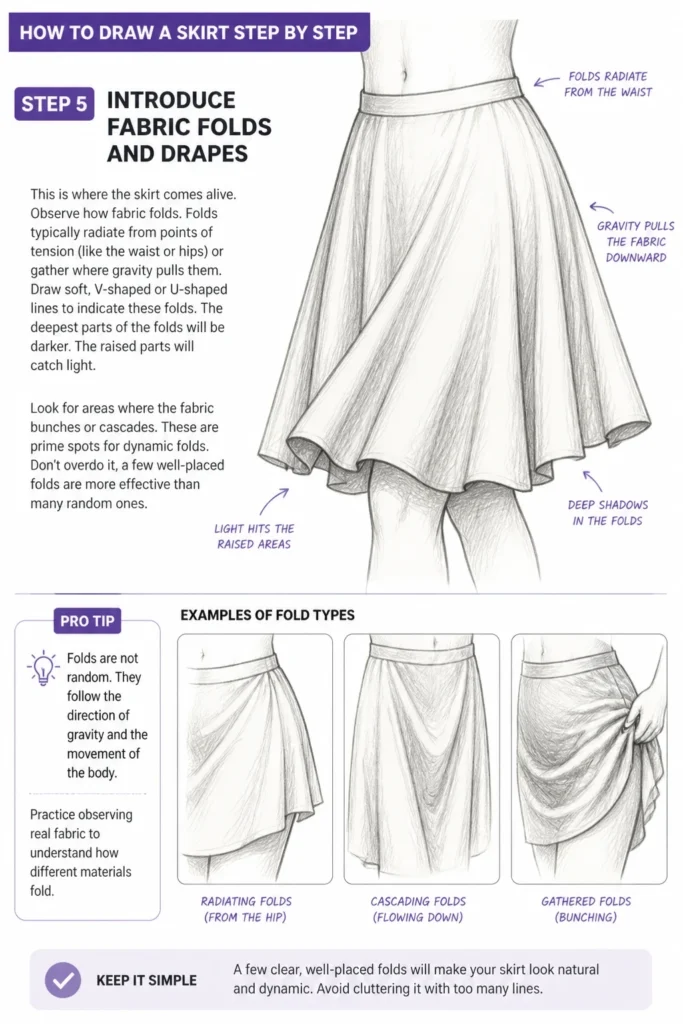
This is where the skirt comes alive. Observe how fabric folds. Folds typically radiate from points of tension (like the waist or hips) or gather where gravity pulls them.
Draw soft, V-shaped or U-shaped lines to indicate these folds. The deepest parts of the folds will be darker. The raised parts will catch light.
Look for areas where the fabric bunches or cascades. These are prime spots for dynamic folds. Don’t overdo it; a few well-placed folds are more effective than many random ones.
Pro Tip: Folds are not random. They follow the direction of gravity and the movement of the body. Practice observing real fabric to understand how different materials fold.
Step 6: Refine the Hemline
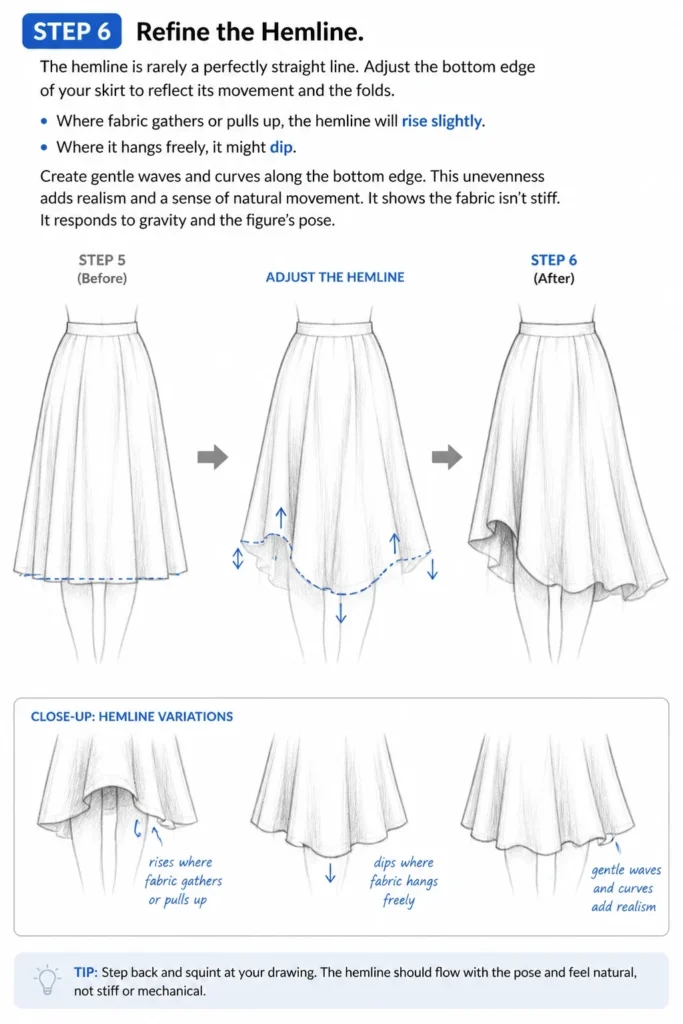
The hemline is rarely a perfectly straight line. Adjust the bottom edge of your skirt to reflect its movement and the folds.
Where fabric gathers or pulls up, the hemline will rise slightly. Where it hangs freely, it might dip. Create gentle waves and curves along the bottom edge.
This unevenness adds realism and a sense of natural movement. It shows the fabric isn’t stiff. It responds to gravity and the figure’s pose.
Step 7: Add Details and Texture
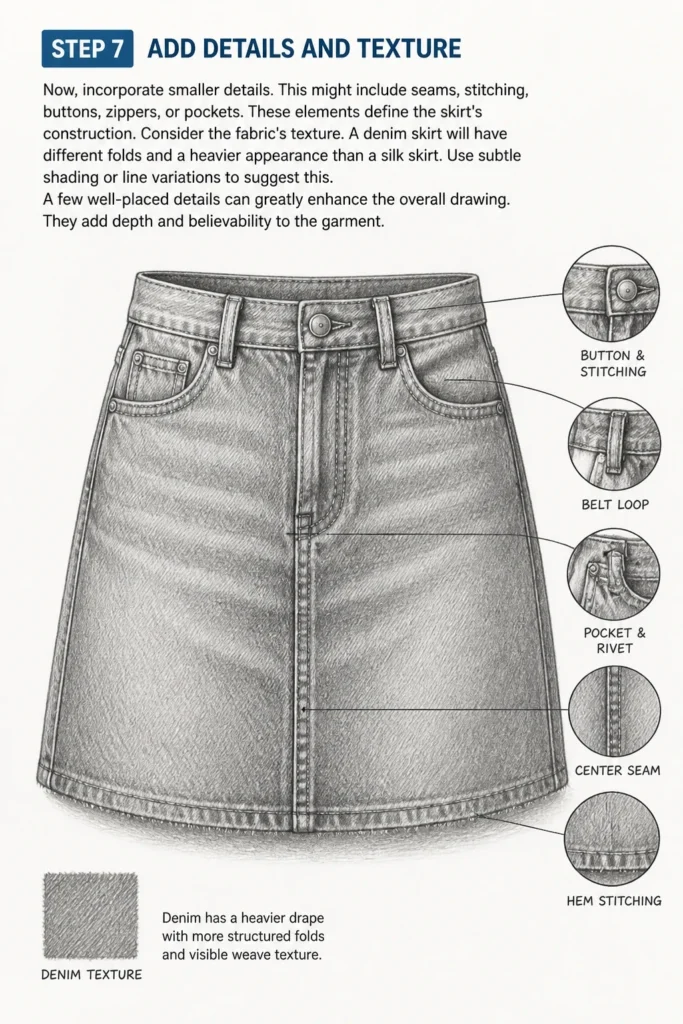
Now, incorporate smaller details. This might include seams, stitching, buttons, zippers, or pockets. These elements define the skirt’s construction.
Consider the fabric’s texture. A denim skirt will have different folds and a heavier appearance than a silk skirt. Use subtle shading or line variations to suggest this.
A few well-placed details can greatly enhance the overall drawing. They add depth and believability to the garment.
Step 8: Shade for Depth and Form
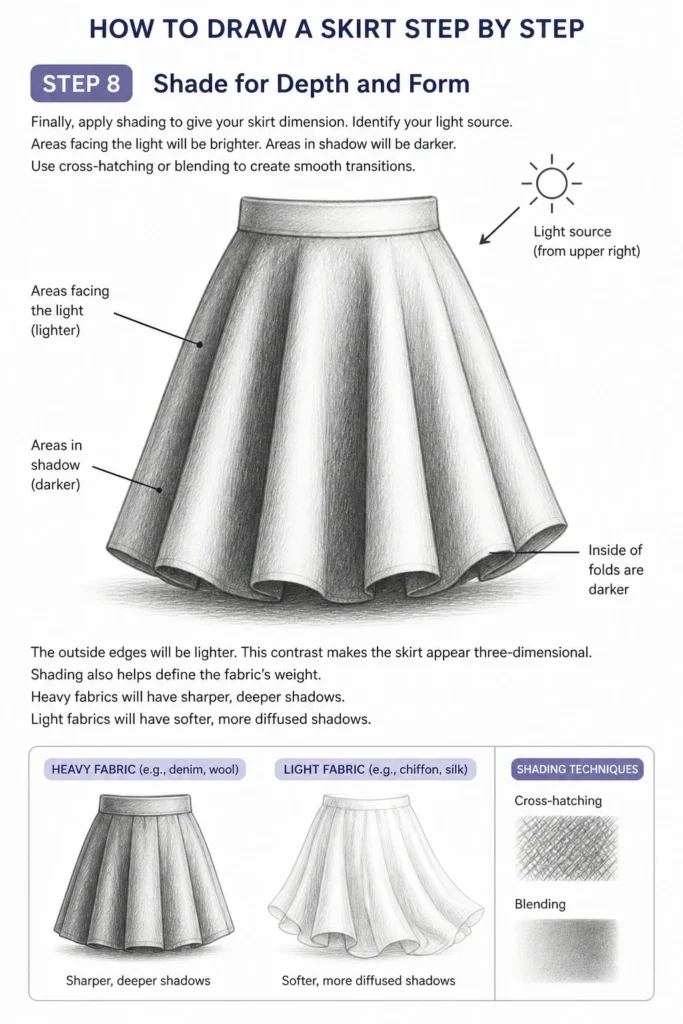
Finally, apply shading to give your skirt dimension. Identify your light source. Areas facing the light will be brighter. Areas in shadow will be darker.
Use cross-hatching or blending to create smooth transitions. The inside of folds will be darker. The outside edges will be lighter. This contrast makes the skirt appear three-dimensional.
Shading also helps define the fabric’s weight. Heavy fabrics will have sharper, deeper shadows. Light fabrics will have softer, more diffused shadows.
Common Mistakes to Avoid
Drawing a Flat Skirt
Many beginners draw skirts as if they are completely flat, like a cardboard cutout. This makes the garment look stiff and unnatural. The skirt appears to float in front of the figure instead of wrapping around it.
Instead, always consider the three-dimensional form of the body underneath. Use curved lines for the waist and sides of the skirt. Imagine the fabric having volume and depth, even in a simple pencil skirt.
Unnatural Folds
Randomly scattering V-shapes across a skirt often results in folds that look unrealistic. Fabric folds are not arbitrary. They are caused by tension, gravity, and movement.
Take time to observe how real fabric folds. Folds tend to radiate from points where the fabric is gathered or pulled. They also tend to drape downwards. Practice drawing different types of folds, like pipe folds, spiral folds, or diaper folds.
Incorrect Proportions
Drawing a skirt that is too long, too short, or disproportionate to the figure is a common error. This throws off the entire composition. The skirt might look like it belongs to a different person.
Always start with your underlying figure. This provides a clear reference for the skirt’s length and width. Double-check your measurements against the body to ensure everything looks balanced and realistic.
Stiff Hemlines
A perfectly straight hemline can make a skirt look rigid and lifeless. In reality, hemlines are rarely perfectly straight, especially when the fabric is soft or the figure is moving.
Allow the hemline to have gentle curves and slight variations. These subtle imperfections add to the realism and suggest the natural flow of the fabric. The hem should respond to the folds and movement above it.
Troubleshooting
My Skirt Looks Stiff and Lifeless
If your skirt appears rigid, you might be drawing with too many straight lines. Fabric is rarely perfectly straight. It drapes and flows.
Try introducing more curves, especially at the sides and hem. Focus on the subtle outward curve that suggests volume around the body. Also, ensure your folds are dynamic, not just static lines. Think about how a skirt moves with a person.
The Folds Don’t Look Right or Realistic
Unrealistic folds are often due to a lack of understanding of how fabric behaves. Are your folds too uniform, or do they lack a clear origin point?
Go back to observing real fabric. Look at where tension points are (like the waist or hips). See how gravity pulls the fabric down. Practice drawing different types of folds from reference photos. Remember, folds are not just lines; they represent changes in surface direction.
The Skirt’s Proportions Seem Off
If the skirt looks too big, too small, or poorly fitted to your figure, the initial base sketch might be the issue. It’s hard to fit clothing if the foundation is incorrect.
Revisit your underlying figure sketch. Ensure the waist and hip lines are accurately placed. Then, redraw the skirt’s basic shape, making sure its width and length are appropriate for the figure’s build and pose. Use light lines so you can easily adjust.
Key Takeaways
- Always start with the underlying figure to ensure correct proportions.
- Emphasize volume by using curved lines instead of straight ones.
- Observe real fabric to understand how folds and drapes naturally form.
- Vary the hemline with subtle curves to add realism and movement.
- Use shading to create depth and define the skirt’s form and material.
- Practice regularly and use references to improve your observation skills.
Frequently Asked Questions
How do I draw different types of skirts, like pleated or gathered skirts?
For pleated skirts, start by drawing vertical lines for the pleats from the waist down. Then, add subtle diagonal lines within each pleat to show the overlap. For gathered skirts, draw a wider waistline and then create many small, soft U-shaped folds radiating downwards from it. The key is consistent observation of the specific skirt type.
What if I want to draw a skirt on a moving figure?
Drawing skirts on moving figures requires exaggerating the folds and flow. Consider the direction of movement and how the fabric would be pulled or pushed. A skirt on a running figure will have strong, dynamic folds trailing behind. A twirling skirt will fan out dramatically. Focus on capturing that sense of motion through your lines.
How do I add patterns or textures to a skirt?
First, draw the skirt’s form and shading completely. Then, lightly sketch the pattern onto the curved surface of the skirt. Remember that patterns will distort and follow the contours of the fabric and the folds. For texture, use subtle hatching or stippling to suggest the material, like the weave of denim or the sheen of silk.
Should I draw the entire figure before adding the skirt?
Yes, it’s highly recommended. Drawing a basic mannequin or stick figure first ensures that your skirt has a proper foundation. This helps you maintain correct proportions and understand how the fabric will drape over the body. You can always erase the underlying body lines that are covered by the skirt later.
Our Top Recommended Finds
- Sketchbook with quality paper: A good sketchbook prevents bleed-through and handles erasing well. It’s essential for practicing your lines and forms without worrying about damaging the paper.
- Pencil set (HB, 2B, 4B): Different lead hardness allows for varying line weights and shading depths. An HB is great for light sketching, while 2B and 4B are excellent for darker lines and shadows.
- Kneaded eraser: This type of eraser is gentle on paper and can be molded to pick up specific lines without smudging. It’s perfect for refining your sketches and cleaning up mistakes.
Your Next Creative Step Awaits
You now have a clear roadmap for drawing skirts that look natural and full of life. This isn’t just about drawing clothes; it’s about understanding form, gravity, and movement.
Keep practicing these steps with different skirt styles and poses. Observe the clothing around you every day. Pay attention to how fabrics drape and fold.
Grab your pencil and paper today. Start sketching your first dynamic skirt. The more you draw, the more confident you’ll become in bringing your fashion ideas to life.
& Painting
No rigid rules or pretension. Just practical guides, medium comparisons, and encouraging tips to help you enjoy the drawing & painting process.