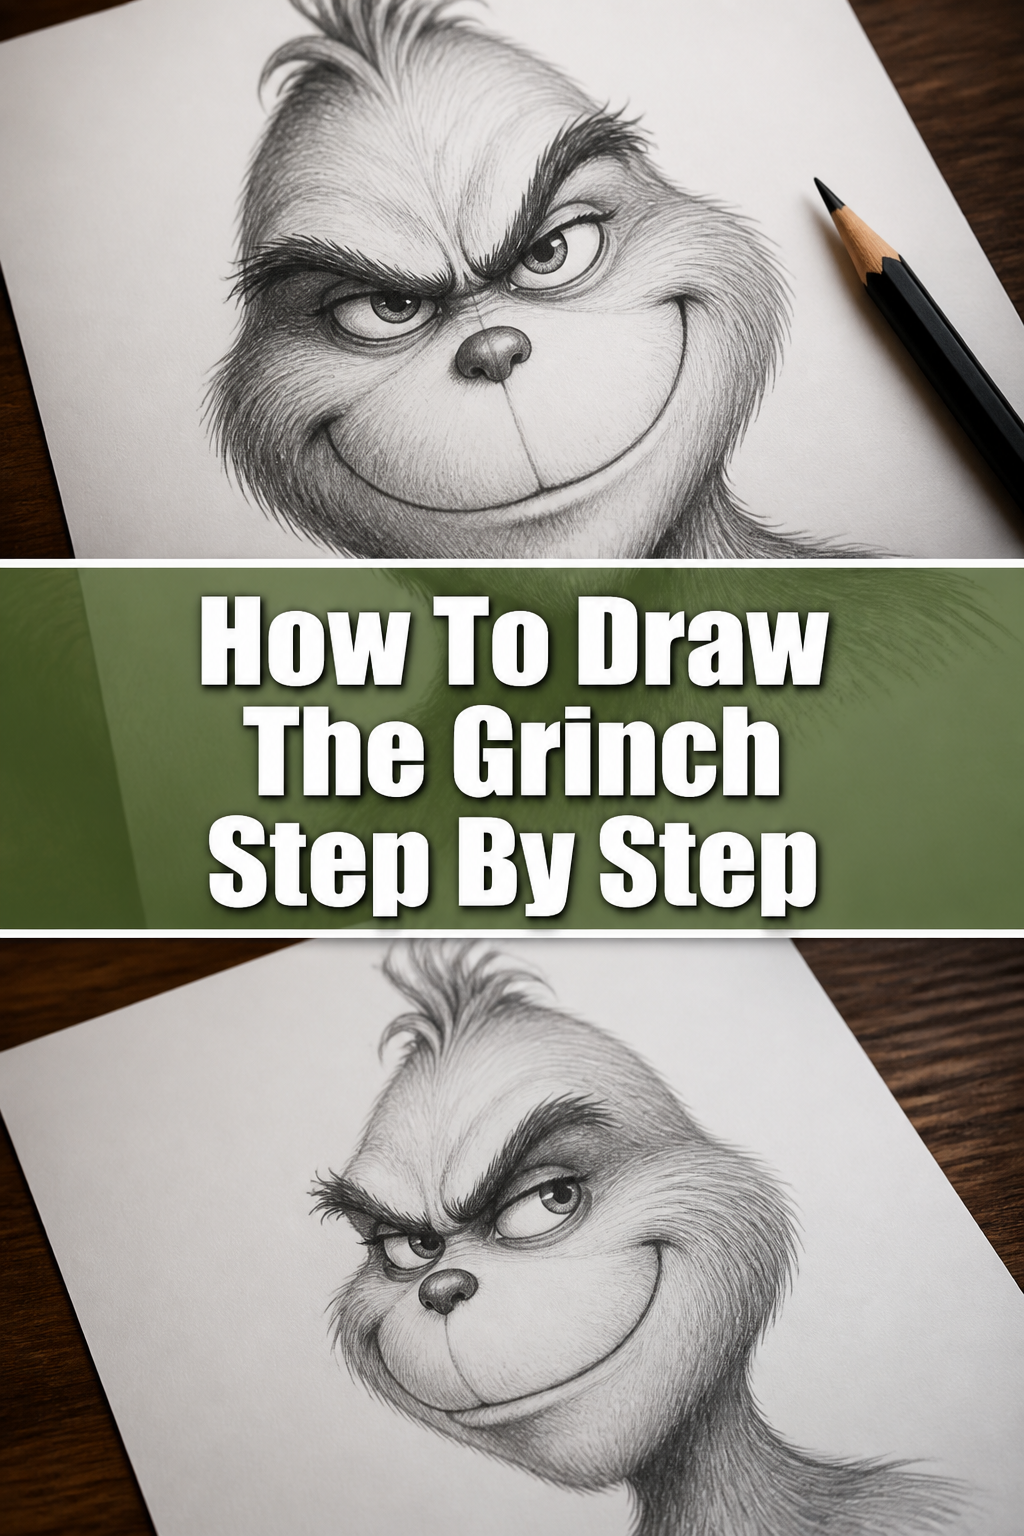
😠 How To Draw The Grinch Step By Step

& Painting
No rigid rules or pretension. Just practical guides, medium comparisons, and encouraging tips to help you enjoy the drawing & painting process.
Have you ever wanted to capture the Grinch’s iconic grumpy charm on paper? His mischievous sneer and furry green face are instantly recognizable, making him a beloved, albeit cynical, holiday figure.
I’ve personally sketched countless holiday characters, and the Grinch always brings a unique challenge and joy. This guide will help you bring Whoville’s most infamous resident to life, even if you’re just starting your drawing journey.
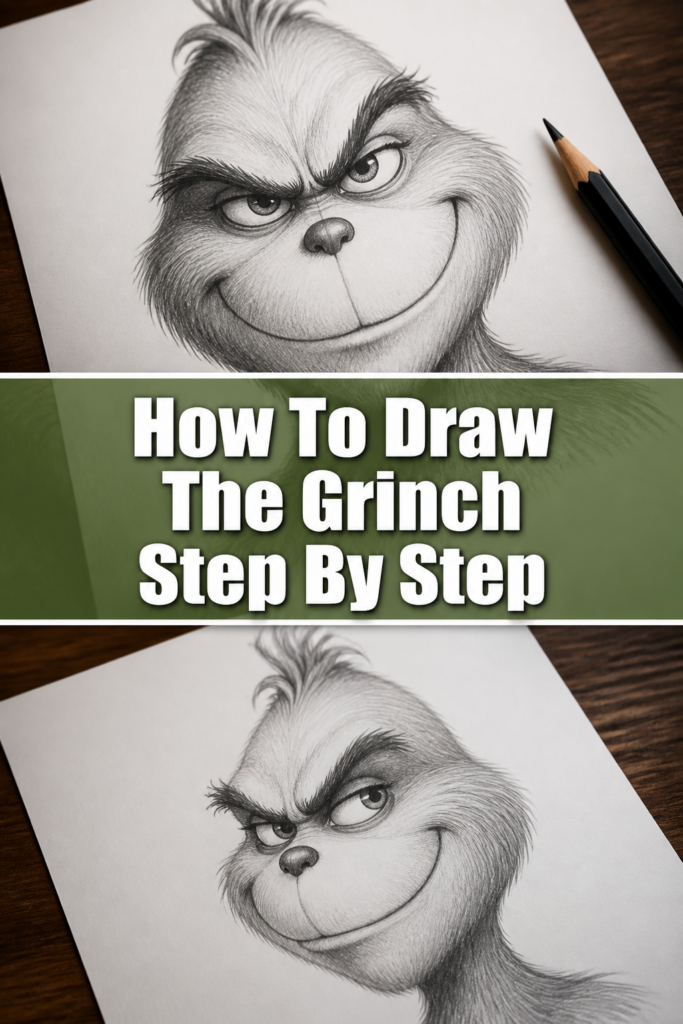
Quick Overview
You’re about to embark on a creative adventure, learning to draw the Grinch with his signature scowl and fuzzy details. By the end, you’ll have a completed sketch ready for coloring or display.
- Time needed: 45-75 minutes
- Difficulty: Intermediate
- What you’ll need: Pencil, eraser, paper, optional: colored pencils or markers
Step-by-Step Instructions
Step 1: Lay Down the Basic Shapes
Begin your drawing by lightly sketching the foundational forms. Think of the Grinch’s head as a slightly squashed oval, wider at the top and narrowing towards the chin. This shape will define his distinct head structure.
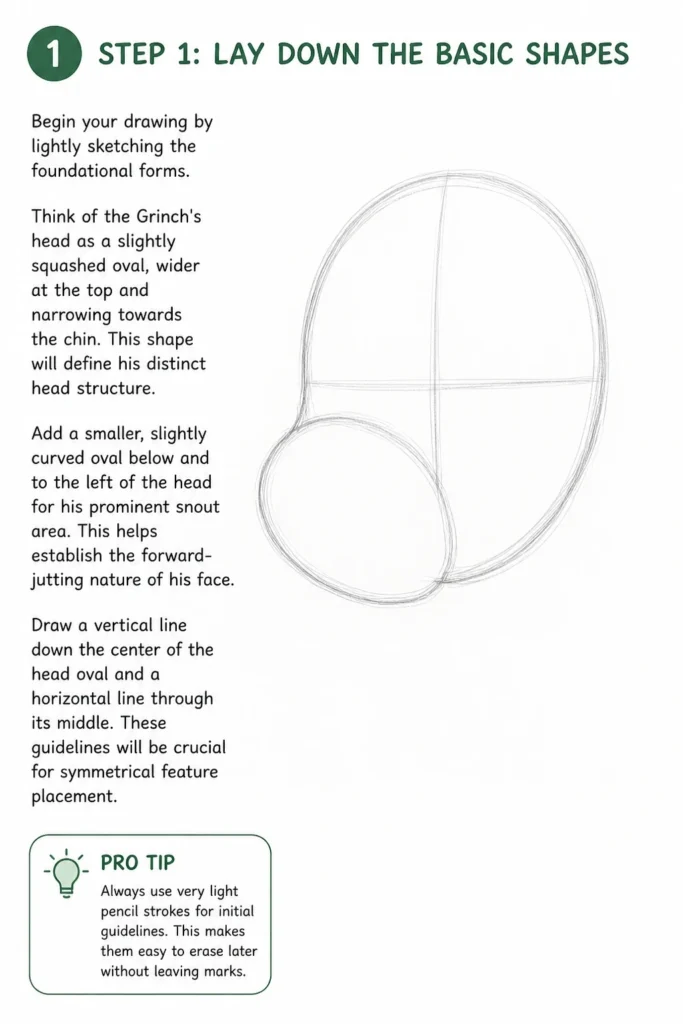
Add a smaller, slightly curved oval below and to the left of the head for his prominent snout area. This helps establish the forward-jutting nature of his face.
Draw a vertical line down the center of the head oval and a horizontal line through its middle. These guidelines will be crucial for symmetrical feature placement.
Pro Tip: Always use very light pencil strokes for initial guidelines. This makes them easy to erase later without leaving marks.
Step 2: Define the Head and Jawline
Refine the head shape, making the top a bit more irregular to suggest fur. Curve the sides inward slightly before flaring out for his jowls.
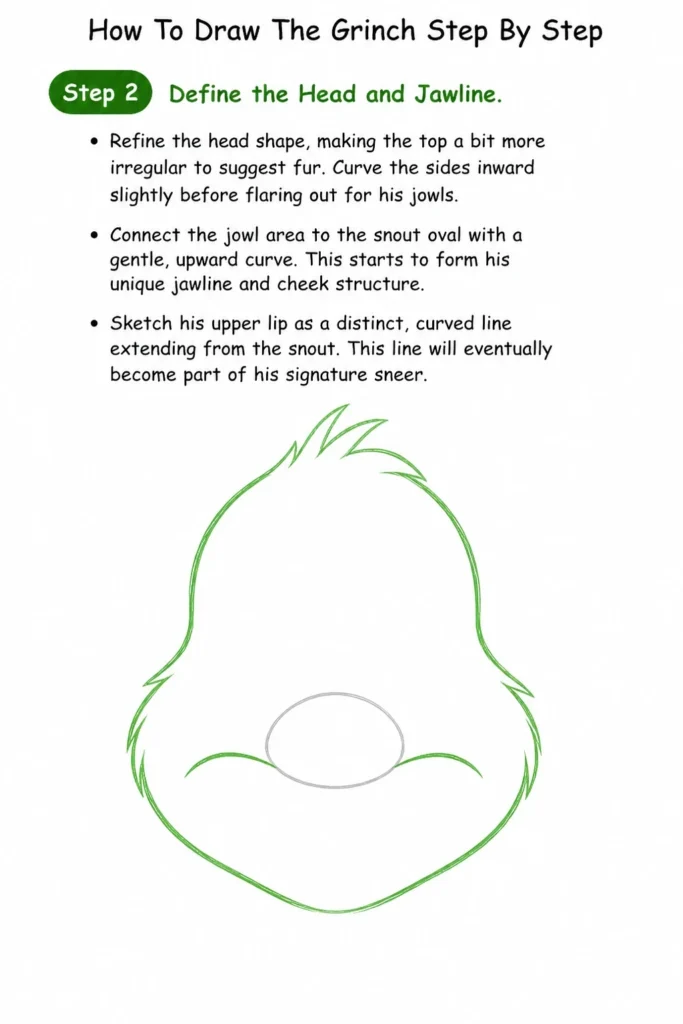
Connect the jowl area to the snout oval with a gentle, upward curve. This starts to form his unique jawline and cheek structure.
Sketch his upper lip as a distinct, curved line extending from the snout. This line will eventually become part of his signature sneer.
Step 3: Place the Eyes and Eyebrows
Draw two almond-shaped eyes along the horizontal guideline, spaced slightly apart. The Grinch’s eyes are typically narrow and angled slightly upwards at the outer corners, giving him a suspicious look.
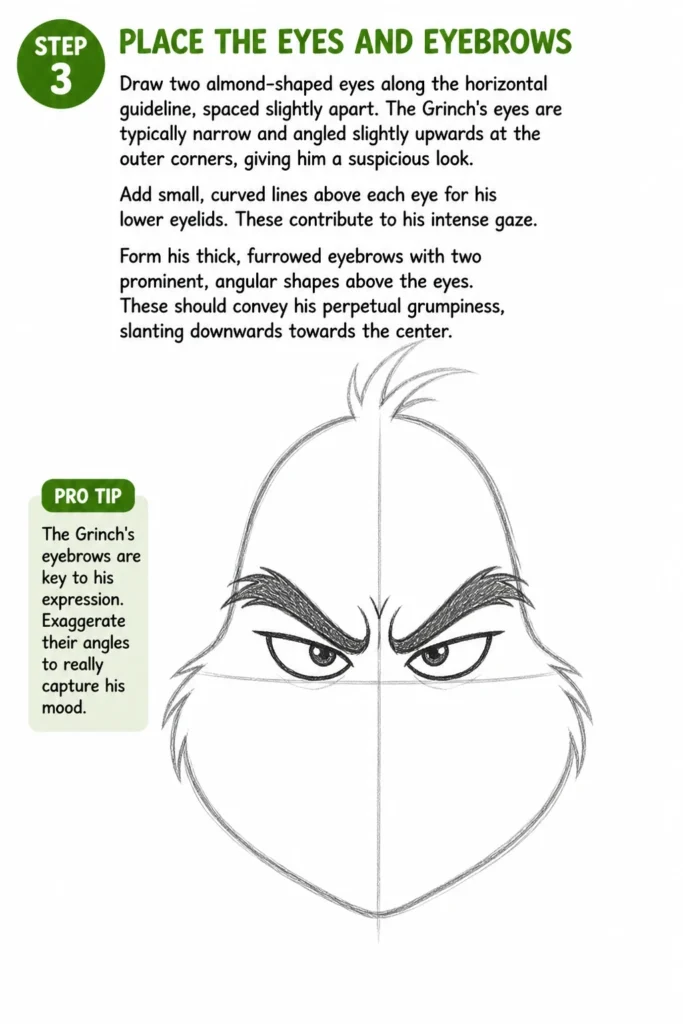
Add small, curved lines above each eye for his lower eyelids. These contribute to his intense gaze.
Form his thick, furrowed eyebrows with two prominent, angular shapes above the eyes. These should convey his perpetual grumpiness, slanting downwards towards the center.
Pro Tip: The Grinch’s eyebrows are key to his expression. Exaggerate their angles to really capture his mood.
Step 4: Sculpt the Snout and Mouth
Detail the snout by adding two small, slightly curved lines for his nostrils within the snout oval. Make them point slightly upwards.
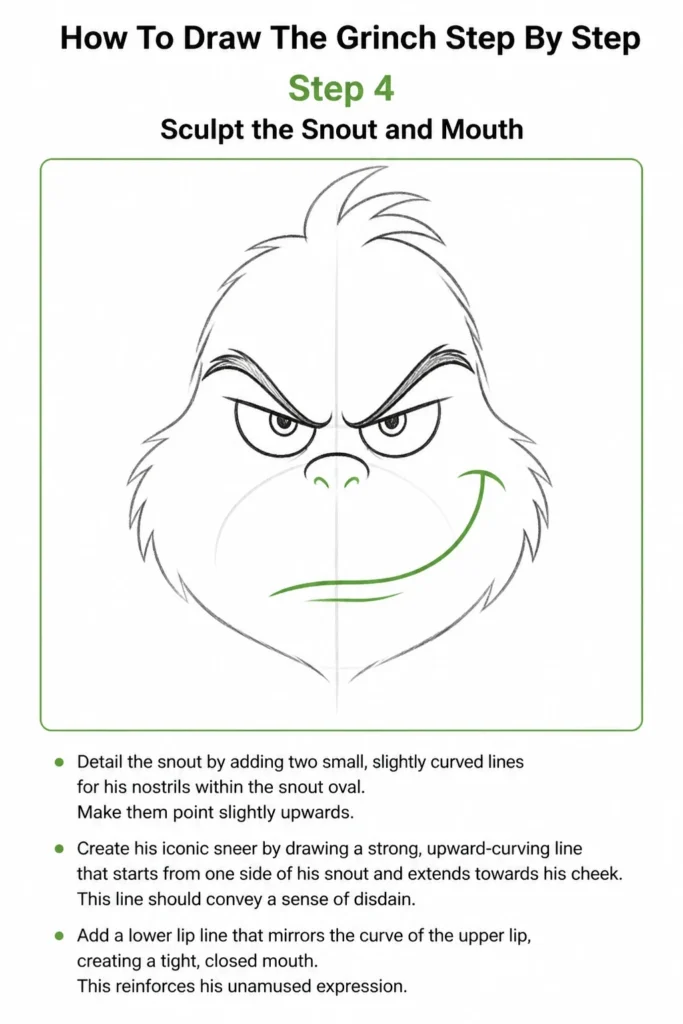
Create his iconic sneer by drawing a strong, upward-curving line that starts from one side of his snout and extends towards his cheek. This line should convey a sense of disdain.
Add a lower lip line that mirrors the curve of the upper lip, creating a tight, closed mouth. This reinforces his unamused expression.
Step 5: Develop the Body and Clothing
Sketch the Grinch’s neck, which is relatively short and thick, connecting to a hunched shoulder line. His posture often suggests a slight slouch.
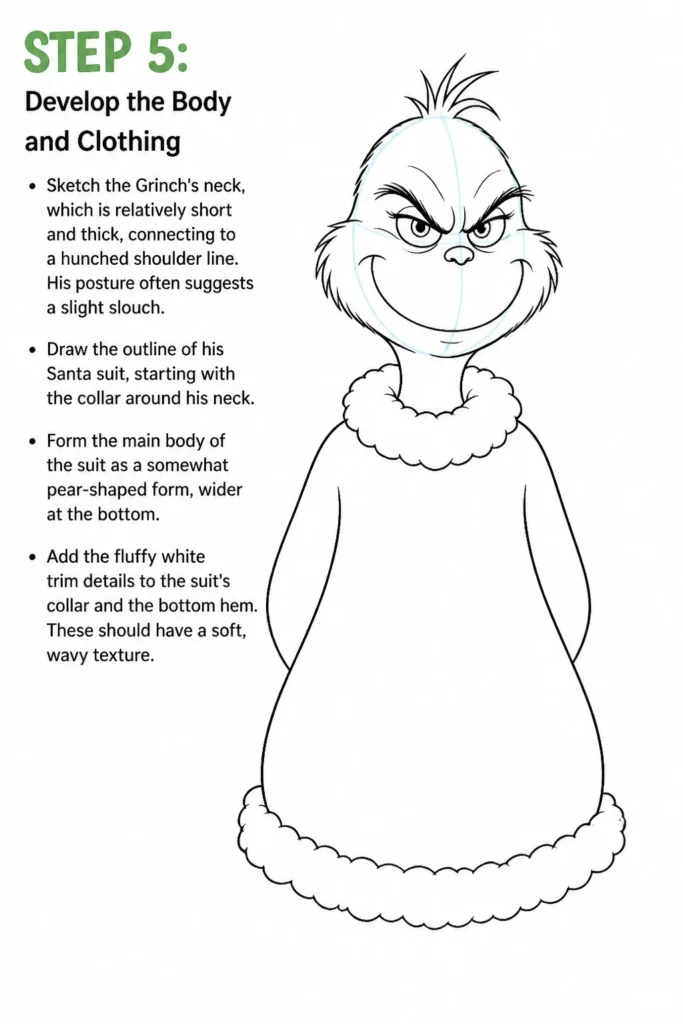
Draw the outline of his Santa suit, starting with the collar around his neck. Form the main body of the suit as a somewhat pear-shaped form, wider at the bottom.
Add the fluffy white trim details to the suit’s collar and the bottom hem. These should have a soft, wavy texture.
Step 6: Outline the Arms and Legs
Position the Grinch’s arms, which are relatively thin compared to his body. Draw them bending at the elbow, often held slightly away from his body in a characteristic pose.
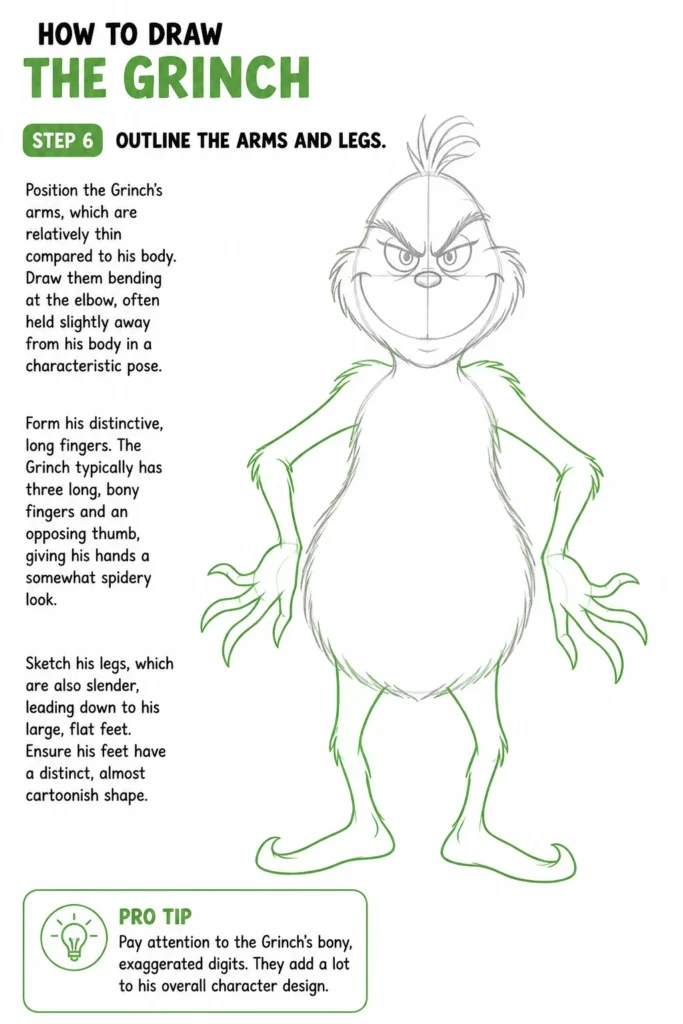
Form his distinctive, long fingers. The Grinch typically has three long, bony fingers and an opposing thumb, giving his hands a somewhat spidery look.
Sketch his legs, which are also slender, leading down to his large, flat feet. Ensure his feet have a distinct, almost cartoonish shape.
Pro Tip: Pay attention to the Grinch’s bony, exaggerated digits. They add a lot to his overall character design.
Step 7: Add Fur Texture and Final Details
Go back over the outlines of his head, cheeks, and body, adding short, jagged lines to suggest fur. This texture is essential for his Grinchy appearance.
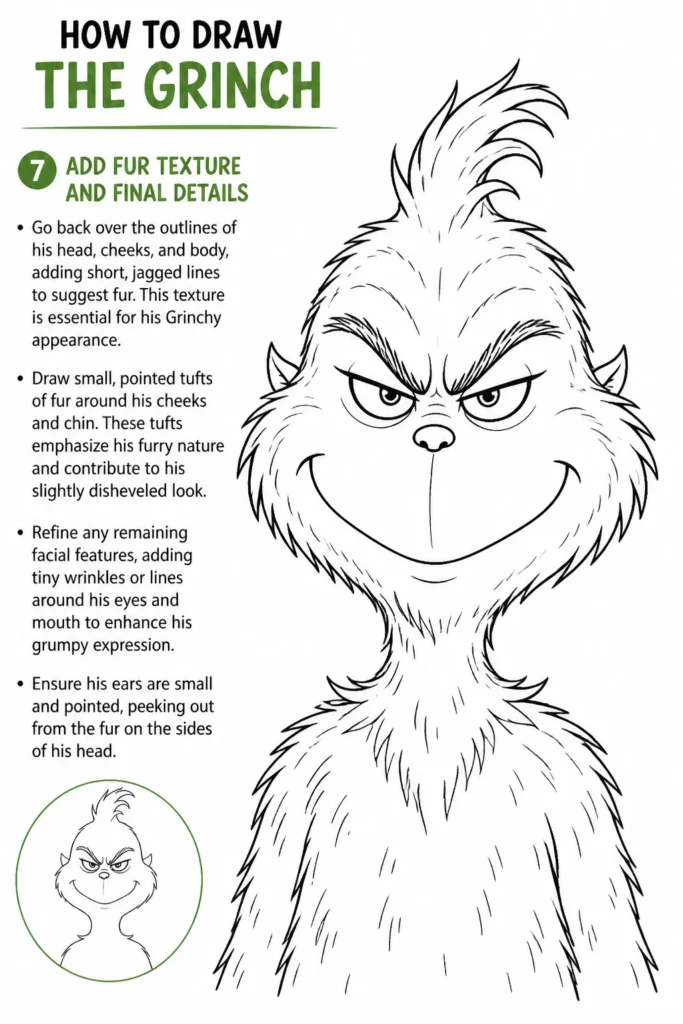
Draw small, pointed tufts of fur around his cheeks and chin. These tufts emphasize his furry nature and contribute to his slightly disheveled look.
Refine any remaining facial features, adding tiny wrinkles or lines around his eyes and mouth to enhance his grumpy expression. Ensure his ears are small and pointed, peeking out from the fur on the sides of his head.
Step 8: Clean Up and Ink (Optional)
Carefully erase all the initial light guidelines you drew in the first steps. You should be left with a clean, defined outline of the Grinch.
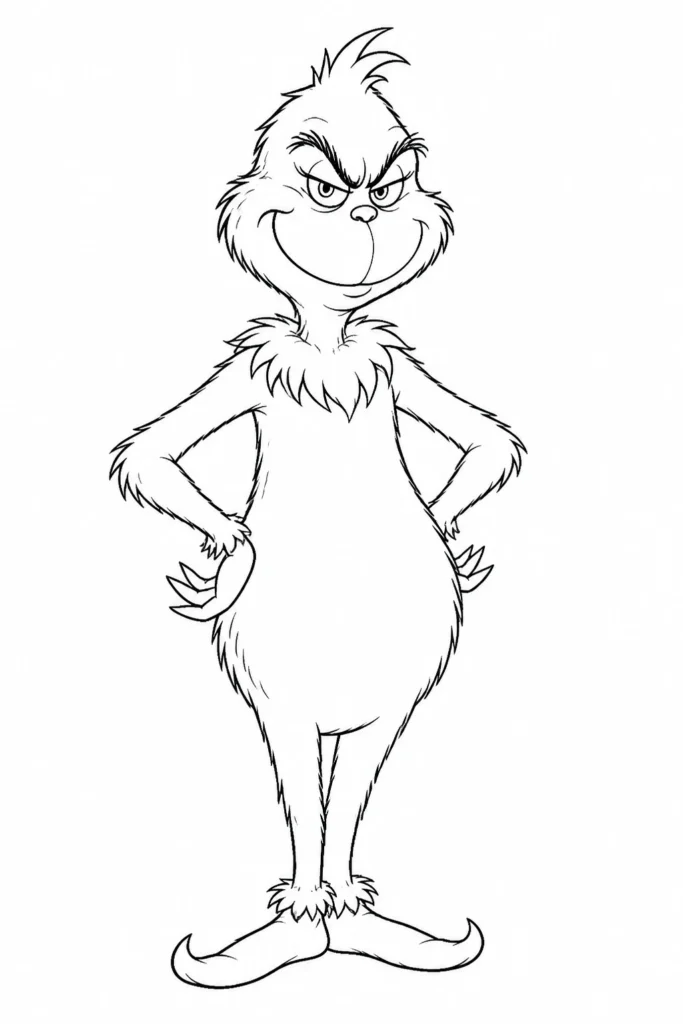
Go over your pencil lines with a slightly darker pencil or a fine-tip black pen if you want a more permanent outline. Make sure to keep the fur texture visible.
Remove any stray marks or smudges with your eraser. A clean drawing always looks more professional.
Step 9: Shade and Color
Apply a base layer of green for the Grinch’s skin, using a light, even tone. Remember his iconic color.
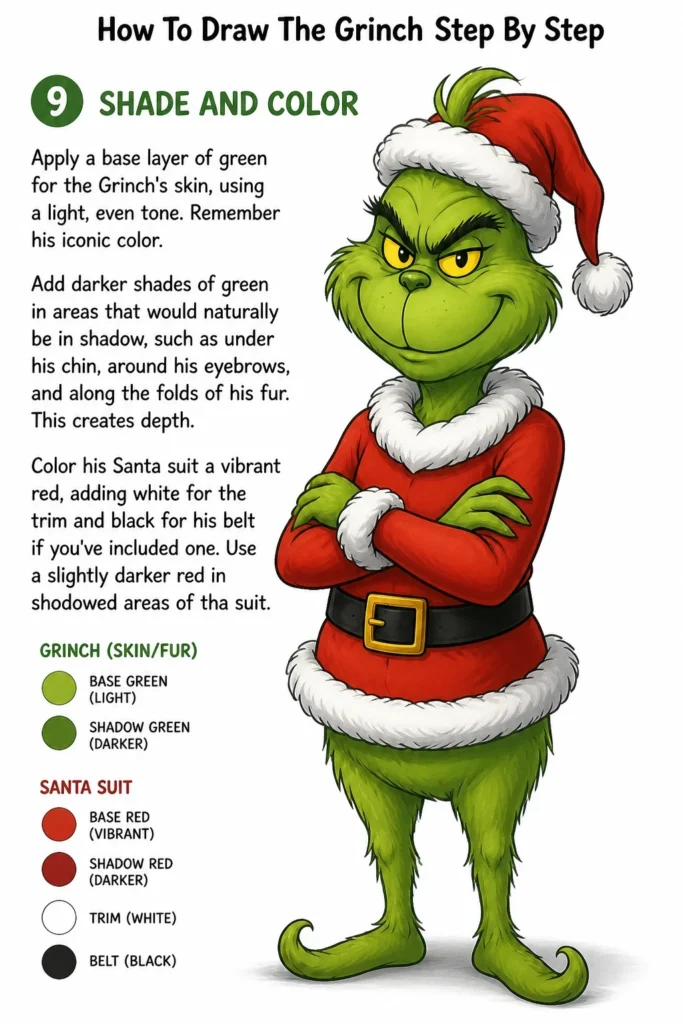
Add darker shades of green in areas that would naturally be in shadow, such as under his chin, around his eyebrows, and along the folds of his fur. This creates depth.
Color his Santa suit a vibrant red, adding white for the trim and black for his belt if you’ve included one. Use a slightly darker red in shadowed areas of the suit.
Common Mistakes to Avoid
Disproportionate Features
One common pitfall is making the Grinch’s features too small or too large relative to his head. For instance, tiny eyes on a big head can make him look less expressive and more generic. Always refer back to your initial guidelines and use them to ensure elements like eyes, nose, and mouth are correctly scaled and spaced.
Lack of Grumpy Expression
The Grinch is defined by his perpetually grumpy or mischievous expression. If his eyebrows aren’t furrowed enough, or his mouth isn’t a distinct sneer, he might lose his character. Focus heavily on the angles of his eyebrows and the specific curve of his mouth to truly capture his signature mood.
Neglecting Fur Texture
Drawing the Grinch with smooth skin makes him look less like the furry creature we know. It’s crucial to add those short, jagged lines and tufts of fur around his cheeks, chin, and body. This texture is vital for his identity and adds an important layer of detail.
Rushed Outlines
Sloppy or hesitant lines can make your drawing look messy and unpolished. Take your time when finalizing your outlines, aiming for confident, smooth strokes. If you’re nervous, try sketching the line lightly first, then going over it with a firmer hand once you’re satisfied.
Troubleshooting
My Grinch Looks Too Friendly!
If your Grinch seems less grumpy and more approachable, focus on his eyebrows and mouth. Intensify the downward slant of his inner eyebrows, making them closer together. Exaggerate the upward curve of his sneer, ensuring it’s pronounced and asymmetrical. A slight frown line between his brows can also enhance his disgruntled look.
I Can’t Get the Fur Texture Right.
Creating convincing fur takes practice. Try using short, quick strokes that follow the contours of his body rather than long, continuous lines. Vary the length and direction of these strokes slightly to create a more natural, shaggy appearance. Don’t be afraid to overlap strokes to build up density.
My Proportions Are Off.
If your Grinch looks distorted, go back to Step 1 and re-evaluate your basic shapes. Ensure your initial ovals for the head and snout are correctly sized and positioned relative to each other. Use your central guidelines to check symmetry and placement of features. Sometimes, simply resizing one element, like the snout, can bring the whole drawing into balance.
Key Takeaways
- Start with light, basic shapes to establish the Grinch’s overall structure and proportions.
- Focus heavily on his facial features, especially the eyebrows and mouth, to capture his iconic grumpy expression.
- Incorporate fur texture with short, jagged lines and tufts to make him recognizably furry.
- Take your time with each step, building up details gradually rather than rushing.
- Practice makes perfect; don’t be discouraged if your first attempt isn’t flawless.
- Erase guidelines cleanly to ensure a polished final drawing.
Frequently Asked Questions
What kind of pencil is best for this drawing?
A standard HB pencil is excellent for initial sketches and general outlining. For darker lines or shading, you might consider a 2B or 4B pencil, which provides richer tones. A good quality eraser is also indispensable.
Can I draw the Grinch in different poses?
Absolutely! Once you’ve mastered the basic Grinch, try experimenting with different body positions. Focus on how his joints bend and how his clothing would wrinkle, always keeping his signature grumpy face consistent.
How do I make him look more evil or mischievous?
To enhance his mischievousness, slightly widen his eyes while keeping the angry brow. For more evil, deepen the shadows under his brows and around his mouth, and perhaps add a very subtle, sharp glint in his eye. His expression is key.
What if I’m a complete beginner at drawing?
This guide is designed to be accessible, but if you’re a complete beginner, focus on the basic shapes and light lines first. Don’t worry about perfection; just try to get the shapes and proportions down. Practice drawing circles, ovals, and lines before tackling the Grinch.
Our Top Recommended Finds
- Staedtler Mars Lumograph Pencils: These pencils offer a smooth drawing experience with varying degrees of hardness, perfect for both light sketches and dark shading.
- Kneaded Eraser: Unlike traditional erasers, a kneaded eraser can be molded to pick up graphite without smudging, making clean-up much easier.
- Canson XL Mix Media Pad: This versatile paper is suitable for pencils, markers, and even light washes, providing a good surface for practice and finished pieces.
Your Grinch Masterpiece Awaits!
You’ve now got all the tools and knowledge to create your very own Grinch illustration. Remember that every artist starts somewhere, and practice is the secret ingredient to improvement. Don’t be afraid to experiment with colors, textures, and even different expressions for your Grinch.
Grab your pencil and paper today. Start sketching, refining, and bringing that iconic green grump to life! Perhaps next, you’ll try drawing Cindy Lou Who or Max the dog. The world of Whoville awaits your artistic touch!
& Painting
No rigid rules or pretension. Just practical guides, medium comparisons, and encouraging tips to help you enjoy the drawing & painting process.