💪 How To Draw Body Tutorial Step By Step

& Painting
No rigid rules or pretension. Just practical guides, medium comparisons, and encouraging tips to help you enjoy the drawing & painting process.
Learning to draw the human body can feel intimidating for many aspiring artists.
I remember struggling with proportions and dynamic poses for years, often feeling my figures looked stiff or unnatural.
This guide shares the practical methods and foundational principles I learned to finally make my drawings feel alive and accurate.
Quick Overview
This tutorial will walk you through the essential stages of constructing the human form, from initial gestures to refined details.
You’ll learn to break down complex anatomy into manageable shapes, improving your understanding and confidence.
- Time needed: 1-2 hours for initial study, ongoing practice for mastery
- Difficulty: Beginner to Intermediate
- What you’ll need: Sketchbook, pencils (HB, 2B), eraser, reference images
Step-by-Step Instructions
Step 1: Understand Basic Proportions with Head Units
Before drawing, grasp the foundational concept of head units. The average adult human body is approximately 7 to 7.5 head units tall.
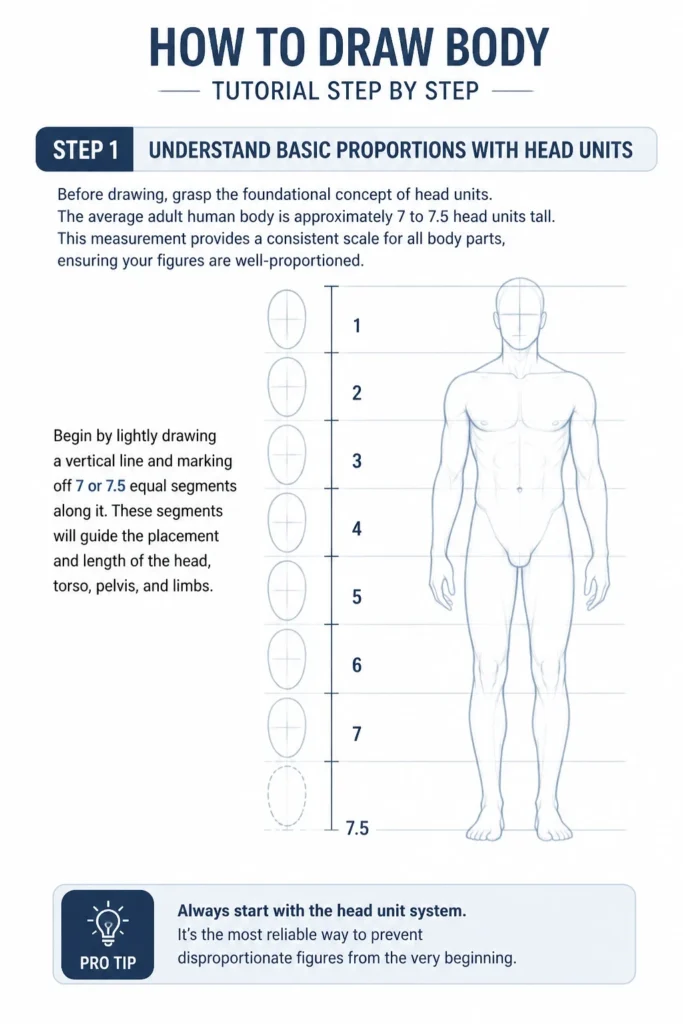
This measurement provides a consistent scale for all body parts, ensuring your figures are well-proportioned.
Begin by lightly drawing a vertical line and marking off 7 or 7.5 equal segments along it.
These segments will guide the placement and length of the head, torso, pelvis, and limbs.
Pro Tip: Always start with the head unit system. It’s the most reliable way to prevent disproportionate figures from the very beginning.
Step 2: Capture the Gesture and Line of Action
The gesture drawing is the soul of your figure. It conveys movement, balance, and emotion.
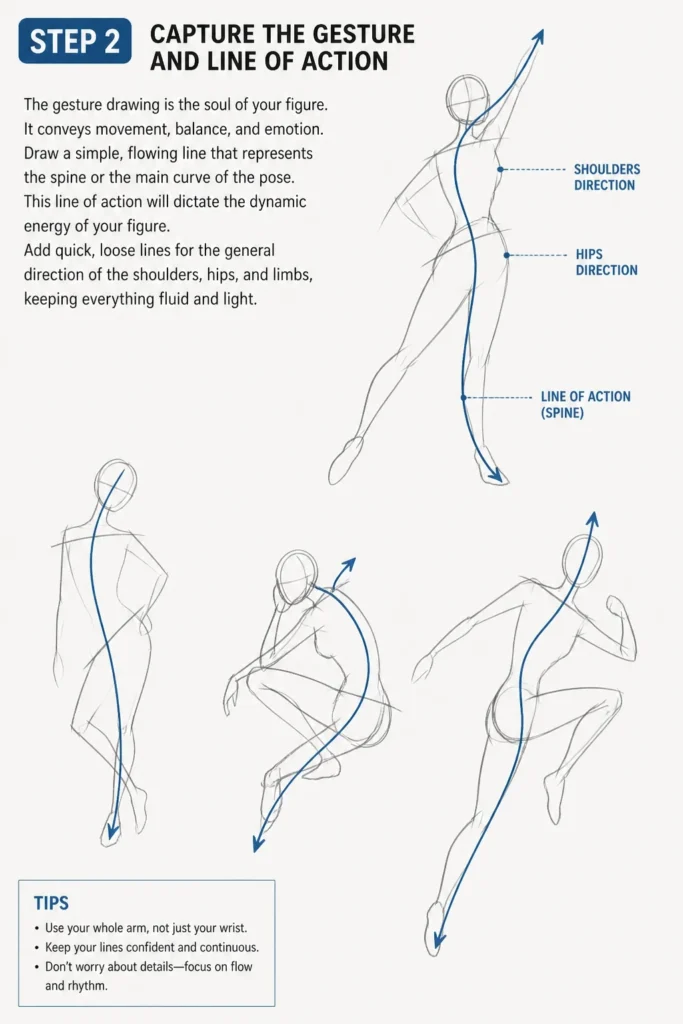
Draw a simple, flowing line that represents the spine or the main curve of the pose.
This “line of action” will dictate the dynamic energy of your figure.
Add quick, loose lines for the general direction of the shoulders, hips, and limbs, keeping everything fluid and light.
Step 3: Construct the Torso and Pelvis with Basic Forms
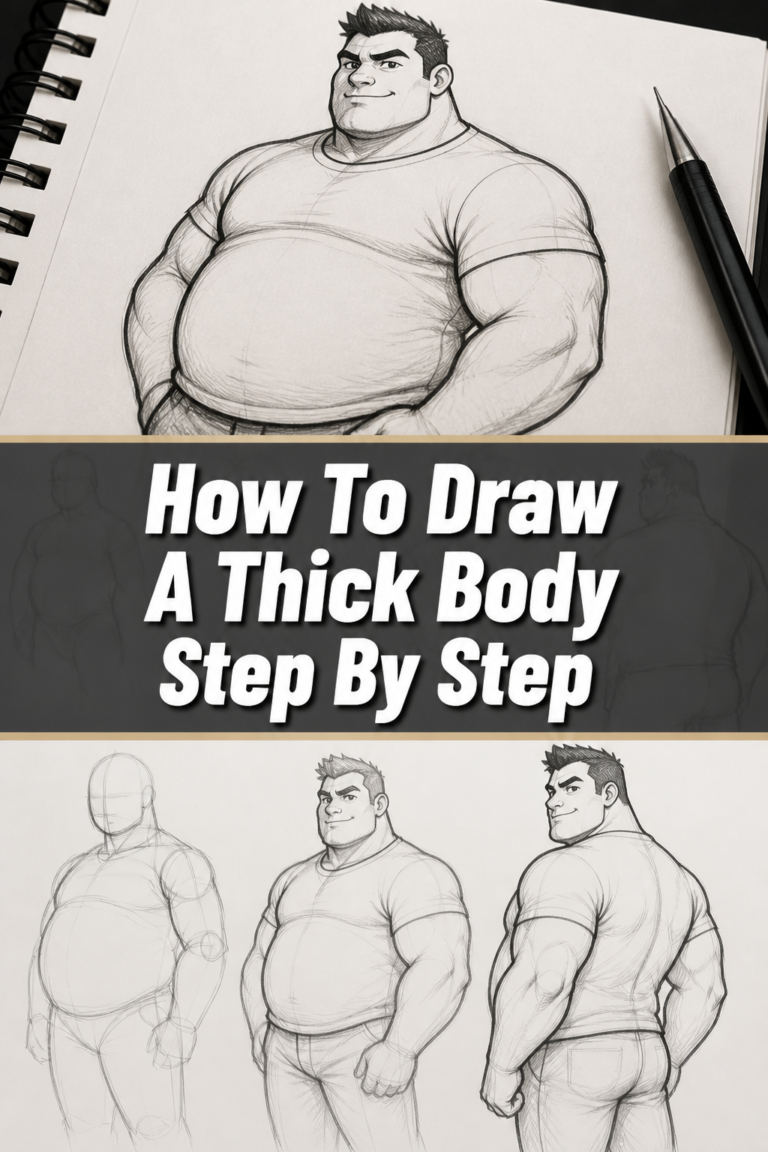
Think of the body as a series of simplified geometric shapes. This approach helps you visualize volume and structure.
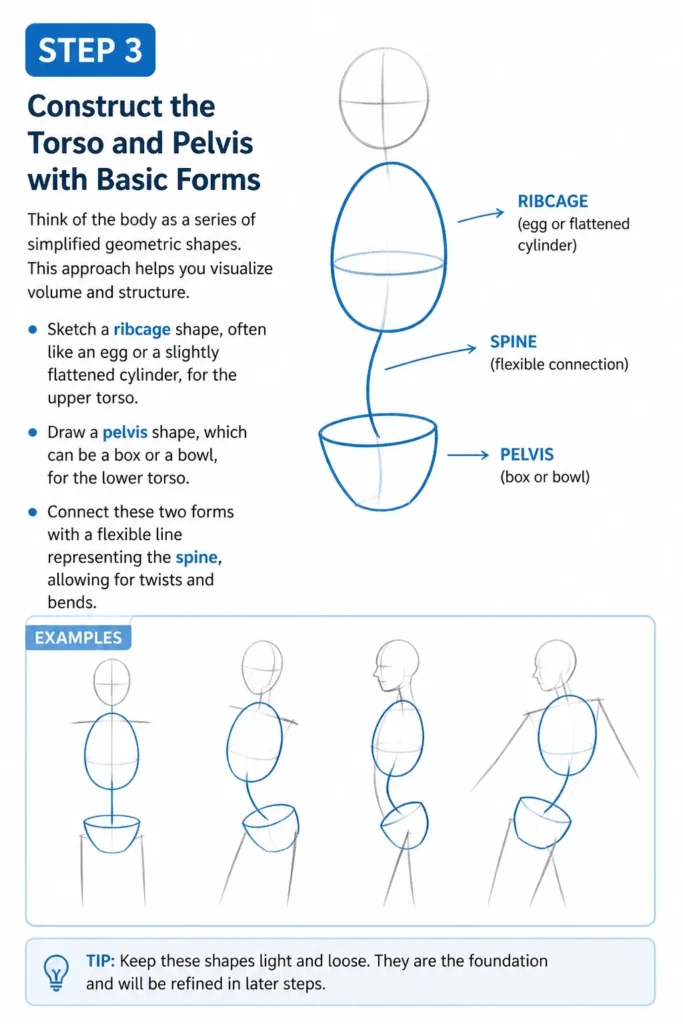
Sketch a “ribcage” shape, often like an egg or a slightly flattened cylinder, for the upper torso.
Draw a “pelvis” shape, which can be a box or a bowl, for the lower torso.
Connect these two forms with a flexible line representing the spine, allowing for twists and bends.
Step 4: Block In the Limbs Using Cylinders and Spheres
Now, build out the arms and legs using simple three-dimensional forms.
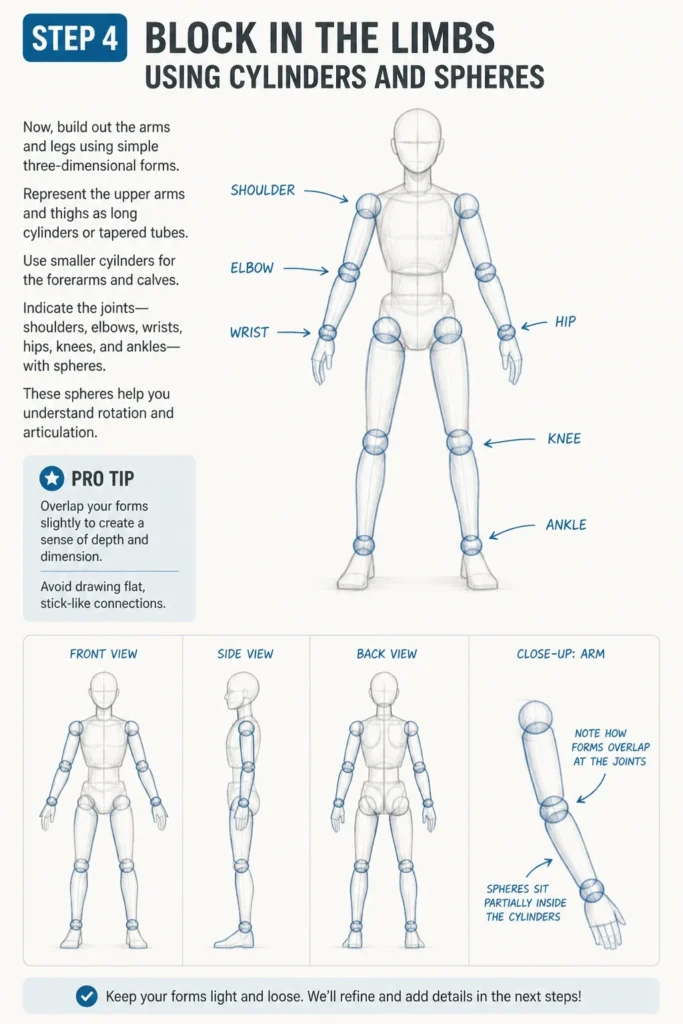
Represent the upper arms and thighs as long cylinders or tapered tubes.
Use smaller cylinders for the forearms and calves.
Indicate the joints—shoulders, elbows, wrists, hips, knees, and ankles—with spheres.
These spheres help you understand rotation and articulation.
Pro Tip: Overlap your forms slightly to create a sense of depth and dimension. Avoid drawing flat, stick-like connections.
Step 5: Refine the Connecting Forms and Contours
Once your basic shapes are in place, begin to smooth out the transitions between them.
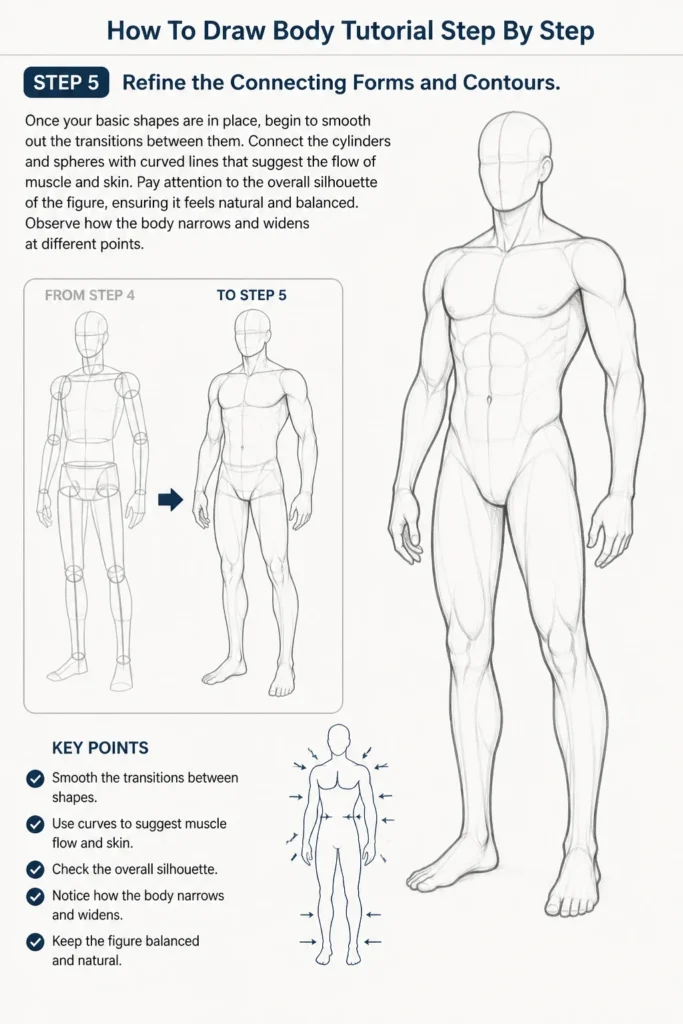
Connect the cylinders and spheres with curved lines that suggest the flow of muscle and skin.
Pay attention to the overall silhouette of the figure, ensuring it feels natural and balanced.
Observe how the body narrows and widens at different points.
Step 6: Introduce Basic Musculature and Anatomy
You don’t need to be an anatomist, but a basic understanding of major muscle groups helps give definition.
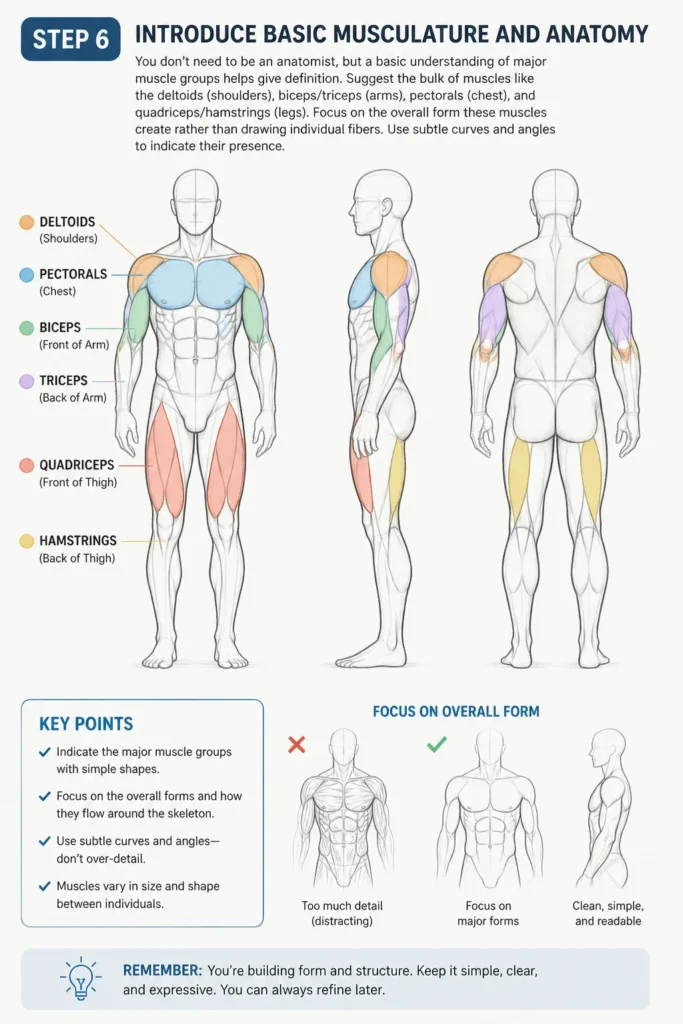
Suggest the bulk of muscles like the deltoids (shoulders), biceps/triceps (arms), pectorals (chest), and quadriceps/hamstrings (legs).
Focus on the overall form these muscles create rather than drawing individual fibers.
Use subtle curves and angles to indicate their presence.
Step 7: Add Hands, Feet, and Facial Features
These details bring your figure to life, but they can be complex. Keep them simplified initially.
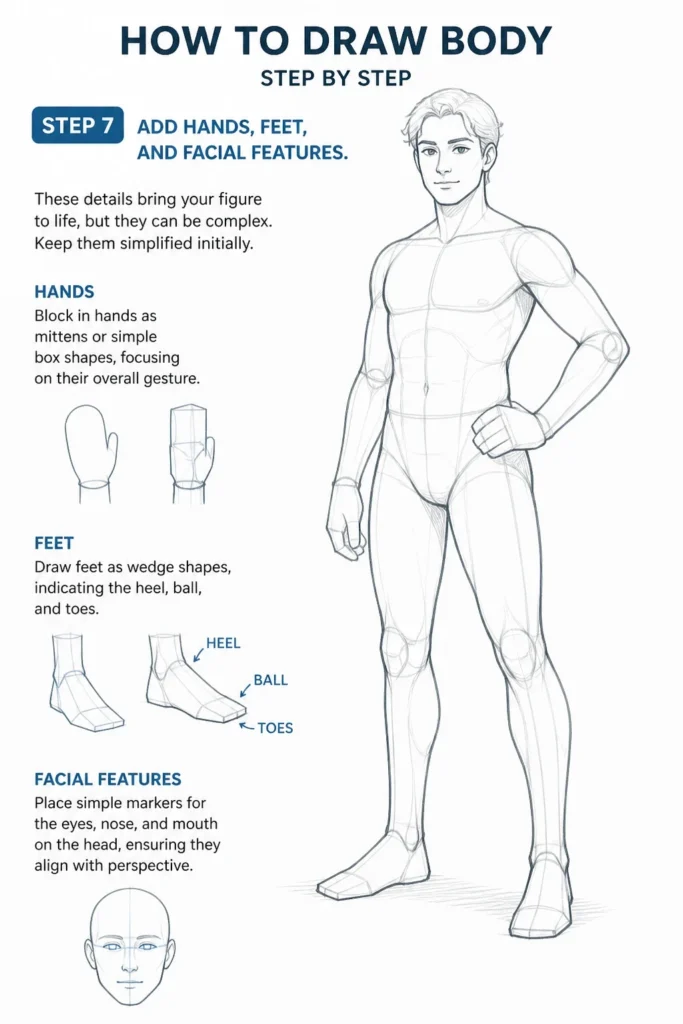
Block in hands as mittens or simple box shapes, focusing on their overall gesture.
Draw feet as wedge shapes, indicating the heel, ball, and toes.
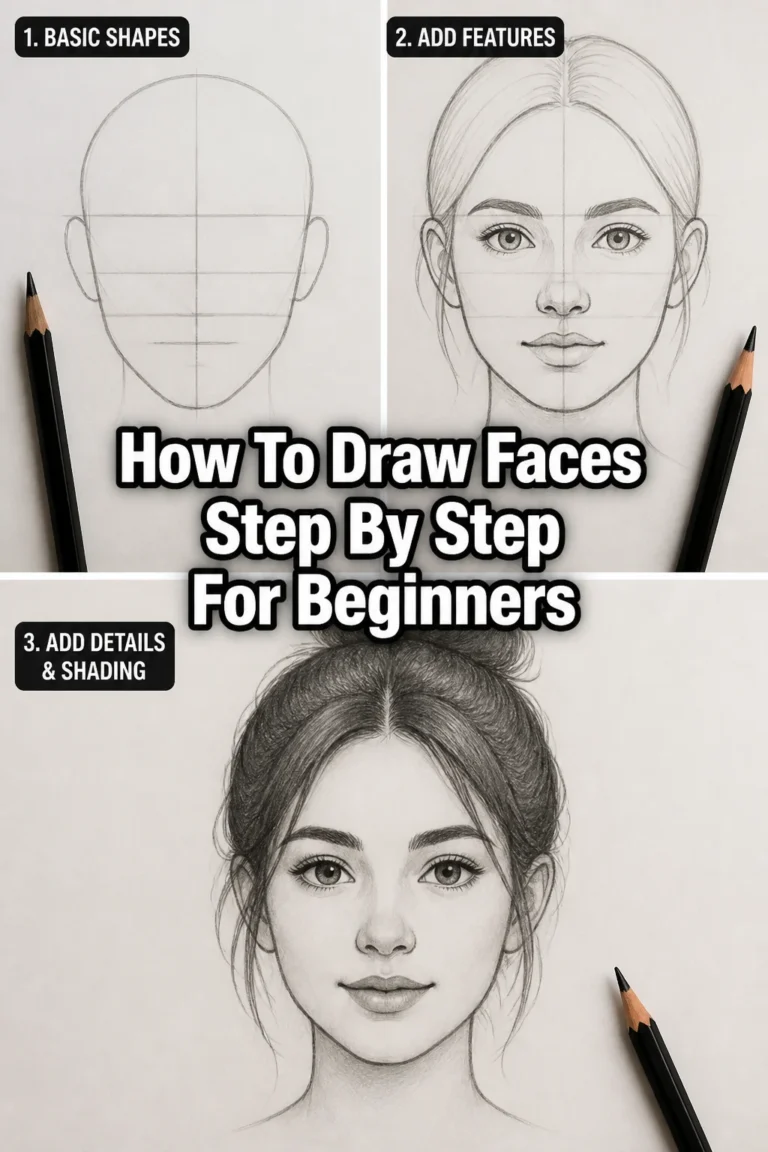
Place simple markers for the eyes, nose, and mouth on the head, ensuring they align with perspective.
Step 8: Clean Up and Refine the Lines
With the structure established, it’s time to make your drawing more presentable.
Lighten your initial construction lines using a kneaded eraser.
Go over your preferred contour lines with a darker pencil, making them more confident and precise.
Add subtle shading if desired, to enhance the three-dimensionality of your figure.
Common Mistakes to Avoid
Drawing Stiff Figures
Many beginners draw figures that look rigid, almost like mannequins. This often happens when you focus too much on individual parts without considering the overall flow.
To fix this, always start with a strong gesture line. Emphasize curves and counter-curves to create dynamic poses, even in standing figures.
Ignoring Proportions
A common pitfall is making limbs too long or short, or the head too large for the body. This immediately makes a drawing look amateurish.
Consistently use the head unit system from Step 1. Regularly check your measurements against your reference, and don’t be afraid to adjust early on.
Failing to See in 3D
Drawing figures flat, without a sense of depth or volume, is another frequent error. This makes the body appear like a cutout.
Remember to build your figure with geometric forms like cylinders and spheres. Overlap shapes and consider how they turn in space to create a three-dimensional illusion.
Over-detailing Too Early
Jumping straight to muscles, fingers, or facial features before the underlying structure is sound can lead to frustration and inaccurate drawings.
Resist the urge to add details until your gesture, proportions, and major forms are firmly established. Build from big shapes to small details.
Troubleshooting
My Figures Look Flat and Lifeless
If your drawings lack depth, it’s likely you’re not thinking in three dimensions. Focus on the cylindrical and spherical forms for limbs and joints.
Try drawing through your forms, imagining the lines continuing on the “far side” of the body. This helps reinforce the illusion of volume.
I Can’t Get the Proportions Right
This is a very common struggle. Revisit the head unit system and practice measuring. Use a pencil to measure distances on your reference and transfer those ratios to your paper.
Don’t be afraid to erase and redraw sections. Consistent practice with proportional guidelines will gradually train your eye.
The Limbs Look Disconnected from the Torso
If arms and legs seem to float or attach awkwardly, you might be neglecting the joint connections. The shoulders and hips are crucial pivot points.
Ensure your “sphere” joints overlap with the main torso forms. Think of them as ball-and-socket connections that smoothly integrate the limbs with the body.
Key Takeaways
- Always start by establishing clear head unit proportions.
- Prioritize the gesture and line of action to create dynamic, living figures.
- Construct the body using simplified 3D geometric forms like cylinders and spheres.
- Build your drawing from large shapes to smaller, refined details.
- Practice consistently and use reference images to improve your observational skills.
- Don’t be afraid to erase and make corrections; it’s part of the learning process.
Frequently Asked Questions
How long does it take to get good at drawing bodies?
Mastering figure drawing is a lifelong journey, but significant improvement can be seen within a few months of consistent practice. Dedicate at least 15-30 minutes daily to sketching figures.
Should I use reference images or draw from imagination?
Always use reference images, especially when starting out. They are invaluable for understanding anatomy, proportions, and how light falls on the body. Drawing from imagination comes later, built upon a strong foundation of observation.
What about drawing different body types?
The foundational principles of head units, gesture, and basic forms apply to all body types. Once you understand the underlying structure, you can adapt the forms to depict various physiques, always paying attention to unique proportions and curves.
Is anatomy knowledge essential?
While you don’t need to memorize every muscle, a basic understanding of major muscle groups and skeletal landmarks is incredibly helpful. It allows you to suggest form and tension more convincingly, making your figures feel more realistic.
Our Top Recommended Finds
- Good Quality Sketchbook: A sturdy sketchbook with smooth, slightly toothy paper is a joy to draw in and encourages regular practice.
- Variety of Graphite Pencils: Having HB, 2B, and 4B pencils allows for a range of line weights and shading, from light construction lines to darker, confident contours.
- Kneaded Eraser: Essential for lifting graphite without damaging the paper, perfect for cleaning up construction lines or creating highlights.
Embrace Your Drawing Journey
Drawing the human body is a skill that develops with patience and consistent effort.
Don’t get discouraged by initial challenges; every artist starts somewhere.
Keep practicing these steps, observe the world around you, and enjoy the process of bringing your figures to life on paper.
Pick up your pencil today and start sketching. Your artistic journey is just beginning.
& Painting
No rigid rules or pretension. Just practical guides, medium comparisons, and encouraging tips to help you enjoy the drawing & painting process.