🏰 How To Draw A Castle Step By Step

& Painting
No rigid rules or pretension. Just practical guides, medium comparisons, and encouraging tips to help you enjoy the drawing & painting process.
Drawing a castle feels like stepping into a fairy tale or a history book.
I remember spending hours as a kid trying to get the stone textures just right on my sketchpad, often ending up with a messy pile of gray scribbles.
This guide uses those years of trial and error to help you create a majestic fortress with ease and confidence.
Quick Overview
You will learn to build a castle from the ground up using simple shapes and layers to create a sense of scale and history.
- Time needed: 45-60 minutes
- Difficulty: Beginner to Intermediate
- What you’ll need: Graphite pencil (HB and 2B), high-quality eraser, ruler, and drawing paper.
Step-by-Step Instructions
Step 1: Sketch the Main Keep
Start by drawing a large rectangle in the center of your page to represent the main body of the castle.
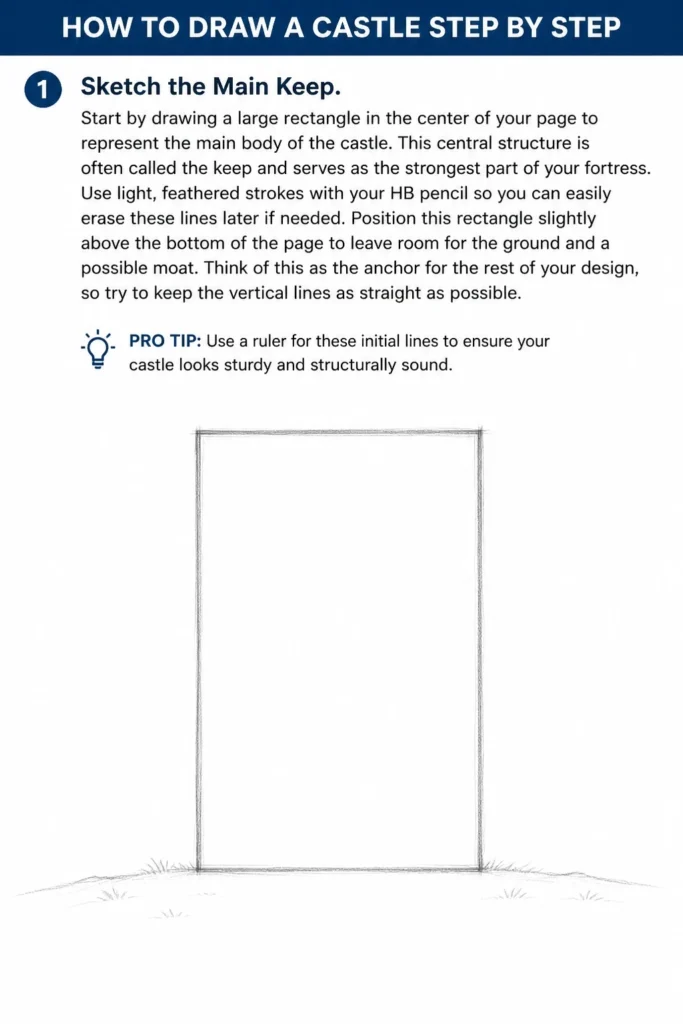
This central structure is often called the “keep” and serves as the strongest part of your fortress.
Use light, feathered strokes with your HB pencil so you can easily erase these lines later if needed.
Position this rectangle slightly above the bottom of the page to leave room for the ground and a possible moat.
Think of this as the anchor for the rest of your design, so try to keep the vertical lines as straight as possible.
Pro Tip: Use a ruler for these initial lines to ensure your castle looks sturdy and structurally sound.
Step 2: Add the Corner Towers
Draw two tall, narrow rectangles on either side of your main keep.
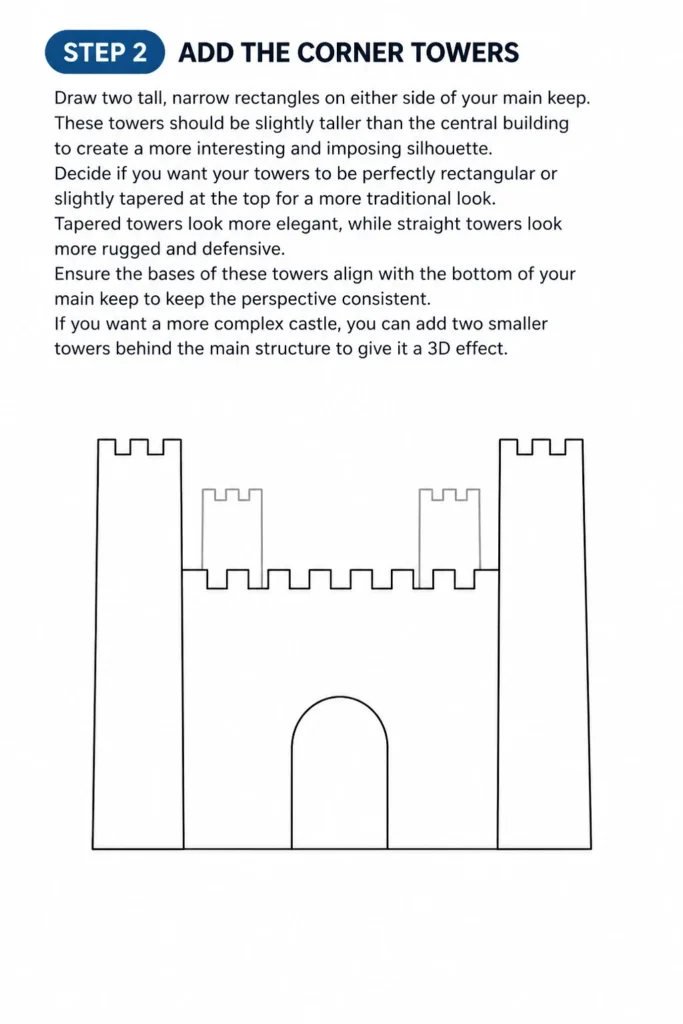
These towers should be slightly taller than the central building to create a more interesting and imposing silhouette.
Decide if you want your towers to be perfectly rectangular or slightly tapered at the top for a more traditional look.
Tapered towers look more elegant, while straight towers look more rugged and defensive.
Ensure the bases of these towers align with the bottom of your main keep to keep the perspective consistent.
If you want a more complex castle, you can add two smaller towers behind the main structure to give it a 3D effect.
Step 3: Create the Roofs and Turrets
Place triangles or cones on top of your towers to give them a classic medieval appearance.
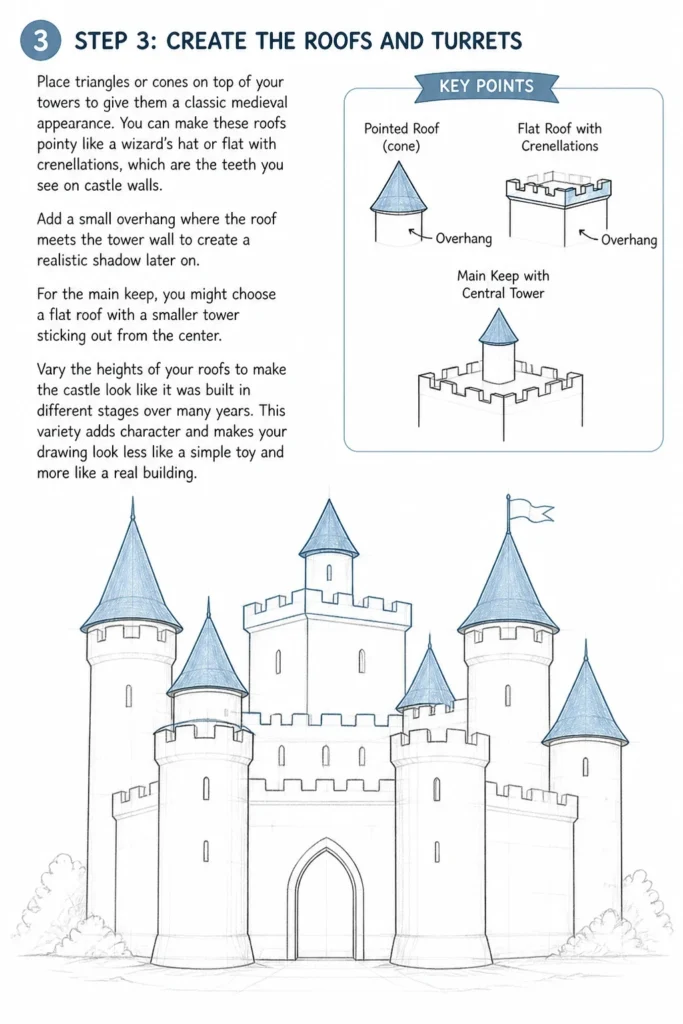
You can make these roofs pointy like a wizard’s hat or flat with crenellations, which are the “teeth” you see on castle walls.
Add a small overhang where the roof meets the tower wall to create a realistic shadow later on.
For the main keep, you might choose a flat roof with a smaller tower sticking out from the center.
Vary the heights of your roofs to make the castle look like it was built in different stages over many years.
This variety adds character and makes your drawing look less like a simple toy and more like a real building.
Step 4: Design the Battlements
Draw a series of small squares along the top edges of the walls and towers that don’t have pointed roofs.
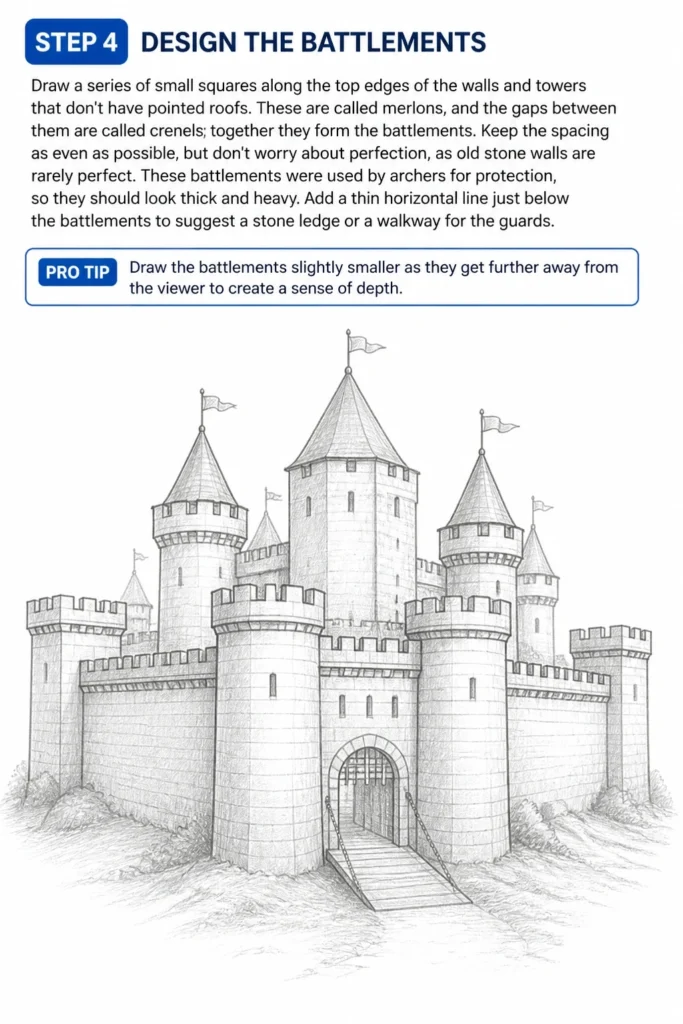
These are called merlons, and the gaps between them are called crenels; together they form the battlements.
Keep the spacing as even as possible, but don’t worry about perfection, as old stone walls are rarely perfect.
These battlements were used by archers for protection, so they should look thick and heavy.
Add a thin horizontal line just below the battlements to suggest a stone ledge or a walkway for the guards.
Pro Tip: Draw the battlements slightly smaller as they get further away from the viewer to create a sense of depth.
Step 5: Outline the Gatehouse and Drawbridge
Sketch a large archway in the bottom center of the main keep for the primary entrance.
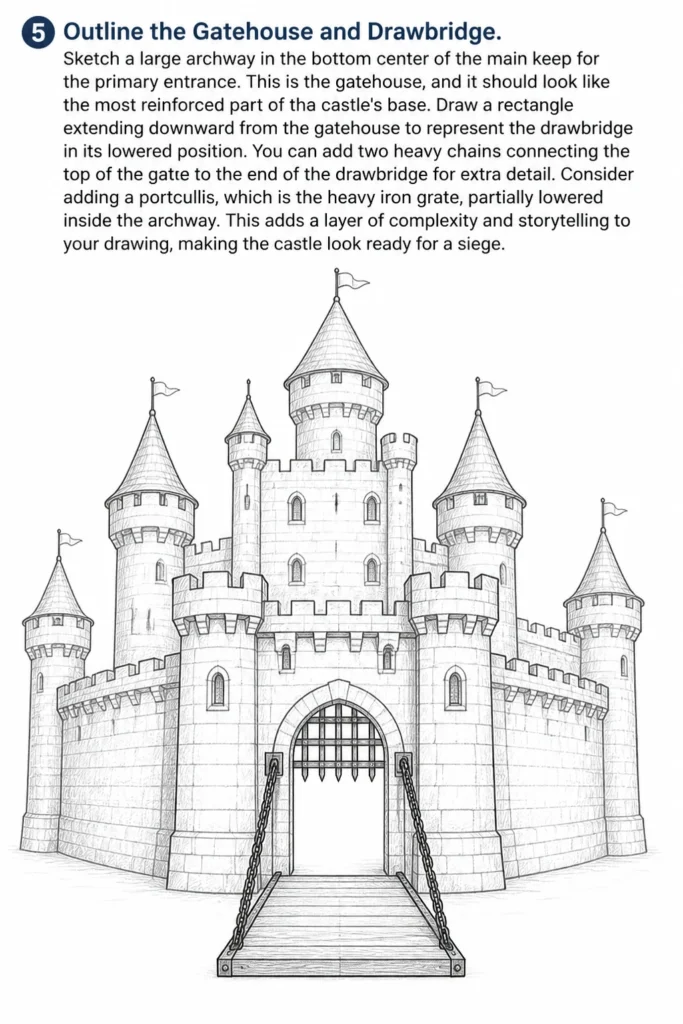
This is the gatehouse, and it should look like the most reinforced part of the castle’s base.
Draw a rectangle extending downward from the gatehouse to represent the drawbridge in its lowered position.
You can add two heavy chains connecting the top of the gate to the end of the drawbridge for extra detail.
Consider adding a portcullis, which is the heavy iron grate, partially lowered inside the archway.
This adds a layer of complexity and storytelling to your drawing, making the castle look ready for a siege.
Step 6: Add Windows and Arrow Slits
Place small, narrow vertical rectangles on the towers and upper walls of the keep.
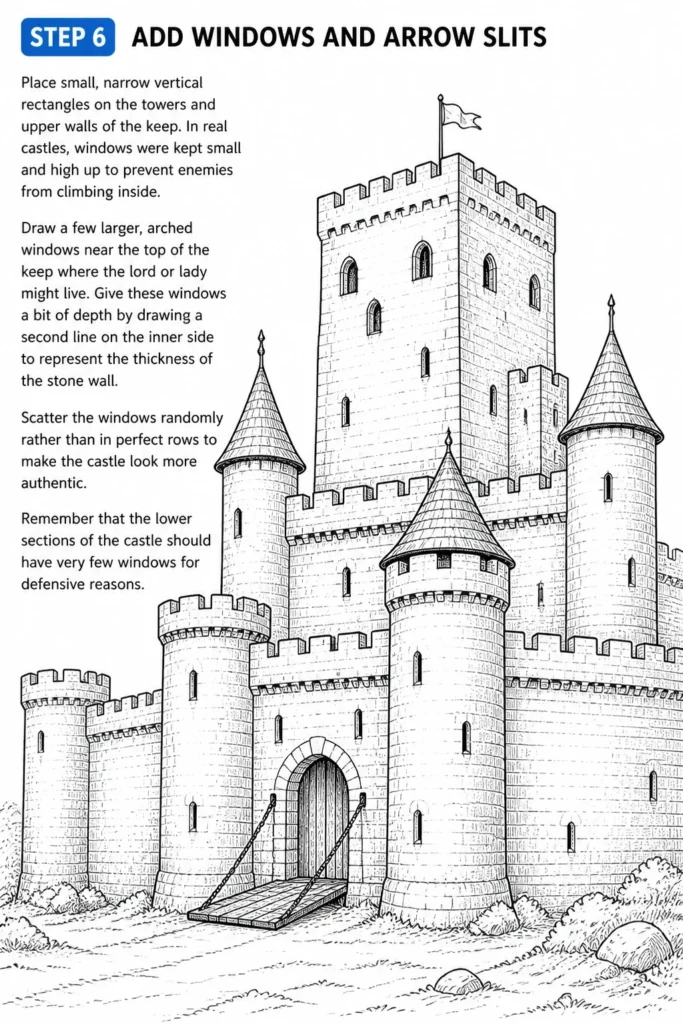
In real castles, windows were kept small and high up to prevent enemies from climbing inside.
Draw a few larger, arched windows near the top of the keep where the lord or lady might live.
Give these windows a bit of depth by drawing a second line on the inner side to represent the thickness of the stone wall.
Scatter the windows randomly rather than in perfect rows to make the castle look more authentic.
Remember that the lower sections of the castle should have very few windows for defensive reasons.
Step 7: Texture the Stone Walls
Sketch small clusters of rectangles and squares across the surface of the walls to suggest individual stones.
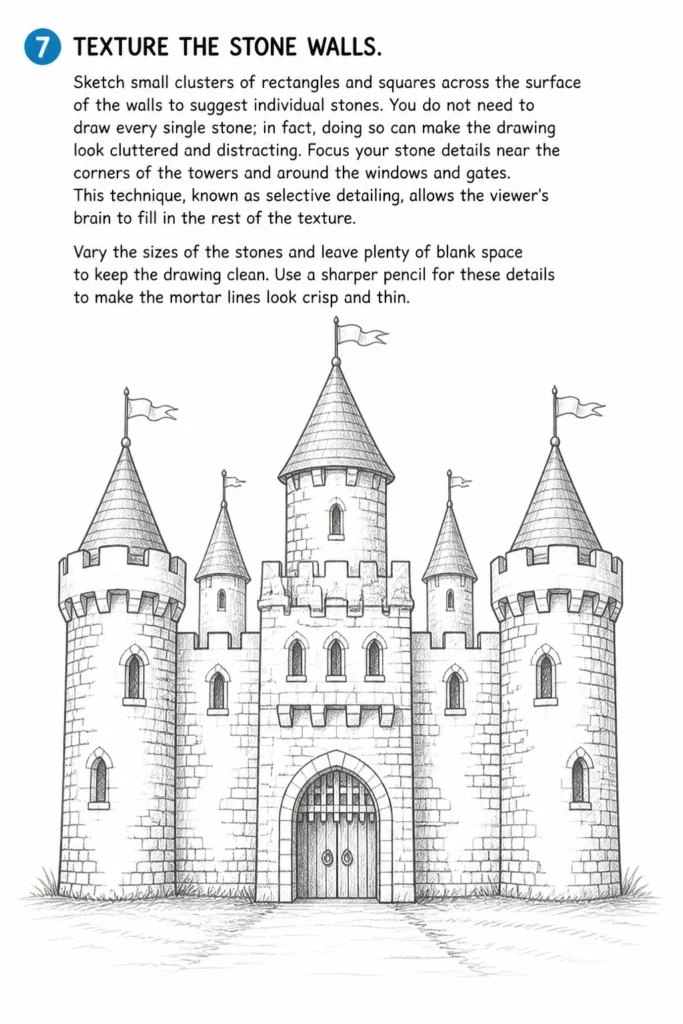
You do not need to draw every single stone; in fact, doing so can make the drawing look cluttered and distracting.
Focus your stone details near the corners of the towers and around the windows and gates.
This technique, known as “selective detailing,” allows the viewer’s brain to fill in the rest of the texture.
Vary the sizes of the stones and leave plenty of blank space to keep the drawing clean.
Use a sharper pencil for these details to make the “mortar” lines look crisp and thin.
Step 8: Shade for Depth and Volume
Identify a light source, such as the sun in the top right corner of your page.
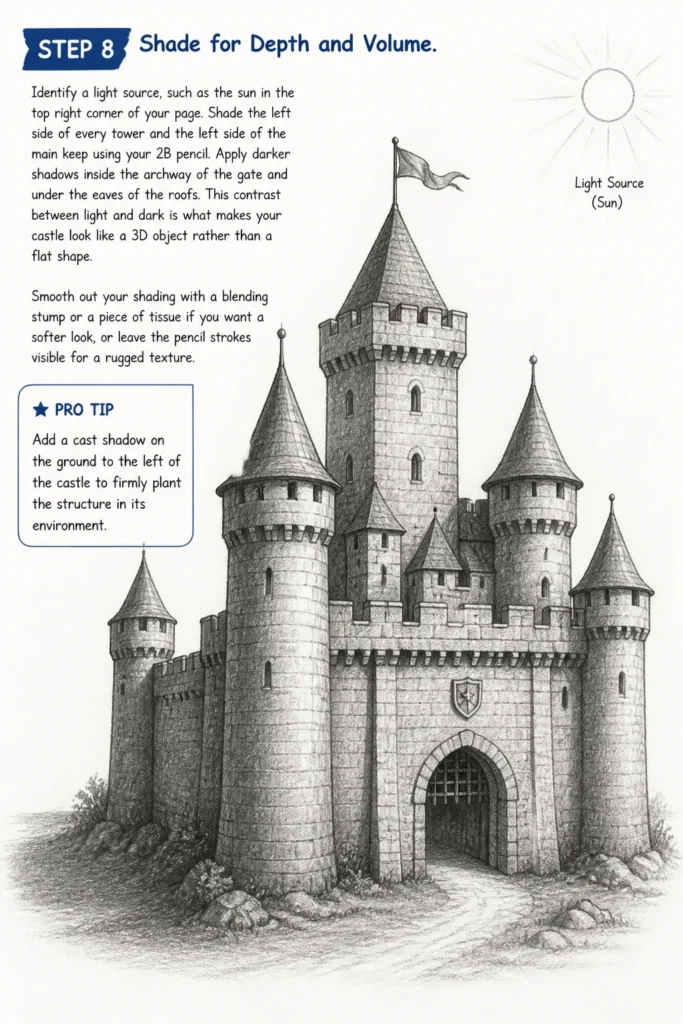
Shade the left side of every tower and the left side of the main keep using your 2B pencil.
Apply darker shadows inside the archway of the gate and under the eaves of the roofs.
This contrast between light and dark is what makes your castle look like a 3D object rather than a flat shape.
Smooth out your shading with a blending stump or a piece of tissue if you want a softer look, or leave the pencil strokes visible for a rugged texture.
Pro Tip: Add a “cast shadow” on the ground to the left of the castle to firmly plant the structure in its environment.
Step 9: Detail the Environment
Draw a horizontal line behind the castle to represent the horizon and give the scene some context.
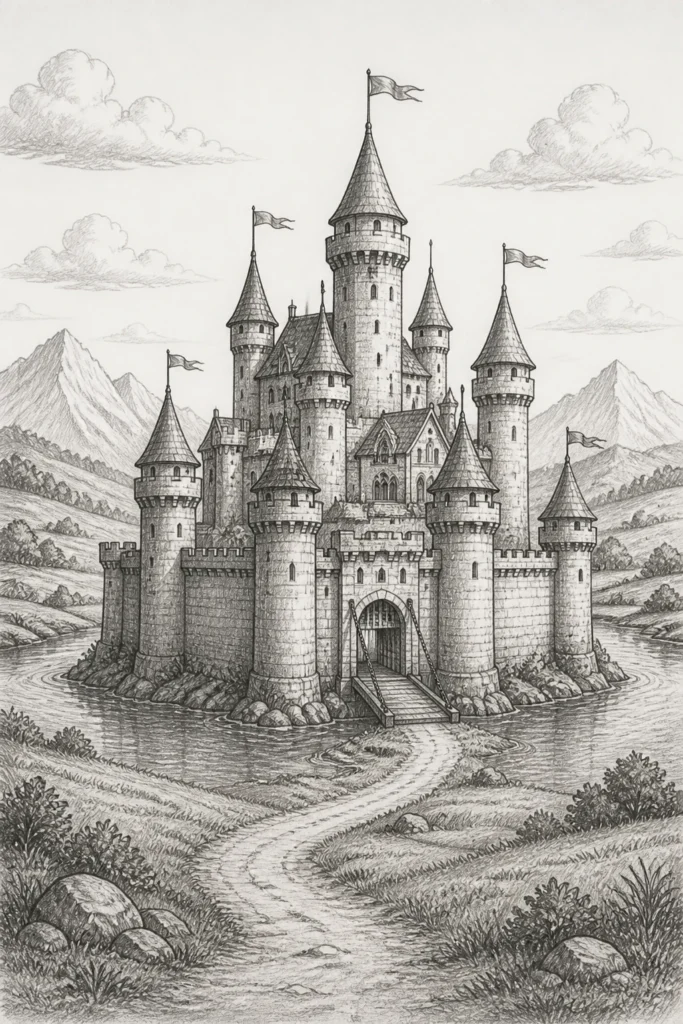
You can add rolling hills, a winding path leading to the drawbridge, or even a jagged mountain range in the distance.
Sketch some water ripples around the base of the castle if you want to include a moat.
Adding a few tiny flags or banners flying from the tops of the towers can give your castle a sense of life and movement.
Check your overall composition and erase any stray guide lines from the beginning of the process.
A few tufts of grass or some rocks at the base of the walls can help blend the castle into the landscape.
Common Mistakes to Avoid
Making the Castle Perfectly Symmetrical
Many beginners try to make the left side of the castle an exact mirror image of the right side.
Real medieval castles were rarely symmetrical because they were built on uneven terrain and expanded over centuries.
A castle with different tower heights and varying wall lengths looks much more realistic and visually interesting.
Try to vary the placement of windows and the heights of the turrets to avoid a “stiff” appearance.
Ignoring the Scale of Details
If you draw a massive door but tiny battlements, the proportions of your castle will feel “off.”
Think about the size of a human being in relation to the structure you are drawing.
The drawbridge should be large enough for a horse and carriage, while the arrow slits should be just wide enough for a bowman.
Keeping these scales in mind helps the viewer understand the true size of the fortress.
Drawing Every Single Stone
Trying to outline every individual stone in the wall usually results in a messy, flat-looking drawing.
It can also be incredibly tedious and may lead you to lose interest in the project before it is finished.
Instead, use clusters of stone shapes to suggest the texture and let the shading do the rest of the work.
The human eye is very good at “filling in the blanks” when it sees a few well-placed details.
Troubleshooting
The Towers Look Like They Are Leaning
This usually happens if your vertical lines aren’t perfectly parallel to the sides of your paper.
To fix this, use a ruler to check the distance from the tower wall to the edge of the page at both the top and the bottom.
If you have already shaded the drawing, you can sometimes “straighten” a tower by darkening one side and erasing the other.
In the future, drawing a light vertical “center line” for each tower can help you keep them upright.
The Drawing Looks Flat and Lifeless
Flatness is almost always caused by a lack of contrast in your shading.
Make your shadows much darker than you think they need to be, especially in areas like the gatehouse or under the battlements.
Ensure your light source is consistent across the entire drawing; if the sun is on the right, every shadow must be on the left.
Adding a few highlights with a clean eraser on the “sunny” side of the towers can also help create a 3D effect.
Key Takeaways
- Start with basic shapes like rectangles and triangles to build a strong foundation.
- Vary the heights of towers and walls to create a more realistic and interesting silhouette.
- Use selective detailing for stone textures instead of drawing every single brick.
- Establish a clear light source to give your castle volume and depth through shading.
- Add environmental elements like paths, hills, or a moat to ground your castle in a scene.
- Keep scale in mind by comparing the size of windows and doors to the overall structure.
Frequently Asked Questions
What kind of pencil is best for drawing a castle?
An HB pencil is perfect for the initial sketch because it is light and easy to erase. For the shading and stone textures, a 2B or 4B pencil is better because it allows for darker, richer tones. Using a range of pencils helps you create the contrast necessary for a realistic look.
How do I make the castle look old and weathered?
To give your castle an aged appearance, avoid drawing perfectly straight lines for the walls. Use slightly wobbly lines to suggest stones that have shifted over time. You can also add some “cracks” in the walls and draw vines or moss growing up the sides of the towers.
Should I use a ruler for the whole drawing?
A ruler is great for the initial layout to ensure your structure is straight and tall. However, once you start adding details and textures, try drawing by hand. Freehand lines look more organic and better represent the hand-carved nature of medieval stonework.
How do I draw a round tower instead of a square one?
To make a tower look round, use curved lines for the battlements and the base rather than straight ones. When shading, use a gradient that transitions smoothly from light to dark across the tower’s surface. This “wrapping” shadow is the key to making a flat shape look cylindrical.
Our Top Recommended Finds
- Graphite Drawing Pencil Set: A set that includes grades from 2H to 6B will give you the versatility needed for both light sketches and deep shadows.
- Kneaded Eraser: These erasers are excellent for lifting small amounts of graphite to create highlights on stone edges without smudging.
- Bristol Board or Heavy Sketch Paper: A smoother, thicker paper prevents the pencil from “grooving” the page and allows for better blending.
Bring Your Kingdom To Life
Now that you have the basic structure of your castle down, the real fun begins with customization.
Think about who lives in this castle—is it a heroic knight, a mysterious sorcerer, or a bustling village of peasants?
You can add more layers of walls, complex gatehouses, or even a dragon perched on the highest spire.
Pick up your pencil and try drawing a different style of castle today, perhaps focusing on a circular design or a fortress built into a cliffside.
The more you practice these structural steps, the more natural and imaginative your architectural drawings will become.
& Painting
No rigid rules or pretension. Just practical guides, medium comparisons, and encouraging tips to help you enjoy the drawing & painting process.