🦊 How To Draw A Fox Step By Step

& Painting
No rigid rules or pretension. Just practical guides, medium comparisons, and encouraging tips to help you enjoy the drawing & painting process.
Learning to draw animals can feel intimidating, especially when you want to capture their unique charm.
I remember my own early attempts at drawing a fox; they often looked more like stylized dogs until I broke down the process.
This guide shares the practical steps I learned to create a convincing fox drawing, helping you build confidence with each line.

Quick Overview
This guide will walk you through creating a charming fox drawing, from initial shapes to final details. You’ll finish with a clear understanding of fox anatomy and sketching techniques.
- Time needed: 45-60 minutes
- Difficulty: Beginner
- What you’ll need: Pencil (HB, 2B recommended), Eraser (kneaded is great), Sketchbook or drawing paper, Optional: A reference photo of a fox for inspiration.
Step-by-Step Instructions
Step 1: Prepare Your Workspace and Tools
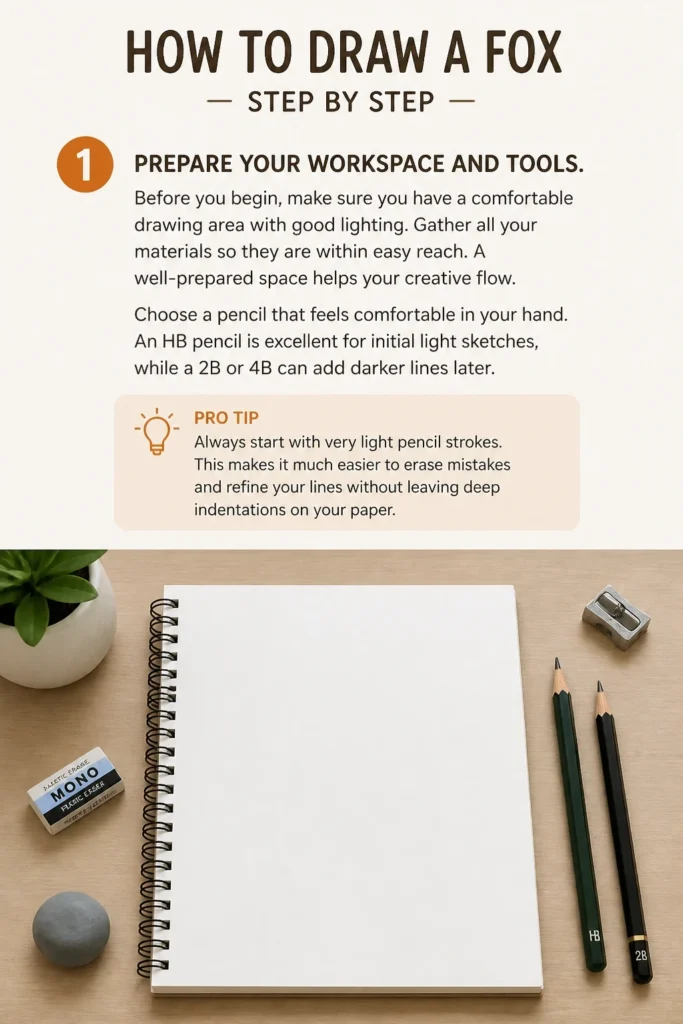
Before you begin, make sure you have a comfortable drawing area with good lighting. Gather all your materials so they are within easy reach. A well-prepared space helps your creative flow.
Choose a pencil that feels comfortable in your hand. An HB pencil is excellent for initial light sketches, while a 2B or 4B can add darker lines later.
Pro Tip: Always start with very light pencil strokes. This makes it much easier to erase mistakes and refine your lines without leaving deep indentations on your paper.
Step 2: Establish the Basic Head and Body Shapes
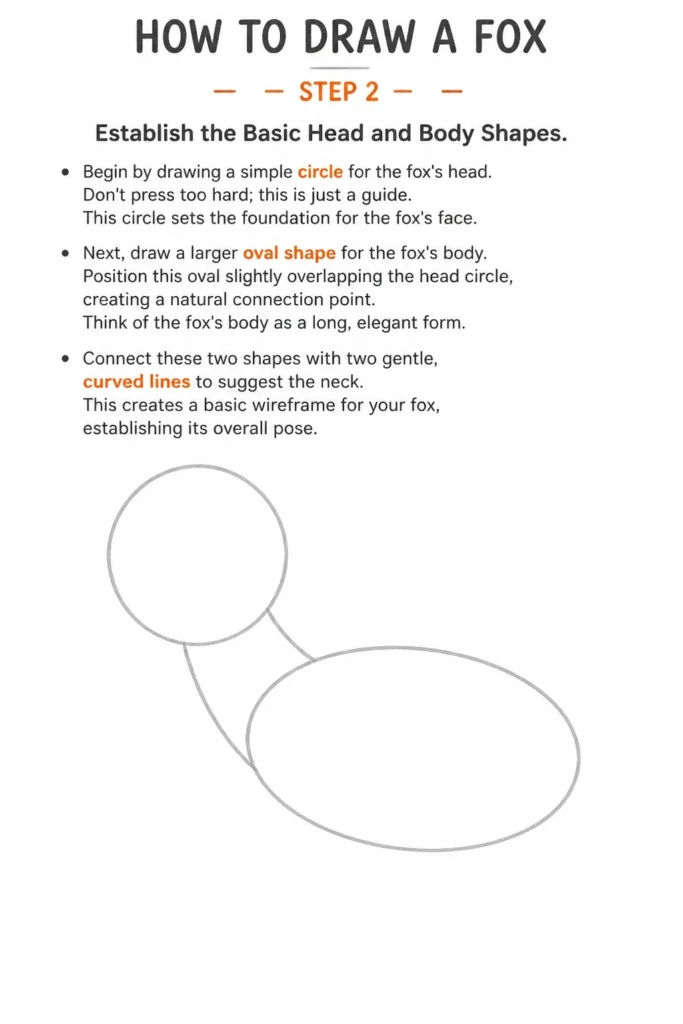
Begin by drawing a simple circle for the fox’s head. Don’t press too hard; this is just a guide. This circle sets the foundation for the fox’s face.
Next, draw a larger oval shape for the fox’s body. Position this oval slightly overlapping the head circle, creating a natural connection point. Think of the fox’s body as a long, elegant form.
Connect these two shapes with two gentle, curved lines to suggest the neck. This creates a basic wireframe for your fox, establishing its overall pose.
Step 3: Define the Muzzle and Ears
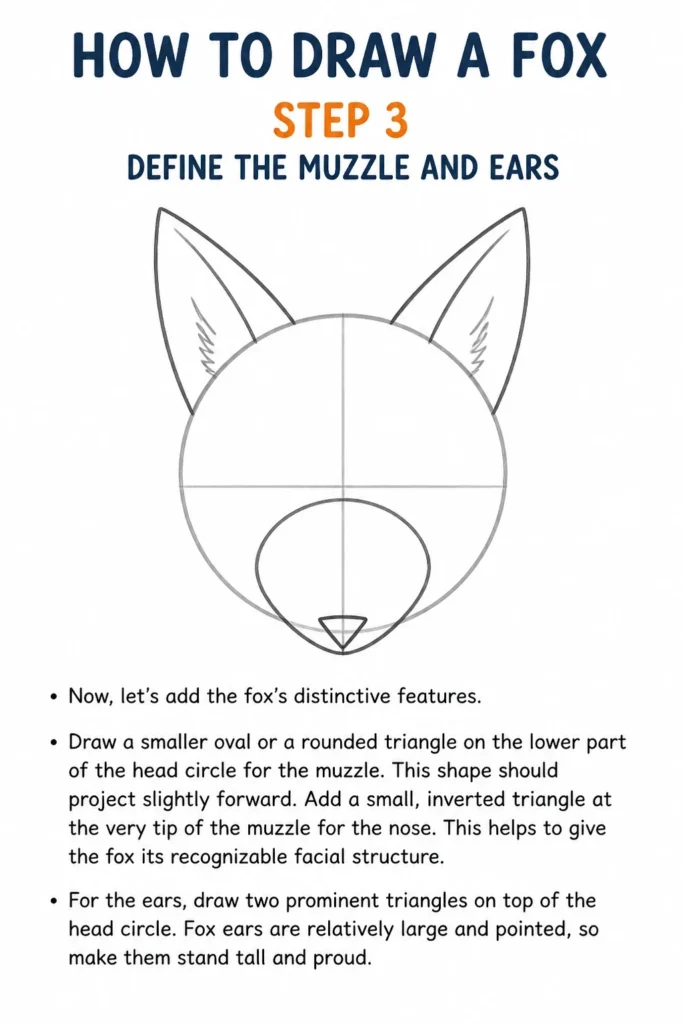
Now, let’s add the fox’s distinctive features. Draw a smaller oval or a rounded triangle on the lower part of the head circle for the muzzle. This shape should project slightly forward.
Add a small, inverted triangle at the very tip of the muzzle for the nose. This helps to give the fox its recognizable facial structure.
For the ears, draw two prominent triangles on top of the head circle. Fox ears are relatively large and pointed, so make them stand tall and proud.
Step 4: Sketch the Body Outline and Legs
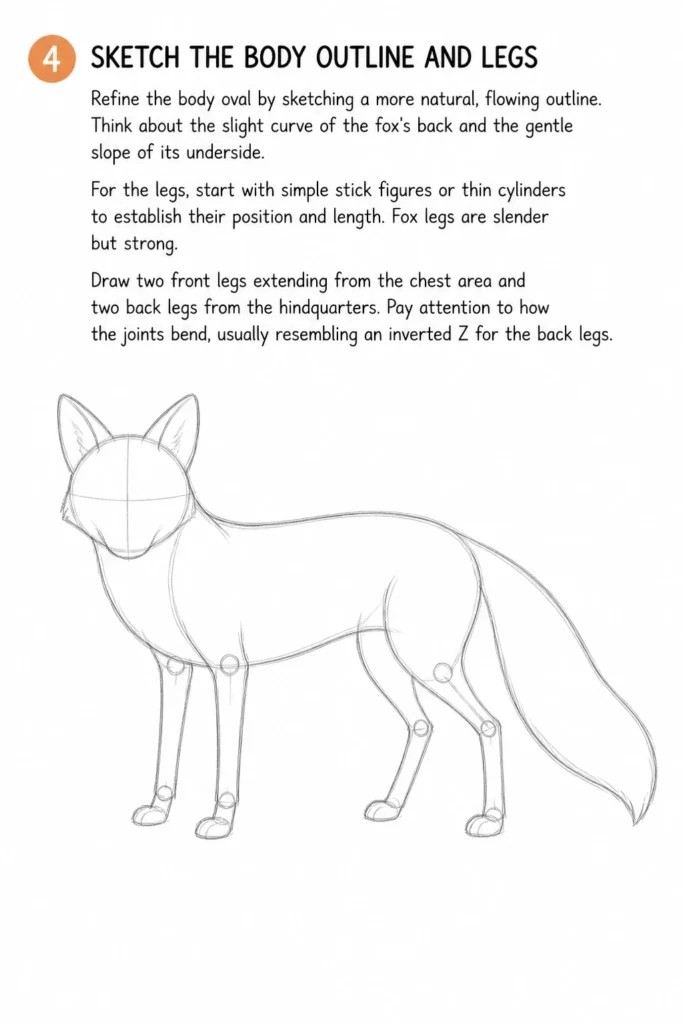
Refine the body oval by sketching a more natural, flowing outline. Think about the slight curve of the fox’s back and the gentle slope of its underside.
For the legs, start with simple stick figures or thin cylinders to establish their position and length. Fox legs are slender but strong.
Draw two front legs extending from the chest area and two back legs from the hindquarters. Pay attention to how the joints bend, usually resembling an inverted “Z” for the back legs.
Step 5: Add the Iconic Bushy Tail
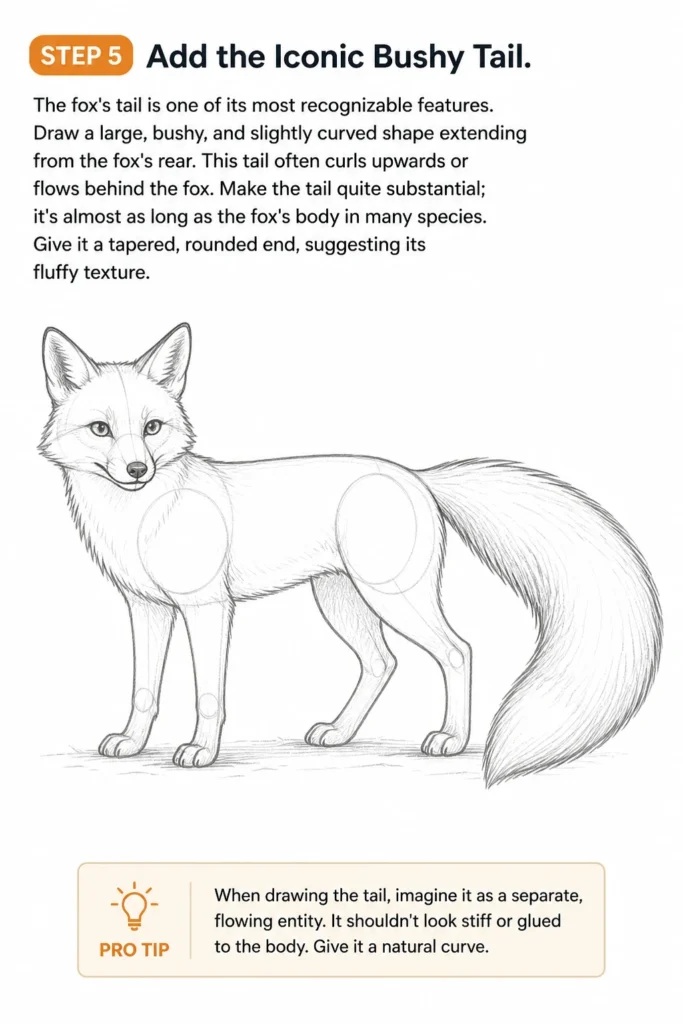
The fox’s tail is one of its most recognizable features. Draw a large, bushy, and slightly curved shape extending from the fox’s rear. This tail often curls upwards or flows behind the fox.
Make the tail quite substantial; it’s almost as long as the fox’s body in many species. Give it a tapered, rounded end, suggesting its fluffy texture.
Consider the weight and movement of the tail. It adds balance and character to your drawing.
Pro Tip: When drawing the tail, imagine it as a separate, flowing entity. It shouldn’t look stiff or glued to the body. Give it a natural curve.
Step 6: Refine Facial Features and Paws
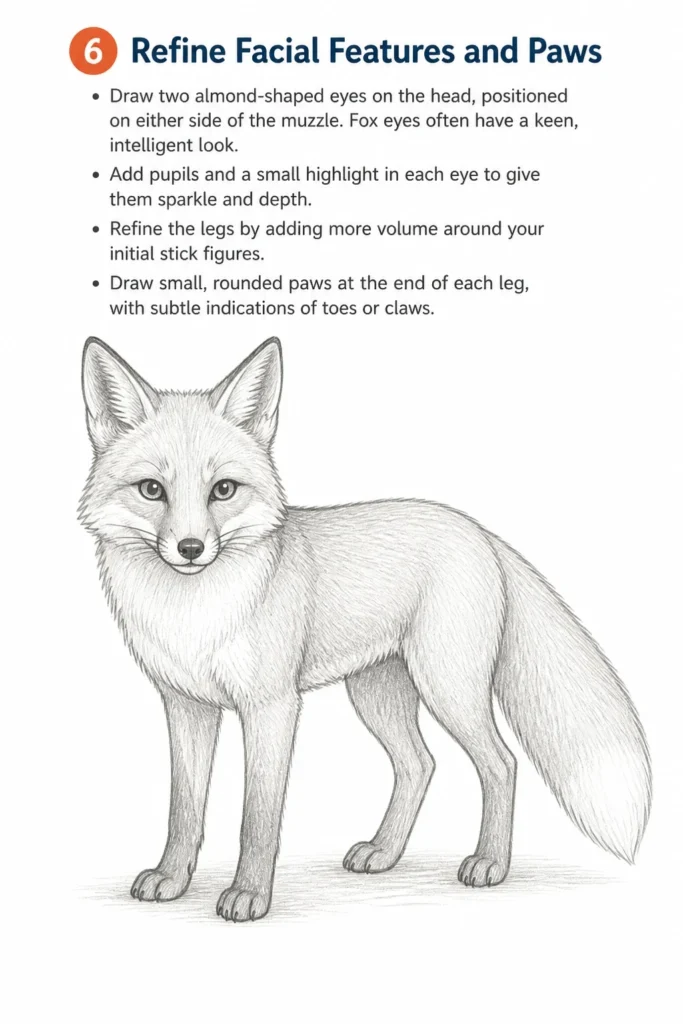
Now, let’s bring the face to life. Draw two almond-shaped eyes on the head, positioned on either side of the muzzle. Fox eyes often have a keen, intelligent look.
Add pupils and a small highlight in each eye to give them sparkle and depth. This small detail can make a big difference in expression.
Refine the legs by adding more volume around your initial stick figures. Draw small, rounded paws at the end of each leg, with subtle indications of toes or claws.
Step 7: Clean Up Guidelines and Ink Your Drawing (Optional)
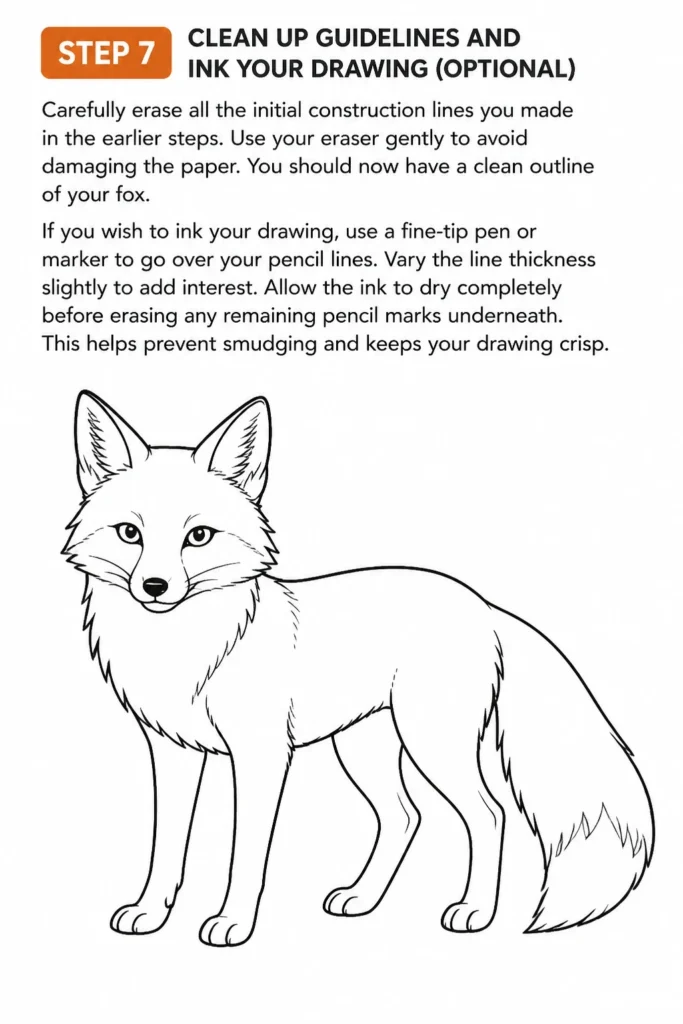
Carefully erase all the initial construction lines you made in the earlier steps. Use your eraser gently to avoid damaging the paper. You should now have a clean outline of your fox.
If you wish to ink your drawing, use a fine-tip pen or marker to go over your pencil lines. Vary the line thickness slightly to add interest.
Allow the ink to dry completely before erasing any remaining pencil marks underneath. This helps prevent smudging and keeps your drawing crisp.
Step 8: Add Fur Texture and Shading
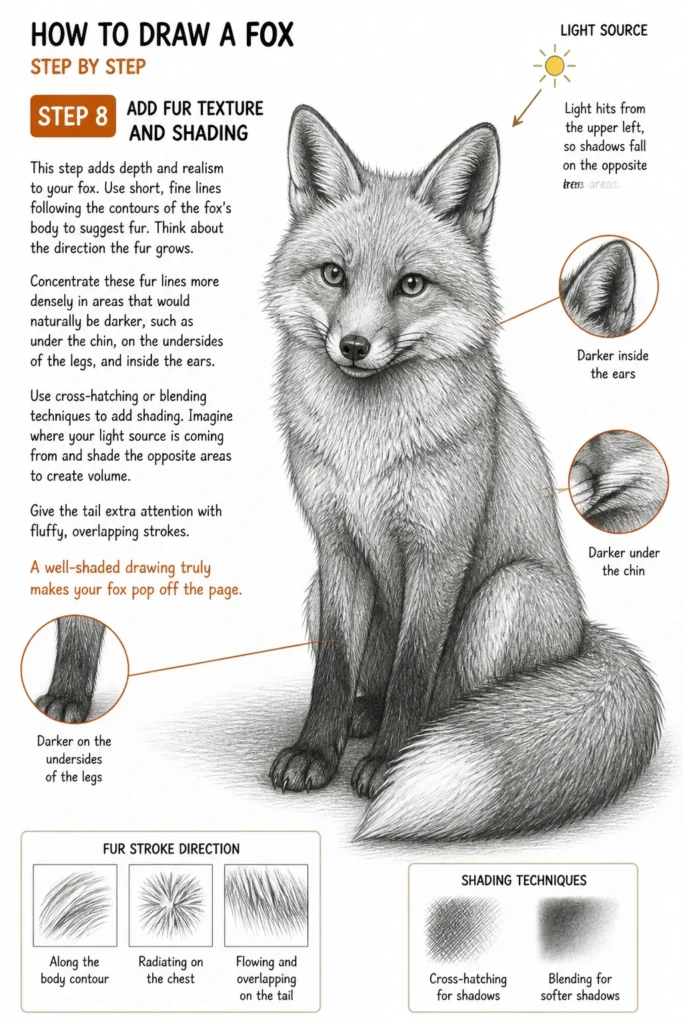
This step adds depth and realism to your fox. Use short, fine lines following the contours of the fox’s body to suggest fur. Think about the direction the fur grows.
Concentrate these fur lines more densely in areas that would naturally be darker, such as under the chin, on the undersides of the legs, and inside the ears.
Use cross-hatching or blending techniques to add shading. Imagine where your light source is coming from and shade the opposite areas to create volume.
Give the tail extra attention with fluffy, overlapping strokes. A well-shaded drawing truly makes your fox pop off the page.
Common Mistakes to Avoid
Disproportionate Features
A common pitfall is making certain parts of the fox too large or too small compared to the rest of its body. This can result in a fox that looks awkward or unnatural. For example, a head that’s too big or legs that are too short will throw off the overall balance.
To correct this, always start with basic shapes and check proportions frequently. Hold your pencil at arm’s length and compare the size of the head to the body, or the length of the legs to the torso. Using a grid method or light measuring lines can also help maintain accurate scale.
Stiff or Lifeless Poses
Sometimes, a drawing can look rigid, as if the fox is a statue rather than a living creature. This happens when the initial shapes lack fluidity or the pose is too symmetrical. Foxes are agile and dynamic animals.
To avoid this, try to incorporate curves and natural angles from the very beginning. Imagine the fox moving, even subtly. Use reference photos to observe natural fox postures and adapt them to your sketch, adding a sense of movement and vitality.
Flat Fur Texture
Failing to give fur depth and direction can make your fox look two-dimensional or like it’s wearing a smooth costume. Fur isn’t just a solid color; it has texture, highlights, and shadows. Neglecting this detail diminishes realism.
To achieve a more realistic fur texture, use varied line strokes. Draw short, overlapping lines in the direction the fur grows, adding more pressure in shaded areas and lighter touches for highlights. Don’t draw every single strand, but imply texture through patterns and density of lines.
Ignoring Reference Photos
Drawing from memory alone can often lead to generic or inaccurate representations. While imagination is valuable, real animals have specific anatomical details that are hard to invent. This can result in a fox that doesn’t quite look like a fox.
Always consult reference photos, even if you just glance at them for a few minutes. Pay attention to eye placement, ear shape, leg proportions, and tail bushiness. Observing real foxes will significantly improve the accuracy and character of your drawings.
Troubleshooting
My Fox Looks Like a Dog or Cat
This is a very common issue, as many canids share similar basic structures. The problem usually lies in not emphasizing the unique features that define a fox.
To fix this, pay closer attention to the distinctive fox traits. Ensure the ears are proportionally larger and more pointed than a dog’s. Make the muzzle narrower and more delicate, and the tail significantly bushier and often tipped with a different color. Fox eyes also tend to have a more almond shape.
Difficulty with Symmetry or Balance
If your fox looks lopsided or unbalanced, it often stems from not having strong initial construction lines. Achieving perfect symmetry freehand is challenging for anyone.
To improve balance, start by drawing a central axis line through the head and body. Use light horizontal lines to help align features like eyes, the base of the ears, and the tops of the shoulders. You can also flip your paper or use a mirror to spot imbalances more easily.
Can’t Get the Fur Texture Right
Achieving realistic fur can be tricky, often resulting in either a “spiky” or “smooth” but lifeless texture. The issue might be inconsistent stroke direction or pressure.
Practice drawing short, varied strokes that follow the fox’s contours. Use lighter pressure for areas in the light and gradually increase pressure for shaded regions. Remember that fur isn’t uniform; it has different lengths and densities in various places. Don’t try to draw every hair, but rather suggest the overall texture through patterns of strokes.
Key Takeaways
- Always start with light, basic geometric shapes to build your fox’s structure.
- Pay close attention to distinctive fox features like large ears, a narrow muzzle, and a bushy tail.
- Use reference photos to accurately capture the unique anatomy and natural poses of a fox.
- Refine your drawing by gradually adding details, from facial features to paw definition.
- Practice suggests fur texture with varied, short strokes that follow the body’s contours.
- Don’t be afraid to erase and adjust; drawing is a process of continuous refinement.
Frequently Asked Questions
What kind of pencil should I use for drawing a fox?
For initial sketches and guidelines, an HB pencil is ideal because it’s light and easy to erase. For adding details, shading, and darker lines, a 2B or 4B pencil will give you richer tones. A good range of graphite pencils allows for more dynamic drawings.
How do I make the fur look realistic?
Realistic fur comes from understanding its direction and texture. Use short, overlapping strokes that follow the contours of the fox’s body. Vary your pressure to create lighter and darker areas, suggesting depth and fluffiness. Avoid drawing individual hairs; instead, focus on clumps and patterns.
Should I use a reference photo?
Absolutely! Using reference photos is highly recommended, especially when you’re learning. They provide accurate anatomical details, diverse poses, and insights into how light interacts with fur. Even experienced artists use references to enhance their work and inspire new ideas.
How can I make my fox drawing unique?
Once you’re comfortable with the basic structure, experiment with different poses, expressions, and environments. Try drawing a fox curled up, pouncing, or looking over its shoulder. You can also add personal touches with stylized fur patterns or imaginative color choices.
Our Top Recommended Finds
- Sketchbook with Quality Paper: A good sketchbook provides a dedicated space for your art and prevents bleed-through. Look for paper that handles erasing well.
- Graphite Pencil Set: A set with pencils ranging from 2H to 6B offers versatility for light sketching, dark lines, and rich shading. It’s an essential tool for any artist.
- Kneaded Eraser: Unlike standard erasers, a kneaded eraser lifts graphite without smudging or damaging the paper, perfect for subtle corrections and highlights.
Your Fox Drawing Journey Continues!
You’ve just completed your first detailed fox drawing, and that’s a fantastic achievement! This process builds foundational skills that will serve you well in all your artistic endeavors.
Keep practicing these steps, and don’t hesitate to experiment with different fox breeds or poses. Each drawing is a chance to learn and grow your skills.
Why not try drawing your fox in a natural habitat next, or explore adding color with pencils or paints? The world of animal art is vast and waiting for your unique touch. Grab your pencil and start your next sketch today!
& Painting
No rigid rules or pretension. Just practical guides, medium comparisons, and encouraging tips to help you enjoy the drawing & painting process.