💡 How To Edit Gacha Hair In Ibis Paint

& Painting
No rigid rules or pretension. Just practical guides, medium comparisons, and encouraging tips to help you enjoy the drawing & painting process.
Do you dream of giving your Gacha characters hair that truly pops, full of life and vibrant detail?
Transforming flat Gacha hair into a dynamic masterpiece is easier than you think with Ibis Paint.
Having spent countless hours refining my own Gacha edits, I’ve distilled the process into simple, actionable steps, perfect for anyone looking to elevate their art.
Quick Overview
This guide will walk you through the essential techniques to revamp your Gacha character’s hair, adding stunning depth, highlights, and intricate details. You’ll learn how to master layers, blend modes, and various brush tools to achieve a professional look.
- Time needed: 1-3 hours (depending on complexity and experience)
- Difficulty: Intermediate
- What you’ll need: Ibis Paint X app, a Gacha character screenshot (transparent background preferred), a stylus (optional but recommended)
Step-by-Step Instructions
Step 1: Prepare Your Canvas and Import Your Gacha Base
First, open Ibis Paint X on your device. Tap on “My Gallery” and then the “+” icon to start a new canvas.
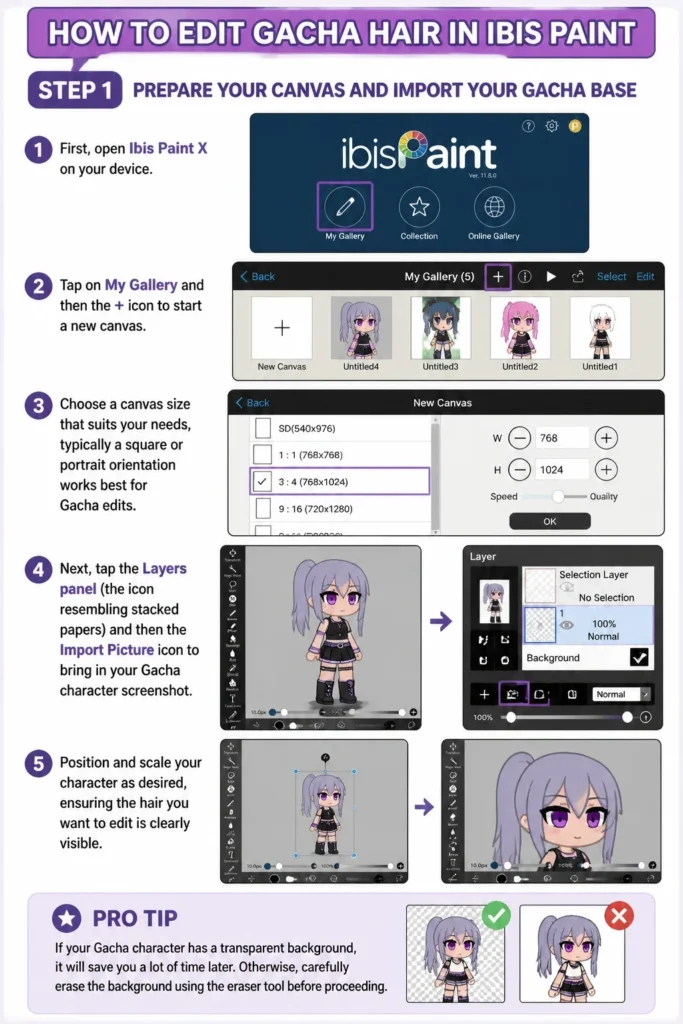
Choose a canvas size that suits your needs, typically a square or portrait orientation works best for Gacha edits.
Next, tap the “Layers” panel (the icon resembling stacked papers) and then the “Import Picture” icon to bring in your Gacha character screenshot.
Position and scale your character as desired, ensuring the hair you want to edit is clearly visible.
Pro Tip: If your Gacha character has a transparent background, it will save you a lot of time later. Otherwise, carefully erase the background using the eraser tool before proceeding.
Step 2: Isolate the Hair and Create a Base Shape
Create a new layer above your Gacha character layer. This new layer will be dedicated to your initial hair shape.
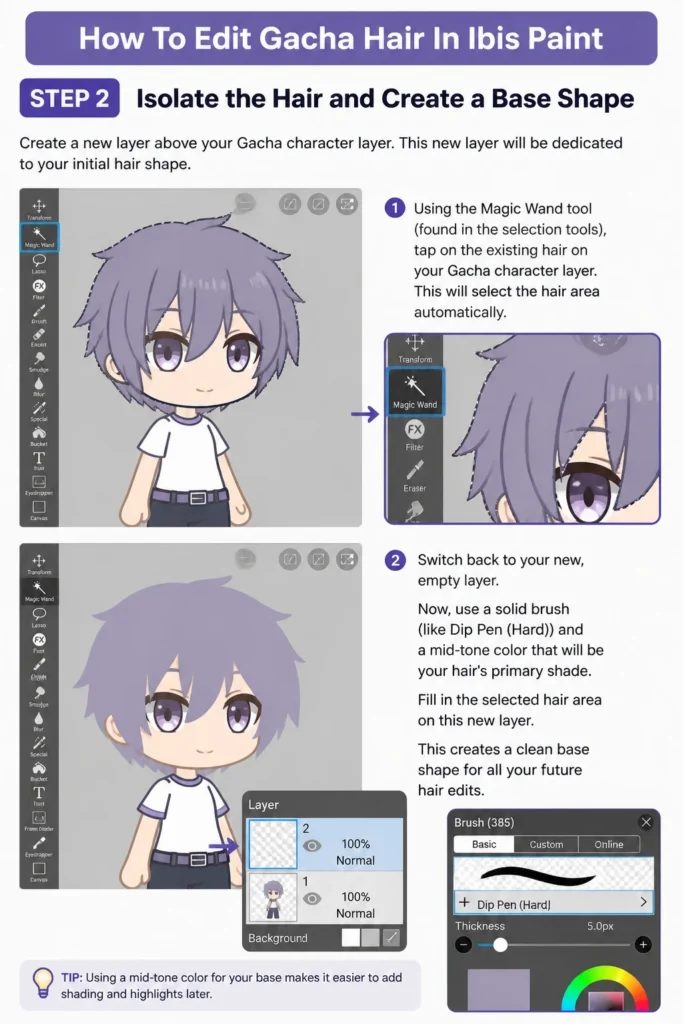
Using the “Magic Wand” tool (found in the selection tools), tap on the existing hair on your Gacha character layer. This will select the hair area automatically.
Switch back to your new, empty layer. Now, use a solid brush (like “Dip Pen (Hard)”) and a mid-tone color that will be your hair’s primary shade.
Fill in the selected hair area on this new layer. This creates a clean base shape for all your future hair edits.
Step 3: Lay Down the Hair’s Base Color and Form
After filling the initial shape, create another new layer directly above your base hair layer. Tap the “Clipping” button for this new layer.
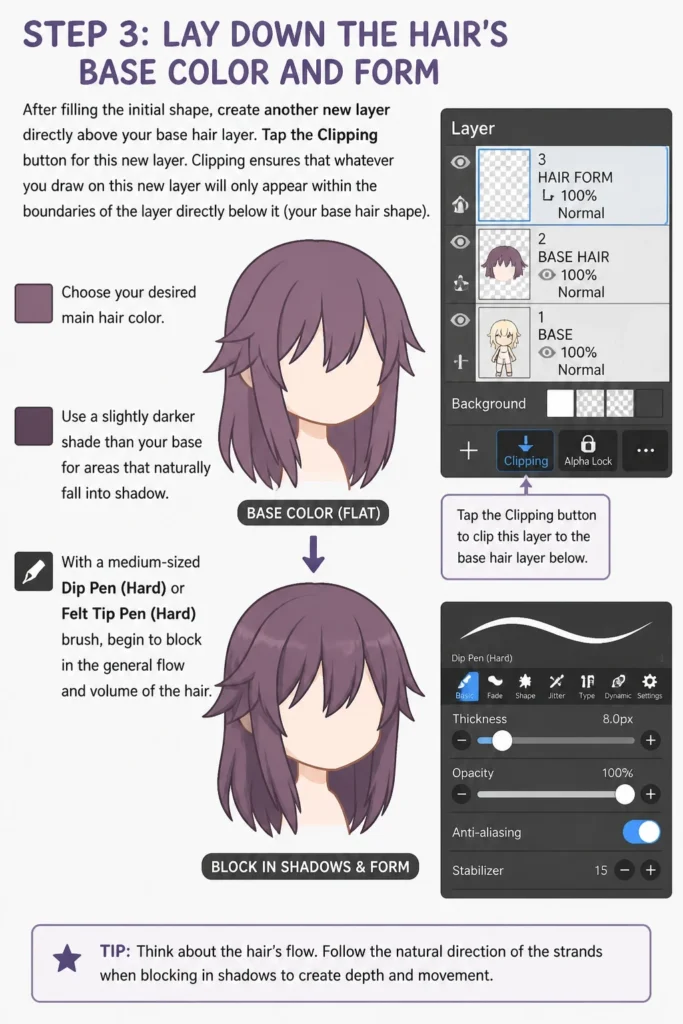
Clipping ensures that whatever you draw on this new layer will only appear within the boundaries of the layer directly below it (your base hair shape).
Choose your desired main hair color. Use a slightly darker shade than your base for areas that naturally fall into shadow.
With a medium-sized “Dip Pen (Hard)” or “Felt Tip Pen (Hard)” brush, begin to block in the general flow and volume of the hair.
Step 4: Add Deeper Shadows and Define Strands
Create yet another new layer, also set to “Clipping.” Change its blend mode to “Multiply” or “Linear Burn.”
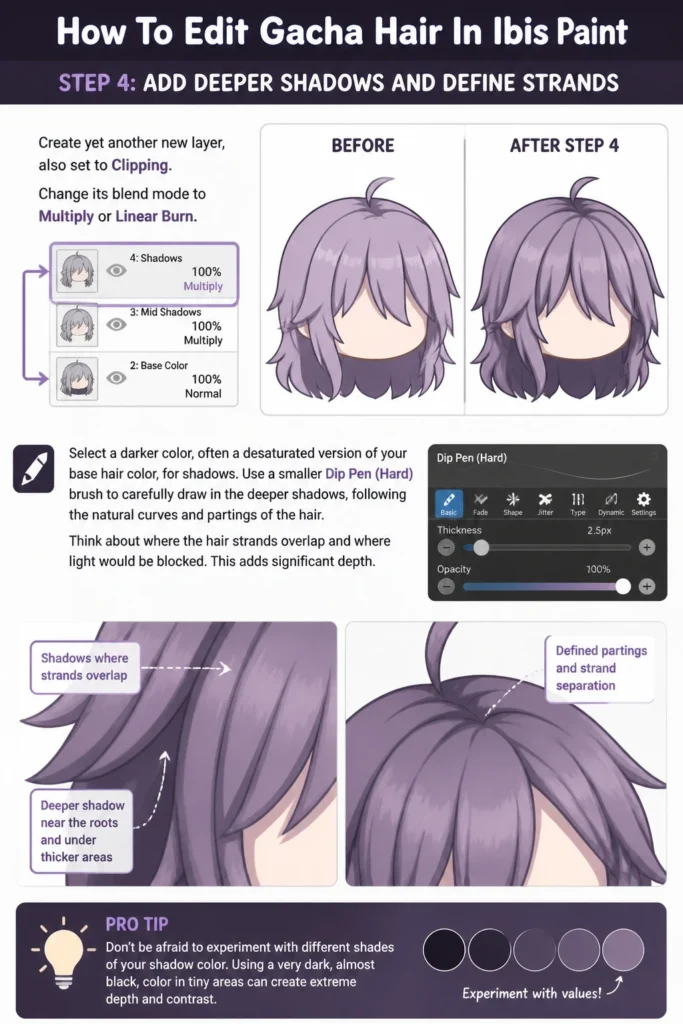
Select a darker color, often a desaturated version of your base hair color, for shadows.
Use a smaller “Dip Pen (Hard)” brush to carefully draw in the deeper shadows, following the natural curves and partings of the hair.
Think about where the hair strands overlap and where light would be blocked. This adds significant depth.
Pro Tip: Don’t be afraid to experiment with different shades of your shadow color. Using a very dark, almost black, color in tiny areas can create extreme depth and contrast.
Step 5: Introduce Highlights and Shine
Now, create a new clipping layer above your shadow layers. Set its blend mode to “Add” or “Screen” for soft glows, or keep it “Normal” for sharper highlights.
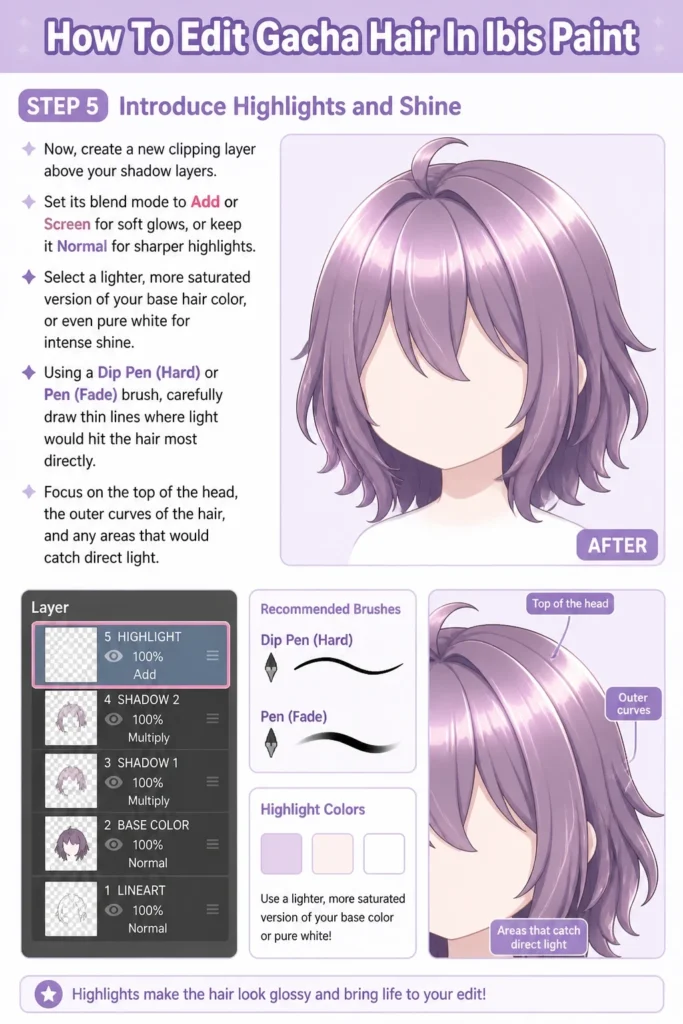
Select a lighter, more saturated version of your base hair color, or even pure white for intense shine.
Using a “Dip Pen (Hard)” or “Pen (Fade)” brush, carefully draw thin lines where light would hit the hair most directly.
Focus on the top of the head, the outer curves of the hair, and any areas that would catch direct light.
Step 6: Refine Details and Add Flyaways
Create another normal clipping layer. This layer is for the intricate details that make hair look realistic.
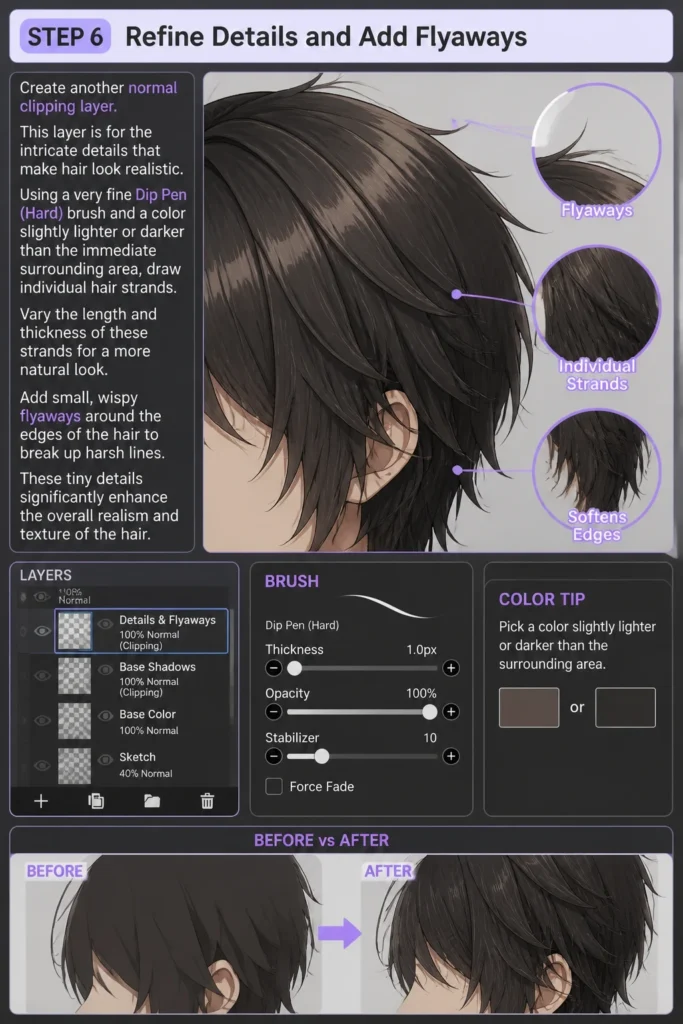
Using a very fine “Dip Pen (Hard)” brush and a color slightly lighter or darker than the immediate surrounding area, draw individual hair strands.
Vary the length and thickness of these strands for a more natural look. Add small, wispy flyaways around the edges of the hair to break up harsh lines.
These tiny details significantly enhance the overall realism and texture of the hair.
Step 7: Blend and Soften for a Natural Look
While sharp details are good, some areas need softening. Select the “Smudge” tool (the finger icon) or the “Blur” tool from the brush menu.
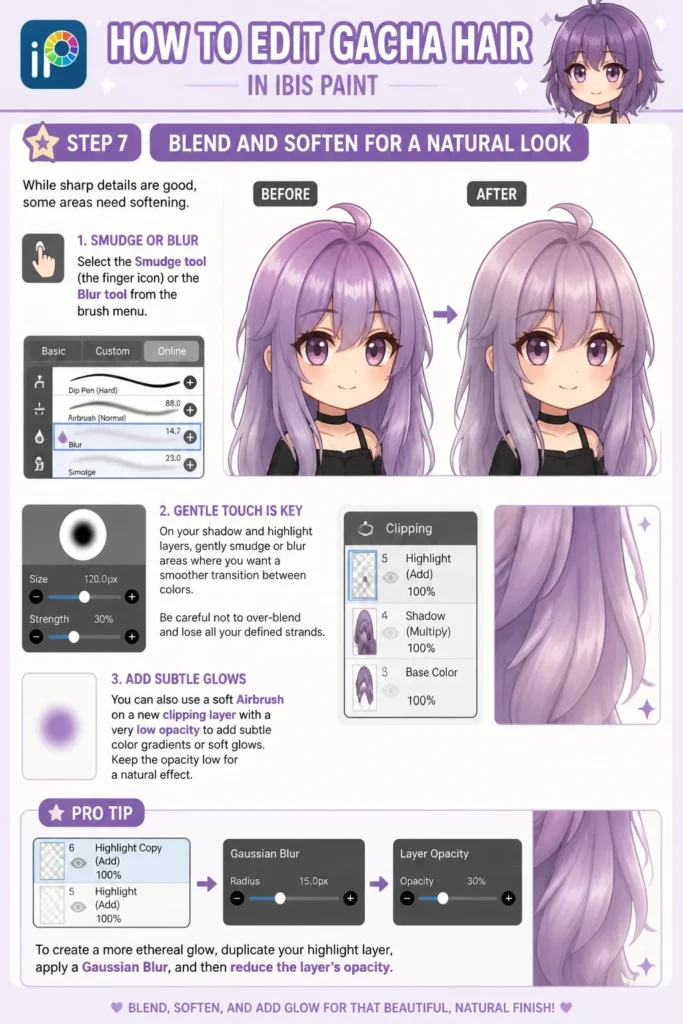
On your shadow and highlight layers, gently smudge or blur areas where you want a smoother transition between colors.
Be careful not to over-blend and lose all your defined strands. A light touch is key here.
You can also use a soft “Airbrush” on a new clipping layer with a very low opacity to add subtle color gradients or soft glows.
Pro Tip: To create a more ethereal glow, duplicate your highlight layer, apply a Gaussian Blur, and then reduce the layer’s opacity.
Step 8: Final Adjustments and Color Correction
Finally, collapse all your hair layers into a single layer by merging them (make sure to save your work beforehand!).
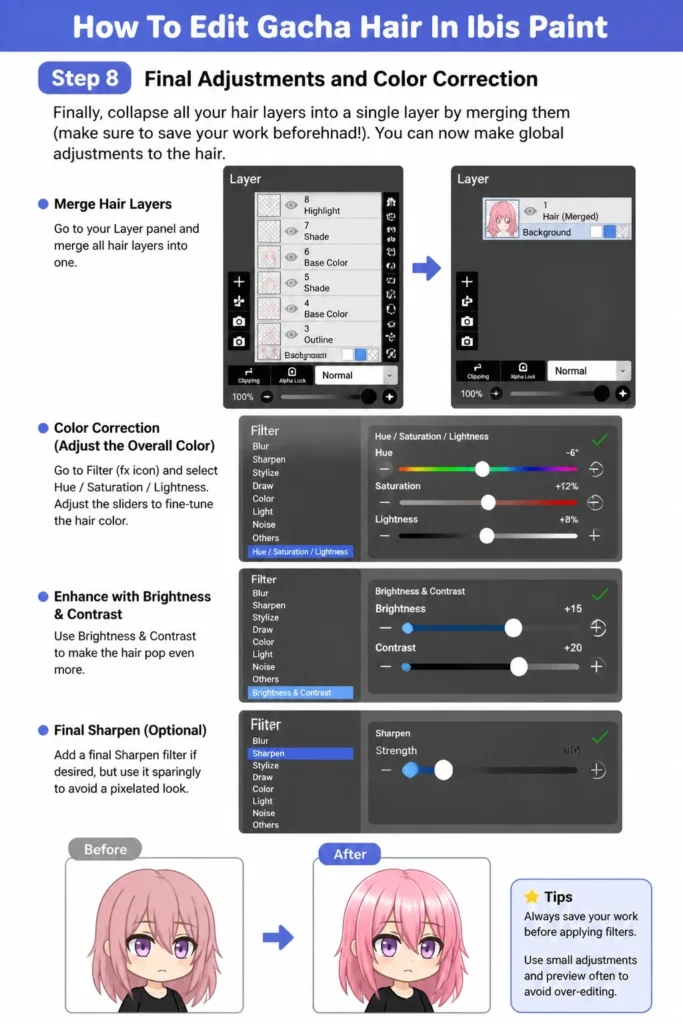
You can now make global adjustments to the hair. Go to “Filter” (the “fx” icon) and experiment with “Hue/Saturation/Lightness” to fine-tune the color.
Use “Brightness & Contrast” to make the hair pop even more.
Add a final “Sharpen” filter if desired, but use it sparingly to avoid a pixelated look.
Common Mistakes to Avoid
Over-Blending
A common pitfall is blending too much, which can make the hair look flat and lose its individual strand definition. While blending is important for smooth transitions, ensure you retain crisp lines for strands and highlights to maintain texture and realism.
Using Too Many Colors
Resist the urge to use every color in the rainbow. Stick to a primary hair color, then choose a few darker shades for shadows and a few lighter shades for highlights within that color family. This creates a cohesive and believable look.
Ignoring Light Source
Failing to consider where your light source is coming from will make your shadows and highlights appear random and unnatural. Always visualize an imaginary light source and apply your shading and lighting consistently with that direction.
Not Using Clipping Layers
Drawing directly onto your base hair layer without using clipping layers can make edits messy and difficult to correct. Clipping layers are essential for non-destructive editing, allowing you to easily adjust colors and effects without affecting the underlying shape.
Troubleshooting
Hair Looks Flat and Lifeless
If your hair lacks depth, you likely need more contrast between your shadows and highlights. Revisit Step 4 and 5. Ensure you’re using distinctly darker shades for shadows and noticeably lighter shades for highlights. Don’t be afraid to push the values further.
Edges of the Hair Look Too Harsh
Harsh edges often occur if you’re not using the blur or smudge tool effectively, or if you’re not adding enough flyaways. Go back to Step 6 and 7. Use a soft eraser or the blur tool around the hair’s perimeter. Add subtle, thin flyaway strands to soften the outline.
Colors Don’t Look Right Together
If your colors clash, check your color palette. Ensure your shadow colors are desaturated and slightly cooler than your base, and your highlight colors are slightly more saturated and warmer. The “Hue/Saturation/Lightness” filter in Step 8 can help you make global adjustments to bring colors into harmony.
Key Takeaways
- Always work with multiple layers, especially clipping layers, for non-destructive editing.
- Mastering blend modes like “Multiply” for shadows and “Add” for highlights is crucial for depth.
- Pay close attention to your light source to apply consistent and realistic shading.
- Vary brush sizes and opacities to create both broad strokes and fine, individual hair strands.
- Don’t over-blend; maintain some crispness for texture and detail.
- Practice makes perfect; experiment with different techniques and colors to find your unique style.
Frequently Asked Questions
Can I edit the hair of an existing Gacha character or do I have to draw new hair from scratch?
You can absolutely edit the existing hair! This guide focuses on enhancing the pre-existing Gacha hair. By isolating the hair area and using clipping layers, you build on top of the original design, adding your own details and shading without starting from zero.
What’s the best brush for drawing individual hair strands?
For fine individual hair strands, the “Dip Pen (Hard)” is highly recommended due to its crisp lines. You can also experiment with “Pen (Fade)” for a slightly softer, tapering effect at the ends of strands.
How do I make the hair look shiny instead of just light?
To achieve a truly shiny look, use a combination of bright, saturated colors for your highlights and a blend mode like “Add” or “Screen” on a separate clipping layer. Adding very thin, almost pure white lines in the brightest areas, often called specular highlights, enhances the illusion of shine.
Is a stylus necessary for good results?
While not strictly necessary, a stylus (like an Apple Pencil or a generic capacitive stylus) significantly improves precision and control, making it much easier to draw fine details, smooth curves, and accurate shadows. You can achieve good results with just your finger, but a stylus will speed up your workflow and enhance accuracy.
Our Top Recommended Finds
- Stylus Pen: A good quality stylus improves precision for fine details and blending, making the editing process much smoother.
- Screen Protector (Matte Finish): Reduces glare and provides a paper-like texture, enhancing the drawing experience and reducing finger fatigue.
- Portable Power Bank: Ibis Paint can be battery-intensive. A power bank ensures your creative flow isn’t interrupted, especially during longer editing sessions.
Unleash Your Inner Hair Stylist
Now that you have these practical steps, it’s time to bring your Gacha characters to life with stunning, detailed hair.
Don’t be afraid to experiment with different colors, styles, and techniques.
The beauty of digital art lies in its endless possibilities, so open Ibis Paint today and start transforming your Gacha hair into a masterpiece!
& Painting
No rigid rules or pretension. Just practical guides, medium comparisons, and encouraging tips to help you enjoy the drawing & painting process.