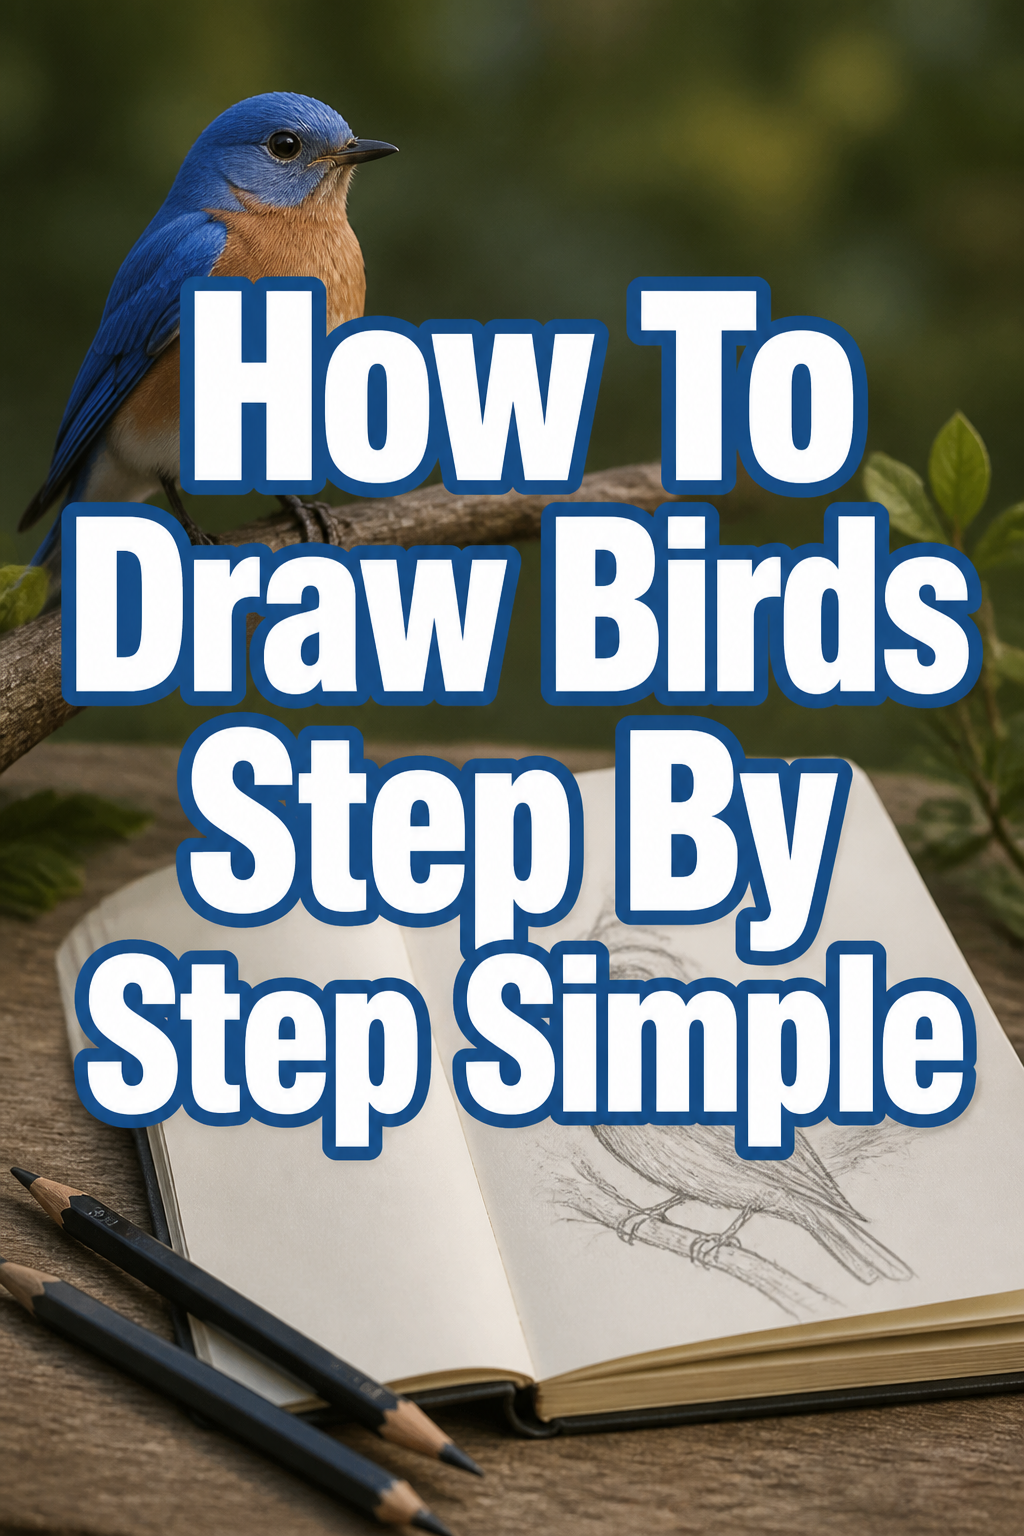
🐦 How To Draw Birds Step By Step Simple

& Painting
No rigid rules or pretension. Just practical guides, medium comparisons, and encouraging tips to help you enjoy the drawing & painting process.
Learning to draw birds can seem daunting at first glance.
I remember feeling intimidated by their delicate features and unique structures.
This guide will break down the process into easy, manageable steps, drawing from years of my own sketching experience to help you find your artistic wings.
Quick Overview
This guide will equip you with the fundamental skills to sketch charming birds.
You’ll learn to see birds in basic shapes, building up detail confidently.
- Time needed: 30-60 minutes per bird sketch
- Difficulty: Beginner
- What you’ll need: Pencil (HB or 2B recommended), paper, eraser, optional bird reference photos
Step-by-Step Instructions
Step 1: Start with Basic Shapes
Every bird begins with simple forms. Think of the bird’s body as two main circles or ovals.
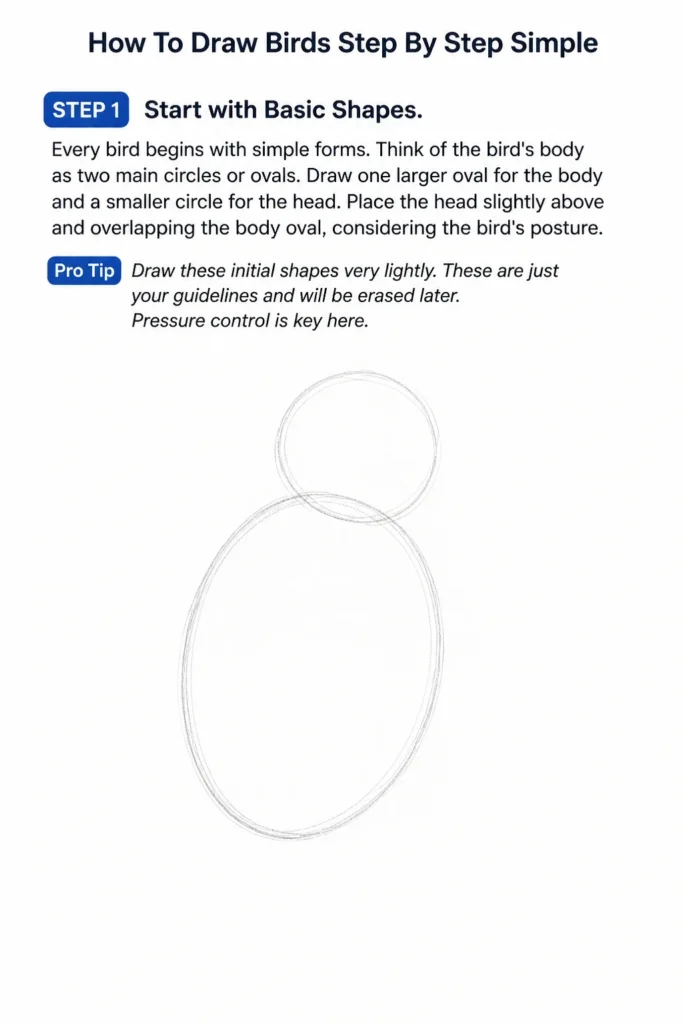
Draw one larger oval for the body and a smaller circle for the head.
Place the head slightly above and overlapping the body oval, considering the bird’s posture.
Pro Tip: Draw these initial shapes very lightly. These are just your guidelines and will be erased later. Pressure control is key here.
Step 2: Connect the Shapes and Add the Neck
Now, gently connect the head and body shapes with two curved lines to form the neck.
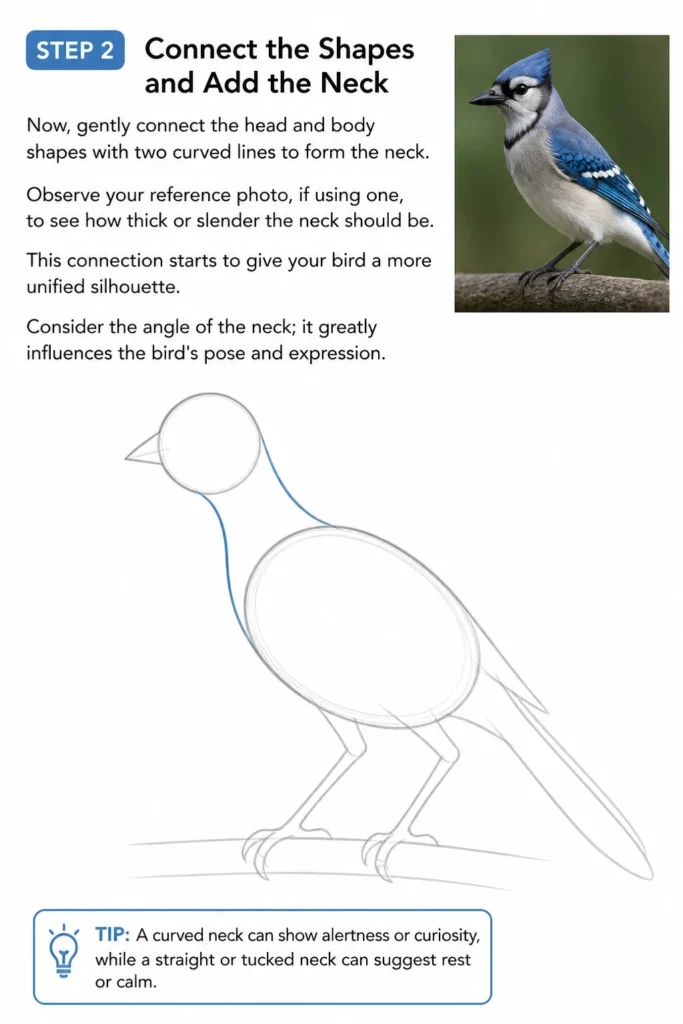
Observe your reference photo, if using one, to see how thick or slender the neck should be.
This connection starts to give your bird a more unified silhouette.
Consider the angle of the neck; it greatly influences the bird’s pose and expression.
Step 3: Sketch the Tail and Wings
From the back of the body oval, lightly sketch the shape of the tail.
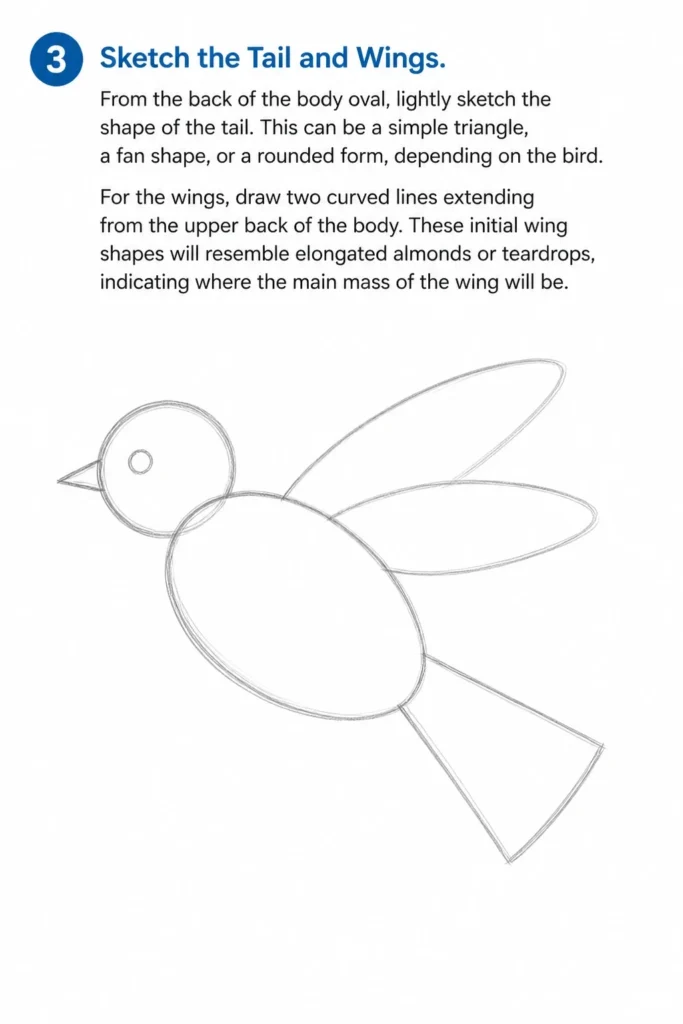
This can be a simple triangle, a fan shape, or a rounded form, depending on the bird.
For the wings, draw two curved lines extending from the upper back of the body.
These initial wing shapes will resemble elongated almonds or teardrops, indicating where the main mass of the wing will be.
Step 4: Define the Beak and Eye
On the head circle, place a small dot for the eye. Position it carefully, as it’s crucial for expression.
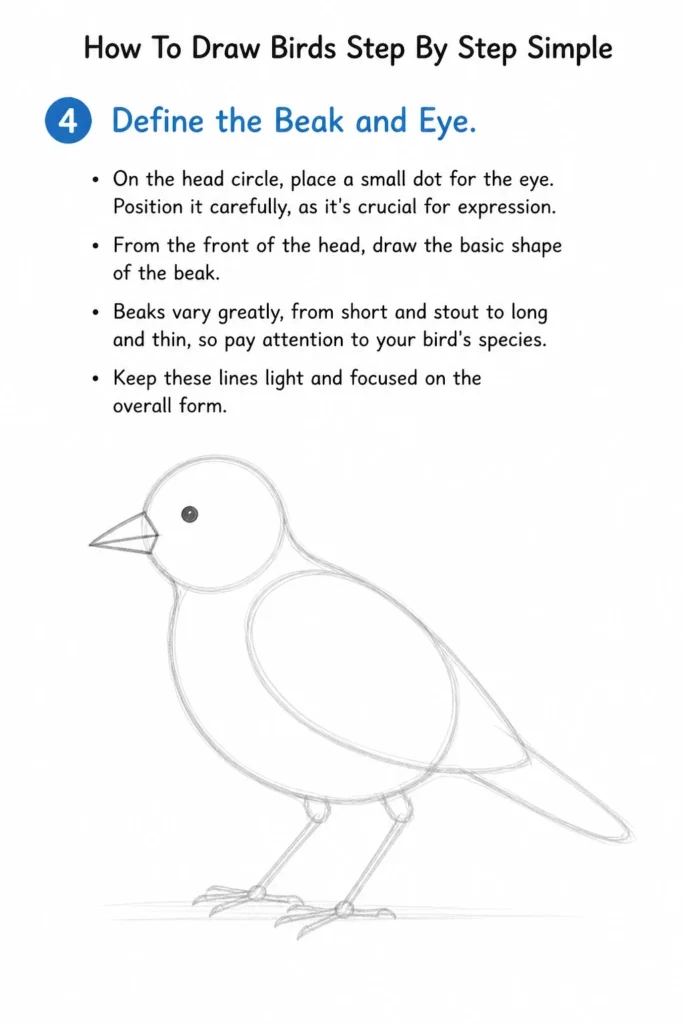
From the front of the head, draw the basic shape of the beak.
Beaks vary greatly, from short and stout to long and thin, so pay attention to your bird’s species.
Keep these lines light and focused on the overall form.
Step 5: Add Legs and Feet
Extend two simple lines from the bottom of the body oval for the legs.
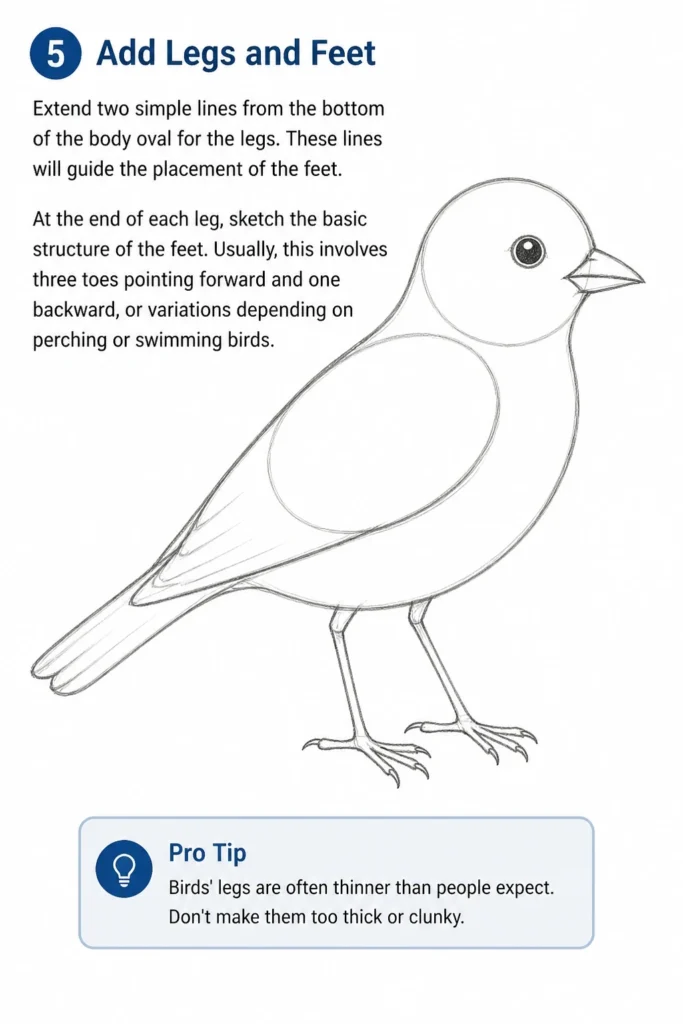
These lines will guide the placement of the feet.
At the end of each leg, sketch the basic structure of the feet.
Usually, this involves three toes pointing forward and one backward, or variations depending on perching or swimming birds.
Pro Tip: Birds’ legs are often thinner than people expect. Don’t make them too thick or clunky.
Step 6: Refine the Outline and Erase Guidelines
Now, gently go over your light sketch, drawing a more confident and continuous outline.
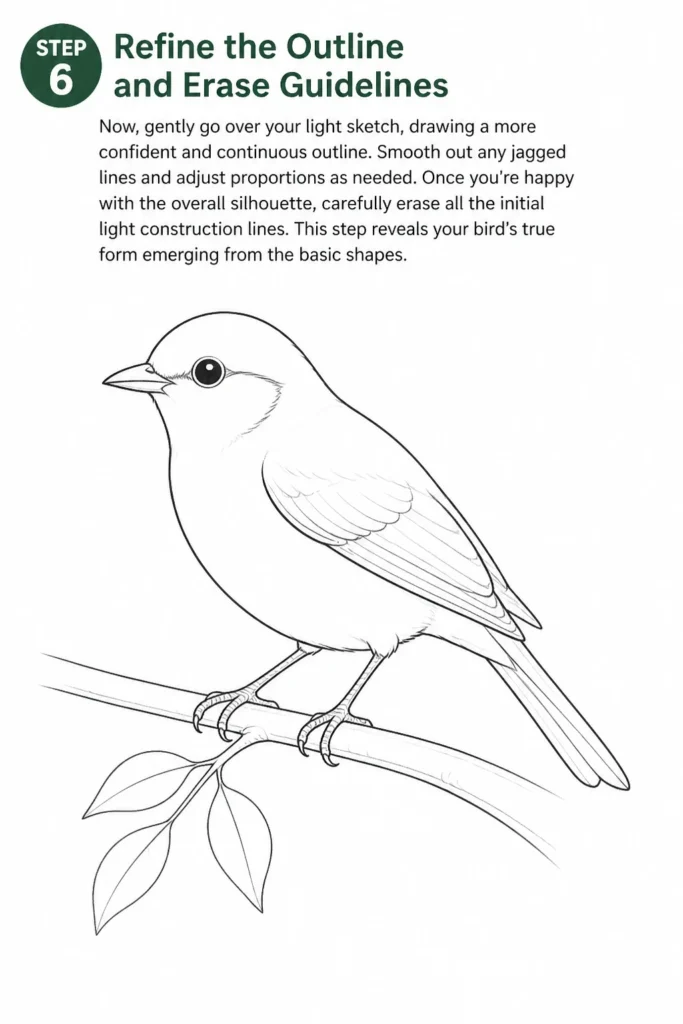
Smooth out any jagged lines and adjust proportions as needed.
Once you’re happy with the overall silhouette, carefully erase all the initial light construction lines.
This step reveals your bird’s true form emerging from the basic shapes.
Step 7: Introduce Feather Details
Start adding a few key feather details, especially on the wings and tail.
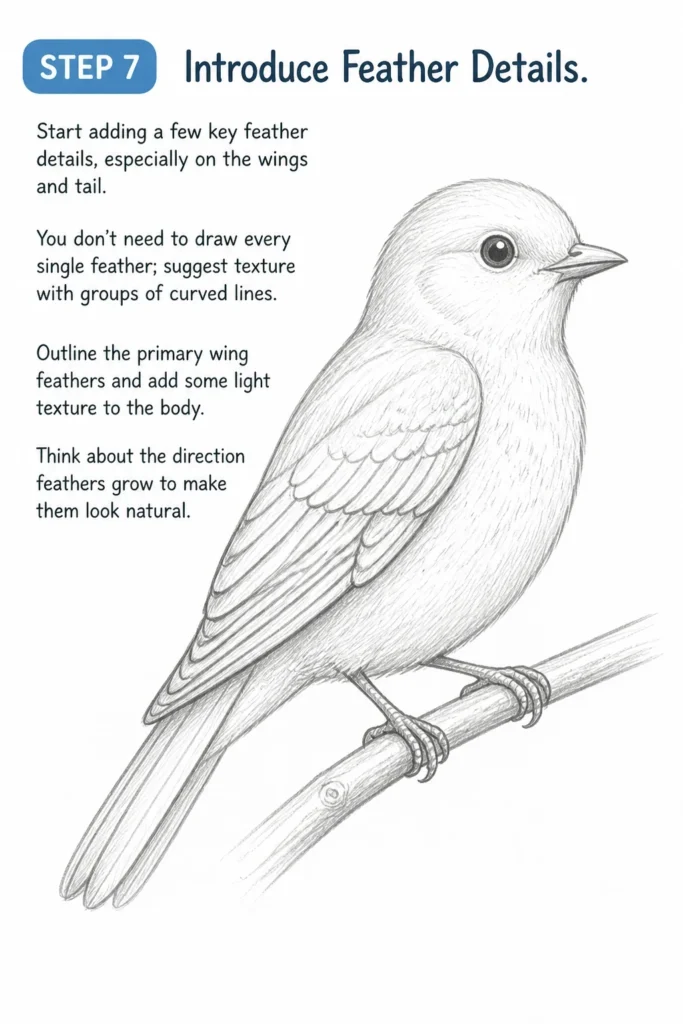
You don’t need to draw every single feather; suggest texture with groups of curved lines.
Outline the primary wing feathers and add some light texture to the body.
Think about the direction feathers grow to make them look natural.
Step 8: Add Facial Details and Shading
Darken the eye and add a small highlight to make it look alive.
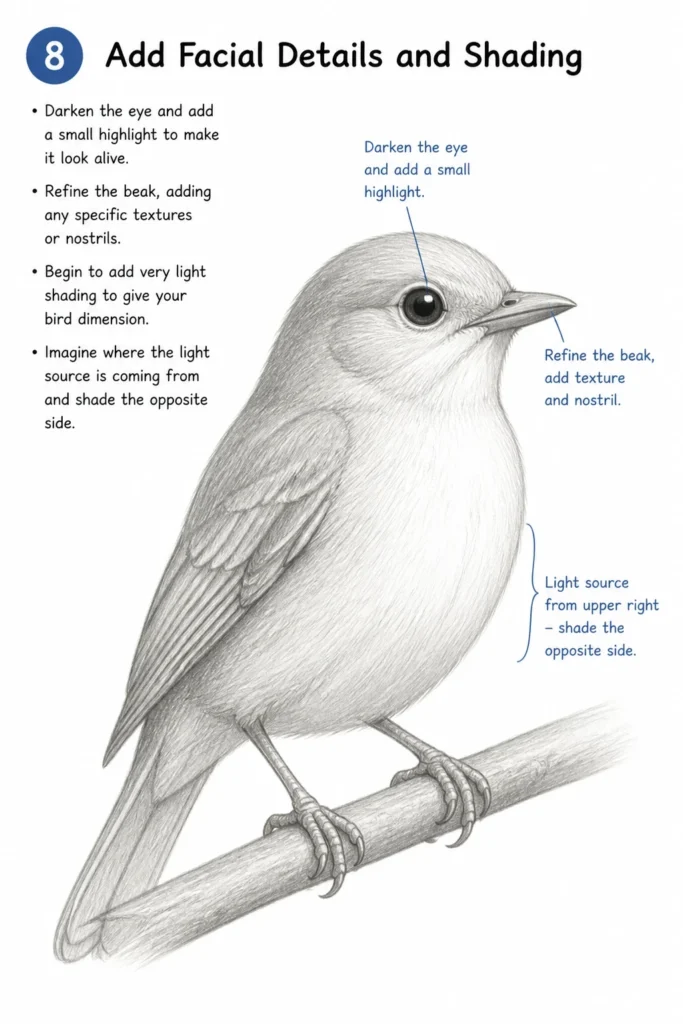
Refine the beak, adding any specific textures or nostrils.
Begin to add very light shading to give your bird dimension.
Imagine where the light source is coming from and shade the opposite side.
Step 9: Final Touches and Texture
Look at your drawing critically. Are there any areas that need more definition?
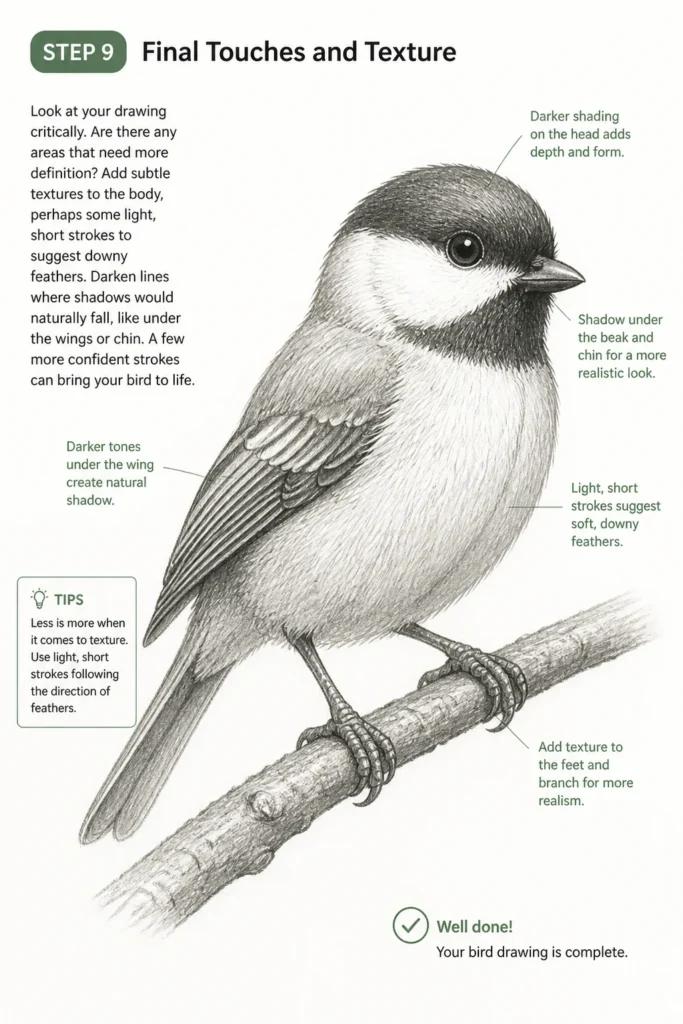
Add subtle textures to the body, perhaps some light, short strokes to suggest downy feathers.
Darken lines where shadows would naturally fall, like under the wings or chin.
A few more confident strokes can bring your bird to life.
Common Mistakes to Avoid
Making Birds Too Stiff or Symmetrical
Many beginners draw birds with very straight lines and perfectly symmetrical features.
This often results in a rigid, lifeless bird that lacks natural movement.
Instead, embrace curves and slight asymmetry; birds are dynamic creatures, even when still.
Slight tilts of the head or varied wing angles add immense character.
Ignoring Basic Shapes and Proportions
Jumping straight into details like feathers or eyes without establishing the underlying structure is a common pitfall.
This leads to disproportionate features and an overall awkward appearance.
Always start with those simple circles and ovals to get the size relationships right before adding anything else.
The foundation is everything in drawing.
Over-Detailing Too Early
It’s tempting to want to draw every single feather right away.
However, this can quickly overwhelm the drawing and make it look busy and messy.
Focus on the larger forms and major feather groups first, then suggest texture with minimal lines.
Less is often more when it comes to feather details.
Not Using Reference Photos
Drawing from memory is challenging, especially for complex subjects like birds.
Neglecting reference photos means you’re guessing at anatomy and posture.
Always use good quality reference images to understand proportions, feather patterns, and specific characteristics of the bird you’re drawing.
Even experienced artists rely on references.
Troubleshooting
My Bird Looks Flat and Lifeless
If your bird lacks depth, it’s likely due to insufficient shading or a lack of varied line weight.
Introduce subtle shadows under the wings, along the belly, and beneath the beak to create dimension.
Use slightly darker lines for areas closer to the viewer or in shadow, and lighter lines for highlights.
This contrast helps the bird pop off the page.
Proportions Seem Off, Head Too Big/Small
This usually points back to the initial basic shapes.
The head-to-body ratio is critical and needs to be established accurately from the start.
Go back to Step 1 and redraw your initial circles and ovals, paying close attention to their relative sizes.
Compare them carefully to your reference photo.
I Can’t Get the Feathers to Look Natural
Drawing individual feathers can be tedious and often looks unnatural.
Instead, focus on feather groups and the overall flow of the plumage.
Use short, overlapping curved strokes that follow the contour of the bird’s body, rather than drawing sharp, distinct lines.
Suggest texture rather than precisely defining every single feather.
Key Takeaways
- Start Simple: Always begin with basic geometric shapes for the head and body.
- Build Up Gradually: Add details incrementally, from connecting lines to features, then feathers.
- Use Light Lines: Keep your initial sketch lines very light for easy erasing and adjustments.
- Observe Your Subject: Pay close attention to reference photos for accurate proportions and unique characteristics.
- Embrace Shading: Even simple shading adds immense depth and makes your bird look three-dimensional.
- Practice Consistently: The more you draw, the better your eye and hand coordination will become.
Frequently Asked Questions
What kind of pencil is best for drawing birds?
An HB or 2B graphite pencil is ideal for beginners. HB offers a good balance of hardness for light sketching and darkness for outlines, while 2B is slightly softer, allowing for darker lines and easier shading.
How do I make my birds look unique instead of generic?
The key is specific observation. Pay close attention to the unique beak shape, eye placement, feather patterns, and posture of the particular bird species you’re drawing.
Reference photos of different birds are invaluable for capturing these individual traits.
How often should I practice drawing?
Consistency is more important than duration. Even 15-30 minutes of drawing a few times a week is more beneficial than one long session once a month.
Regular practice helps build muscle memory and sharpens your observational skills.
Is it okay to trace when I’m just starting?
Tracing can be a useful tool for understanding proportions and shapes, especially when you’re just beginning.
However, don’t rely on it exclusively. Use tracing as a stepping stone to build confidence, then try freehand sketching as much as possible.
Our Top Recommended Finds
- Sketchbook with Smooth Paper: A good quality paper reduces friction and allows for smoother pencil strokes, making the drawing process more enjoyable.
- Graphite Pencil Set (HB, 2B, 4B, 6B): Having a range of lead hardness allows you to achieve varied line weights and a broader spectrum of shading.
- Kneaded Eraser: Unlike a regular eraser, a kneaded eraser can be molded to lift graphite gently without smudging or damaging the paper, perfect for subtle corrections.
Your Artistic Flight Path Continues
You’ve taken the first exciting steps into the world of drawing birds.
Remember that every stroke is a learning opportunity, and every bird you draw helps refine your skills.
Don’t be afraid to experiment with different bird species, poses, and even add a splash of color if you feel inspired.
Grab your pencil and paper today, and let your creativity take flight.
& Painting
No rigid rules or pretension. Just practical guides, medium comparisons, and encouraging tips to help you enjoy the drawing & painting process.