🌟 How To Make A Skin Color With Paint

& Painting
No rigid rules or pretension. Just practical guides, medium comparisons, and encouraging tips to help you enjoy the drawing & painting process.
Mixing realistic skin tones is one of the most rewarding challenges for any artist.
I spent years struggling with “flesh” colored tubes that looked like plastic before I learned the secret of the primary palette.
This guide will show you how to create every human complexion using just a few basic colors and a bit of patience.

Quick Overview
Before you start mixing, it helps to know what you are getting into and what tools you need to have ready on your palette.
- Time needed: 20 to 40 minutes for practice mixing
- Difficulty: Intermediate
- What you’ll need: Red, yellow, blue, and white paint, a palette knife, a mixing surface, and a scrap of paper for testing.
Step-by-Step Instructions
Step 1: Select Your Primary Pigments
Choose your red, yellow, and blue paints carefully because the specific hue of your primaries changes the final result.
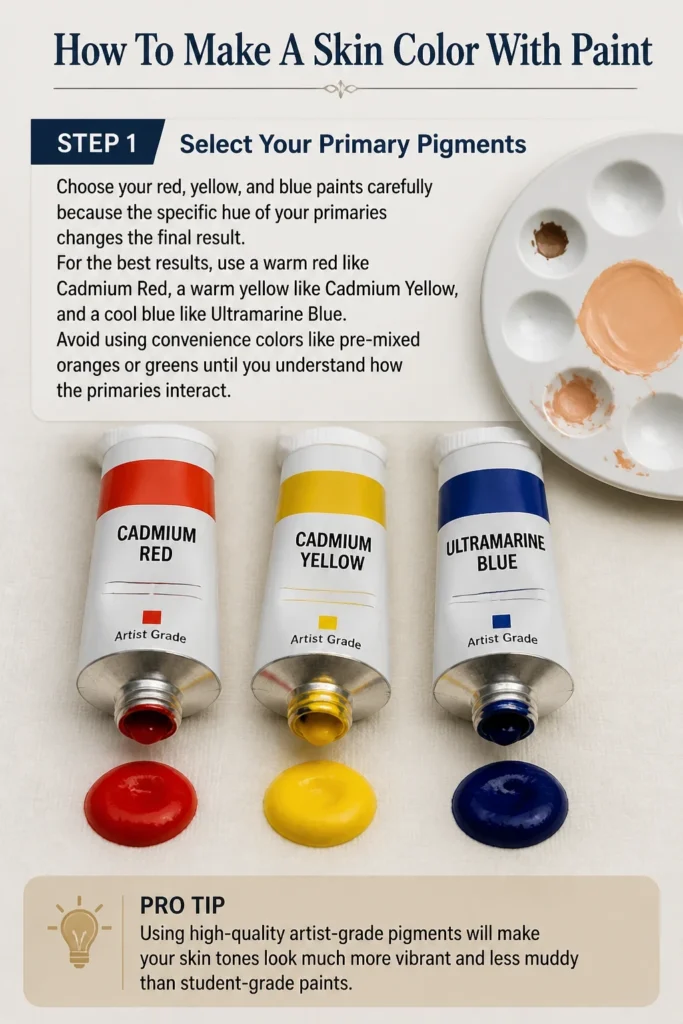
For the best results, use a warm red like Cadmium Red, a warm yellow like Cadmium Yellow, and a cool blue like Ultramarine Blue.
Avoid using “convenience” colors like pre-mixed oranges or greens until you understand how the primaries interact.
Pro Tip: Using high-quality artist-grade pigments will make your skin tones look much more vibrant and less “muddy” than student-grade paints.
Step 2: Create a Base Orange
Combine equal parts of red and yellow on your palette to create a vibrant orange base.
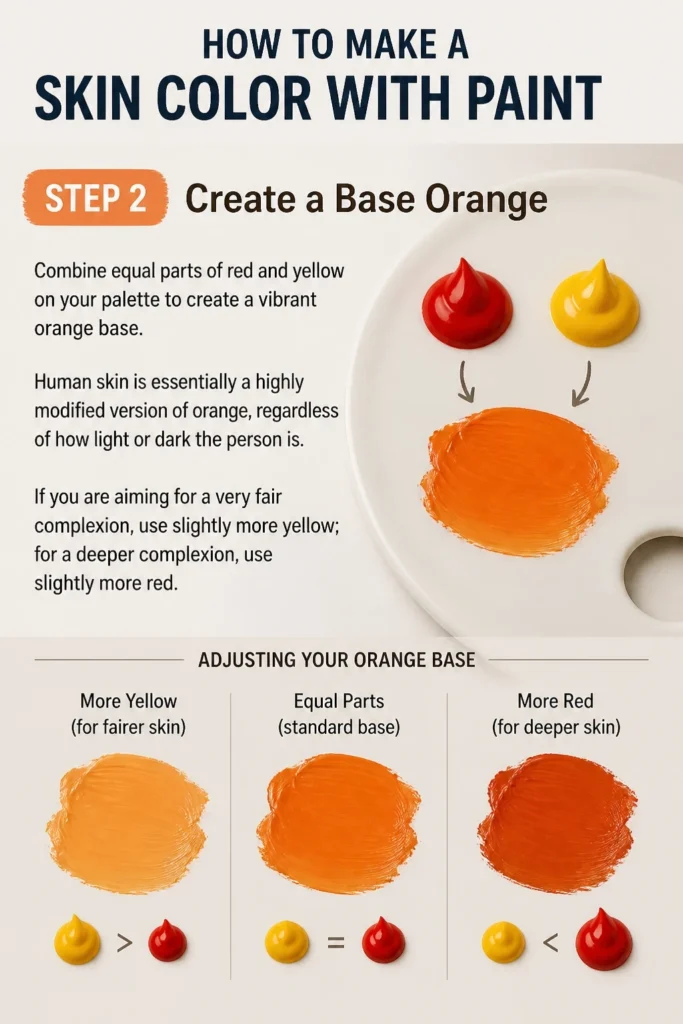
Human skin is essentially a highly modified version of orange, regardless of how light or dark the person is.
If you are aiming for a very fair complexion, use slightly more yellow; for a deeper complexion, use slightly more red.
Step 3: Neutralize the Vibrancy
Add a very small amount of blue to your orange mixture to tone down the intensity.
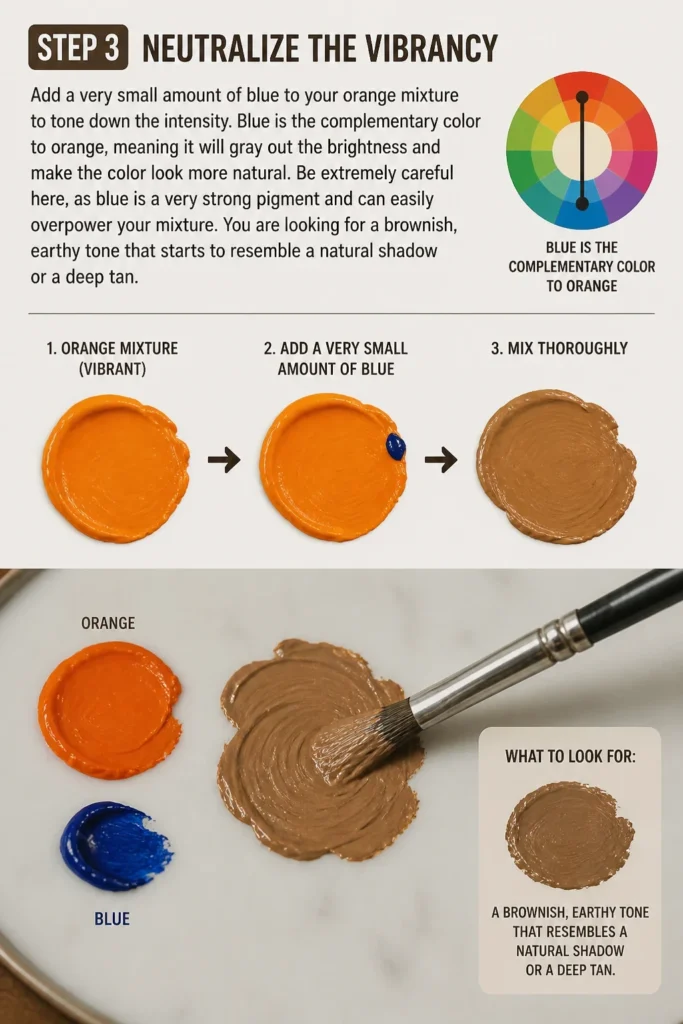
Blue is the complementary color to orange, meaning it will “gray out” the brightness and make the color look more natural.
Be extremely careful here, as blue is a very strong pigment and can easily overpower your mixture.
You are looking for a brownish, earthy tone that starts to resemble a natural shadow or a deep tan.
Step 4: Adjust the Value with White
Scoop a small amount of your neutralized brown to the side and add white paint to it.
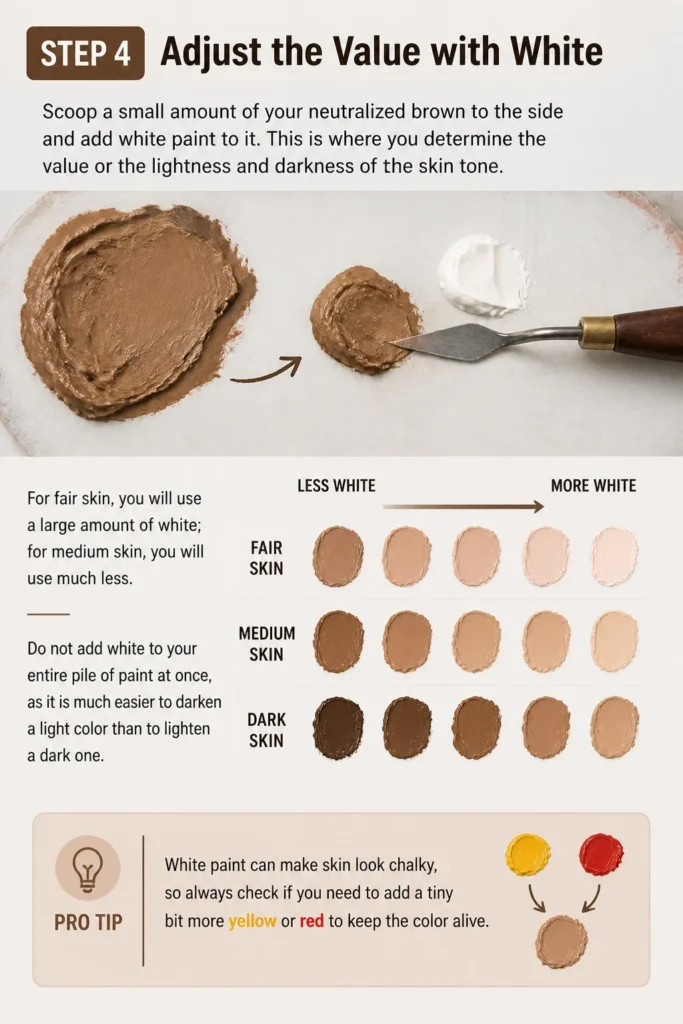
This is where you determine the “value” or the lightness and darkness of the skin tone.
For fair skin, you will use a large amount of white; for medium skin, you will use much less.
Do not add white to your entire pile of paint at once, as it is much easier to darken a light color than to lighten a dark one.
Pro Tip: White paint can make skin look “chalky,” so always check if you need to add a tiny bit more yellow or red to keep the color “alive.”
Step 5: Identify and Add Undertones
Analyze the specific skin tone you are trying to match to see if it leans toward pink, yellow, or olive.
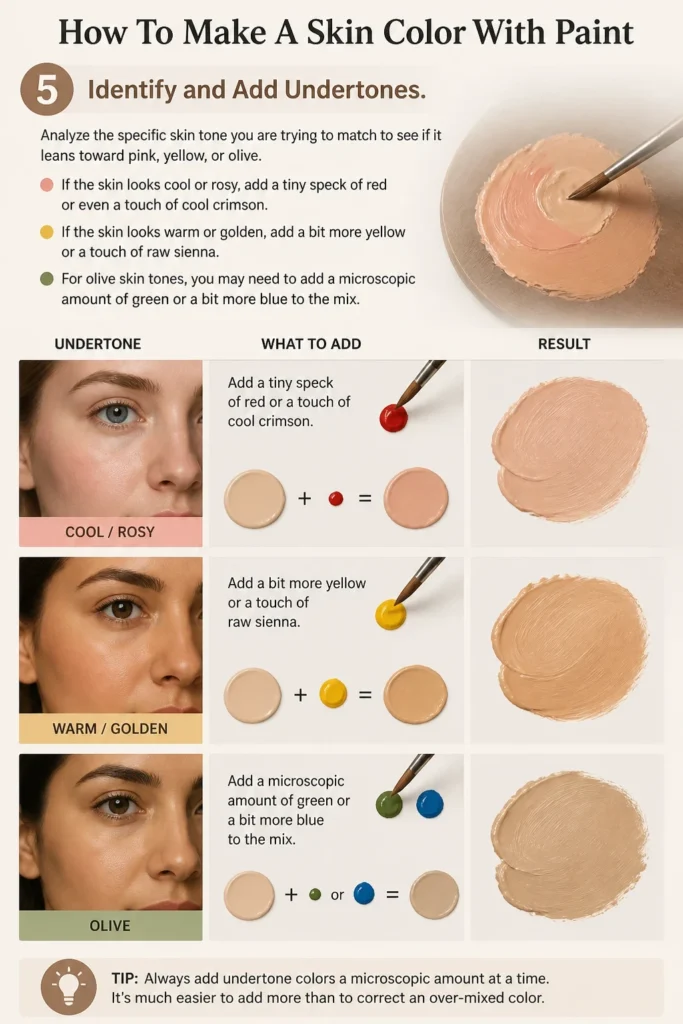
If the skin looks “cool” or rosy, add a tiny speck of red or even a touch of cool crimson.
If the skin looks “warm” or golden, add a bit more yellow or a touch of raw sienna.
For olive skin tones, you may need to add a microscopic amount of green or a bit more blue to the mix.
Step 6: Mix for Shadows and Highlights
Create variations of your base skin tone by shifting the ratios of your original colors.
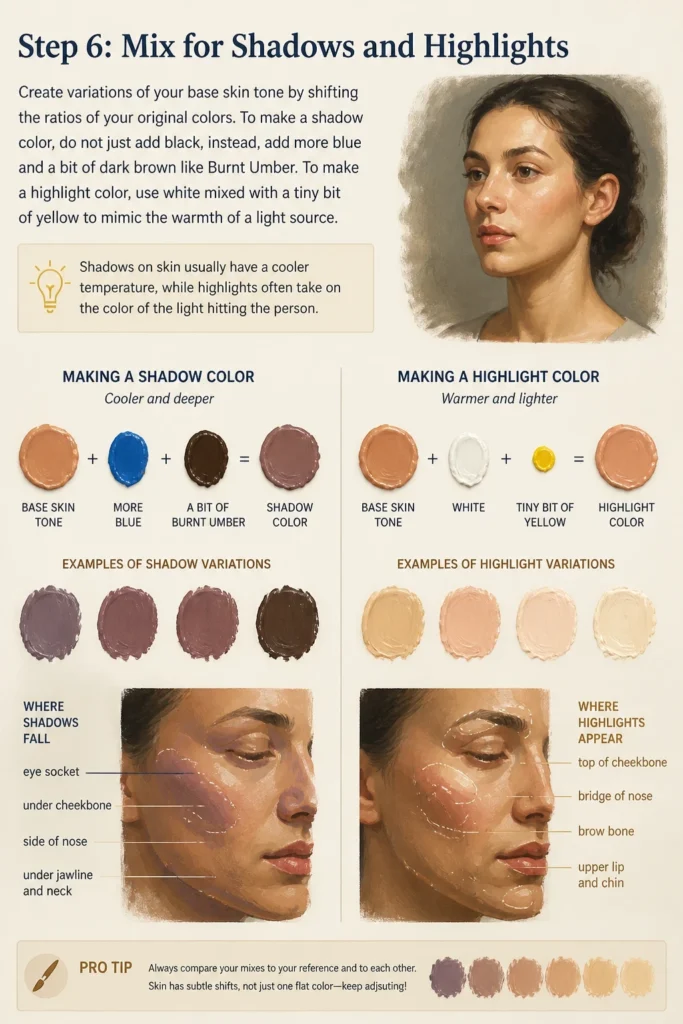
To make a shadow color, do not just add black; instead, add more blue and a bit of dark brown like Burnt Umber.
To make a highlight color, use white mixed with a tiny bit of yellow to mimic the warmth of a light source.
Shadows on skin usually have a cooler temperature, while highlights often take on the color of the light hitting the person.
Step 7: Test Against Your Subject
Apply a small stroke of the paint to a piece of paper and let it dry slightly.
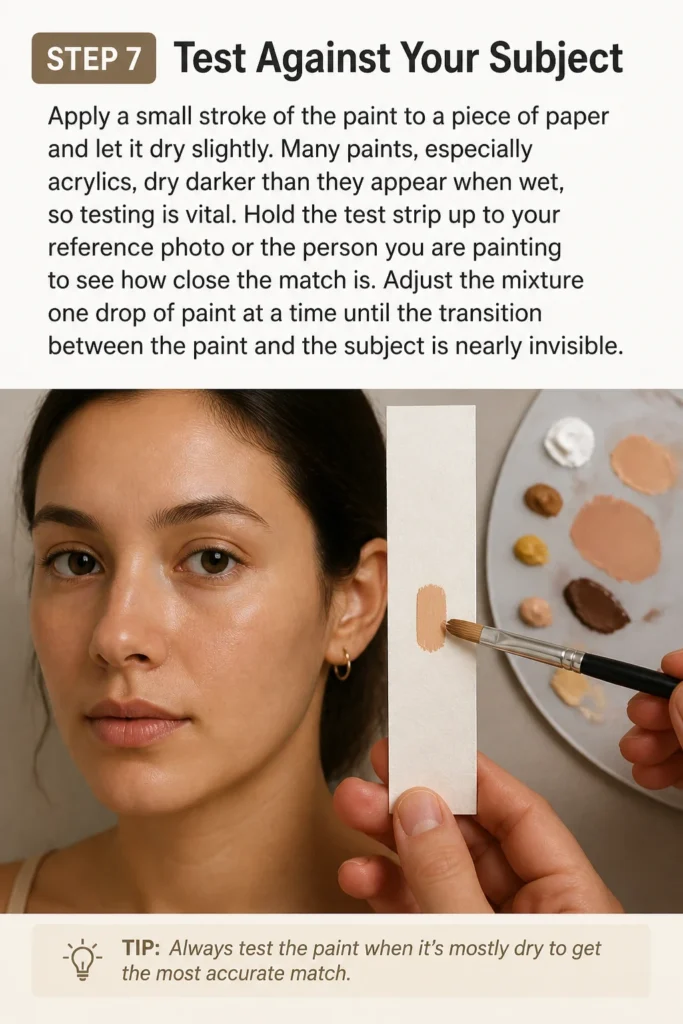
Many paints, especially acrylics, dry darker than they appear when wet, so testing is vital.
Hold the test strip up to your reference photo or the person you are painting to see how close the match is.
Adjust the mixture one drop of paint at a time until the transition between the paint and the subject is nearly invisible.
Common Mistakes to Avoid
Relying on Pre-Mixed “Flesh” Tones
Many paint brands sell tubes labeled “Flesh” or “Skin Tone,” but these are rarely accurate for real people.
These colors often look flat and synthetic because they lack the complex layers of color found in human skin.
It is much better to mix your own colors from primaries to achieve the depth and translucency that makes skin look real.
Using Straight Black for Shadows
Using black paint to darken skin tones is a very common mistake that often results in a “dirty” or “dead” appearance.
Black paint tends to suck the life out of skin colors and makes them look bruised or gray.
Instead, use a combination of dark blues, purples, or deep browns to create shadows that feel rich and dimensional.
Ignoring the Environment
Skin is reflective and will pick up colors from the surrounding environment, such as a blue shirt or a green wall.
If you paint a person’s skin using only “skin colors” without considering the light around them, the figure will look like a cutout.
Always look for “bounced light” where colors from the background subtly bleed into the shadows of the skin.
Troubleshooting
The Skin Looks Too Chalky
This usually happens when you use too much white paint to lighten the tone.
To fix this, add a very small amount of warm yellow or red to bring the “blood flow” back into the color.
You can also try using a “transparent” mixing white instead of a heavy titanium white for a more natural glow.
The Color Looks Like Mud
Muddy colors occur when you mix too many different pigments together or use colors that are too far apart on the color wheel.
If your mixture looks gray or brown in a way that feels “dirty,” it is often best to scrape the palette and start fresh.
Try to stick to a limited palette of three or four colors to keep the mixtures clean and vibrant.
The Skin Looks Too Orange or Yellow
This is a sign that the mixture is too warm and needs to be neutralized with a cool color.
Add a tiny amount of blue or a very pale violet to counteract the orange tones.
Remember that the goal is a “muted” orange, not a “bright” orange, so the neutralizing step is the most important part.
Key Takeaways
- Start with primaries: You can mix any skin tone using red, yellow, blue, and white.
- Orange is the base: Every human skin tone is a variation of a neutralized orange.
- Value over color: Getting the lightness or darkness right is more important than the exact hue.
- Avoid black: Use blues and browns for shadows to keep the skin looking vibrant and alive.
- Test while dry: Always account for the “dry-down” effect where paint changes color as it loses moisture.
- Observe undertones: Look for the subtle greens, blues, and pinks beneath the surface of the skin.
Frequently Asked Questions
Can I make skin color without blue paint?
While you can use a dark brown like Burnt Umber to neutralize orange, blue provides a specific coolness that is hard to replicate.
Blue is essential for creating the “vein” colors and cool shadows that make skin look three-dimensional.
If you don’t have blue, you can try a very cool green, but the results may look slightly more sallow or earthy.
What is the difference between mixing for oil and acrylic?
Oil paints stay wet longer, allowing you to blend skin tones directly on the canvas for smooth transitions.
Acrylics dry very fast, so you often have to mix several “steps” of the skin tone on your palette beforehand.
Additionally, acrylics have a more significant color shift when drying, so you must be more diligent with testing your colors.
How do I make very dark skin tones?
For deep complexions, start with a base of Burnt Sienna or Burnt Umber rather than starting with white.
Add small amounts of Ultramarine Blue and Alizarin Crimson to create a rich, dark base with purple undertones.
Use very little white, and instead use yellows or light ochres to create the highlights on the skin’s surface.
How do I paint the “glow” of skin?
The “glow” often comes from “subsurface scattering,” where light enters the skin and bounces back out through the red of the blood vessels.
To replicate this, add a slightly more saturated red or orange to the “terminator” line where the light meets the shadow.
This small strip of warm color makes the skin look soft and translucent rather than hard like stone.
Our Top Recommended Finds
- Stay-Wet Palette: This tool keeps your acrylic skin mixtures moist for hours or even days, preventing you from having to re-mix constantly.
- Stainless Steel Palette Knife: A good knife allows you to mix colors thoroughly without wasting paint or ruining your brushes.
- Gray Toned Paper: Testing your skin tones on a neutral gray surface helps you judge the values more accurately than testing on stark white paper.
Mastering The Art Of Human Tones
The best way to get better at mixing skin tones is to practice creating “color strings” on your palette.
Try mixing a gradient from the lightest highlight to the deepest shadow using only your primary colors.
Once you feel comfortable with the basics, try painting a small study of your own hand in different lighting conditions.
Grab your brushes today and see how many different complexions you can create with just a few tubes of paint.
& Painting
No rigid rules or pretension. Just practical guides, medium comparisons, and encouraging tips to help you enjoy the drawing & painting process.