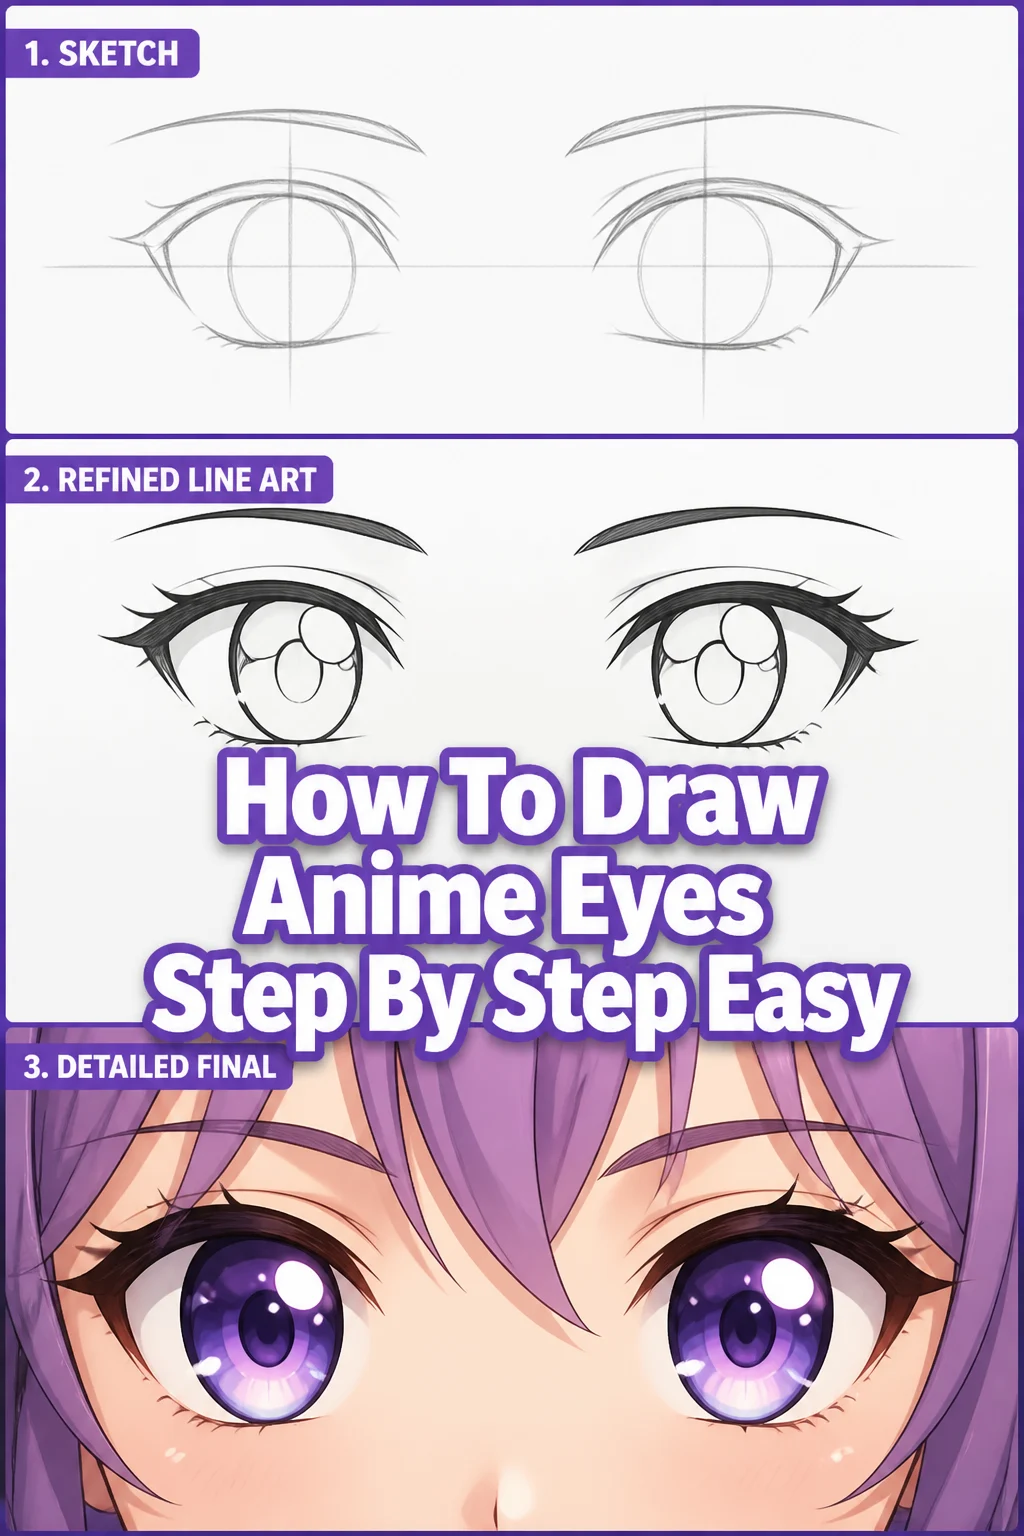
✨ How To Draw Anime Eyes Step By Step Easy
I remember my first attempts at drawing anime eyes. They often looked lopsided or lacked that signature sparkle. This guide is built from years of practice and understanding what truly makes anime eyes pop.
You’ll learn the simple tricks and techniques that artists use to create expressive, captivating eyes every time. Let’s bring your characters to life with stunning anime eyes.
Quick Overview
This guide will walk you through the process of drawing various anime eye styles, focusing on simplicity and expressiveness. You’ll gain the foundational skills to sketch, refine, and add emotion to your character’s gaze. By the end, you’ll have a solid understanding of shape, proportion, and detail.
- Time needed: 30-60 minutes for the first attempt, less with practice.
- Difficulty: Beginner
- What you’ll need: Pencil, eraser, paper, optional fine-liner pen, colored pencils or markers.
Step-by-Step Instructions
Step 1: Sketch the Basic Shape
Begin by lightly sketching the overall shape of the eye. Think of a slightly flattened oval or an almond shape for a common anime style. This initial outline defines the general dimensions and angle of the eye.
Draw a curved line for the upper eyelid. It often starts thin, thickens in the middle, and tapers off at the end.
Add a shorter, less curved line beneath it for the lower eyelid. This line usually stays thinner.
Pro Tip: Use very light pencil strokes. These are just guidelines, and you’ll refine them later. Heavy lines are hard to erase cleanly.
Step 2: Position the Iris and Pupil
The iris and pupil are central to the eye’s expression. Their placement dictates where your character is looking. Make sure they are proportionate to the overall eye shape.
Sketch a large circle within the eye shape for the iris. It often overlaps the upper eyelid, making it appear partially hidden.
Draw a smaller, solid black circle in the center of the iris for the pupil. This is the darkest part of the eye.
Consider your character’s gaze. If looking forward, the iris is centered. If looking to the side, shift the iris and pupil accordingly.
Step 3: Add Light Reflectors (Highlights)
Highlights are crucial for giving anime eyes their characteristic sparkle and life. They suggest light reflecting off a moist surface. There are many ways to add highlights, but a few common patterns work well.
Draw one or two prominent white shapes within the iris and pupil area. A large, rounded rectangle or oval in the upper corner is common.
Include a smaller, secondary highlight, perhaps a tiny circle or dot, in a different part of the iris. This adds depth.
Ensure these highlights remain perfectly white. These are areas you will not shade.
Pro Tip: Highlights should ideally be on the same side for both eyes if you’re drawing a pair, indicating a single light source.
Step 4: Define the Eyelashes and Eyelids
Eyelashes frame the eye and add character. The thickness and style of lashes can differentiate male and female characters, or even specific personalities. Eyelids add dimension.
Draw a line slightly above the upper eyelid line to indicate the crease of the eyelid. This gives the eye depth.
Sketch eyelashes originating from the upper eyelid line. For female eyes, they are often long, thick, and fan out.
Add a few subtle, shorter lashes to the lower eyelid. These are usually less prominent than the upper ones.
Vary the length and curve of the lashes to create a more natural, dynamic look.
Step 5: Begin Shading the Iris
Shading gives the iris depth and color. Anime eyes often feature a gradient, making them appear luminous. Start with a base color and build up from there.
Apply a light base color or shade to the entire iris, avoiding the highlights.
Darken the upper part of the iris, just beneath the upper eyelid. This creates a shadow cast by the lid.
Blend this darker shade downwards, creating a soft gradient towards the bottom of the iris.
Add a few radiating lines or a darker ring around the pupil to enhance detail.
Step 6: Refine Shading and Add Details
Now it’s time to bring out the details and make the eyes truly expressive. This step involves darkening key areas and adding subtle touches.
Darken the outline of the eye, particularly the upper eyelid and the pupil. Use a fine-liner or a darker pencil.
Intensify the shading around the pupil and the top of the iris. This contrast makes the highlights stand out.
Consider adding a subtle reflective glow at the very bottom edge of the iris, a lighter band just above the lower lid.
Clean up any stray lines with your eraser, making sure the edges are crisp.
Step 7: Final Touches and Expression
The final step is about adding personality. Small adjustments can drastically change the mood and expression of your character.
Add subtle eyebrows above the eyes. Their shape and angle greatly influence emotion.
Consider adding a blush or a teardrop for specific emotional impact.
Review the overall balance of the eye. Does it look natural and expressive? Adjust any areas that feel off.
Practice different highlight patterns and iris details to develop your own unique style.
Common Mistakes to Avoid
Making the Eyes Too Flat
Many beginners draw the iris and pupil as simple flat circles. This makes the eyes look lifeless and two-dimensional. Remember that the eye is a sphere, so the iris should appear to wrap around it.
Instead, draw the iris as a circle that is often partially obscured by the eyelids. This immediately gives it depth. Shading with a gradient also helps suggest its spherical form, avoiding a flat, cutout look.
Inconsistent Highlights
Placing highlights randomly or having them in different positions on each eye can break the illusion of a single light source. This makes the eyes look unnatural or even cross-eyed. Always think about where the light is coming from.
Ensure all highlights, both large and small, are consistently placed on the same side of both eyes. This creates a cohesive and believable lighting effect. Consistency makes the eyes feel connected to the environment.
Overly Thick or Sparse Eyelashes
Eyelashes are important, but their thickness and density need to suit the character. Too many or too few can make the eye look unnatural or disproportionate. Often, beginners draw every single lash.
Focus on creating a few distinct clusters of lashes rather than individual hairs. For female characters, a thicker, fanned-out cluster works well. For male characters, a few subtle, short lashes are usually sufficient.
Lack of Contrast
Eyes without enough contrast between light and dark areas tend to look dull and uninteresting. The sparkle of anime eyes comes from the sharp distinction between the darkest shadows and the brightest highlights.
Make sure the pupil is truly black and that the highlights are pure white. Darken the area under the upper eyelid significantly. This strong contrast is what gives anime eyes their vibrant and reflective quality.
Troubleshooting
My Eyes Look Lifeless
If your anime eyes lack that characteristic sparkle, it’s often due to insufficient highlights or poor contrast. Eyes need areas of pure light to feel alive.
Solution: Double-check your highlights. Are they pure white? Are they distinct shapes? Ensure there’s a strong contrast between the darkest parts of the iris (near the pupil and upper lid) and these bright highlights. Adding a small, secondary highlight can also boost the sparkle.
The Gaze Seems Off or Cross-Eyed
This usually happens when the irises and pupils are not aligned correctly. Even a slight misalignment can drastically alter the character’s focus.
Solution: Pay close attention to the placement of the iris and pupil within the eye socket. Draw a very light horizontal line through the center of both eyes to ensure the pupils sit on the same level. Make sure the visible portion of the iris is consistent in both eyes.
My Shading Looks Flat or Muddy
When shading, it’s easy to overwork the pencil or apply color unevenly, resulting in a flat or messy appearance. A smooth gradient is key for depth.
Solution: Start with very light pressure and build up layers gradually. Use a blending stump or a clean finger (if suitable for your medium) to smooth out transitions. Focus on creating a clear gradient from dark (top) to light (bottom) in the iris, avoiding harsh lines within the shaded area.
Key Takeaways
- Start Simple: Always begin with light, basic shapes before adding details to establish proportion.
- Highlights are Key: Pure white highlights are essential for the signature anime eye sparkle and life.
- Shade for Depth: Use gradients in the iris and shadows from the eyelids to create a three-dimensional effect.
- Eyelashes Define: Eyelashes add character and frame the eye; adjust their style to suit your character.
- Practice Consistency: Ensure both eyes align and have consistent lighting for a natural look.
- Expression Matters: Small changes in shape, pupil size, or eyebrow placement can dramatically alter emotion.
Frequently Asked Questions
How do I make male and female anime eyes look different?
Female anime eyes often feature larger, rounder shapes, more prominent and fanned-out eyelashes, and more pronounced highlights for a softer, more expressive look. Male eyes tend to be narrower, sharper, with fewer, shorter, or less defined lashes, giving a more serious or intense gaze. The thickness of the upper eyelid line can also vary.
Can I draw anime eyes without color?
Absolutely! Many manga are drawn in black and white. You can achieve fantastic results using only pencil shading. Focus on strong contrasts between darks and lights, creating clear gradients within the iris, and ensuring your highlights are crisp and white. Varying pencil pressure is your best friend here.
What if my eyes don’t look symmetrical?
Symmetry is one of the hardest aspects of drawing faces. Don’t worry if your first attempts aren’t perfect. Practice drawing light construction lines across your character’s face to guide eye placement. Draw one eye, then try to mirror its shape, size, and tilt for the second. Practice is the only way to improve your eye for symmetry.
How do different emotions affect anime eye drawing?
Eye shape, pupil size, and eyebrow position are crucial for conveying emotion. Happy eyes might be slightly squinted with upward-curving eyebrows. Sad eyes might have a downward droop and larger, tearful highlights. Angry eyes are often narrower, with sharp, angled eyebrows. Experiment with these elements to show emotion.
Our Top Recommended Finds
- Staedtler Mars Lumograph Pencils: A good set of graphite pencils (HB, 2B, 4B, 6B) offers a range of hardness for sketching and shading.
- Kneaded Eraser: Essential for lifting graphite without smudging and creating precise highlights.
- Sakura Pigma Micron Fine-liner Pens: Great for inking clean, sharp lines and adding definition after sketching.
Bring Your Characters to Life
You’ve just taken a significant step toward mastering the art of anime eyes. The techniques you’ve learned are fundamental, but the real magic begins with your unique creativity. Don’t be afraid to experiment with different shapes, highlight patterns, and expressions.
Your characters are waiting to tell their stories through their eyes. Grab your tools and start drawing today. Keep practicing, keep observing, and watch your skills grow with every sketch.