🐶 How To Draw A Dog Easy Step By Step
Learning to draw can feel daunting, especially when you’re staring at a blank page.
But what if I told you that drawing a charming dog is much simpler than you think?
Having guided countless aspiring artists through their first sketches, I’ve seen firsthand how a few basic shapes can transform into a beloved pet.
Quick Overview
This guide will walk you through creating a delightful dog drawing, breaking down the process into manageable, enjoyable steps.
You’ll build confidence and discover the joy of bringing your own canine companion to life on paper.
- Time needed: 45-75 minutes (depending on detail and shading)
- Difficulty: Beginner
- What you’ll need: Pencil (HB or 2B recommended), paper, eraser, optional: blending stump or tissue, a simple reference photo of a dog.
Step-by-Step Instructions
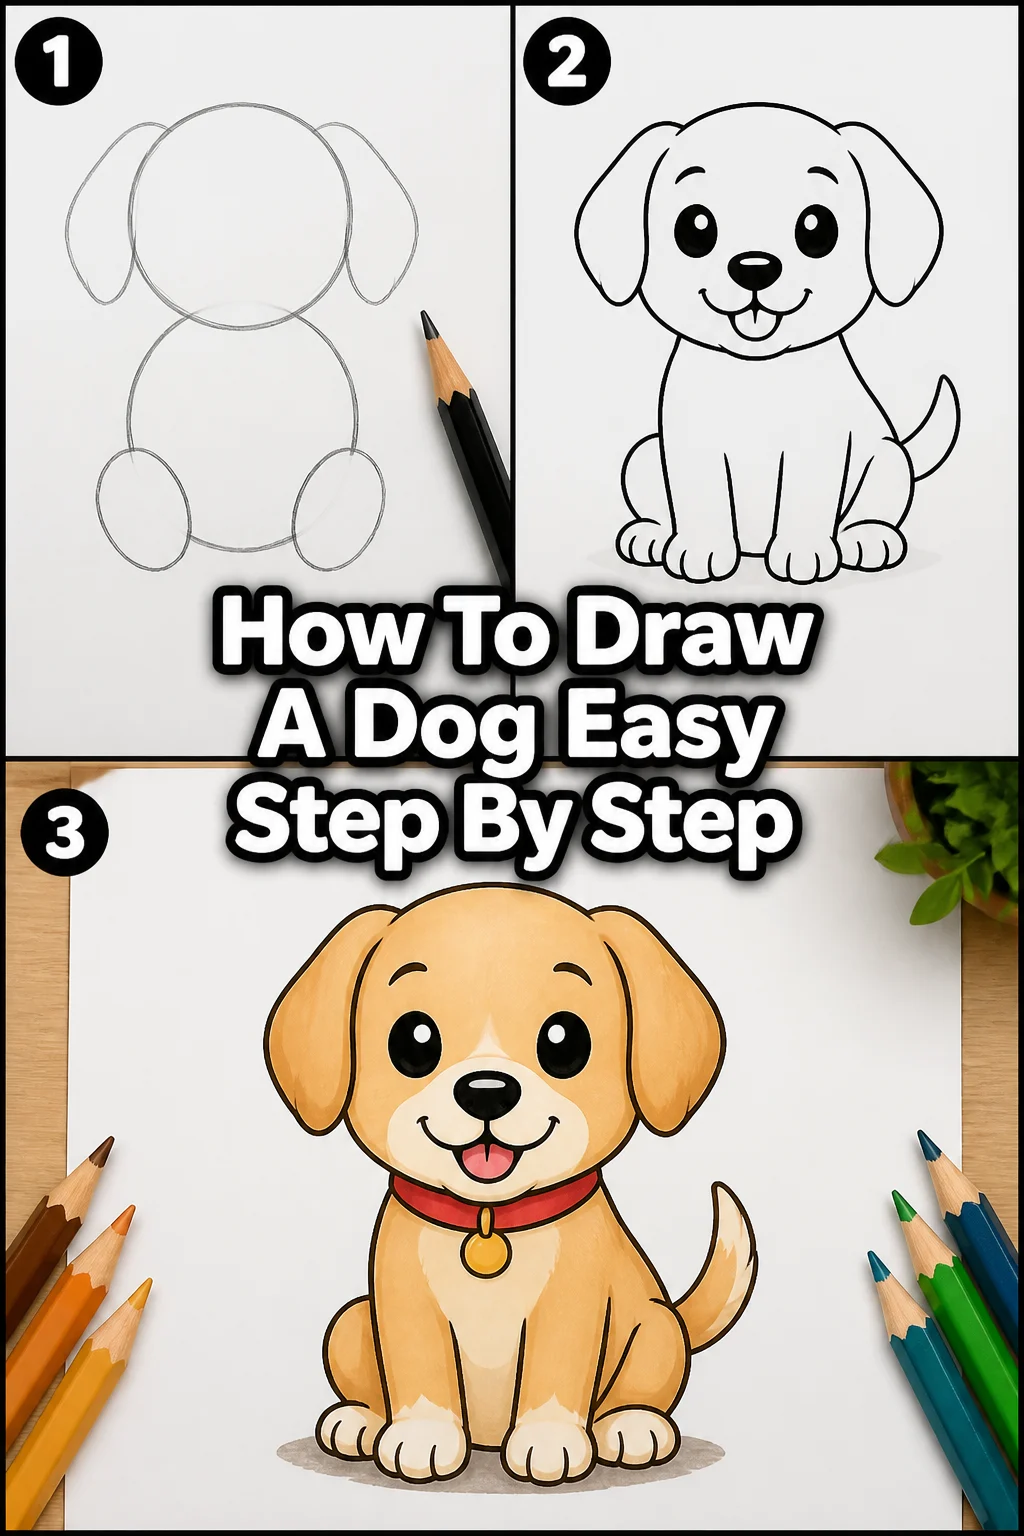
Step 1: Lay Down the Basic Shapes for the Head and Body
Begin by sketching two overlapping ovals. The larger oval will form the dog’s body, positioned horizontally.
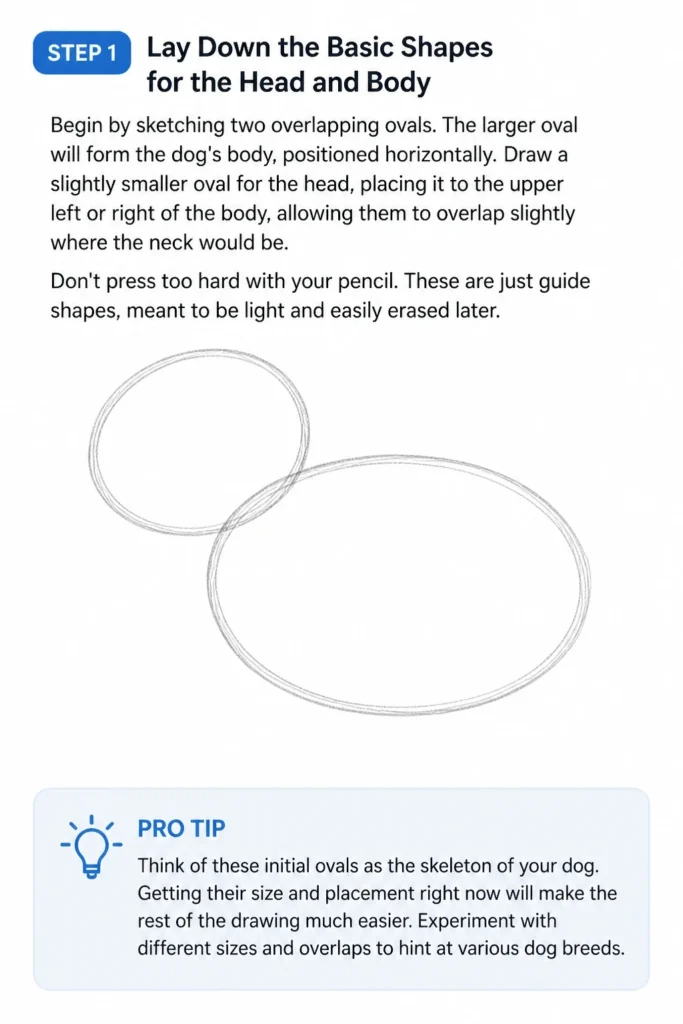
Draw a slightly smaller oval for the head, placing it to the upper left or right of the body, allowing them to overlap slightly where the neck would be.
Don’t press too hard with your pencil. These are just guide shapes, meant to be light and easily erased later.
Pro Tip: Think of these initial ovals as the “skeleton” of your dog. Getting their size and placement right now will make the rest of the drawing much easier. Experiment with different sizes and overlaps to hint at various dog breeds.
Step 2: Connect the Head and Body with the Neck
Now, gently connect the head oval to the body oval with two curved lines.
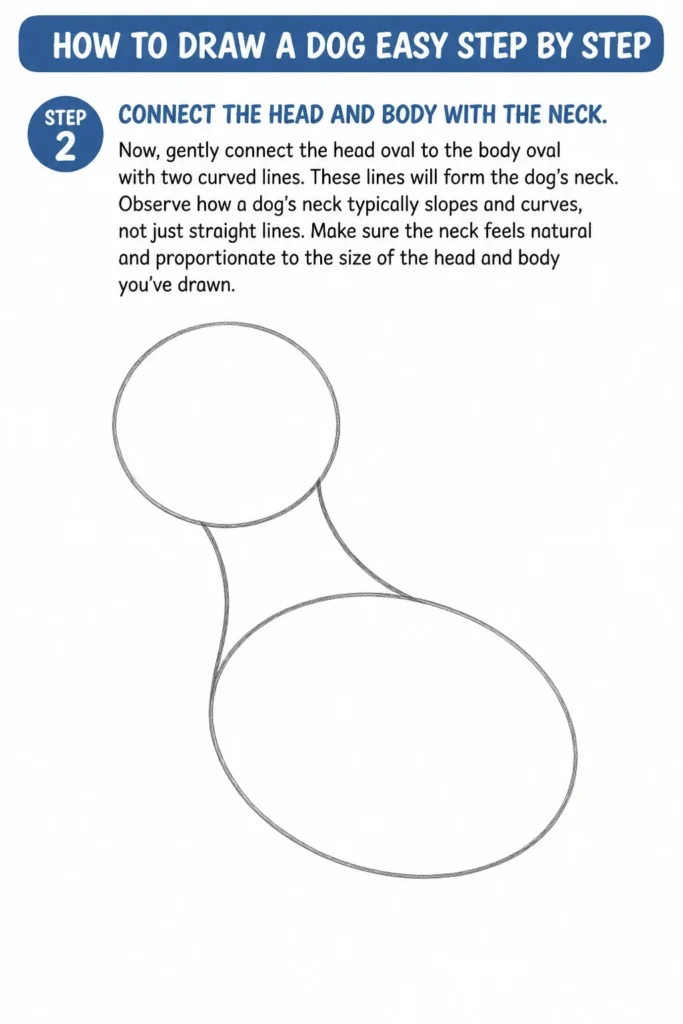
These lines will form the dog’s neck. Observe how a dog’s neck typically slopes and curves, not just straight lines.
Make sure the neck feels natural and proportionate to the size of the head and body you’ve drawn.
Step 3: Establish the Muzzle and Ear Placement
Inside the head oval, draw a smaller, slightly elongated oval or a rounded rectangle for the muzzle area.
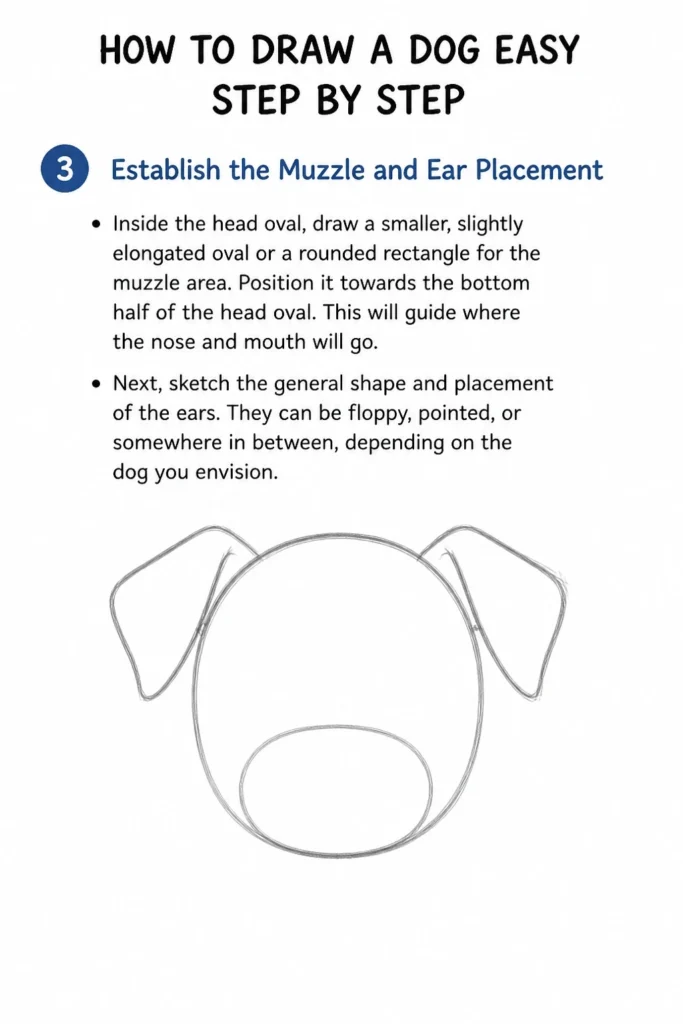
Position it towards the bottom half of the head oval. This will guide where the nose and mouth will go.
Next, sketch the general shape and placement of the ears. They can be floppy, pointed, or somewhere in between, depending on the dog you envision.
Step 4: Block Out the Legs and Paws
Use simple cylindrical or rectangular shapes to sketch out the dog’s legs.
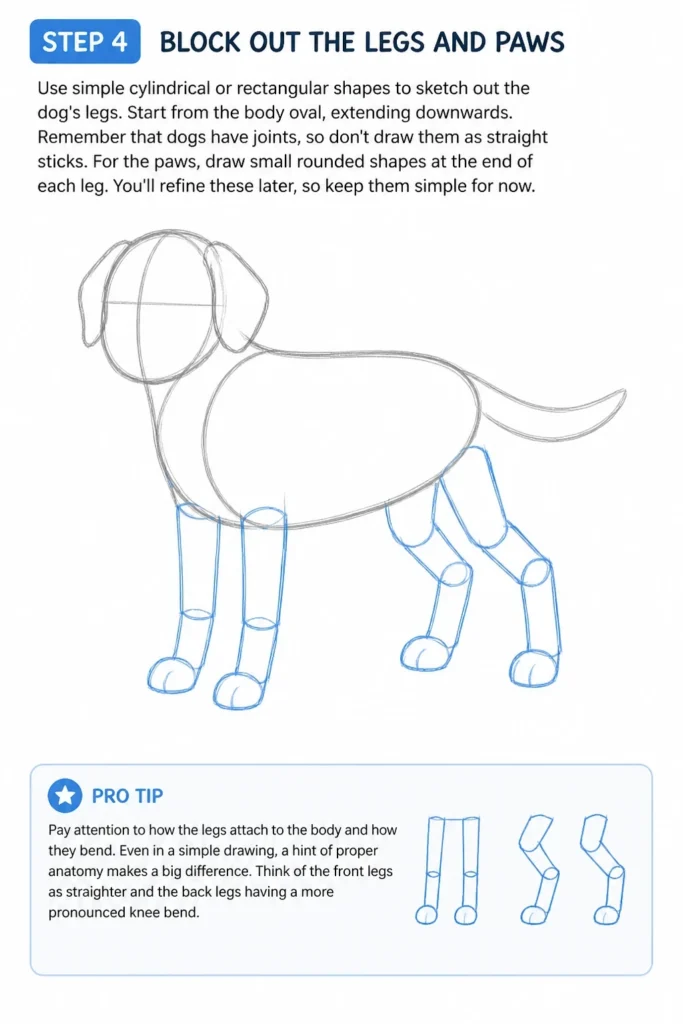
Start from the body oval, extending downwards. Remember that dogs have joints, so don’t draw them as straight sticks.
For the paws, draw small rounded shapes at the end of each leg. You’ll refine these later, so keep them simple for now.
Pro Tip: Pay attention to how the legs attach to the body and how they bend. Even in a simple drawing, a hint of proper anatomy makes a big difference. Think of the front legs as straighter and the back legs having a more pronounced “knee” bend.
Step 5: Add the Facial Features: Eyes, Nose, and Mouth
It’s time to give your dog some personality.
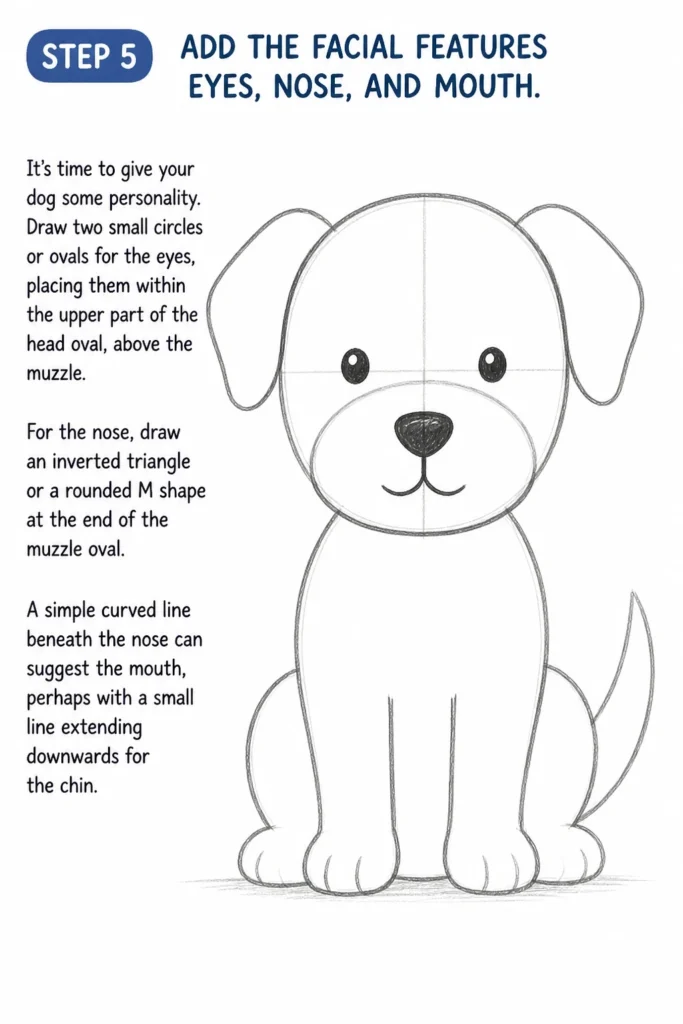
Draw two small circles or ovals for the eyes, placing them within the upper part of the head oval, above the muzzle.
For the nose, draw an inverted triangle or a rounded “M” shape at the end of the muzzle oval.
A simple curved line beneath the nose can suggest the mouth, perhaps with a small line extending downwards for the chin.
Step 6: Refine the Outline and Add Fur Details
Start to go over your light guide lines, drawing a more confident, continuous outline for your dog.
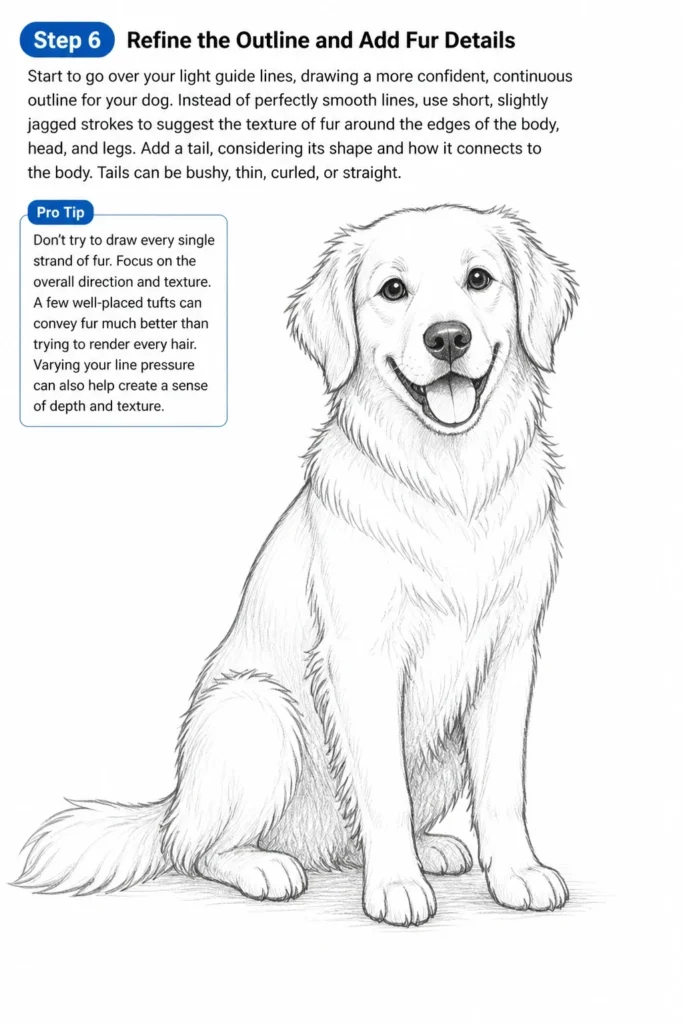
Instead of perfectly smooth lines, use short, slightly jagged strokes to suggest the texture of fur around the edges of the body, head, and legs.
Add a tail, considering its shape and how it connects to the body. Tails can be bushy, thin, curled, or straight.
Pro Tip: Don’t try to draw every single strand of fur. Focus on the overall direction and texture. A few well-placed tufts can convey fur much better than trying to render every hair. Varying your line pressure can also help create a sense of depth and texture.
Step 7: Erase Guide Lines and Clean Up
Carefully erase all the initial guide ovals and connecting lines that are no longer needed.
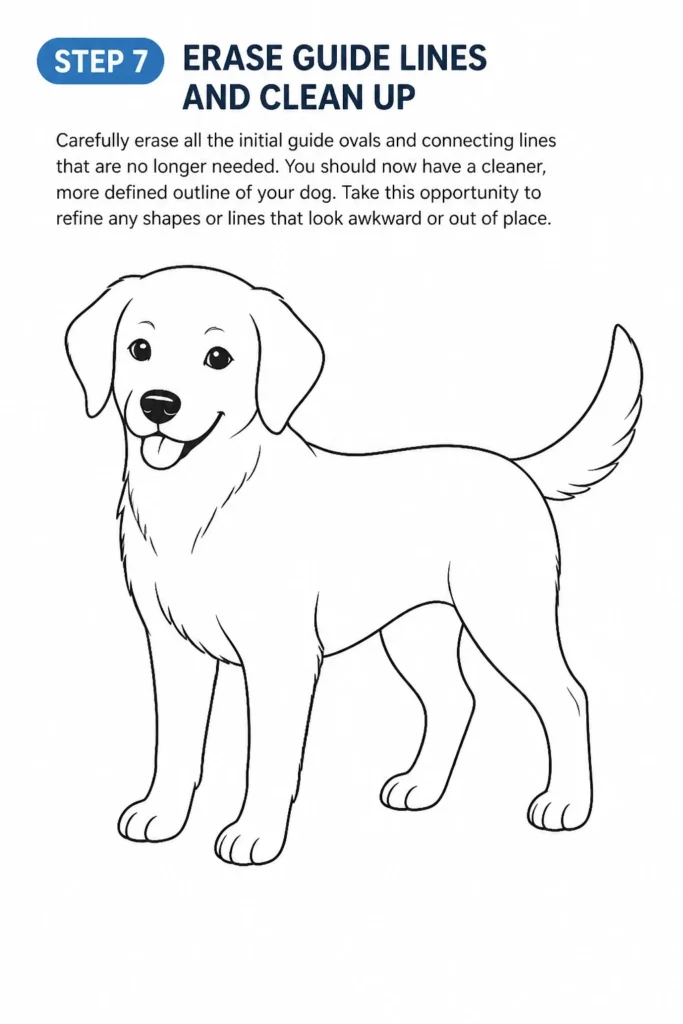
You should now have a cleaner, more defined outline of your dog.
Take this opportunity to refine any shapes or lines that look awkward or out of place.
Step 8: Add Shading and Finishing Touches
This step brings your dog to life. Choose a light source and add subtle shading to give your dog dimension.
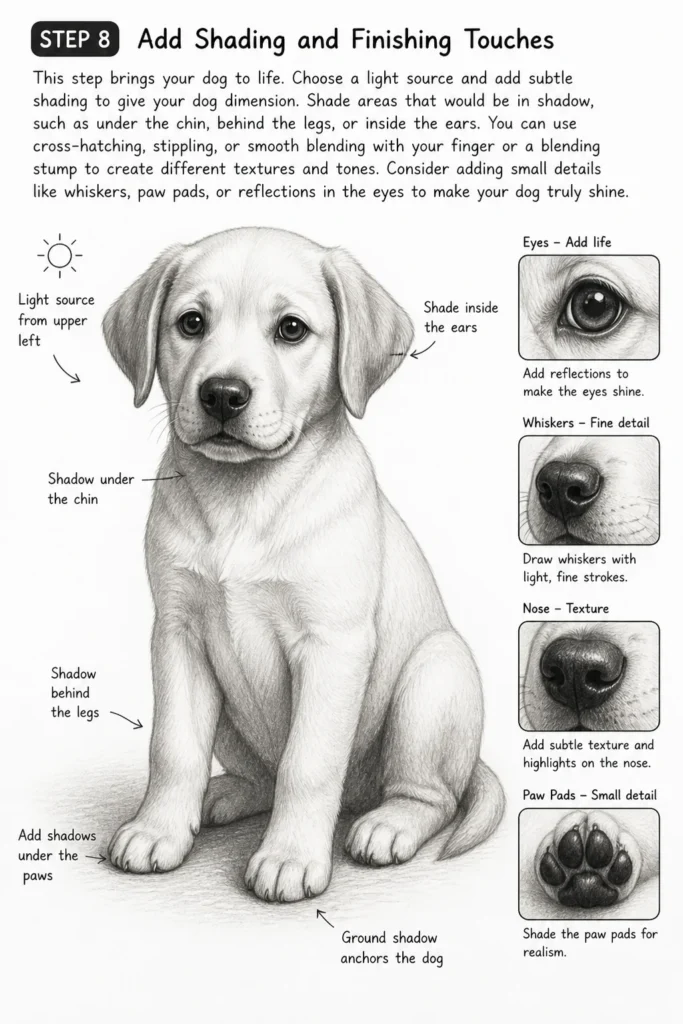
Shade areas that would be in shadow, such as under the chin, behind the legs, or inside the ears.
You can use cross-hatching, stippling, or smooth blending with your finger or a blending stump to create different textures and tones.
Consider adding small details like whiskers, paw pads, or reflections in the eyes to make your dog truly shine.
Common Mistakes to Avoid
Proportions Are Off
One common pitfall is making the head too big or too small for the body, or the legs too short or too long.
This can make your dog look unnatural or unbalanced. Always start with light guide shapes and compare them to each other to ensure they feel correct.
Step back frequently to view your drawing from a distance; this helps you spot proportional errors more easily.
Stiff or Static Poses
Many beginners draw dogs in very rigid, straight-on poses, which can make them look lifeless.
Try to introduce a slight curve to the spine or angle the head slightly. Even a small tilt can add dynamism.
Using reference photos of dogs in various natural poses can significantly help you capture more fluid and engaging stances.
Neglecting Reference Images
Drawing from imagination is great, but relying solely on it can lead to generic or anatomically incorrect features.
Always keep a reference image handy, even for a simple drawing. It helps you understand how ears attach, how legs bend, and where shadows naturally fall.
You don’t have to copy it exactly, but let it inform your decisions.
Rushing the Details
It’s tempting to jump straight to the eyes or the fur texture, but building a solid foundation is crucial.
Rushing through the initial basic shapes and proportions will often result in a drawing that feels “off” later on.
Take your time with each step, especially the early ones, as they form the backbone of your drawing.
Troubleshooting
My Dog Looks Flat and Lifeless
If your drawing lacks depth, it’s likely due to insufficient shading or a lack of varied line weight.
Introduce more contrast by adding darker shadows in recessed areas and using lighter lines for parts closer to the light source.
Consider adding a slight cast shadow beneath your dog to ground it on the page and give it a sense of presence.
Can’t Get the Eyes Right
The eyes are often called the windows to the soul, and getting them right can be tricky.
Ensure they are properly aligned and proportionate to the head. Adding a small highlight (a tiny white spot) in each eye can instantly make them sparkle and appear more lifelike.
Don’t forget the eyelids and surrounding fur, which help to define their shape.
My Lines Are Too Messy and Uneven
This is a very common issue for beginners. It often stems from pressing too hard initially or trying to draw long, continuous lines.
Practice drawing with a lighter touch for your initial sketches. Use multiple, short, overlapping lines to build up your shapes instead of one hesitant, heavy line.
A good quality eraser can also be your best friend for cleaning up stray marks and refining edges without damaging the paper.
Key Takeaways
- Always start with light, basic geometric shapes to establish proportions.
- Build your drawing layer by layer, from general forms to specific details.
- Use a reference photo to guide your understanding of dog anatomy and features.
- Don’t be afraid to erase and adjust; it’s part of the drawing process.
- Shading and varied line weight add depth and bring your drawing to life.
- Practice is paramount; every drawing improves your skill.
Frequently Asked Questions
What kind of dog should I draw first?
For your first attempt, choose a dog with relatively simple features and fur. Breeds like a Labrador, Beagle, or a simple cartoon-style dog are often easier to start with than complex long-haired or wrinkled breeds.
How do I make my dog look realistic?
Realism comes from observing details. Pay close attention to fur texture, the specific shape of the eyes and nose, and how light interacts with the dog’s form. Gradual shading and subtle variations in tone are key to creating a realistic appearance.
Is it okay to trace to learn how to draw?
Tracing can be a helpful tool for understanding proportions and muscle memory, especially when you’re just starting out. However, don’t rely on it exclusively. Use tracing as a stepping stone to understanding forms, then try drawing freehand using what you’ve learned.
How do I draw different dog breeds?
Once you master the basic dog form, drawing different breeds involves adjusting the proportions and specific features. A Dachshund will have a long body and short legs, while a German Shepherd will have pointed ears and a more angular muzzle. Study reference photos for each breed.
Our Top Recommended Finds
- Sketching Pencils Set: A good set with varying lead hardness (e.g., 2H to 6B) offers versatility for light sketching and dark shading.
- Good Quality Sketchbook: Look for paper that can handle erasing and blending without tearing or becoming too textured.
- Kneaded Eraser: This type of eraser is excellent for lifting graphite gently without smudging, perfect for cleaning up light guide lines.
Your Artistic Journey Begins Now
You’ve taken the first exciting step towards drawing your very own dog!
Remember, every artist starts somewhere, and consistent practice is your most powerful tool.
Don’t be afraid to experiment with different dog breeds, poses, or even adding backgrounds to your drawings. Keep a sketchbook handy, draw often, and watch your skills flourish.