✍️ How To Draw A Hand Step By Step Easy
Learning to draw hands can feel like a daunting challenge for many artists, especially when you’re just starting out.
They are incredibly expressive and complex, often seen as one of the hardest parts of the human anatomy to capture accurately.
Through years of sketching and practice, I’ve discovered simple methods that break down this complexity, and I’m here to share those straightforward techniques with you today.
Quick Overview
This guide will walk you through a simplified process to draw a realistic hand, focusing on basic shapes and fundamental proportions.
You’ll build confidence as you see your hand drawing skills improve with each step.
- Time needed: 30-60 minutes for a detailed first attempt
- Difficulty: Beginner
- What you’ll need: Pencil, eraser, paper, a reference hand (your own!)
Step-by-Step Instructions
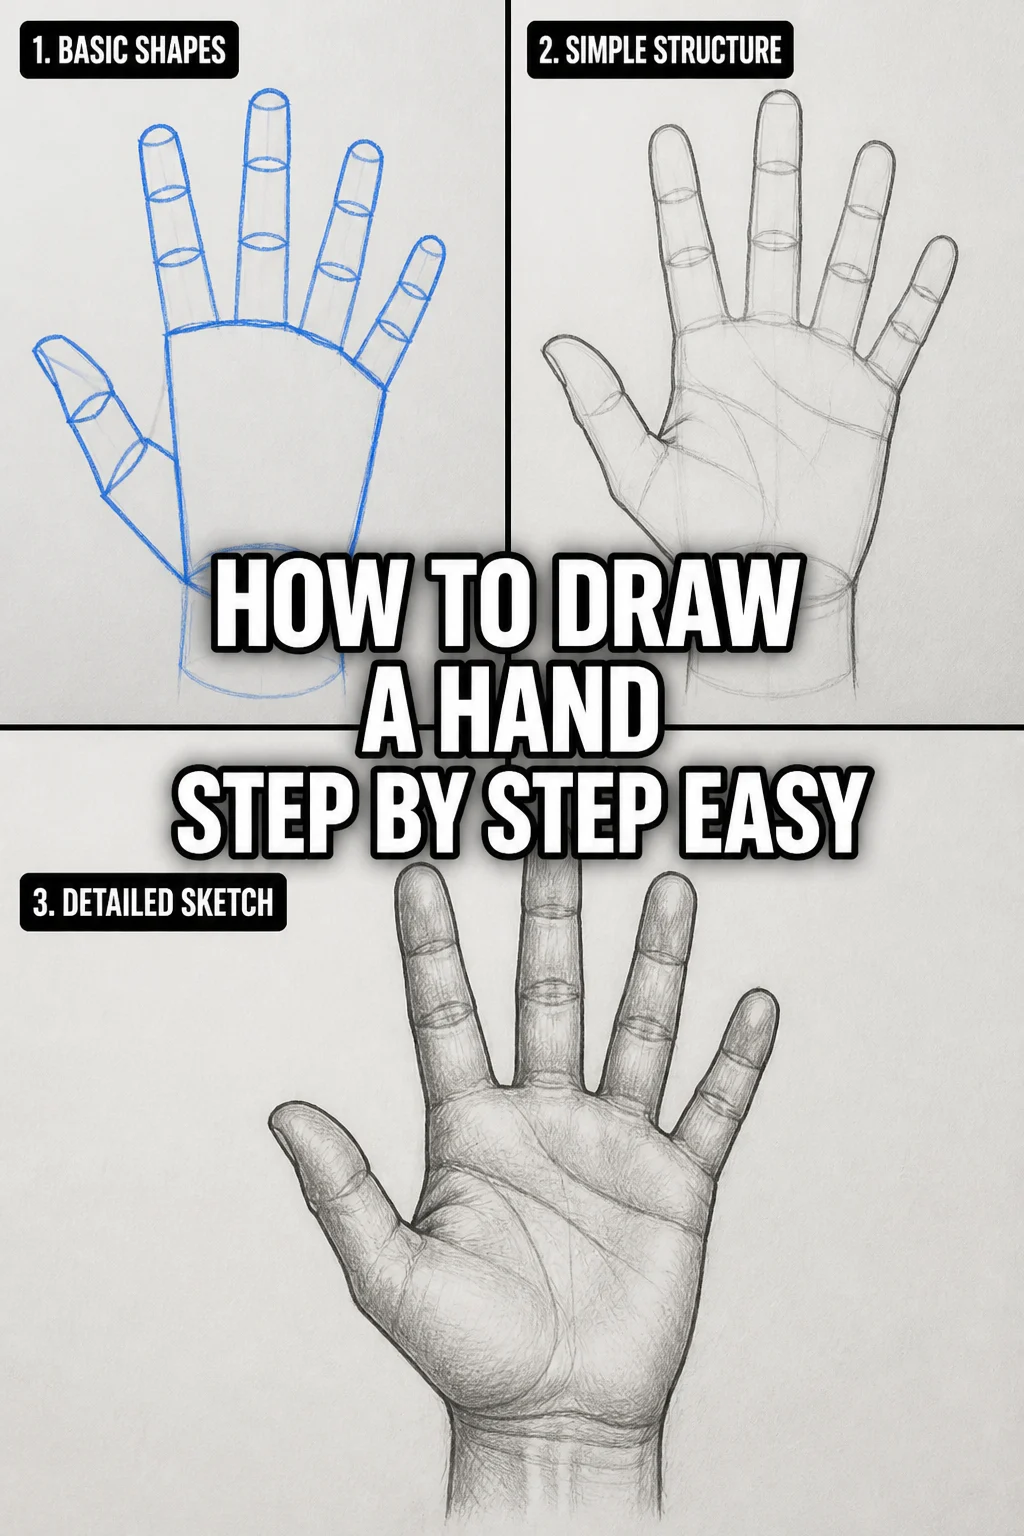
Step 1: Start with the Palm Shape
Begin by lightly sketching the basic shape of the palm. Think of it as a slightly flattened square or a rectangular box with rounded corners.
This initial shape represents the main mass of the hand, excluding the thumb and fingers.
Pay attention to the general width and height, keeping your lines very faint as these are just construction lines.
Pro Tip: Use your own hand as a reference. Hold it in the pose you want to draw and observe its overall shape. Squinting your eyes can help you see the larger forms without getting lost in details.
Step 2: Add the Thumb Mound
Draw a curved, almost kidney-bean shape on one side of your palm box to represent the thumb’s base, also known as the thenar eminence.
This fleshy pad is crucial for giving the hand its volume and separating the palm from the thumb.
Ensure it connects smoothly to the main palm shape you established in the previous step.
Step 3: Establish the Finger Base Lines
Sketch four short, parallel lines extending from the top edge of your palm box. These lines will serve as the starting points for your fingers.
They don’t need to be perfectly spaced yet, but aim for a general evenness.
Think of them as the knuckles where the fingers meet the palm.
Pro Tip: The middle finger is usually the longest. Use this as a guide to determine the relative lengths of the other fingers. The index and ring fingers are often similar in length, while the pinky is noticeably shorter.
Step 4: Block Out the Fingers and Thumb
Construct the individual fingers and thumb using simple cylindrical or rectangular shapes for each segment.
Each finger has three segments (phalanges), and the thumb has two, plus the metacarpal within the palm.
Connect these segments with small circles or dots to indicate the joints, allowing for natural bends.
For the thumb, remember it originates lower on the hand and is generally thicker and shorter than the fingers.
Give each finger a slight taper towards the tip, avoiding perfectly straight or identical shapes.
Step 5: Refine the Contours and Joints
Smooth out the blocky shapes you’ve drawn, transforming them into more organic, curved lines.
Pay close attention to the knuckles and joints, adding slight bulges where bones meet.
Observe how the skin folds and creases around these areas when your hand is in a specific pose.
Pro Tip: Don’t make the fingers look like sausages. Add subtle indentations where the bones are visible and gentle curves to the sides of the fingers. The webbing between fingers also creates a slight curve at the base.
Step 6: Add Details and Form
Introduce the fingernails, which typically start about two-thirds of the way down the last finger segment.
Sketch in the lines of the palm, paying attention to the major creases.
Think about the overall form of the hand; it’s not flat but has curves and subtle undulations.
Consider the shadows and highlights that would define its three-dimensional structure.
You can also lightly indicate veins or tendons on the back of the hand if your reference shows them clearly.
Step 7: Clean Up and Define
Erase your initial construction lines, leaving only the refined contours of the hand.
Darken the lines you want to keep, giving your drawing more presence and definition.
Add shading to create depth and volume, thinking about where light hits the hand and where shadows fall.
This final step brings your hand drawing to life, making it appear solid and realistic.
Common Mistakes to Avoid
Drawing Fingers Too Straight or Identical
A common pitfall is making all fingers perfectly straight, parallel, and the exact same length.
This results in a stiff, unnatural-looking hand. Hands are dynamic; fingers often have a slight curve, taper, and vary in length.
Always consider the natural slight bend and individual character of each digit.
Ignoring the Palm’s Structure
Many beginners focus solely on the fingers and thumb, neglecting the palm’s underlying structure.
The palm is not a flat rectangle; it has a distinct arch and fleshy mounds, especially the thenar (thumb) and hypothenar (pinky) eminences.
Establishing these forms early provides a solid foundation for the fingers and thumb to attach convincingly.
Incorrect Proportions and Foreshortening
Getting the proportions right is crucial. The fingers are generally longer than the palm, and the middle finger is the longest.
Foreshortening, when parts of the hand appear shorter because they are closer to the viewer, can be tricky.
Practice observing your reference carefully and simplify complex angles into basic shapes before detailing.
Skipping Construction Lines
Jumping straight to detailed outlines without first establishing basic shapes and guidelines often leads to distorted results.
Construction lines act as a blueprint, helping you place elements correctly and maintain proportions.
Always start light and loose, building up your drawing gradually from simple forms to complex details.
Troubleshooting
My Hand Looks Flat and Lifeless
If your hand drawing lacks dimension, you might be focusing too much on outlines and not enough on volume.
Think of the hand as a collection of cylinders and boxes in space, rather than a flat cutout.
Add subtle shading to define the curves of the palm, fingers, and knuckles, indicating where light hits and shadows recede.
Fingers Look Like Sausages or Sticks
This usually happens when you draw fingers as uniform tubes or straight lines without considering their tapering form and bony structure.
Ensure you add slight bulges for knuckles and subtle indentations along the sides of the fingers.
Vary the thickness slightly along the length of each segment and give the tips a natural, rounded shape.
Proportions Feel Off
When proportions are incorrect, the hand can look awkward or alien.
Go back to your basic construction lines and compare them directly to your reference hand (your own works great!).
Measure relative lengths and widths using your pencil as a guide, and don’t be afraid to erase and redraw sections until they feel right.
Key Takeaways
- Always start with simple, light construction shapes for the palm and thumb mound.
- Use your own hand as a primary reference for accurate observation.
- Break down complex forms into basic cylinders and boxes before adding details.
- Pay attention to the natural curves, tapering, and varying lengths of individual fingers.
- Don’t neglect the underlying structure and volume of the palm.
- Refine your drawing by erasing construction lines and adding shading for depth.
Frequently Asked Questions
How can I make my hand drawings more expressive?
To add expressiveness, focus on the pose and the subtle tension or relaxation in the fingers and palm.
Observe how different emotions or actions affect the hand’s posture and finger arrangements.
Practice drawing hands performing various actions, from holding objects to conveying gestures.
Is it better to draw from imagination or reference?
Always start by drawing from reference, especially when learning. This builds your visual library and understanding of anatomy.
Once you have a solid grasp of structure and proportion, you can then draw more effectively from imagination, using your learned knowledge.
What’s the best way to practice drawing hands?
Consistent practice is key. Sketch hands in different poses daily, even quick 1-2 minute studies.
Focus on one aspect at a time, like just the knuckles, or just the thumb, to build mastery.
Draw your own hand in various positions, as it’s always available.
How long does it take to get good at drawing hands?
Mastery comes with dedication and time. You’ll see improvement with each drawing session.
With regular practice, you can achieve noticeable progress in weeks or months, but continuous learning and refinement are lifelong journeys for artists.
Our Top Recommended Finds
- Graphite Pencil Set: A good range of hardness (2H to 6B) allows for light construction lines and rich shading.
- Kneaded Eraser: Perfect for lifting graphite without damaging the paper, and for creating highlights.
- Sketchbook with Quality Paper: Choose paper with a slight tooth that can handle multiple layers of graphite and erasing.
Embrace the Journey of Hand Drawing
You’ve now walked through the fundamental steps to drawing a hand, transforming a complex subject into manageable parts.
Remember that drawing is a skill built on observation, practice, and patience.
Don’t be discouraged by initial attempts; every line you draw is a step forward in your artistic development.
Pick up your pencil right now and try sketching your own hand in a new pose.
Consider exploring different angles and hand gestures next, or try integrating your newly drawn hands into full figure sketches.
The world of drawing hands is vast and rewarding, and you’ve just taken your first confident stride.