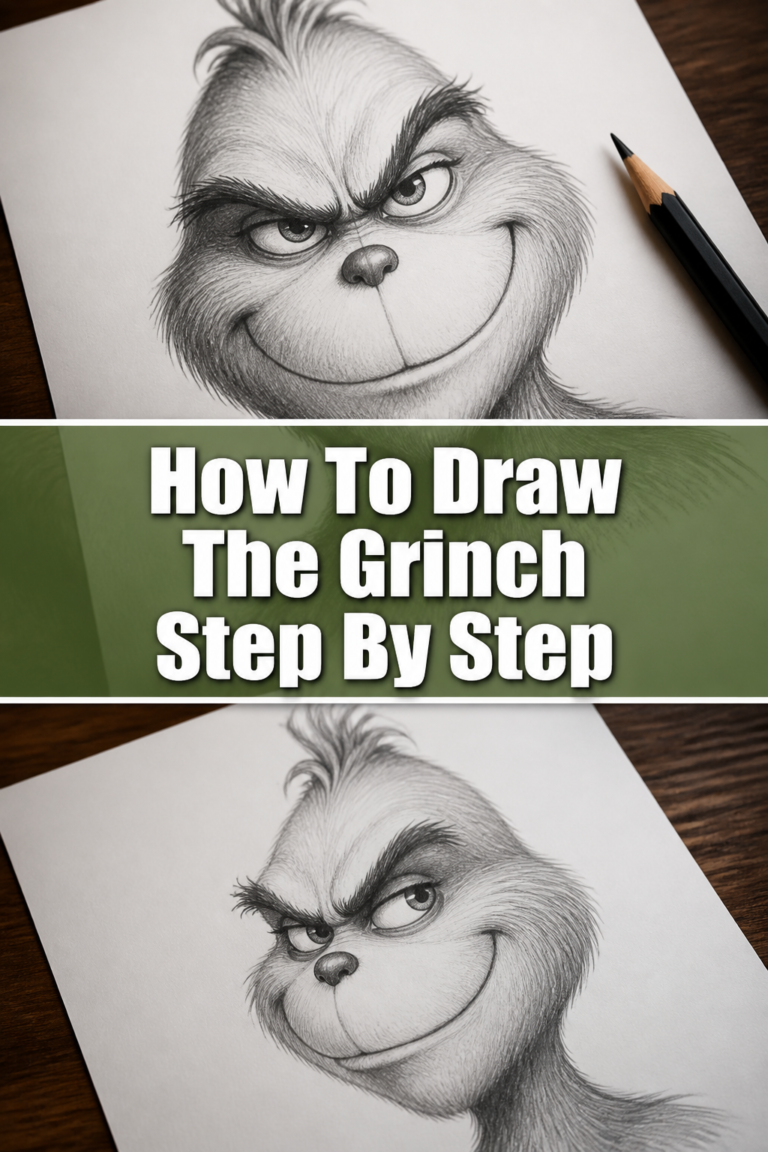
🎄 How To Draw The Grinch Step By Step Easy
Drawing the Grinch brings a special kind of holiday cheer, even for the most cynical hearts. I remember my first attempt, struggling to capture his unique blend of mischief and eventual warmth. This guide is built from those experiences, designed to make your drawing journey smooth and enjoyable.
You’ll discover simple techniques to bring Whoville’s most famous resident to life on your page.
Quick Overview
This guide will walk you through creating a charming Grinch drawing from start to finish. You’ll learn how to break down complex shapes into easy, manageable steps. By the end, you’ll have a fantastic Grinch illustration you can be proud of.
Step-by-Step Instructions
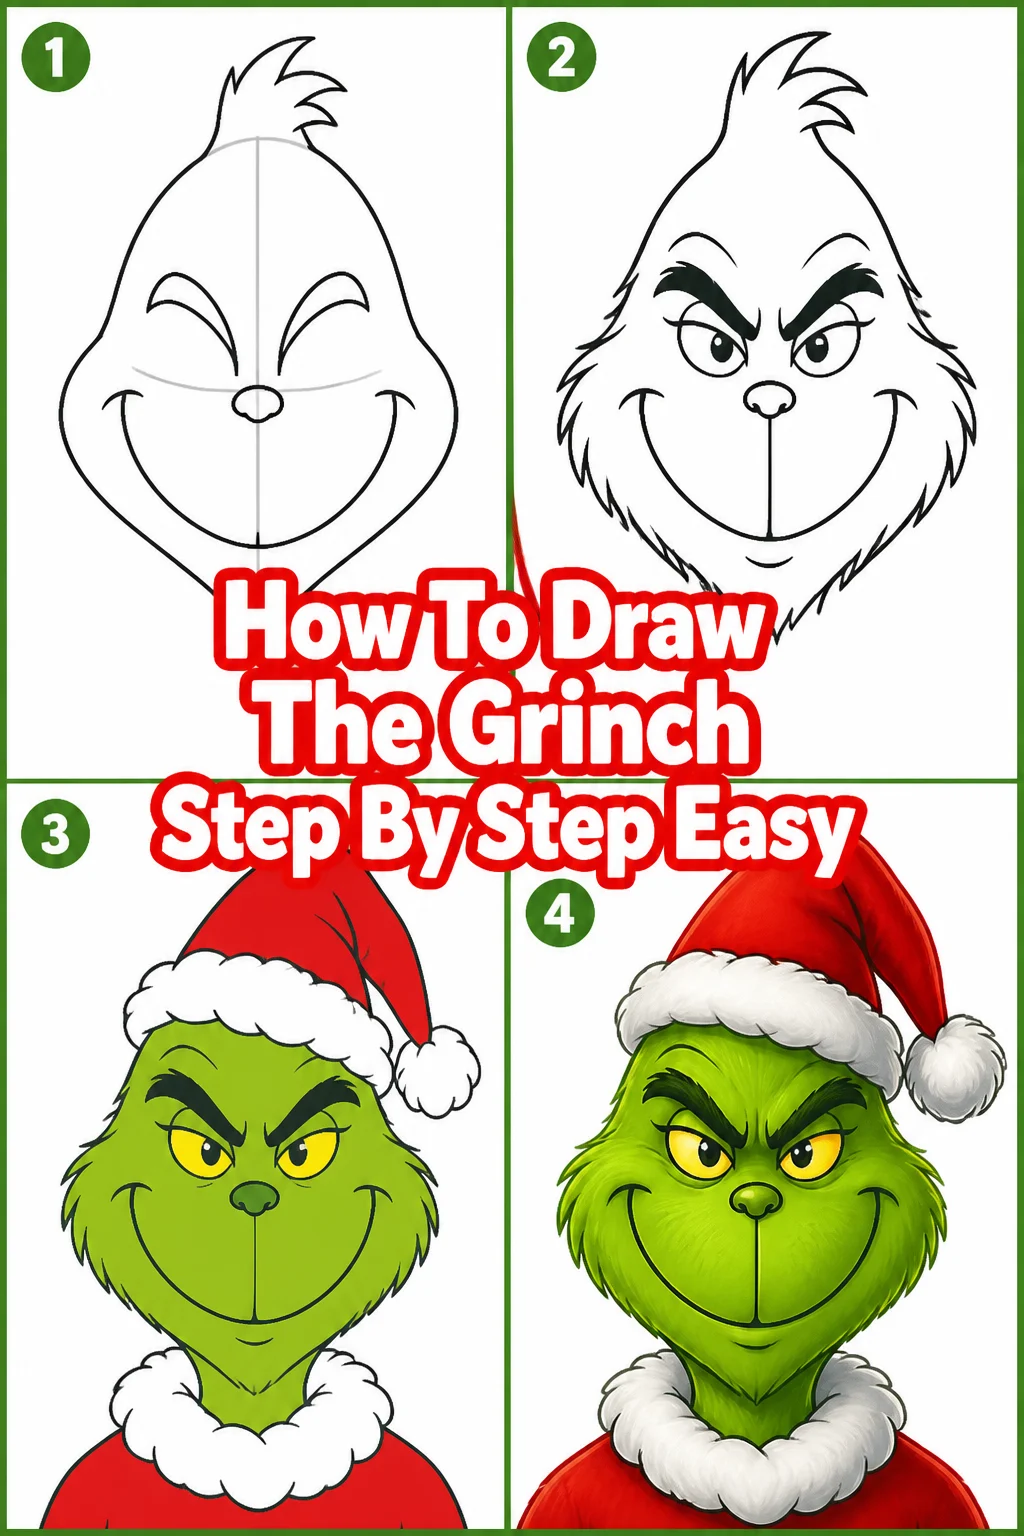
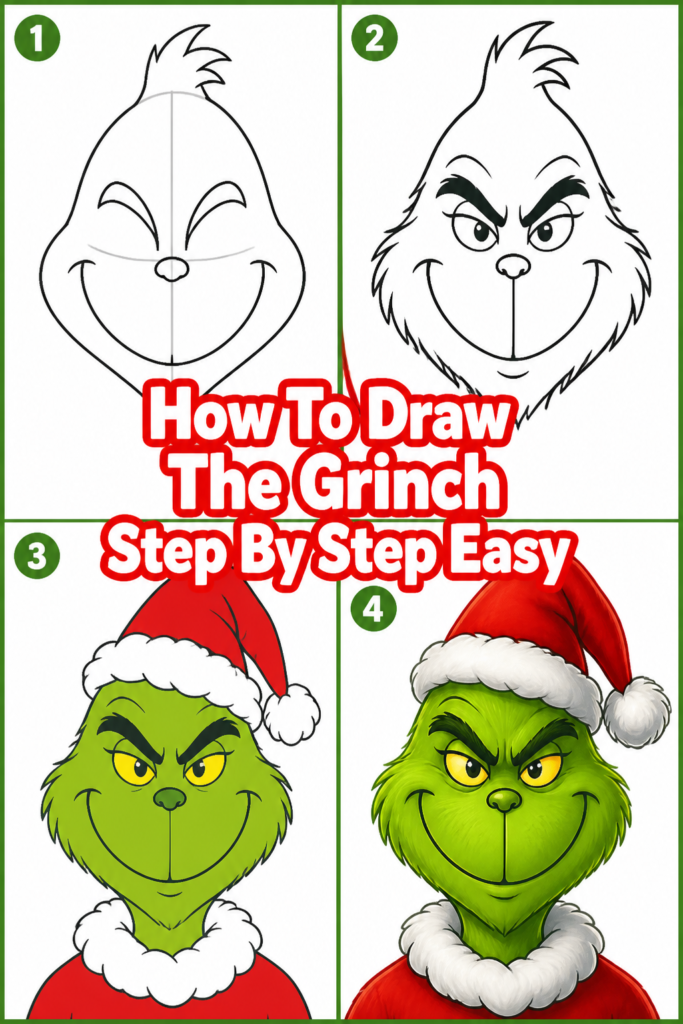
Step 1: Sketch the Basic Head Shape
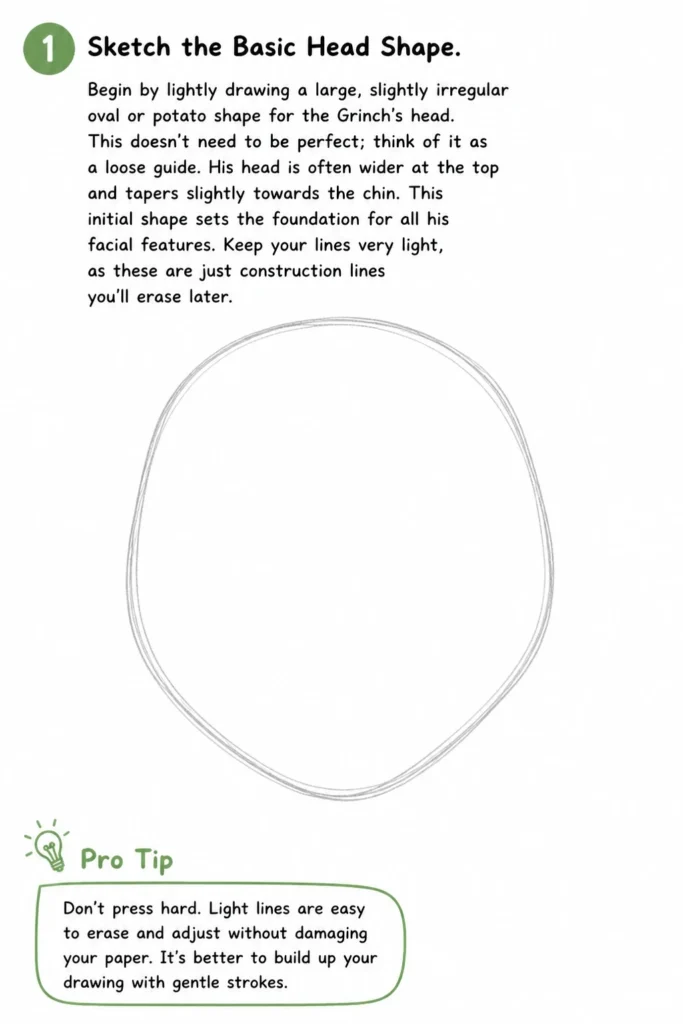
Begin by lightly drawing a large, slightly irregular oval or potato shape for the Grinch’s head. This doesn’t need to be perfect; think of it as a loose guide. His head is often wider at the top and tapers slightly towards the chin.
This initial shape sets the foundation for all his facial features. Keep your lines very light, as these are just construction lines you’ll erase later.
Pro Tip: Don’t press hard. Light lines are easy to erase and adjust without damaging your paper. It’s better to build up your drawing with gentle strokes.
Step 2: Add Guide Lines for Features
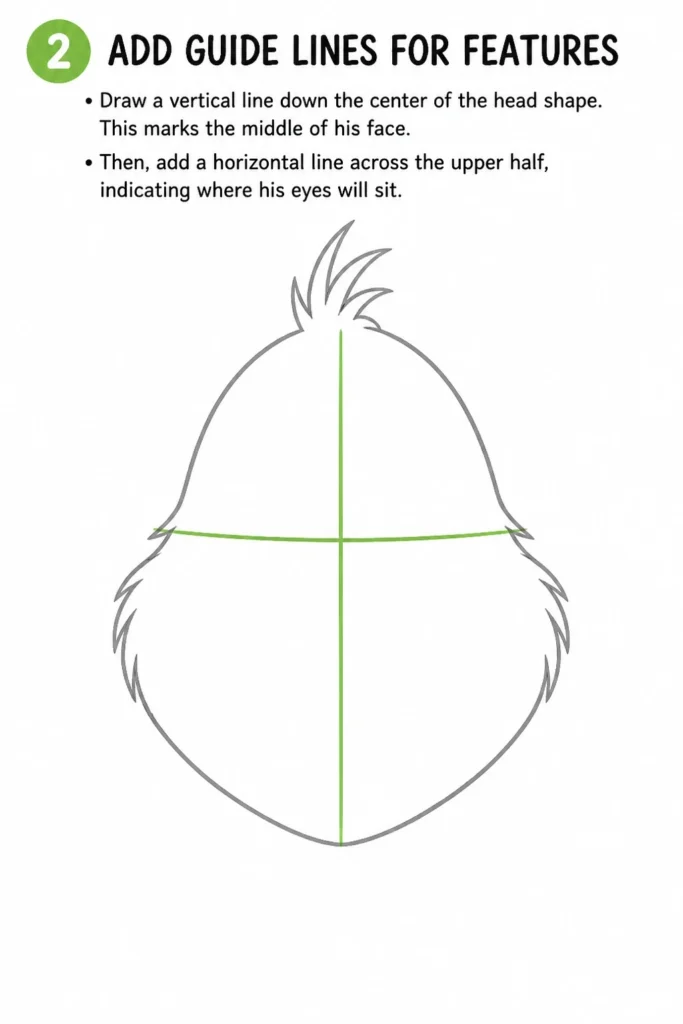
Draw a vertical line down the center of the head shape. This marks the middle of his face. Then, add a horizontal line across the upper half, indicating where his eyes will sit.
These cross-hatch lines are crucial for placing the Grinch’s features symmetrically. They help ensure his eyes, nose, and mouth are all in proportion.
Step 3: Shape the Eyes and Eyebrows
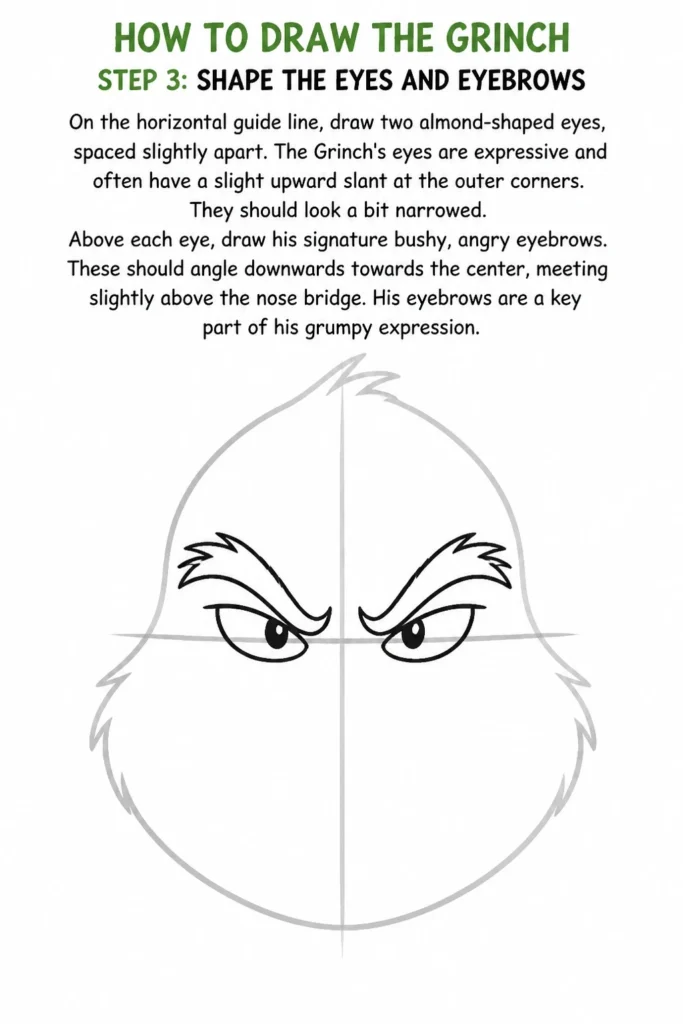
On the horizontal guide line, draw two almond-shaped eyes, spaced slightly apart. The Grinch’s eyes are expressive and often have a slight upward slant at the outer corners. They should look a bit narrowed.
Above each eye, draw his signature bushy, angry eyebrows. These should angle downwards towards the center, meeting slightly above the nose bridge. His eyebrows are a key part of his grumpy expression.
Step 4: Draw the Nose and Mouth
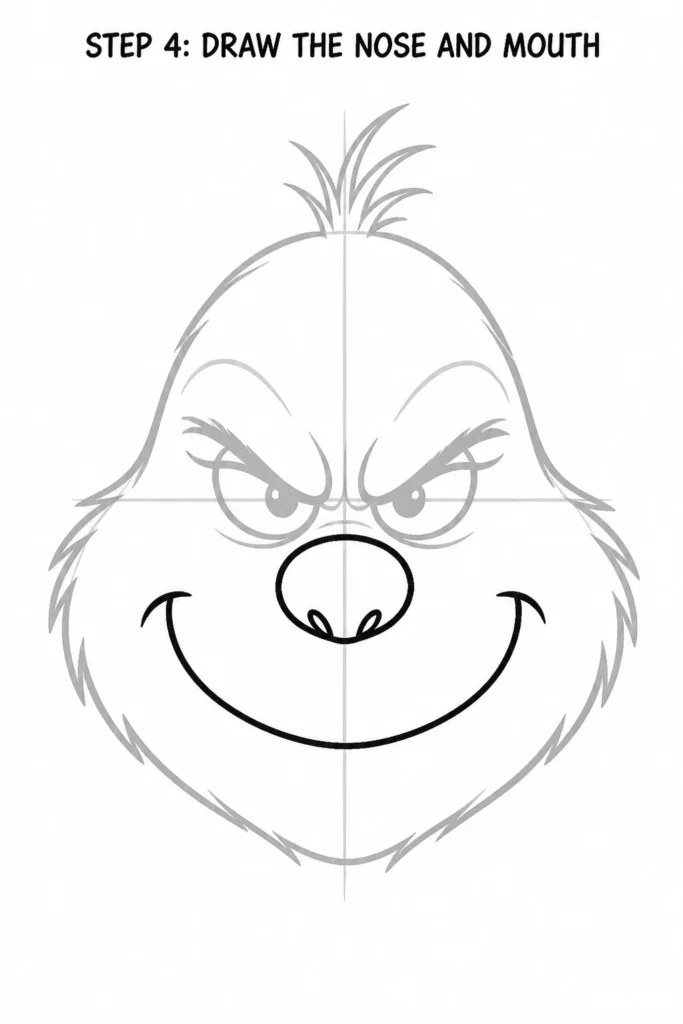
Position the Grinch’s distinctive nose just below the eye line, on the central vertical guide. It’s typically a large, somewhat triangular shape with rounded corners, like an inverted heart or a wide ‘U’ with a hump. Add two small nostrils at the bottom.
For his mouth, draw a wide, mischievous grin that extends beyond the width of his nose. It often has a slight upward curve at the corners, even when he’s grumpy. You can show a hint of his teeth if you like, or keep it as a simple, wide smile.
Step 5: Define the Ears and Hair Tufts
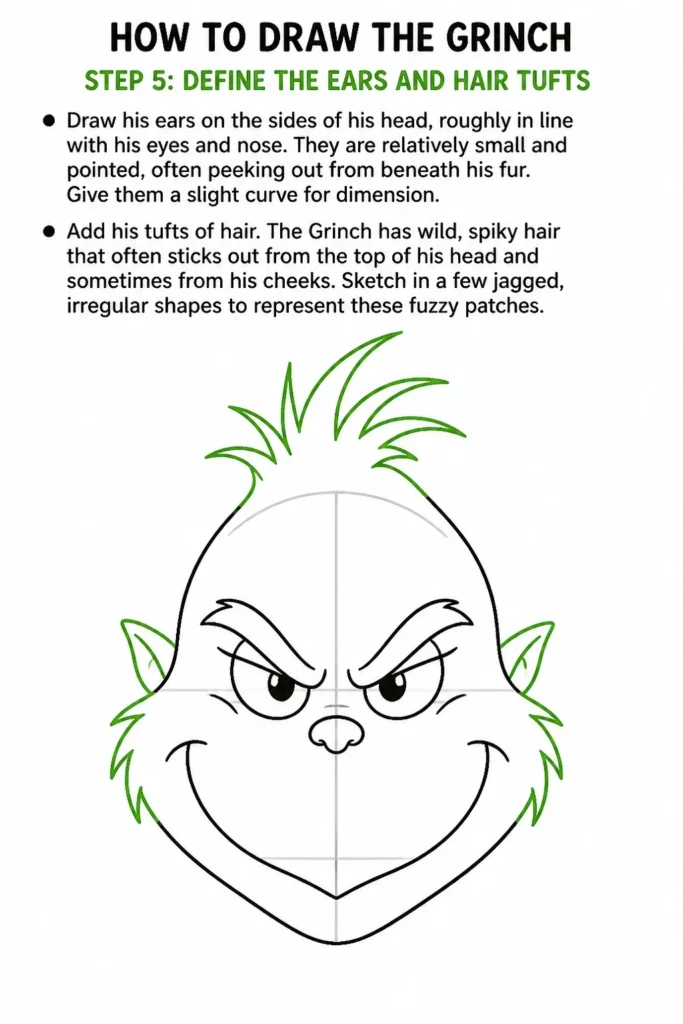
Draw his ears on the sides of his head, roughly in line with his eyes and nose. They are relatively small and pointed, often peeking out from beneath his fur. Give them a slight curve for dimension.
Add his tufts of hair. The Grinch has wild, spiky hair that often sticks out from the top of his head and sometimes from his cheeks. Sketch in a few jagged, irregular shapes to represent these fuzzy patches.
Step 6: Outline the Body and Neck
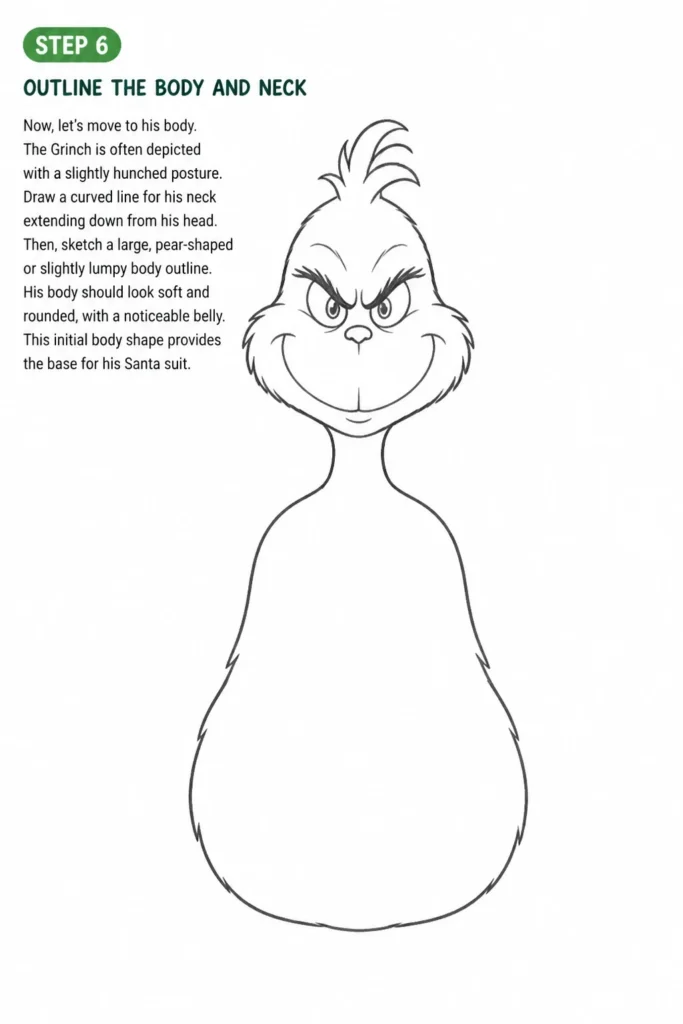
Now, let’s move to his body. The Grinch is often depicted with a slightly hunched posture. Draw a curved line for his neck extending down from his head. Then, sketch a large, pear-shaped or slightly lumpy body outline.
His body should look soft and rounded, with a noticeable belly. This initial body shape provides the base for his Santa suit.
Step 7: Sketch His Grinchy Hands and Feet
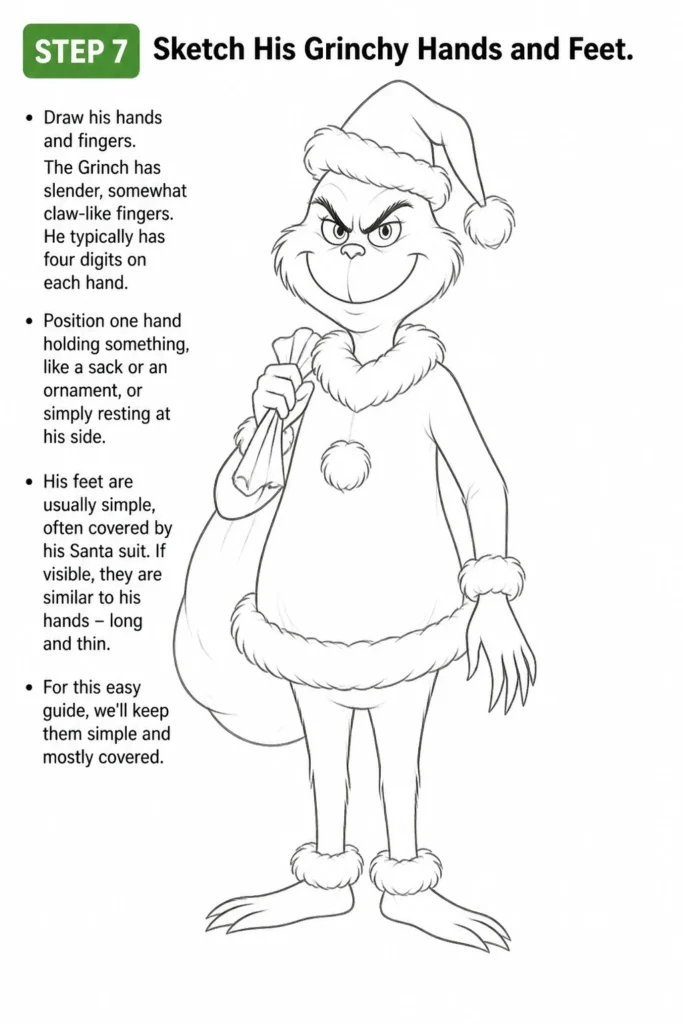
Draw his hands and fingers. The Grinch has slender, somewhat claw-like fingers. He typically has four digits on each hand. Position one hand holding something, like a sack or an ornament, or simply resting at his side.
His feet are usually simple, often covered by his Santa suit. If visible, they are similar to his hands – long and thin. For this easy guide, we’ll keep them simple and mostly covered.
Step 8: Add the Santa Suit Details
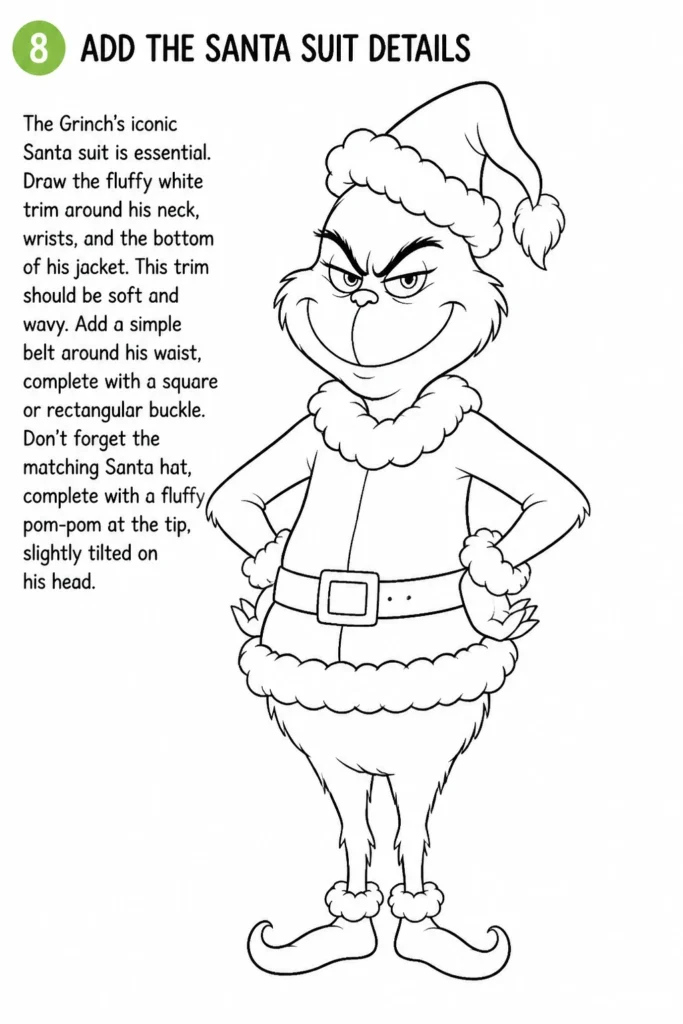
The Grinch’s iconic Santa suit is essential. Draw the fluffy white trim around his neck, wrists, and the bottom of his jacket. This trim should be soft and wavy.
Add a simple belt around his waist, complete with a square or rectangular buckle. Don’t forget the matching Santa hat, complete with a fluffy pom-pom at the tip, slightly tilted on his head.
Step 9: Refine Lines and Erase Guides
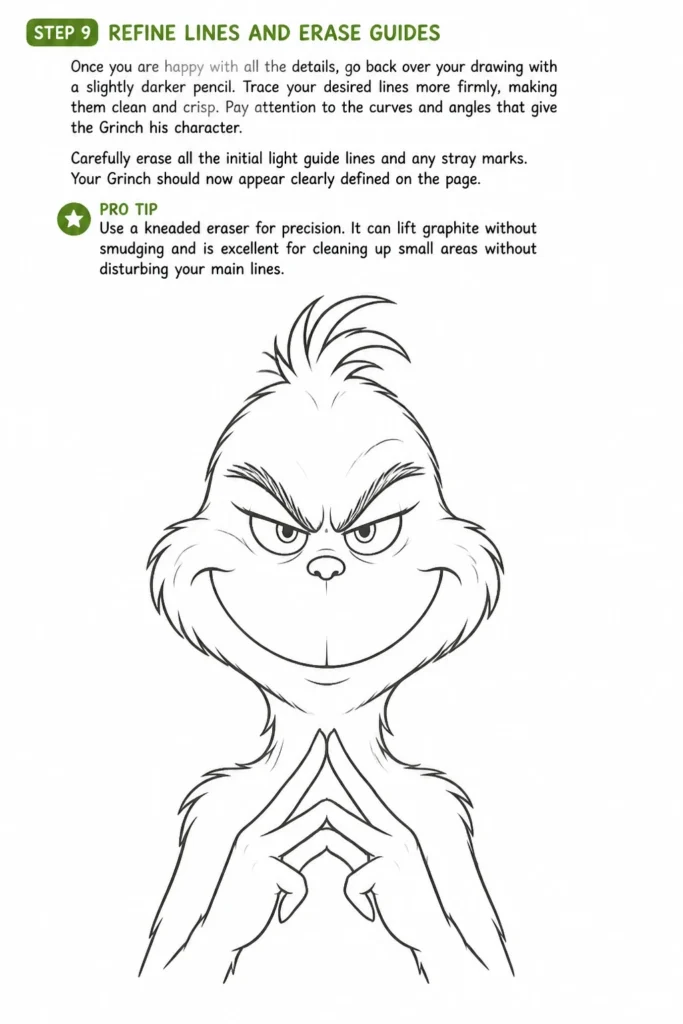
Once you are happy with all the details, go back over your drawing with a slightly darker pencil. Trace your desired lines more firmly, making them clean and crisp. Pay attention to the curves and angles that give the Grinch his character.
Carefully erase all the initial light guide lines and any stray marks. Your Grinch should now appear clearly defined on the page.
Pro Tip: Use a kneaded eraser for precision. It can lift graphite without smudging and is excellent for cleaning up small areas without disturbing your main lines.
Step 10: Add Color and Shading (Optional)
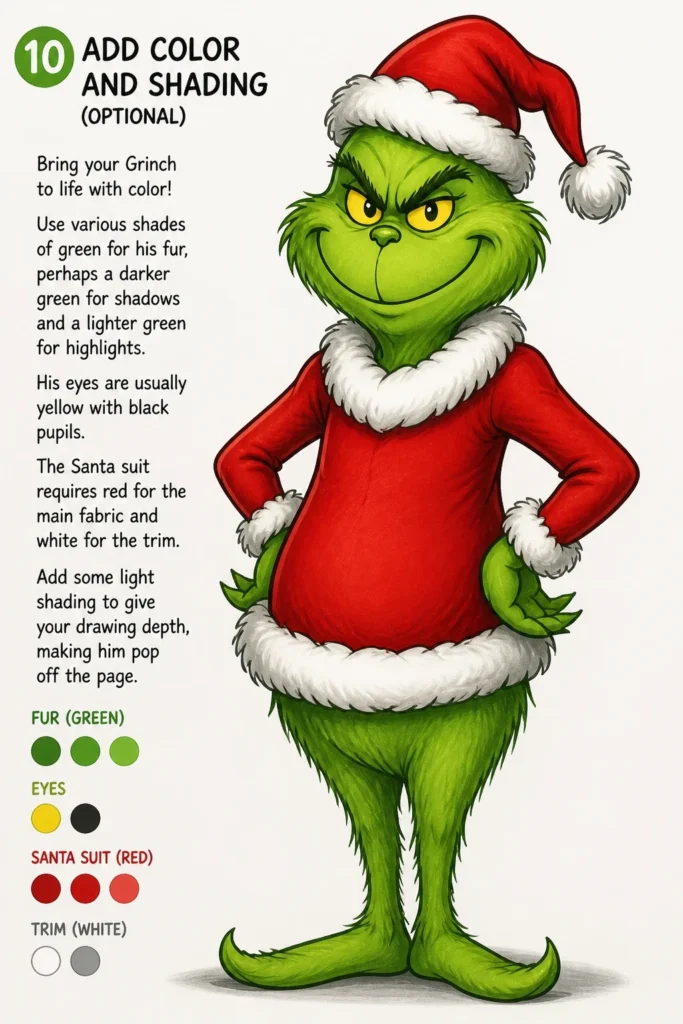
Bring your Grinch to life with color! Use various shades of green for his fur, perhaps a darker green for shadows and a lighter green for highlights. His eyes are usually yellow with black pupils.
The Santa suit requires red for the main fabric and white for the trim. Add some light shading to give your drawing depth, making him pop off the page.
Common Mistakes to Avoid
Making His Face Too Symmetrical
The Grinch often has a slightly asymmetrical, expressive face. Trying to make everything perfectly balanced can make him look stiff and less characterful. Embrace the slight tilts and quirks in his features.
Instead, focus on capturing his overall expression and the dynamic flow of his lines. A little imperfection often adds more personality to your drawing.
Drawing Stiff, Straight Lines
The Grinch is a furry, organic creature, not a robot. Using too many straight, rigid lines will make him look unnatural. His fur, his body, and even his grin should have soft, flowing curves.
Always aim for gentle, curved lines to convey his softness and the movement of his fur. Think about the texture you want to create.
Forgetting His Signature Eyebrows
His eyebrows are perhaps his most defining feature, conveying much of his grumpy or mischievous personality. Neglecting them or drawing them too thin will make him less recognizable.
Make sure his eyebrows are bushy, expressive, and angled correctly to show his emotion. They are key to his unique look.
Rushing the Initial Sketch
Skipping the light guide lines and jumping straight into dark, detailed lines can lead to frustration. If proportions are off early on, it’s hard to correct them without major erasing.
Take your time with the initial light sketches. Establish the basic shapes and guides before committing to darker, more permanent lines. This saves time and stress in the long run.
Troubleshooting
My Grinch Looks Too Human
If your Grinch appears too much like a regular person, you might be making his features too proportionate or soft. The Grinch has exaggerated, almost cartoonish features.
To fix this, try making his nose larger and more angular. Give his eyes a more pronounced slant and his eyebrows a stronger, downward angle. Exaggerate his grin and make his hair tufts spikier.
I Can’t Get His Grumpy Expression Right
Capturing the Grinch’s signature grumpiness is all about the eyebrows and mouth. If he looks too neutral, adjust these key areas.
Lower the inner ends of his eyebrows significantly, making them almost meet in the middle. Curl the corners of his mouth downwards slightly, or give him a more exaggerated, sneering grin that shows a hint of teeth.
His Body Looks Flat or Stiff
A flat-looking body usually means you’ve drawn it with too many straight lines or haven’t given it enough dimension. The Grinch has a soft, slightly lumpy build.
Redraw his body using more curved, organic lines. Think of it as a series of connected rounded shapes. Add subtle curves to his back and belly to give him a more natural, three-dimensional appearance.
Key Takeaways
Frequently Asked Questions
What are the best materials for a beginner?
For beginners, a simple graphite pencil (like an HB or 2B), a good eraser (kneaded or vinyl), and standard drawing paper are perfect. These tools are affordable and easy to use. Once comfortable, you can explore colored pencils or markers.
How can I make my Grinch look more mischievous?
To enhance his mischievous look, give him a wider, more exaggerated grin, perhaps with one eyebrow raised higher than the other. You can also add a slight twinkle or sparkle to his eyes, or show him peeking from the side of the page.
Can I draw the Grinch with Max?
Absolutely! Once you’re comfortable drawing the Grinch, you can add Max by sketching a simple dog shape next to him. Focus on Max’s perky ears and his small, reindeer-antler accessory. Max adds another layer of charm to the scene.
What if my drawing doesn’t look exactly like the Grinch?
That’s perfectly fine! Every artist has their unique style. The goal is to capture the essence of the Grinch, not to create an exact replica. Embrace your personal touch; it makes your drawing unique and special.
Our Top Recommended Finds
Your Grinchy Masterpiece Awaits!
You’ve now got all the tools and knowledge to create your very own Grinch drawing. The satisfaction of seeing him come to life on your page is truly rewarding. Don’t stop here; your artistic journey has just begun!
Consider drawing other Whoville characters, or try the Grinch in different poses or expressions. The more you practice, the more confident and skilled you will become. Grab your pencil and paper right now, and let your creativity flow!