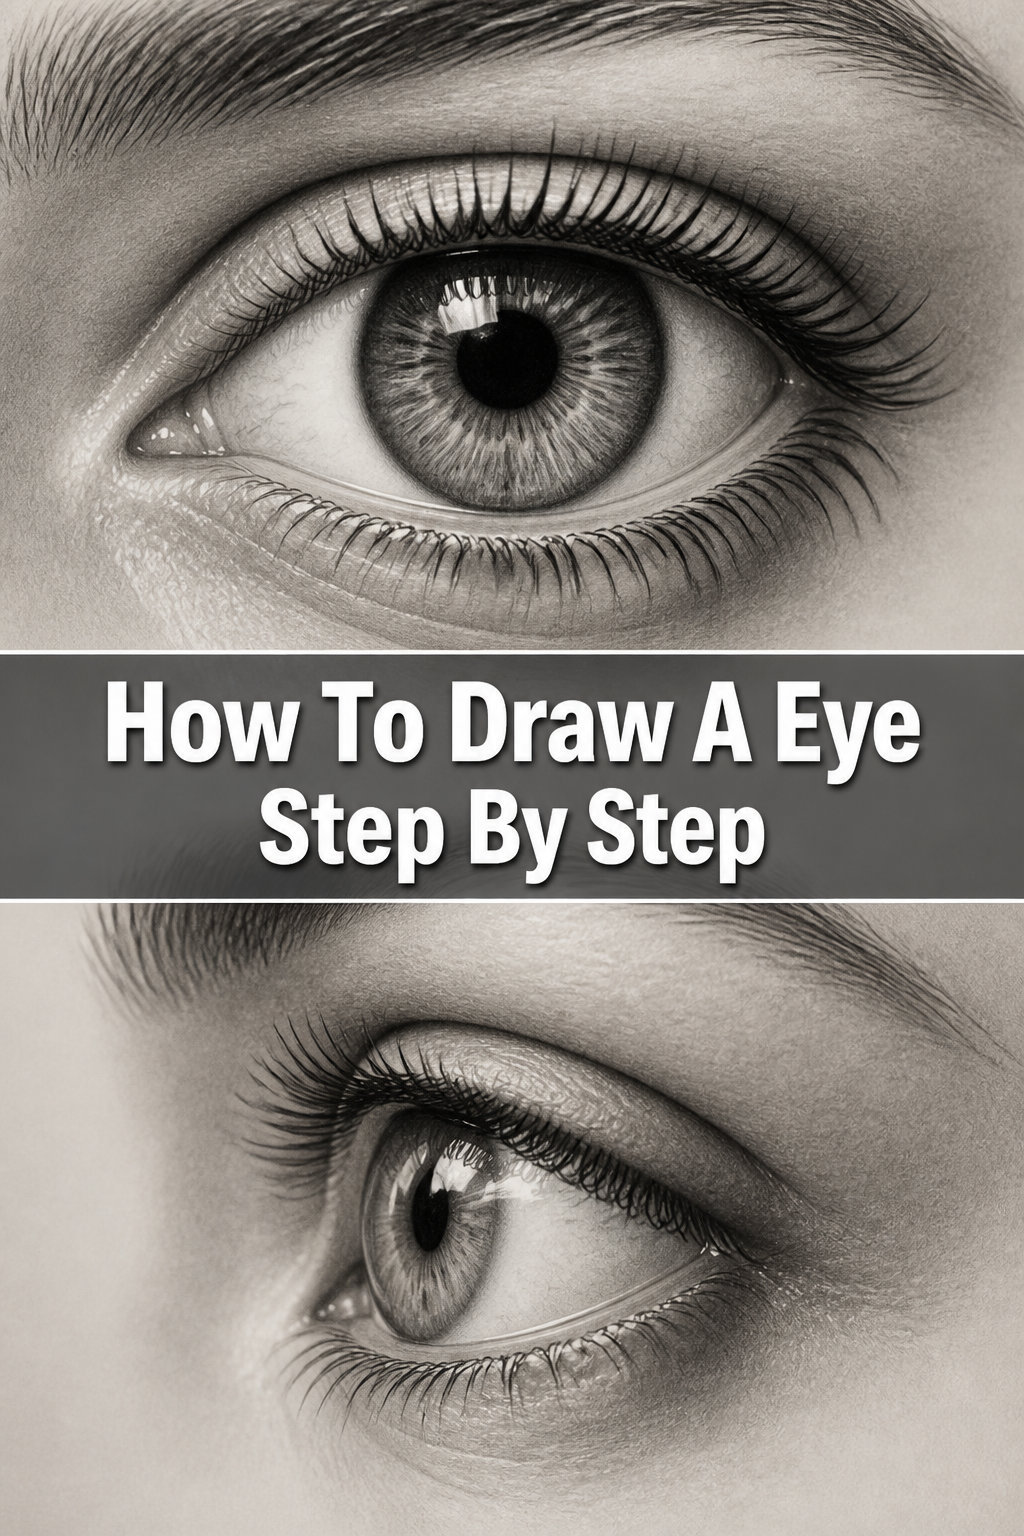
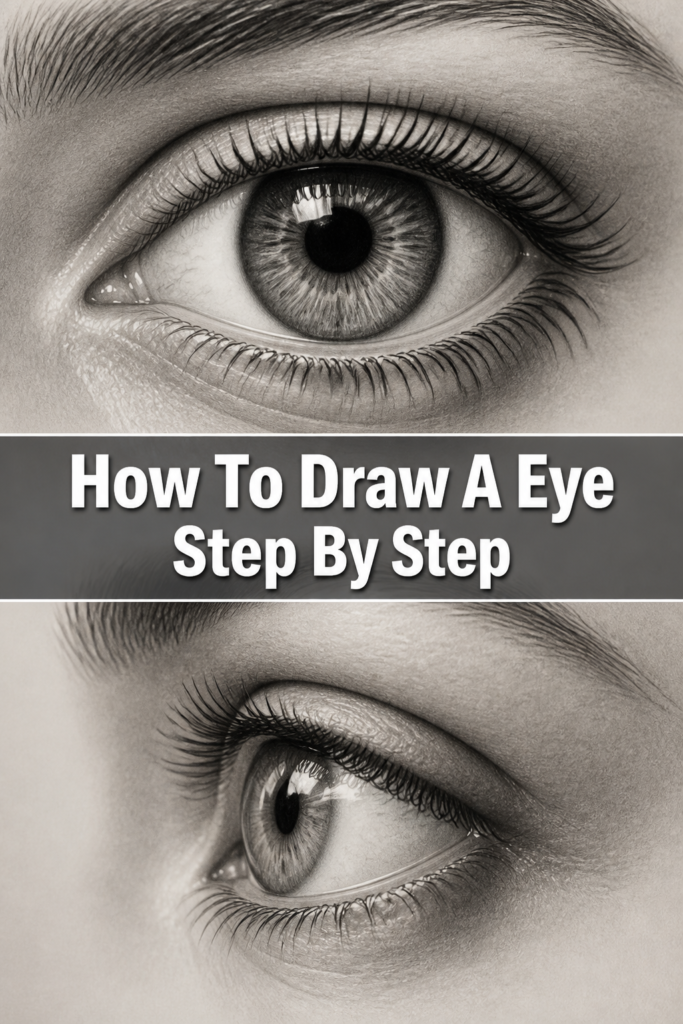
👁️ How To Draw A Eye Step By Step

& Painting
No rigid rules or pretension. Just practical guides, medium comparisons, and encouraging tips to help you enjoy the drawing & painting process.
Drawing an eye can seem daunting at first. It’s a focal point of expression and realism in any portrait. Many artists struggle with capturing its depth.
I’ve spent countless hours practicing eyes, understanding their intricate anatomy and subtle nuances. This guide shares the practical techniques I’ve refined over time, making the process clear and achievable for you.
Quick Overview
You’re about to embark on a creative journey that will transform your drawing skills. By the end, you’ll have a beautifully rendered eye, complete with depth and emotion. This guide breaks down complex steps into manageable actions.
- Time needed: 45-75 minutes (for a focused drawing session)
- Difficulty: Beginner to Intermediate
- What you’ll need: Sketching pencils (HB, 2B, 4B), paper, kneaded eraser, blending stump or cotton swab.
Step-by-Step Instructions
Step 1: Lay Down Your Basic Shapes
Begin by lightly sketching a large circle. This circle will serve as the general area for the eye and surrounding bone structure. Think of it as mapping out the orbital socket.
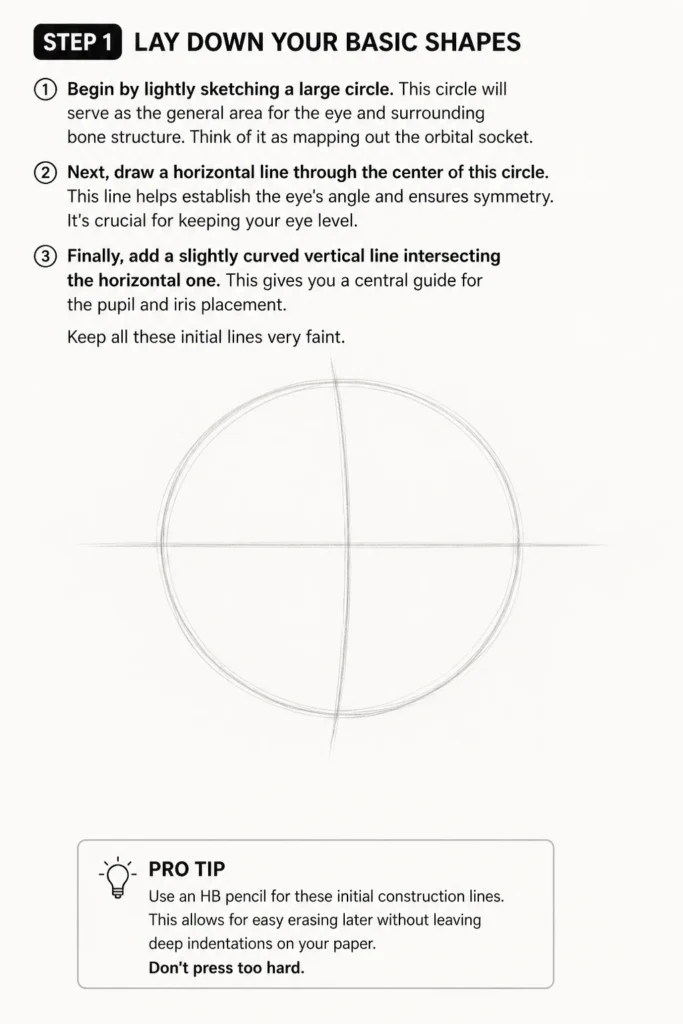
Next, draw a horizontal line through the center of this circle. This line helps establish the eye’s angle and ensures symmetry. It’s crucial for keeping your eye level.
Finally, add a slightly curved vertical line intersecting the horizontal one. This gives you a central guide for the pupil and iris placement. Keep all these initial lines very faint.
Pro Tip: Use an HB pencil for these initial construction lines. This allows for easy erasing later without leaving deep indentations on your paper. Don’t press too hard.
Step 2: Outline the Eye’s Almond Shape
Now, define the actual shape of the eyeball. Sketch two curved lines that meet at the horizontal guideline, forming an almond-like shape within your larger circle. This is the outer boundary of the eye opening.
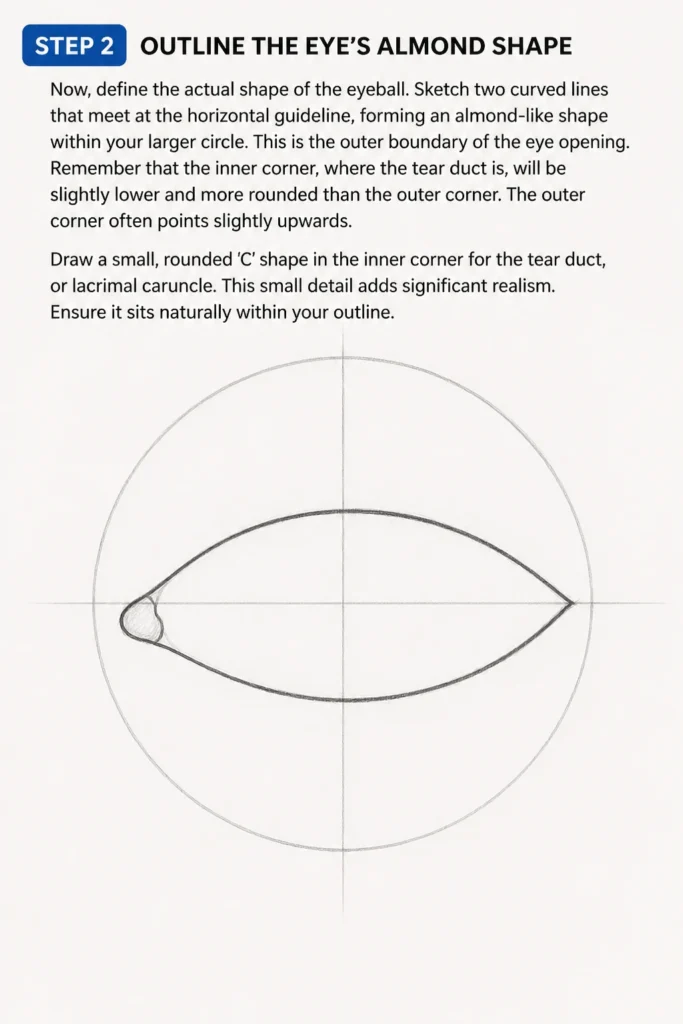
Remember that the inner corner, where the tear duct is, will be slightly lower and more rounded than the outer corner. The outer corner often points slightly upwards. Pay attention to these subtle differences.
Draw a small, rounded ‘C’ shape in the inner corner for the tear duct, or lacrimal caruncle. This small detail adds significant realism. Ensure it sits naturally within your outline.
Step 3: Draw the Iris and Pupil
Within your almond shape, sketch a perfect circle for the iris. Ensure it’s centered on your initial vertical guideline. Part of the iris will be covered by the upper eyelid, and sometimes the lower eyelid too.
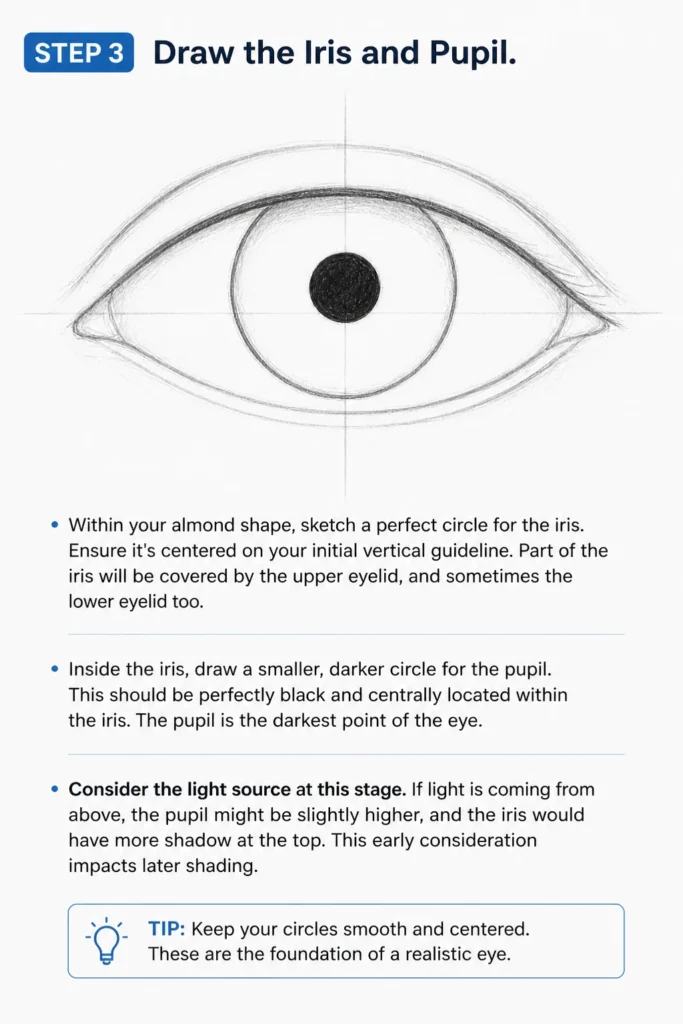
Inside the iris, draw a smaller, darker circle for the pupil. This should be perfectly black and centrally located within the iris. The pupil is the darkest point of the eye.
Consider the light source at this stage. If light is coming from above, the pupil might be slightly higher, and the iris would have more shadow at the top. This early consideration impacts later shading.
Step 4: Add Eyelids and Creases
Sketch the upper eyelid by drawing a line just above and parallel to the top curve of your eye outline. This line indicates the thickness of the eyelid itself. It gives the eye depth.
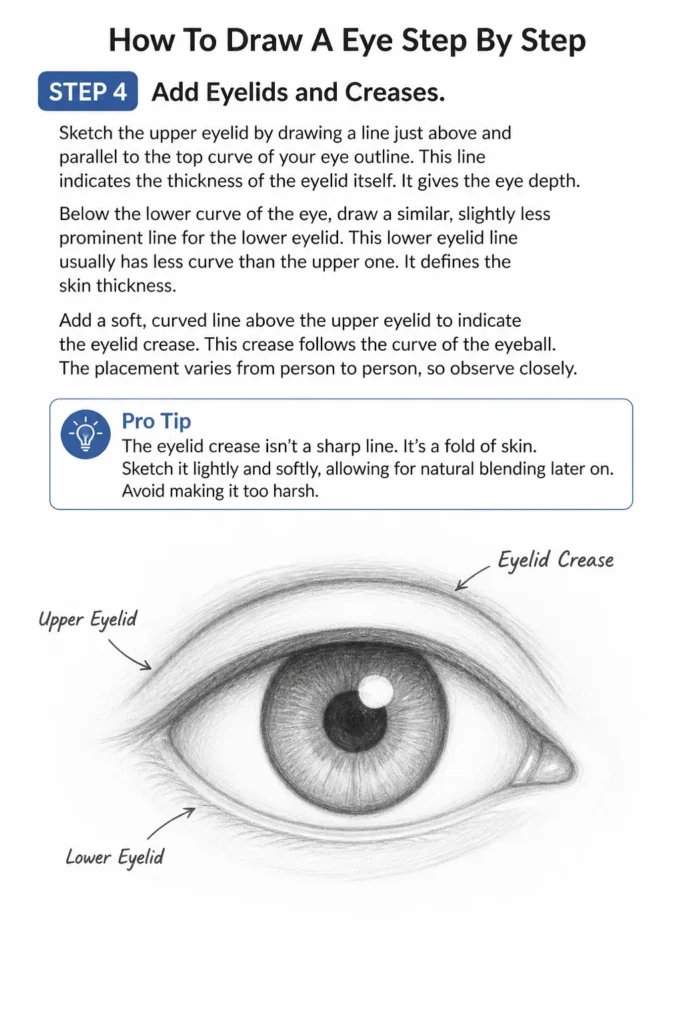
Below the lower curve of the eye, draw a similar, slightly less prominent line for the lower eyelid. This lower eyelid line usually has less curve than the upper one. It defines the skin thickness.
Add a soft, curved line above the upper eyelid to indicate the eyelid crease. This crease follows the curve of the eyeball. The placement varies from person to person, so observe closely.
Pro Tip: The eyelid crease isn’t a sharp line. It’s a fold of skin. Sketch it lightly and softly, allowing for natural blending later on. Avoid making it too harsh.
Step 5: Sketch Eyelashes
Eyelashes aren’t just straight lines. They grow in a curve, fanning out from the eyelid. They also differ in length and thickness. Start by drawing individual hairs.
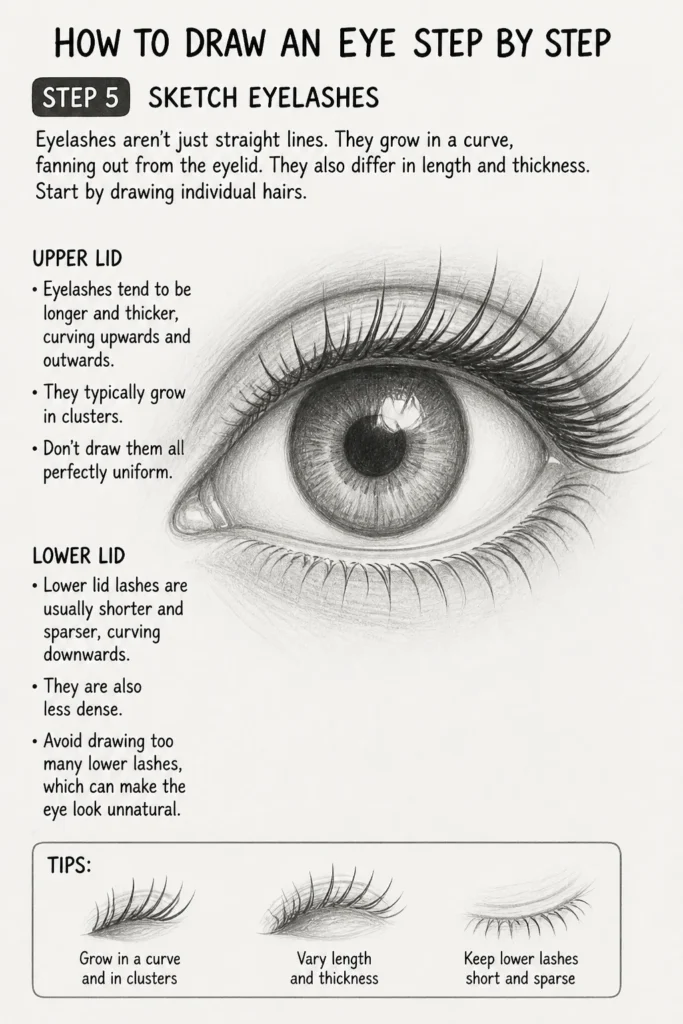
For the upper lid, eyelashes tend to be longer and thicker, curving upwards and outwards. They typically grow in clusters. Don’t draw them all perfectly uniform.
Lower lid lashes are usually shorter and sparser, curving downwards. They are also less dense. Avoid drawing too many lower lashes, which can make the eye look unnatural.
Step 6: Define the Brow and Surrounding Area
Lightly sketch the eyebrow above the eye. The eyebrow follows the curve of the brow bone. Its shape greatly influences the eye’s expression.
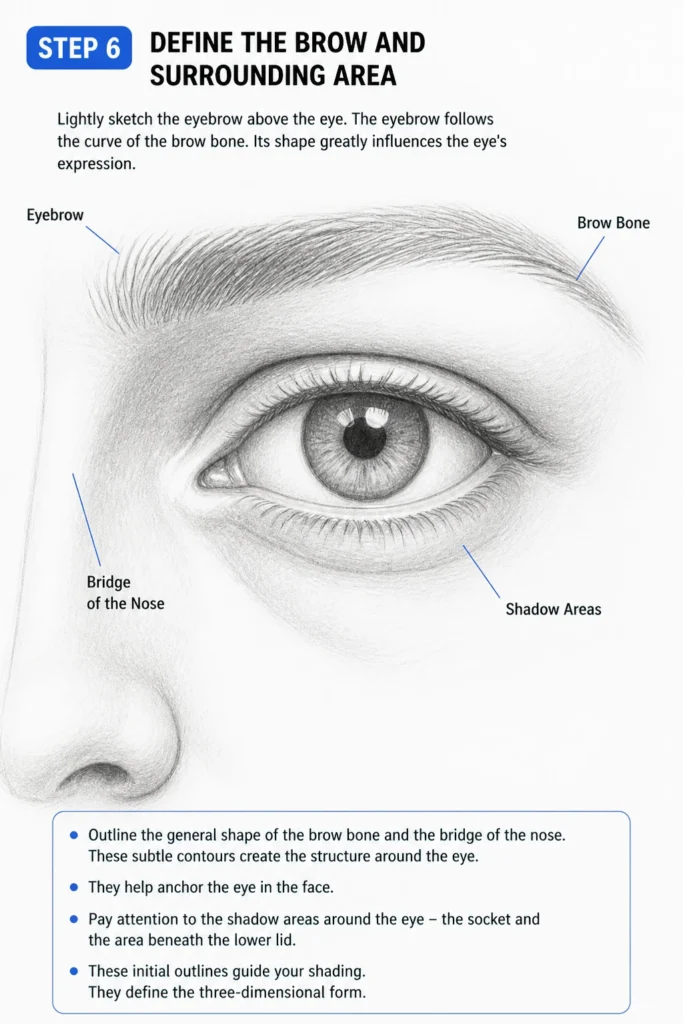
Outline the general shape of the brow bone and the bridge of the nose. These subtle contours create the structure around the eye. They help anchor the eye in the face.
Pay attention to the shadow areas around the eye – the socket and the area beneath the lower lid. These initial outlines guide your shading. They define the three-dimensional form.
Step 7: Shading and Tonal Values
This is where the eye comes to life. Begin by shading the pupil completely black using a 4B or 6B pencil. This creates the deepest dark.
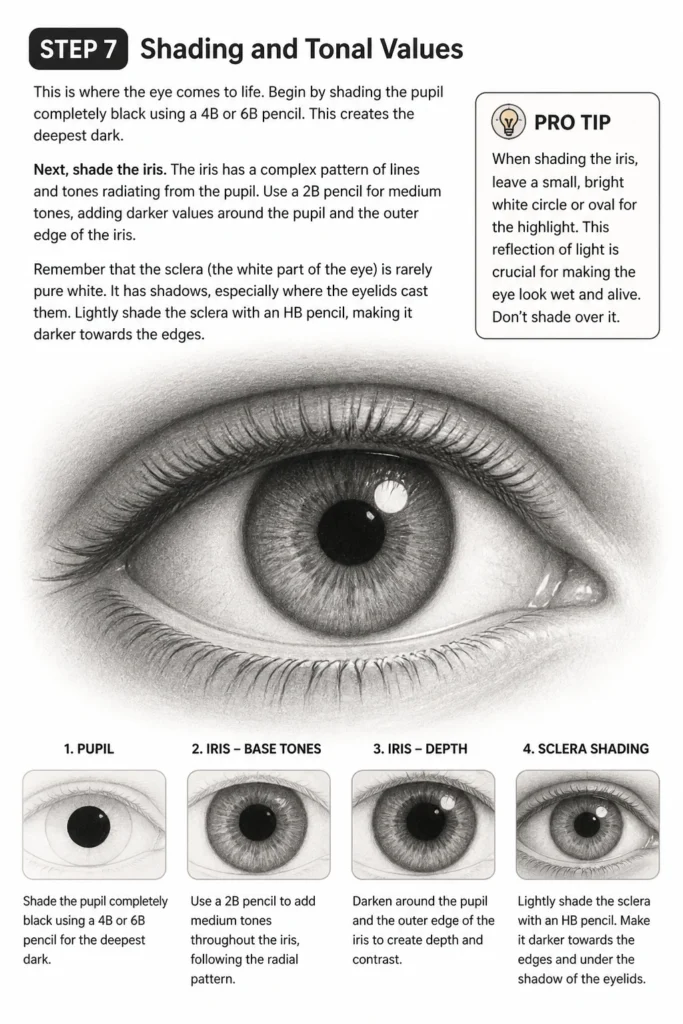
Next, shade the iris. The iris has a complex pattern of lines and tones radiating from the pupil. Use a 2B pencil for medium tones, adding darker values around the pupil and the outer edge of the iris.
Remember that the sclera (the white part of the eye) is rarely pure white. It has shadows, especially where the eyelids cast them. Lightly shade the sclera with an HB pencil, making it darker towards the edges.
Pro Tip: When shading the iris, leave a small, bright white circle or oval for the highlight. This reflection of light is crucial for making the eye look wet and alive. Don’t shade over it.
Step 8: Add Highlights and Refinements
Go back to the eyelashes and darken them where necessary. They should be the darkest lines on the eye, besides the pupil. Ensure they still show individual hairs.
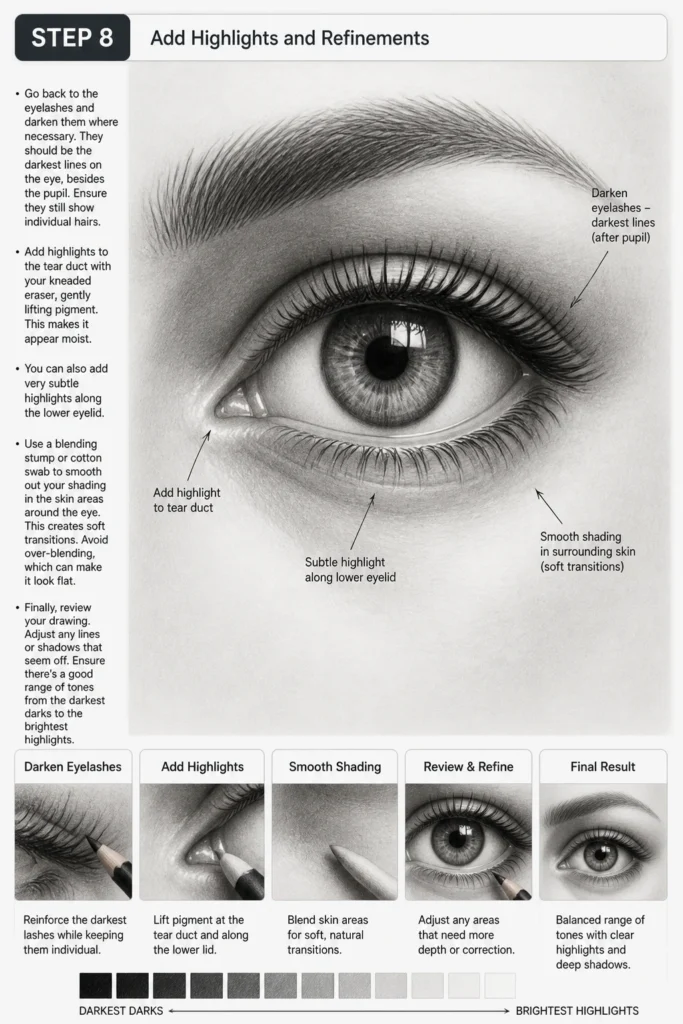
Add highlights to the tear duct with your kneaded eraser, gently lifting pigment. This makes it appear moist. You can also add very subtle highlights along the lower eyelid.
Use a blending stump or cotton swab to smooth out your shading in the skin areas around the eye. This creates soft transitions. Avoid over-blending, which can make it look flat.
Finally, review your drawing. Adjust any lines or shadows that seem off. Ensure there’s a good range of tones from the darkest darks to the brightest highlights.
Common Mistakes to Avoid
Drawing a Flat Eye
Many beginners draw the eye as a flat shape on the page. They forget it’s a sphere sitting within a socket. This makes the eye look pasted on rather than integrated.
To fix this, always visualize the eyeball as a three-dimensional sphere. Shade the sclera (the white part) with subtle curves to show its roundness. Remember the eyelids wrap around this sphere, not just sit on top.
Making the Sclera Too White
The “whites” of the eyes are rarely pure white in reality. They are often in shadow, reflecting ambient light. Leaving them stark white makes the eye look lifeless or like a cartoon.
Instead, lightly shade the sclera with an HB pencil, especially where the upper eyelid casts a shadow. Add subtle darker tones near the corners. This gives it depth and realism, making it feel part of the face.
Uniform Eyelashes
Drawing eyelashes as identical, evenly spaced lines is a common pitfall. Real eyelashes are messy, varied, and grow in different directions. This uniformity makes the eye look unnatural.
Vary the length, thickness, and direction of your lashes. Draw them in small clusters rather than perfectly spaced. Some will overlap; some will be shorter. This creates a much more organic and believable look.
Ignoring Surrounding Structure
Focusing only on the eye itself and neglecting the brow bone, nose bridge, and cheek can leave the eye floating on the page. The surrounding anatomy is crucial for context.
Always include light indications of the brow, the shadow beneath the brow bone, and the subtle contours of the cheekbone. These elements define the eye socket and ground the eye within the face.
Troubleshooting
My Eye Looks Stiff and Unnatural
If your eye appears rigid, you might be drawing lines too harshly or making shapes too geometric. Eyes have soft curves and organic forms.
Try to loosen your grip on the pencil and use lighter strokes. Focus on capturing the natural flow of the eyelids and the subtle irregularities of the iris. Practice drawing quick, gestural eyes to build fluidity.
The Eye Lacks Depth
A flat-looking eye often means you haven’t utilized a full range of tonal values. Everything might be too light or too uniform in shade.
Push your darks! Make the pupil truly black and add strong shadows in the iris and under the eyelids. Conversely, ensure your highlights are truly bright. The contrast between light and dark creates the illusion of depth.
Eyelashes Don’t Look Realistic
If your lashes seem spiky or like fence posts, you might be drawing them too straight or too uniformly. They need to show natural curve and variation.
Observe how lashes grow from the eyelid, not just from the edge. They curve upwards for upper lashes and downwards for lower ones. Draw them in varying lengths and thickness, letting some overlap and fan out naturally.
Key Takeaways
- Start with basic shapes: Use construction lines to establish placement and proportion before detailing.
- Visualize the sphere: Always remember the eye is a round object within a socket, not a flat shape.
- Vary your tones: Utilize a full range of light and dark values to create depth and realism.
- Embrace imperfections: Real eyes have subtle irregularities; don’t strive for perfect symmetry in every detail.
- Pay attention to surrounding anatomy: The brow, nose bridge, and cheek contours define the eye’s context.
- Practice makes progress: Drawing eyes repeatedly helps you understand their structure and expressiveness.
Frequently Asked Questions
How do I make the eye look shiny and wet?
To achieve a wet, shiny look, you need strong highlights. Leave a crisp, bright white spot in the iris and on the tear duct. These reflections indicate moisture. Ensure the surrounding areas are darker to make these highlights pop.
What’s the best pencil to start with?
An HB pencil is ideal for initial sketching and lighter tones. It’s easy to erase and doesn’t smudge much. As you progress to shading, incorporate 2B and 4B for darker values and richer contrast.
Should I draw both eyes at once or one at a time?
It’s often helpful to sketch the basic shapes and outlines for both eyes simultaneously. This helps maintain symmetry and ensures they are aligned. Once the basic framework is in place, you can then detail one eye at a time.
How can I make my eyes look more expressive?
Expression comes from subtle changes in the eyelids, eyebrows, and the angle of the eye. A slight raise of the brow, a narrowing of the eyelids, or a glance in a particular direction can convey emotion. Observe real people’s eyes to capture these nuances.
Our Top Recommended Finds
- Staedtler Mars Lumograph Pencils: A fantastic set offering a range of graphite hardness for versatile sketching and shading.
- Kneaded Eraser: Essential for lifting graphite gently, creating highlights, and cleaning up without damaging paper.
- Blending Stumps/Tortillons: Perfect for smoothing out graphite and creating seamless transitions in shaded areas.
Your Canvas Awaits
You’ve now explored the intricate steps to drawing a realistic eye. It’s a journey of observation, patience, and practice. Every stroke builds towards a more lifelike representation.
Don’t let perfection be the enemy of progress. Pick up your pencil and start sketching today. The more you draw, the more your eyes will reveal their secrets to you. Consider trying different angles or expressions next to expand your skills even further.
& Painting
No rigid rules or pretension. Just practical guides, medium comparisons, and encouraging tips to help you enjoy the drawing & painting process.