🎂 How To Draw A Birthday Cake Step By Step
Have you ever wanted to sketch a delightful birthday cake but felt unsure where to begin? It’s a common desire for many aspiring artists, or even just for personal cards and notes.
I remember drawing my first birthday cake for a friend’s card, a simple gesture that brought so much joy. This guide comes from years of experimenting and finding the easiest ways to create charming illustrations.
You’ll discover how simple it can be to bring a festive cake to life on paper. Let’s create something sweet together!
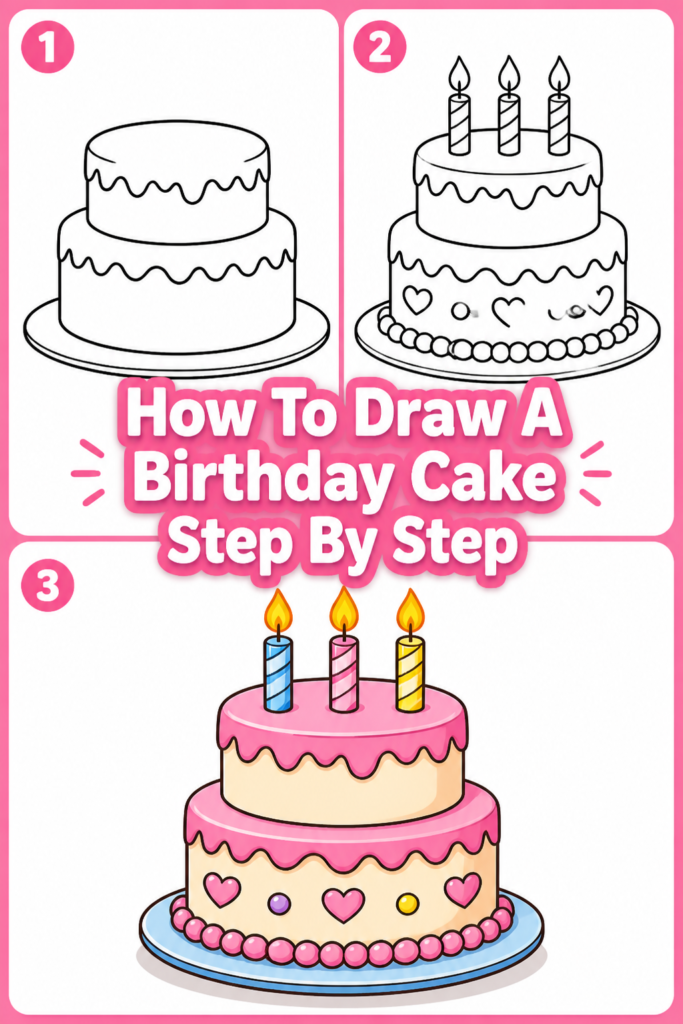
Quick Overview
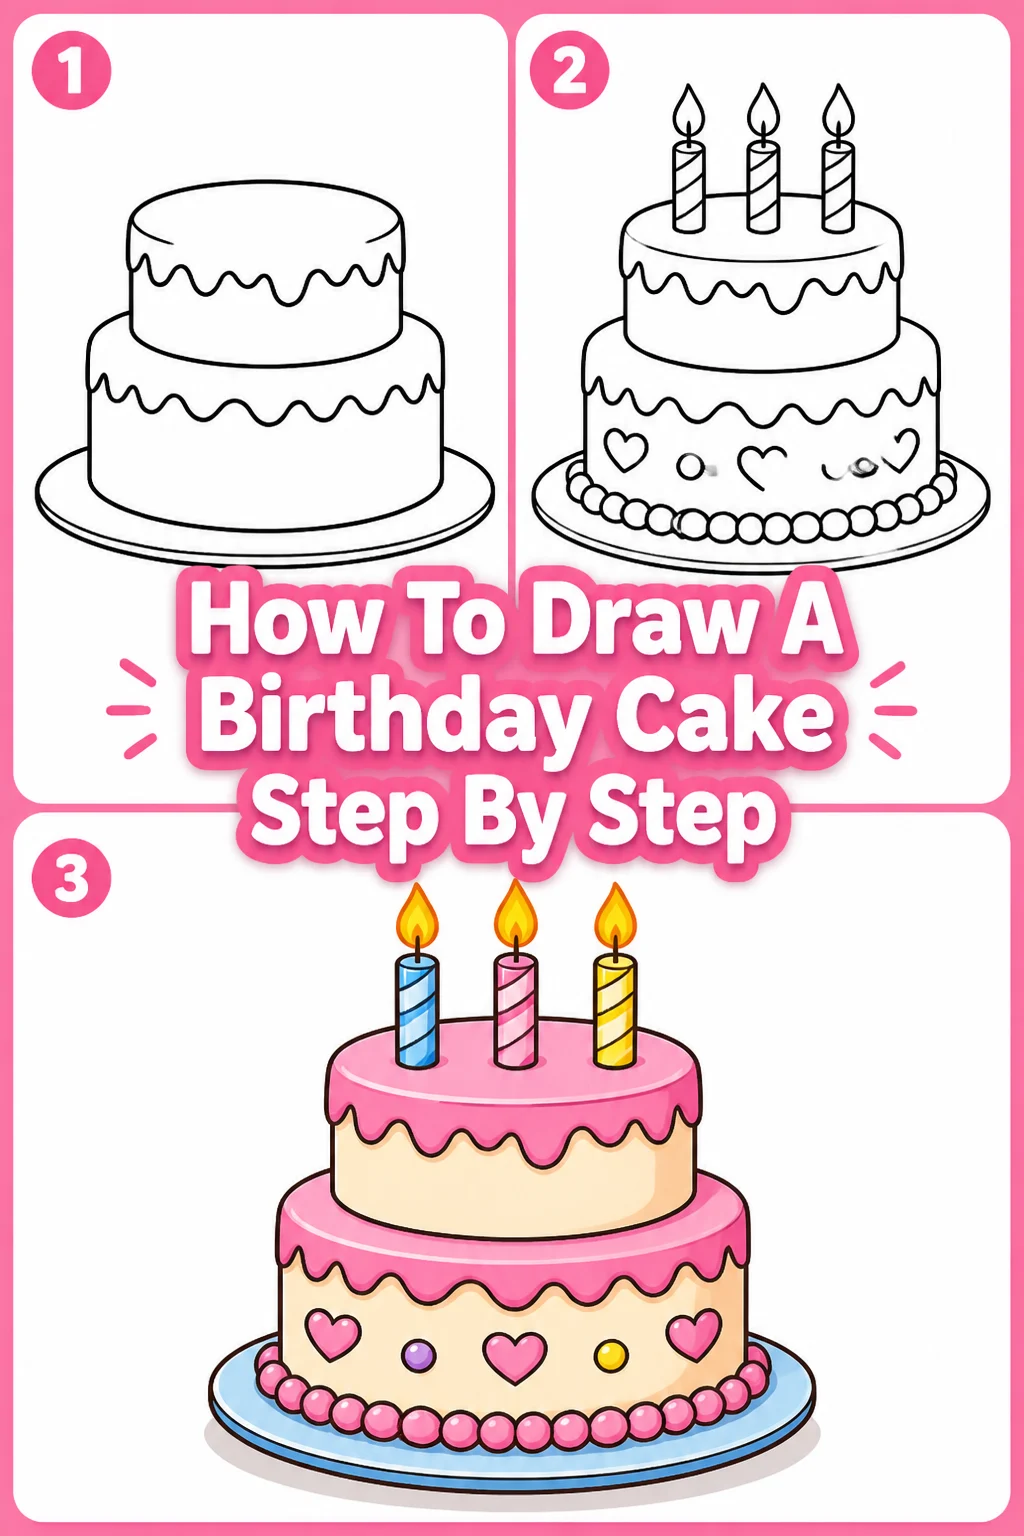
By following these steps, you will learn to draw a charming birthday cake, complete with frosting, candles, and fun decorations. It’s a rewarding project that builds fundamental drawing skills.
Time needed: 45-75 minutes (depending on detail)
Difficulty: Beginner
What you’ll need: Pencil (HB, 2B recommended), eraser, paper, ruler (optional), colored pencils or markers.
Step-by-Step Instructions
Step 1: Sketch the Base Shape
Begin by lightly sketching the foundational shape of your cake. This initial outline will serve as the blueprint for everything else you add. Think of it as building the cake stand and the bottom layer.
Draw a horizontal oval for the top of the cake. This will give it a nice, round appearance.
Add two vertical lines extending downwards from the sides of the oval. Make sure these lines are roughly parallel.
Connect the bottom of these vertical lines with a slightly curved horizontal line. This forms the first, lowest layer of your cake.
Pro Tip: Keep your lines very light in this stage. You’ll be erasing them later, so don’t press too hard with your pencil. This allows for easy adjustments.
Step 2: Build the Cake Layers
Now, let’s add more height and structure to your cake by stacking additional layers. This creates a classic tiered look. Each layer will be slightly smaller or the same size as the one below it.
Draw another horizontal oval directly above your first cake layer. This oval should be slightly smaller than the base oval, suggesting a tiered cake.
Extend two more vertical lines downwards from this new oval, connecting them to the top of the first layer.
Repeat this process for a third layer if you wish, making it even smaller for a grander effect. You can also make all layers the same size for a simpler design.
Pro Tip: Ensure the vertical lines for each layer are aligned. Using a ruler for these initial structural lines can help maintain symmetry and stability in your drawing.
Step 3: Define the Frosting and Drips
Frosting is what makes a birthday cake truly festive and appealing. This step adds that delicious, soft texture and some playful drips. It brings your cake to life with a touch of sweetness.
Outline the top of each cake layer with a wavy, irregular line to represent soft, fluffy frosting. Don’t make it perfectly smooth.
Draw small, curved lines extending downwards from the edges of the top frosting layer. These are your frosting drips, adding a dynamic touch.
Connect the bottoms of these drips with a slightly wavy line to the top of the layer below, creating a sense of flow.
Pro Tip: Vary the length and curve of your drips. Some can be short and subtle, while others might stretch further down, making the frosting look more natural and appealing.
Step 4: Place the Candles
No birthday cake is complete without candles! They add a celebratory element and instantly communicate the cake’s purpose. Think about how many candles you want to include.
Draw several thin, vertical rectangles on the top frosting layer. Space them out evenly or cluster them for a different look.
Add a small, flame-like shape or a simple oval on top of each rectangle to represent the candle’s flame.
Give each flame a tiny, upward-curving line for the wick.
Pro Tip: Experiment with candle placement. You can have them all standing straight, or slightly angled for a more playful, whimsical feel. Consider adding a few extra for decoration, even if they don’t represent an age.
Step 5: Design Decorations
This is where you can truly personalize your cake and make it unique. Decorations add character, flair, and a burst of color. Let your imagination guide you in this step.
Add sprinkles by drawing tiny dots or short dashes scattered across the frosting.
Draw small cherries or berries on top or around the base of each layer. Use simple circles with a tiny stem.
Create decorative swirls or patterns along the sides of the cake layers. Simple dots, lines, or small hearts work wonderfully.
Pro Tip: Don’t feel limited to traditional decorations. You could add chocolate shavings, fruit slices, or even a small banner on top. Think about the recipient’s favorite things.
Step 6: Refine Lines and Erase Guides
Now that all your elements are in place, it’s time to clean up your drawing. This step makes your cake look polished and professional. It brings clarity to your artwork.
Go over your preferred lines with a slightly firmer hand or a darker pencil (like a 2B) to make them stand out.
Carefully erase all the light construction lines from your initial sketches. Ensure you only remove the guide lines, leaving your final cake outline.
Smooth out any jagged edges or uneven curves.
Pro Tip: Use a kneaded eraser for precision. It can lift graphite without smudging and can be molded into a fine point for small areas.
Step 7: Add Color
Bringing color into your drawing makes it vibrant and inviting. Choose a palette that evokes celebration and joy. This step transforms your sketch into a lively piece.
Choose your preferred coloring medium: colored pencils, markers, or even watercolors.
Start by coloring the cake layers, perhaps a light yellow or pink for a classic sponge.
Color the frosting with a contrasting or complementary shade. Think blues, purples, or a vibrant white.
Fill in the candles with bright colors, and the flames with yellows and oranges.
Apply color to your decorations, making sprinkles multi-colored and cherries red.
Pro Tip: Layer your colors for depth. Start with a light base color and gradually build up intensity, especially in areas that will receive shading.
Step 8: Introduce Shading and Highlights
Shading adds dimension and makes your cake look three-dimensional, rather than flat. Highlights make it appear shiny and fresh, creating a sense of realism.
Identify a light source. Imagine where the light is coming from (e.g., top-left).
Apply darker shades to the areas opposite your light source, such as under the frosting drips and on the sides of the cake layers furthest from the light.
Use a lighter hand or even a white pencil/gel pen to add small highlights on the brightest parts of the frosting and candles, where the light would directly hit.
Pro Tip: Observe real cakes or photos of cakes to understand how light interacts with their surfaces. Notice where shadows naturally fall and where reflections appear.
Step 9: Finish with Details and Texture
The final touches can truly elevate your drawing. Adding small details and texture makes your cake look more appetizing and complete. It’s about bringing out the fine characteristics.
Add tiny dots or lines to the cake layers themselves to suggest a porous cake texture.
Use a fine-tipped pen or darker pencil to add very small, subtle outlines or details to your decorations.
Consider drawing a simple surface underneath the cake, like a table, or a faint background to ground your drawing.
Pro Tip: Step back from your drawing frequently to assess it. Sometimes, a fresh perspective helps you spot areas that need a little more attention or refinement.
Common Mistakes to Avoid
Uneven Layers
Many beginners struggle with making their cake layers look symmetrical and stable. If your layers are wobbly or lopsided, the entire cake can appear unstable. The trick is to establish a strong foundation. Always begin with very light construction lines, using a ruler if needed, to ensure your base oval and vertical lines are even before committing to darker strokes. Regularly check for balance as you add each tier.
Stiff, Unnatural Candles
Sometimes, candles can look like rigid sticks rather than delicate, festive elements. If they are too perfectly straight or uniformly spaced, they lose their charm. To avoid this, introduce slight variations in height and angle. You can even give a couple of candles a gentle lean, suggesting movement and a more organic, hand-placed feel. Remember to make the flames lively, not just static shapes.
Flat, Lifeless Decorations
Decorations like sprinkles or cherries can sometimes appear two-dimensional, failing to add depth. If your sprinkles look like simple dots or your cherries lack roundness, they won’t pop. To counter this, add a tiny highlight to each sprinkle or cherry with a lighter color or a white gel pen. For larger decorations, a touch of shading on one side can instantly make them appear three-dimensional and more appealing.
Over-Complicating the Design
It’s tempting to add every decoration imaginable, but sometimes less is more. If your cake looks cluttered or too busy, the individual elements might get lost. Start with a few key decorations and build from there. Learn to stop when the cake feels complete and visually balanced, rather than adding extra details just for the sake of it. Simplicity often allows the main cake structure to shine.
Troubleshooting
My cake looks lopsided or unbalanced.
This is a common issue when freehand drawing. The best solution is to go back to your initial construction lines. Lightly redraw a central vertical axis through your cake. Then, check if your horizontal ovals and vertical sides are equidistant from this central line. Use a ruler to measure if necessary. Often, a slight adjustment to one side can bring the whole cake back into balance. Don’t be afraid to erase and redraw segments until it feels right.
My frosting looks messy or too rigid.
If your frosting appears clumpy or too angular, it usually means your strokes were too heavy or too uniform. To fix this, practice drawing wavy, irregular lines with a very light hand on a separate piece of paper. When applying this to your cake, aim for soft, flowing curves. If the existing frosting is too rigid, gently erase parts of it and redraw with lighter, more organic strokes, varying the depth of the waves and drips. Think about the natural flow of soft icing.
I can’t get the colors to look vibrant or realistic.
Achieving vibrant and realistic colors often involves layering and understanding color theory. If your colors look dull, try applying a lighter shade first, then gradually building up intensity with a slightly darker shade of the same color. For realism, consider the light source and add subtle variations in hue—for instance, a slightly warmer yellow in highlighted areas of the cake, and a cooler yellow in shaded parts. Don’t be afraid to experiment with blending different shades together to create richer, more complex colors.
Key Takeaways
Start with Light Sketches: Always begin with gentle, erasable lines to establish your cake’s basic structure and proportions.
Layer for Dimension: Build your cake layer by layer, considering how each tier sits upon the one below it.
Embrace Imperfection: Frosting and decorations look more natural with slight irregularities and varied textures.
Add Celebratory Elements: Candles and diverse decorations are crucial for making your cake look festive and complete.
Refine and Enhance: Cleaning up lines, adding color, and applying shading transform a simple sketch into a vibrant artwork.
Practice Makes Perfect: Consistent drawing practice helps improve your hand control, observation skills, and confidence.
Frequently Asked Questions
Can I draw a round cake instead of a tiered one?
Absolutely! The principles remain the same. Instead of stacking multiple layers, you would focus on a single, larger round shape. Start with a prominent oval for the top, then draw two curved lines down from its sides, connecting them with another curve at the bottom to form the cylindrical body of the cake. All the steps for frosting, candles, and decorations still apply beautifully.
How can I make my cake look more realistic?
Realism comes from attention to detail in shading, texture, and light. Focus on creating depth by adding shadows where light wouldn’t hit (e.g., under frosting drips, on the side furthest from your light source). Introduce subtle textures like tiny pores on the cake or a slight sheen on the frosting using highlights. Observing real cakes or photographs can greatly inform your artistic choices.
What if I don’t have colored pencils or markers?
No problem at all! You can create a stunning birthday cake using just a pencil. Focus on varying your line weights—use darker lines for outlines and areas in shadow, and lighter lines for highlights and soft textures. You can also use cross-hatching or stippling techniques to add texture and depth, creating a beautiful monochromatic drawing.
How can I add personalized touches to my cake?
Personalization is key to making your drawing special. Consider adding a name written in icing on top of the cake, incorporating specific themes (like stars, hearts, or character motifs), or even drawing a small, edible figurine on the top layer. Think about the person you’re drawing it for and what they love, then translate those elements into your design.
Our Top Recommended Finds
Sketchbook with Quality Paper: A good sketchbook provides a smooth surface that takes pencil and color well, making your drawing experience more enjoyable.
Drawing Pencil Set (HB, 2B, 4B): Having a range of pencil hardness allows you to create lighter construction lines and darker, more defined final lines and shading.
* Kneaded Eraser and Vinyl Eraser: A kneaded eraser is excellent for lifting graphite gently without smudging, while a vinyl eraser offers precise removal of unwanted lines.
Your Next Creative Adventure Awaits
You’ve just created a delightful birthday cake, a symbol of joy and celebration. This journey from a blank page to a finished drawing is a testament to your patience and creativity.
Don’t let your artistic momentum stop here. Take a moment to admire your work, then consider what other sweet treats you might draw next. Perhaps a stack of pancakes, a towering ice cream sundae, or a tray of cookies?
Pick up your pencil again today and continue exploring the wonderful world of drawing. Every stroke is a step towards mastering your craft.