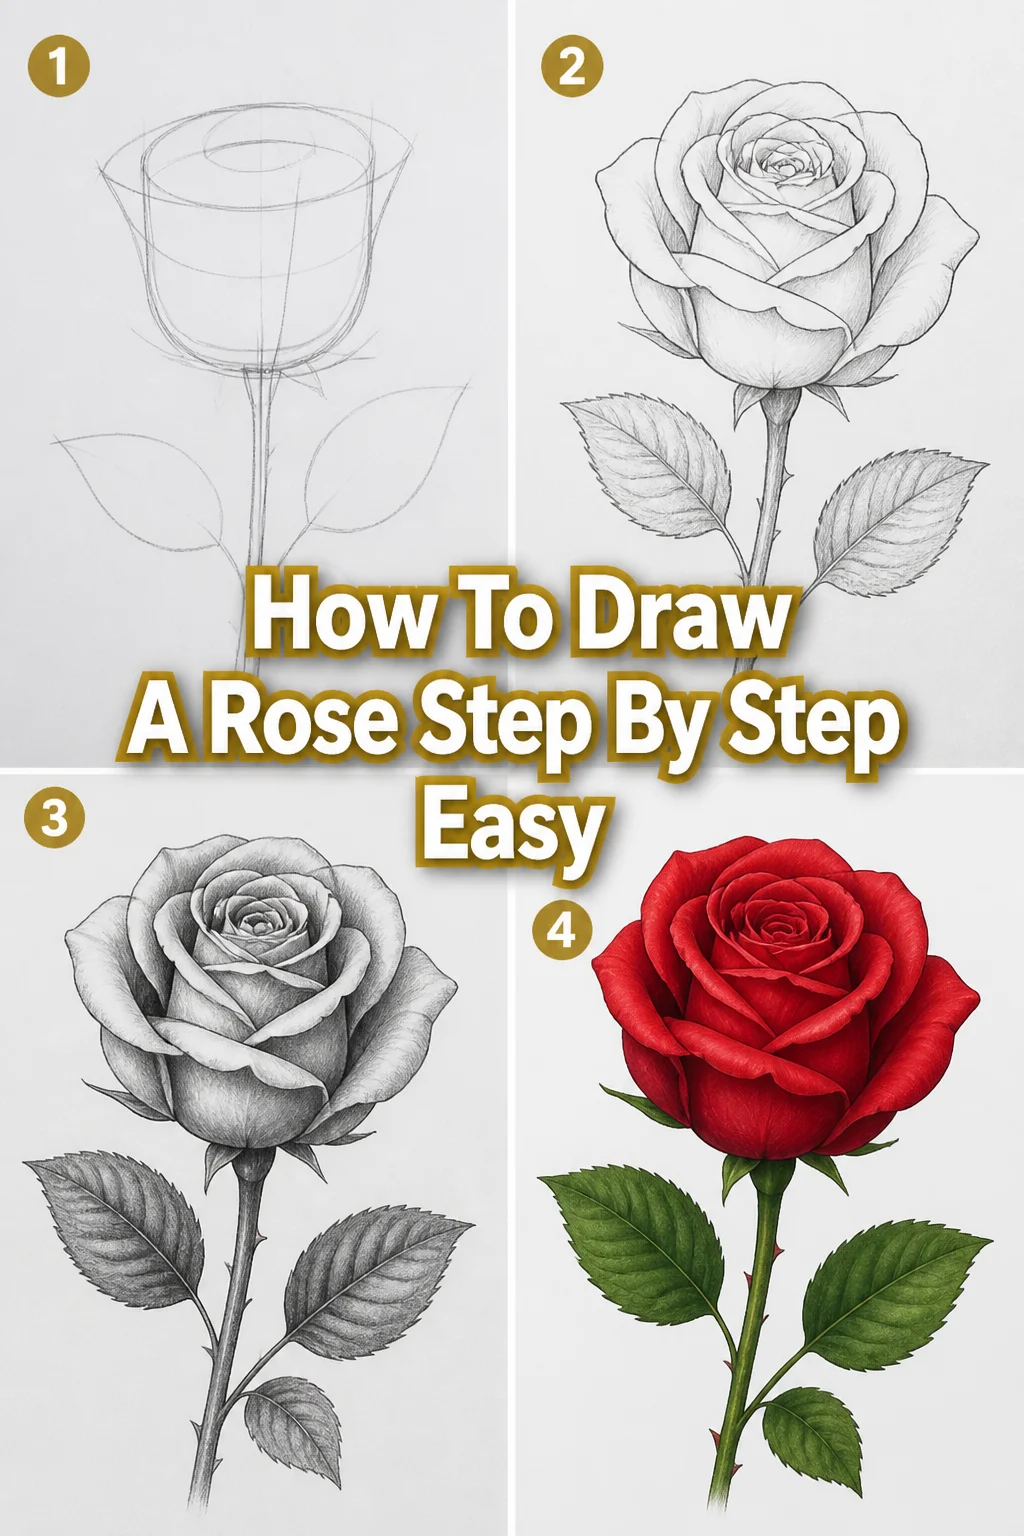
🌹 How To Draw A Rose Step By Step Easy
Learning to draw a rose might seem tricky at first glance. Its delicate petals and intricate form can feel intimidating for beginners. However, with the right approach, anyone can create a beautiful rose on paper.
I remember my own early attempts, often ending in frustration with messy, unrealistic shapes. This guide breaks down the process into simple, manageable steps, making it accessible even if you’ve never drawn before. You’ll soon discover the joy of bringing this classic flower to life.
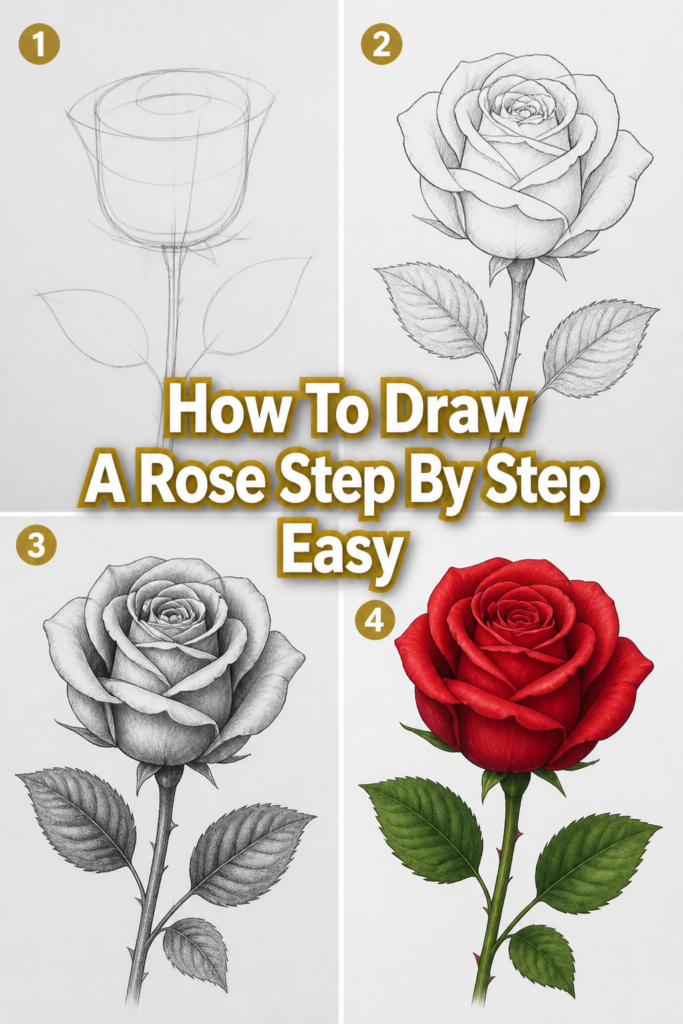
Quick Overview
This guide will walk you through creating a lovely rose drawing from scratch. You’ll learn to build up the form layer by layer, focusing on natural shapes and gentle curves. By the end, you’ll have a completed rose and the confidence to try more complex drawings.
- Time needed: 30-60 minutes
- Difficulty: Beginner
- What you’ll need: Pencil (HB or 2B recommended), Eraser, Paper
Step-by-Step Instructions
Step 1: Sketch the Basic Form
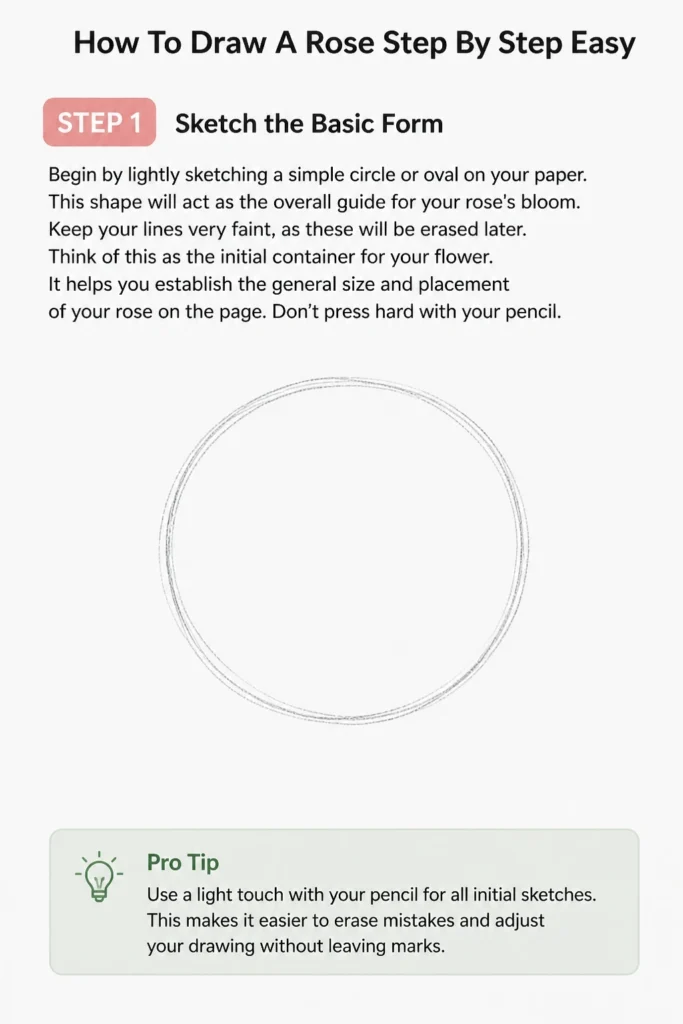
Begin by lightly sketching a simple circle or oval on your paper. This shape will act as the overall guide for your rose’s bloom. Keep your lines very faint, as these will be erased later.
Think of this as the initial container for your flower. It helps you establish the general size and placement of your rose on the page. Don’t press hard with your pencil.
Pro Tip: Use a light touch with your pencil for all initial sketches. This makes it easier to erase mistakes and adjust your drawing without leaving marks.
Step 2: Define the Central Bud
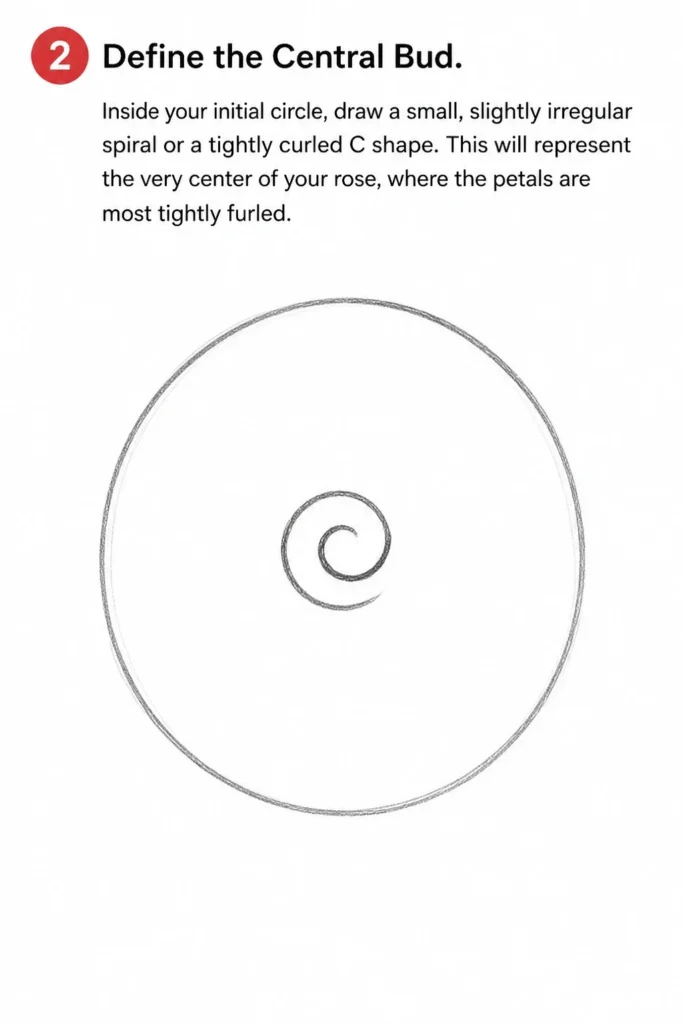
Inside your initial circle, draw a small, slightly irregular spiral or a tightly curled “C” shape. This will represent the very center of your rose, where the petals are most tightly furled. It doesn’t need to be perfect.
This central shape is crucial for giving your rose its characteristic depth. It suggests the innermost petals that are still closed. Observe real roses to see how tight their centers are.
Step 3: Add the First Layer of Petals
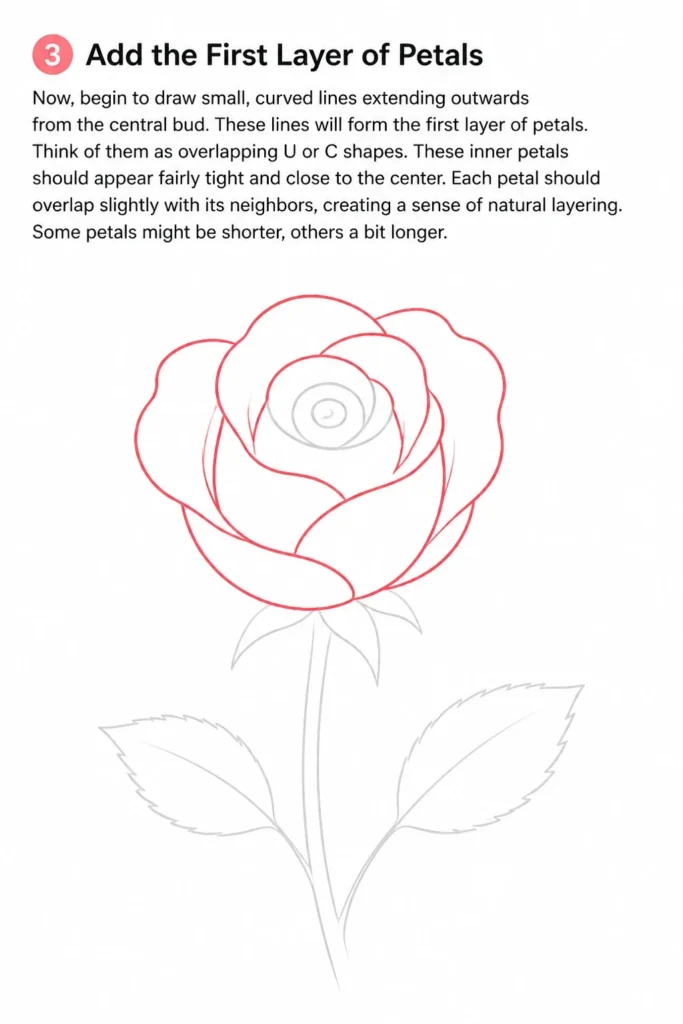
Now, begin to draw small, curved lines extending outwards from the central bud. These lines will form the first layer of petals. Think of them as overlapping “U” or “C” shapes.
These inner petals should appear fairly tight and close to the center. Each petal should overlap slightly with its neighbors, creating a sense of natural layering. Some petals might be shorter, others a bit longer.
Step 4: Expand with the Second Layer
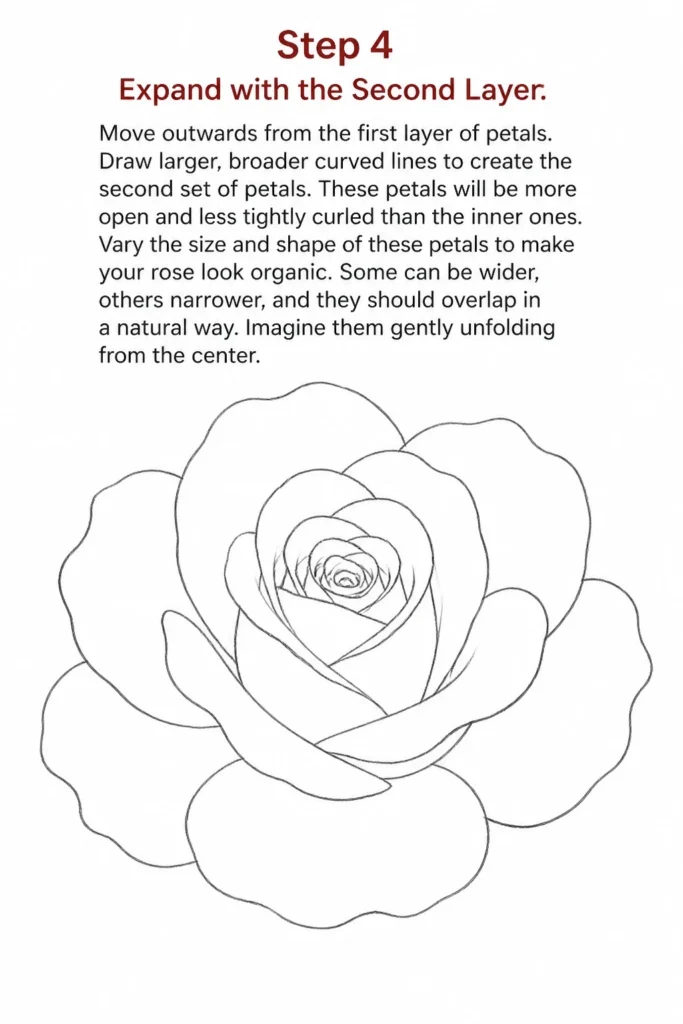
Move outwards from the first layer of petals. Draw larger, broader curved lines to create the second set of petals. These petals will be more open and less tightly curled than the inner ones.
Vary the size and shape of these petals to make your rose look organic. Some can be wider, others narrower, and they should overlap in a natural way. Imagine them gently unfolding from the center.
Step 5: Form the Outer Petals
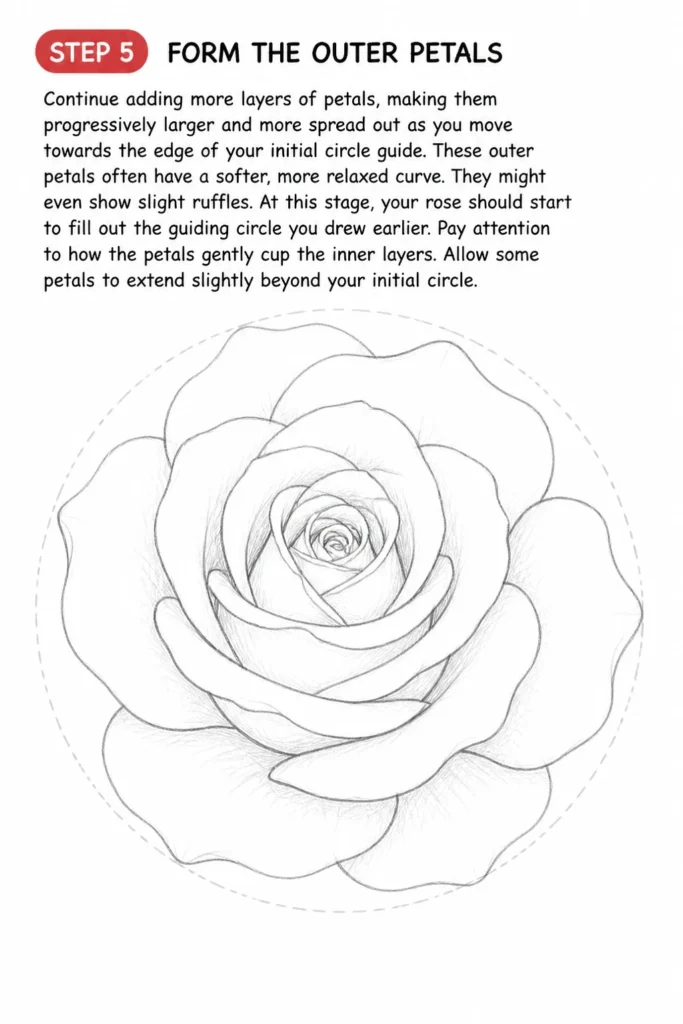
Continue adding more layers of petals, making them progressively larger and more spread out as you move towards the edge of your initial circle guide. These outer petals often have a softer, more relaxed curve. They might even show slight ruffles.
At this stage, your rose should start to fill out the guiding circle you drew earlier. Pay attention to how the petals gently cup the inner layers. Allow some petals to extend slightly beyond your initial circle.
Step 6: Refine the Petal Edges
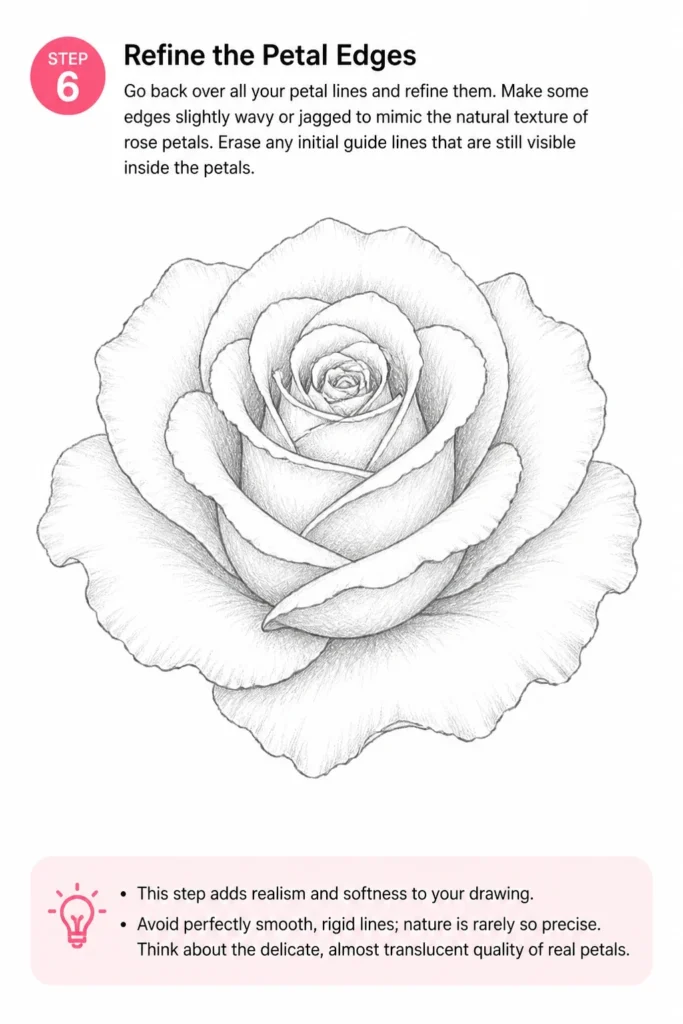
Go back over all your petal lines and refine them. Make some edges slightly wavy or jagged to mimic the natural texture of rose petals. Erase any initial guide lines that are still visible inside the petals.
This step adds realism and softness to your drawing. Avoid perfectly smooth, rigid lines; nature is rarely so precise. Think about the delicate, almost translucent quality of real petals.
Step 7: Draw the Calyx and Stem Base
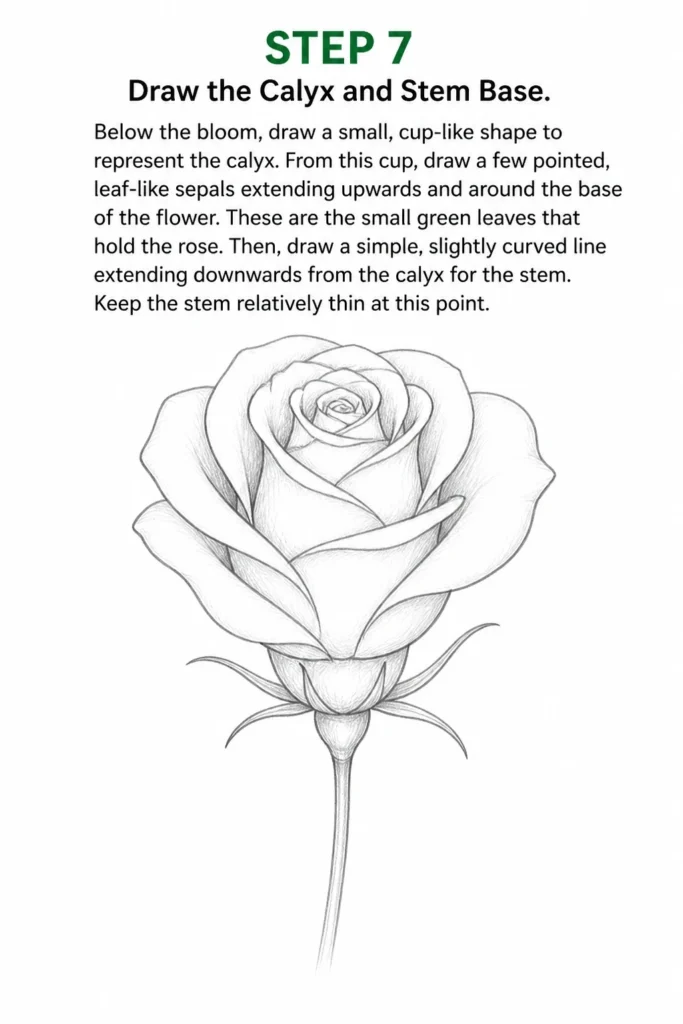
Below the bloom, draw a small, cup-like shape to represent the calyx. From this cup, draw a few pointed, leaf-like sepals extending upwards and around the base of the flower. These are the small green leaves that hold the rose.
Then, draw a simple, slightly curved line extending downwards from the calyx for the stem. Keep the stem relatively thin at this point. It creates a solid foundation for your rose.
Step 8: Add Leaves and Thorns
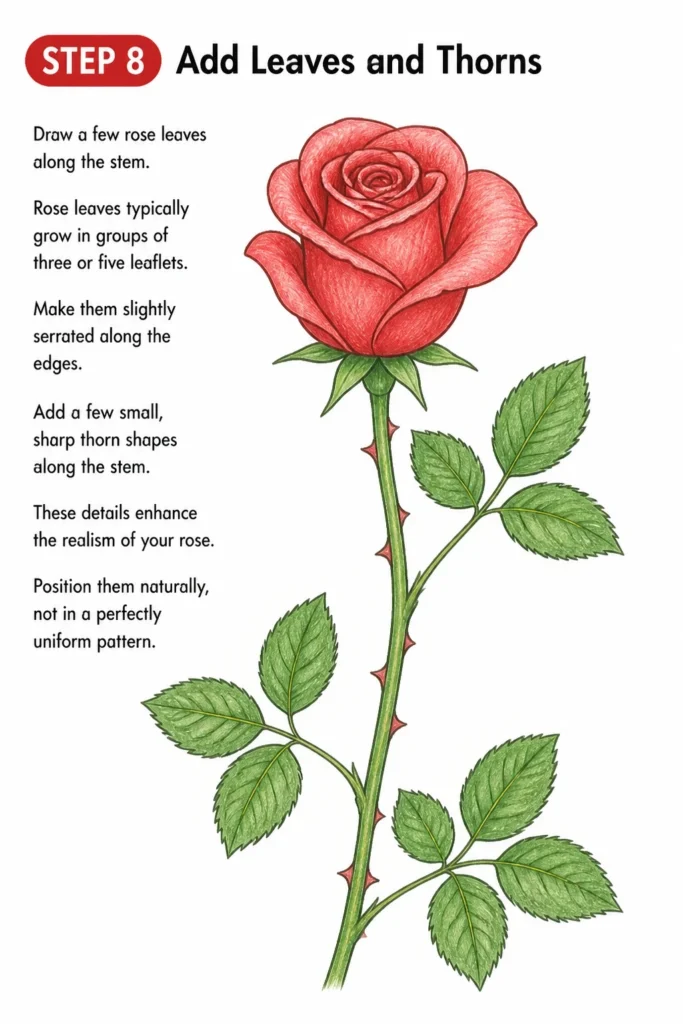
Draw a few rose leaves along the stem. Rose leaves typically grow in groups of three or five leaflets. Make them slightly serrated along the edges.
Add a few small, sharp thorn shapes along the stem. These details enhance the realism of your rose. Position them naturally, not in a perfectly uniform pattern.
Step 9: Introduce Shading for Depth
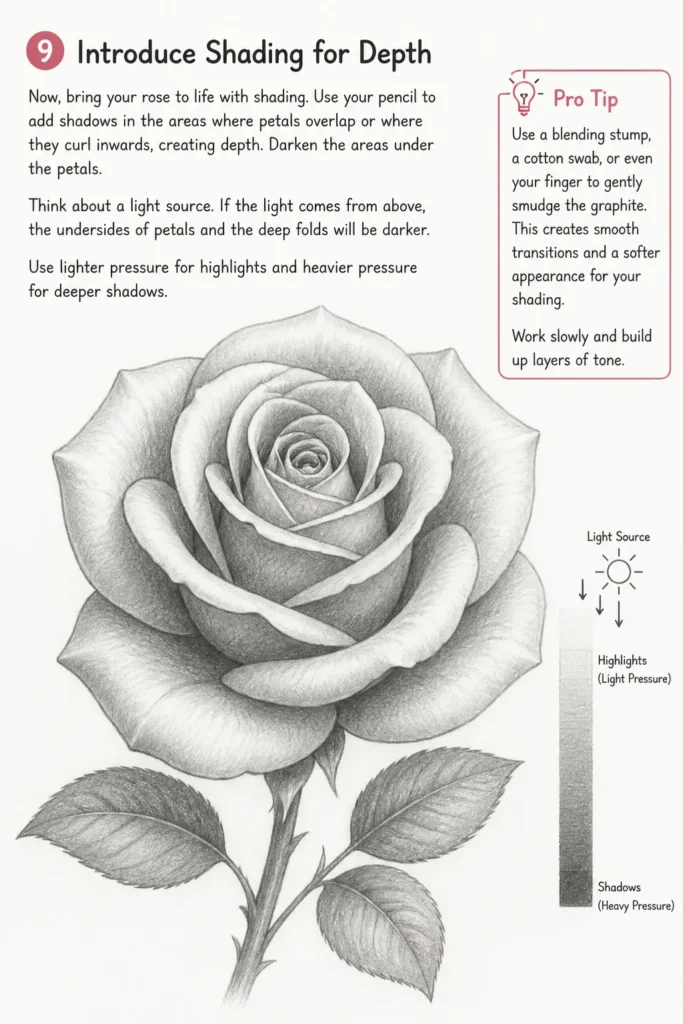
Now, bring your rose to life with shading. Use your pencil to add shadows in the areas where petals overlap or where they curl inwards, creating depth. Darken the areas under the petals.
Think about a light source. If the light comes from above, the undersides of petals and the deep folds will be darker. Use lighter pressure for highlights and heavier pressure for deeper shadows.
Pro Tip: Use a blending stump, a cotton swab, or even your finger to gently smudge the graphite. This creates smooth transitions and a softer appearance for your shading. Work slowly and build up layers of tone.
Step 10: Final Touches and Erasing
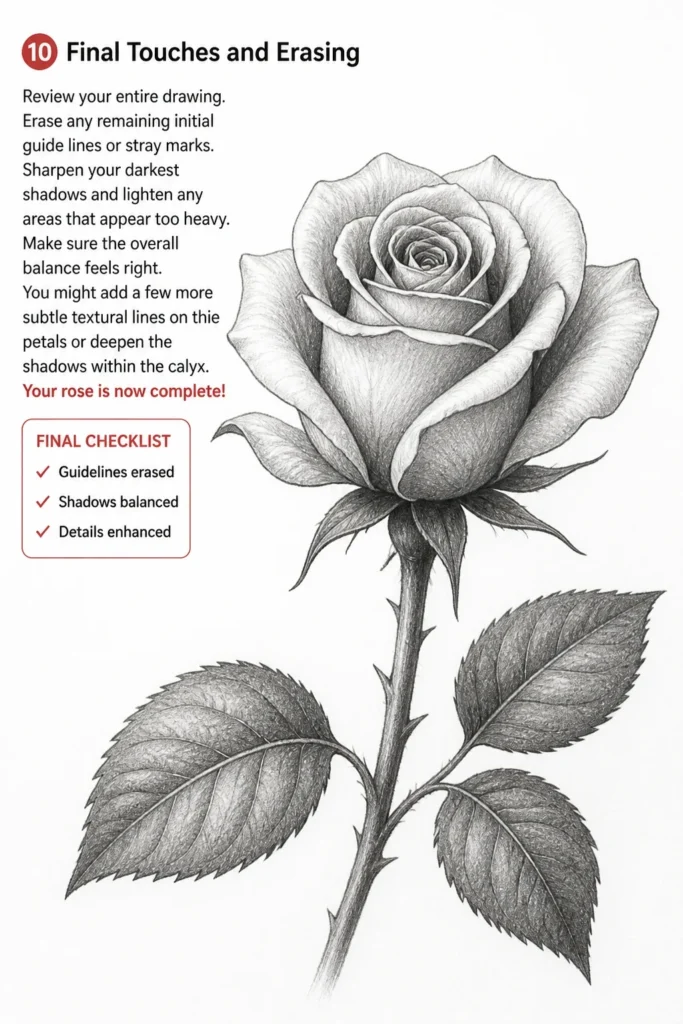
Review your entire drawing. Erase any remaining initial guide lines or stray marks. Sharpen your darkest shadows and lighten any areas that appear too heavy.
Make sure the overall balance feels right. You might add a few more subtle textural lines on the petals or deepen the shadows within the calyx. Your rose is now complete!
Common Mistakes to Avoid
Drawing Too Symmetrically
Roses in nature are beautifully imperfect. A common mistake is to try and make every petal identical in size and perfectly spaced. This results in a stiff, unnatural-looking flower.
Instead, embrace asymmetry. Vary the sizes, shapes, and overlaps of your petals. Allow some to be slightly crumpled or bent. This makes your rose feel organic and alive.
Using Heavy Lines for Initial Sketches
Starting with dark, heavy lines for your basic shapes makes it difficult to erase them cleanly later. These lines can show through your final drawing, making it appear messy.
Always begin with the lightest possible pencil pressure for your guide lines. You can always darken lines as you refine your drawing. This approach saves you from frustration and smudges.
Neglecting Overlapping Petals
The beauty of a rose comes from its many layers of petals. If you draw petals that simply sit side-by-side without overlapping, your rose will look flat and two-dimensional.
Consciously draw each new petal as if it is emerging from behind or wrapping around an existing one. This creates the illusion of depth and volume, giving your rose its characteristic fullness.
Ignoring Shading and Value
A line drawing of a rose can be nice, but without shading, it lacks dimension. Many beginners skip or rush the shading process, missing an opportunity to add realism.
Take your time with shading. Identify where light hits and where shadows fall. Use different pencil pressures to create a range of tones, from light grays to deep blacks. This depth makes your rose pop off the page.
Troubleshooting
My Rose Looks Flat and Lifeless
If your rose appears flat, it likely needs more dimension through overlapping petals and proper shading. Ensure your petals are clearly layered, with some appearing to tuck behind others.
Focus on adding shadows in the creases and under the overlapping edges of petals. This creates a sense of depth and form. Lightly shade the undersides of petals that curl upwards.
The Petals Don’t Look Natural or Flowing
Stiff or angular petals often result from drawing with straight lines or sharp angles. Rose petals are soft and organic, characterized by gentle, continuous curves.
Practice drawing “C” and “S” curves. Instead of drawing a petal with one continuous line, try building it up with a series of soft, connected curves. Observe reference photos of real roses to see their natural flow.
My Shading Looks Messy or Uneven
Uneven shading can happen if you apply too much pressure in one spot or don’t blend smoothly. It can also occur if you’re not consistent with your light source.
Try using lighter pressure and building up your shadows in layers. Use a blending tool like a blending stump or cotton swab to smooth out transitions. Always imagine where the light is coming from and shade consistently based on that direction.
Key Takeaways
- Start with light guide lines for easy adjustments and clean erasing.
- Embrace asymmetry; nature is rarely perfectly symmetrical.
- Layer your petals with clear overlaps to create depth and volume.
- Use a variety of curved lines to mimic the soft, organic nature of petals.
- Shading is essential for transforming a flat drawing into a three-dimensional form.
- Don’t be afraid to make mistakes; they are part of the learning process.
- Practice regularly to improve your observation skills and hand control.
Frequently Asked Questions
What pencil hardness is best for drawing roses?
An HB pencil is a great all-around choice for initial sketches and general lines. For shading, a 2B or 4B pencil will give you darker tones and smoother blending. A harder pencil, like 2H, can be useful for very light guide lines.
How can I make my rose look more realistic?
To enhance realism, pay close attention to details like slight ruffles on petal edges, subtle veins, and the way light interacts with the form. Varying petal sizes and adding soft, gradual shading are key. Using reference photos of real roses is incredibly helpful.
Should I draw the whole rose before shading, or shade as I go?
It’s generally more effective to complete your line drawing of the entire rose first. This allows you to focus on the structure and proportions without being distracted by shading. Once the lines are established, you can then focus solely on adding depth and form through shading.
What if my rose doesn’t look perfect on the first try?
That’s completely normal and expected! Drawing is a skill that develops with practice and patience. Every artist, no matter their level, makes drawings that aren’t “perfect.” Focus on learning from each attempt and enjoying the process. Keep trying, and you will see improvement.
Our Top Recommended Finds
- Sketchbook with medium-weight paper: A good quality paper can make a big difference in how your pencil glides and how well it takes shading.
- Set of drawing pencils (HB, 2B, 4B, 6B): Having a range of graphite hardness allows for versatile line work and rich, varied shading.
- Kneaded eraser: This type of eraser is excellent for lifting graphite gently without damaging the paper, and it can be molded into fine points for precise erasing.
Embrace Your Artistic Journey
You’ve just taken a wonderful step in your artistic journey by learning to draw a rose. This process has shown you that complex subjects can be broken down into simple, manageable parts. The skills you’ve developed here—observing shapes, layering, and adding depth—are fundamental to all drawing.
Don’t let your pencil rest for too long! Try drawing another rose, perhaps from a different angle or with more open petals. Experiment with different types of flowers, applying the same step-by-step approach. Continue to observe the world around you, noticing the forms and shadows. Keep practicing, and watch your confidence grow with every line you draw.