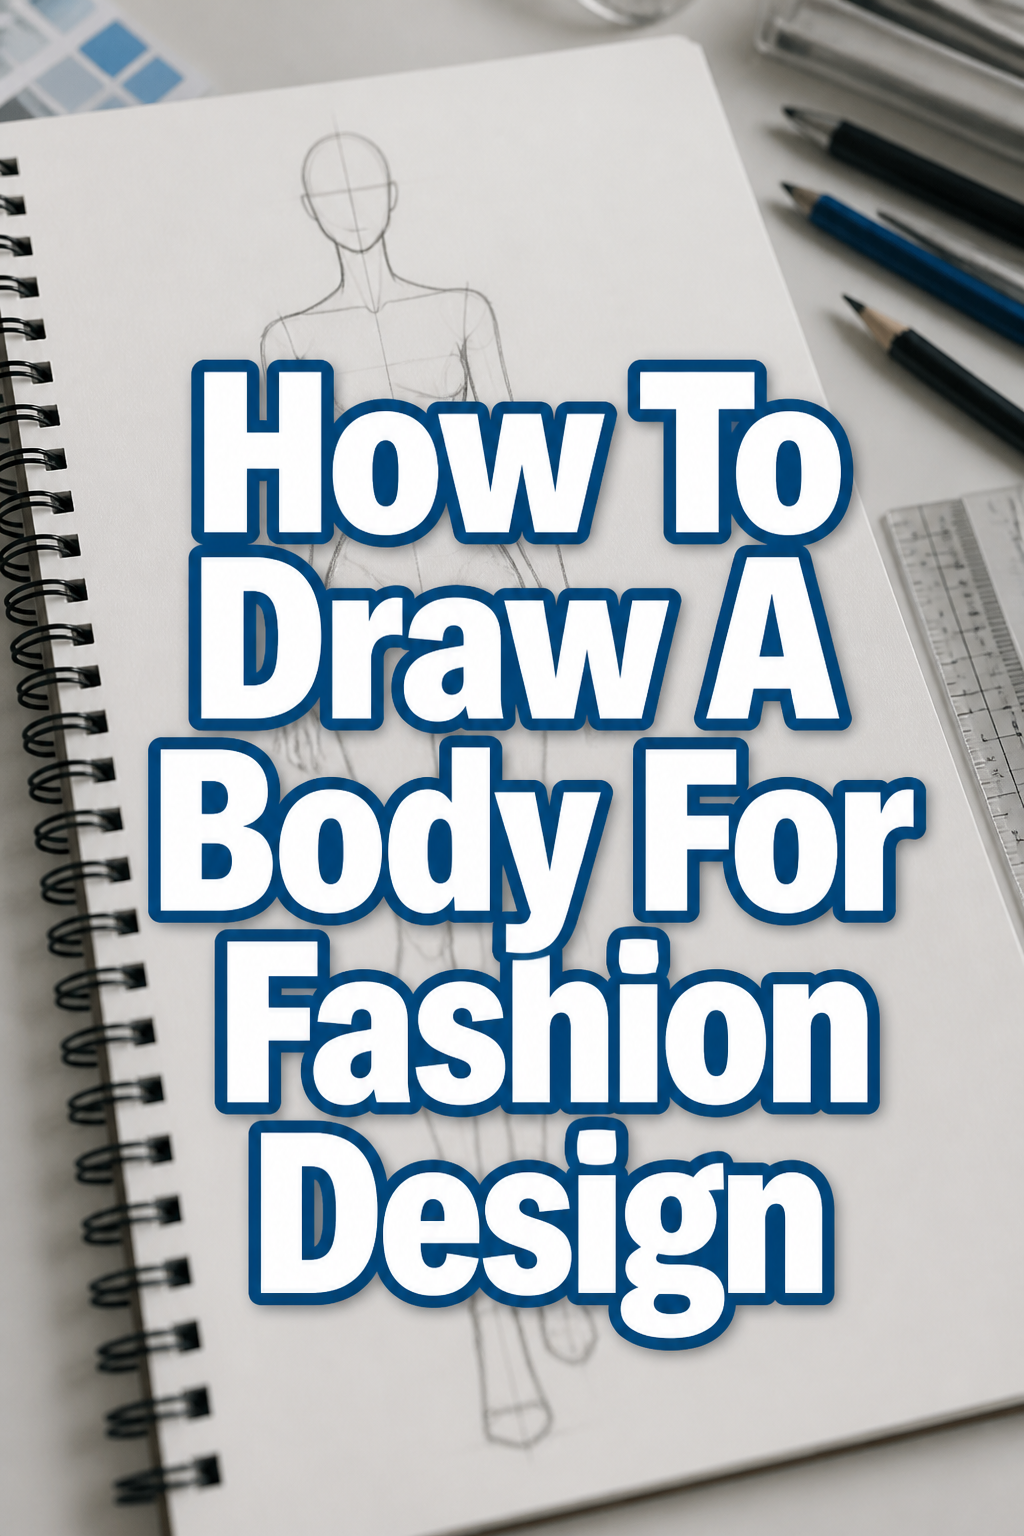
🎨 How To Draw A Body For Fashion Design

& Painting
No rigid rules or pretension. Just practical guides, medium comparisons, and encouraging tips to help you enjoy the drawing & painting process.
Drawing bodies for fashion design is a foundational skill that brings your creative visions to life. It’s about more than just anatomy; it’s about capturing grace, movement, and the perfect canvas for your garments.
I’ve spent countless hours refining my own fashion illustration techniques, understanding the nuances that make a design truly pop on paper. This guide distills that experience, offering a clear path to drawing compelling fashion figures. You’ll learn the essential steps to create dynamic and expressive croquis, ready to showcase your unique designs.
Quick Overview
This guide will walk you through creating a balanced and expressive fashion croquis from scratch. You’ll learn how to establish proportions, add movement, and refine your figure, making it the ideal base for any fashion illustration.
- Time needed: 1-2 hours for initial learning, ongoing practice for mastery
- Difficulty: Beginner
- What you’ll need: Pencil (HB or 2B), eraser, ruler, paper, reference images
Step-by-Step Instructions
Step 1: Gather Your Tools and Set Up Your Space
Before you begin, ensure you have a comfortable and well-lit workspace. Good lighting reduces eye strain and helps you see your lines clearly. Having the right tools makes the process smoother and more enjoyable.
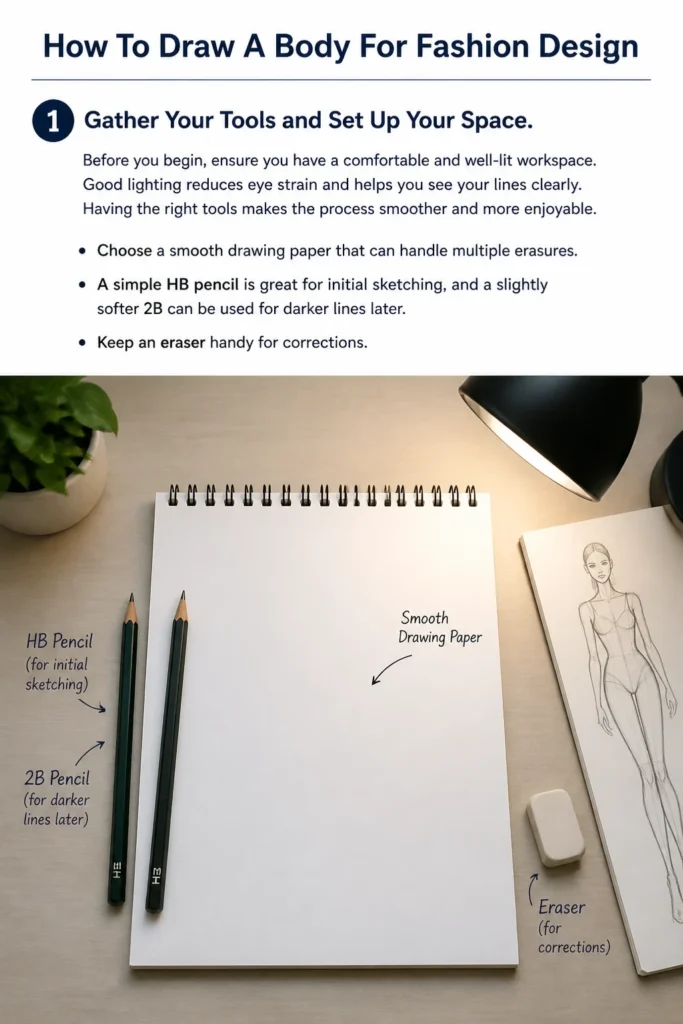
Choose a smooth drawing paper that can handle multiple erasures. A simple HB pencil is great for initial sketching, and a slightly softer 2B can be used for darker lines later. Keep an eraser handy for corrections.
Step 2: Understand Fashion Proportions (The 9-Head Method)
Fashion figures are typically elongated and idealized, not anatomically precise. The standard fashion croquis uses a 9-head proportion, making the figure taller and more elegant than a realistic 7.5-head figure.
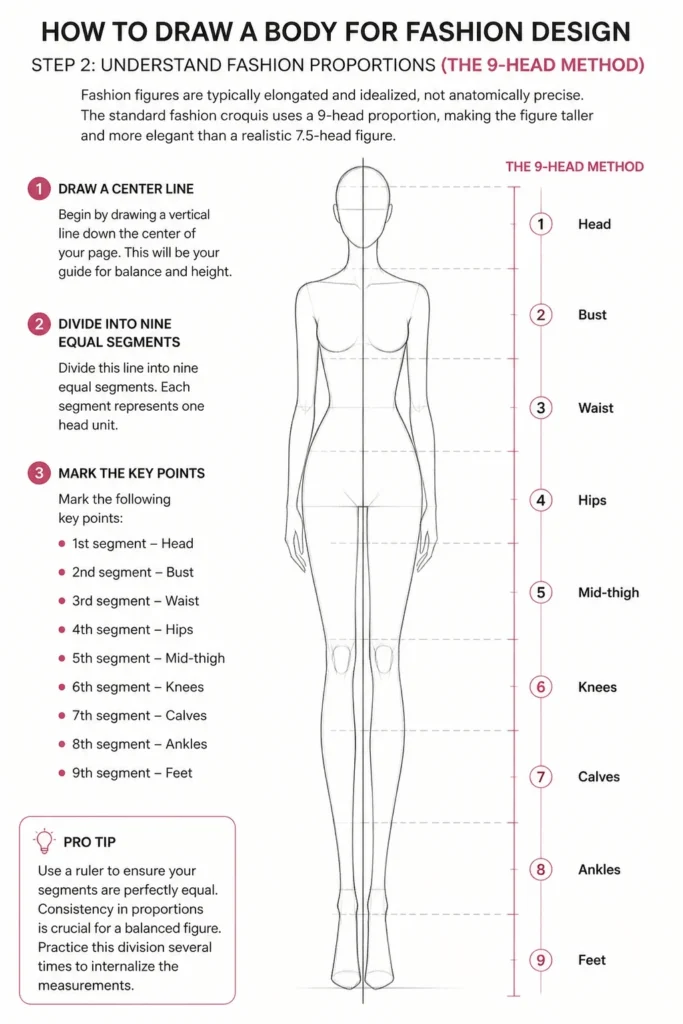
Begin by drawing a vertical line down the center of your page. This will be your guide for balance and height. Divide this line into nine equal segments. Each segment represents one “head” unit.
Mark the following key points:
Head: 1st segment
Bust: 2nd segment
Waist: 3rd segment
Hips: 4th segment
Mid-thigh: 5th segment
Knees: 6th segment
Calves: 7th segment
Ankles: 8th segment
Feet: 9th segment
Pro Tip: Use a ruler to ensure your segments are perfectly equal. Consistency in proportions is crucial for a balanced figure. Practice this division several times to internalize the measurements.
Step 3: Establish the Gesture and Pose
A dynamic pose makes your fashion illustration engaging. Think about the mood and movement you want your design to convey. Fashion figures rarely stand perfectly straight; they often lean, twist, or stride.
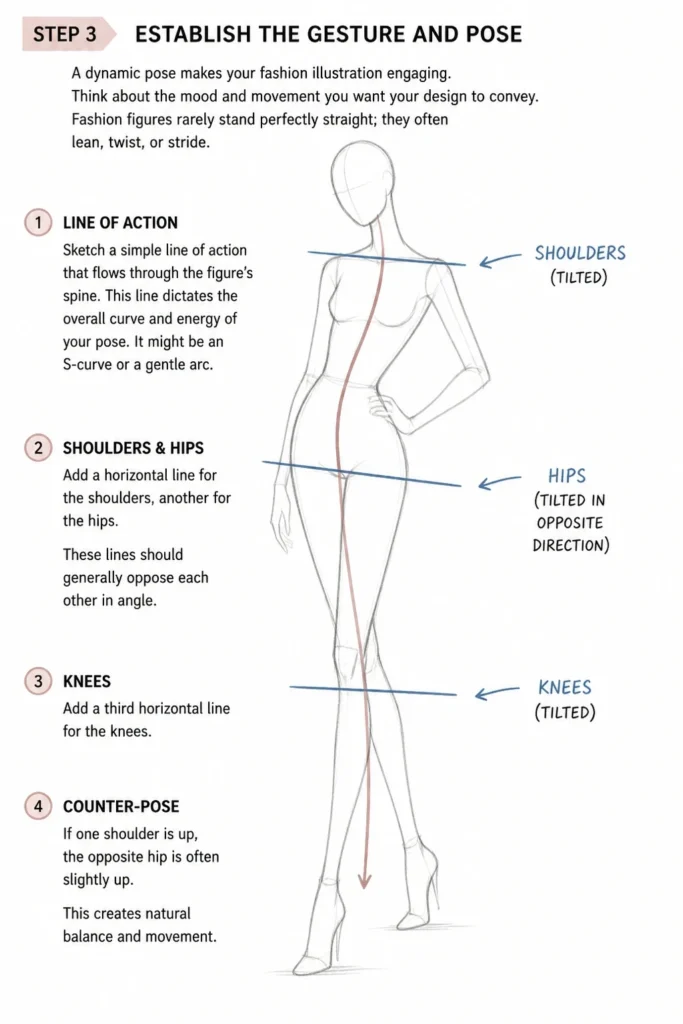
Sketch a simple “line of action” that flows through the figure’s spine. This line dictates the overall curve and energy of your pose. It might be an S-curve or a gentle arc.
Add a horizontal line for the shoulders, another for the hips, and a third for the knees. These lines should generally oppose each other in angle, creating a sense of counter-pose (e.g., if one shoulder is up, the opposite hip is often slightly up). This creates natural balance.
Step 4: Construct the Basic Form with Simple Shapes
Now, build the figure using basic geometric shapes. This method helps you visualize the figure in 3D space and establish volume before adding details. Don’t worry about perfection at this stage; focus on placement and proportion.
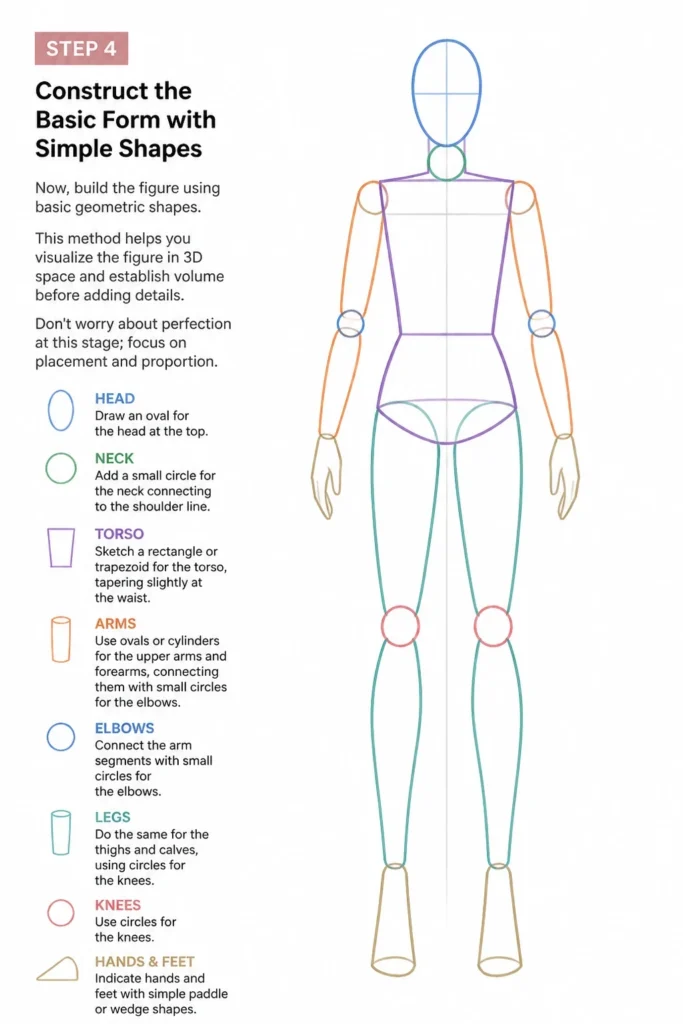
Draw an oval for the head at the top. Add a small circle for the neck connecting to the shoulder line. Sketch a rectangle or trapezoid for the torso, tapering slightly at the waist.
Use ovals or cylinders for the upper arms and forearms, connecting them with small circles for the elbows. Do the same for the thighs and calves, using circles for the knees. Indicate hands and feet with simple paddle or wedge shapes.
Step 5: Refine the Anatomy and Connect the Shapes
Once your basic shapes are in place, begin to smooth out the connections and hint at anatomical forms. Think about how the body flows from one section to another. This stage starts to give your figure a more lifelike appearance.
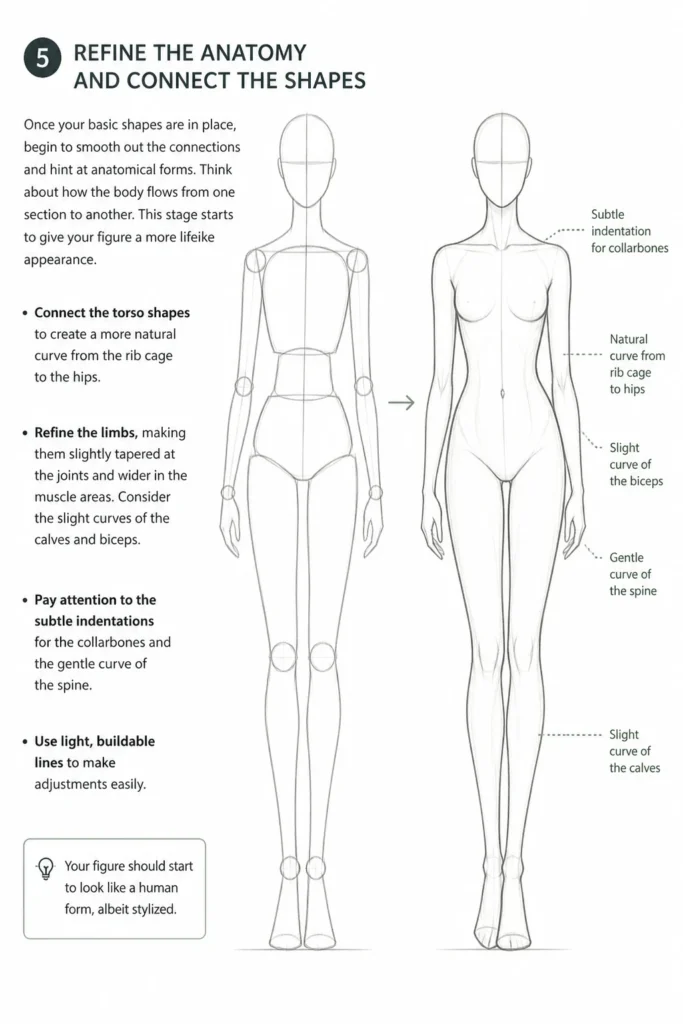
Connect the torso shapes to create a more natural curve from the rib cage to the hips. Refine the limbs, making them slightly tapered at the joints and wider in the muscle areas. Consider the slight curves of the calves and biceps.
Pay attention to the subtle indentations for the collarbones and the gentle curve of the spine. Use light, buildable lines to make adjustments easily. Your figure should start to look like a human form, albeit stylized.
Step 6: Add Details for Definition
With the underlying structure complete, it’s time to add the defining details that bring your croquis to life. This includes facial features, hair, hands, and feet, all simplified for fashion illustration.
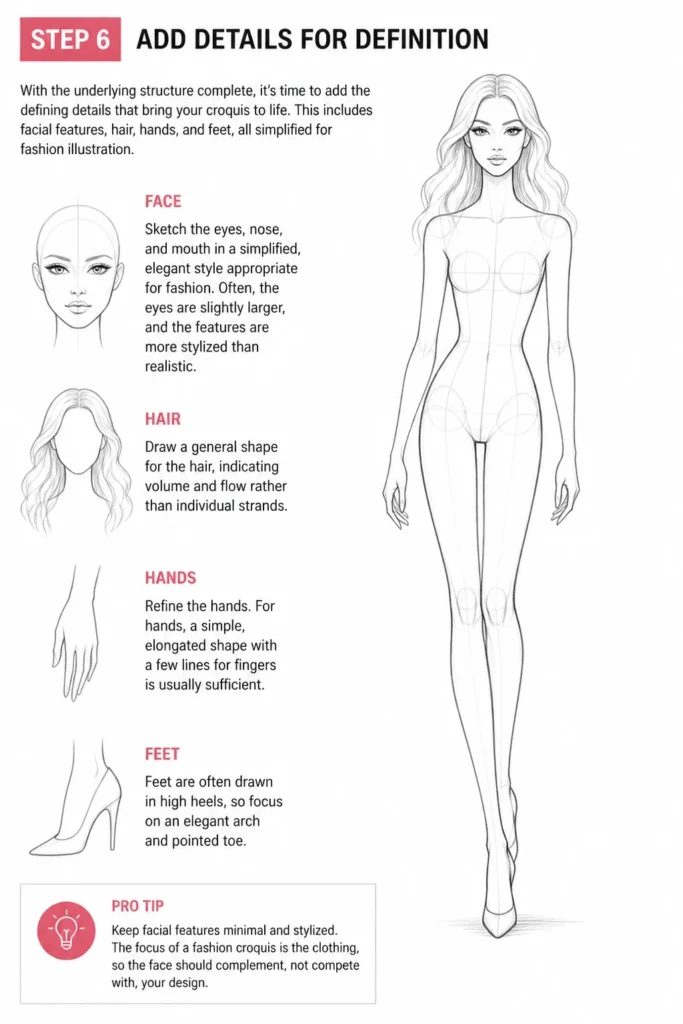
Sketch the eyes, nose, and mouth in a simplified, elegant style appropriate for fashion. Often, the eyes are slightly larger, and the features are more stylized than realistic. Draw a general shape for the hair, indicating volume and flow rather than individual strands.
Refine the hands and feet. For hands, a simple, elongated shape with a few lines for fingers is usually sufficient. Feet are often drawn in high heels, so focus on an elegant arch and pointed toe.
Pro Tip: Keep facial features minimal and stylized. The focus of a fashion croquis is the clothing, so the face should complement, not distract. A simple, confident expression is usually best.
Step 7: Clean Up and Prepare for Design
The final step is to clean up your drawing and make it ready to showcase your designs. This involves erasing construction lines and darkening the permanent outlines.
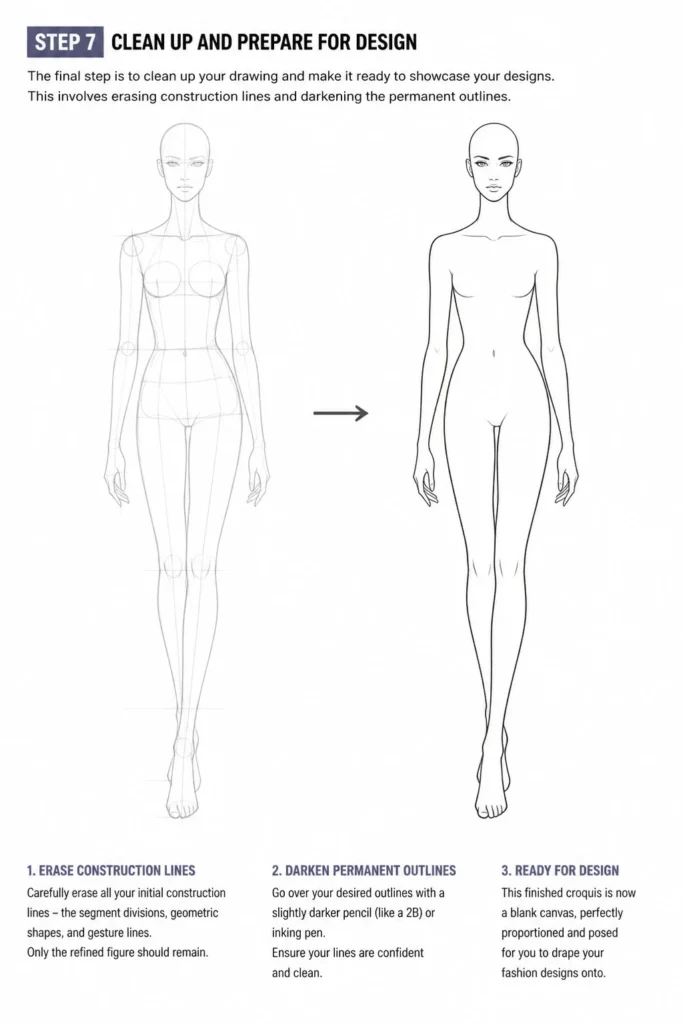
Carefully erase all your initial construction lines – the segment divisions, geometric shapes, and gesture lines. Only the refined figure should remain. Go over your desired outlines with a slightly darker pencil (like a 2B) or an inking pen.
Ensure your lines are confident and clean. This finished croquis is now a blank canvas, perfectly proportioned and posed for you to drape your fashion designs onto.
Common Mistakes to Avoid
Incorrect Proportions
Many beginners struggle with making their figures too short or disproportionate. This often happens by not consistently using a head unit measurement. An incorrectly proportioned figure will make your clothing designs look off, regardless of how well they are drawn. Always start with your 9-head division and adhere to it throughout the sketching process.
Stiff or Lifeless Poses
A common pitfall is drawing figures that look rigid, like mannequins. This happens when you don’t establish a strong line of action or ignore counter-pose principles. A stiff pose fails to convey movement or emotion, making your designs less dynamic. Always begin with a gesture line and opposing shoulder/hip angles to inject life into your figure.
Over-detailing Anatomy
Fashion illustration is about conveying style, not anatomical precision. Some artists get too caught up in rendering every muscle or bone, which can distract from the clothing. The figure should be a supportive element, a canvas for the design. Keep anatomical details simplified and suggestive, focusing on elegant lines rather than realistic muscle definition.
Troubleshooting
My figure looks lopsided or unbalanced.
This usually indicates an issue with your initial gesture and balance lines. Revisit Step 3. Ensure your central line of action is truly central to the pose you envision. Check that your shoulder and hip lines are angled in opposition, creating a natural counter-pose. Use a ruler to check the horizontal alignment of your key points like knees and ankles to ensure they are at the correct head units.
The limbs look too thin or too thick.
This problem often arises during Step 4 or 5. When constructing with shapes, ensure your ovals and cylinders have appropriate width relative to the body’s core. Avoid making them uniformly thick; limbs naturally taper. If they look too thin, go back and add a bit more volume to the ovals. If too thick, gently erase and refine the outer edges to create a more elegant, elongated fashion silhouette.
My figure lacks fluidity and looks robotic.
A lack of fluidity usually points to rigid connections between the basic shapes. Instead of sharp angles, think about soft, continuous curves when connecting the torso, limbs, and joints in Step 5. Practice drawing long, sweeping lines rather than short, choppy ones. Focus on the flow of energy through the entire body, from head to toe, letting each part gracefully transition into the next.
Key Takeaways
- Mastering the 9-head proportion is fundamental for creating elongated fashion figures.
- Always start with a dynamic gesture line to give your croquis movement and life.
- Build your figure using simple geometric shapes before refining anatomical details.
- Keep anatomical details stylized and minimal; the figure is a canvas for your designs.
- Practice consistently, focusing on clean lines and elegant forms.
- The goal is to create a compelling, balanced figure that enhances your fashion illustrations.
Frequently Asked Questions
What’s the difference between a fashion croquis and a regular figure drawing?
A fashion croquis is a stylized, elongated figure, typically 9-10 heads tall, designed specifically to showcase clothing. It emphasizes elegance and movement over anatomical realism. A regular figure drawing aims for accurate anatomical proportions (usually 7.5-8 heads tall) and realistic rendering of the human form.
Can I draw a fashion croquis in different poses?
Absolutely! In fact, drawing croquis in varied, dynamic poses is highly encouraged. Different garments look best on different poses. Practice standing, walking, sitting, and twisting poses to give your designs versatility and impact. Always start with a strong gesture line for each new pose.
Do I need to be good at realistic drawing to draw fashion figures?
Not necessarily. While a basic understanding of form and proportion is helpful, fashion illustration is a distinct skill. It prioritizes style, elongation, and the ability to drape fabric over a stylized form. You can develop excellent fashion illustration skills even if realistic drawing isn’t your strongest suit, as the focus shifts to line quality and design presentation.
Our Top Recommended Finds
*
- Strathmore 400 Series Drawing Paper: This paper offers a smooth surface perfect for pencil work and multiple erasures without pilling.
- Staedtler Mars Lumograph Pencils (HB, 2B, 4B set): A good range of graphite pencils allows for light sketching and darker, more defined outlines.
- Kneaded Eraser: Essential for lifting graphite without smudging or damaging the paper, ideal for cleaning up construction lines.
Embrace Your Inner Fashion Illustrator
You now have a solid framework for drawing compelling fashion figures. This journey is about practice, observation, and developing your unique artistic voice. Don’t be afraid to experiment with different poses and styles as you gain confidence.
Keep sketching every day. Look at fashion magazines and runway photos for inspiration on dynamic poses and styling. Your ability to translate your design ideas onto a strong, expressive figure will truly elevate your fashion design work. Start drawing your next croquis today and watch your designs come to life!
& Painting
No rigid rules or pretension. Just practical guides, medium comparisons, and encouraging tips to help you enjoy the drawing & painting process.