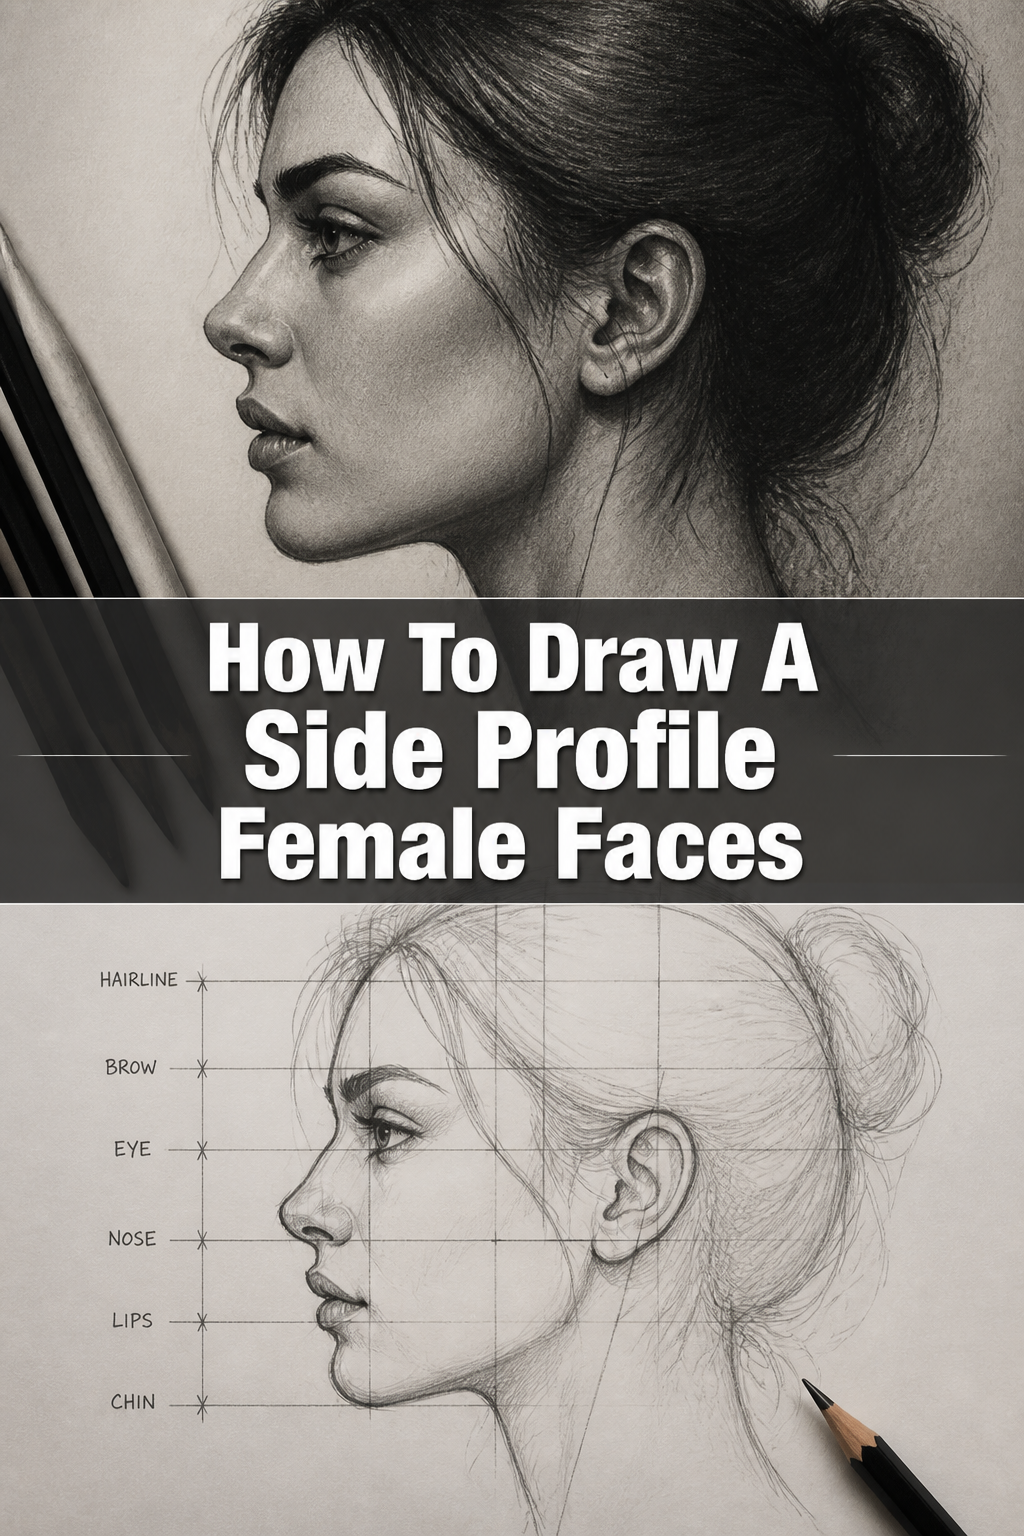
🎨 How To Draw A Side Profile Female Faces

& Painting
No rigid rules or pretension. Just practical guides, medium comparisons, and encouraging tips to help you enjoy the drawing & painting process.
Learning to draw a compelling side profile can feel like a significant hurdle in your artistic journey. I remember struggling for ages to get the proportions just right, often ending up with faces that looked flat or distorted. This guide will help you overcome those common challenges.
I’ve refined these techniques over years of practice, and I’m excited to share a practical, step-by-step method that simplifies the process. You’ll learn how to build a beautiful female profile from basic shapes to intricate details.
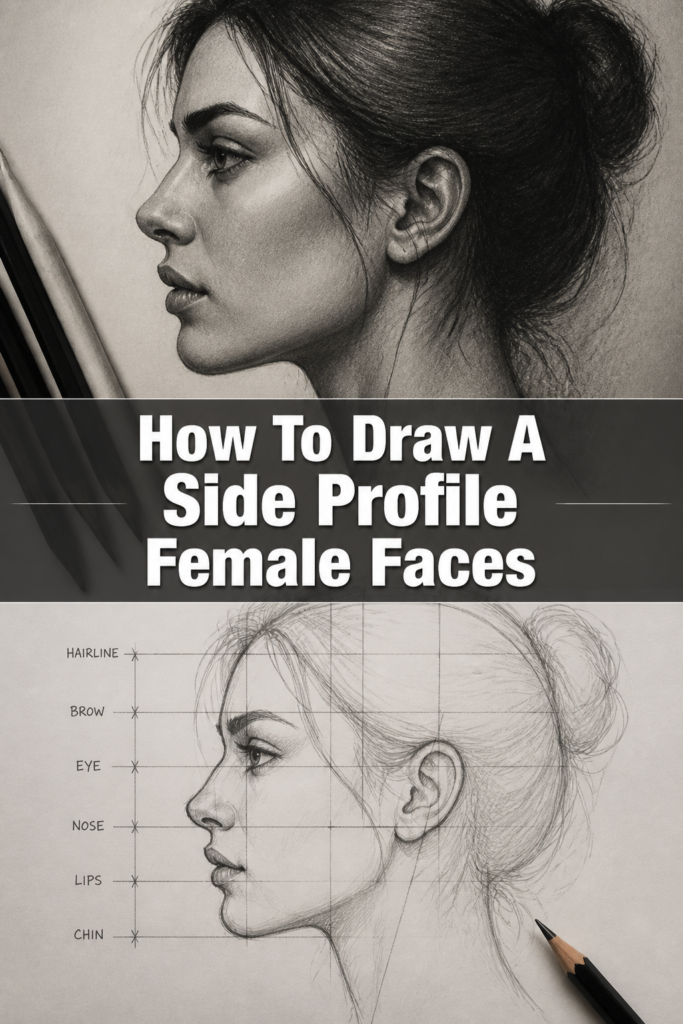
Quick Overview
This guide will walk you through creating a balanced and expressive female side profile. You’ll learn to establish foundational shapes, place key features accurately, and refine your lines for a polished finish.
- Time needed: 45-90 minutes (depending on detail and practice)
- Difficulty: Beginner to Intermediate
- What you’ll need: Pencil (HB, 2B), eraser, paper, ruler (optional, for initial guides)
Step-by-Step Instructions
Step 1: Sketch the Basic Head Shape
Begin by lightly sketching a large circle on your paper. This circle will represent the cranium, the top part of the head. Don’t press too hard; these are just guide lines.
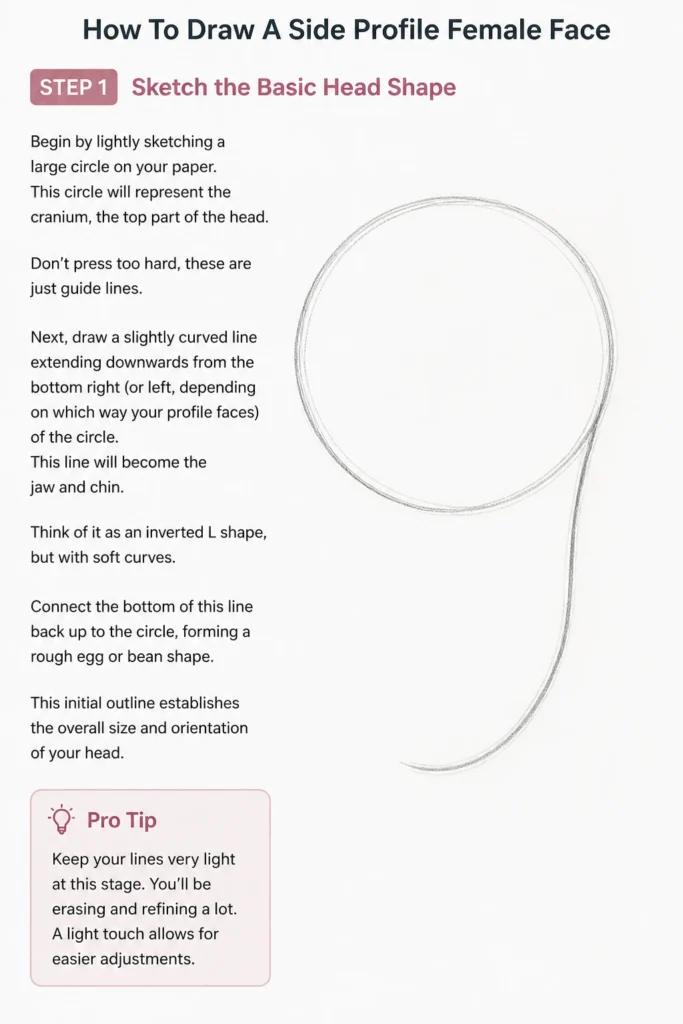
Next, draw a slightly curved line extending downwards from the bottom right (or left, depending on which way your profile faces) of the circle. This line will become the jaw and chin. Think of it as an inverted “L” shape, but with soft curves.
Connect the bottom of this line back up to the circle, forming a rough egg or bean shape. This initial outline establishes the overall size and orientation of your head.
Pro Tip: Keep your lines very light at this stage. You’ll be erasing and refining a lot. A light touch allows for easier adjustments.
Step 2: Establish Key Guide Lines
Now, let’s add some crucial horizontal guide lines to place features accurately. Draw a vertical line down the center of your egg shape, slightly curved to follow the curve of the head. This marks the center of the face.
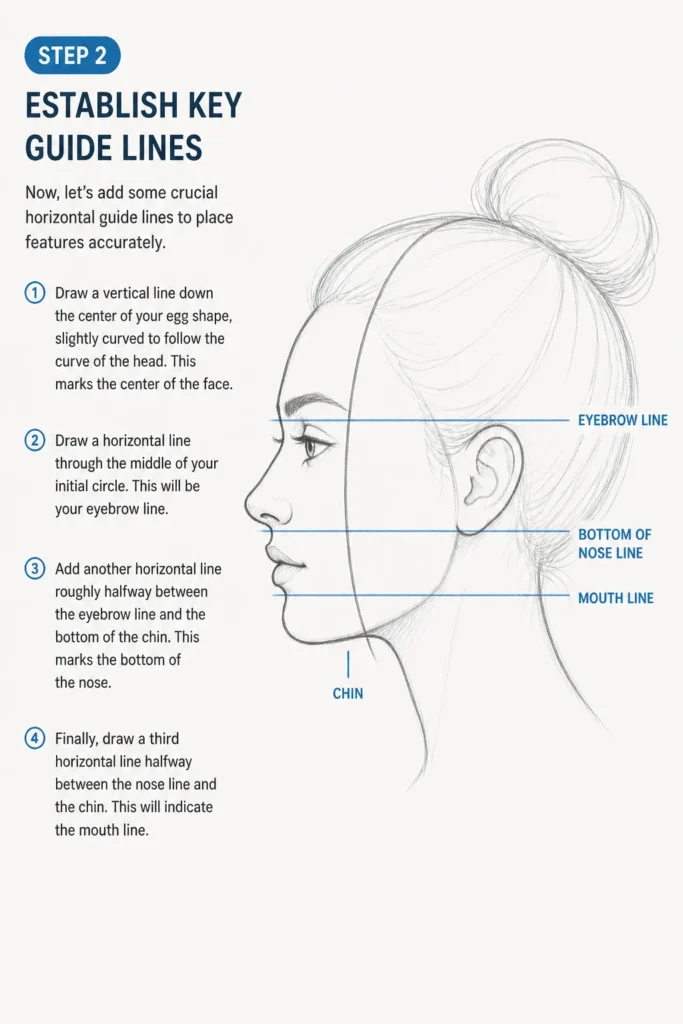
Draw a horizontal line through the middle of your initial circle. This will be your eyebrow line.
Add another horizontal line roughly halfway between the eyebrow line and the bottom of the chin. This marks the bottom of the nose.
Finally, draw a third horizontal line halfway between the nose line and the chin. This will indicate the mouth line.
Step 3: Define the Forehead and Nose Bridge
Lightly sketch a curved line from the top of the cranium circle down to the eyebrow line. This forms the forehead. It should have a gentle curve, not a flat vertical line.
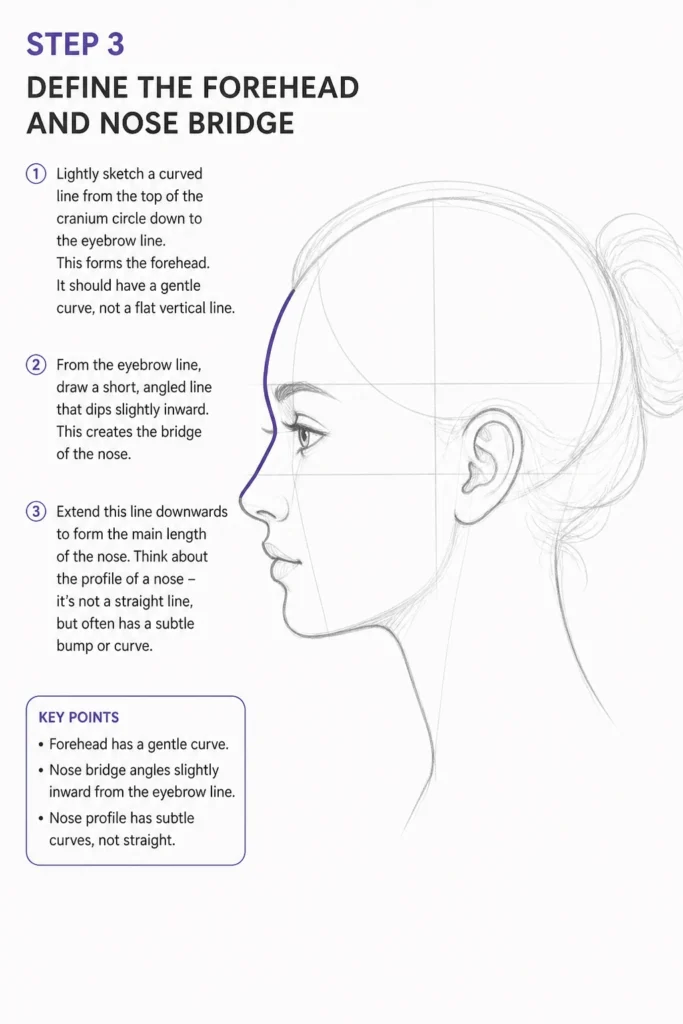
From the eyebrow line, draw a short, angled line that dips slightly inward. This creates the bridge of the nose. The exact angle and depth will vary based on the facial structure you envision.
Extend this line downwards to form the main length of the nose. Think about the profile of a nose – it’s not a straight line, but often has a subtle bump or curve.
Step 4: Shape the Nose and Mouth
Once the bridge is established, draw the tip of the nose. This can be rounded, pointed, or slightly upturned. Below the tip, add the nostril, which usually looks like a small, curved comma shape in a side profile.
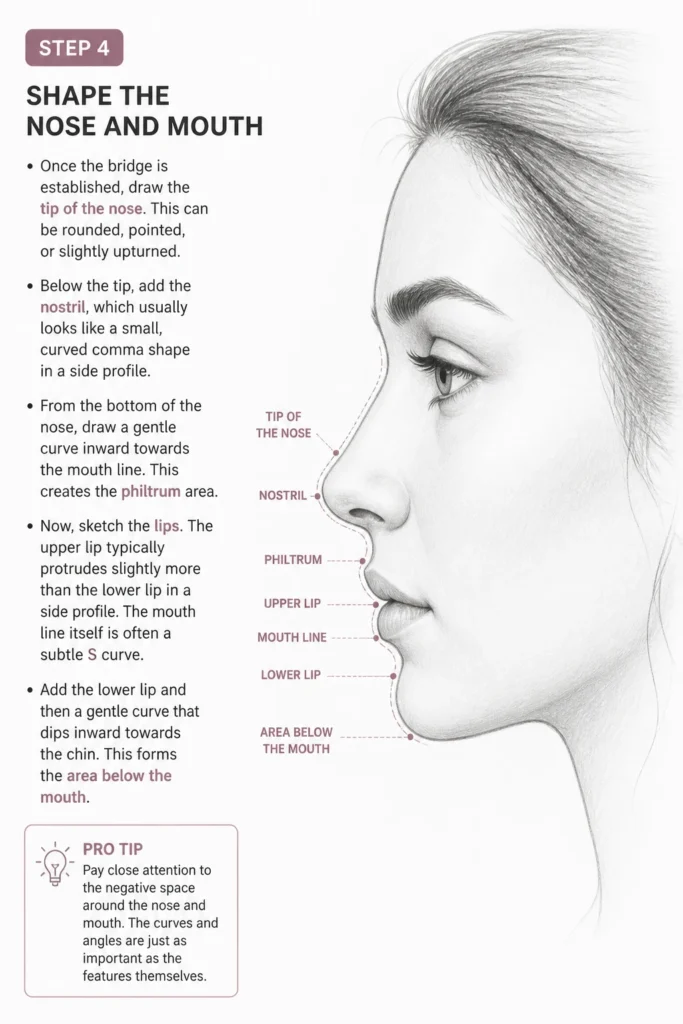
From the bottom of the nose, draw a gentle curve inward towards the mouth line. This creates the philtrum area.
Now, sketch the lips. The upper lip typically protrudes slightly more than the lower lip in a side profile. The mouth line itself is often a subtle “S” curve.
Add the lower lip and then a gentle curve that dips inward towards the chin. This forms the area below the mouth.
Pro Tip: Pay close attention to the negative space around the nose and mouth. The curves and angles are just as important as the features themselves.
Step 5: Place the Eye and Eyebrow
The eye is a critical feature for conveying expression. Draw the eye on the eyebrow line, slightly recessed into the face. In a side profile, you’ll see a triangular or almond shape for the visible part of the eye.
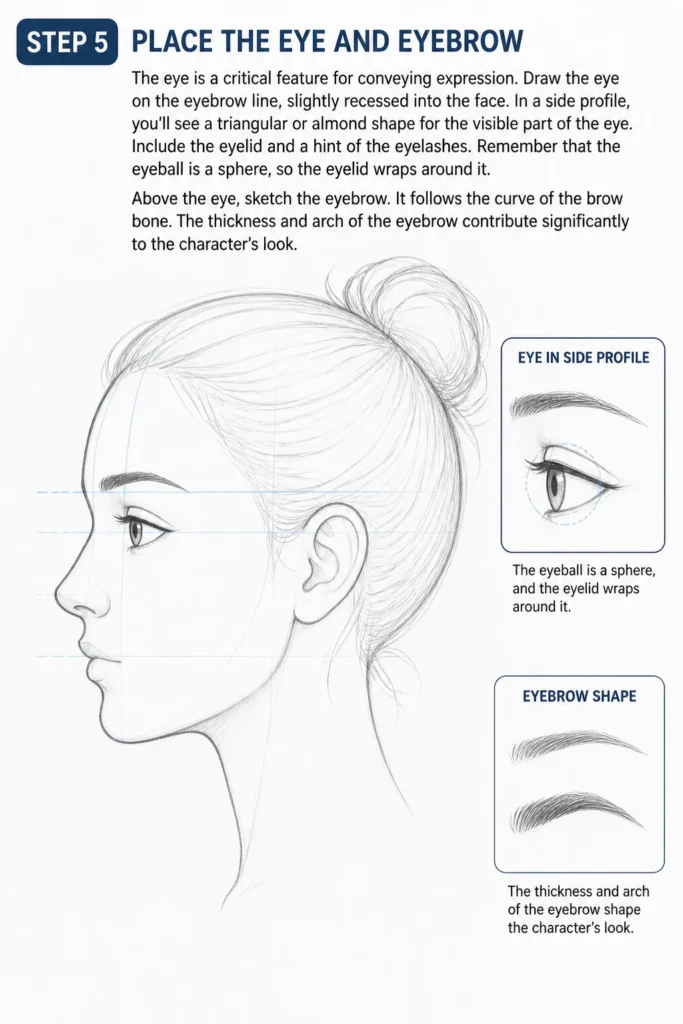
Include the eyelid and a hint of the eyelashes. Remember that the eyeball is a sphere, so the eyelid wraps around it.
Above the eye, sketch the eyebrow. It follows the curve of the brow bone. The thickness and arch of the eyebrow contribute significantly to the character’s look.
Step 6: Define the Chin and Jawline
From the area below the lower lip, draw the chin. This can be rounded, pointed, or more squared off. Ensure it extends slightly forward, giving dimension to the face.
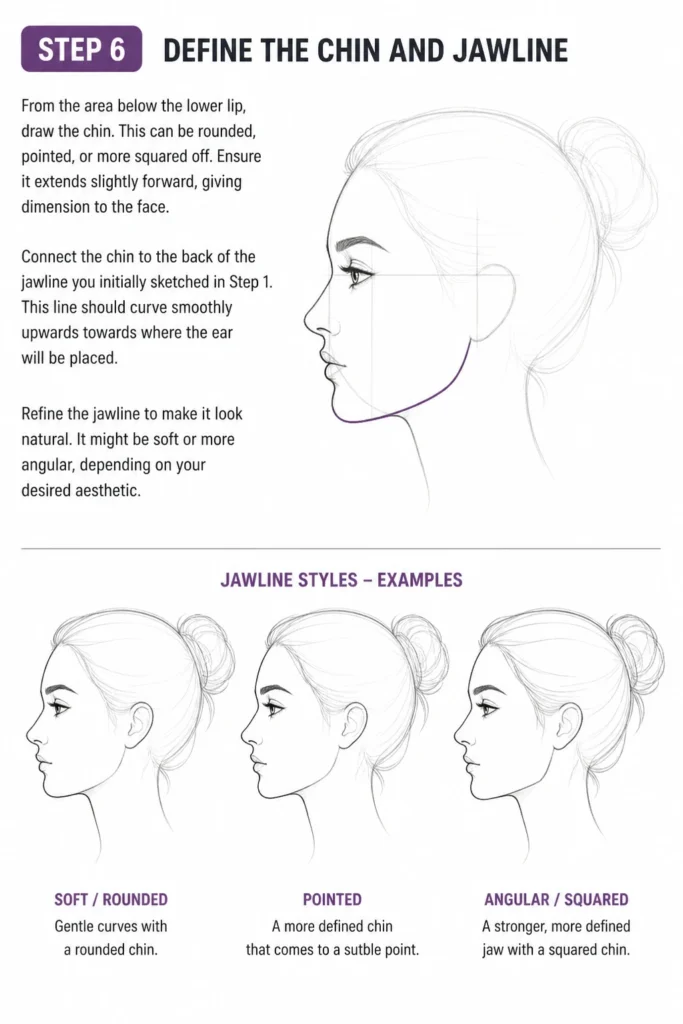
Connect the chin to the back of the jawline you initially sketched in Step 1. This line should curve smoothly upwards towards where the ear will be placed.
Refine the jawline to make it look natural. It might be soft or more angular, depending on your desired aesthetic.
Step 7: Position the Ear
The ear is typically placed between the eyebrow line and the nose line. Draw the ear starting from the back edge of the head, aligning it with these guide lines.
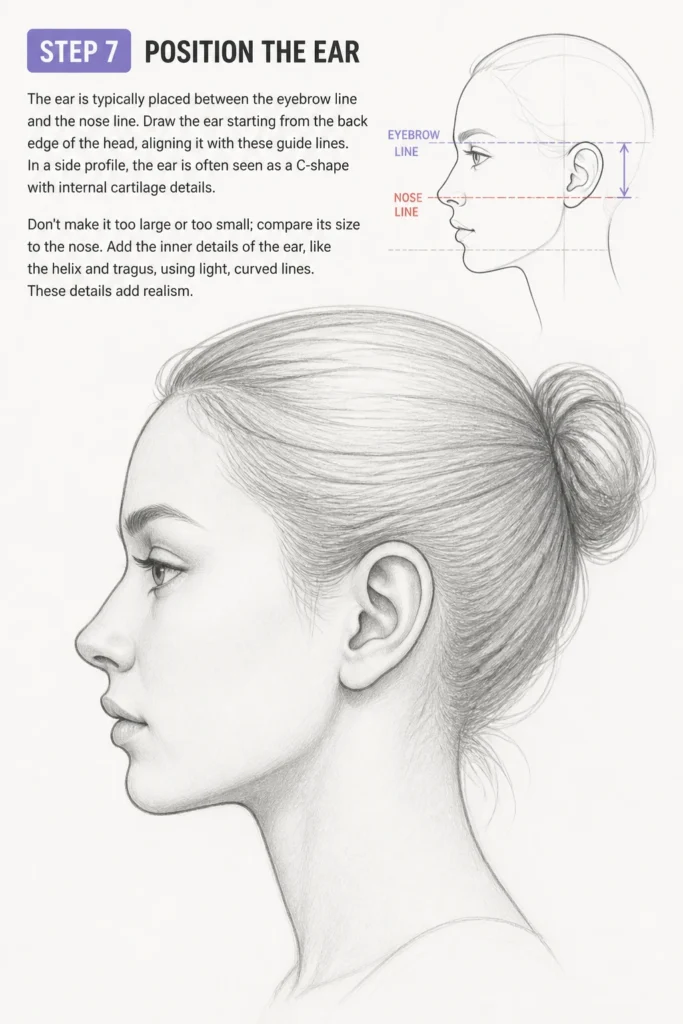
In a side profile, the ear is often seen as a C-shape with internal cartilage details. Don’t make it too large or too small; compare its size to the nose.
Add the inner details of the ear, like the helix and tragus, using light, curved lines. These details add realism.
Step 8: Add the Hairline and Hair
The hairline begins on the forehead, usually just above the eyebrow line. Draw the hairline as a gentle curve.
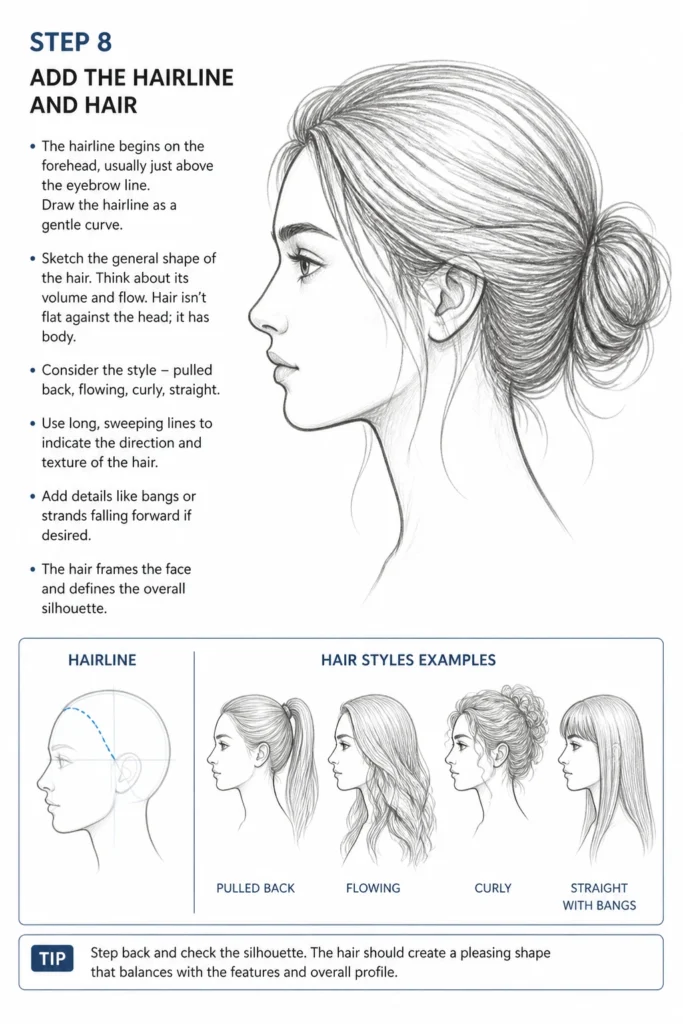
Sketch the general shape of the hair. Think about its volume and flow. Hair isn’t flat against the head; it has body.
Consider the style – pulled back, flowing, curly, straight. Use long, sweeping lines to indicate the direction and texture of the hair.
Add details like bangs or strands falling forward if desired. The hair frames the face and defines the overall silhouette.
Step 9: Draw the Neck and Shoulders
The neck supports the head and connects it to the body. Draw the front of the neck extending downwards from the chin. It usually curves slightly backward.
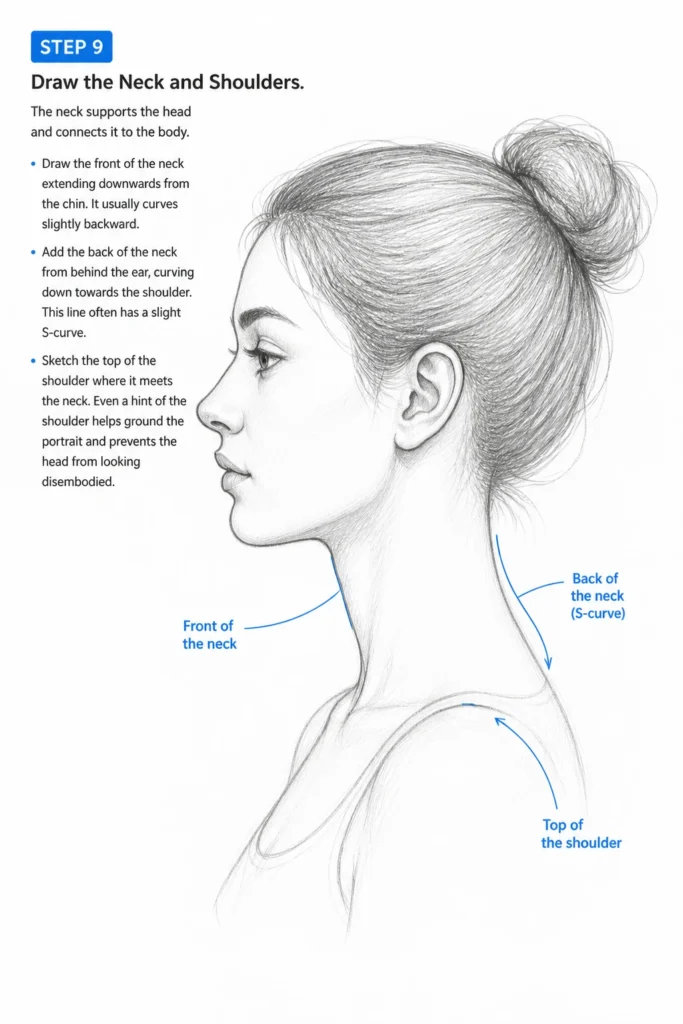
Add the back of the neck from behind the ear, curving down towards the shoulder. This line often has a slight S-curve.
Sketch the top of the shoulder where it meets the neck. Even a hint of the shoulder helps ground the portrait and prevents the head from looking disembodied.
Step 10: Refine and Erase
Now that all the features are in place, it’s time to clean up your drawing. Erase all your initial guide lines and any unnecessary construction marks.
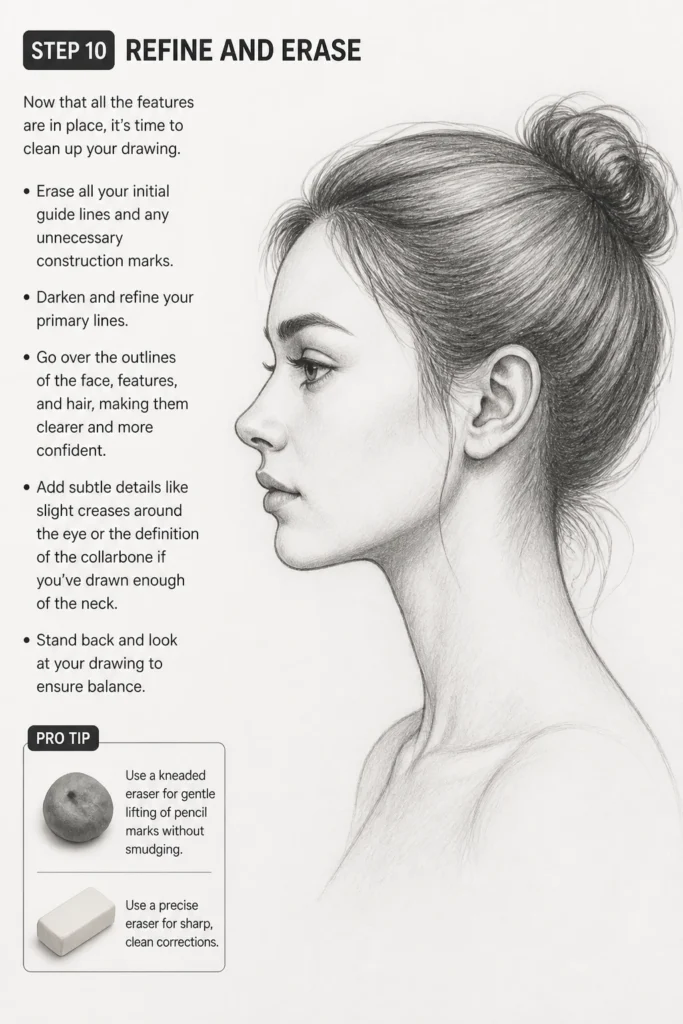
Darken and refine your primary lines. Go over the outlines of the face, features, and hair, making them clearer and more confident.
Add subtle details like slight creases around the eye or the definition of the collarbone if you’ve drawn enough of the neck. Stand back and look at your drawing to ensure balance.
Pro Tip: Use a kneaded eraser for gentle lifting of pencil marks without smudging, and a precise eraser for sharp, clean corrections.
Common Mistakes to Avoid
Flat Facial Features
Many beginners draw the nose, lips, and chin as if they are flat against a wall. This makes the profile look two-dimensional and unrealistic. Remember that the face has depth; features like the nose and lips protrude, and the eye is set back in its socket. Always think about the volumetric form of the head, not just its outline.
Incorrect Eye Placement
A common error is placing the eye too far forward or too far back. The eye should be nestled within the brow bone and cheekbone structure. In a side profile, you’re seeing the side of the eye, not a full frontal view, so it will appear more elongated or triangular. Ensure it sits naturally within the skull’s curve.
Disproportionate Forehead or Chin
Sometimes artists make the forehead too tall or the chin too small, throwing off the entire balance of the face. Use your guide lines to help maintain proportion. The distance from the hairline to the eyebrows, eyebrows to the nose, and nose to the chin are roughly equal in an idealized face. Always compare these sections.
Stiff Neck and Shoulders
A common mistake is drawing the neck as a straight, rigid column. The neck has a natural curve and muscle structure. Ensure the front of the neck curves slightly inward and the back curves gently outward, connecting fluidly to the shoulders. A stiff neck can make the entire pose feel unnatural.
Troubleshooting
My Face Looks Flat and Lifeless
If your profile lacks dimension, it’s likely due to not considering the underlying skull structure. Try to envision the head as a 3D sphere and cube before adding features. Emphasize the subtle overlaps and protrusions of the nose, lips, and chin. Use slight shading under the brow bone or jaw to suggest depth.
Features Don’t Align Correctly
Misaligned features often stem from skipping or rushing the initial guide lines. Go back to Step 2 and draw your horizontal lines for the eyebrow, nose, and mouth very carefully. Use a ruler if needed for precision. Ensure your vertical center line is also accurately curved to match the head’s form.
The Profile Looks Too Masculine or Androgynous
To enhance femininity, soften the angles. Reduce the sharpness of the jawline and chin. Make the forehead curve more gently, and the nose less prominent or more upturned. Emphasize fuller lips and a more arched, refined eyebrow. Hair also plays a huge role in framing a feminine face.
Key Takeaways
- Always start with basic shapes and light guide lines to establish proportion.
- Break down the face into manageable sections: forehead, nose, mouth, chin, eye, ear.
- Pay close attention to the subtle curves and angles that define each feature.
- Refine your lines and erase guides only after all features are in place.
- Practice observing real faces and reference photos to understand natural variations.
- Don’t be afraid to make mistakes; they are part of the learning process.
Frequently Asked Questions
How do I make the face look unique and not generic?
To add uniqueness, focus on subtle variations in proportions. Experiment with different nose shapes, lip fullness, chin angles, and eyebrow arches. Observe different people’s profiles and note what makes them distinct. Hair styles and accessories also contribute greatly to individuality.
What’s the best way to practice proportions without getting frustrated?
Start by tracing over reference photos, focusing only on the guide lines and basic shapes. Then, try to replicate those lines next to the photo. Use a grid method if you find it helpful. Consistent, short practice sessions are more effective than infrequent, long ones.
Should I draw the neck and shoulders every time?
While the focus is on the face, including at least a hint of the neck and shoulders helps ground the portrait and provides context. It prevents the head from looking like it’s floating. For a complete portrait, definitely include them to create a sense of balance and realism.
How important is shading for a side profile?
Shading isn’t mandatory for a basic drawing, but it’s crucial for adding depth, form, and realism. It defines the planes of the face, shows where light hits and shadows fall, and makes the profile truly pop. Start with simple value changes before attempting complex rendering.
Our Top Recommended Finds
- Sketchbook with Quality Paper: Look for paper that can handle multiple erasures without tearing or pilling, typically 80-100gsm.
- Set of Graphite Pencils: A range from HB for light sketching to 4B or 6B for darker lines and shading offers versatility.
- Kneaded Eraser: Essential for lifting pencil marks gently without smudging, and for creating highlights.
Your Next Creative Journey Awaits
You’ve just taken a fantastic step in mastering the art of drawing female side profiles. This skill is a cornerstone for character design, portraiture, and visual storytelling. Don’t let your pencils sit idle.
Keep practicing these steps, experimenting with different features and expressions. Try drawing profiles from various angles or with different hair types. The more you draw, the more intuitive the process will become. Grab your sketchbook and create something amazing today!
& Painting
No rigid rules or pretension. Just practical guides, medium comparisons, and encouraging tips to help you enjoy the drawing & painting process.