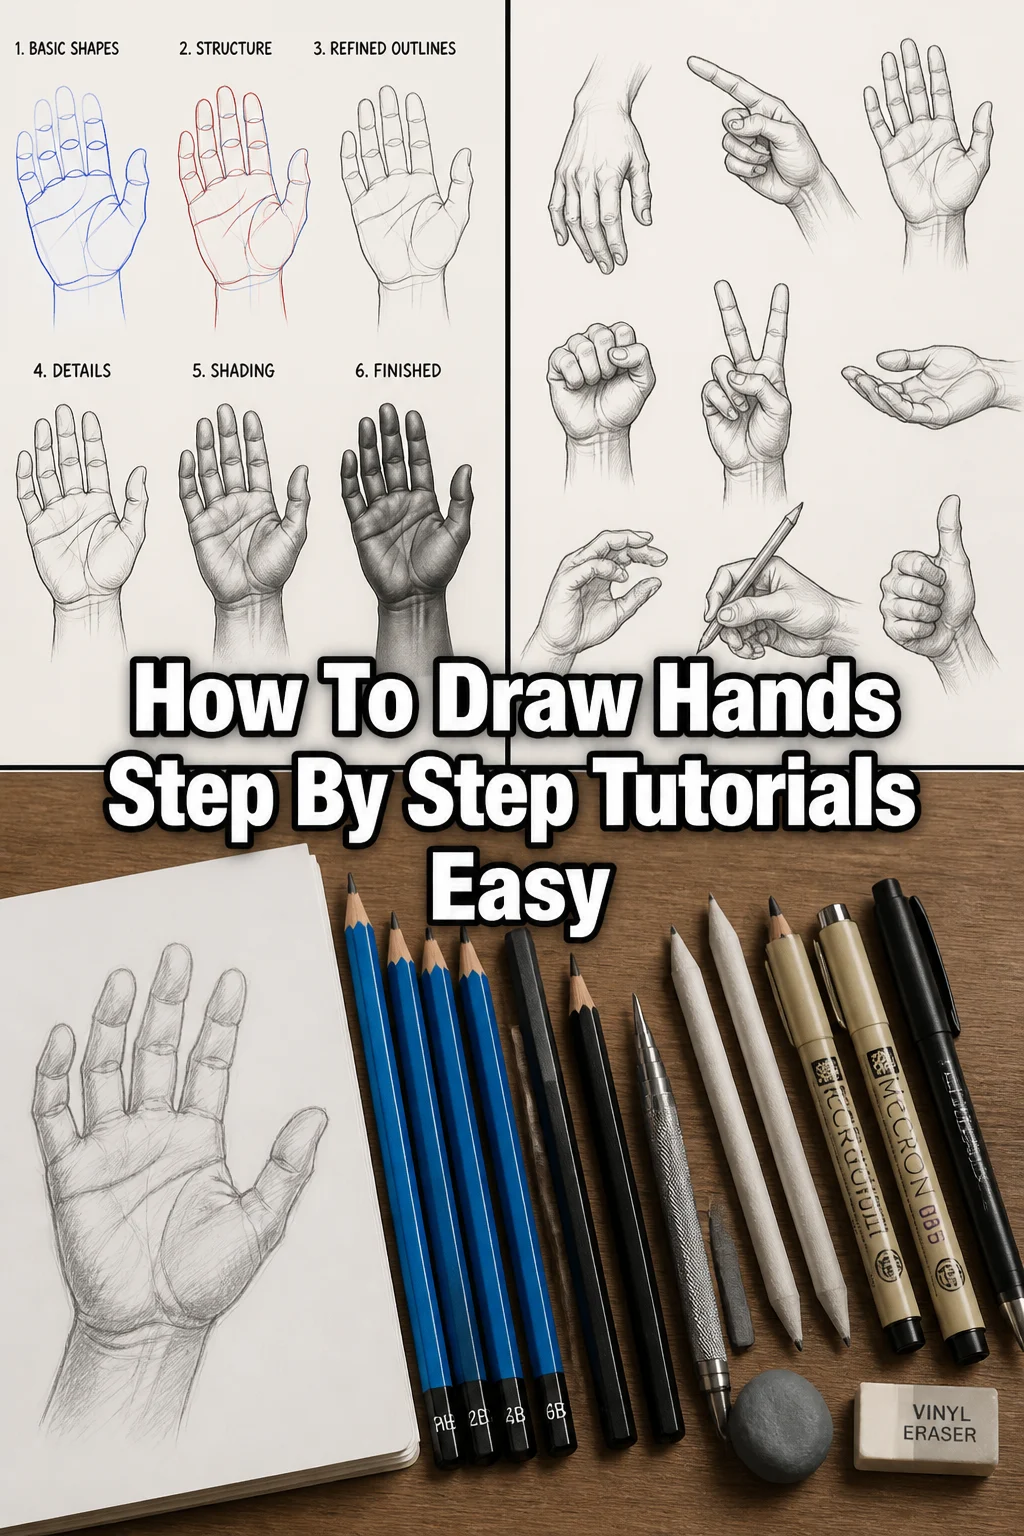
👋 How To Draw Hands Step By Step Tutorials Easy
Drawing hands can feel like a mountain to climb for many artists. I remember the frustration of trying to make fingers look natural, only for them to turn out like stiff sausages.
But with the right approach, it doesn’t have to be intimidating. This guide will break down the process into simple, manageable steps. You’ll soon find confidence in sketching expressive and believable hands.
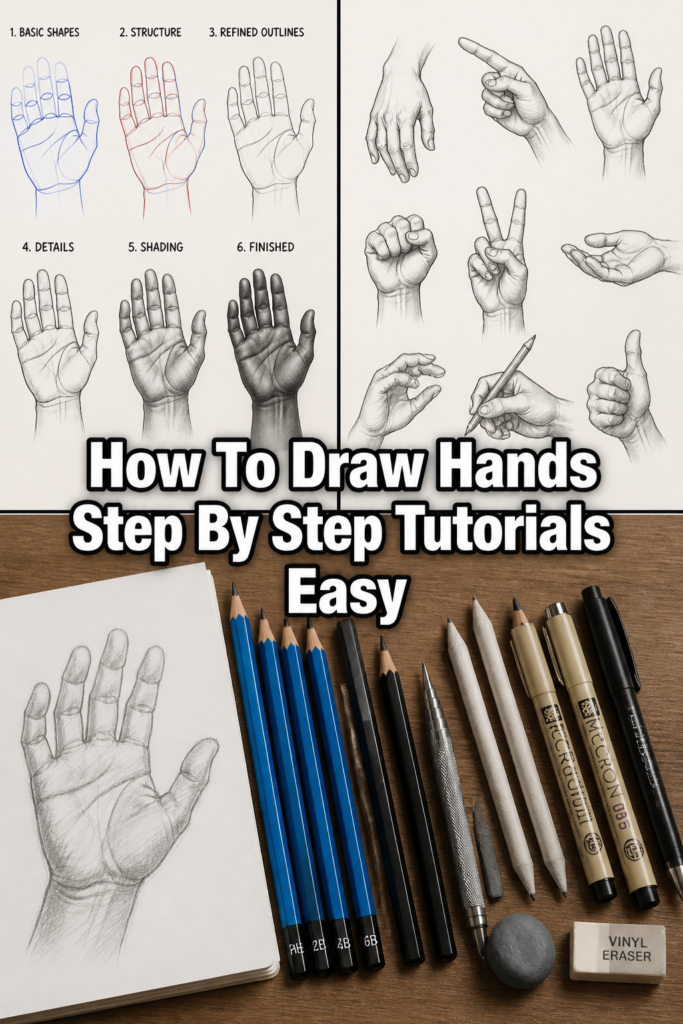
Quick Overview
This tutorial will guide you through the fundamental principles of drawing hands. You’ll learn to simplify complex forms and build them up step by step. Our goal is to make a challenging subject feel approachable and fun.
- Time needed: 1-2 hours for your first complete drawing, ongoing practice recommended.
- Difficulty: Beginner
- What you’ll need: Pencil (HB or 2B recommended), paper, eraser, and some reference photos of hands (your own hands work perfectly!).
Step-by-Step Instructions
Step 1: Understand Basic Shapes and Proportions
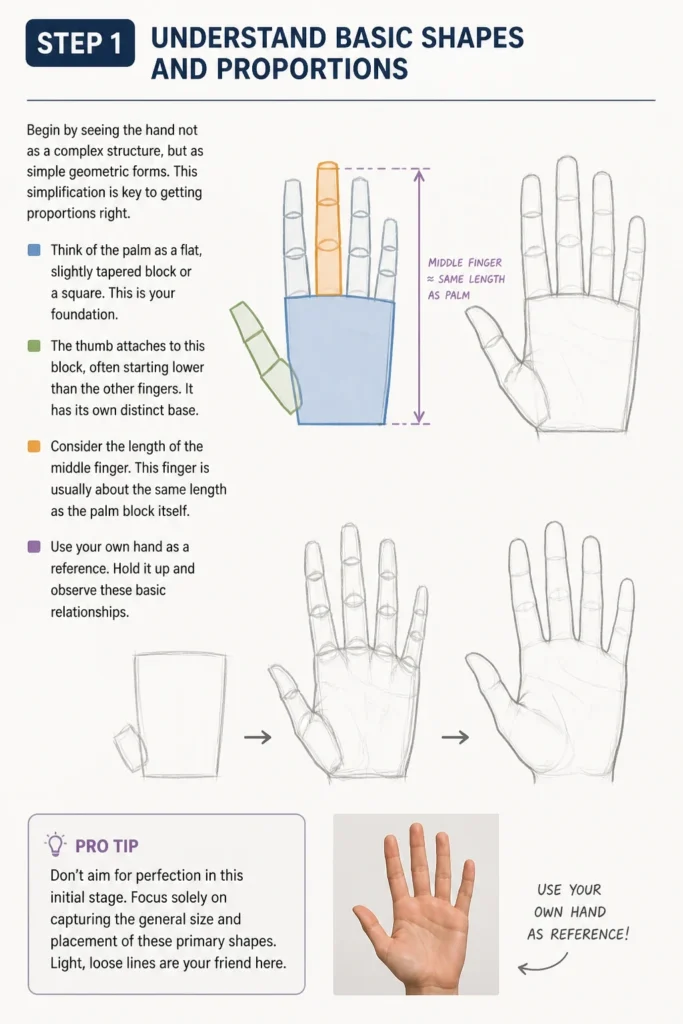
Begin by seeing the hand not as a complex structure, but as simple geometric forms. This simplification is key to getting proportions right.
Think of the palm as a flat, slightly tapered block or a square. This is your foundation.
The thumb attaches to this block, often starting lower than the other fingers. It has its own distinct base.
Consider the length of the middle finger. This finger is usually about the same length as the palm block itself.
Use your own hand as a reference. Hold it up and observe these basic relationships.
Pro Tip: Don’t aim for perfection in this initial stage. Focus solely on capturing the general size and placement of these primary shapes. Light, loose lines are your friend here.
Step 2: Construct the Palm and Thumb Block
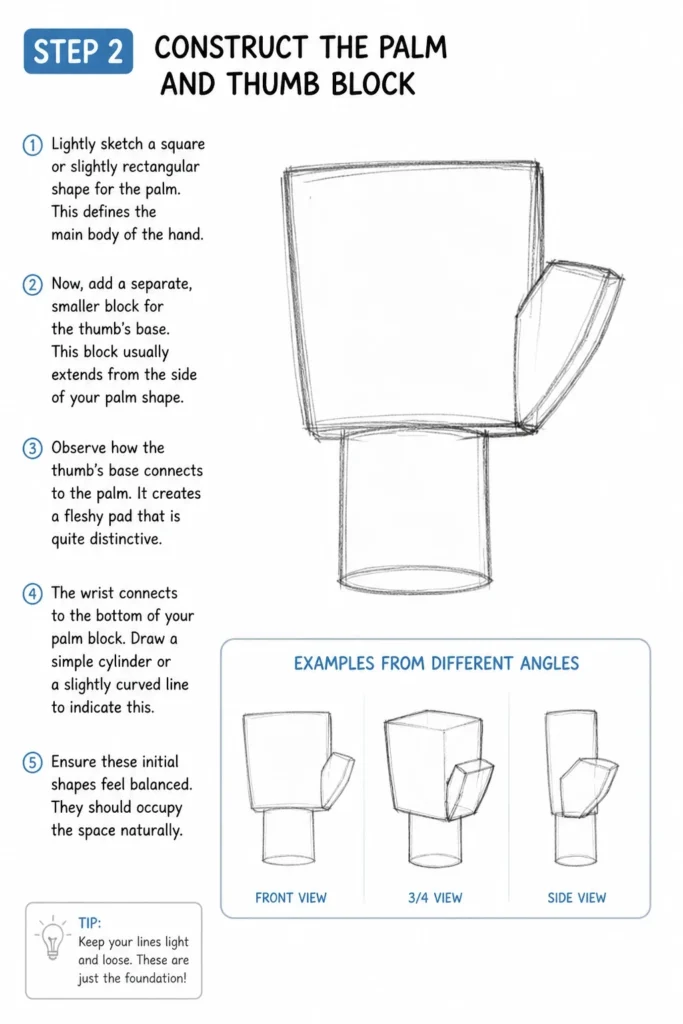
Lightly sketch a square or slightly rectangular shape for the palm. This defines the main body of the hand.
Now, add a separate, smaller block for the thumb’s base. This block usually extends from the side of your palm shape.
Observe how the thumb’s base connects to the palm. It creates a fleshy pad that is quite distinctive.
The wrist connects to the bottom of your palm block. Draw a simple cylinder or a slightly curved line to indicate this.
Ensure these initial shapes feel balanced. They should occupy the space naturally.
Step 3: Map Out the Finger Placement and Lengths
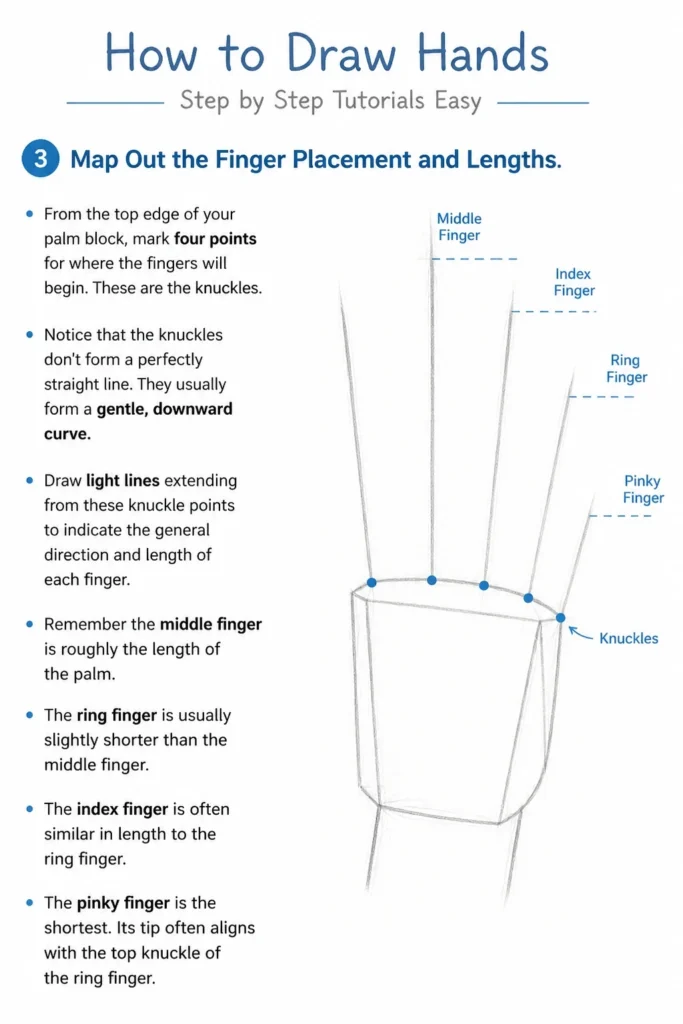
From the top edge of your palm block, mark four points for where the fingers will begin. These are the knuckles.
Notice that the knuckles don’t form a perfectly straight line. They usually form a gentle, downward curve.
Draw light lines extending from these knuckle points to indicate the general direction and length of each finger. Remember the middle finger is roughly the length of the palm.
The ring finger is usually slightly shorter than the middle finger. The index finger is often similar in length to the ring finger.
The pinky finger is the shortest. Its tip often aligns with the top knuckle of the ring finger.
Step 4: Segment the Fingers and Add Joints
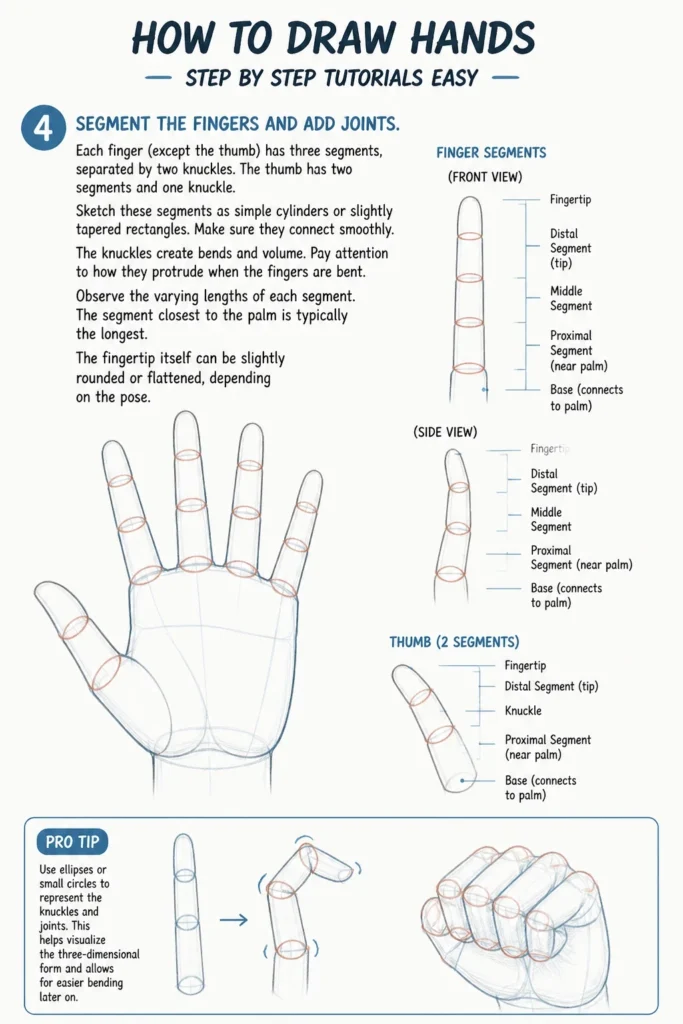
Each finger (except the thumb) has three segments, separated by two knuckles. The thumb has two segments and one knuckle.
Sketch these segments as simple cylinders or slightly tapered rectangles. Make sure they connect smoothly.
The knuckles create bends and volume. Pay attention to how they protrude when the fingers are bent.
Observe the varying lengths of each segment. The segment closest to the palm is typically the longest.
The fingertip itself can be slightly rounded or flattened, depending on the pose.
Pro Tip: Use ellipses or small circles to represent the knuckles and joints. This helps visualize the three-dimensional form and allows for easier bending later on.
Step 5: Refine the Contours and Overall Form
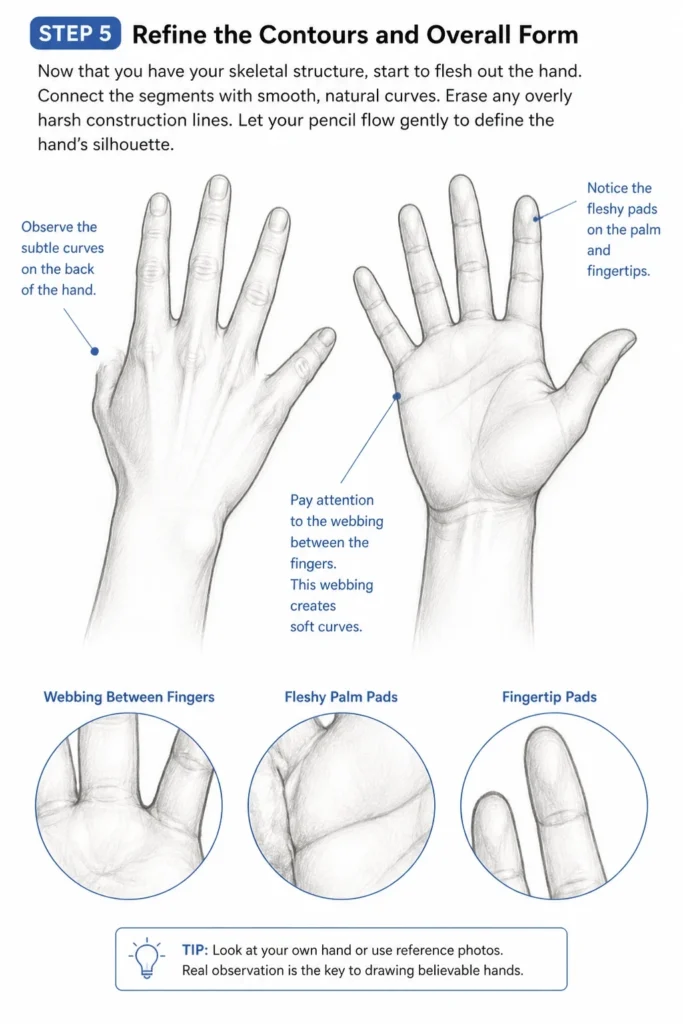
Now that you have your skeletal structure, start to “flesh out” the hand. Connect the segments with smooth, natural curves.
Erase any overly harsh construction lines. Let your pencil flow gently to define the hand’s silhouette.
Pay attention to the webbing between the fingers. This webbing creates soft curves.
Observe the subtle curves on the back of the hand. It’s rarely perfectly flat.
Notice the fleshy pads on the palm and fingertips. These add volume and realism.
Step 6: Detail the Knuckles, Creases, and Nails
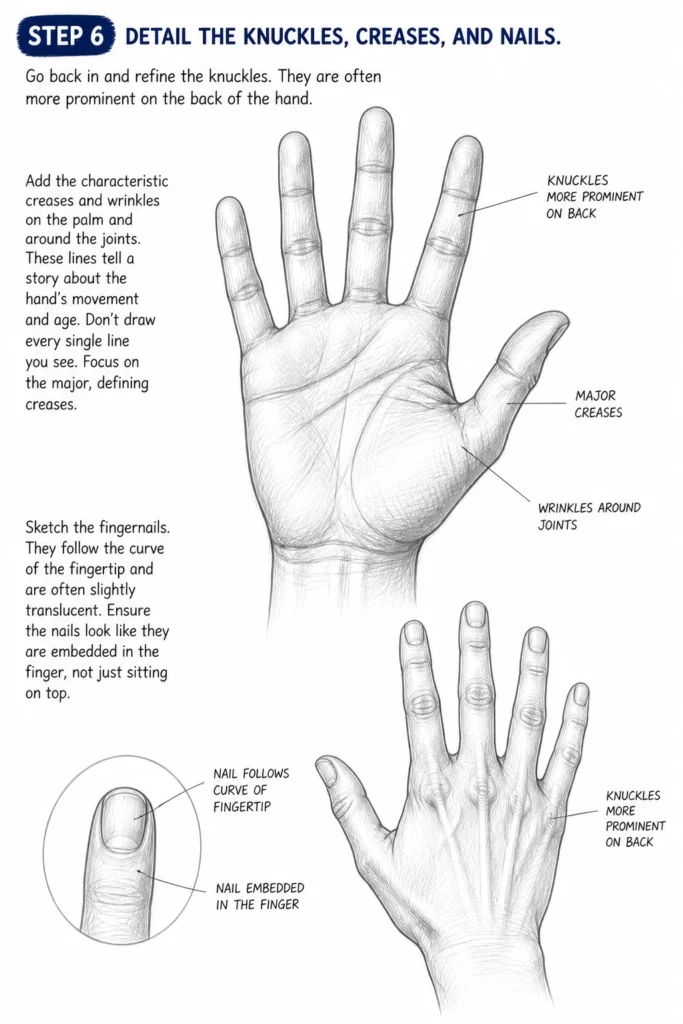
Go back in and refine the knuckles. They are often more prominent on the back of the hand.
Add the characteristic creases and wrinkles on the palm and around the joints. These lines tell a story about the hand’s movement and age.
Don’t draw every single line you see. Focus on the major, defining creases.
Sketch the fingernails. They follow the curve of the fingertip and are often slightly translucent.
Ensure the nails look like they are embedded in the finger, not just sitting on top.
Step 7: Add Shading and Volume
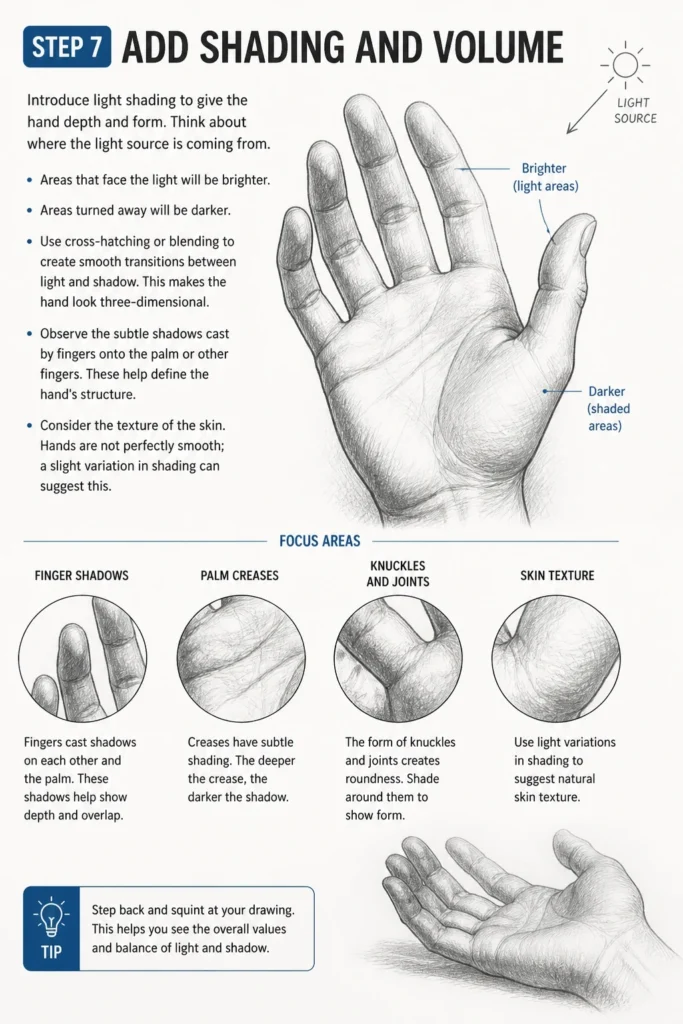
Introduce light shading to give the hand depth and form. Think about where the light source is coming from.
Areas that face the light will be brighter. Areas turned away will be darker.
Use cross-hatching or blending to create smooth transitions between light and shadow. This makes the hand look three-dimensional.
Observe the subtle shadows cast by fingers onto the palm or other fingers. These help define the hand’s structure.
Consider the texture of the skin. Hands are not perfectly smooth; a slight variation in shading can suggest this.
Step 8: Practice Different Poses and Perspectives
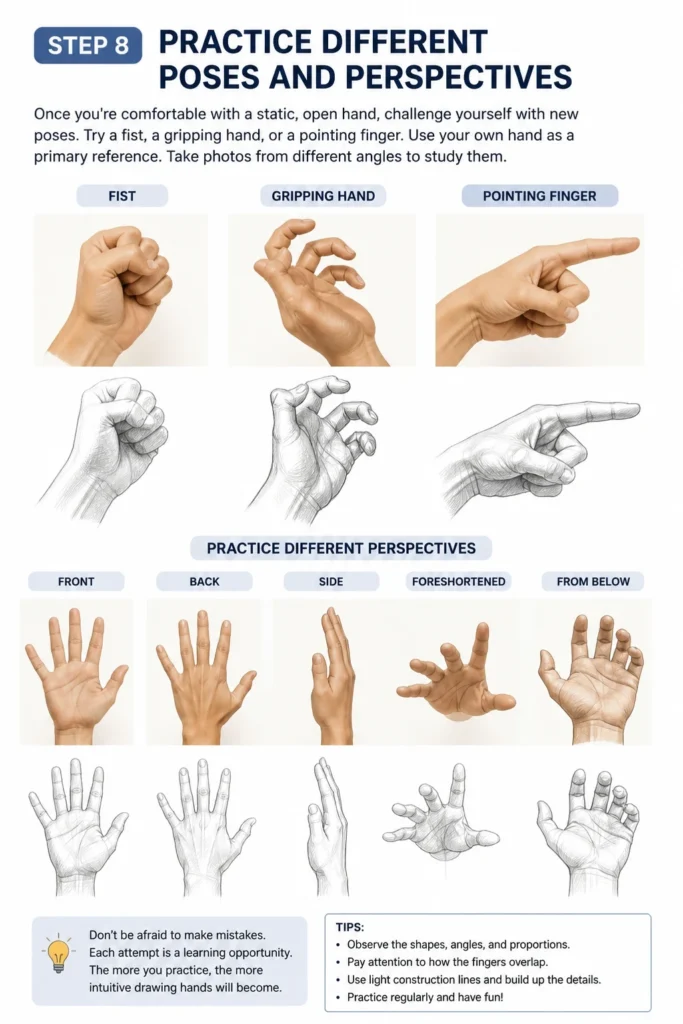
Once you’re comfortable with a static, open hand, challenge yourself with new poses. Try a fist, a gripping hand, or a pointing finger.
Use your own hand as a primary reference. Take photos from different angles to study them.
Drawing hands from various perspectives (front, back, side, foreshortened) will greatly improve your understanding.
Don’t be afraid to make mistakes. Each attempt is a learning opportunity.
The more you practice, the more intuitive drawing hands will become.
Common Mistakes to Avoid
Drawing “Sausage Fingers”
This is a very common pitfall where fingers appear stiff, cylindrical, and uniform in thickness. It happens when artists don’t consider the tapering of fingers and the distinct shape of knuckles. To fix this, remember that fingers are not perfectly straight cylinders. They taper slightly towards the tips and have distinct bumps at the knuckles. Vary the thickness and add subtle curves to make them look more natural and organic.
Ignoring Anatomy and Proportions
Many beginners jump straight to details without establishing the underlying structure. This leads to hands with incorrect finger lengths, misplaced thumbs, or a disproportionate palm. Always start with the basic shapes and proportions first. Measure mental ratios, like the middle finger being roughly the length of the palm, and ensure the thumb’s base is correctly positioned. Building a strong foundation prevents these errors.
Lack of Dynamic Poses
Hands are incredibly expressive and convey emotion. Drawing them in only one static, open position misses a huge opportunity. A hand can be clenched in anger, gently holding an object, or gesturing gracefully. Actively seek out dynamic references and challenge yourself to capture movement and emotion. This will make your drawings much more engaging and lifelike.
Mirroring Hands Incorrectly
When drawing two hands, or a hand in a complex pose, artists sometimes mirror the pose symmetrically without considering how human anatomy works. Our hands are not perfect mirror images in every pose; they have unique characteristics. Always use separate references for each hand or carefully observe how the features differ when they are mirrored or in different positions.
Troubleshooting
My hands look stiff and flat.
This usually means you’re not fully capturing the three-dimensional quality of the hand. To fix this, focus more on overlapping forms and using shading to define volume. Think of fingers as cylinders, not flat lines. Use ellipses for knuckles to show their roundness. Also, introduce subtle curves to the back of the hand and the palm, avoiding perfectly straight lines.
Fingers look uneven or unnatural.
Inconsistency in finger length, thickness, or joint placement can make fingers look odd. Go back to your basic construction lines. Ensure your initial knuckle placement forms a gentle curve. Check the relative lengths of your finger segments against your reference. Practice observing the subtle tapering of each finger and the distinct shape of each knuckle. Don’t be afraid to erase and redraw segments until they feel right.
Proportions always seem off.
If your hands consistently look too big, too small, or have oddly proportioned parts, you might be skipping the initial measurement steps. Always start by comparing the length of the palm to the length of the middle finger. Use your pencil to measure proportions directly from your reference photo. Spend more time on Step 1 and Step 2, ensuring your basic block shapes are accurate before adding any detail. Consistent proportional checks are crucial.
Key Takeaways
- Always begin by simplifying the hand into basic geometric shapes like blocks and cylinders.
- Establish the palm and thumb’s base first to set up accurate proportions for the rest of the hand.
- Remember that fingers have three segments (two for the thumb) and taper towards the tips.
- Knuckles form a gentle curve across the hand, not a straight line.
- Use light construction lines and gradually refine the contours, adding details like creases and nails later.
- Shading is essential for giving the hand volume and making it appear three-dimensional.
- Consistent practice with various poses and references is the most effective way to improve your hand-drawing skills.
Frequently Asked Questions
How long does it take to get good at drawing hands?
Mastering hands takes consistent practice over time. While you’ll see improvement after a few dedicated sessions, truly “getting good” can take months or even years of regular drawing. The key is persistence and learning from each attempt.
Should I draw from imagination or reference?
Always start with references, especially when learning. Drawing from life (your own hand) or photos helps you understand actual anatomy and how light interacts with the form. Once you have a strong grasp of the fundamentals, you can begin to experiment with drawing from imagination.
What’s the best way to practice?
The best way to practice is frequently and with intention. Set aside short, regular drawing sessions. Focus on one aspect at a time, like just drawing knuckles or different finger poses. Sketch hands quickly in a sketchbook whenever you have a moment, and analyze what went well and what needs improvement.
Our Top Recommended Finds
- Good Quality Sketchbook: A sturdy sketchbook with paper that can handle erasing and light washes encourages regular practice and keeps all your attempts in one place.
- Set of Drawing Pencils (HB, 2B, 4B): Having a range of pencil hardness allows you to create lighter construction lines and deeper, richer shadows, adding more depth to your hand drawings.
- Articulated Wooden Hand Model: While not essential, a wooden hand model can be incredibly helpful for studying complex poses and understanding how light falls on the hand from different angles, especially when a live reference isn’t available.
Embrace the Journey of Drawing Hands
You’ve now got a solid roadmap for tackling one of drawing’s most challenging yet rewarding subjects. Remember, every master artist started right where you are. The journey of learning to draw is all about taking one small, consistent step after another.
Don’t let initial struggles discourage you. Pick up your pencil right now and try drawing a hand using these steps. The more you practice, the more natural and confident your hand drawings will become. Keep observing, keep sketching, and enjoy the process of bringing expressive hands to life on your page.