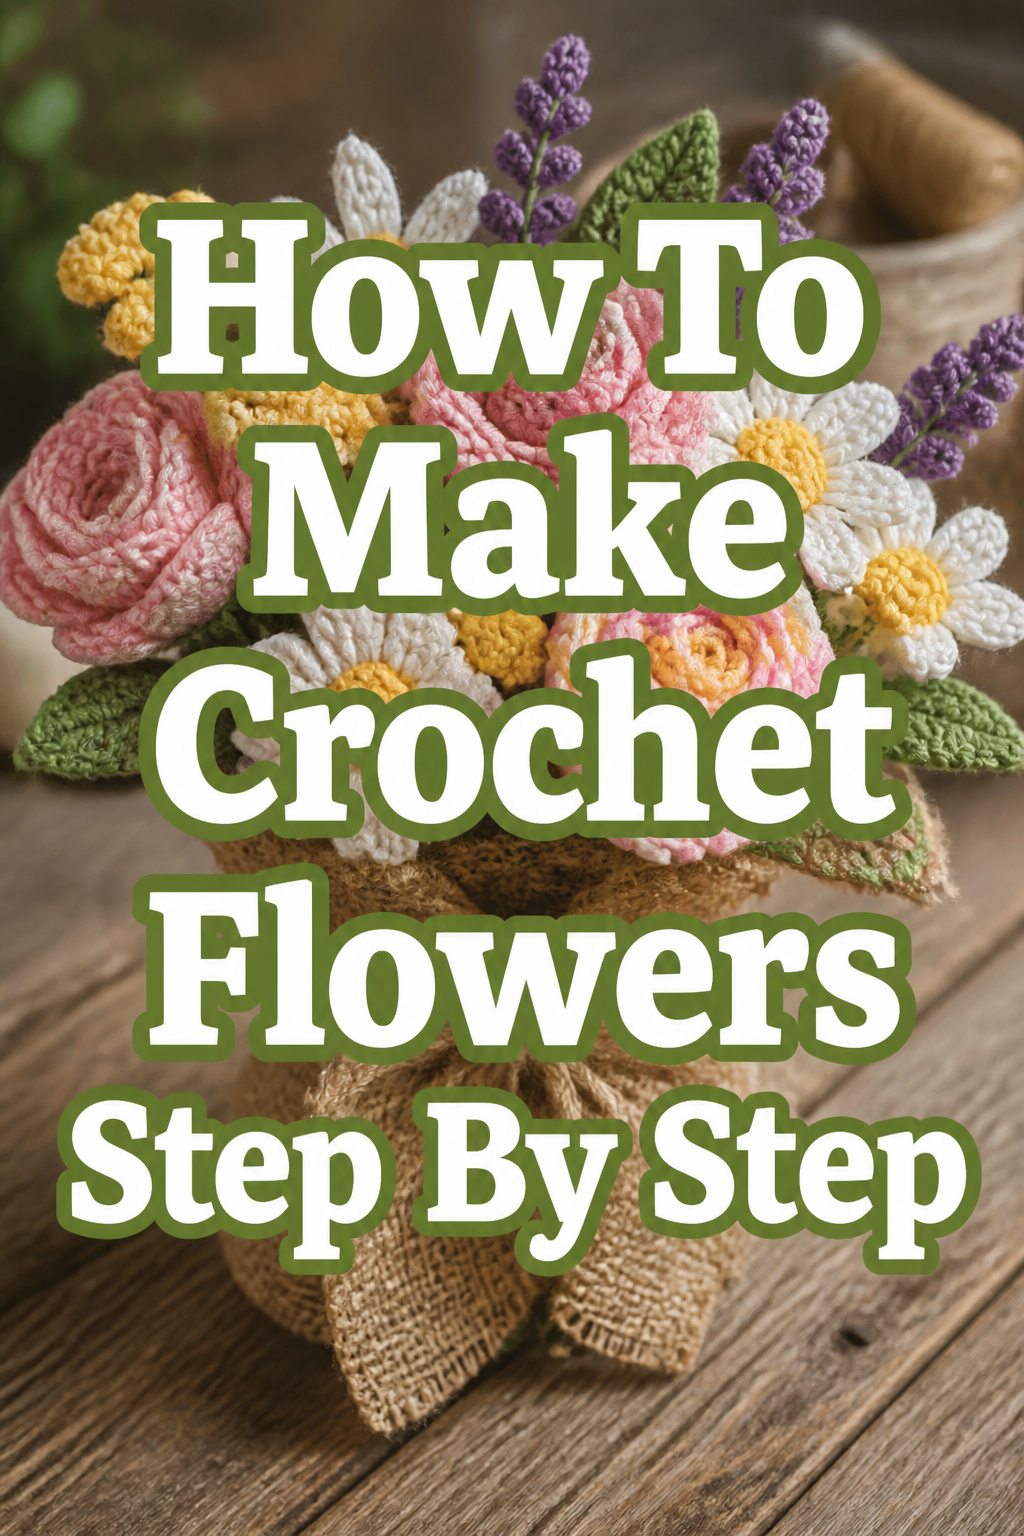
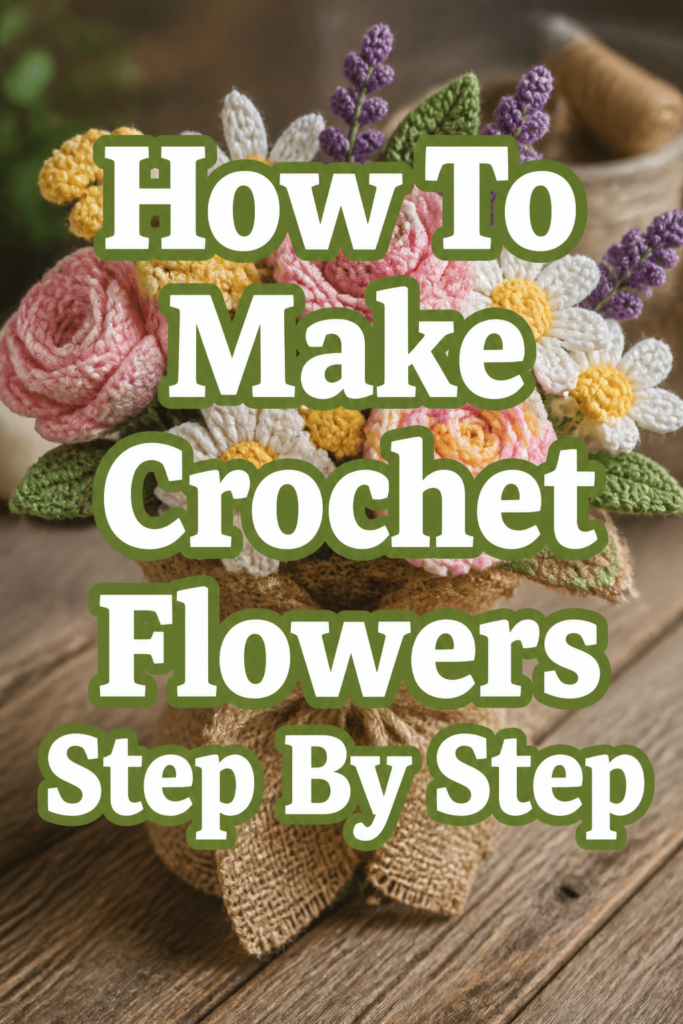
🌸 How To Make Crochet Flowers Step By Step

& Painting
No rigid rules or pretension. Just practical guides, medium comparisons, and encouraging tips to help you enjoy the drawing & painting process.
There’s something truly special about adding a handmade touch to your projects. I remember the first time I crocheted a tiny flower; it felt like magic blooming right in my hands. This guide will help you experience that same joy, transforming simple yarn into beautiful blossoms.
You don’t need years of experience to create something lovely. Just a few basic stitches and a little patience are all it takes to craft charming crochet flowers for any occasion.
Quick Overview
Crochet flowers are delightful accents for hats, bags, blankets, or even as standalone decorations. This guide will walk you through creating a simple yet elegant five-petal flower, perfect for beginners.
- Time needed: 30-60 minutes per flower (once comfortable with stitches)
- Difficulty: Beginner
- What you’ll need: Yarn, crochet hook, scissors, yarn needle
Step-by-Step Instructions
Step 1: Gather Your Materials
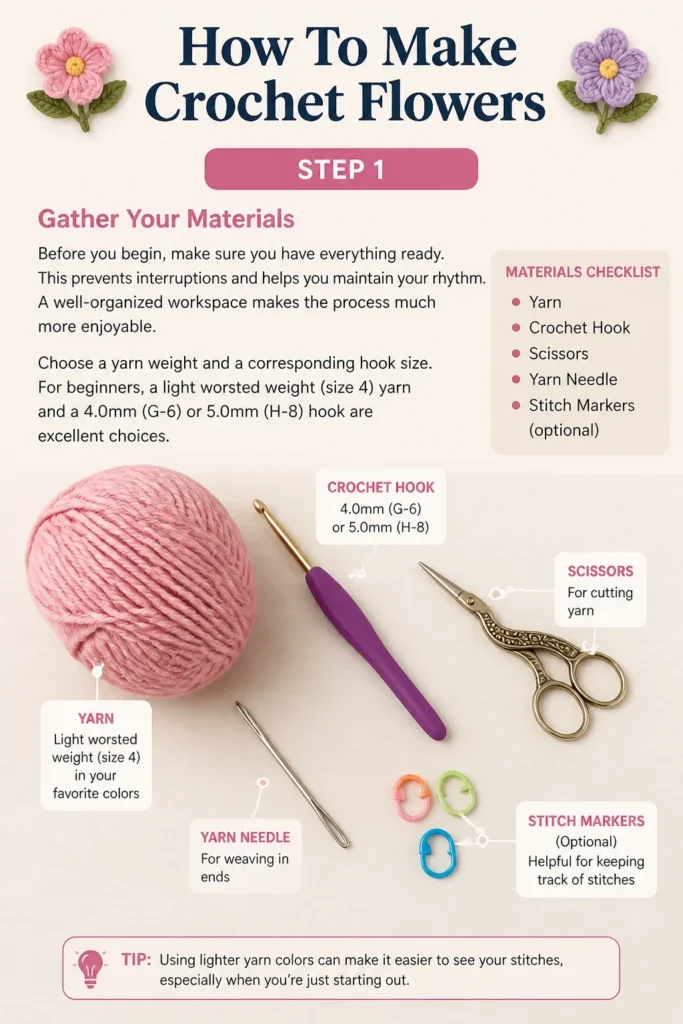
Before you begin, make sure you have everything ready. This prevents interruptions and helps you maintain your rhythm. A well-organized workspace makes the process much more enjoyable.
Choose a yarn weight and a corresponding hook size. For beginners, a light worsted weight (size 4) yarn and a 4.0mm (G-6) or 5.0mm (H-8) hook are excellent choices.
Step 2: Create a Magic Ring (or Chain 2 Alternative)
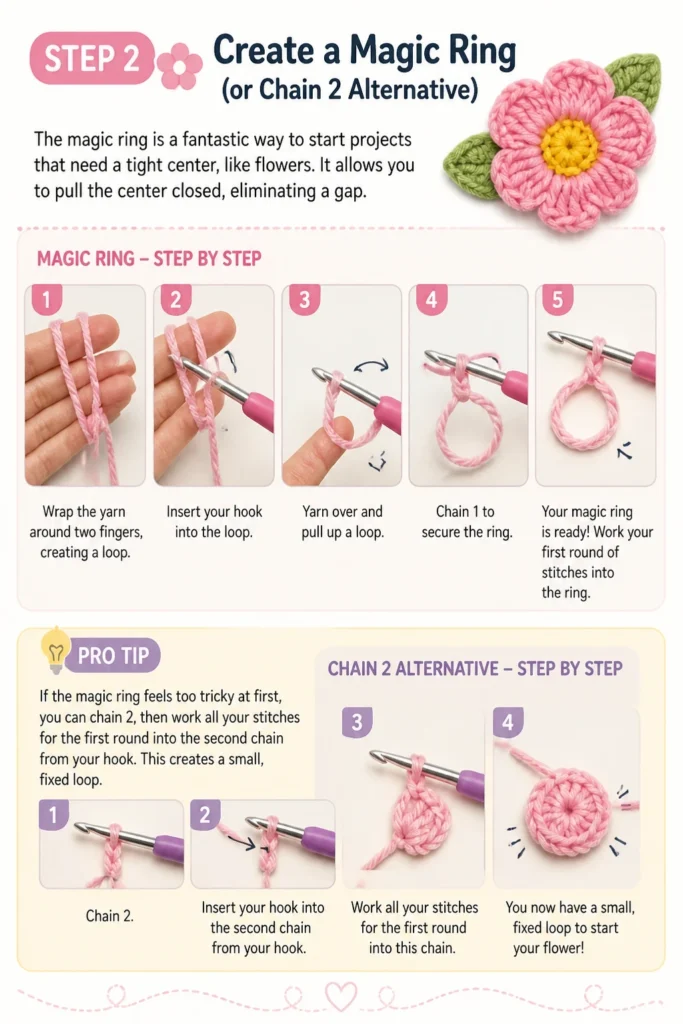
The magic ring is a fantastic way to start projects that need a tight center, like flowers. It allows you to pull the center closed, eliminating a gap.
To make a magic ring, wrap the yarn around two fingers, creating a loop. Insert your hook into the loop, yarn over, and pull up a loop. Chain 1 to secure the ring.
Pro Tip: If the magic ring feels too tricky at first, you can chain 2, then work all your stitches for the first round into the second chain from your hook. This creates a small, fixed loop.
Step 3: Work Your First Round Stitches
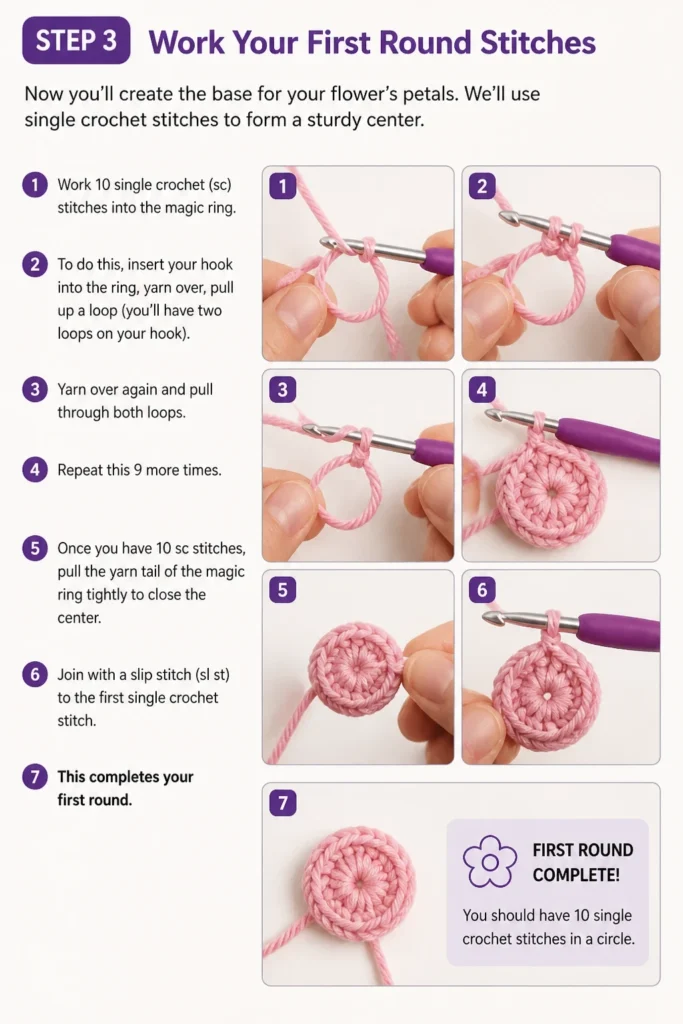
Now you’ll create the base for your flower’s petals. We’ll use single crochet stitches to form a sturdy center.
Work 10 single crochet (sc) stitches into the magic ring. To do this, insert your hook into the ring, yarn over, pull up a loop (you’ll have two loops on your hook). Yarn over again and pull through both loops. Repeat this 9 more times.
Once you have 10 sc stitches, pull the yarn tail of the magic ring tightly to close the center. Join with a slip stitch (sl st) to the first single crochet stitch. This completes your first round.
Step 4: Prepare for Petals with Chain Arcs
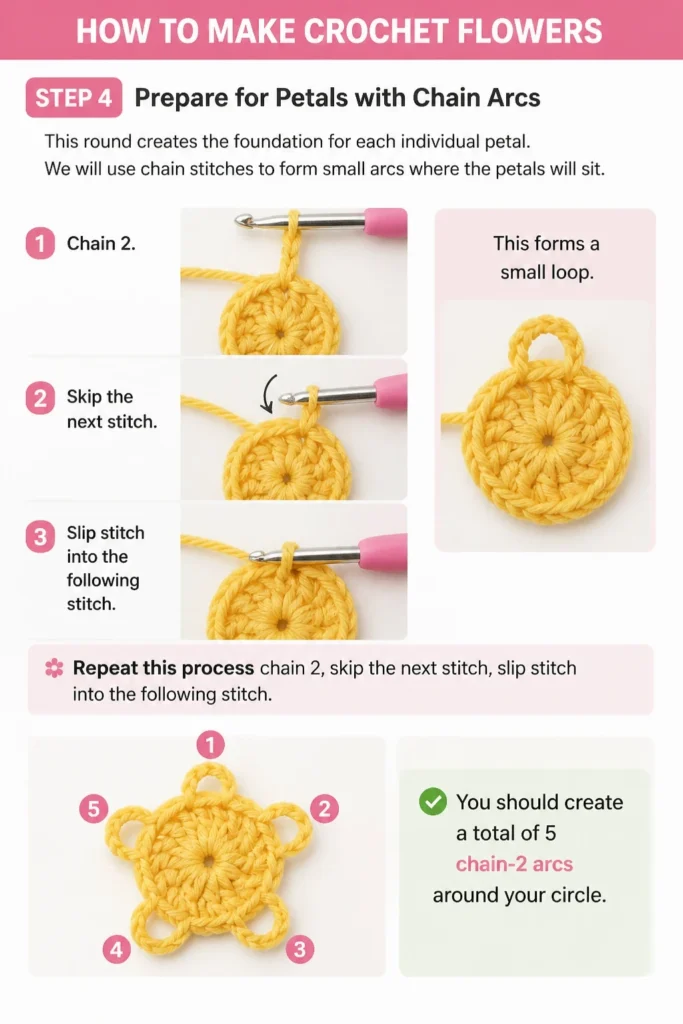
This round creates the foundation for each individual petal. We will use chain stitches to form small “arcs” where the petals will sit.
Chain 2. Then, skip the next stitch. Slip stitch into the following stitch. This forms a small loop.
Repeat this process: chain 2, skip the next stitch, slip stitch into the following stitch. You should create a total of 5 chain-2 arcs around your circle.
Step 5: Form the Petals
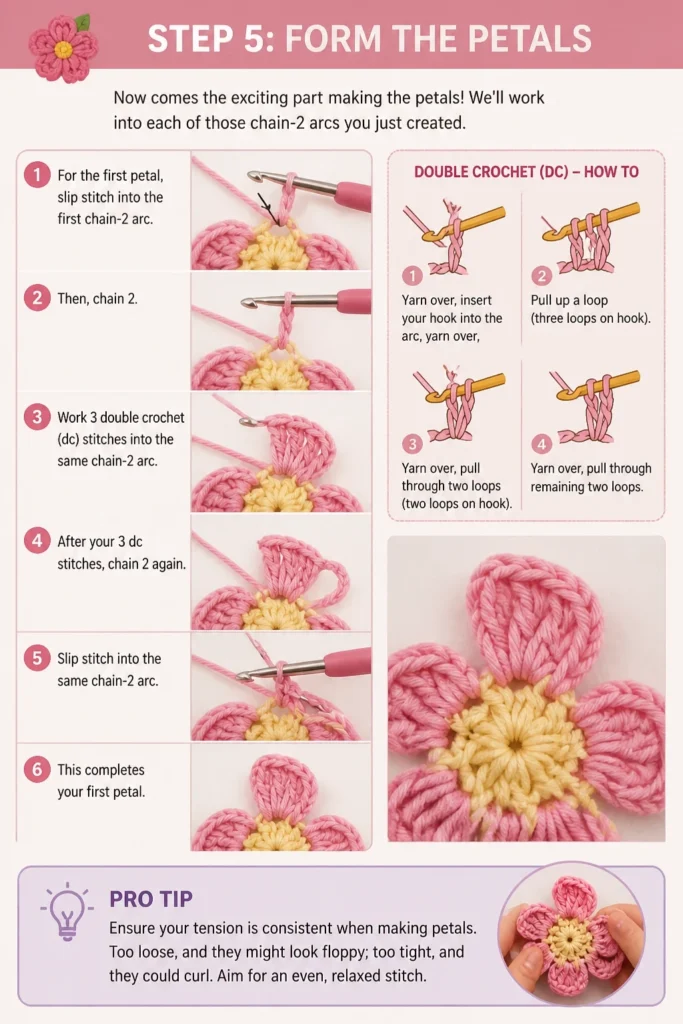
Now comes the exciting part: making the petals! We’ll work into each of those chain-2 arcs you just created.
For the first petal, slip stitch into the first chain-2 arc. Then, chain 2. Work 3 double crochet (dc) stitches into the same chain-2 arc. To make a double crochet, yarn over, insert your hook into the arc, yarn over, pull up a loop (three loops on hook). Yarn over, pull through two loops (two loops on hook). Yarn over, pull through remaining two loops.
After your 3 dc stitches, chain 2 again and slip stitch into the same chain-2 arc. This completes your first petal.
Pro Tip: Ensure your tension is consistent when making petals. Too loose, and they might look floppy; too tight, and they could curl. Aim for an even, relaxed stitch.
Step 6: Complete All Petals
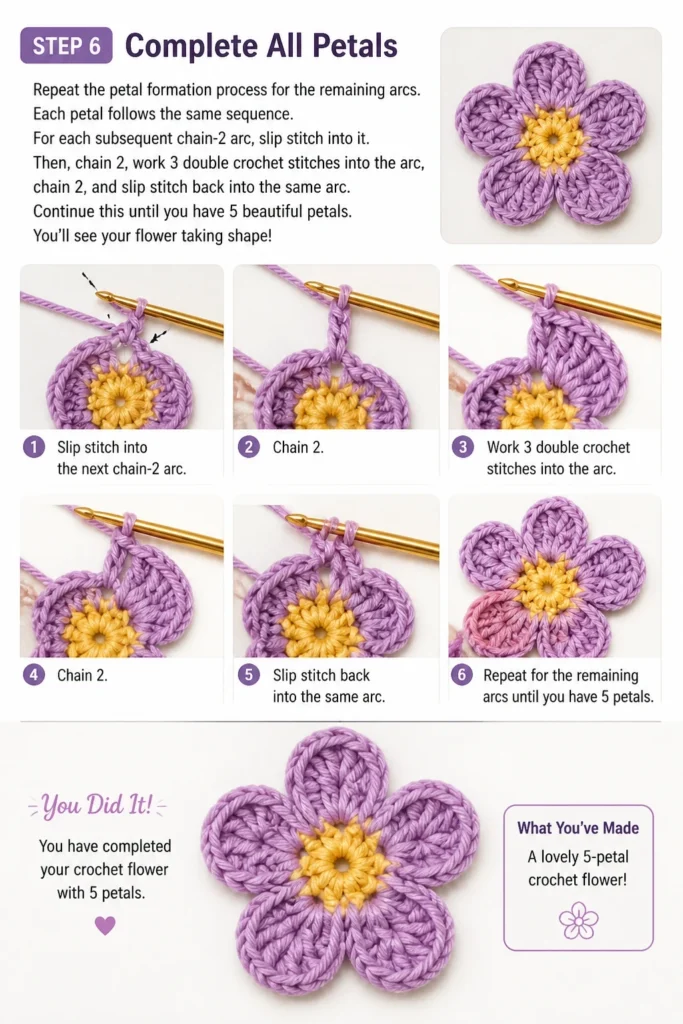
Repeat the petal formation process for the remaining arcs. Each petal follows the same sequence.
For each subsequent chain-2 arc, slip stitch into it. Then, chain 2, work 3 double crochet stitches into the arc, chain 2, and slip stitch back into the same arc.
Continue this until you have 5 beautiful petals. You’ll see your flower taking shape!
Step 7: Finish Off Your Flower
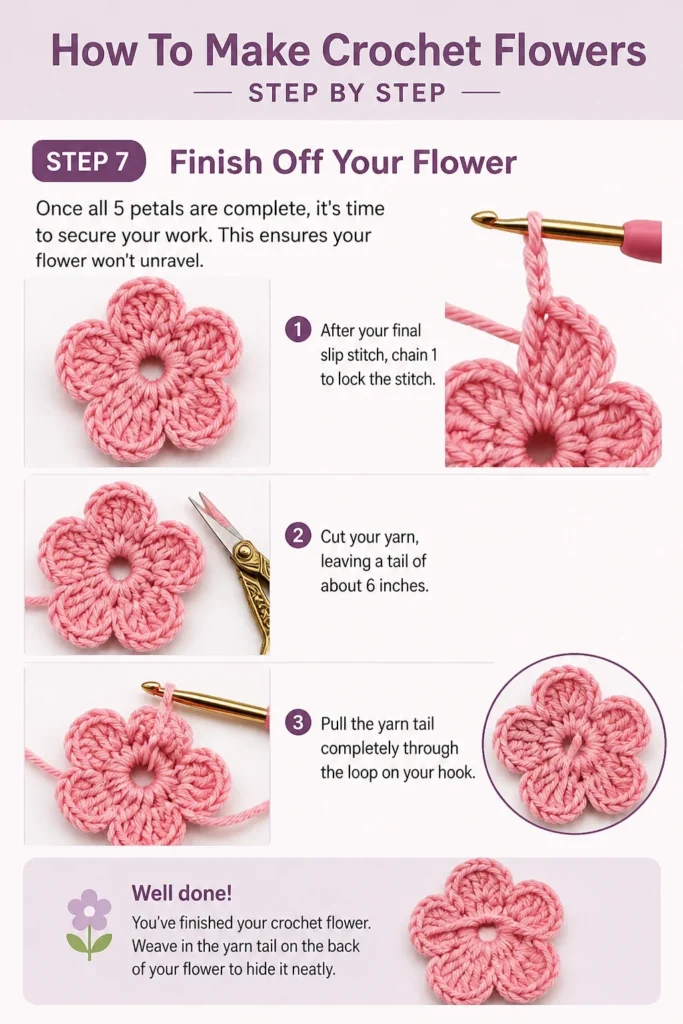
Once all 5 petals are complete, it’s time to secure your work. This ensures your flower won’t unravel.
After your final slip stitch, chain 1 to lock the stitch. Cut your yarn, leaving a tail of about 6 inches. Pull the yarn tail completely through the loop on your hook.
Step 8: Weave in Ends
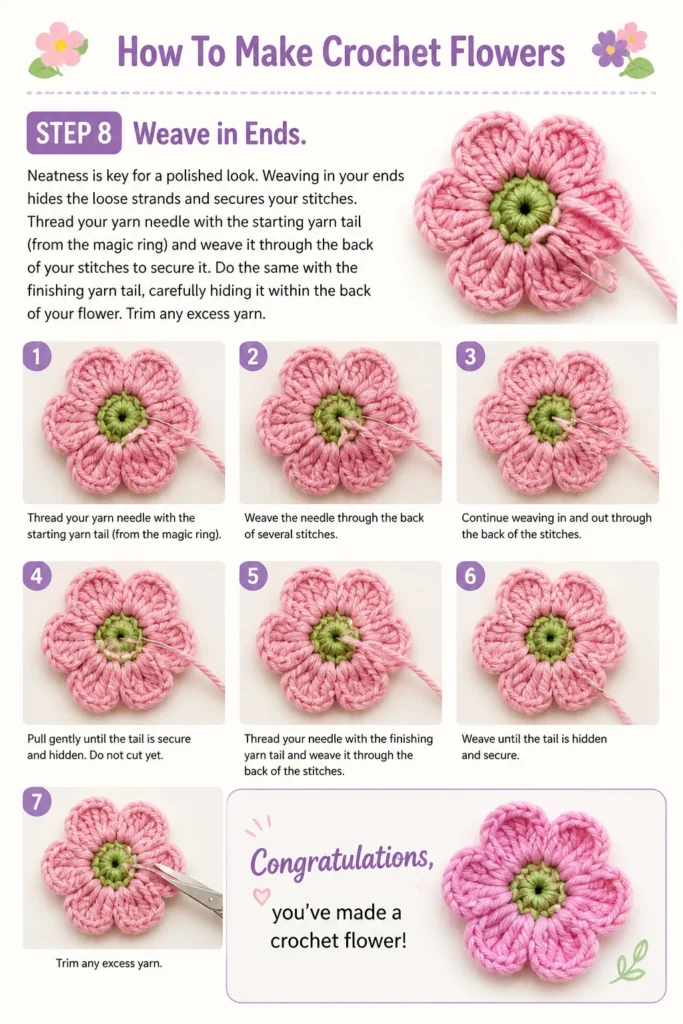
Neatness is key for a polished look. Weaving in your ends hides the loose strands and secures your stitches.
Thread your yarn needle with the starting yarn tail (from the magic ring) and weave it through the back of your stitches to secure it. Do the same with the finishing yarn tail, carefully hiding it within the back of your flower. Trim any excess yarn.
Congratulations, you’ve made a crochet flower!
Common Mistakes to Avoid
Inconsistent Tension
Many beginners struggle with maintaining even tension. This can lead to stitches that are too tight or too loose, resulting in a flower that looks uneven or puckered. Practice helps immensely, but consciously trying to keep your yarn flowing smoothly and your hook consistent makes a big difference. If your stitches are too tight, try a slightly larger hook. If they’re too loose, try a smaller one.
Skipping Stitches or Adding Extra Stitches
It’s easy to miscount or accidentally skip a stitch, especially in the first few rounds. This can throw off your stitch count and make your flower asymmetrical. Always double-check your stitch count after each round. Using stitch markers can be incredibly helpful to mark your first stitch or keep track of important points, preventing these common errors.
Not Securing Ends Properly
Leaving yarn tails too short or not weaving them in securely can cause your flower to unravel over time. Always leave a decent tail (at least 6 inches) and weave it through several stitches in different directions on the back of your work. This creates friction and locks the yarn in place, ensuring your beautiful flower lasts.
Using the Wrong Hook Size for Yarn Weight
While there’s some flexibility, using a hook that’s drastically too small for your yarn can make your fabric stiff and difficult to work with. Conversely, a hook that’s too large can result in a very loose, gappy, and floppy flower. Refer to your yarn label for recommended hook sizes, and don’t be afraid to experiment slightly to find what works best for your desired aesthetic.
Troubleshooting
My Flower is Curling Up
If your flower is curling or not lying flat, it’s likely due to too many stitches in a round or overly tight tension. Try using a larger hook size, or slightly loosen your grip on the yarn. Alternatively, if you’re making a pattern with many stitches, you might need to add an extra chain or two in your petal arcs to give them more room to lay flat. Blocking your finished flower can also help it relax and flatten out.
My Petals Look Uneven
Uneven petals often stem from inconsistent stitch height or tension within your double crochet stitches. Ensure you’re pulling up loops to the same height each time you make a stitch. Practice helps build muscle memory for consistent stitch height. If one petal is significantly larger or smaller, gently unravel that petal and re-crochet it, paying close attention to your tension and stitch count.
The Center of My Flower Has a Hole
If you used the magic ring method and there’s still a hole, you might not have pulled the tail tight enough, or your initial stitches were too loose. Gently pull the magic ring tail again. If you used the “chain 2, work into first chain” method, a small hole is normal. For a tighter center, ensure your stitches in the first round are snug against each other.
Key Takeaways
- Gathering materials and understanding basic stitches are your first steps to success.
- The magic ring provides a neat, tight center for your crochet flowers.
- Consistent tension is crucial for a symmetrical and attractive finished piece.
- Accurate stitch counting in each round prevents lopsided or uneven results.
- Properly weaving in your yarn tails ensures your flower’s durability and neatness.
- Don’t be afraid to experiment with different yarn weights and hook sizes for varied effects.
Frequently Asked Questions
Can I use any type of yarn for crochet flowers?
Yes, you can use almost any yarn! Cotton yarn is popular for its defined stitches and crisp look, while acrylic is versatile and comes in many colors. Wool can create a softer, more textured flower. The key is to match your hook size to your chosen yarn weight for the best results.
How can I make my crochet flower stiffer?
To make your crochet flower stiffer, you can “block” it. Pin the finished flower to a foam mat, spray it with water or a fabric stiffener, and let it dry completely. For a very firm flower, a mixture of white glue and water can be painted on and allowed to dry.
What can I use crochet flowers for?
Crochet flowers are incredibly versatile! They can embellish clothing, hats, bags, and blankets. You can make them into brooches, hair clips, or attach them to headbands. They also make lovely appliques for home decor items like pillows, or you can string them together to create garlands.
How do I attach my crochet flower to another project?
The easiest way to attach your flower is by hand-sewing it with a yarn needle and a matching piece of yarn. Simply place the flower where you want it and use small stitches around the edge of the flower, catching stitches on the main project, to secure it firmly.
Our Top Recommended Finds
- Ergonomic Crochet Hook Set: A set with comfortable handles reduces hand fatigue, making long crafting sessions more enjoyable.
- Assorted Cotton Yarn Pack: Offers a vibrant range of colors perfect for making many different flowers without buying full skeins.
- Yarn Needle Set with Various Sizes: Essential for weaving in ends neatly, different sizes accommodate various yarn weights.
Blooming Your Creativity
You’ve now learned the fundamental steps to creating beautiful crochet flowers. This simple pattern is just the beginning of what you can achieve with yarn and a hook. Each flower you make will build your confidence and refine your skills.
Why not try experimenting with different yarn colors or adding a button to the center of your next bloom? Consider exploring patterns for multi-layered flowers or those with unique petal shapes. Grab your hook and yarn today, and let your crochet garden grow!
& Painting
No rigid rules or pretension. Just practical guides, medium comparisons, and encouraging tips to help you enjoy the drawing & painting process.