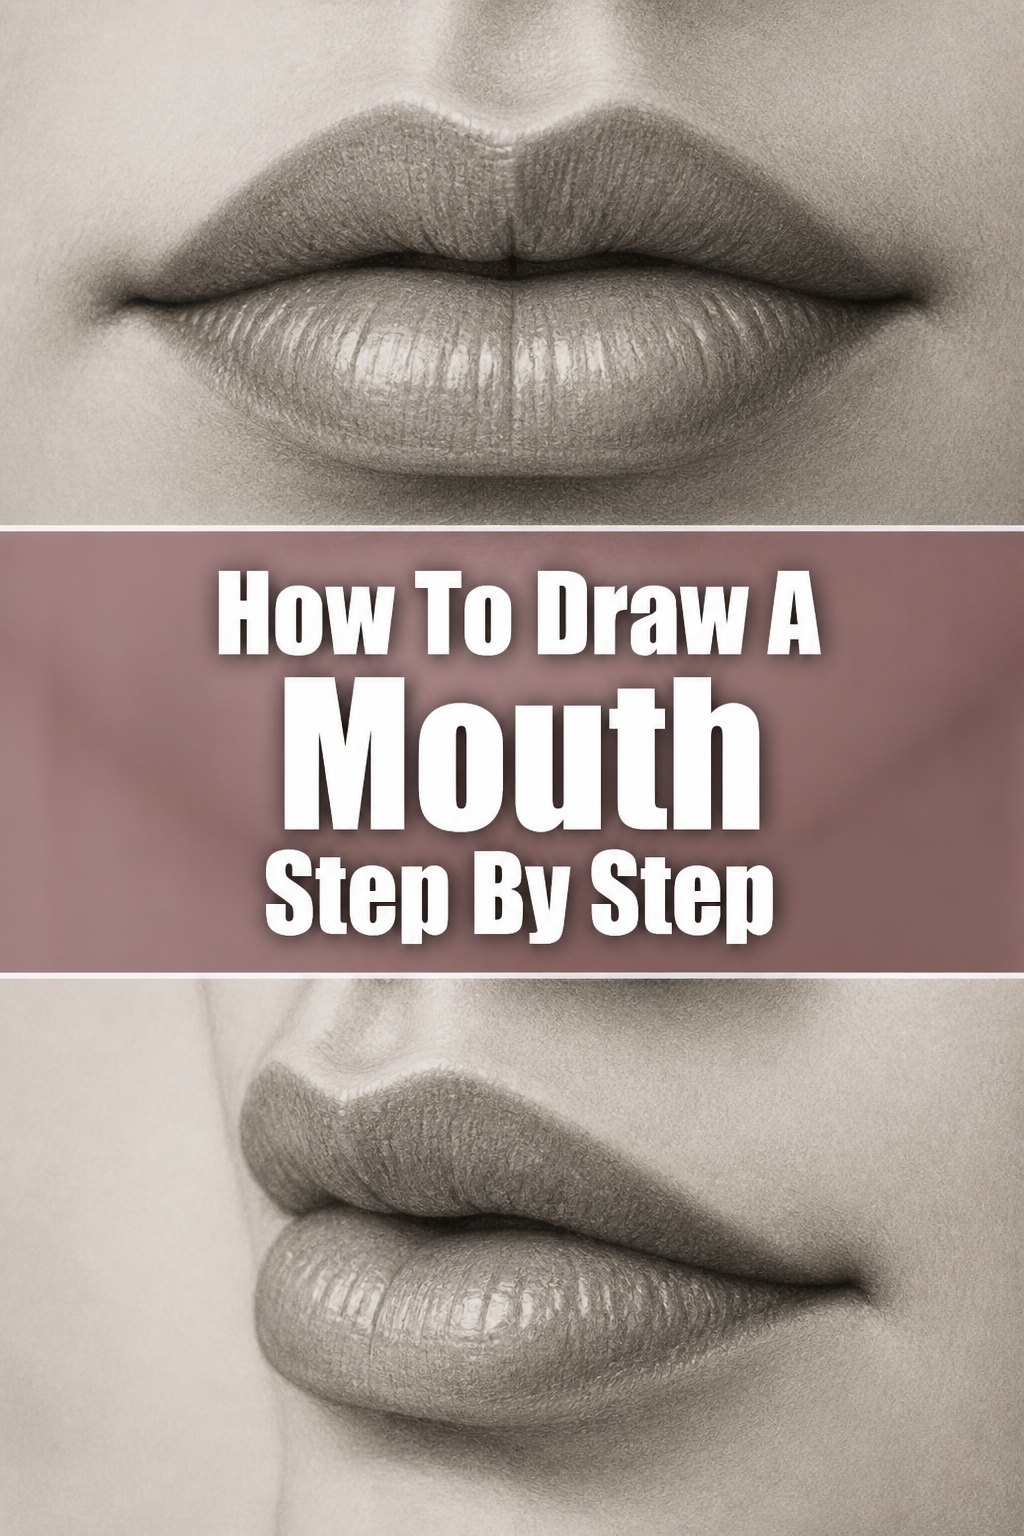
👄 How To Draw A Mouth Step By Step

& Painting
No rigid rules or pretension. Just practical guides, medium comparisons, and encouraging tips to help you enjoy the drawing & painting process.
Learning to draw a realistic and expressive mouth can transform your portraits.
It’s a feature that conveys so much emotion, often intimidating for beginners.
Having taught countless students, I’ve refined a simple approach that breaks down this complex task into manageable parts, ensuring you build confidence with every line.
Quick Overview
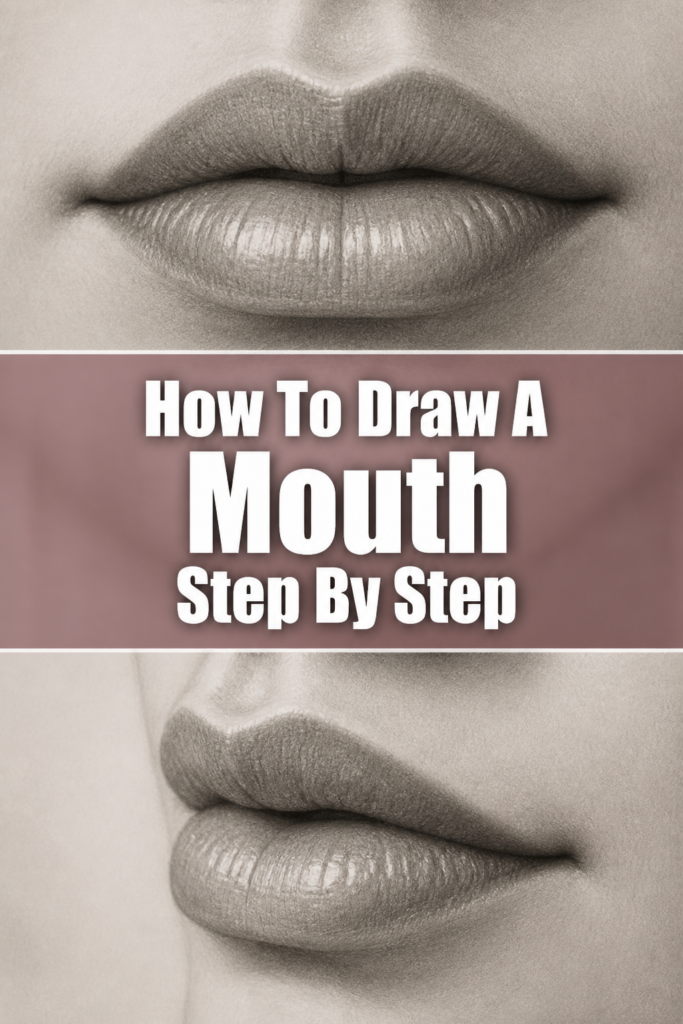
This guide will walk you through creating a compelling mouth drawing, focusing on structure, form, and subtle details.
- Time needed: 45-60 minutes
- Difficulty: Beginner to Intermediate
- What you’ll need: Pencil (HB, 2B, 4B), eraser, drawing paper, blending stump (optional)
Step-by-Step Instructions
Step 1: Establish the Basic Shape and Placement
Begin by lightly sketching the overall width and general placement of the mouth on your paper. Think about its position relative to the nose and chin.
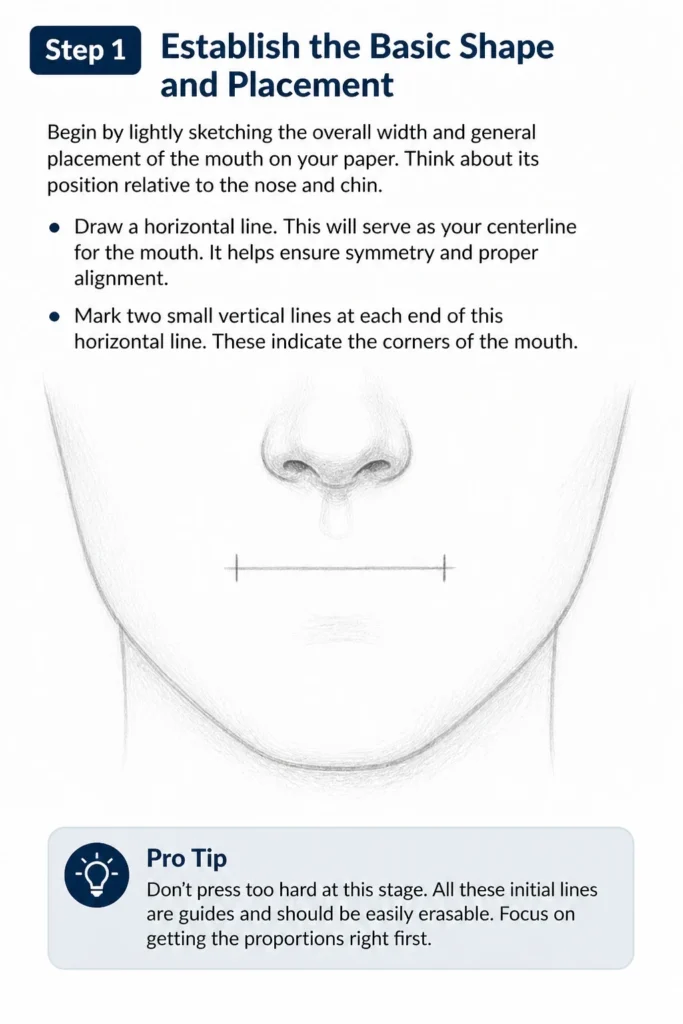
Draw a horizontal line. This will serve as your centerline for the mouth. It helps ensure symmetry and proper alignment.
Mark two small vertical lines at each end of this horizontal line. These indicate the corners of the mouth.
Pro Tip: Don’t press too hard at this stage. All these initial lines are guides and should be easily erasable. Focus on getting the proportions right first.
Step 2: Define the Cupid’s Bow and Lower Lip Curve
Sketch the “cupid’s bow” of the upper lip. This is the distinct double curve in the center of the upper lip.
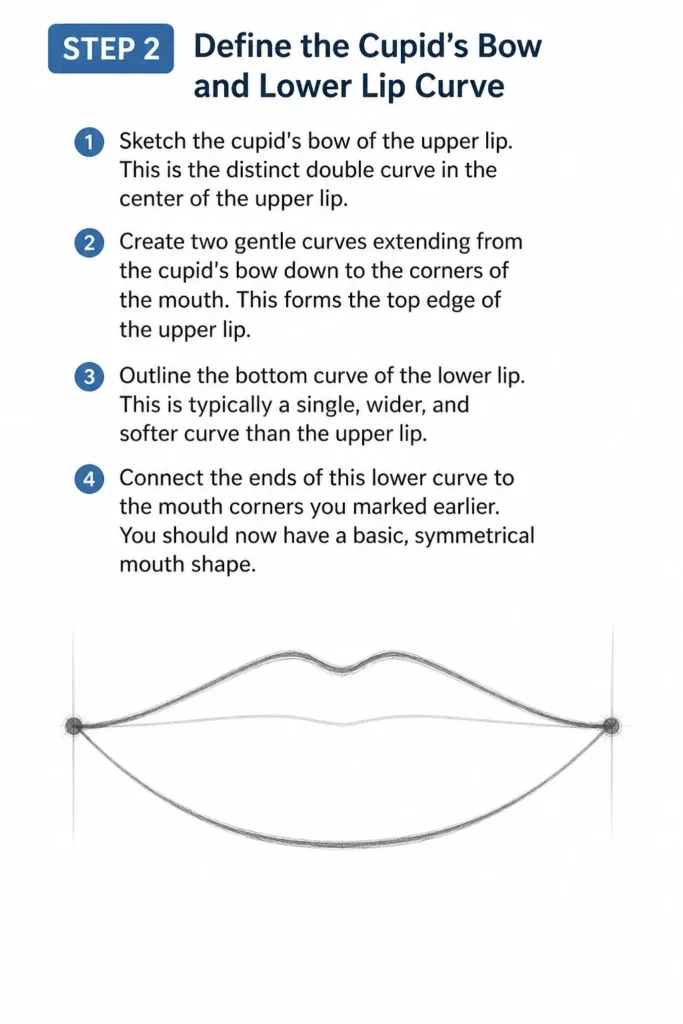
Create two gentle curves extending from the cupid’s bow down to the corners of the mouth. This forms the top edge of the upper lip.
Outline the bottom curve of the lower lip. This is typically a single, wider, and softer curve than the upper lip.
Connect the ends of this lower curve to the mouth corners you marked earlier. You should now have a basic, symmetrical mouth shape.
Step 3: Refine the Lip Contours and Volume
Observe the natural curves and fullness of lips. Lips are not flat; they have volume.
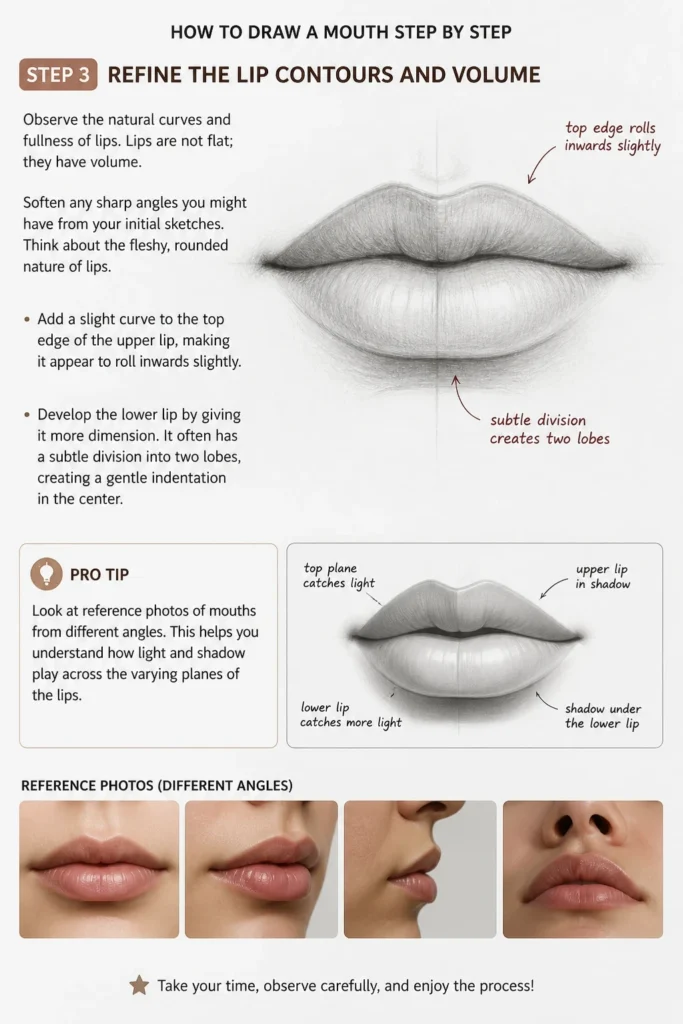
Soften any sharp angles you might have from your initial sketches. Think about the fleshy, rounded nature of lips.
Add a slight curve to the top edge of the upper lip, making it appear to roll inwards slightly.
Develop the lower lip by giving it more dimension. It often has a subtle division into two lobes, creating a gentle indentation in the center.
Pro Tip: Look at reference photos of mouths from different angles. This helps you understand how light and shadow play across the varying planes of the lips.
Step 4: Sketch the Philtrum and Labial Folds
Draw the philtrum, which is the vertical groove between the base of the nose and the center of the upper lip’s cupid’s bow. It’s subtle but important for realism.
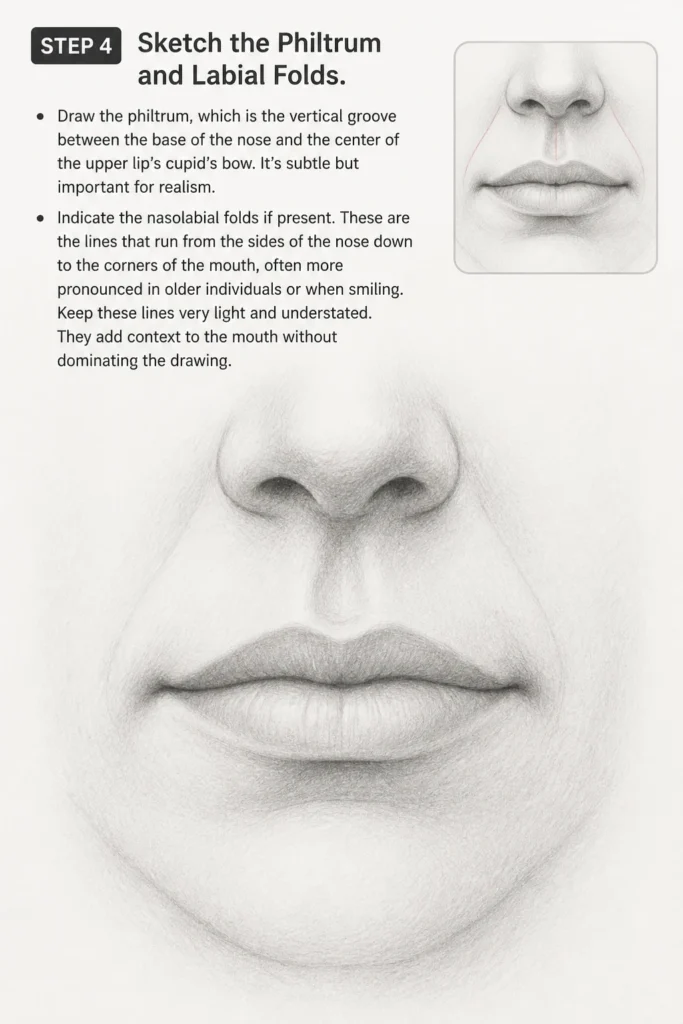
Indicate the nasolabial folds if present. These are the lines that run from the sides of the nose down to the corners of the mouth, often more pronounced in older individuals or when smiling.
Keep these lines very light and understated. They add context to the mouth without dominating the drawing.
Step 5: Begin Shading for Form and Dimension
Identify your light source. This determines where shadows will fall and highlights will appear.
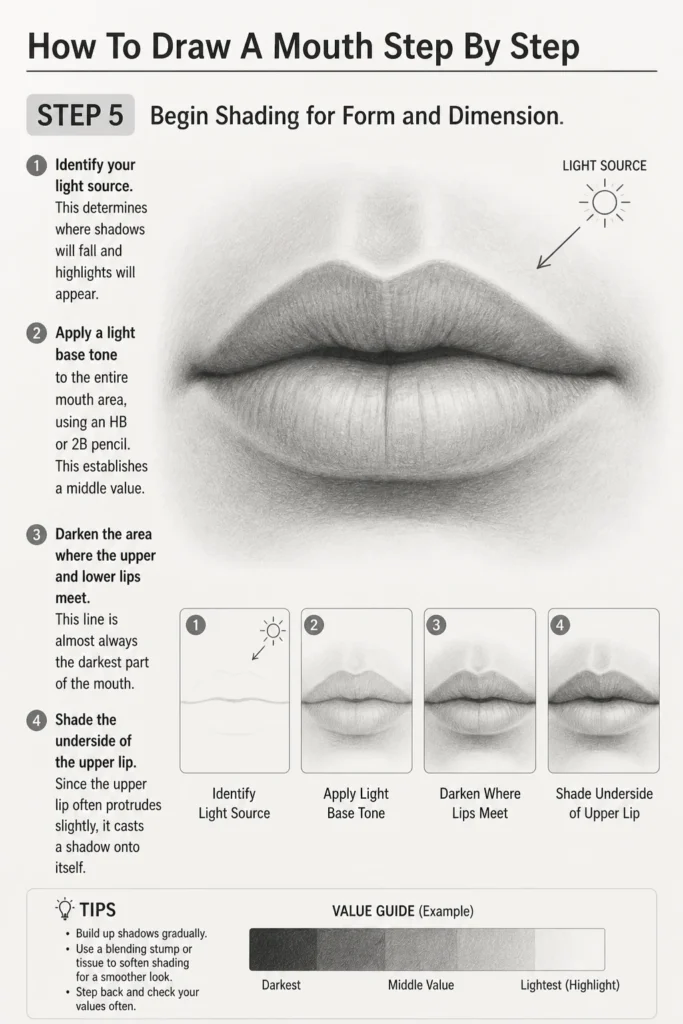
Apply a light base tone to the entire mouth area, using an HB or 2B pencil. This establishes a middle value.
Darken the area where the upper and lower lips meet. This line is almost always the darkest part of the mouth.
Shade the underside of the upper lip. Since the upper lip often protrudes slightly, it casts a shadow onto itself.
Step 6: Develop Shadows and Highlights
Deepen the shadows in the corners of the mouth. These areas tend to be recessed.
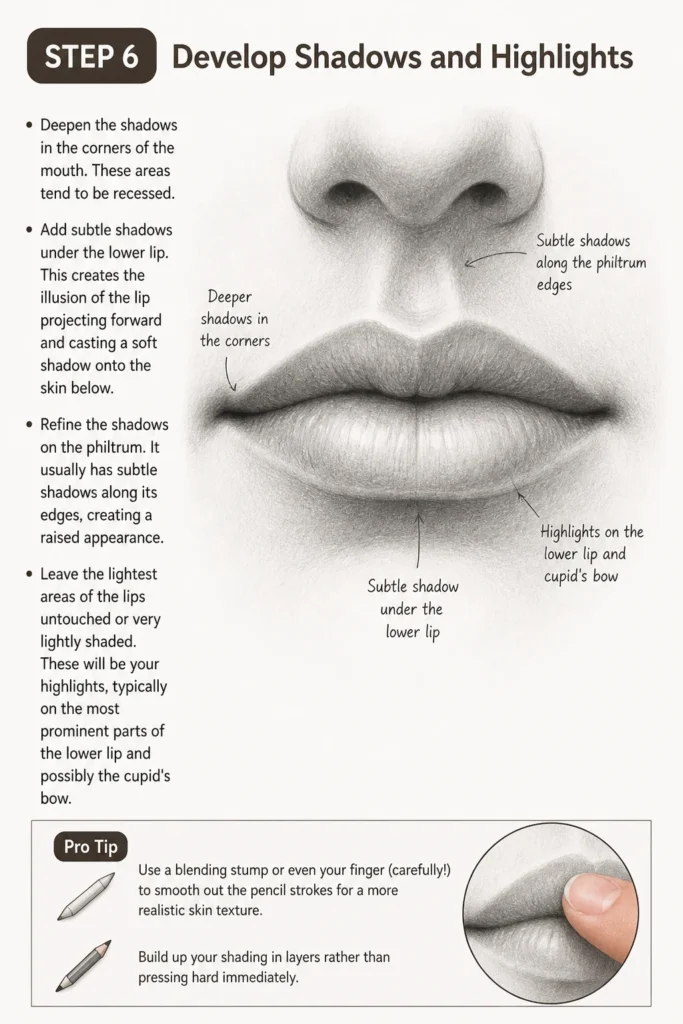
Add subtle shadows under the lower lip. This creates the illusion of the lip projecting forward and casting a soft shadow onto the skin below.
Refine the shadows on the philtrum. It usually has subtle shadows along its edges, creating a raised appearance.
Leave the lightest areas of the lips untouched or very lightly shaded. These will be your highlights, typically on the most prominent parts of the lower lip and possibly the cupid’s bow.
Pro Tip: Use a blending stump or even your finger (carefully!) to smooth out the pencil strokes for a more realistic skin texture. Build up your shading in layers rather than pressing hard immediately.
Step 7: Add Texture and Final Details
Introduce very fine, subtle lines on the lips to suggest texture. These lines follow the natural wrinkles and grooves of the lips.
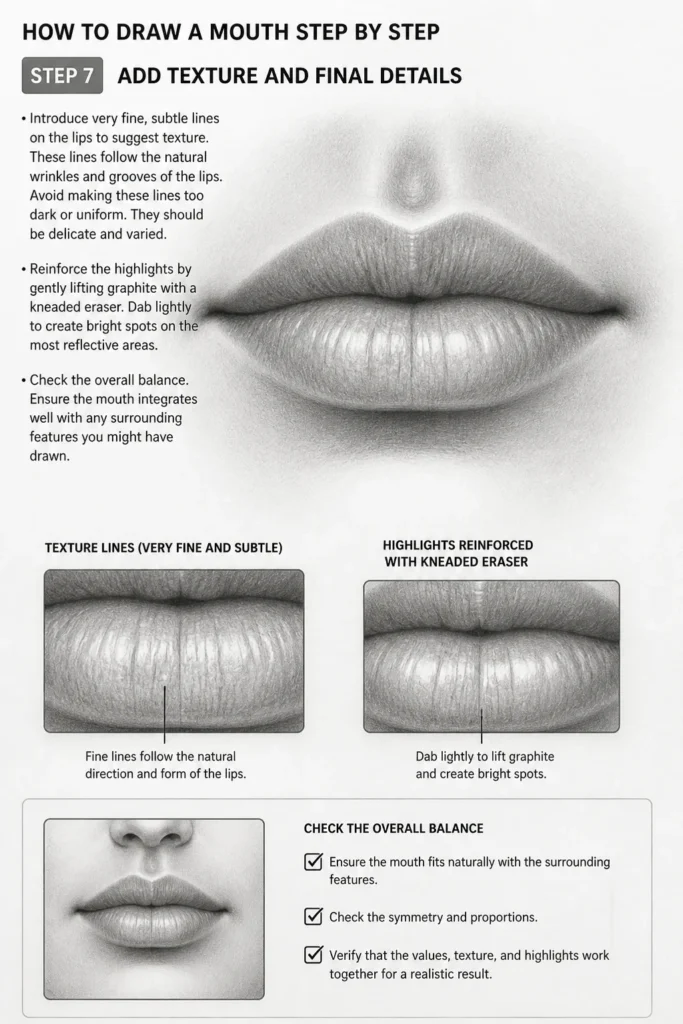
Avoid making these lines too dark or uniform. They should be delicate and varied.
Reinforce the highlights by gently lifting graphite with a kneaded eraser. Dab lightly to create bright spots on the most reflective areas.
Check the overall balance. Ensure the mouth integrates well with any surrounding features you might have drawn.
Step 8: Review and Refine
Step back from your drawing. Observe it from a distance to catch any imbalances or areas needing adjustment.
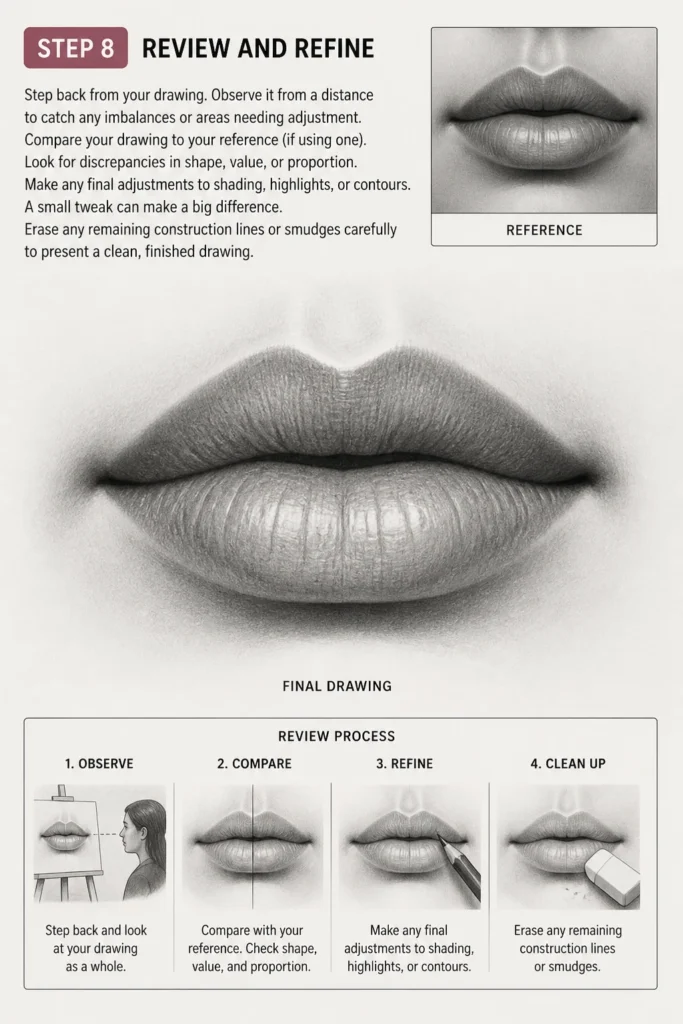
Compare your drawing to your reference (if using one). Look for discrepancies in shape, value, or proportion.
Make any final adjustments to shading, highlights, or contours. A small tweak can make a big difference.
Erase any remaining construction lines or smudges carefully to present a clean, finished drawing.
Common Mistakes to Avoid
Making Lips Too Symmetrical
While we aim for overall balance, perfectly symmetrical lips often look unnatural and stiff. Real faces have subtle asymmetries.
Allow for slight variations in the curves of the upper and lower lips, or in how one corner might turn slightly more than the other.
Drawing the Lip Line as a Hard Edge
The outline of the lips is rarely a single, dark, continuous line. Lips transition into the skin around them.
Instead of a hard outline, define the lips through changes in value and soft edges. Use shading to create the form rather than a cartoonish border.
Ignoring Lip Volume and Form
Many beginners draw lips as two flat shapes. This results in a very two-dimensional appearance.
Remember that lips are rounded forms. Use shading and highlights to indicate their curves, bumps, and indentations, making them appear three-dimensional.
Overdoing Lip Texture
While lips have texture, drawing every single wrinkle can make them look aged or overly busy. This detracts from the overall realism.
Suggest texture with a few light, broken lines that follow the lip’s natural direction. Focus on the overall form and value first.
Troubleshooting
My Mouth Looks Flat
A flat appearance often comes from insufficient shading and lack of contrast. You need to create a sense of depth.
Ensure you have a full range of values, from very dark in the mouth corners and where lips meet, to bright highlights on the most prominent areas. Revisit your light source and how it interacts with the lip’s rounded surfaces.
The Mouth Seems Detached from the Face
This usually happens when you only focus on the lips themselves, neglecting the surrounding anatomy. The mouth is part of a larger structure.
Include the philtrum, the slight shadows under the lower lip, and the subtle contours of the chin and cheeks leading up to the mouth. These contextual elements help anchor the mouth to the face.
My Lines are Too Hard and Stiff
Overly stiff lines make the drawing look rigid and lifeless. This often stems from pressing too hard with your pencil during initial sketching or outline stages.
Practice drawing with a lighter touch, especially in the beginning. Use multiple, softer strokes to build up a line. Allow for natural, flowing curves instead of rigid, straight segments.
Key Takeaways
- Start with light construction lines to establish proportion and symmetry.
- Build the mouth’s form and volume through careful layering of values.
- Pay attention to the subtle anatomy like the cupid’s bow and philtrum.
- Use a range of shading from dark to light to create depth and realism.
- Remember that lips are three-dimensional forms, not flat cutouts.
- Refine your drawing by adding subtle texture and highlights.
Frequently Asked Questions
How do I make the mouth look expressive?
Expression comes from subtle shifts in the mouth’s basic shape. A slight upward curve at the corners indicates a smile, while a downward turn suggests sadness. The tension or relaxation of the lips also plays a role. Study various expressions in reference photos to understand these nuanced changes.
What’s the best pencil to use for lips?
A good starting point is an HB pencil for initial sketching, then moving to a 2B for mid-tones and a 4B or 6B for darker shadows and accents. This range allows you to achieve varied values and depth. A kneaded eraser is also invaluable for creating highlights.
Should I draw teeth?
Often, it’s best to imply teeth rather than draw each one individually. When the mouth is slightly open, you might see the shadowed mass of the upper teeth. Drawing distinct teeth can make the mouth look too “toothy” or artificial. Focus on the shadow and shape of the general tooth area.
How do I make lips look wet or glossy?
To achieve a wet or glossy effect, emphasize sharp, bright highlights. These highlights should contrast strongly with the surrounding darker areas. The shape and placement of these highlights are crucial; they often appear as distinct, reflective patches rather than soft, blended light.
Our Top Recommended Finds
- Graphite Pencil Set: A good set with a range of hardness (HB to 6B) allows for versatile shading.
- Kneaded Eraser: Essential for lifting graphite to create soft highlights and clean up without smudging.
- Blending Stumps/Tortillons: These paper tools help smooth out pencil marks for an even, realistic skin texture.
Your Next Creative Journey
You’ve taken the first exciting step in mastering a key facial feature. Don’t stop here; practice is your greatest ally in drawing.
Now that you have the mouth down, consider integrating it into a full face. Explore drawing noses or eyes next, applying the same step-by-step approach.
Grab your pencils and paper today. Begin sketching different mouth expressions, or try drawing the mouth from various angles. Each attempt builds your skill and confidence.
& Painting
No rigid rules or pretension. Just practical guides, medium comparisons, and encouraging tips to help you enjoy the drawing & painting process.