🎨 How To Draw A Face From The Side

& Painting
No rigid rules or pretension. Just practical guides, medium comparisons, and encouraging tips to help you enjoy the drawing & painting process.
Drawing a face from the side, also known as a profile, can seem daunting at first.
I remember struggling to get the nose and forehead to connect naturally, often ending up with a flat or distorted look.
Through countless sketches and refining techniques, I discovered a systematic approach that makes the process enjoyable and achievable for anyone.
Quick Overview
This guide will walk you through the fundamental steps to create a convincing and expressive profile drawing. You’ll learn how to establish basic proportions, place features accurately, and add depth to your artwork.
- Time needed: 1-2 hours (including practice)
- Difficulty: Beginner to Intermediate
- What you’ll need: Pencil, paper, eraser, ruler (optional)
Step-by-Step Instructions
Step 1: Lay the Foundation with a Circle
Begin by drawing a perfect circle in the center of your page. This circle will form the main volume of the skull and establish the overall size of your head.
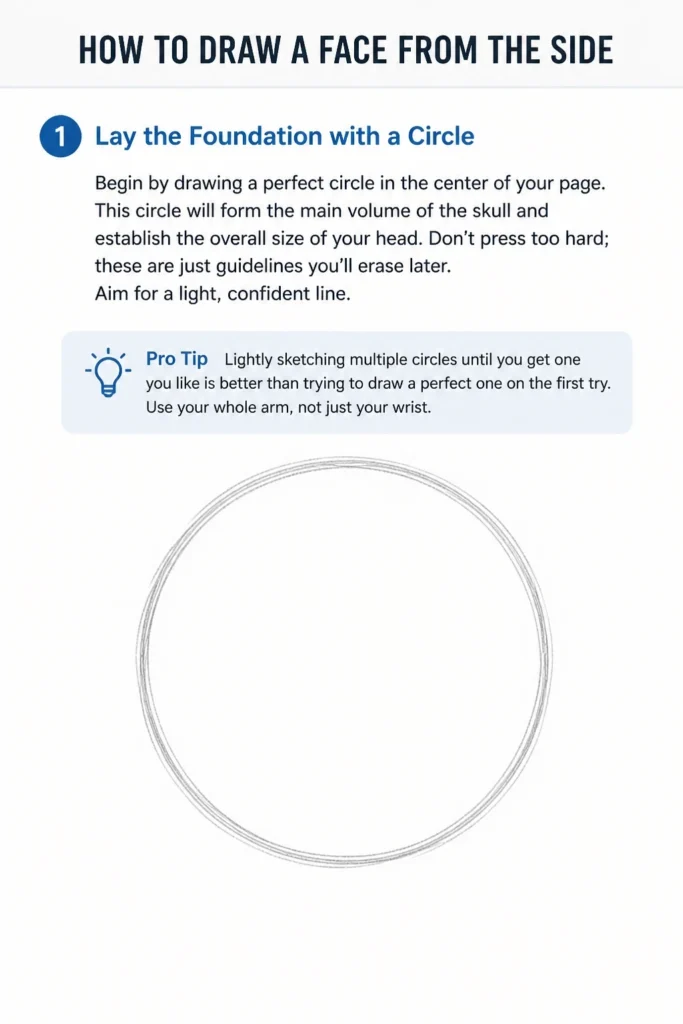
Don’t press too hard; these are just guidelines you’ll erase later. Aim for a light, confident line.
Pro Tip: Lightly sketching multiple circles until you get one you like is better than trying to draw a perfect one on the first try. Use your whole arm, not just your wrist.
Step 2: Define the Jawline and Back of the Head
Extend a curved line from the top back of your circle, gently curving outwards and then downwards. This line represents the back of the skull.
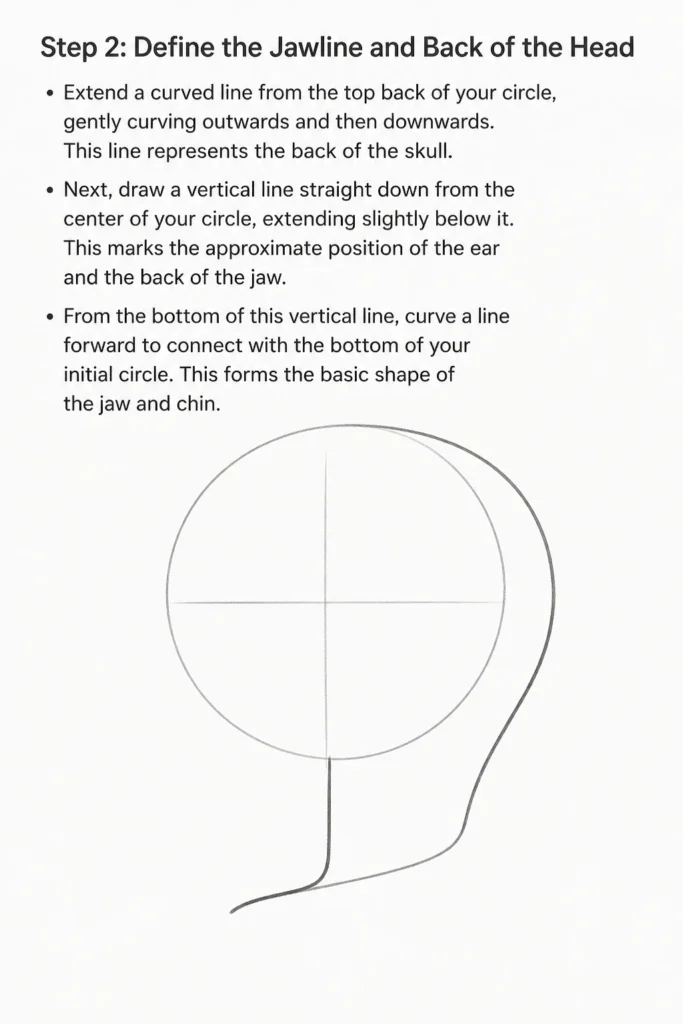
Next, draw a vertical line straight down from the center of your circle, extending slightly below it. This marks the approximate position of the ear and the back of the jaw.
From the bottom of this vertical line, curve a line forward to connect with the bottom of your initial circle. This forms the basic shape of the jaw and chin.
Step 3: Establish the Facial Plane and Guidelines
Draw a vertical line tangent to the front-most edge of your circle. This line marks the front plane of the face, where the forehead and nose will begin.
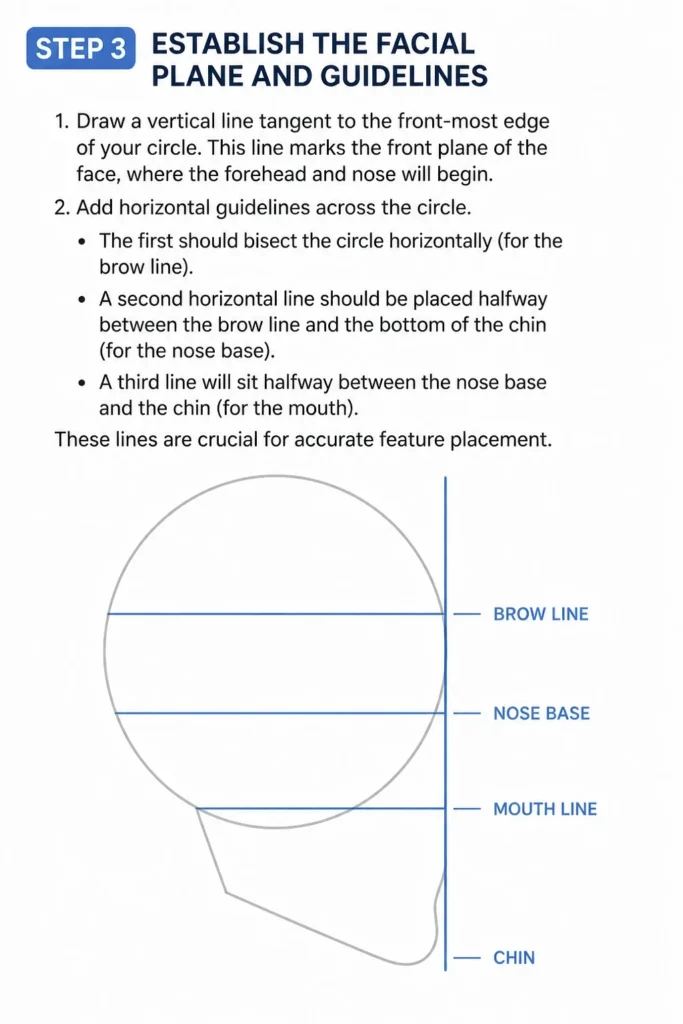
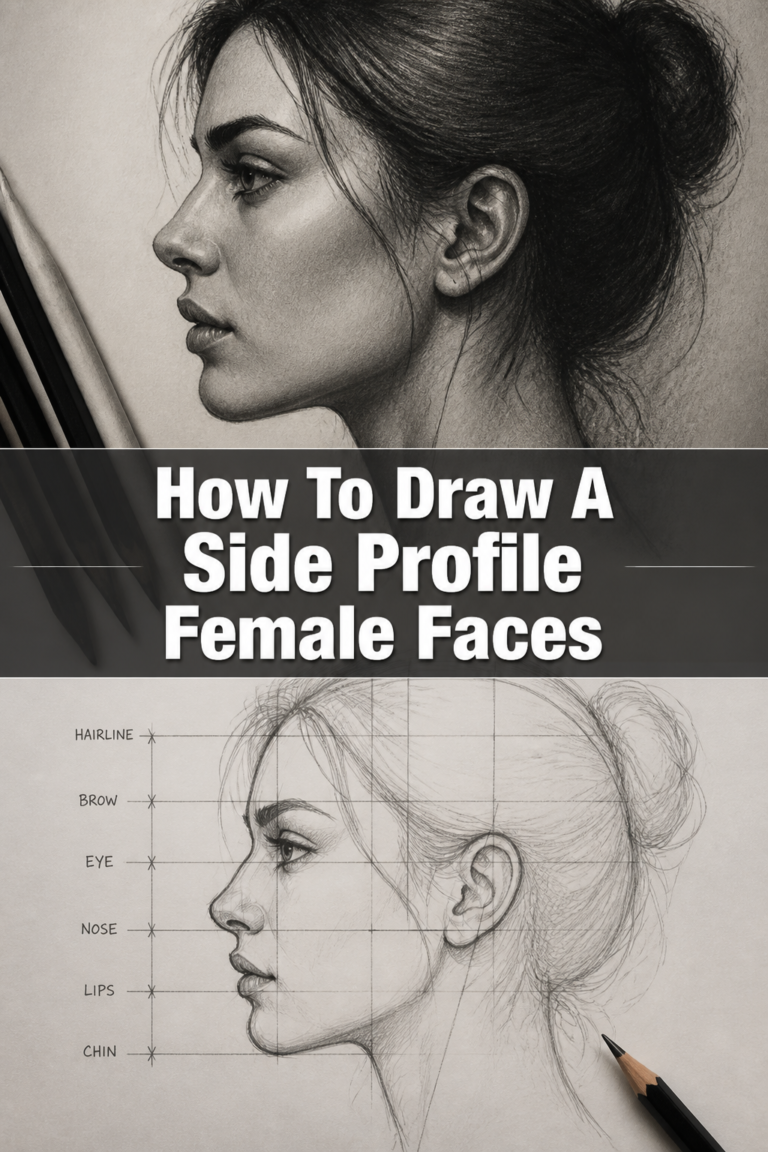
Add horizontal guidelines across the circle. The first should bisect the circle horizontally (for the brow line).
A second horizontal line should be placed halfway between the brow line and the bottom of the chin (for the nose base).
A third line will sit halfway between the nose base and the chin (for the mouth). These lines are crucial for accurate feature placement.
Step 4: Sketch the Forehead, Nose, and Mouth
From the top of your front vertical line, gently curve backwards to meet the top of the circle, forming the forehead.
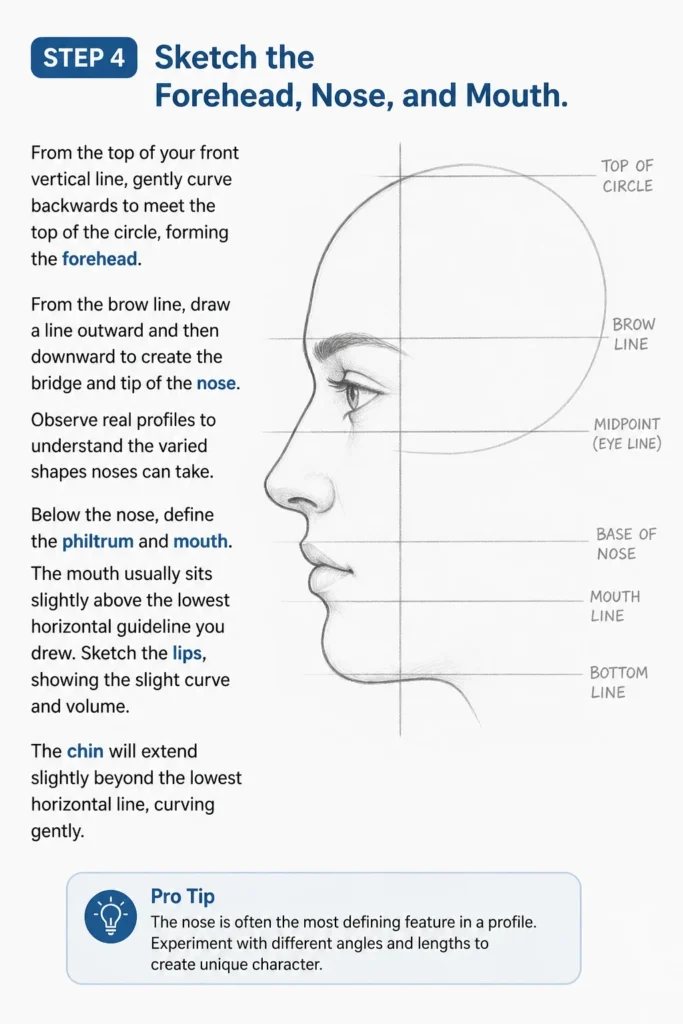
From the brow line, draw a line outward and then downward to create the bridge and tip of the nose. Observe real profiles to understand the varied shapes noses can take.
Below the nose, define the philtrum and mouth. The mouth usually sits slightly above the lowest horizontal guideline you drew.
Sketch the lips, showing the slight curve and volume. The chin will extend slightly beyond the lowest horizontal line, curving gently.
Pro Tip: The nose is often the most defining feature in a profile. Experiment with different angles and lengths to create unique character.
Step 5: Place the Eye and Eyebrow
The eye in profile is unique. Draw it as a slightly curved triangle or wedge shape that fits snugly under the brow line and slightly behind the front vertical guideline.
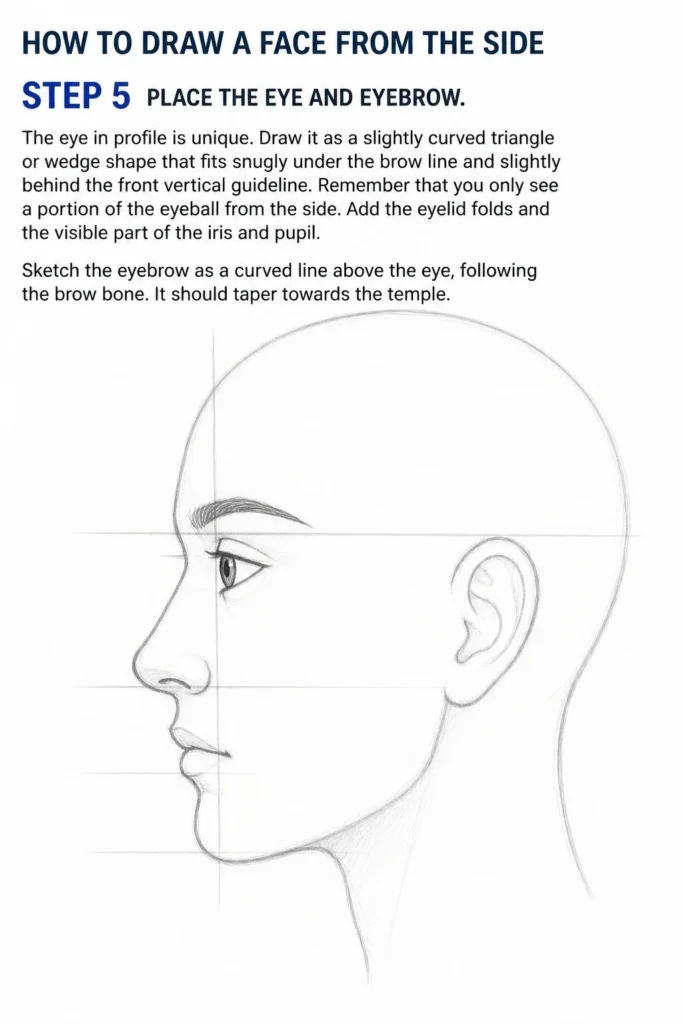
Remember that you only see a portion of the eyeball from the side. Add the eyelid folds and the visible part of the iris and pupil.
Sketch the eyebrow as a curved line above the eye, following the brow bone. It should taper towards the temple.
Step 6: Position the Ear and Neck
The ear typically sits between the brow line and the nose line, along the vertical line you drew in Step 2.
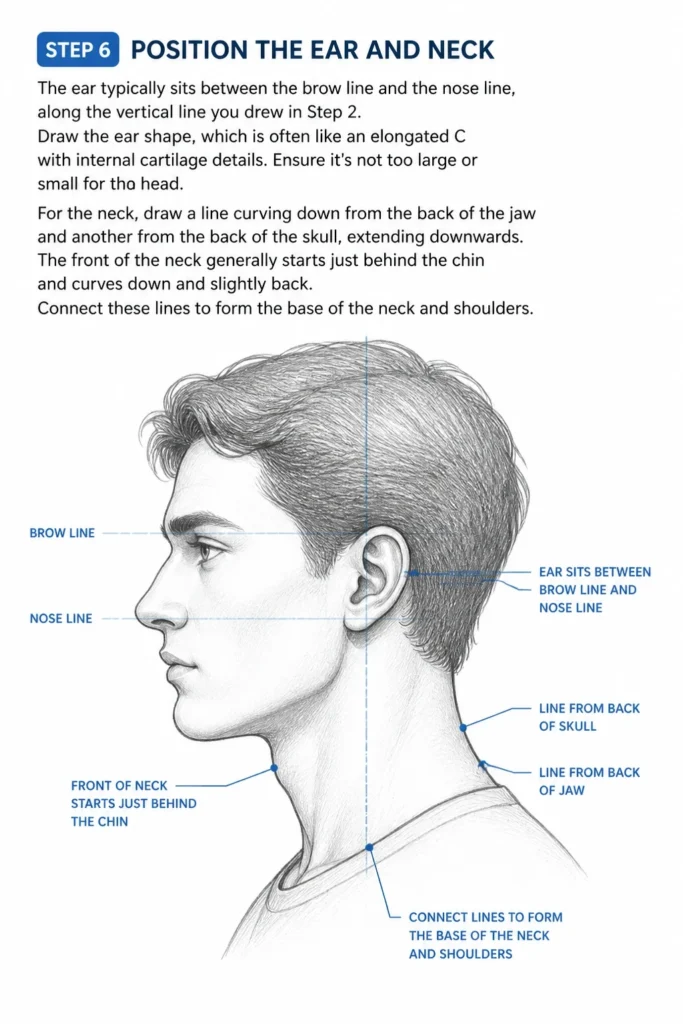
Draw the ear shape, which is often like an elongated “C” with internal cartilage details. Ensure it’s not too large or small for the head.
For the neck, draw a line curving down from the back of the jaw and another from the back of the skull, extending downwards.
The front of the neck generally starts just behind the chin and curves down and slightly back. Connect these lines to form the base of the neck and shoulders.
Step 7: Refine and Add Details
Erase your initial construction lines lightly. Now, you can start to firm up your drawing.
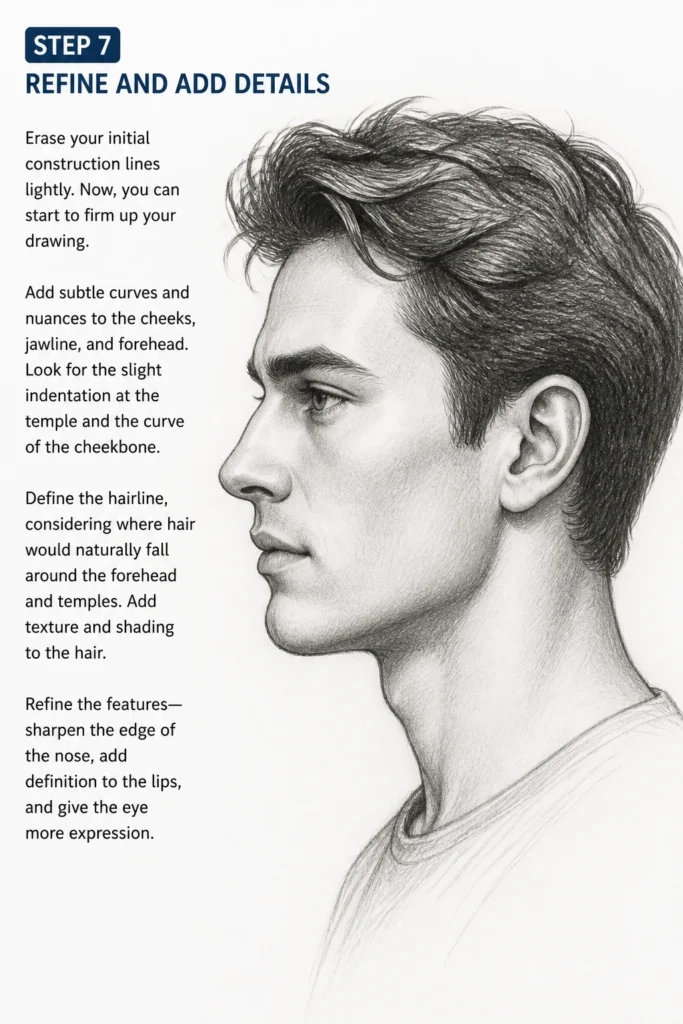
Add subtle curves and nuances to the cheeks, jawline, and forehead. Look for the slight indentation at the temple and the curve of the cheekbone.
Define the hairline, considering where hair would naturally fall around the forehead and temples. Add texture and shading to the hair.
Refine the features: sharpen the edge of the nose, add definition to the lips, and give the eye more expression.
Step 8: Introduce Shading and Form
Identify your light source and begin to apply shading to give your profile drawing depth and dimension.
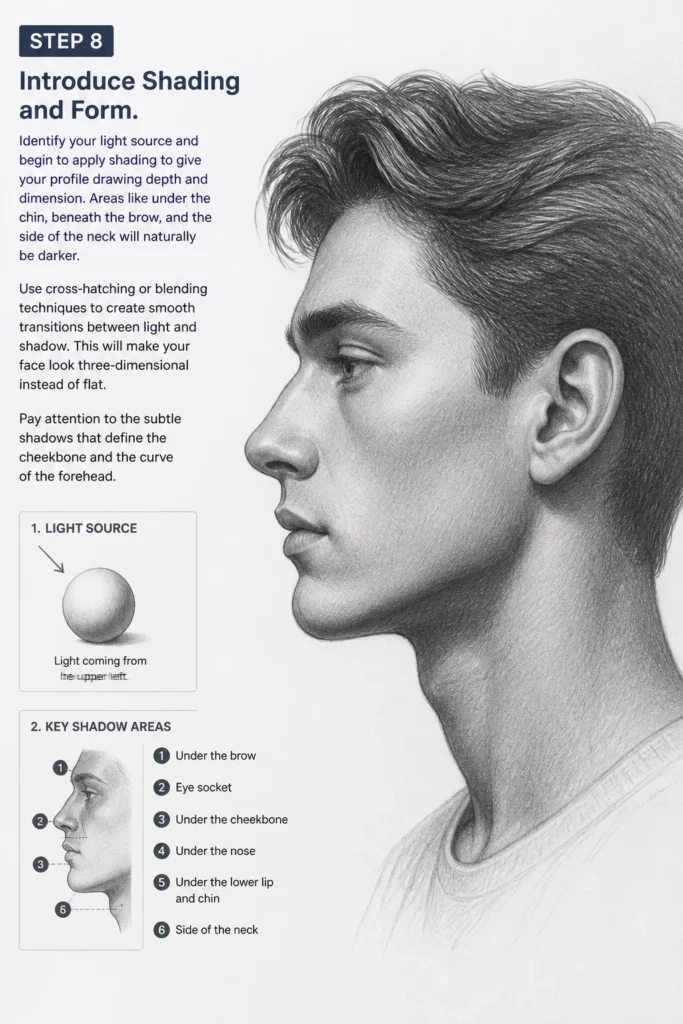
Areas like under the chin, beneath the brow, and the side of the neck will naturally be darker.
Use cross-hatching or blending techniques to create smooth transitions between light and shadow. This will make your face look three-dimensional instead of flat.
Pay attention to the subtle shadows that define the cheekbone and the curve of the forehead.
Common Mistakes to Avoid
Flat Profile Syndrome
Many beginners draw the profile as if it’s perfectly flat against a wall, lacking the subtle curves of the forehead, cheek, and chin. Remember that a face has volume and projects forward. Ensure your lines have a natural, gentle curvature, especially around the brow, nose, and lips, to convey depth.
Incorrect Feature Alignment
A common error is misplacing the eyes, ears, or nose relative to each other. The horizontal guidelines are your best friend here. Always check that the brow line, nose base, and mouth line are consistently placed, and that the ear sits correctly between the brow and nose lines.
Disproportionate Features
Drawing a nose that’s too large, an eye that’s too small, or a chin that’s too weak can throw off the entire profile. Constantly compare the size of each feature to the overall head shape and to other features. Practice observing real faces to develop a sense of natural proportions.
Stiff Neck
A common mistake is drawing the neck as a rigid, straight column. The neck has a natural curve, connecting smoothly from the jaw and skull to the shoulders. Avoid abrupt angles; instead, aim for graceful, flowing lines that suggest muscle and movement.
Troubleshooting
My Face Looks Flat
If your profile lacks depth, you likely need to emphasize the curves and overlaps of the features. Ensure the brow slightly overhangs the eye, the nose projects clearly, and the lips have a gentle outward curve. Shading can significantly help by creating clear light and shadow areas, giving the illusion of form.
The Features Don’t Line Up
This is usually a guideline issue. Go back to your initial circle and horizontal/vertical lines. Redraw them lightly and precisely. Double-check that your ear falls between the brow and nose lines, and that your eye is positioned correctly under the brow. Patience with guidelines pays off.
The Neck Looks Strange or Disconnected
A disconnected neck often comes from neglecting the musculature and how it attaches. Ensure the front of the neck curves gently back from the chin, not straight down. The back of the neck should flow smoothly from the skull. Consider the trapezius muscle connecting the neck to the shoulders for a more natural look.
Key Takeaways
- Always start with a basic circle to establish the head’s volume.
- Utilize horizontal and vertical guidelines for accurate feature placement.
- Pay close attention to the unique curves of the forehead, nose, and chin for a natural profile.
- The ear typically aligns between the brow line and the base of the nose.
- Shading is essential for transforming a flat drawing into a three-dimensional form.
- Practice observing real faces and different profiles to improve your understanding of anatomy.
Frequently Asked Questions
How do I make the nose look realistic?
To make the nose look realistic, focus on its distinct planes and angles. Observe how the bridge, tip, and nostrils interact. Avoid drawing a single, harsh line; instead, use subtle shading and varying line weights to suggest its form and structure. Each nose is unique, so practice drawing many variations.
What’s the best way to draw hair in profile?
When drawing hair in profile, think about its volume and flow, not just individual strands. Sketch the overall mass of the hairstyle first, showing how it frames the face and extends from the scalp. Then, add texture and detail by drawing clumps of hair, following the direction of growth, rather than meticulously drawing every single strand.
Should I use a ruler for guidelines?
While a ruler can provide perfectly straight guidelines, it’s not strictly necessary. For beginners, it can be helpful to ensure accuracy. However, as you gain confidence, try to freehand your guidelines lightly. This helps develop your eye for proportion and your hand-eye coordination, making your drawing process more fluid.
How do I make the profile look more expressive?
To add expressiveness, subtly adjust the angles of the mouth and the shape of the eye. A slight upturn of the lip can suggest a smile, while a downturn can indicate sadness. The angle of the eyebrow also plays a huge role. Experiment with these small changes to convey different emotions and personalities.
Our Top Recommended Finds
- Sketchbook: A good quality sketchbook with thicker paper prevents bleed-through and holds up to erasing, making your practice more enjoyable.
- Graphite Pencil Set: A set with varying hardness (e.g., 2H, HB, 2B, 4B) allows you to create lighter guidelines and darker, richer shading.
- Kneaded Eraser: Unlike traditional erasers, a kneaded eraser lifts graphite without damaging the paper, perfect for subtle corrections and highlights.
Your Next Artistic Adventure Awaits
You’ve taken the first exciting step towards mastering the art of the profile drawing.
Remember, drawing is a skill honed through consistent practice and keen observation.
Now, grab your pencil and paper, and start creating your own unique faces from the side today!
& Painting
No rigid rules or pretension. Just practical guides, medium comparisons, and encouraging tips to help you enjoy the drawing & painting process.