🐉 How To Draw A Dragon Step By Step

& Painting
No rigid rules or pretension. Just practical guides, medium comparisons, and encouraging tips to help you enjoy the drawing & painting process.
Learning to draw a dragon might seem like a daunting task at first glance.
I remember feeling overwhelmed by all the scales and complex anatomy when I first started.
But with the right approach and a clear breakdown, anyone can create an impressive draconic masterpiece.
Quick Overview
This guide will walk you through the entire process, from basic shapes to intricate details.
You’ll learn how to construct a dragon that looks dynamic and full of life.
- Time needed: 1-3 hours (depending on detail and experience)
- Difficulty: Beginner to Intermediate
- What you’ll need: Pencil, paper, eraser, optional fineliner pens
Step-by-Step Instructions
Step 1: Gather Your Tools and Set Up
Before you begin, ensure you have all your drawing materials ready.
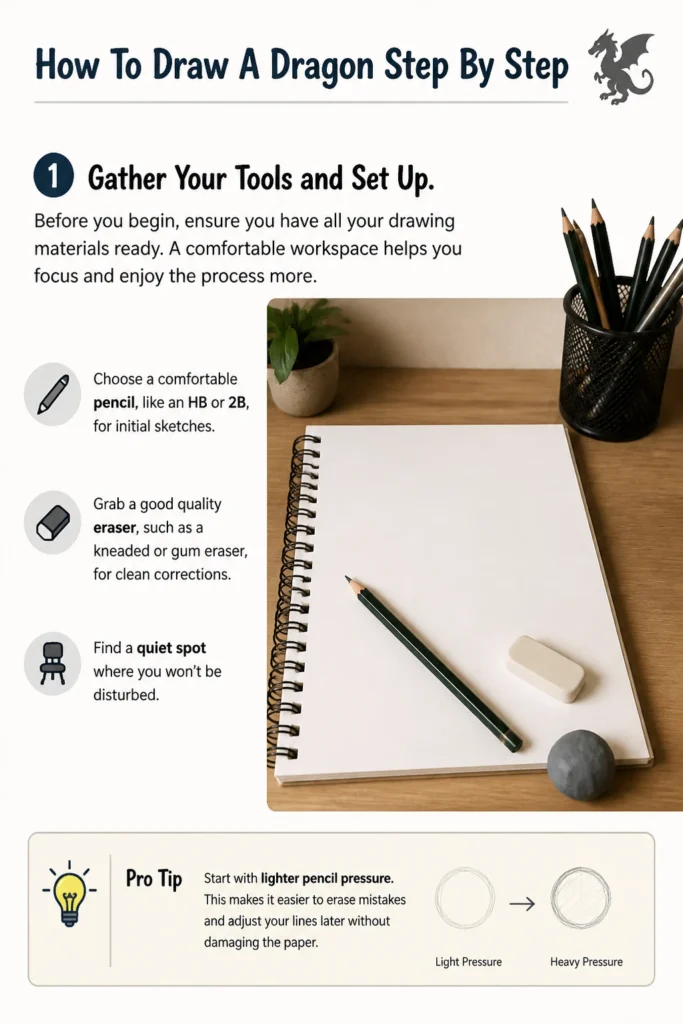
A comfortable workspace helps you focus and enjoy the process more.
- Choose a comfortable pencil, like an HB or 2B, for initial sketches.
- Grab a good quality eraser, such as a kneaded or gum eraser, for clean corrections.
- Find a quiet spot where you won’t be disturbed.
Pro Tip: Start with lighter pencil pressure. This makes it easier to erase mistakes and adjust your lines later without damaging the paper.
Step 2: Establish the Basic Forms and Pose
Think of your dragon as a collection of simple geometric shapes.
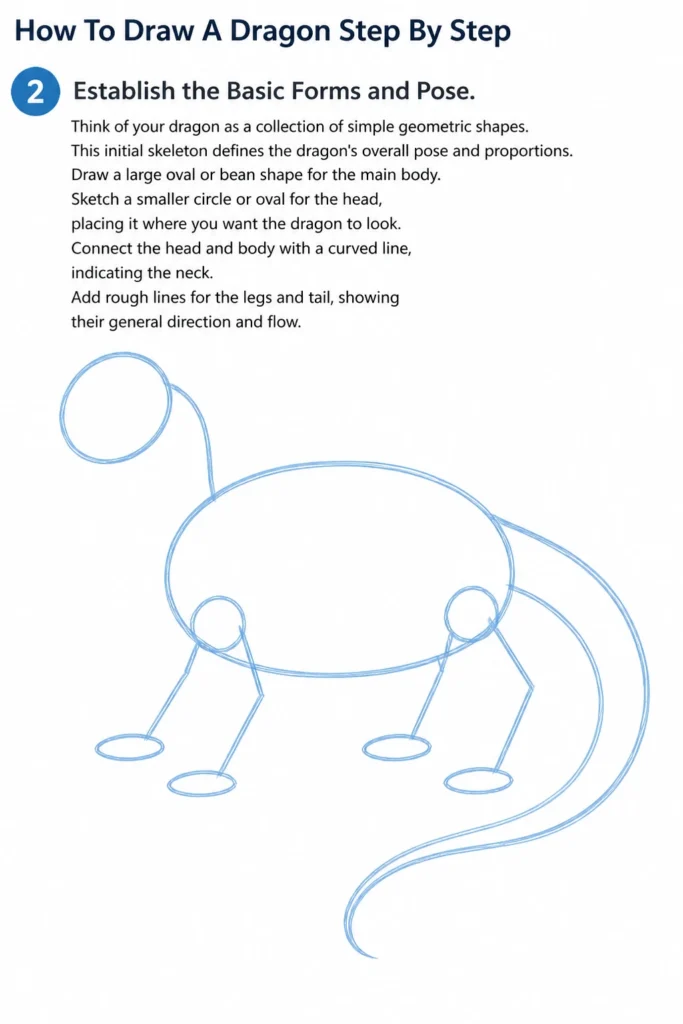
This initial skeleton defines the dragon’s overall pose and proportions.
- Draw a large oval or bean shape for the main body.
- Sketch a smaller circle or oval for the head, placing it where you want the dragon to look.
- Connect the head and body with a curved line, indicating the neck.
- Add rough lines for the legs and tail, showing their general direction and flow.
Step 3: Refine the Anatomy and Connect the Shapes
Now, we’ll start to give our dragon some volume and definition.
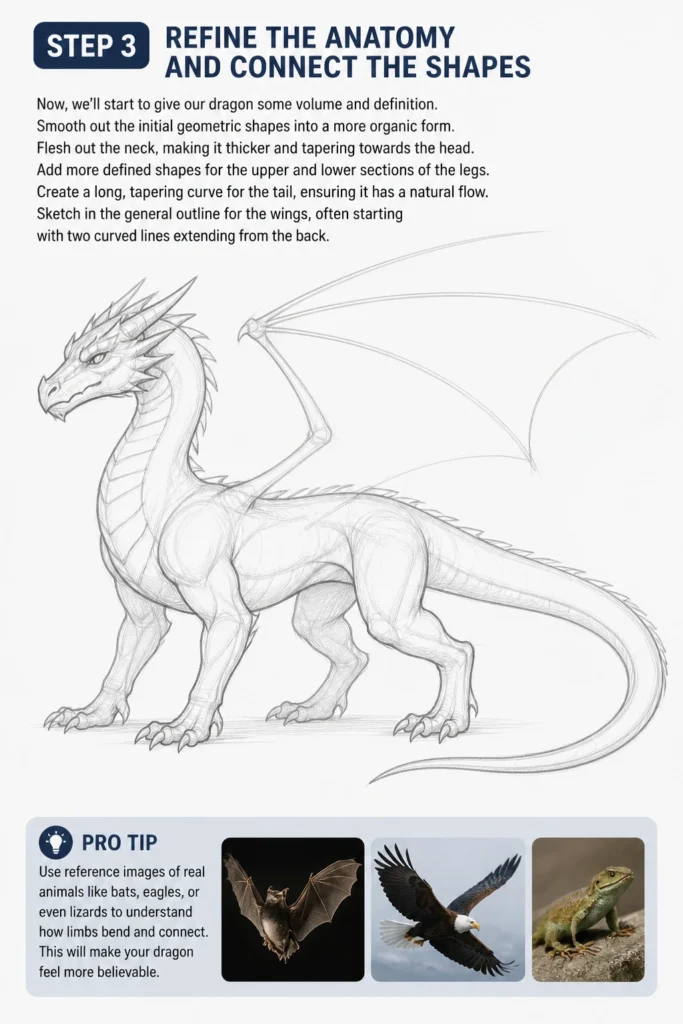
Smooth out the initial geometric shapes into a more organic form.
- Flesh out the neck, making it thicker and tapering towards the head.
- Add more defined shapes for the upper and lower sections of the legs.
- Create a long, tapering curve for the tail, ensuring it has a natural flow.
- Sketch in the general outline for the wings, often starting with two curved lines extending from the back.
Pro Tip: Use reference images of real animals like bats, eagles, or even lizards to understand how limbs bend and connect. This will make your dragon feel more believable.
Step 4: Develop the Head and Facial Features
The dragon’s head is crucial for conveying its personality and power.
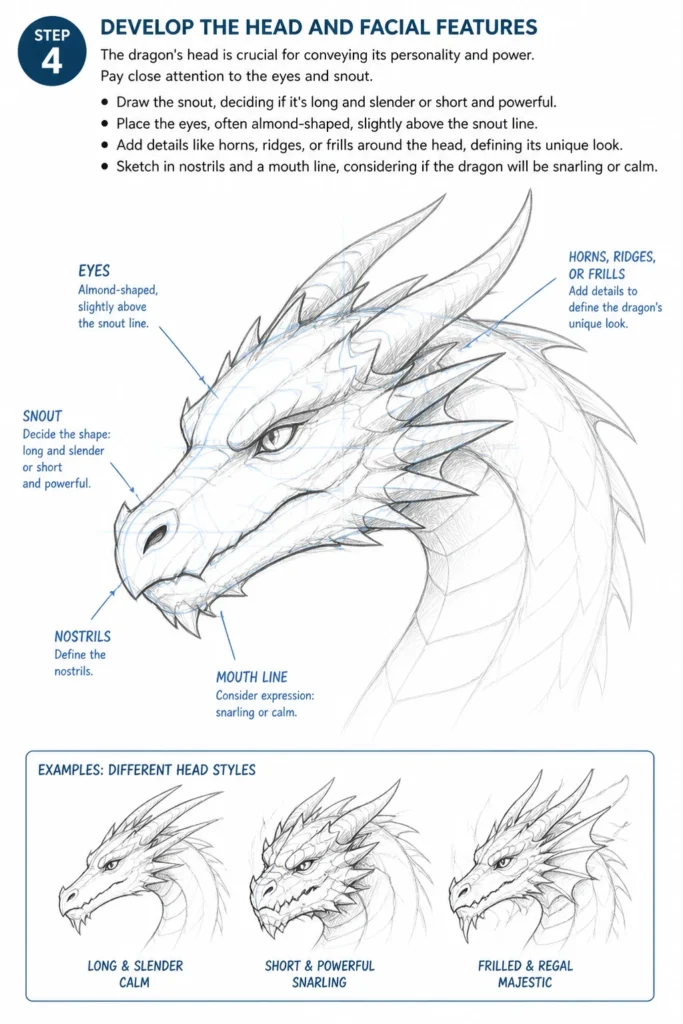
Pay close attention to the eyes and snout.
- Draw the snout, deciding if it’s long and slender or short and powerful.
- Place the eyes, often almond-shaped, slightly above the snout line.
- Add details like horns, ridges, or frills around the head, defining its unique look.
- Sketch in nostrils and a mouth line, considering if the dragon will be snarling or calm.
Step 5: Design the Wings and Limbs
Wings are a defining feature of many dragons, and their structure is important.
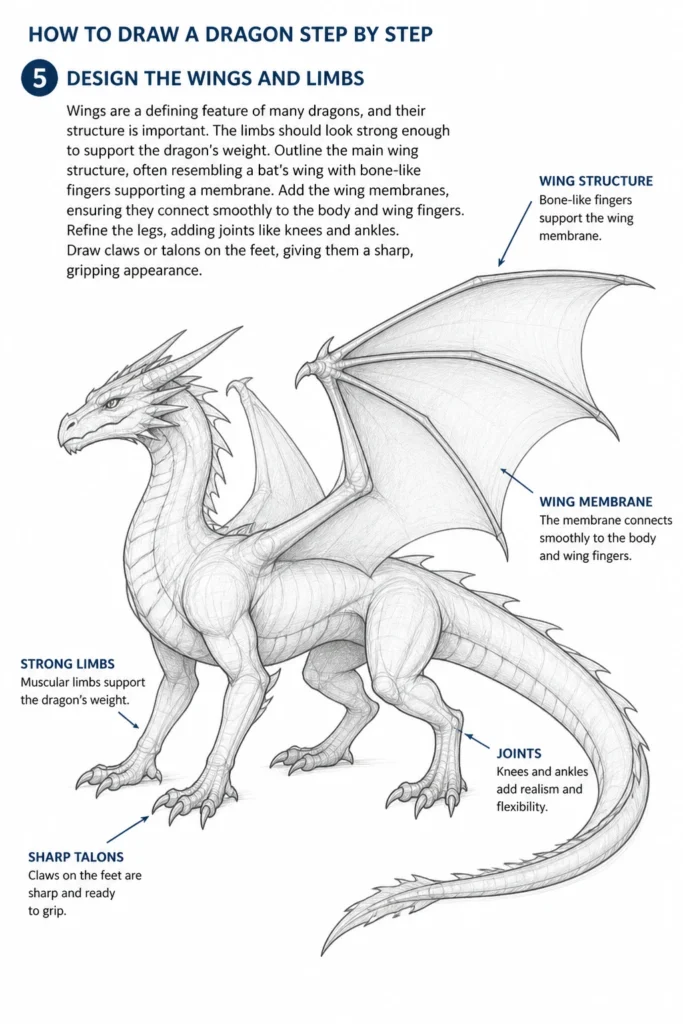
The limbs should look strong enough to support the dragon’s weight.
- Outline the main wing structure, often resembling a bat’s wing with bone-like fingers supporting a membrane.
- Add the wing membranes, ensuring they connect smoothly to the body and wing fingers.
- Refine the legs, adding joints like knees and ankles.
- Draw claws or talons on the feet, giving them a sharp, gripping appearance.
Step 6: Introduce Scales and Textural Elements
Scales bring your dragon to life, giving it a reptilian appearance.
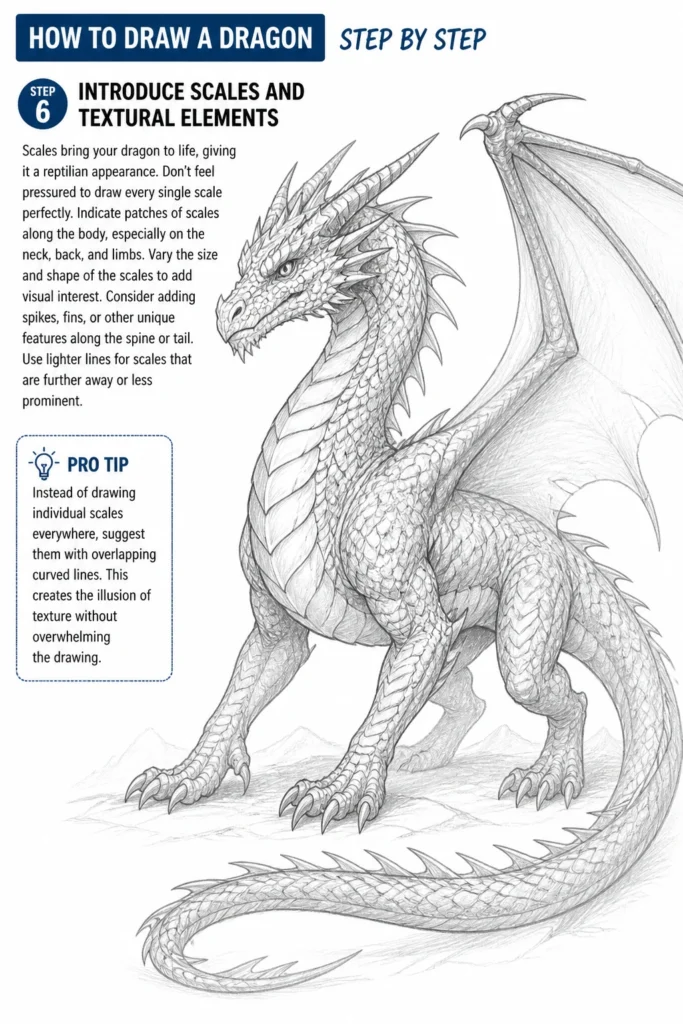
Don’t feel pressured to draw every single scale perfectly.
- Indicate patches of scales along the body, especially on the neck, back, and limbs.
- Vary the size and shape of the scales to add visual interest.
- Consider adding spikes, fins, or other unique features along the spine or tail.
- Use lighter lines for scales that are further away or less prominent.
Pro Tip: Instead of drawing individual scales everywhere, suggest them with overlapping curved lines. This creates the illusion of texture without overwhelming the drawing.
Step 7: Clean Up and Define Your Lines (Inking)
This step involves making your final lines crisp and clear.
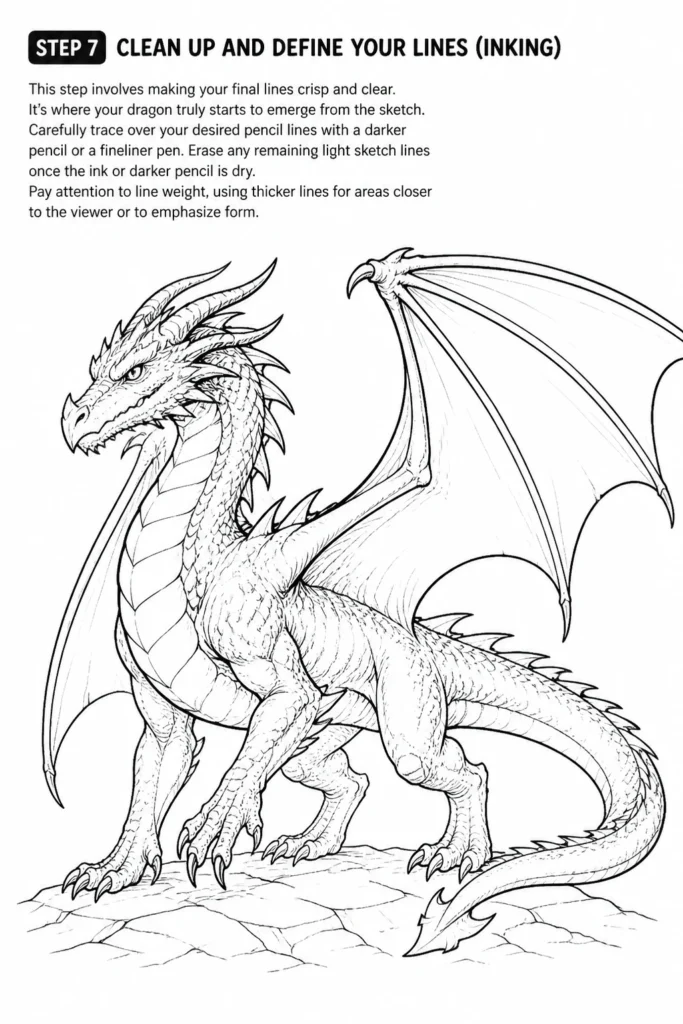
It’s where your dragon truly starts to emerge from the sketch.
- Carefully trace over your desired pencil lines with a darker pencil or a fineliner pen.
- Erase any remaining light sketch lines once the ink or darker pencil is dry.
- Pay attention to line weight, using thicker lines for areas closer to the viewer or to emphasize form.
Step 8: Add Depth with Shading and Value
Shading transforms a flat drawing into a three-dimensional form.
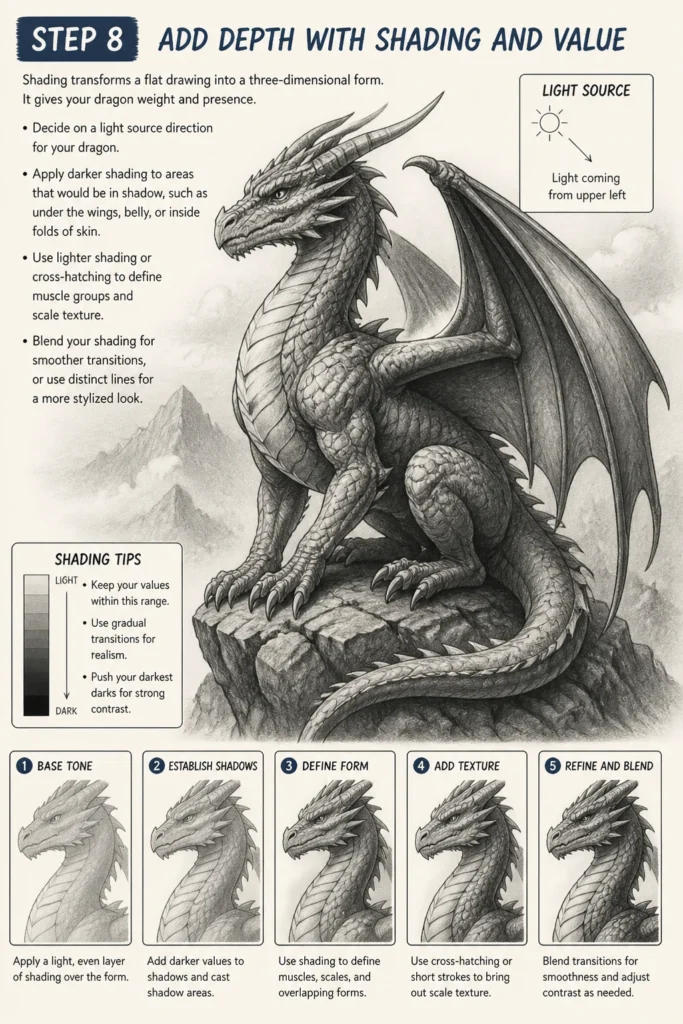
It gives your dragon weight and presence.
- Decide on a light source direction for your dragon.
- Apply darker shading to areas that would be in shadow, such as under the wings, belly, or inside folds of skin.
- Use lighter shading or cross-hatching to define muscle groups and scale texture.
- Blend your shading for smoother transitions, or use distinct lines for a more stylized look.
Step 9: Final Touches and Details
This is where you add those small elements that make your dragon unique.
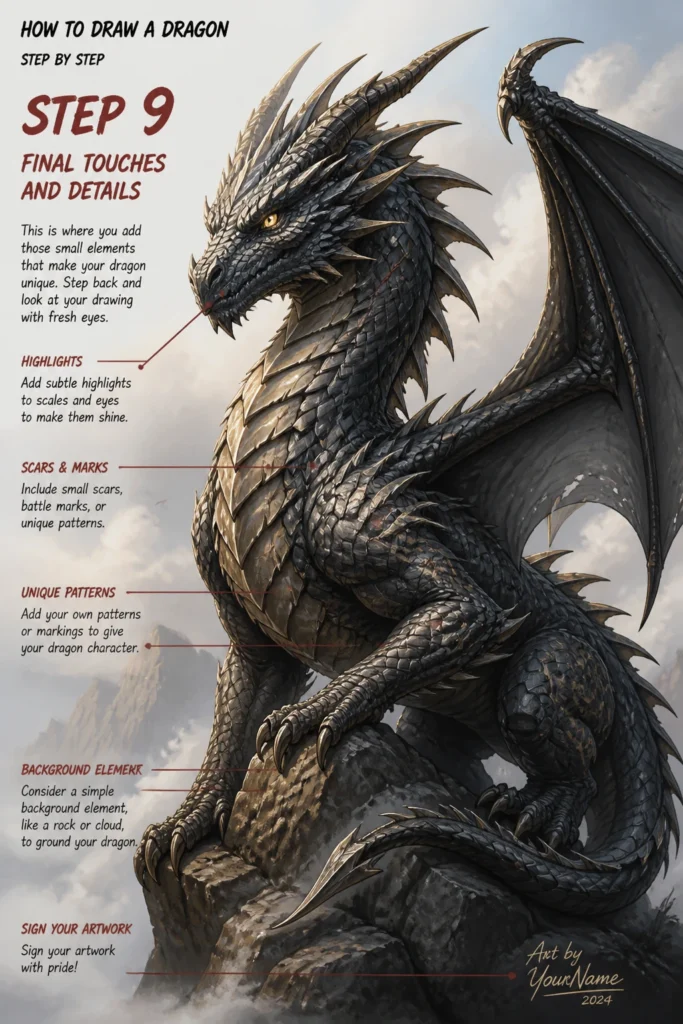
Step back and look at your drawing with fresh eyes.
- Add subtle highlights to scales or eyes to make them shine.
- Include small scars, battle marks, or unique patterns if desired.
- Consider a simple background element, like a rock or cloud, to ground your dragon.
- Sign your artwork with pride!
Common Mistakes to Avoid
Stiff Poses and Lack of Flow
A common pitfall is drawing a dragon that looks rigid and lifeless.
This often happens when artists focus too much on individual parts without considering the overall movement.
Always start with a dynamic gesture line or curve to establish the dragon’s action and flow before adding any details.
Disproportionate Limbs or Wings
Sometimes, the wings might appear too small to lift the dragon, or the legs might look too flimsy.
This breaks the illusion of power and realism.
Regularly compare the size of limbs and wings to the main body to ensure they are anatomically plausible and balanced.
Over-detailing Too Early
Jumping straight into drawing individual scales or tiny spikes can lead to a messy drawing.
It’s easy to lose the overall form if you get bogged down in minutiae too soon.
Always build your drawing from large shapes to small details, ensuring the underlying structure is solid before adding texture.
Ignoring Perspective
A dragon drawn without consideration for perspective can look flat or distorted.
If parts of the dragon are closer or further away, they should reflect that visually.
Even simple overlapping of forms can suggest depth, and understanding basic perspective principles will make your dragon appear more three-dimensional.
Troubleshooting
My Dragon Looks Flat and Lifeless
If your dragon lacks depth, it’s likely due to insufficient shading or a lack of overlapping forms.
Revisit your light source and add stronger shadows to the areas that recede.
Ensure elements like wings, legs, and the tail overlap parts of the body to create a sense of foreground and background.
My Lines Are Messy and Inconsistent
Messy lines often stem from pressing too hard during the initial sketch or not cleaning up properly.
Practice drawing with a lighter touch for your initial construction lines.
When inking, use confident, single strokes rather than ‘chicken scratching’ with many small lines.
I Can’t Get the Wings to Look Right
Dragon wings are a challenge for many artists because they combine skeletal structure with membrane.
Study real-world examples like bat wings or even bird wings for inspiration on how they fold and articulate.
Break the wing down into simple geometric shapes first, just like the rest of the dragon, before adding the intricate details.
Key Takeaways
- Start Simple: Always begin with basic shapes to establish the dragon’s pose and proportions.
- Build Gradually: Work from large forms to small details, refining as you go.
- Use References: Study real animals for anatomy, movement, and texture inspiration.
- Embrace Flow: Focus on dynamic poses and natural curves to make your dragon feel alive.
- Shading is Key: Use value and shadows to give your dragon depth and three-dimensionality.
- Practice Patience: Drawing takes time and practice; don’t be afraid to make mistakes and learn from them.
Frequently Asked Questions
What kind of dragon should I draw?
There are countless types of dragons, from classic European fire-breathers to elegant Eastern serpentine dragons.
Consider what kind of personality or environment you want your dragon to have.
Don’t be afraid to mix and match features to create your own unique species!
How do I make my dragon look powerful?
To convey power, focus on strong, defined muscle groups, especially in the neck, chest, and limbs.
Give it a confident pose, perhaps with outstretched wings or a snarling expression.
Sharp claws, teeth, and prominent horns also contribute to a powerful aesthetic.
What if I can’t draw straight lines?
Drawing is rarely about perfectly straight lines; it’s about control and confidence.
Practice drawing long, smooth curves and varied line weights to create more organic forms.
Remember, initial sketches are meant to be light and loose, not perfect.
Should I use references when drawing?
Absolutely! Using references is a sign of a smart artist, not a weak one.
Look at photos of lizards, bats, birds, and even big cats for ideas on anatomy, texture, and movement.
References help you understand how real-world creatures are structured, which you can then adapt for your fantasy creature.
Our Top Recommended Finds
- Sketchbook (A4 or A5 size): Provides a dedicated space for your art and encourages regular practice.
- Graphite Pencil Set (HB, 2B, 4B, 6B): Offers a range of hardness for light sketching to dark shading.
- Kneaded Eraser: Excellent for lifting graphite gently without smudging or tearing paper.
Unleash Your Inner Dragon Artist
You now have a clear roadmap to drawing magnificent dragons.
The journey from a blank page to a finished dragon is incredibly rewarding.
Don’t wait for the perfect moment; grab your pencil and paper right now.
Consider exploring different dragon types or even adding color to your next creation.
The world of dragon art is vast and exciting, and your adventure has just begun!
& Painting
No rigid rules or pretension. Just practical guides, medium comparisons, and encouraging tips to help you enjoy the drawing & painting process.