🎨 How To Draw A Pencil Step By Step

& Painting
No rigid rules or pretension. Just practical guides, medium comparisons, and encouraging tips to help you enjoy the drawing & painting process.
Drawing everyday objects is the best way to build your foundational art skills.
I remember sitting at my wooden desk as a child, staring at the yellow pencil in my hand and wondering how to capture its metallic sheen on paper.
This guide draws on my years of experience as an illustrator to help you break down this iconic tool into simple, manageable shapes.
Quick Overview
This tutorial will take you through the process of creating a realistic, three-dimensional pencil from scratch.
- Time needed: 20 to 30 minutes
- Difficulty: Beginner
- What you’ll need: Sketching paper, an HB pencil, a 2B pencil for shading, and a clean eraser.
Step-by-Step Instructions
Step 1: Outline the Main Shaft
Start by drawing two long, parallel horizontal lines to form the main body of the pencil.
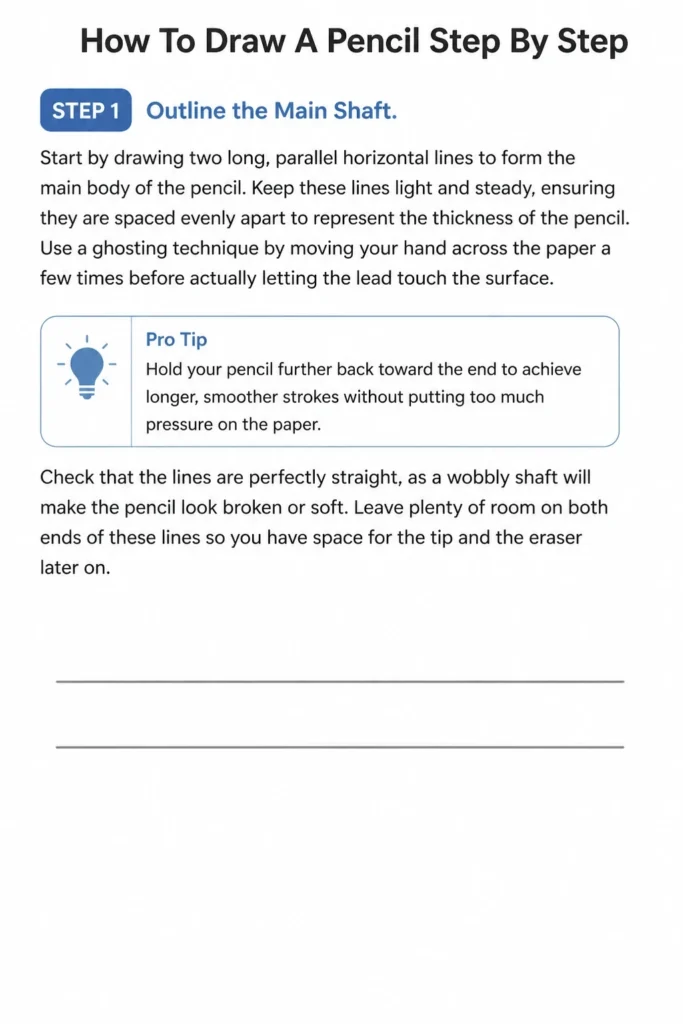
Keep these lines light and steady, ensuring they are spaced evenly apart to represent the thickness of the pencil.
Use a “ghosting” technique by moving your hand across the paper a few times before actually letting the lead touch the surface.
Pro Tip: Hold your pencil further back toward the end to achieve longer, smoother strokes without putting too much pressure on the paper.
Check that the lines are perfectly straight, as a wobbly shaft will make the pencil look broken or soft.
Leave plenty of room on both ends of these lines so you have space for the tip and the eraser later on.
Step 2: Create the Sharpened Cone
Sketch a “V” shape at one end of the parallel lines to represent the transition from the painted wood to the sharpened tip.
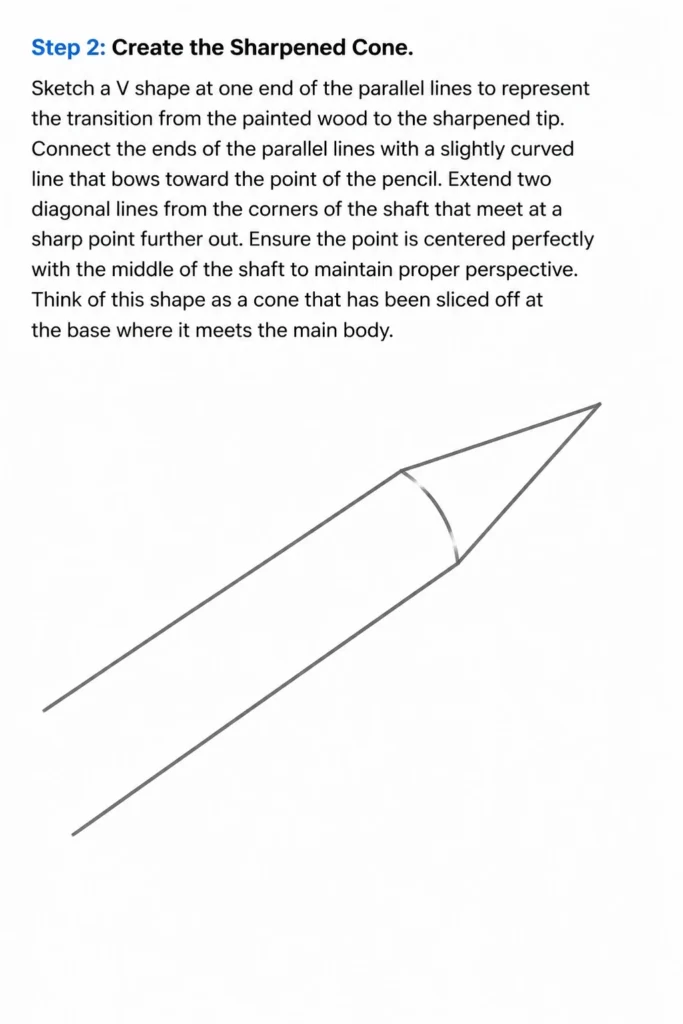
Connect the ends of the parallel lines with a slightly curved line that bows toward the point of the pencil.
Extend two diagonal lines from the corners of the shaft that meet at a sharp point further out.
Ensure the point is centered perfectly with the middle of the shaft to maintain proper perspective.
Think of this shape as a cone that has been sliced off at the base where it meets the main body.
Step 3: Define the Metal Ferrule
Move to the opposite end of the parallel lines to begin drawing the ferrule, which is the metal band holding the eraser.
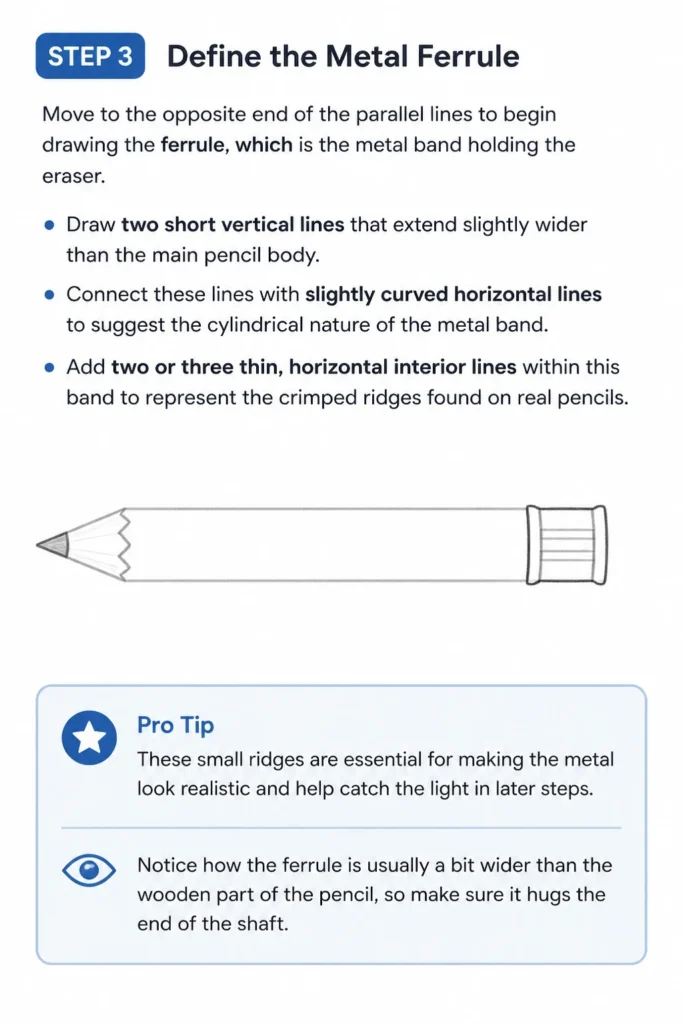
Draw two short vertical lines that extend slightly wider than the main pencil body.
Connect these lines with slightly curved horizontal lines to suggest the cylindrical nature of the metal band.
Add two or three thin, horizontal interior lines within this band to represent the crimped ridges found on real pencils.
Pro Tip: These small ridges are essential for making the metal look realistic and help catch the light in later steps.
Notice how the ferrule is usually a bit wider than the wooden part of the pencil, so make sure it “hugs” the end of the shaft.
Step 4: Shape the Eraser Cap
Attach a rounded rectangular shape to the end of the metal ferrule to create the eraser.
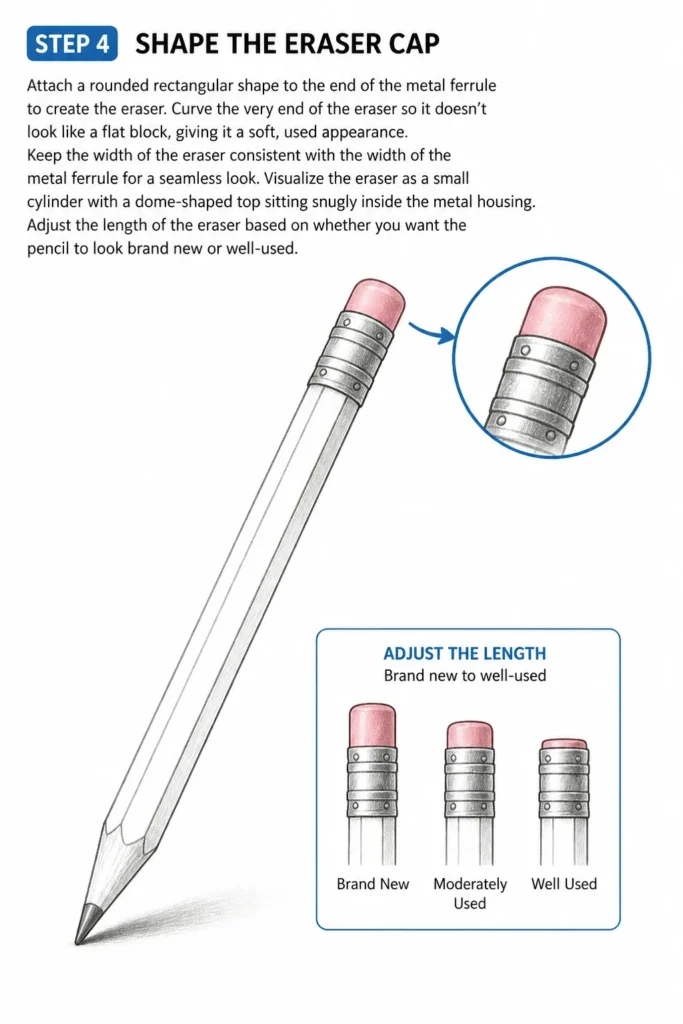
Curve the very end of the eraser so it doesn’t look like a flat block, giving it a soft, used appearance.
Keep the width of the eraser consistent with the width of the metal ferrule for a seamless look.
Visualize the eraser as a small cylinder with a dome-shaped top sitting snugly inside the metal housing.
Adjust the length of the eraser based on whether you want the pencil to look brand new or well-used.
Step 5: Add the Graphite Lead Point
Draw a tiny “V” shape at the very tip of the cone you created in Step 2.
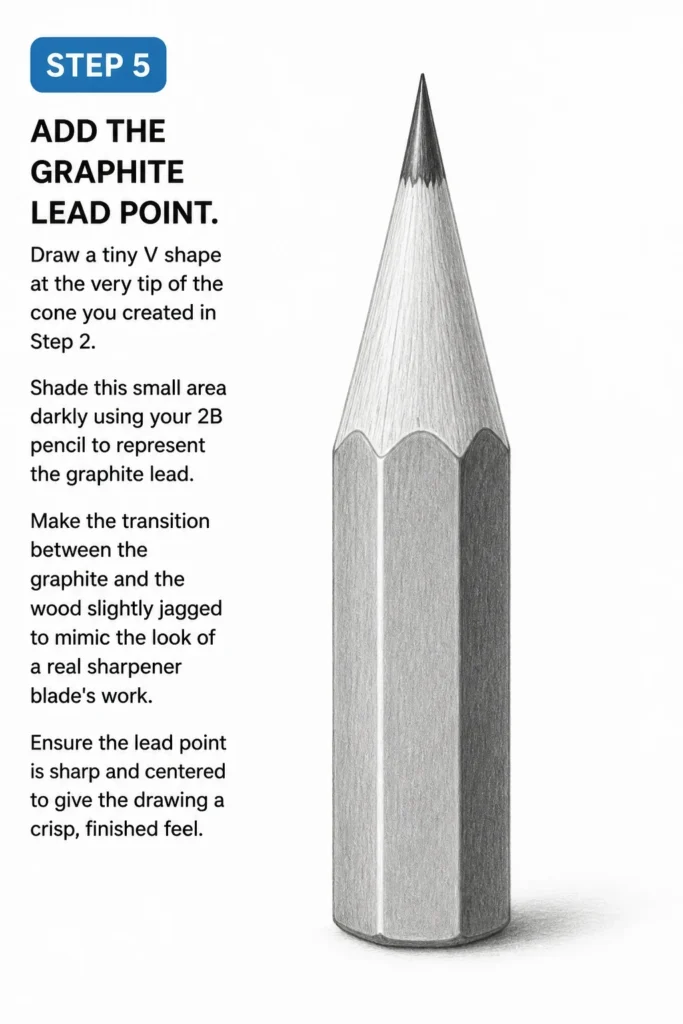
Shade this small area darkly using your 2B pencil to represent the graphite lead.
Make the transition between the graphite and the wood slightly jagged to mimic the look of a real sharpener blade’s work.
Ensure the lead point is sharp and centered to give the drawing a crisp, finished feel.
Step 6: Establish the Hexagonal Ridges
Draw two light, horizontal lines inside the main shaft to indicate the flat planes of a hexagonal pencil.
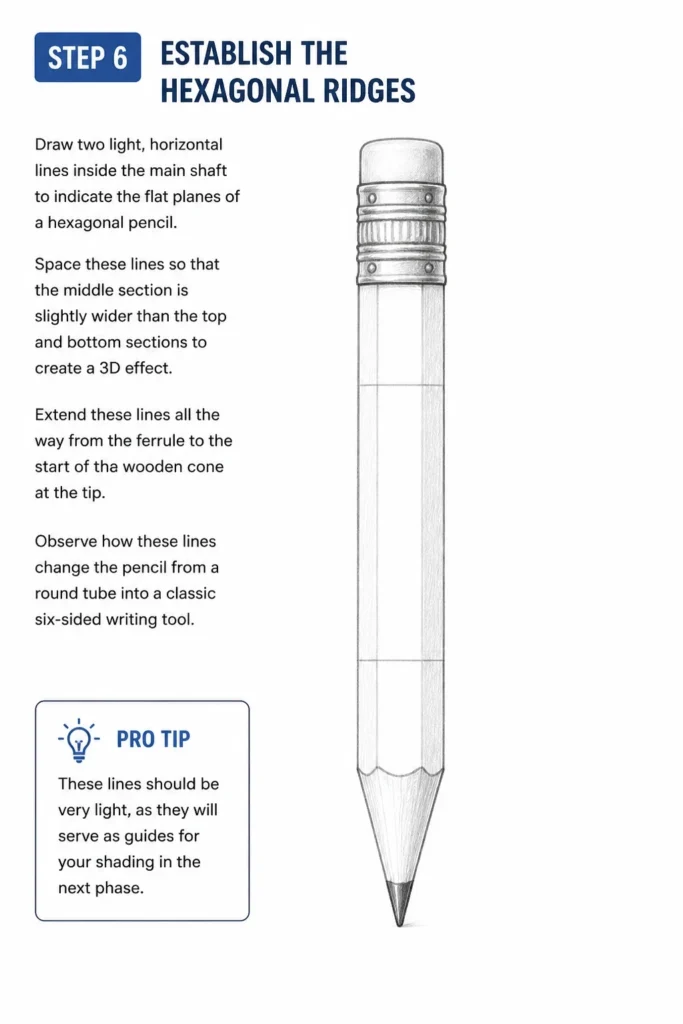
Space these lines so that the middle section is slightly wider than the top and bottom sections to create a 3D effect.
Extend these lines all the way from the ferrule to the start of the wooden cone at the tip.
Observe how these lines change the pencil from a round tube into a classic six-sided writing tool.
Pro Tip: These lines should be very light, as they will serve as guides for your shading in the next phase.
Step 7: Apply the Core Shading
Identify where your light source is coming from, such as the top-left corner of your paper.
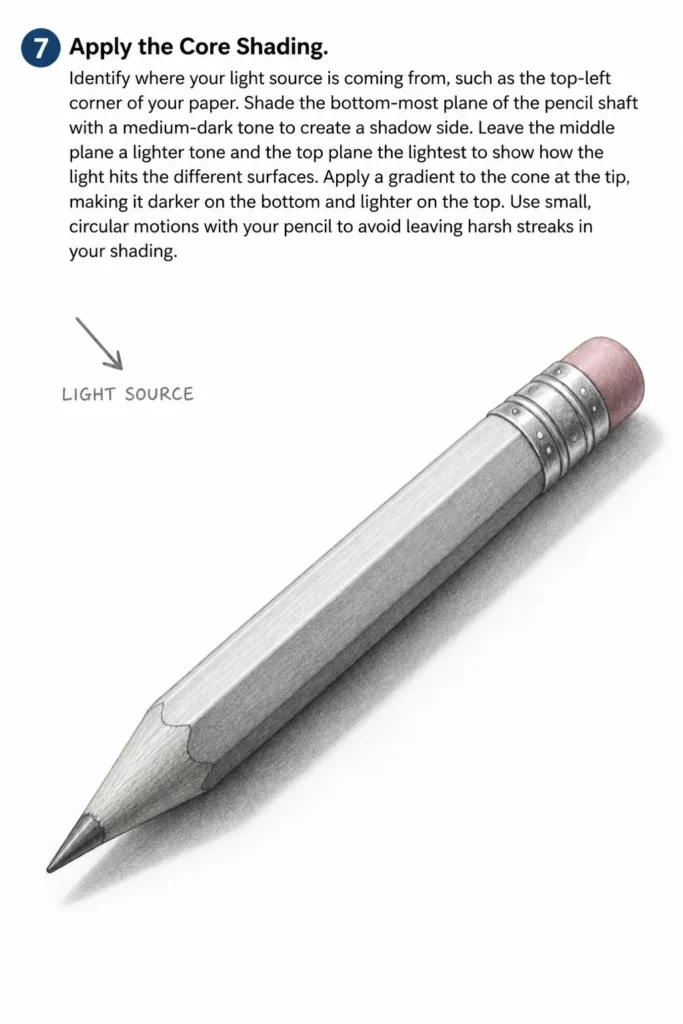
Shade the bottom-most plane of the pencil shaft with a medium-dark tone to create a shadow side.
Leave the middle plane a lighter tone and the top plane the lightest to show how the light hits the different surfaces.
Apply a gradient to the cone at the tip, making it darker on the bottom and lighter on the top.
Use small, circular motions with your pencil to avoid leaving harsh streaks in your shading.
Step 8: Detail the Metal and Wood
Add dark vertical shadows to the sides of the metal ferrule to give it a reflective, metallic quality.
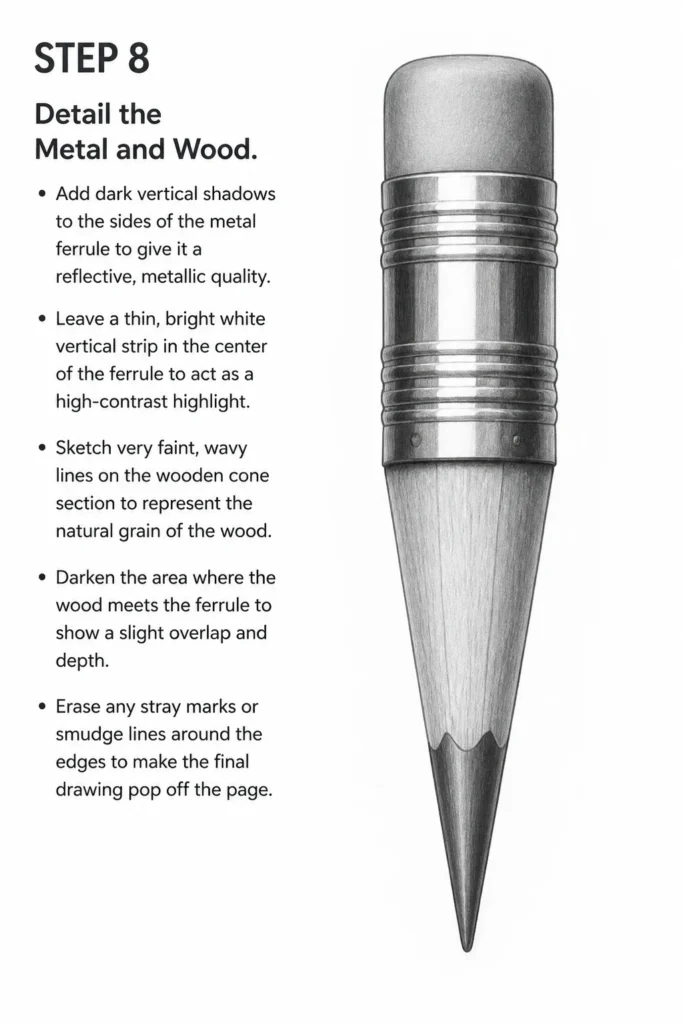
Leave a thin, bright white vertical strip in the center of the ferrule to act as a high-contrast highlight.
Sketch very faint, wavy lines on the wooden cone section to represent the natural grain of the wood.
Darken the area where the wood meets the ferrule to show a slight overlap and depth.
Erase any stray marks or smudge lines around the edges to make the final drawing pop off the page.
Common Mistakes to Avoid
The Perfectly Flat Tip
Many beginners draw the tip of the pencil as a flat triangle rather than a rounded cone. This makes the pencil look like a 2D cutout instead of a 3D object. Always remember to curve the line where the wood meets the paint to suggest volume.
Ignoring the Ferrule Width
If you draw the metal ferrule the exact same width as the pencil shaft, it will look like one continuous piece of plastic. In reality, the ferrule is a separate sleeve that slides over the wood. Making it slightly wider adds an essential layer of realism.
Uniform Shading Across All Planes
A hexagonal pencil has distinct sides that catch light differently. If you shade the entire shaft with the same pressure, you lose the hexagonal shape entirely. You must treat each of the three visible planes as a separate surface with its own value.
Troubleshooting
The Pencil Looks Crooked or Bent
This usually happens when the two main parallel lines aren’t truly parallel. To fix this, use a ruler to check the distance between the lines at several points. If one end is wider than the other, the pencil will look like it is warping or tapering unnaturally.
The Shading Looks Muddy or Dirty
Muddy shading occurs when you use your finger to blend or when you apply too much pressure too quickly. Switch to a clean blending stump or a folded piece of tissue for smoother transitions. Always build up your layers of graphite slowly rather than pressing hard from the start.
The Lead Point Doesn’t Look Sharp
If the lead at the tip looks like a blunt blob, your pencil might be too dull. Sharpen your drawing pencil to a fine point before detailing the lead area. You can also use a sharp eraser to “cut” into the graphite and define a crisp edge for the point.
Key Takeaways
- Start with light construction lines to ensure your proportions are correct before committing to dark details.
- Use a “V” shape and a curve to create a realistic transition from the pencil body to the sharpened wood.
- Emphasize the ferrule by adding small horizontal ridges and high-contrast highlights to mimic metal.
- Respect the hexagonal shape by shading the three visible planes with different values of gray.
- Define the light source early on to keep your highlights and shadows consistent across the entire object.
Frequently Asked Questions
Should I use a ruler for the straight lines?
While using a ruler can help you get perfect lines, practicing freehand will improve your muscle memory and line control. If you are a total beginner, feel free to use a ruler for the initial shaft, but try to do the details and the tip by hand to keep the drawing looking organic.
How do I make the eraser look pink?
Even in a black and white graphite drawing, you can suggest color through value. Erasers are generally a medium-light gray tone. If you leave it too white, it looks like a highlight; if you make it too dark, it looks like a black eraser, so aim for a soft, middle-ground shade.
What is the best way to draw the wood grain?
The grain should be very subtle and follow the curve of the cone. Use a very sharp, hard pencil like an H or 2H to draw thin, broken lines. Don’t overdo it, as too many lines will make the wood look dirty rather than textured.
How do I draw a pencil at an angle?
Drawing a pencil in perspective requires foreshortening, where the shaft appears shorter and the tip appears larger. Start by drawing a circle for the end of the pencil and then extend the lines back toward a vanishing point. This is a more advanced technique that builds on the basic steps covered here.
Our Top Recommended Finds
- Derwent Graphic Sketching Pencils: A high-quality set of pencils with various hardness levels will help you achieve the different shades needed for the shaft and lead.
- Kneaded Eraser: This tool is perfect for lifting small amounts of graphite to create highlights on the metal ferrule without damaging the paper.
- Strathmore 400 Series Sketch Pad: The fine tooth of this paper allows for smooth shading and crisp lines, which is ideal for detailed object drawings.
Level Up Your Artistic Journey
Now that you have mastered the basic pencil, try drawing other office supplies like a stapler or a pair of scissors.
Each new object will teach you something different about how light interacts with various materials and shapes.
Grab your sketchbook and try drawing a pencil from a different angle or even a broken one to practice new textures today.
& Painting
No rigid rules or pretension. Just practical guides, medium comparisons, and encouraging tips to help you enjoy the drawing & painting process.