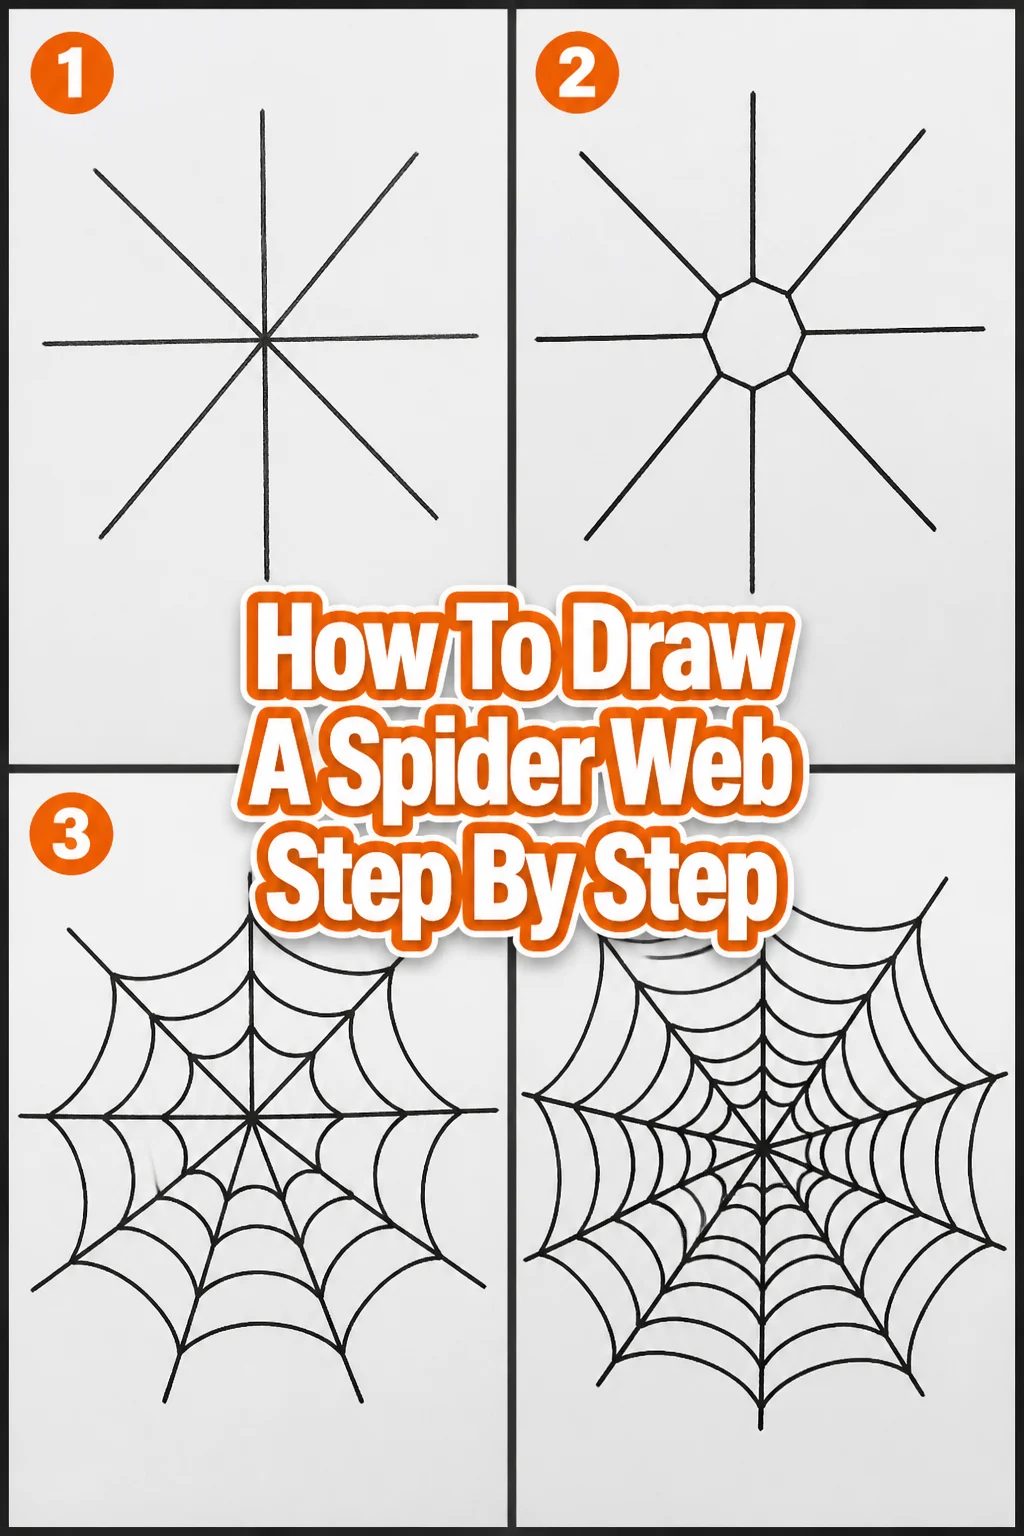
🕸️ How To Draw A Spider Web Step By Step
There’s a unique magic in capturing the delicate beauty of a spider web on paper.
I remember my first attempts were a tangled mess, but with practice and understanding the basic structure, it became a truly satisfying drawing.
This guide shares the exact process I’ve refined over many drawings, helping you create a realistic and captivating web with ease.
Quick Overview
You’re about to create a stunning spider web drawing, perfect for spooky decorations or just honing your artistic skills.
We’ll build it layer by layer, ensuring a beautiful result.
- Time needed: 20-40 minutes
- Difficulty: Beginner
- What you’ll need: Pencil (HB or 2B), eraser, paper, a ruler (optional)
Step-by-Step Instructions
Step 1: Lay Out Your Basic Frame
Begin by drawing a simple “X” shape on your paper.
This will form the central anchors for your web’s structure.
Make these lines light, as they are guides you might adjust later.
Cross them near the center of your page.
Step 2: Add More Radial Lines
Now, draw more straight lines extending outwards from the central cross-point.
Imagine spokes on a bicycle wheel.
Aim for an odd number of lines, or at least uneven spacing, to make the web look more organic.
These lines radiate from the center to the edges of your intended web.
Pro Tip: Don’t strive for perfect symmetry. Real spider webs are often a bit irregular, which adds to their charm and realism. Slight variations make your drawing more interesting.
Step 3: Connect the Radial Lines with Inner Spirals
Starting close to the center, draw short, slightly curved lines connecting one radial line to the next.
These should form small, irregular polygons or a loose spiral shape.
Work your way outwards, creating concentric rings.
Each “ring” should connect all the radial lines.
Step 4: Expand the Web with Outer Spirals
Continue drawing more concentric rings, moving further away from the center.
Keep these lines slightly curved, mimicking the natural sag of silk strands.
Maintain a relatively consistent distance between each spiral segment.
This creates the classic web pattern.
Step 5: Refine Your Lines and Add Thickness
Once you have your full web structure, go back over the lines you want to emphasize.
Make the main radial lines and the spiral threads slightly darker and a bit thicker than your initial sketch lines.
Use a gentle hand to build up the line weight.
This helps define the web’s presence.
Pro Tip: Not all lines need to be the same thickness. A little variation can suggest tension or different types of silk, adding depth to your drawing.
Step 6: Erase Unnecessary Guide Lines
Carefully erase any initial light guide lines that are still visible, especially those from the “X” and extra radial lines that don’t contribute to the final web structure.
Use a clean eraser to avoid smudges.
You want only the strong web threads to remain.
Step 7: Introduce a Sense of Depth
To make your web pop, consider adding subtle shading.
You can lightly shade the areas behind the web, making the threads stand out.
Alternatively, add tiny, almost imperceptible highlights on the web lines themselves, suggesting light catching the silk.
This creates an illusion of three dimensions.
Step 8: Add Details and Context (Optional)
Think about where your web is situated.
Perhaps a dewdrop clings to a strand, or a small leaf is caught.
You could also hint at a branch or corner where the web is anchored.
Adding a tiny spider (or just its shadow) can complete the scene.
Common Mistakes to Avoid
Making It Too Symmetrical
A common pitfall is trying to make every line and every segment perfectly even.
Real spider webs are often wonderfully imperfect and asymmetrical, adapting to their environment.
Embrace slight wobbles and uneven spacing; it makes your web look more natural and less like a stencil.
Drawing Lines Too Thick Too Soon
Starting with heavy, dark lines can make it difficult to correct mistakes or refine your web’s structure.
Always begin with very light, exploratory strokes.
Gradually build up the line weight and darkness once you are confident in your web’s form.
Forgetting the Anchor Points
A web needs to be attached to something, even if it’s just implied.
If your web seems to float aimlessly on the page, it loses a sense of realism.
Extend some radial lines slightly beyond the main web structure or hint at a corner or branch to ground your drawing.
Lack of Variation in Line Weight
Using a single, uniform line thickness throughout the entire web can make it appear flat and uninteresting.
Varying the thickness of your lines, making some strands bolder and others finer, adds dynamism and suggests light and shadow.
It helps create a more believable and visually engaging web.
Troubleshooting
My Lines Look Shaky
If your lines appear wobbly, it often means you’re drawing too slowly or with too much tension in your hand.
Try drawing with a quicker, more confident stroke from your elbow or shoulder, rather than just your wrist.
Practice drawing long, smooth lines on a separate scrap of paper to build muscle memory.
The Web Looks Flat and Unrealistic
A flat web usually lacks depth, which can be achieved through line variation and subtle shading.
Ensure some lines are slightly thicker or darker than others, especially where strands might overlap or be under more tension.
Consider adding very light shading around the web’s edges or behind certain strands to make them pop forward.
I Can’t Get the Spirals Evenly Spaced
Achieving perfectly even spirals can be tricky, and as we discussed, not strictly necessary for realism.
However, if they’re too uneven, try using light tick marks on your radial lines to guide where each spiral segment should cross.
You can also use a very light pencil to draw a series of concentric circles as guides before drawing the connecting web lines.
Key Takeaways
- Start with light guide lines for your frame and radial spokes.
- Embrace slight imperfections; asymmetry adds realism to a web.
- Build your web outward with concentric, slightly curved connecting lines.
- Vary your line thickness to create depth and visual interest.
- Erase guides carefully and consider subtle shading for a 3D effect.
- Practice makes perfect; don’t be afraid to experiment with different web styles.
Frequently Asked Questions
What’s the best type of pencil to use?
An HB pencil is great for initial sketching and lighter lines, offering a good balance of hardness and darkness. For darker, more prominent lines and any shading, a 2B or 4B pencil will give you richer, smoother results. A mechanical pencil can be excellent for fine details.
How can I make the web look like it has dew drops?
To add dew drops, draw tiny, clear circles or ovals along the web strands. Inside each shape, add a very small, bright highlight dot to simulate light reflecting off the water. You can also add a subtle, dark shadow directly beneath each dewdrop to give it dimension and make it appear to cling to the thread.
Should I use a ruler for the radial lines?
While you can use a ruler for perfectly straight radial lines, drawing them freehand often results in a more natural, organic look. If you’re aiming for a very precise, geometric web, a ruler can be helpful. Otherwise, trust your hand and eye for a more fluid outcome.
How do I make the web look old or torn?
To depict an old or torn web, simply omit some of the connecting spiral lines in places, creating gaps. You can also draw a few radial lines that end abruptly or appear frayed. Adding a bit of debris, like a tiny torn leaf or a dust particle caught in a strand, enhances the aged appearance.
Our Top Recommended Finds
- Quality Sketch Pencils Set: A good set with varying lead hardness (HB, 2B, 4B, 6B) gives you versatility for sketching, line work, and shading.
- Smooth Drawing Paper: Paper with a slight tooth but not too rough allows for crisp lines and easy erasing without damaging the surface.
- Kneaded Eraser: This type of eraser is excellent for lifting pencil marks gently without smudging, perfect for refining delicate web lines.
Unravel Your Artistic Potential
Drawing a spider web is more than just connecting lines; it’s about understanding structure and creating an illusion of fragility and strength.
You now have the steps to bring this intricate natural wonder to life on your page.
Experiment with different web shapes, sizes, and environments.
Don’t just stop here; try adding a spider, a fly, or even a full background to your next web masterpiece.