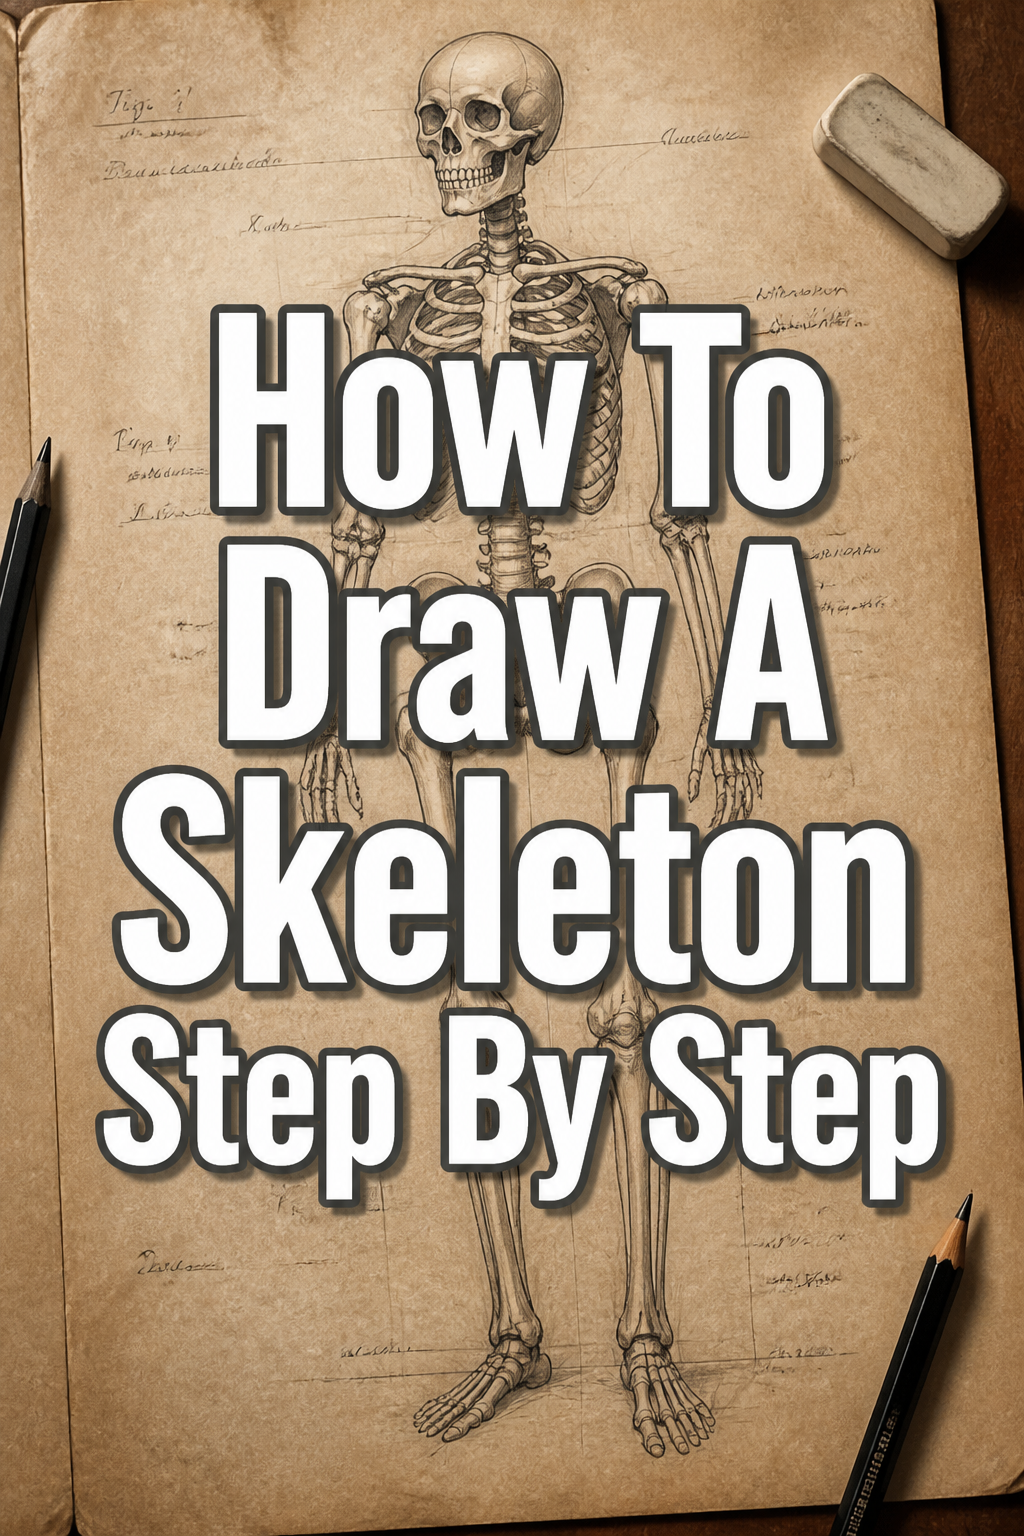
💀 How To Draw A Skeleton Step By Step

& Painting
No rigid rules or pretension. Just practical guides, medium comparisons, and encouraging tips to help you enjoy the drawing & painting process.
Learning to draw a skeleton might seem daunting at first glance.
But with the right approach and a clear understanding of its structure, you’ll find it incredibly rewarding.
I’ve spent years studying anatomy for art, and this guide distills the complex into manageable steps, making the process accessible for anyone.
Quick Overview
This guide will walk you through constructing a full skeleton, focusing on accurate proportions and key anatomical landmarks.
You’ll build confidence in drawing complex forms by breaking them down into simple shapes.
- Time needed: 1-2 hours (can be broken into shorter sessions)
- Difficulty: Intermediate (Beginners can follow along, but some patience is helpful)
- What you’ll need: Pencil (HB, 2B), eraser, paper, a reference image (optional but recommended)
Step-by-Step Instructions
Step 1: Establish Your Gesture and Proportions
Before any bones appear, begin by sketching the overall pose and general proportions of your skeleton.
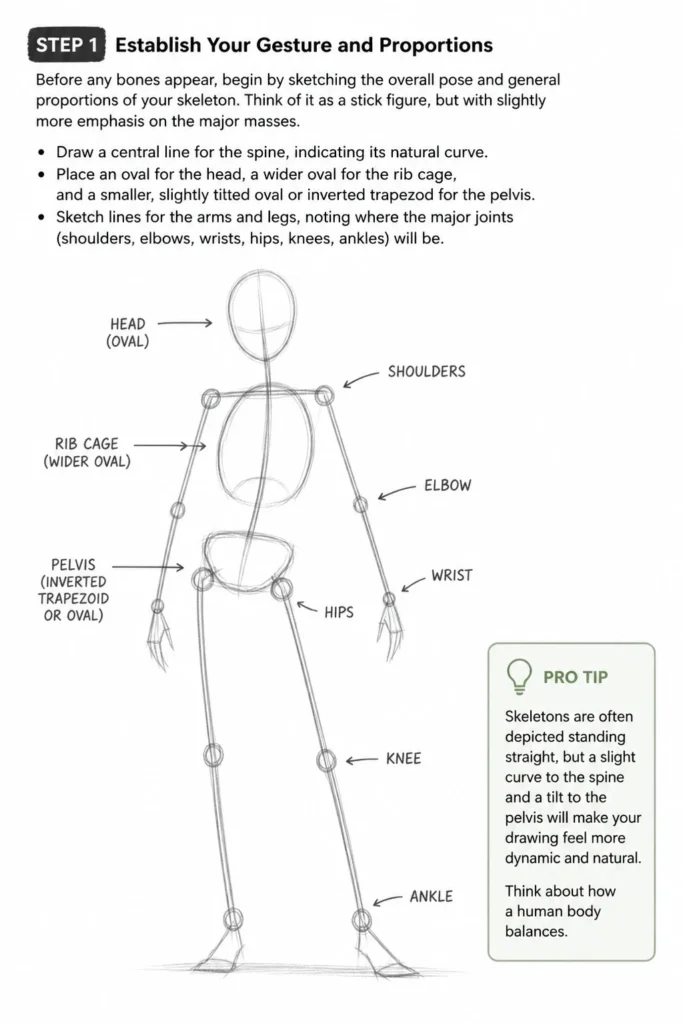
Think of it as a stick figure, but with slightly more emphasis on the major masses.
Draw a central line for the spine, indicating its natural curve.
Place an oval for the head, a wider oval for the rib cage, and a smaller, slightly tilted oval or inverted trapezoid for the pelvis.
Sketch lines for the arms and legs, noting where the major joints (shoulders, elbows, wrists, hips, knees, ankles) will be.
Pro Tip: Skeletons are often depicted standing straight, but a slight curve to the spine and a tilt to the pelvis will make your drawing feel more dynamic and natural. Think about how a human body balances.
Step 2: Construct the Skull
The skull is the most recognizable part, so let’s give it proper attention.
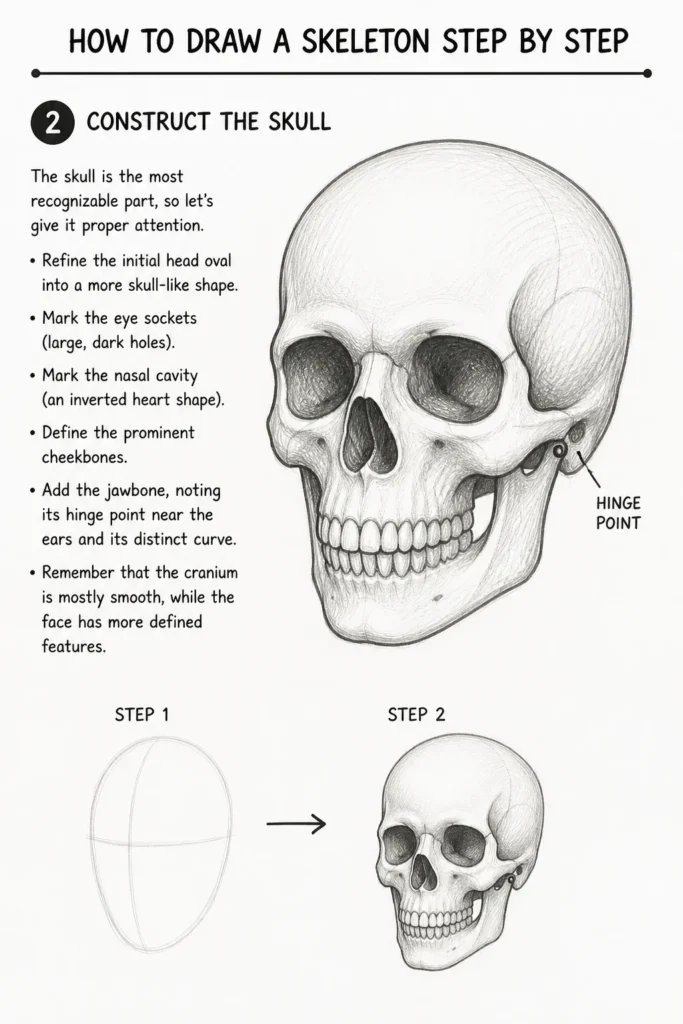
Refine the initial head oval into a more skull-like shape.
Mark the eye sockets (large, dark holes), the nasal cavity (an inverted heart shape), and the prominent cheekbones.
Add the jawbone, noting its hinge point near the ears and its distinct curve.
Remember that the cranium is mostly smooth, while the face has more defined features.
Step 3: Build the Spine and Rib Cage
The spine is the central pillar, and the rib cage protects vital organs.
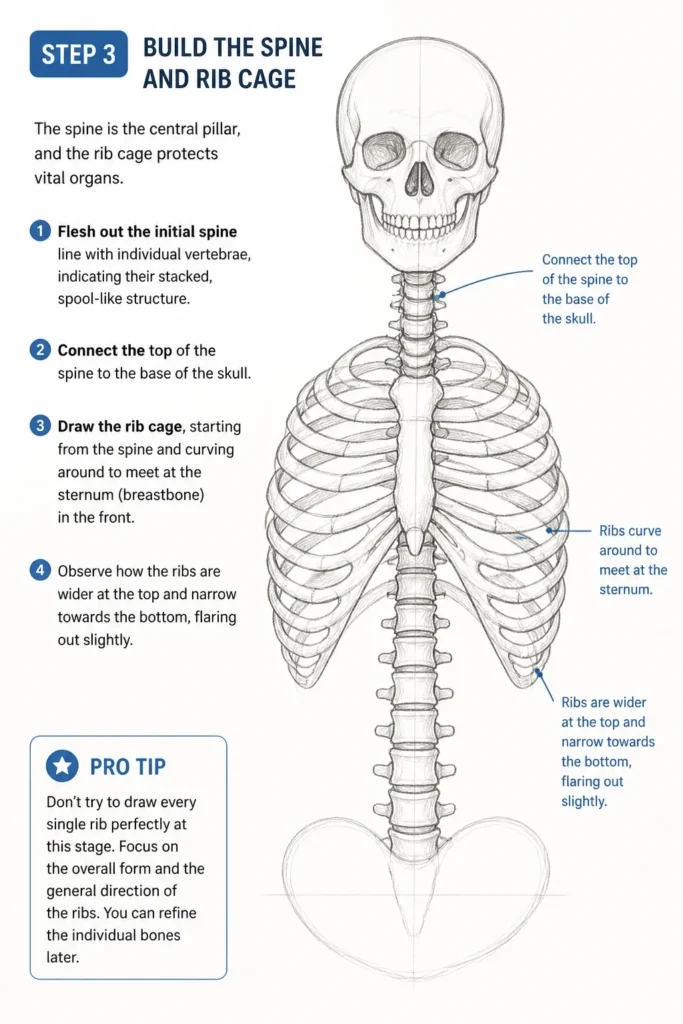
Flesh out the initial spine line with individual vertebrae, indicating their stacked, spool-like structure.
Connect the top of the spine to the base of the skull.
Draw the rib cage, starting from the spine and curving around to meet at the sternum (breastbone) in the front.
Observe how the ribs are wider at the top and narrow towards the bottom, flaring out slightly.
Pro Tip: Don’t try to draw every single rib perfectly at this stage. Focus on the overall form and the general direction of the ribs. You can refine the individual bones later.
Step 4: Form the Pelvis
The pelvis acts as a crucial link between the upper body and the legs.
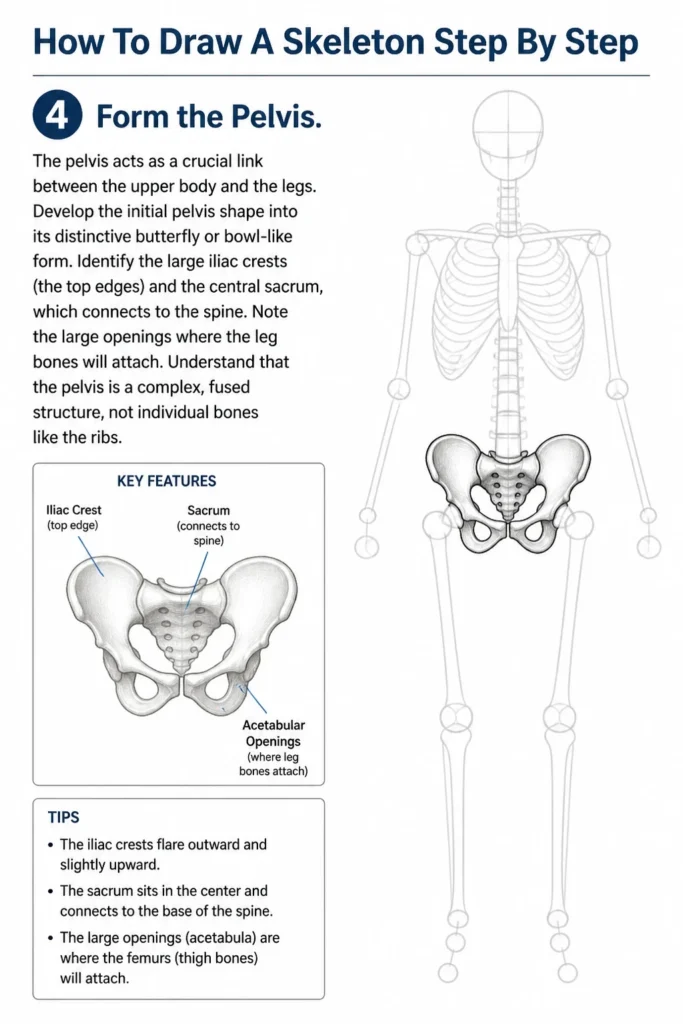
Develop the initial pelvis shape into its distinctive butterfly or bowl-like form.
Identify the large iliac crests (the top edges) and the central sacrum, which connects to the spine.
Note the large openings where the leg bones will attach.
Understand that the pelvis is a complex, fused structure, not individual bones like the ribs.
Step 5: Sketch the Arm Bones
Now, let’s add the limbs, starting with the arms.
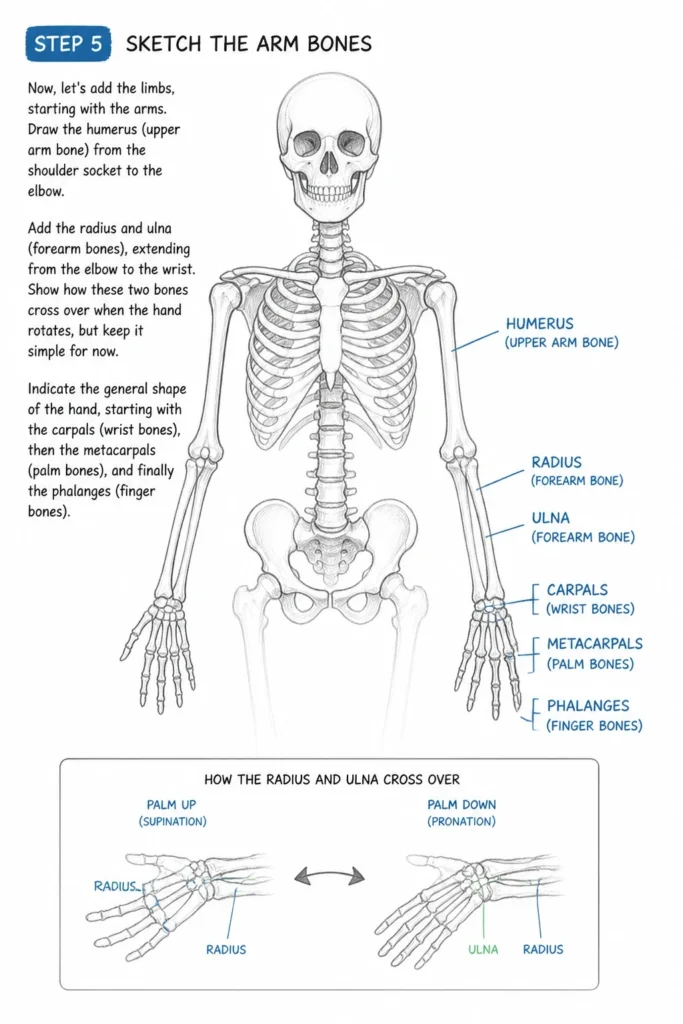
Draw the humerus (upper arm bone) from the shoulder socket to the elbow.
Add the radius and ulna (forearm bones), extending from the elbow to the wrist.
Show how these two bones cross over when the hand rotates, but keep it simple for now.
Indicate the general shape of the hand, starting with the carpals (wrist bones), then the metacarpals (palm bones), and finally the phalanges (finger bones).
Step 6: Outline the Leg Bones
The leg bones are among the longest and strongest in the body.
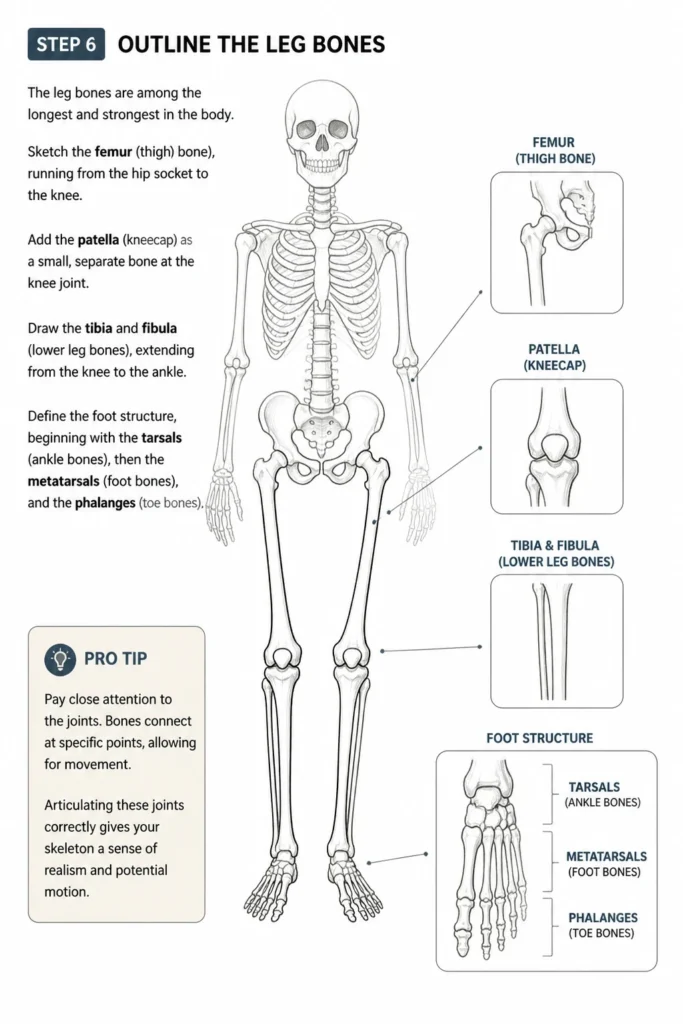
Sketch the femur (thigh bone), running from the hip socket to the knee.
Add the patella (kneecap) as a small, separate bone at the knee joint.
Draw the tibia and fibula (lower leg bones), extending from the knee to the ankle.
Define the foot structure, beginning with the tarsals (ankle bones), then the metatarsals (foot bones), and the phalanges (toe bones).
Pro Tip: Pay close attention to the joints. Bones connect at specific points, allowing for movement. Articulating these joints correctly gives your skeleton a sense of realism and potential motion.
Step 7: Refine and Detail
With all the major bones in place, it’s time to add definition and clean up your lines.
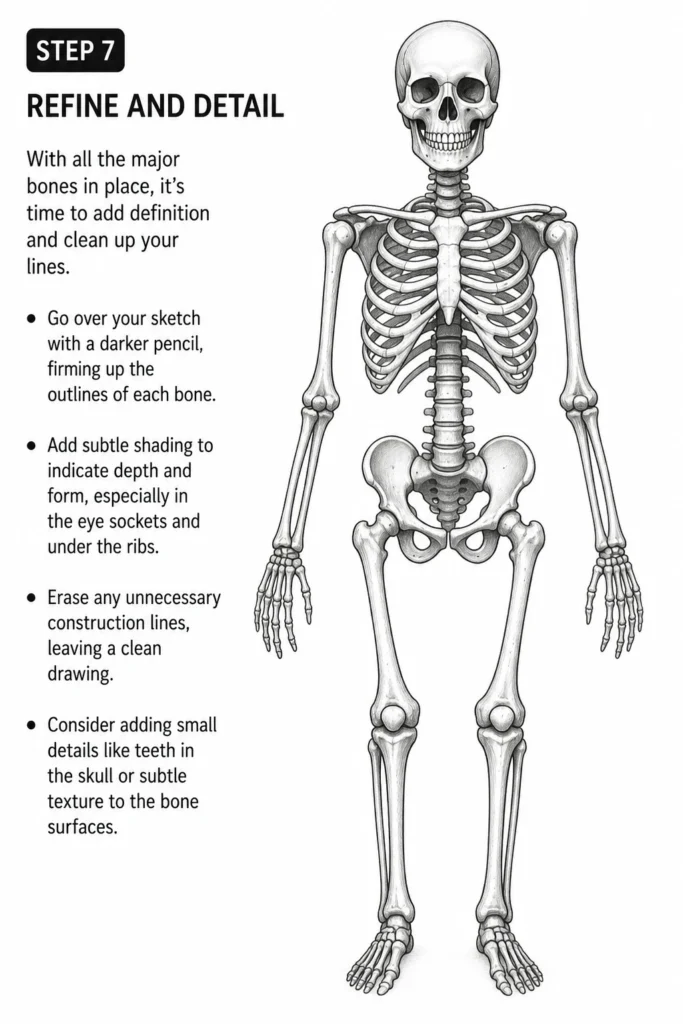
Go over your sketch with a darker pencil, firming up the outlines of each bone.
Add subtle shading to indicate depth and form, especially in the eye sockets and under the ribs.
Erase any unnecessary construction lines, leaving a clean drawing.
Consider adding small details like teeth in the skull or subtle texture to the bone surfaces.
Common Mistakes to Avoid
Incorrect Proportions
A common error is making the head too big or the limbs too short.
This can make your skeleton look cartoonish rather than anatomically correct. Always start with light construction lines and compare the length of different sections of the skeleton to each other. For example, the humerus is roughly the same length as the radius and ulna combined.
Stiff Posture
Drawing a skeleton perfectly straight up and down often results in a rigid, lifeless image.
Even a standing skeleton has subtle curves in the spine and a slight tilt in the pelvis. Embrace these natural S-curves and counter-tilts to give your drawing a more dynamic and realistic feel, even in a static pose.
Ignoring Overlap and Depth
Many beginners draw bones as if they are flat cutouts, without considering how they overlap and exist in three-dimensional space.
Remember that the rib cage curves, and the pelvis has depth. Use overlapping lines and subtle shading to create the illusion of form and space, making your skeleton feel solid.
Over-detailing Too Soon
Jumping straight into drawing every single tooth or rib bone before establishing the overall structure can lead to a messy and disproportionate drawing.
Always work from general shapes to specific details. Get the big forms right first, then gradually add the smaller elements. This ensures your foundation is solid.
Troubleshooting
My Skeleton Looks Flat
If your drawing lacks depth, you might be focusing too much on outlines without considering form.
Try to think of each bone as a three-dimensional object. Use lighter lines for parts of bones that are further away and darker, more defined lines for those closer to the viewer. Add subtle shading, especially in areas like the rib cage and eye sockets, to create volume and curvature.
The Joints Don’t Look Right
Incorrectly drawn joints can make your skeleton appear dislocated or unnatural.
Review your reference images carefully to understand how bones connect. For instance, the knee joint isn’t just a hinge; it involves the femur, tibia, and patella articulating in a specific way. Simplify complex joints into basic spheres or cylinders initially, then refine their specific shapes.
I Can’t Get the Head Shape Correct
The skull is a complex shape, and getting it right can be challenging.
Start with a simple sphere for the cranium, then add a box-like shape for the jaw area. Gradually carve away at these basic forms to define the eye sockets, nasal cavity, and cheekbones. Practice drawing the skull from various angles to build your understanding of its structure.
Key Takeaways
- Always start with a light gesture sketch to establish overall pose and proportions.
- Break down complex structures like the skull and rib cage into simpler geometric shapes first.
- Focus on understanding the major anatomical landmarks and how bones connect at joints.
- Work from general forms to specific details, refining your drawing gradually.
- Use shading and line weight to create depth and make your skeleton appear three-dimensional.
- Practice regularly and use reliable anatomical references to improve accuracy.
Frequently Asked Questions
What’s the best way to learn skeleton anatomy for drawing?
The best way is through a combination of observation and practice. Study anatomical diagrams, photos of real skeletons, and even simplified artistic anatomy books. Draw the skeleton repeatedly from different angles, focusing on understanding the function and form of each bone.
Should I draw every single bone and joint?
While understanding every bone is beneficial, for most artistic purposes, you don’t need to render every tiny detail. Focus on the major bones and how they articulate. Simplify the smaller structures like the hands and feet into their primary masses before adding finer details, especially when starting out.
How can I make my skeleton look less “dead” and more dynamic?
To add dynamism, give your skeleton a pose that suggests movement or emotion. Introduce curves to the spine, tilt the pelvis, and vary the angles of the limbs. Even a slight twist or contrapposto (a balanced asymmetrical pose) can bring life to your drawing. Think about how a living person would hold that pose.
Is it better to draw from memory or use references?
Always use references, especially when you’re learning. References ensure accuracy and help you internalize the correct forms. As you gain experience, you’ll be able to draw more from memory, but even professional artists frequently consult references to maintain precision and discover new details.
Our Top Recommended Finds
- Good Quality Sketchbook: A durable sketchbook with acid-free paper provides a consistent surface for practice and keeps your progress organized.
- Set of Graphite Pencils: Having a range of hardness (HB, 2B, 4B) allows for varied line weights and effective shading, adding depth to your bone structures.
- Anatomy for Artists Book: A dedicated resource like “Anatomy for Sculptors” or “Constructive Anatomy” offers detailed visual guides to bone structure and proportion.
Embrace the Framework of Form
Drawing a skeleton is more than just rendering bones; it’s about understanding the underlying structure of life itself.
Each line you draw builds upon the last, slowly revealing the intricate framework that supports all living things.
Don’t be afraid to make mistakes; they are essential parts of the learning process.
Pick up your pencil today, follow these steps, and watch as you bring this fascinating anatomical study to life on your paper.
Continue exploring human anatomy, perhaps moving on to muscles, to further enhance your artistic understanding of the body.
& Painting
No rigid rules or pretension. Just practical guides, medium comparisons, and encouraging tips to help you enjoy the drawing & painting process.