🌻 How To Draw A Sunflower Step By Step

& Painting
No rigid rules or pretension. Just practical guides, medium comparisons, and encouraging tips to help you enjoy the drawing & painting process.
I remember my first attempt at drawing a sunflower, a messy scribble of yellow that barely resembled the vibrant flower. Over the years, I’ve learned the secrets to capturing its joyful essence on paper. This guide distills my personal journey and practical tips into clear, actionable steps for you.
You’re about to discover how simple it can be to create a beautiful sunflower drawing.
Quick Overview
This guide will walk you through creating a charming sunflower, from initial shapes to final details. You’ll gain confidence in sketching organic forms and adding depth to your artwork.
- Time needed: 45-75 minutes
- Difficulty: Beginner
- What you’ll need: Pencil (HB or 2B), eraser (kneaded or vinyl), drawing paper, optional: colored pencils or markers
Step-by-Step Instructions
Step 1: Map Out Your Basic Shapes
Begin by lightly sketching the core structure of your sunflower. Think of it as building a simple skeleton.
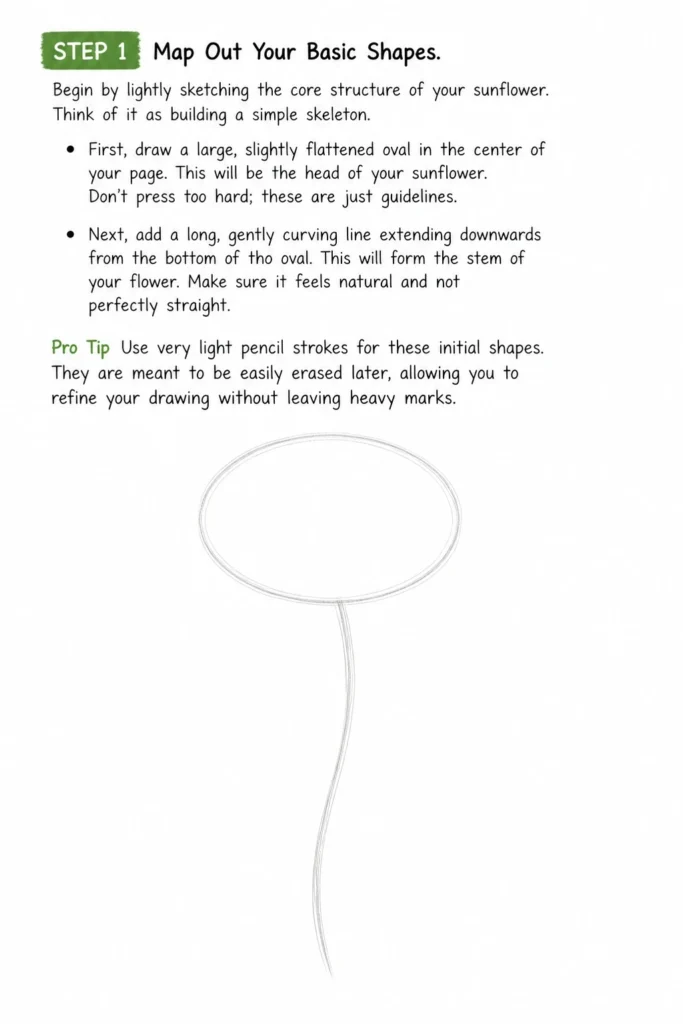
First, draw a large, slightly flattened oval in the center of your page. This will be the head of your sunflower. Don’t press too hard; these are just guidelines.
Next, add a long, gently curving line extending downwards from the bottom of the oval. This will form the stem of your flower. Make sure it feels natural and not perfectly straight.
Pro Tip: Use very light pencil strokes for these initial shapes. They are meant to be easily erased later, allowing you to refine your drawing without leaving heavy marks.
Step 2: Create a Petal Guide Circle
Now, we’ll establish where the petals will emerge from. This step helps ensure your petals are evenly distributed.
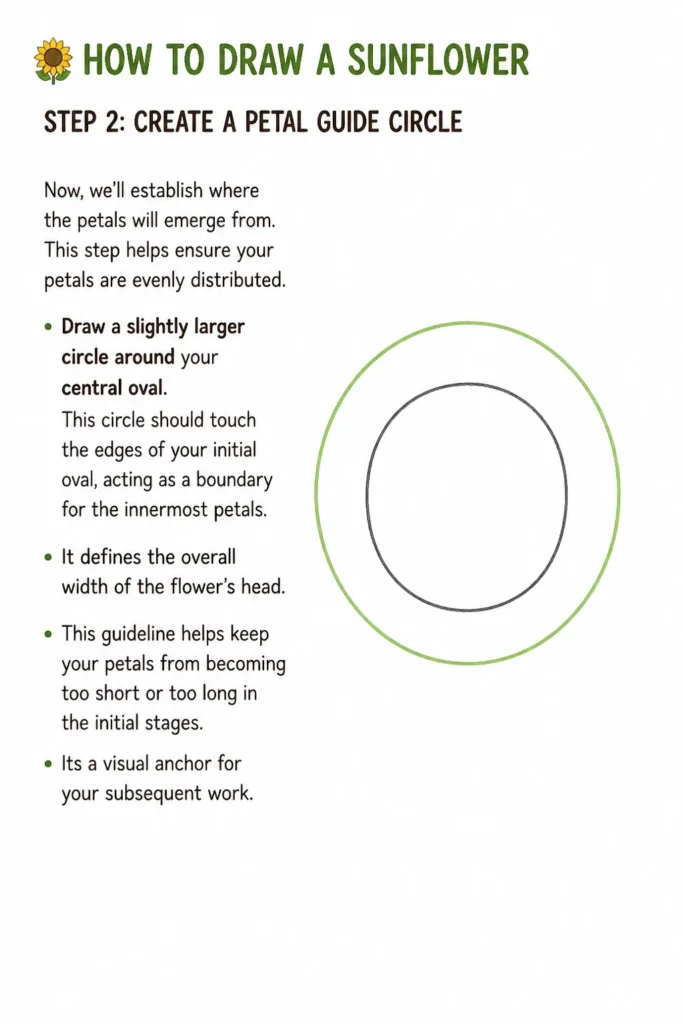
Draw a slightly larger circle around your central oval. This circle should touch the edges of your initial oval, acting as a boundary for the innermost petals. It defines the overall width of the flower’s head.
This guideline helps keep your petals from becoming too short or too long in the initial stages. It’s a visual anchor for your subsequent work.
Step 3: Sketch the First Layer of Petals
It’s time to bring some of the sunflower’s iconic cheer to life. We’ll start with the petals closest to the center.
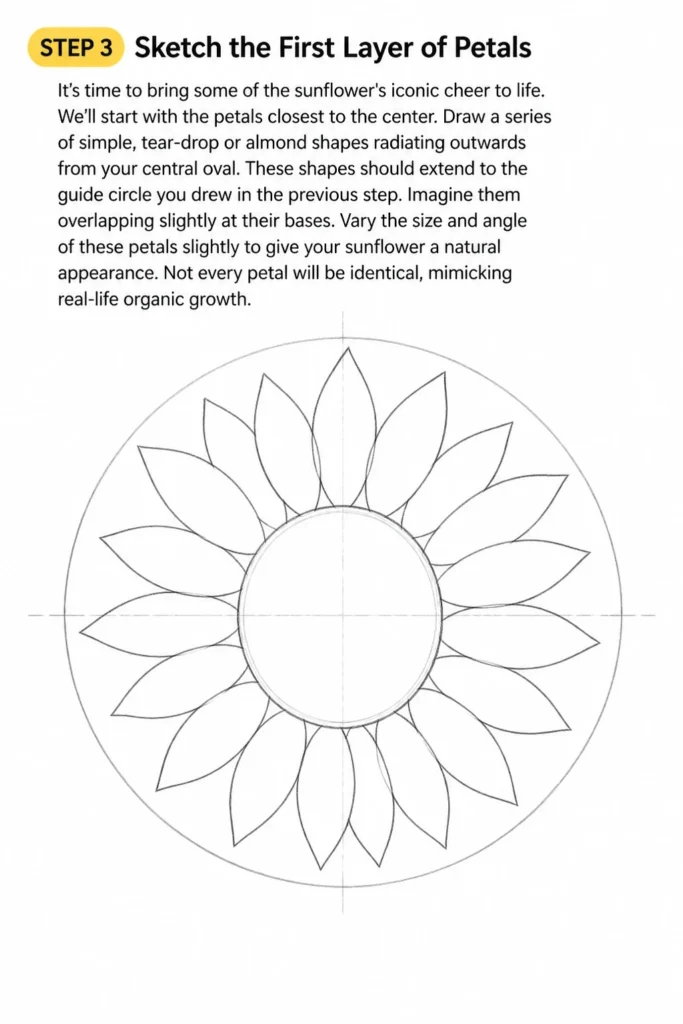
Draw a series of simple, tear-drop or almond shapes radiating outwards from your central oval. These shapes should extend to the guide circle you drew in the previous step. Imagine them overlapping slightly at their bases.
Vary the size and angle of these petals slightly to give your sunflower a natural appearance. Not every petal will be identical, mimicking real-life organic growth.
Step 4: Add More Layers of Petals
Sunflowers are known for their abundant, layered petals. This step builds on the previous one to create that fullness.
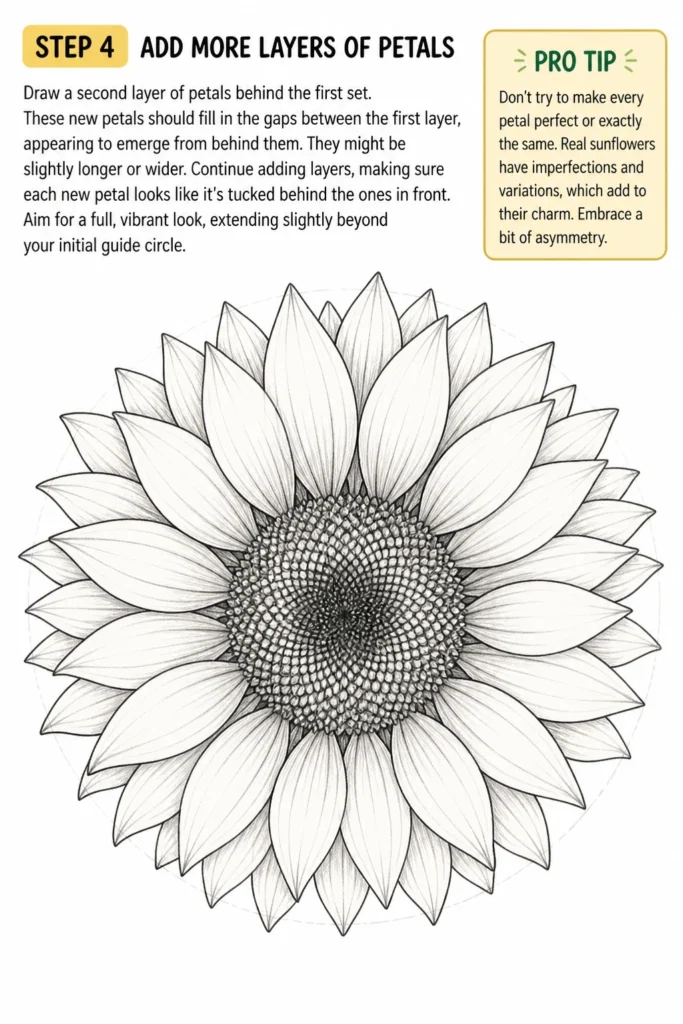
Draw a second layer of petals behind the first set. These new petals should fill in the gaps between the first layer, appearing to emerge from behind them. They might be slightly longer or wider.
Continue adding layers, making sure each new petal looks like it’s tucked behind the ones in front. Aim for a full, vibrant look, extending slightly beyond your initial guide circle.
Pro Tip: Don’t try to make every petal perfect or exactly the same. Real sunflowers have imperfections and variations, which add to their charm. Embrace a bit of asymmetry.
Step 5: Detail the Sunflower’s Center
The intricate center of a sunflower is a key characteristic. Let’s give it some texture.
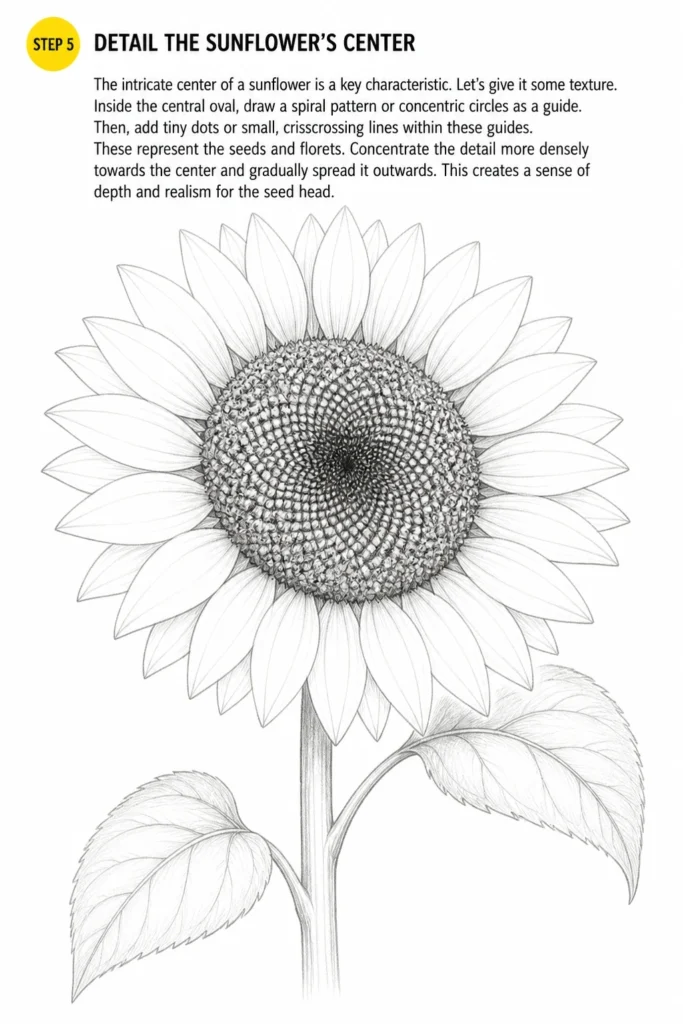
Inside the central oval, draw a spiral pattern or concentric circles as a guide. Then, add tiny dots or small, crisscrossing lines within these guides. These represent the seeds and florets.
Concentrate the detail more densely towards the center and gradually spread it outwards. This creates a sense of depth and realism for the seed head.
Step 6: Refine the Stem and Leaves
A strong stem and healthy leaves ground your sunflower. Let’s give them definition.
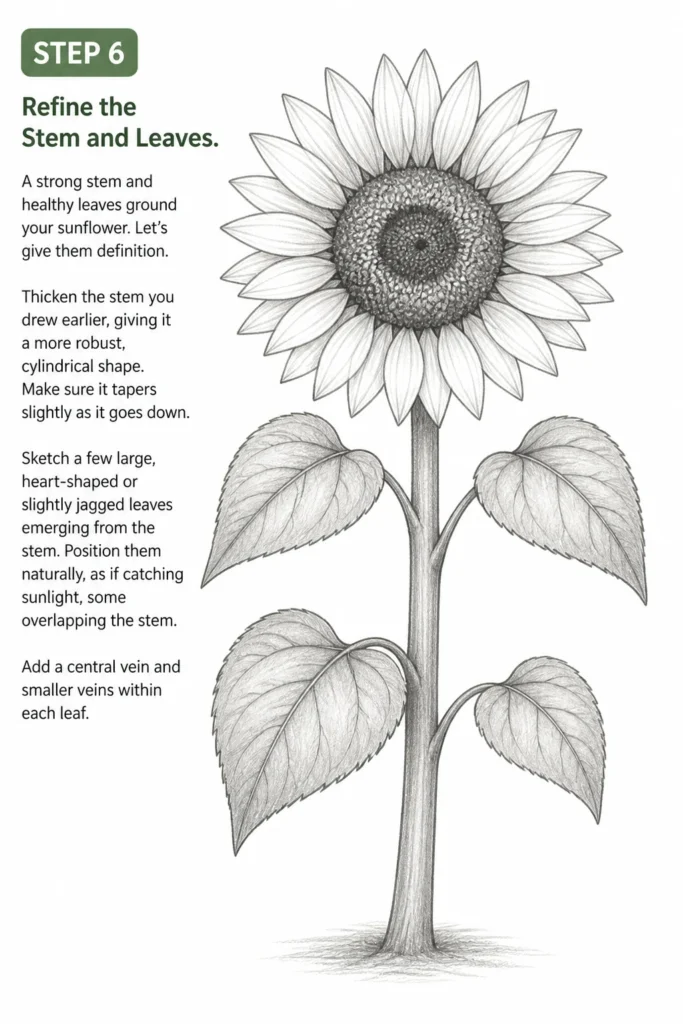
Thicken the stem you drew earlier, giving it a more robust, cylindrical shape. Make sure it tapers slightly as it goes down.
Sketch a few large, heart-shaped or slightly jagged leaves emerging from the stem. Position them naturally, as if catching sunlight, some overlapping the stem. Add a central vein and smaller veins within each leaf.
Step 7: Erase Guidelines and Outline
Now that your sunflower’s form is established, it’s time to clean up and define your lines.
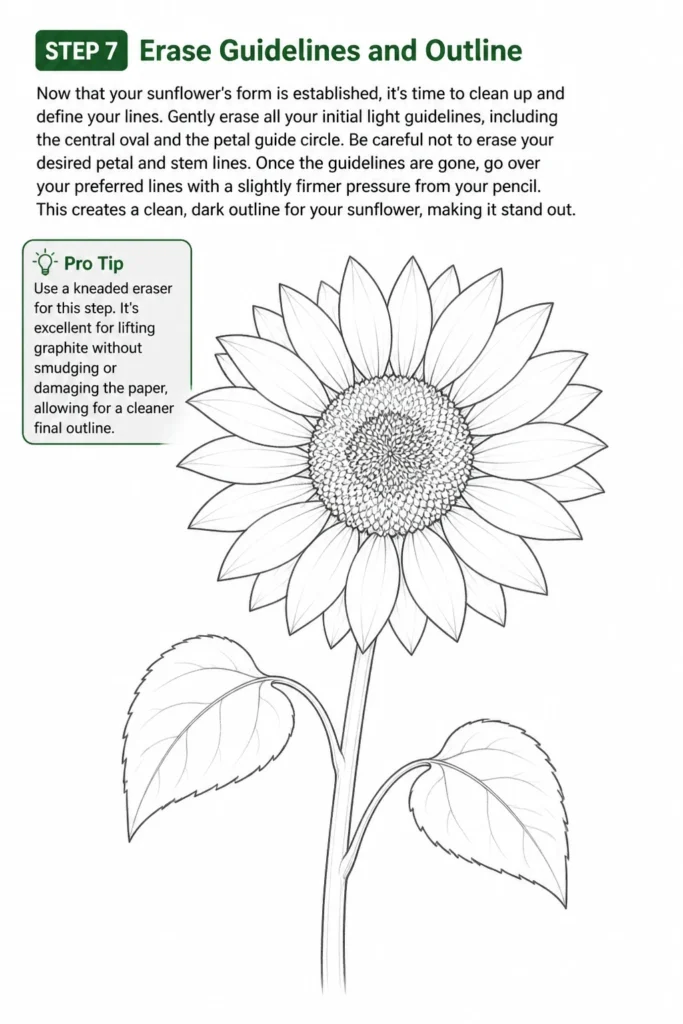
Gently erase all your initial light guidelines, including the central oval and the petal guide circle. Be careful not to erase your desired petal and stem lines.
Once the guidelines are gone, go over your preferred lines with a slightly firmer pressure from your pencil. This creates a clean, dark outline for your sunflower, making it stand out.
Pro Tip: Use a kneaded eraser for this step. It’s excellent for lifting graphite without smudging or damaging the paper, allowing for a cleaner final outline.
Step 8: Add Shading and Color (Optional)
To bring your sunflower truly to life, consider adding depth and vibrancy.
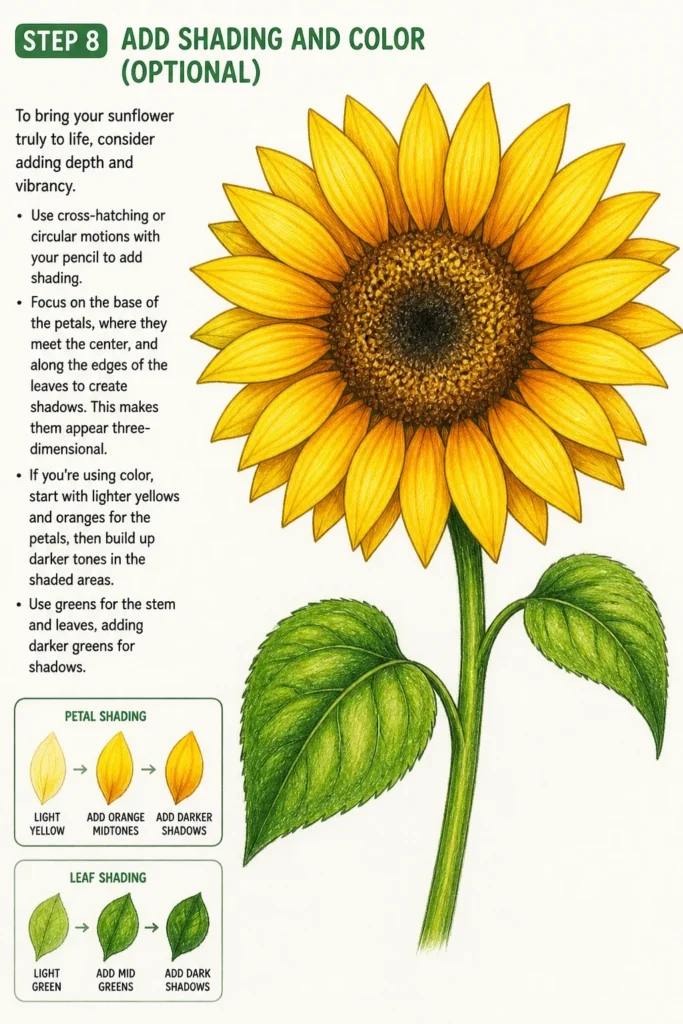
Use cross-hatching or circular motions with your pencil to add shading. Focus on the base of the petals, where they meet the center, and along the edges of the leaves to create shadows. This makes them appear three-dimensional.
If you’re using color, start with lighter yellows and oranges for the petals, then build up darker tones in the shaded areas. Use greens for the stem and leaves, adding darker greens for shadows.
Common Mistakes to Avoid
Making Petals Too Uniform
Many beginners draw every petal exactly the same size and shape, perfectly spaced. This makes the sunflower look stiff and unnatural. Real sunflowers have petals that vary slightly, overlap, and twist in different directions. Embrace this organic variation for a more lifelike drawing.
Drawing a Flat Center
A common pitfall is making the sunflower’s center look like a flat disk. The seed head is actually a slightly domed, textured surface. Failing to add small details, varied shading, and a sense of depth will result in a two-dimensional appearance. Focus on creating texture and subtle curves to show its roundness.
Pressing Too Hard with Initial Sketches
Starting your drawing with heavy, dark lines for your basic shapes makes it incredibly difficult to correct mistakes or refine your form later. These dark lines often show through, even after erasing. Always begin with the lightest possible touch, saving firmer pressure for your final outlines.
Neglecting Reference Images
Even experienced artists use reference images. Trying to draw a complex flower like a sunflower purely from memory can lead to inaccurate proportions or a lack of detail. Keep a photo of a sunflower nearby to observe its unique petal arrangements, seed patterns, and leaf shapes.
Troubleshooting
My Petals Look Flat and Lifeless
If your petals lack dimension, it’s often due to insufficient layering and shading. Try adding more layers of petals, making sure some appear behind others. Then, add subtle shading at the base of each petal where it meets the center, and along the edges that are turning away from an imaginary light source. This creates depth.
The Center Doesn’t Look Round or Textured
A flat-looking center needs more attention to its intricate details. Rethink your approach to the seed patterns. Instead of just random dots, try drawing small, tightly packed spirals or a grid of tiny diamond shapes. Use varying pressure to suggest areas that are slightly raised or recessed, giving it that characteristic dome shape.
I Can’t Get the Proportions Right
Proportion issues usually stem from not using enough initial guidelines. Go back to drawing basic shapes. Ensure your central oval is a good size relative to the overall flower head. Use a light outer circle to define the maximum reach of your petals. Step back frequently to assess the overall balance before adding details.
Key Takeaways
- Always start with light, basic shapes to establish your sunflower’s foundation.
- Layering petals and varying their shapes creates a more natural and fuller appearance.
- Detailing the sunflower’s center with small, intricate patterns adds realism and depth.
- Don’t be afraid to use an eraser; it’s a crucial tool for refining your drawing.
- Embrace imperfections; they contribute to the organic beauty of a hand-drawn flower.
- Consider adding shading or color to enhance the three-dimensional quality of your artwork.
Frequently Asked Questions
What’s the best pencil hardness to start with?
An HB pencil is a great all-rounder for initial sketches and general drawing. For lighter guidelines, you might use a 2H, and for darker outlines and shading, a 2B or 4B can be very effective. It’s good to have a range.
How can I make my sunflower look more realistic?
Focus on observation. Study real sunflowers or high-quality photos. Pay attention to how petals overlap, the texture of the center, and the slight imperfections. Adding subtle shadows and highlights will also significantly increase realism.
Should I use an eraser often?
Absolutely! An eraser is just as important as your pencil. It allows you to correct mistakes, lighten guide lines, and even create highlights. Don’t view erasing as a sign of failure, but rather as part of the iterative drawing process.
Can I draw this digitally?
Yes, the same principles apply to digital drawing. Use separate layers for your initial sketches, outlines, and colors. Digital tools often make it even easier to adjust and refine your lines and shapes, offering great flexibility.
Our Top Recommended Finds
- Good Quality Sketchbook: A sketchbook with thicker paper (at least 90gsm) handles erasing and layering better without tearing.
- Set of Drawing Pencils: A basic set ranging from 2H to 4B provides versatility for light sketching, outlining, and shading.
- Kneaded Eraser: This soft, pliable eraser is excellent for lifting graphite gently without smudging your work or damaging the paper.
Embrace Your Inner Artist
You’ve just walked through the steps of drawing a beautiful sunflower, a symbol of joy and warmth. The true magic now lies in your hands. Don’t let your journey end here.
Perhaps your next project could be drawing a whole field of sunflowers, or experimenting with different angles and lighting. Grab your pencil and paper right now. Let your creativity bloom!
& Painting
No rigid rules or pretension. Just practical guides, medium comparisons, and encouraging tips to help you enjoy the drawing & painting process.