🎨 How To Draw A Body Step By Step

& Painting
No rigid rules or pretension. Just practical guides, medium comparisons, and encouraging tips to help you enjoy the drawing & painting process.
Learning to draw the human body can feel like a huge challenge, but it’s incredibly rewarding.
I remember my own struggles with proportions and making figures look natural, which is why I’ve refined a process that breaks it down into manageable parts.
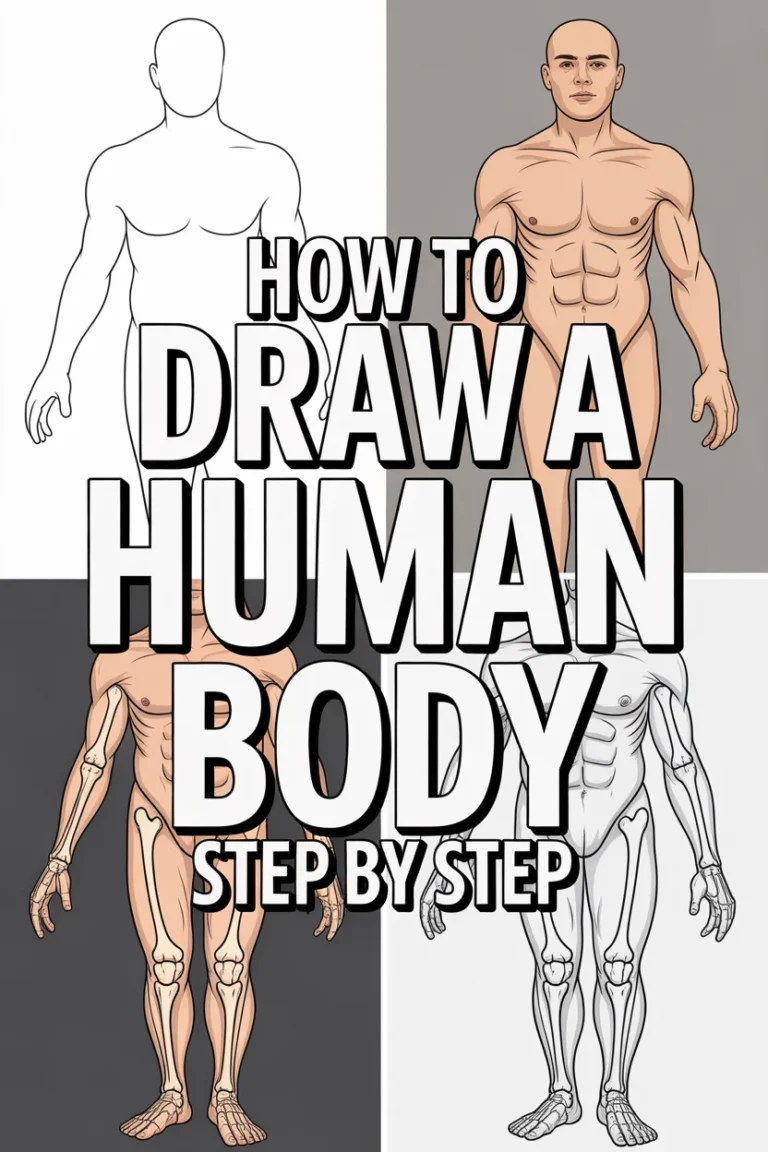
This guide will walk you through a clear, practical method to build believable figures from scratch.
Quick Overview
You’re about to learn a foundational approach to drawing the human form, focusing on structure and proportion.
- Time needed: 1-2 hours for a first complete drawing, but practice will make it faster.
- Difficulty: Beginner-Intermediate. We build from simple shapes.
- What you’ll need: Paper, pencils (HB, 2B), eraser, ruler (optional).
Step-by-Step Instructions
Step 1: Gather Your Tools and Set Up
Before you begin, make sure your drawing space is comfortable and well-lit. Having the right tools at hand makes a big difference in your drawing experience.
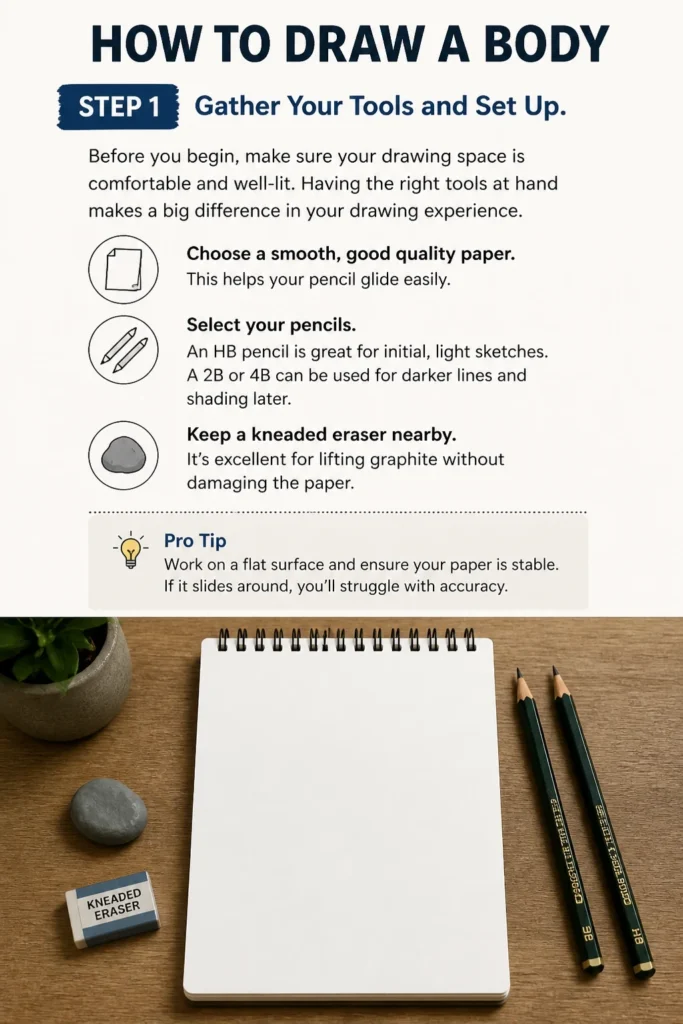
Choose a smooth, good quality paper. This helps your pencil glide easily.
Select your pencils. An HB pencil is great for initial, light sketches. A 2B or 4B can be used for darker lines and shading later.
Keep a kneaded eraser nearby. It’s excellent for lifting graphite without damaging the paper.
Pro Tip: Work on a flat surface and ensure your paper is stable. If it slides around, you’ll struggle with accuracy.
Step 2: Start with the Gesture and Basic Shapes
The very first step is to capture the overall flow and balance of the figure. This is often called the “gesture.”
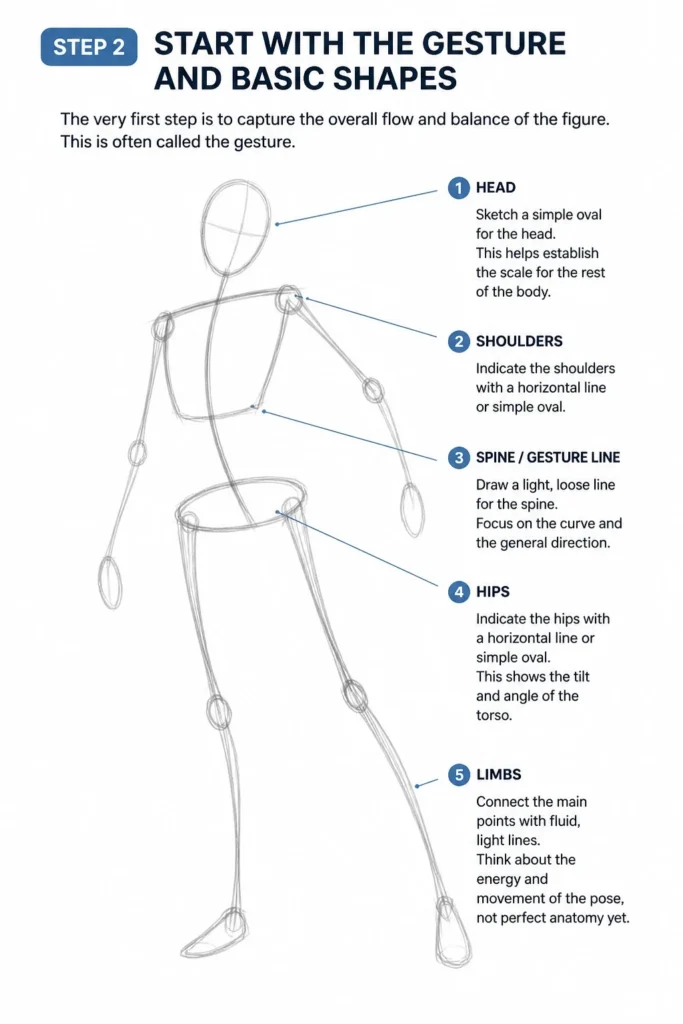
Draw a light, loose stick figure. Focus on the spine’s curve and the general direction of the limbs.
Sketch a simple oval for the head. This helps establish the scale for the rest of the body.
Indicate the shoulders and hips with horizontal lines or simple ovals. These lines will show you the tilt and angle of the torso.
Connect these main points with fluid, light lines. Think about the energy and movement of the pose, not perfect anatomy yet.
Step 3: Establish the Rib Cage and Pelvis
Now, we’ll give volume to the torso, which is crucial for establishing proportion and structure.
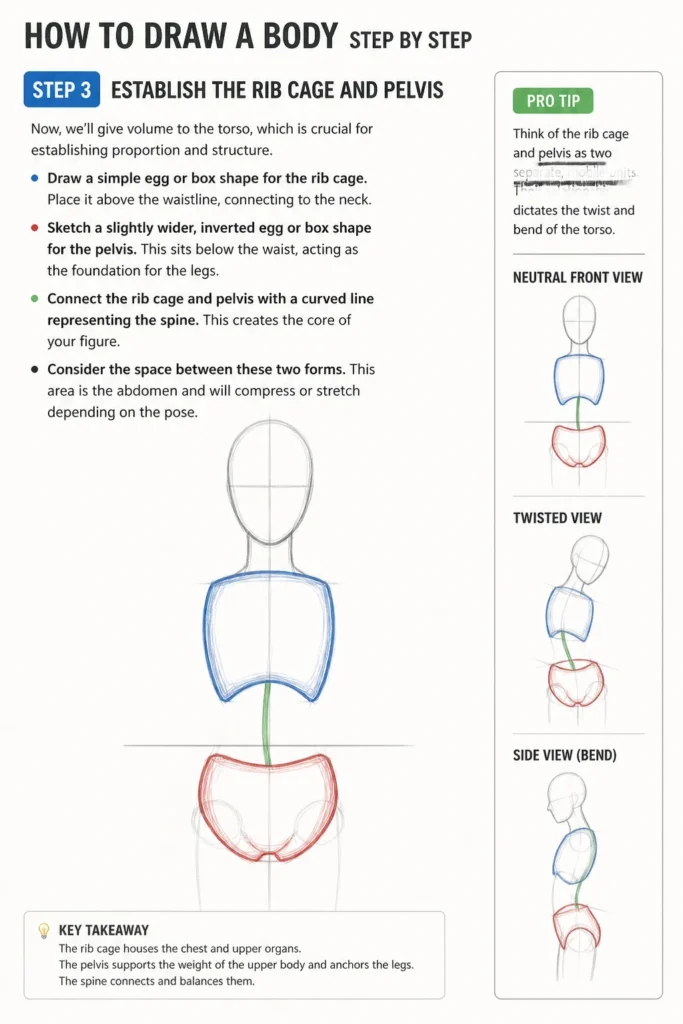
Draw a simple egg or box shape for the rib cage. Place it above the waistline, connecting to the neck.
Sketch a slightly wider, inverted egg or box shape for the pelvis. This sits below the waist, acting as the foundation for the legs.
Connect the rib cage and pelvis with a curved line representing the spine. This creates the “core” of your figure.
Consider the space between these two forms. This area is the abdomen and will compress or stretch depending on the pose.
Pro Tip: Think of the rib cage and pelvis as two separate, mobile units. Their relationship dictates the twist and bend of the torso.
Step 4: Sketch the Limbs with Cylinders and Joints
With the torso established, we can now build out the arms and legs, making sure to show their flexibility at the joints.
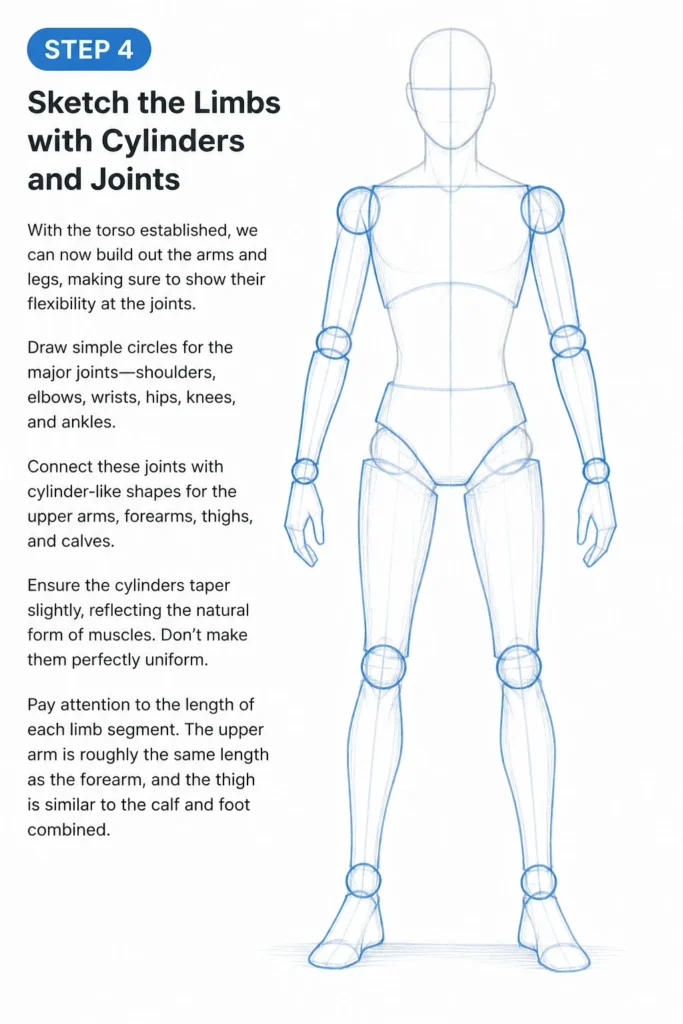
Draw simple circles for the major joints: shoulders, elbows, wrists, hips, knees, and ankles.
Connect these joints with cylinder-like shapes for the upper arms, forearms, thighs, and calves.
Ensure the cylinders taper slightly, reflecting the natural form of muscles. Don’t make them perfectly uniform.
Pay attention to the length of each limb segment. The upper arm is roughly the same length as the forearm, and the thigh is similar to the calf and foot combined.
Step 5: Define the Form with Basic Muscle Groups
It’s time to add more anatomical accuracy and volume to your figure.
Outline the major muscle groups over your cylinder forms. Think of the biceps, triceps, pectorals, deltoids, quadriceps, and hamstrings.
Remember that muscles bulge and taper. Don’t just draw straight lines; curve them to show the natural contours.
Refine the connection between the torso and limbs. The shoulders and hips are complex areas where many muscles attach.
Use reference images if you’re unsure about specific muscle shapes or how they flow into one another.
Pro Tip: Focus on the overall shape of muscle groups, not every individual fiber. Simplify to create a cohesive form.
Step 6: Refine and Connect the Shapes
Now, step back and look at your entire drawing. This is where you smooth out transitions and check proportions.
Erase any overly harsh construction lines that are no longer needed, using your kneaded eraser to lighten them.
Draw smoother, more confident lines that connect the muscle forms. Look for graceful curves and natural transitions.
Check your proportions again. Is the head too small or large? Are the arms too short for the body? Use the head as a unit of measurement (typically 7-8 heads tall for an adult).
Make small adjustments to the overall silhouette. Your figure should start to look less like a collection of parts and more like a unified body.
Step 7: Add Details and Clean Up
The final stages involve bringing your figure to life with specific features and a clean finish.
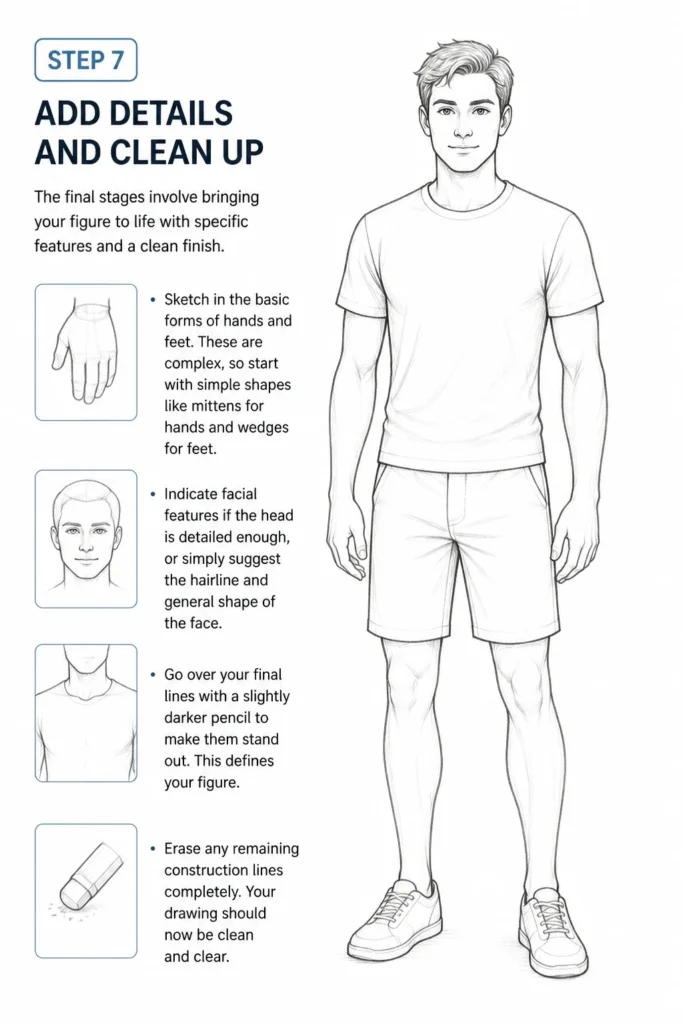
Sketch in the basic forms of hands and feet. These are complex, so start with simple shapes like mittens for hands and wedges for feet.
Indicate facial features if the head is detailed enough, or simply suggest the hairline and general shape of the face.
Go over your final lines with a slightly darker pencil to make them stand out. This defines your figure.
Erase any remaining construction lines completely. Your drawing should now be clean and clear.
Step 8: Consider Light and Shadow
Adding basic shading can give your figure depth and make it appear three-dimensional.
Decide on a light source. Imagine where the light is coming from in your drawing.
Apply light shading to areas that would be in shadow, opposite the light source.
Use a consistent direction for your shading strokes. Build up darker tones in layers.
Observe how forms turn away from the light. This helps create the illusion of roundness and volume.
Pro Tip: Start with very light pressure for shading. It’s much easier to add more graphite than to remove it.
Common Mistakes to Avoid
Drawing Stiff, Symmetrical Figures
Many beginners tend to draw figures that look rigid, standing perfectly straight with limbs mirrored on both sides. This creates an unnatural, lifeless pose. The human body is full of subtle curves and shifts in weight, even when standing still. Always try to introduce a slight “S” curve to the spine or a “contrapposto” stance where weight is shifted to one leg, causing the hips and shoulders to tilt in opposite directions. This simple adjustment adds dynamism and realism.
Incorrect Proportions
One of the biggest hurdles is getting body proportions right. Often, heads are too large, limbs are too short, or the torso is too long. This throws off the entire drawing. Always use the head as a unit of measurement. An adult figure is typically 7 to 8 heads tall. Regularly compare the length of arms to the torso, and legs to the rest of the body. Practice measuring with your pencil to train your eye.
Ignoring Overlapping Forms
When drawing a complex pose, it’s easy to draw each limb or body part in isolation, making them appear flat or disconnected. Remember that parts of the body overlap each other in three-dimensional space. For instance, an arm might partially obscure the torso, or one leg might be in front of the other. Drawing these overlaps correctly is vital for creating depth and making your figure feel solid and grounded in space.
Rushing the Construction Phase
It’s tempting to jump straight to detailing muscles and clothing, but skipping or rushing the initial gesture and basic shape construction leads to fundamental errors. Without a solid foundation of stick figures, rib cage, and pelvis, your figure will lack structure and often end up lopsided or disproportionate. Spend ample time on the light, foundational lines. These are your blueprint for success.
Troubleshooting
My Figures Look Flat and Lifeless
If your drawings lack a sense of depth and energy, you might be focusing too much on outlines rather than forms. Try to think of the body as a collection of three-dimensional shapes like cylinders, spheres, and boxes. Start with these volumetric forms instead of just drawing the outer silhouette. Also, exaggerate the gesture slightly to introduce more movement and flow into your initial sketch, even for static poses.
Proportions Are Always Off
Inconsistent proportions are a common issue. The best solution is consistent practice with measuring. Use your pencil to measure distances on your reference or against parts of your own drawing. For example, hold your pencil up to measure the head, then compare that length to the torso or limbs. Also, try drawing from life or photos using a grid system to help you accurately transfer proportions.
The Joints Look Stiff or Disconnected
Stiff joints often happen when you draw limbs as rigid tubes that simply meet at a point. Remember that joints are points of rotation and connection, not just endpoints. Draw them as spheres or simple hinge shapes. Ensure your cylinders for the limbs flow smoothly into and out of these joint forms, showing how muscles wrap around them. Practice drawing figures in dynamic poses to better understand joint movement.
Key Takeaways
- Begin with Gesture: Always start with loose, energetic lines to capture movement before focusing on detail.
- Build with Basic Shapes: Use simple forms like ovals, boxes, and cylinders to construct the body’s major masses.
- Master Proportions: Consistently check and measure your figure against established proportional guidelines, like the head unit.
- Focus on Form, Not Just Outline: Think in three dimensions, considering how masses overlap and turn in space.
- Practice Regularly: Drawing bodies improves with consistent effort and observation. Don’t be afraid to make mistakes.
- Use References: Study real bodies through photos or life drawing to understand anatomy and natural poses.
Frequently Asked Questions
How can I make my poses more dynamic?
To create more dynamic poses, focus on the line of action early in your sketch. This is an imaginary line that conveys the main movement or energy of the pose. Introduce contrapposto, where the weight is shifted to one leg, causing opposing tilts in the shoulders and hips. Exaggerate curves and twists in the spine and limbs. Avoid perfectly symmetrical or straight-on poses, as these tend to look static.
What’s the best way to learn anatomy without getting overwhelmed?
Start with simplified anatomy. Instead of memorizing every single muscle, focus on the major muscle groups and how they attach to the skeletal forms. Understand their basic shapes and how they influence the surface of the body. Use anatomical diagrams that show simplified muscle masses rather than complex, detailed illustrations. Over time, you can gradually add more detail.
Should I draw from imagination or reference?
Both are crucial. Drawing from reference, whether photos or life models, helps you understand real-world proportions, anatomy, and how light interacts with forms. It builds your visual library. Drawing from imagination allows you to apply what you’ve learned, develop your creativity, and explore new ideas. A good approach is to study extensively from reference, then practice applying that knowledge in your imaginative drawings.
How long does it take to get good at drawing bodies?
Learning to draw the human body is a continuous journey, not a destination. With consistent practice, you can see significant improvement within a few months. However, truly mastering the complexities of the human form can take years of dedicated study and observation. The key is to enjoy the process and celebrate small improvements along the way.
Our Top Recommended Finds
- Sketchbook with medium-weight paper: A good quality paper (like Canson XL Mix Media or Strathmore 400 Series Sketch) handles erasing and layering well.
- Set of graphite pencils (HB, 2B, 4B, 6B): Provides a range of hardness for light construction lines to dark shading.
- Kneaded eraser: Excellent for lifting graphite gently without smudging or damaging the paper surface.
Your Next Creative Step
You’ve taken a fantastic step in understanding the foundations of drawing the human body. Remember that every master artist started with these same basic principles.
Don’t stop here. Keep practicing these steps with different poses and from various angles.
Consider exploring resources on facial anatomy or drawing hands and feet next, as these often present their own unique challenges. Pick up your pencil today and bring your figures to life!
& Painting
No rigid rules or pretension. Just practical guides, medium comparisons, and encouraging tips to help you enjoy the drawing & painting process.