How To Draw A Face Step By Step For Beginners
Learning to draw a face can feel like a daunting task, especially when you’re just starting out.
I remember my early attempts, often resulting in lopsided features or disproportionate heads that didn’t quite look right.
But with the right approach and a little practice, anyone can develop the skills to create compelling portraits.
Quick Overview
This guide will walk you through the foundational steps of drawing a realistic-looking face, breaking down complex ideas into simple, manageable actions.
You’ll learn how to establish correct proportions, place features accurately, and bring your subject to life.
- Time needed: 60-90 minutes (for your first complete attempt, less for subsequent practices)
- Difficulty: Beginner
- What you’ll need: Pencil (HB or 2B recommended), eraser, paper, ruler (optional, but helpful for initial guidelines)
Step-by-Step Instructions
Step 1: Establish the Basic Head Shape and Centerline
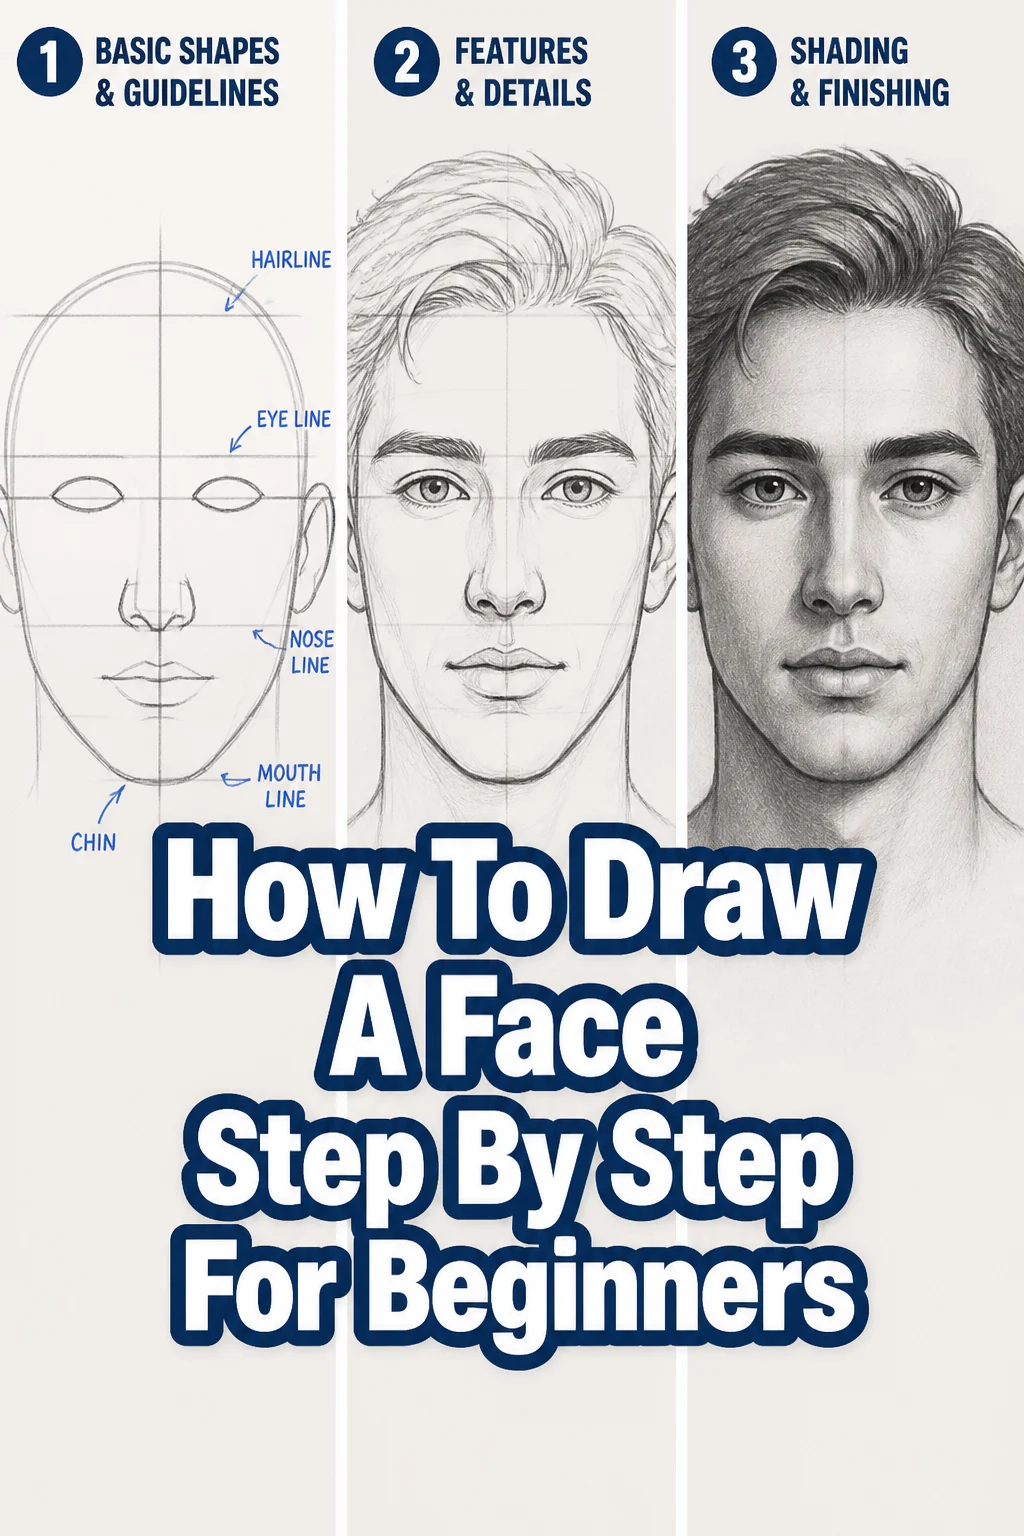
Begin by drawing a light circle in the upper middle of your paper. This circle will represent the top part of the skull.
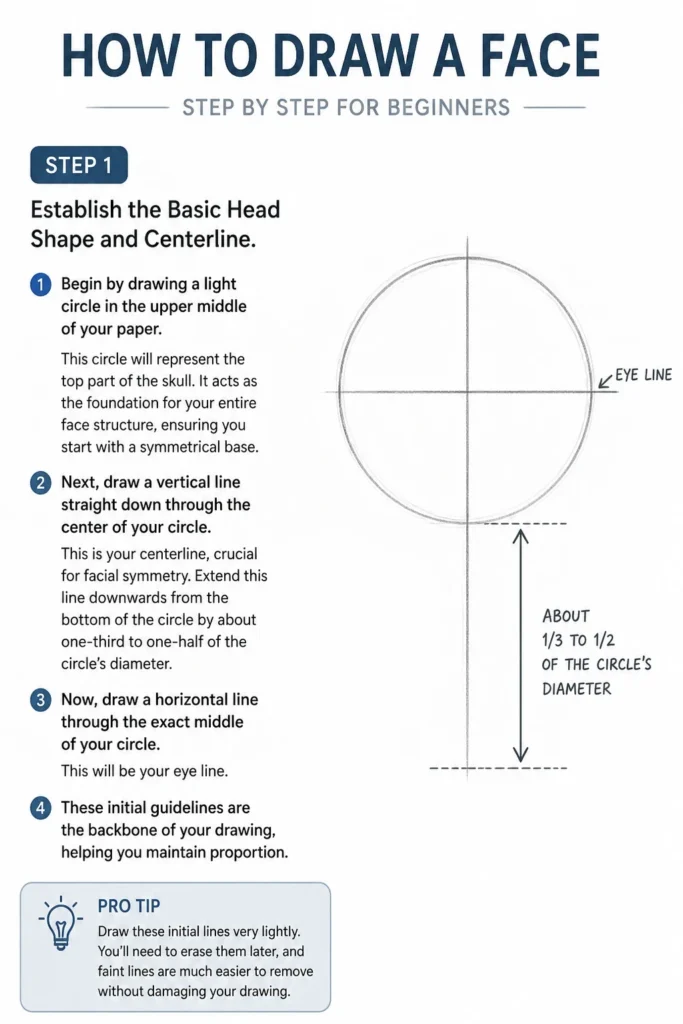
It acts as the foundation for your entire face structure, ensuring you start with a symmetrical base.
Next, draw a vertical line straight down through the center of your circle. This is your centerline, crucial for facial symmetry.
Extend this line downwards from the bottom of the circle by about one-third to one-half of the circle’s diameter.
Now, draw a horizontal line through the exact middle of your circle. This will be your eye line.
These initial guidelines are the backbone of your drawing, helping you maintain proportion.
Pro Tip: Draw these initial lines very lightly. You’ll need to erase them later, and faint lines are much easier to remove without damaging your paper. Use a light hand and focus on accuracy.
Step 2: Define the Jawline and Chin
From the ends of your eye line (the horizontal line within the circle), draw two slightly curved lines extending downwards and inwards.
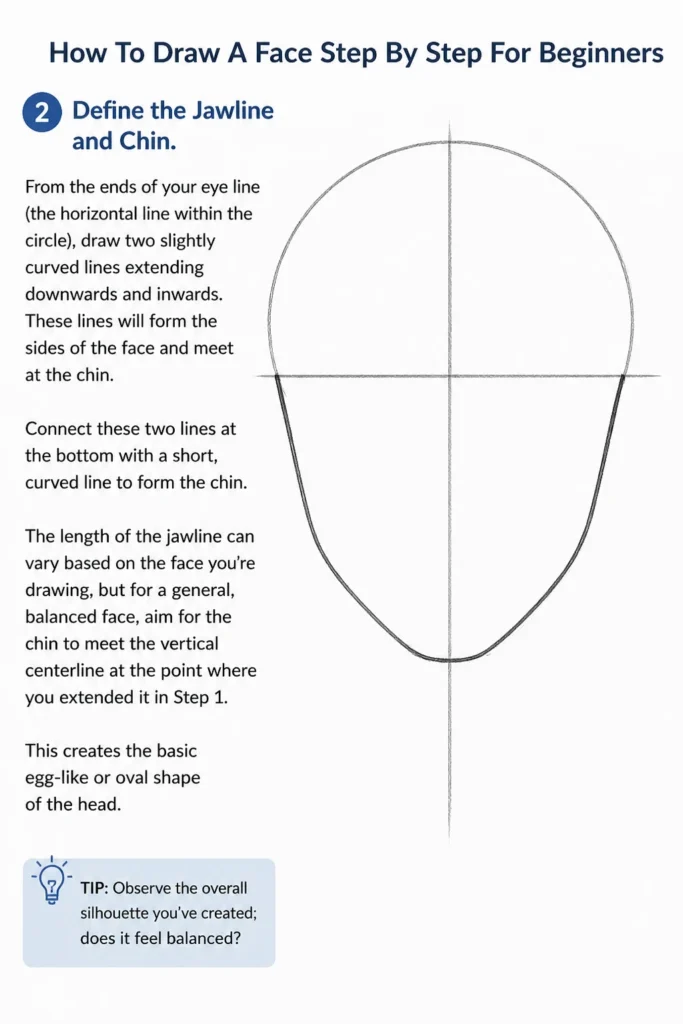
These lines will form the sides of the face and meet at the chin.
Connect these two lines at the bottom with a short, curved line to form the chin.
The length of the jawline can vary based on the face you’re drawing, but for a general, balanced face, aim for the chin to meet the vertical centerline at the point where you extended it in Step 1.
This creates the basic egg-like or oval shape of the head.
Observe the overall silhouette you’ve created; does it feel balanced?
Step 3: Mark the Key Feature Guidelines
You already have the eye line. Now, let’s add lines for the nose and mouth.
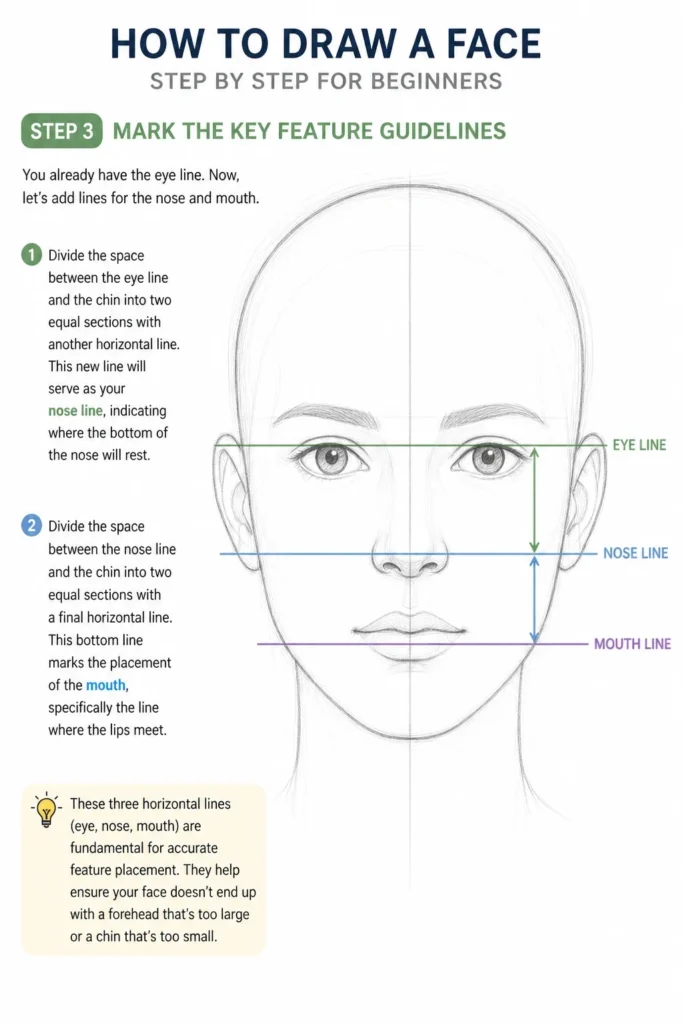
Divide the space between the eye line and the chin into two equal sections with another horizontal line.
This new line will serve as your nose line, indicating where the bottom of the nose will rest.
Next, divide the space between the nose line and the chin into two equal sections with a final horizontal line.
This bottom line marks the placement of the mouth, specifically the line where the lips meet.
These three horizontal lines (eye, nose, mouth) are fundamental for accurate feature placement.
They help ensure your face doesn’t end up with a forehead that’s too large or a chin that’s too small.
Step 4: Place the Eyes and Eyebrows
The eyes are often considered the most expressive part of the face, so their placement is key.
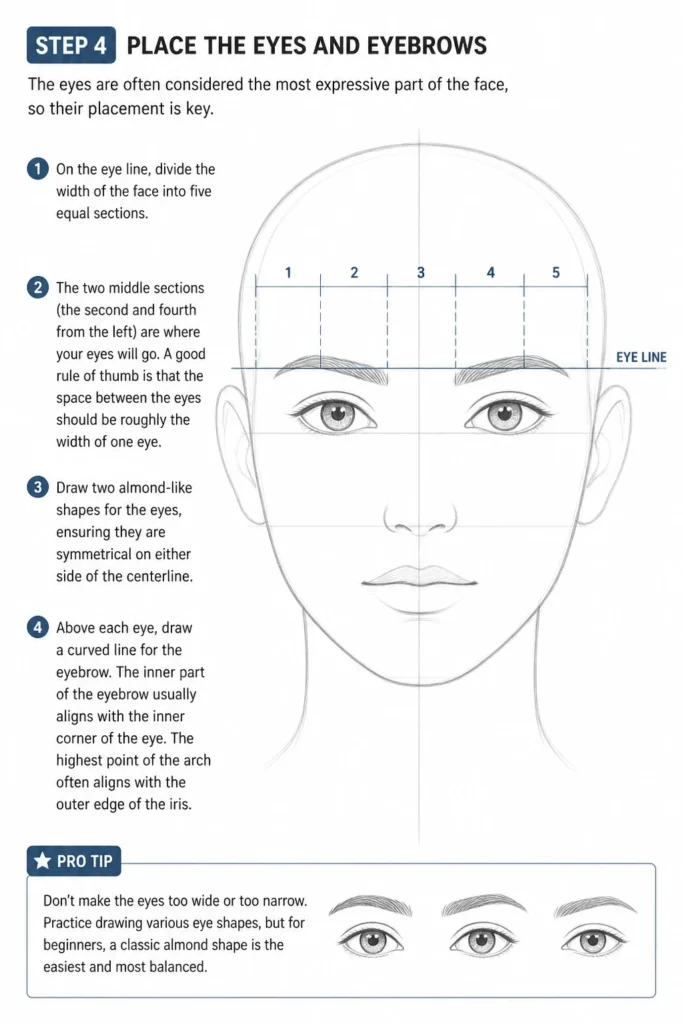
On the eye line, divide the width of the face into five equal sections.
The two middle sections (the second and fourth from the left) are where your eyes will go.
A good rule of thumb is that the space between the eyes should be roughly the width of one eye.
Draw two almond-like shapes for the eyes, ensuring they are symmetrical on either side of the centerline.
Above each eye, draw a curved line for the eyebrow. The inner part of the eyebrow usually aligns with the inner corner of the eye.
The highest point of the arch often aligns with the outer edge of the iris.
Pro Tip: Don’t make the eyes too wide or too narrow. Practice drawing various eye shapes, but for beginners, a classic almond shape is a great starting point. Remember that the top eyelid covers a small part of the iris.
Step 5: Sketch the Nose
The nose sits between the eye line and the nose line you established earlier.
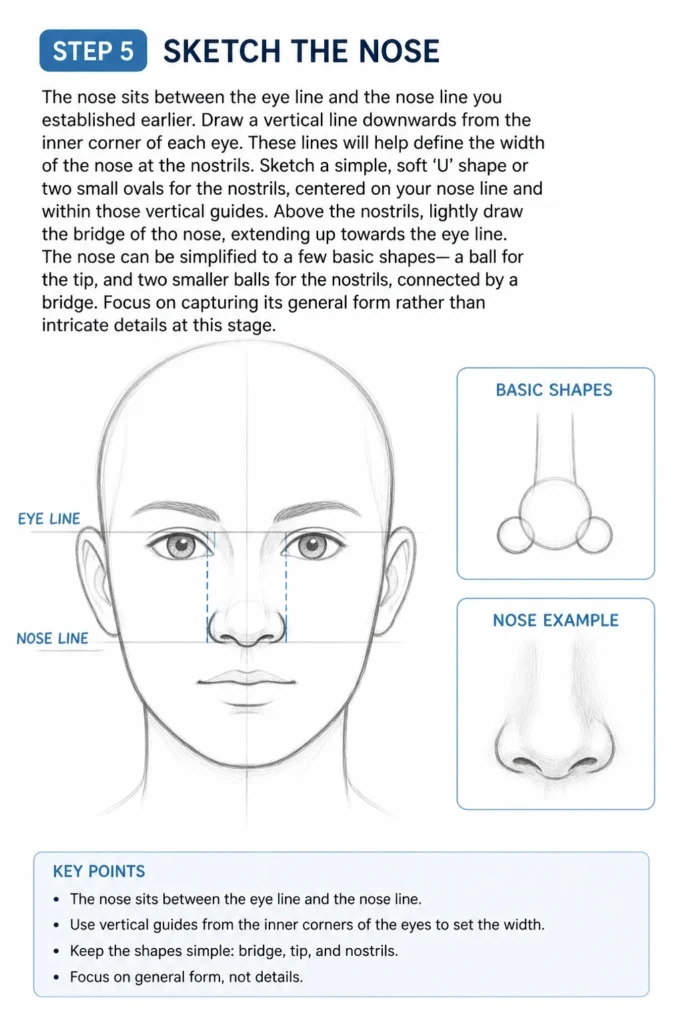
Draw a vertical line downwards from the inner corner of each eye. These lines will help define the width of the nose at the nostrils.
Sketch a simple, soft ‘U’ shape or two small ovals for the nostrils, centered on your nose line and within those vertical guides.
Above the nostrils, lightly draw the bridge of the nose, extending up towards the eye line.
The nose can be simplified to a few basic shapes: a ball for the tip, and two smaller balls for the nostrils, connected by a bridge.
Focus on capturing its general form rather than intricate details at this stage.
Step 6: Draw the Mouth and Lips
The mouth line you drew earlier is where the lips meet.
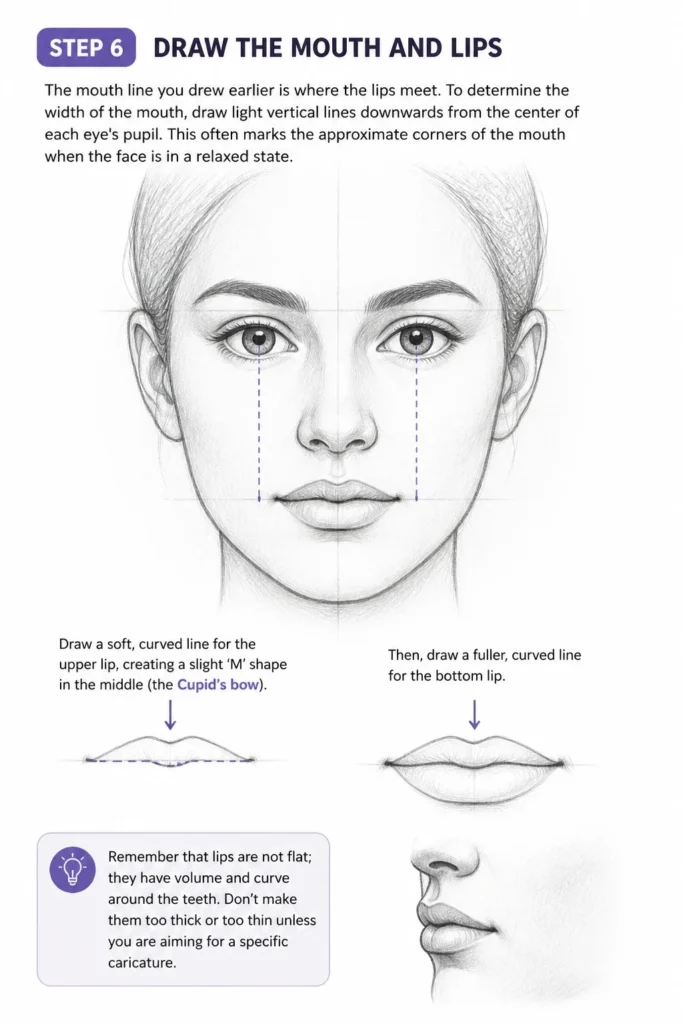
To determine the width of the mouth, draw light vertical lines downwards from the center of each eye’s pupil.
This often marks the approximate corners of the mouth when the face is in a relaxed state.
Draw a soft, curved line for the upper lip, creating a slight ‘M’ shape in the middle (the Cupid’s bow).
Then, draw a fuller, curved line for the bottom lip.
Remember that lips are not flat; they have volume and curve around the teeth.
Don’t make them too thick or too thin unless you are aiming for a specific caricature.
Step 7: Add the Ears, Hairline, and Neck
Ears are often overlooked but are vital for a complete face drawing.
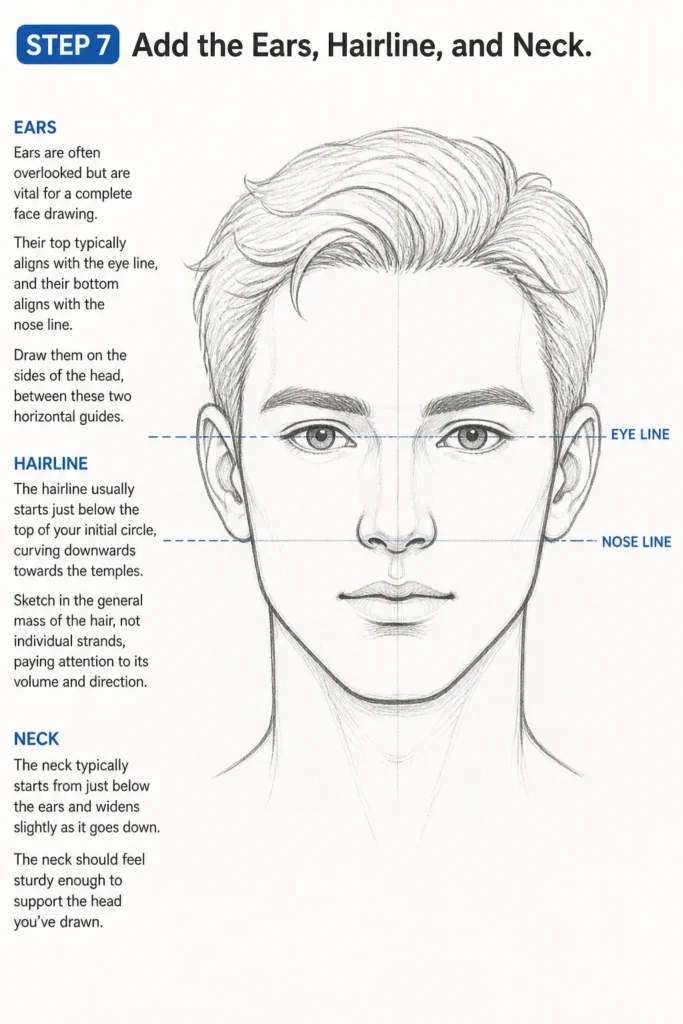
Their top typically aligns with the eye line, and their bottom aligns with the nose line.
Draw them on the sides of the head, between these two horizontal guides.
For the hairline, observe where the initial circle meets the forehead.
The hairline usually starts just below the top of your initial circle, curving downwards towards the temples.
Sketch in the general mass of the hair, not individual strands, paying attention to its volume and direction.
Finally, draw the neck. It typically starts from just below the ears and widens slightly as it goes down.
The neck should feel sturdy enough to support the head you’ve drawn.
Step 8: Refine Details, Erase Guidelines, and Add Shading
Now that all the features are placed, it’s time to refine.
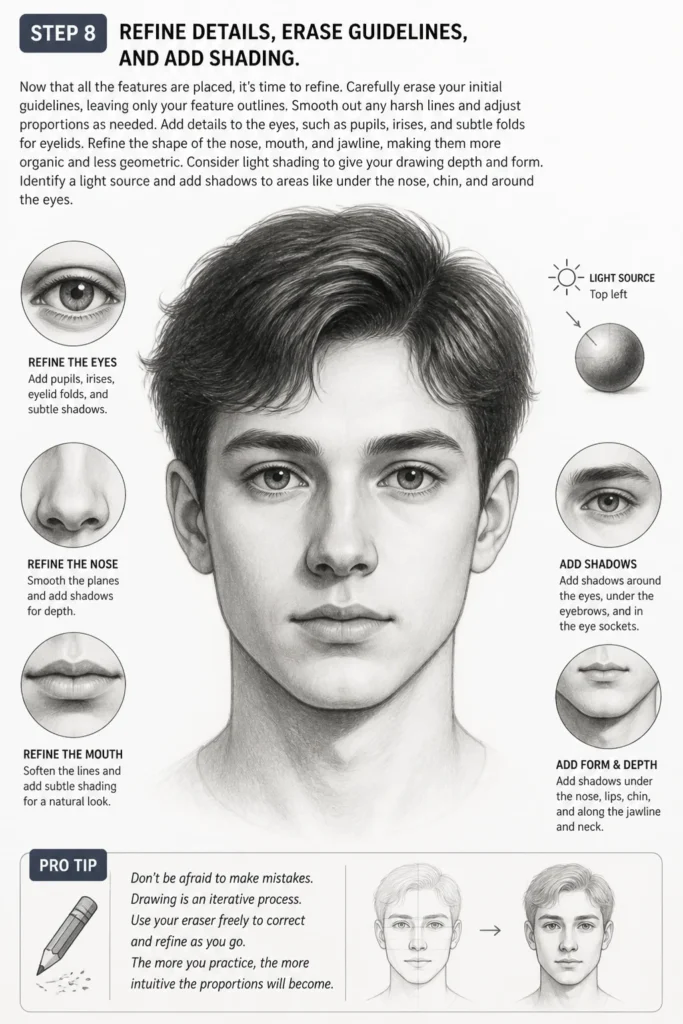
Carefully erase your initial guidelines, leaving only your feature outlines.
Smooth out any harsh lines and adjust proportions as needed.
Add details to the eyes, such as pupils, irises, and subtle folds for eyelids.
Refine the shape of the nose, mouth, and jawline, making them more organic and less geometric.
Consider light shading to give your drawing depth and form.
Identify a light source and add shadows to areas like under the nose, chin, and around the eyes.
Pro Tip: Don’t be afraid to make mistakes. Drawing is an iterative process. Use your eraser freely to correct and refine as you go. The more you practice, the more intuitive the proportions will become.
Common Mistakes to Avoid
Incorrect Proportions
A very common pitfall for beginners is drawing features that are too big or too small for the face. Eyes might be too far apart, or the nose might be too long.
Always double-check your initial guidelines. Use the “rule of thirds” for the face and the “five-eye-width” rule for the eyes. Consistent practice with these guides helps train your eye.
Lack of Symmetry
Faces are generally symmetrical, but beginners often struggle to make both sides of a face match. One eye might be higher than the other, or one side of the jaw might be wider.
Use your vertical centerline diligently. Continuously compare the left and right sides of your drawing. Flipping your paper upside down or holding it up to a mirror can also reveal imbalances you might not notice otherwise.
Drawing Features in Isolation
Beginners sometimes draw each feature perfectly but fail to make them work together harmoniously. The eyes, nose, and mouth might look good individually but don’t feel like they belong on the same face.
Always start with the overall head shape and main guidelines. Place all features lightly before detailing any single one. This ensures that the features relate to each other within the context of the whole face.
Over-detailing Too Early
It’s tempting to jump straight to drawing individual eyelashes or perfect teeth. However, focusing on small details before the main structure is solid can lead to a messy, disproportionate drawing.
Build your drawing from general shapes to specific details. Establish the head, then the main feature placements, then the basic shapes of those features, and only then add the finer details. This layered approach creates a stronger foundation.
Troubleshooting
My Face Looks Flat or Lifeless
If your drawing lacks depth, it might be due to a lack of form and dimension. Faces are not flat; they are three-dimensional objects.
Think about the skull underneath and how light interacts with curved surfaces. Use subtle shading to indicate the roundness of the forehead, cheeks, and chin. Consider light and shadow to give your drawing volume.
Features Don’t Align Correctly
If your eyes are too high or your mouth is too low, it’s almost certainly an issue with your initial guidelines.
Go back to the very first steps. Re-measure and redraw your horizontal eye, nose, and mouth lines. Ensure they accurately divide the face into balanced sections. Don’t be afraid to erase and restart your guidelines if they’re off.
My Drawing Looks Stiff or Unnatural
A stiff drawing often happens when you focus too much on straight lines and perfect symmetry, or when you press too hard with your pencil.
Remember that faces have soft curves and subtle variations. Use lighter, more flowing lines, especially for initial sketches. Embrace slight imperfections, as true faces are rarely perfectly symmetrical. Practice drawing from life or photos to capture natural expressions.
Key Takeaways
- Always start with basic shapes and light guidelines to establish proportions.
- Use the eye, nose, and mouth lines as critical markers for feature placement.
- Practice the “five-eye-width” rule for spacing eyes correctly.
- Build your drawing from general forms to specific details, not the other way around.
- Embrace symmetry but allow for natural, subtle variations.
- Shading adds depth and makes your face look three-dimensional.
Frequently Asked Questions
How can I make my faces look more realistic?
Realism comes from accurate proportions, subtle shading, and careful observation. Study real faces—from photos or life—to understand bone structure, muscle contours, and how light falls on different planes. Pay attention to the nuances of individual features and expressions.
What’s the best pencil to use for drawing faces?
For initial sketching and guidelines, an HB or 2H pencil is ideal as it’s lighter and easier to erase. For darker lines, shading, and details, a 2B or 4B pencil offers richer tones. Experiment to find what you prefer.
How do I draw different facial expressions?
Expressions largely depend on how the eyebrows, eyes, and mouth are positioned and shaped. Slight changes in the arch of an eyebrow, the curve of a lip, or the tension around the eyes can dramatically alter an expression. Practice drawing various emotions by observing people or looking at reference images.
Should I draw hair strand by strand?
For beginners, it’s best to draw hair as a mass or a shape first, rather than individual strands. Focus on the overall volume, flow, and direction of the hair. Once the main shape is established, you can add a few strategic strands to suggest texture and movement, but avoid drawing every single hair.
Our Top Recommended Finds
- Sketchbook with smooth paper: Provides a pleasant surface for your pencil and allows for easy erasing.
- Set of drawing pencils (various hardness): Offers versatility for light sketching, darker lines, and shading.
- Kneaded eraser: Excellent for lifting graphite gently without smudging and for creating highlights.
Your Journey into Portrait Drawing Begins Now
You’ve now got a solid foundation for drawing faces. This guide provides the structure, but your unique artistic voice will emerge with practice.
Don’t be afraid to experiment, to make mistakes, and to draw faces that don’t look perfect the first few times.
Pick up your pencil today and start sketching. The more you draw, the more confident and skilled you’ll become.