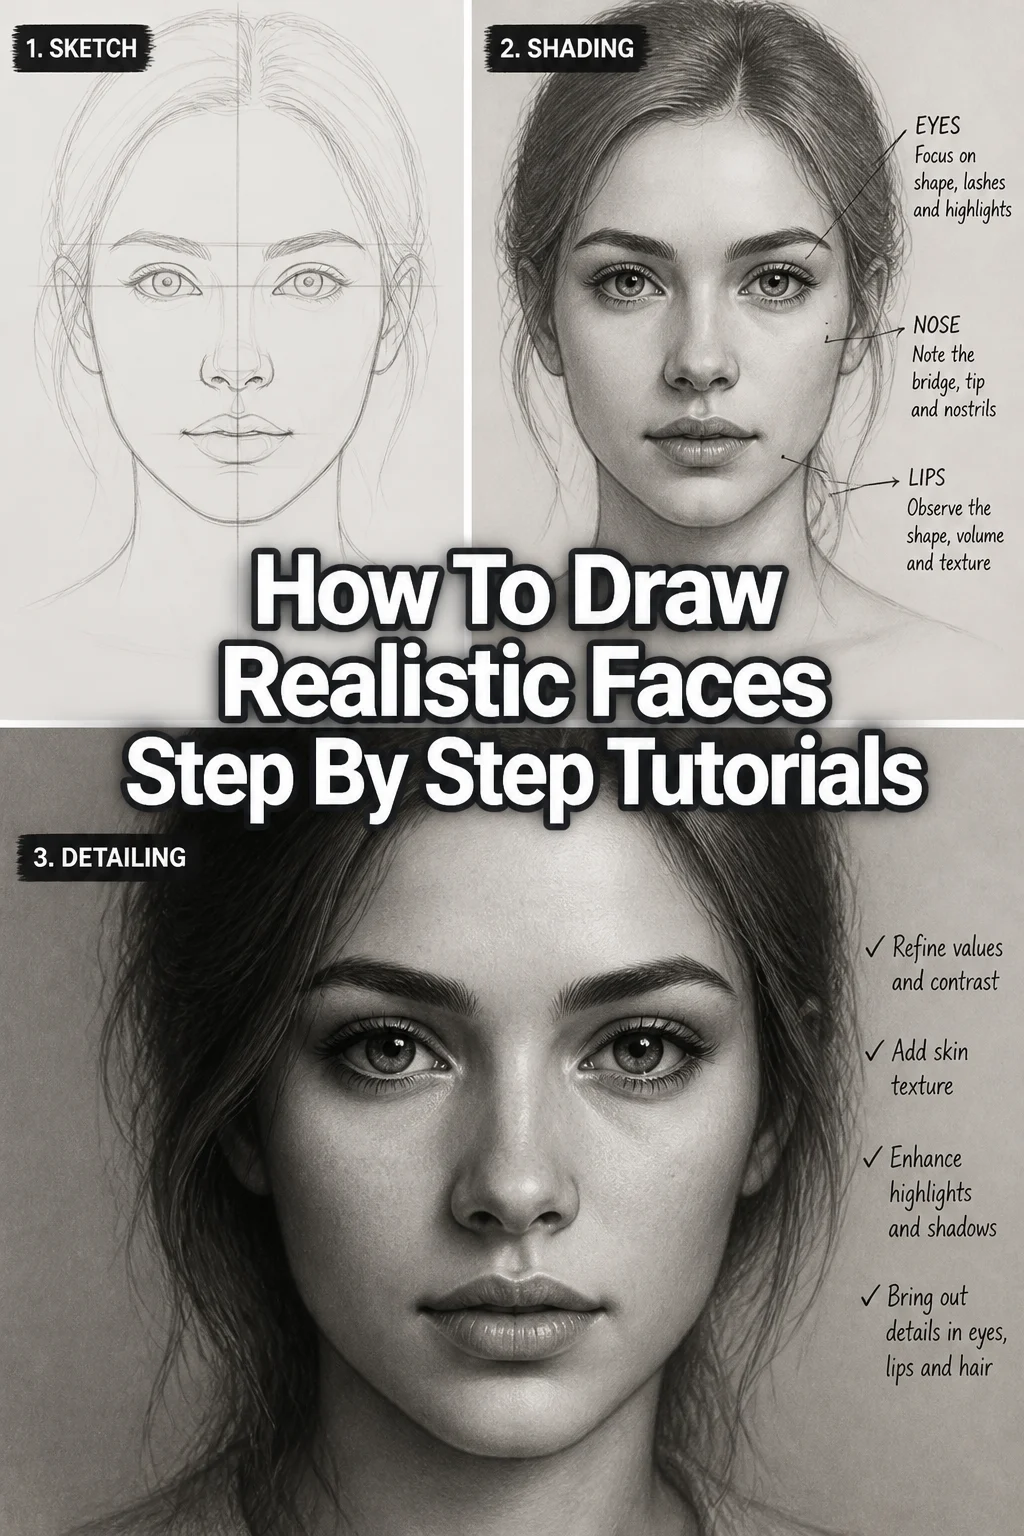
How To Draw Realistic Faces Step By Step Tutorials
Learning to draw realistic faces can feel daunting at first. Many artists struggle with capturing likeness and depth. I remember my early attempts, often ending in frustration with disproportionate features.
This guide shares the techniques I’ve refined over years of practice. You’ll discover a clear path to creating lifelike portraits. Trust these methods to improve your drawing skills significantly.
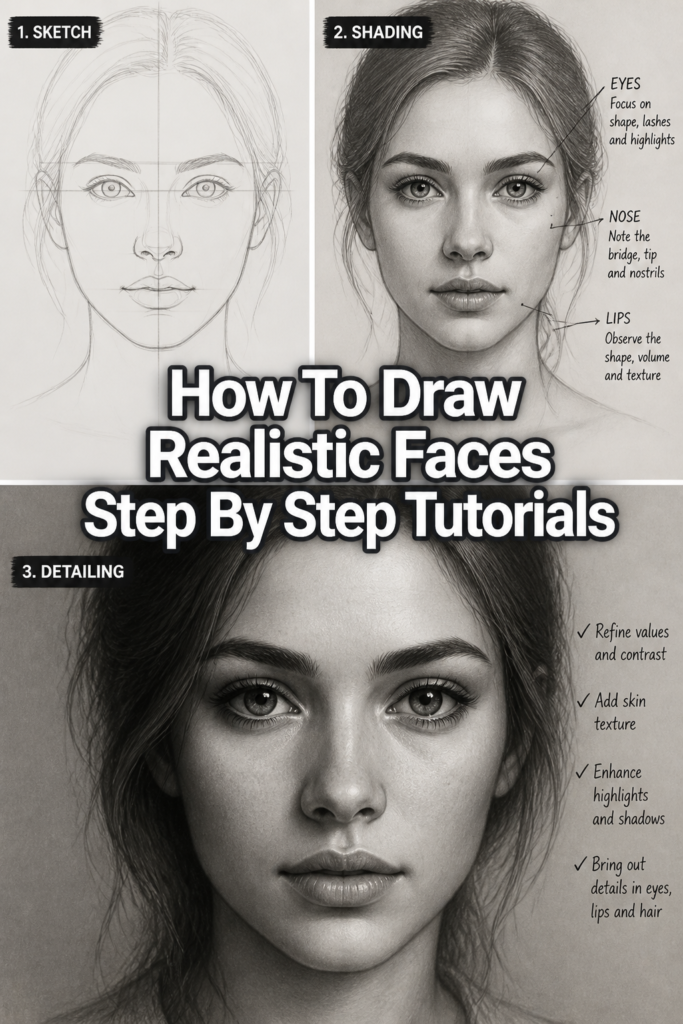
Quick Overview
This guide will walk you through the essential stages of drawing a realistic face. You’ll learn how to build structure, define features, and add dimension. By the end, you’ll have a solid understanding of portrait drawing fundamentals.
- Time needed: 2-4 hours (can be broken into multiple sessions)
- Difficulty: Intermediate (Beginners can follow along but may need more practice)
- What you’ll need: Sketchbook or drawing paper, various graphite pencils (HB, 2B, 4B, 6B), kneaded eraser, sharpener, blending stump or tissue
Step-by-Step Instructions
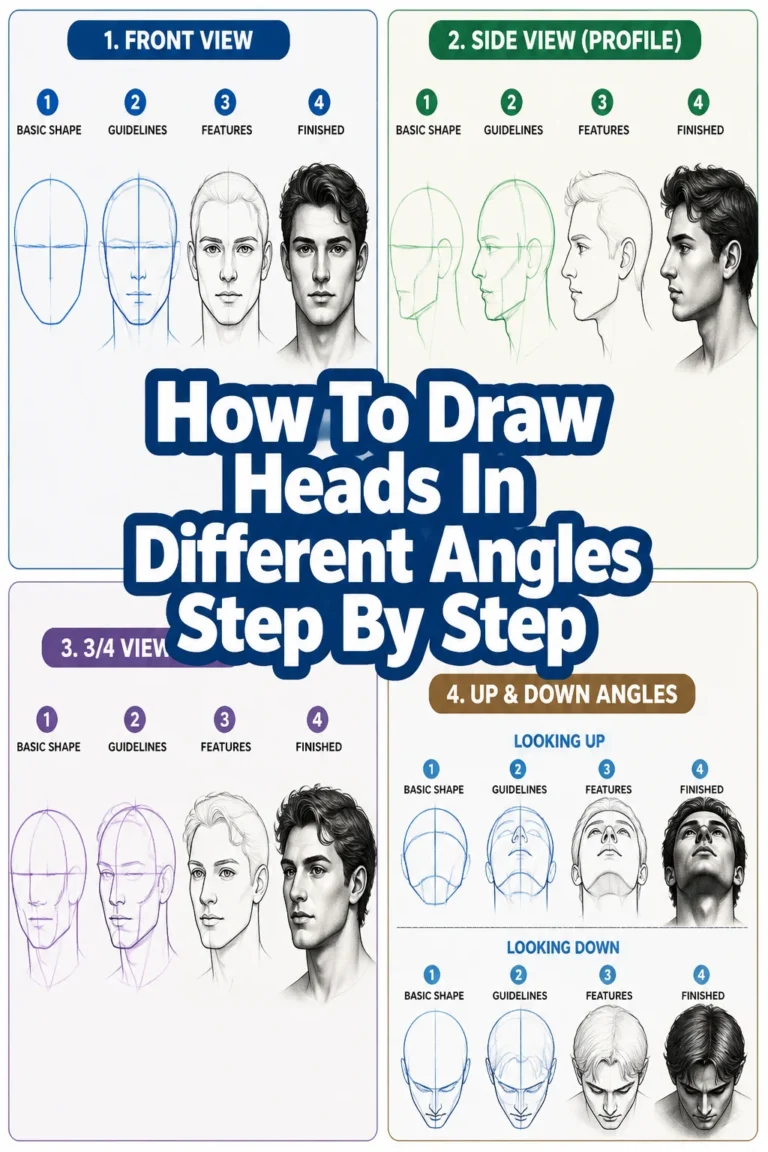
Step 1: Understand Basic Proportions and the Loomis Method
Start by sketching a simple circle for the cranium. This initial shape establishes the head’s overall size and angle. It’s the foundation for everything that follows.
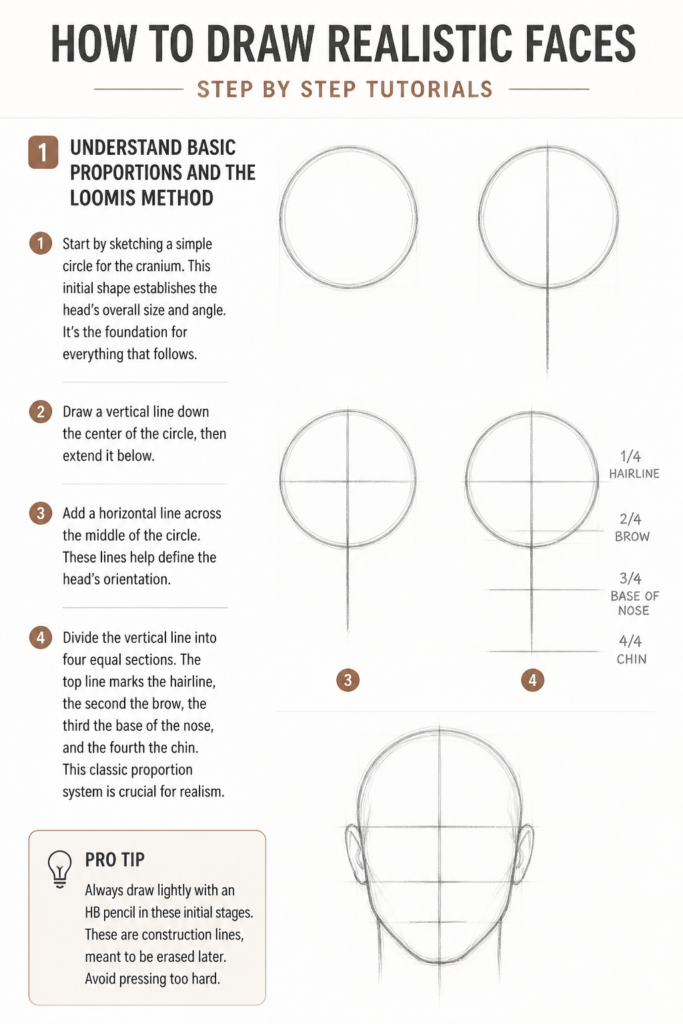
Draw a vertical line down the center of the circle, then extend it below. Add a horizontal line across the middle of the circle. These lines help define the head’s orientation.
Divide the vertical line into four equal sections. The top line marks the hairline, the second the brow, the third the base of the nose, and the fourth the chin. This classic proportion system is crucial for realism.
Pro Tip: Always draw lightly with an HB pencil in these initial stages. These are construction lines, meant to be erased later. Avoid pressing too hard.
Step 2: Define the Head Shape and Jawline
Sketch the sides of the head, connecting them to the circle. These lines should taper slightly towards the chin. Think about the general oval or egg shape of the human head.
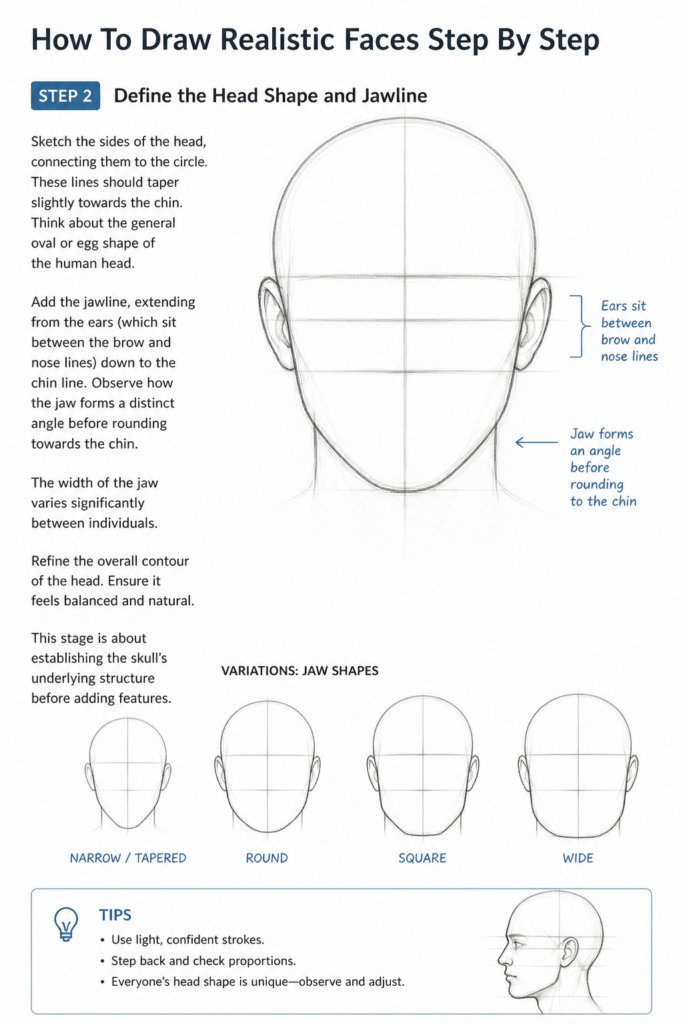
Add the jawline, extending from the ears (which sit between the brow and nose lines) down to the chin line. Observe how the jaw forms a distinct angle before rounding towards the chin. The width of the jaw varies significantly between individuals.
Refine the overall contour of the head. Ensure it feels balanced and natural. This stage is about establishing the skull’s underlying structure before adding features.
Step 3: Place the Eyes and Eyebrows
The eyes typically sit on the horizontal line marking the brow. Imagine the face divided into five “eye-widths” across. The eyes themselves occupy the second and fourth sections.
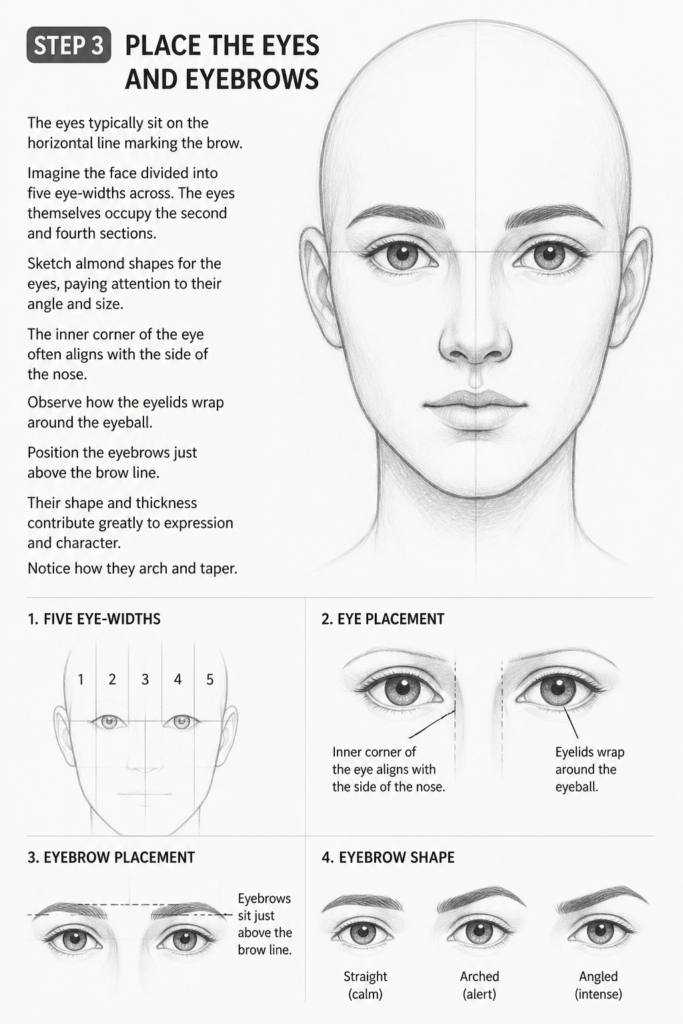
Sketch almond shapes for the eyes, paying attention to their angle and size. The inner corner of the eye often aligns with the side of the nose. Observe how the eyelids wrap around the eyeball.
Position the eyebrows just above the brow line. Their shape and thickness contribute greatly to expression and character. Notice how they arch and taper.
Step 4: Construct the Nose
The base of the nose rests on the third horizontal guideline. Start by sketching a simple sphere for the tip of the nose. This helps give it volume.
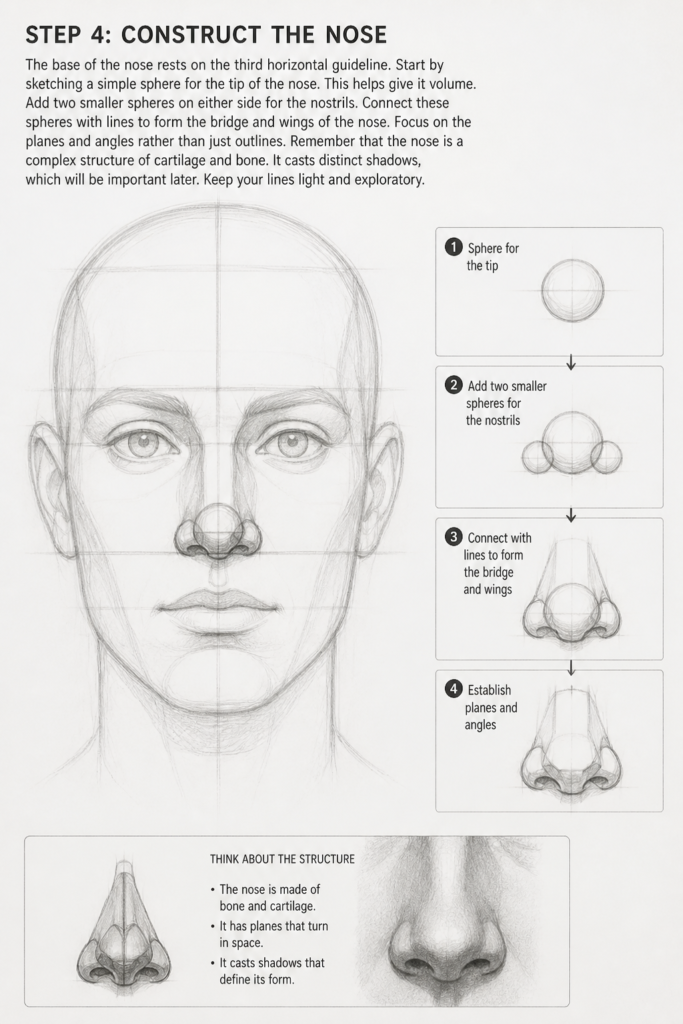
Add two smaller spheres on either side for the nostrils. Connect these spheres with lines to form the bridge and wings of the nose. Focus on the planes and angles rather than just outlines.
Remember that the nose is a complex structure of cartilage and bone. It casts distinct shadows, which will be important later. Keep your lines light and exploratory.
Step 5: Draw the Mouth and Lips
The mouth is positioned roughly halfway between the base of the nose and the chin. A common guide is that the corners of the mouth align with the pupils of the eyes when the face is relaxed.
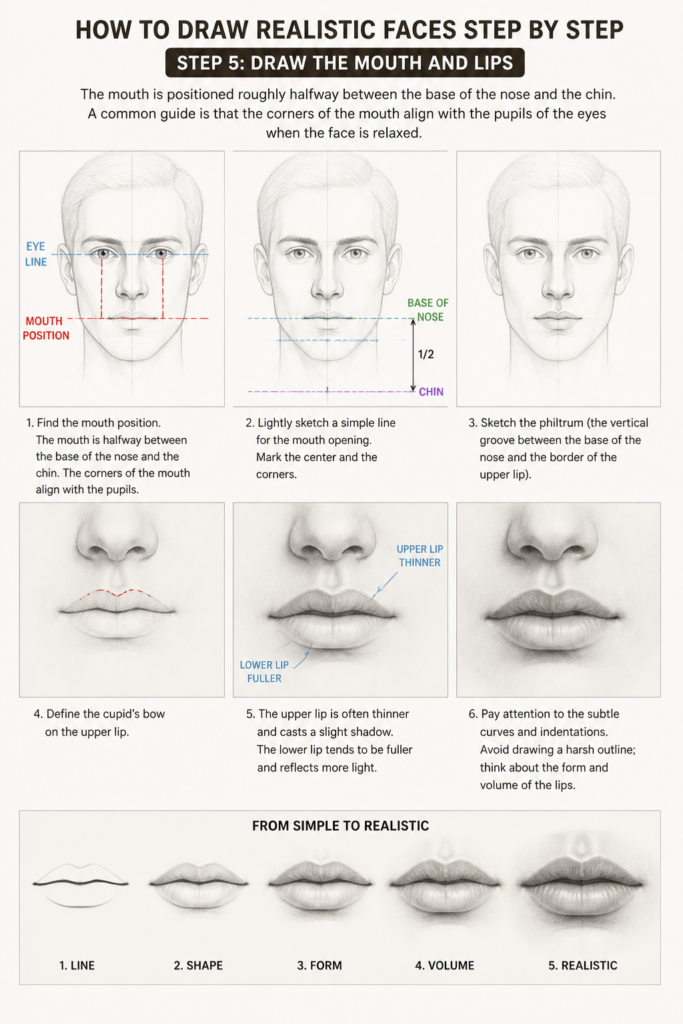
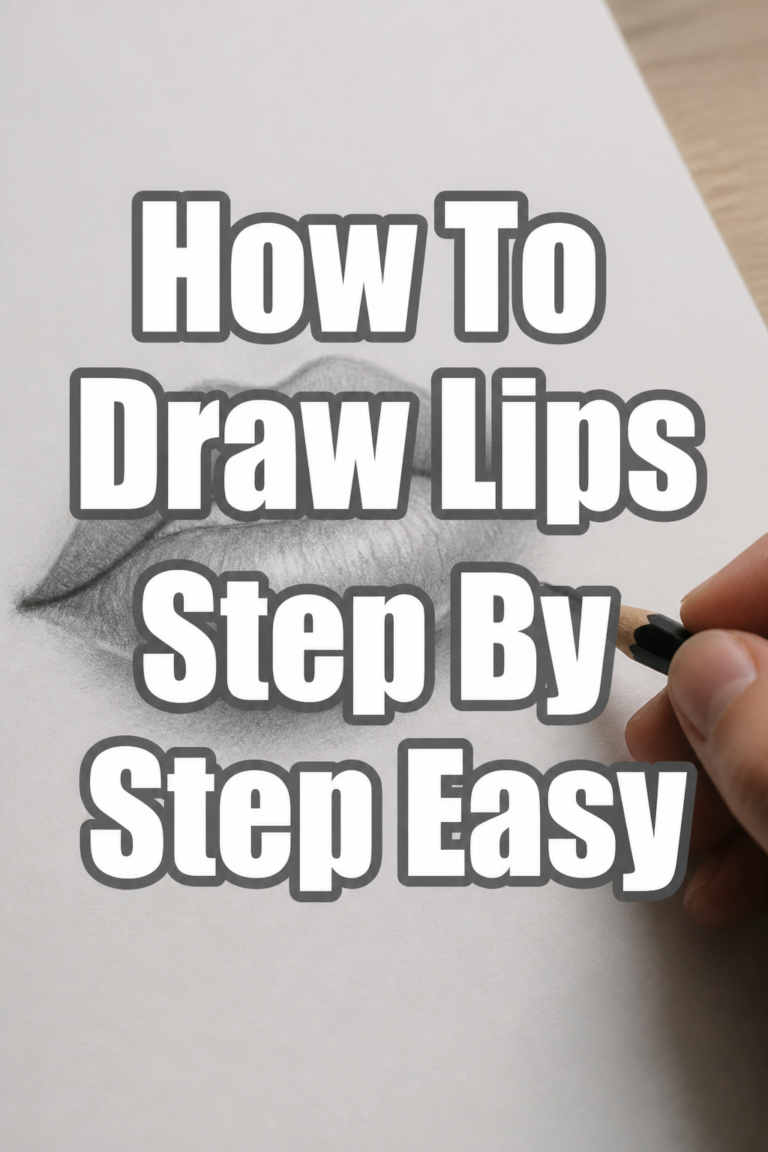
Sketch the philtrum (the vertical groove between the base of the nose and the border of the upper lip). Define the cupid’s bow on the upper lip. The upper lip is often thinner and casts a slight shadow.
The lower lip tends to be fuller and reflects more light. Pay attention to the subtle curves and indentations. Avoid drawing a harsh outline; think about the form and volume of the lips.
Step 6: Place the Ears and Hairline
The ears generally align vertically between the brow line and the base of the nose. Their exact position and size can vary. Draw the outer shape, then add the internal cartilage details.
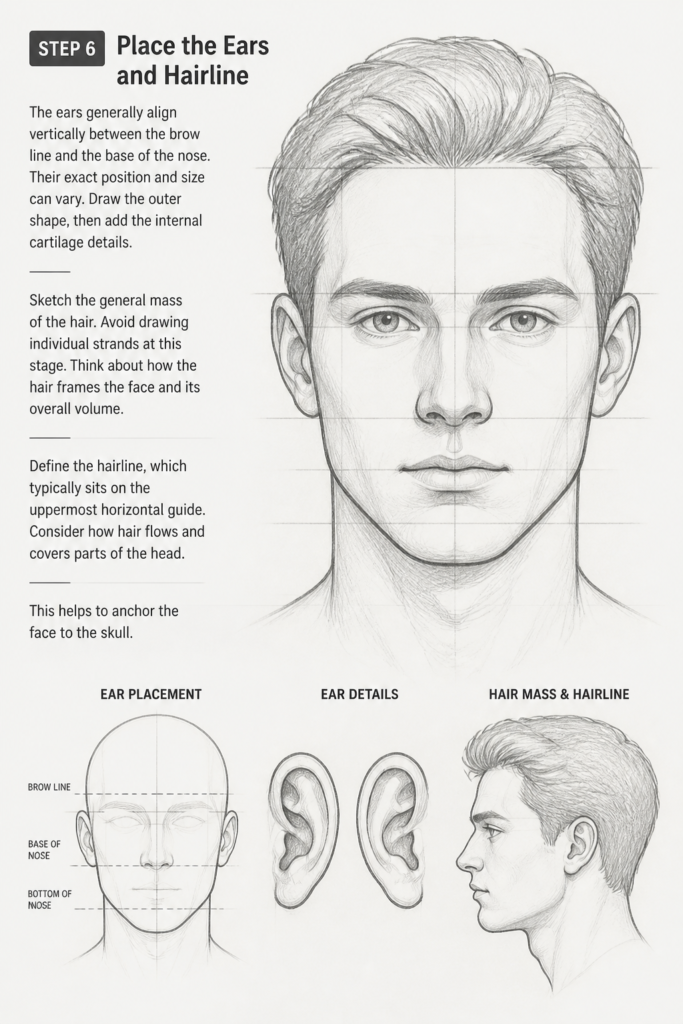
Sketch the general mass of the hair. Avoid drawing individual strands at this stage. Think about how the hair frames the face and its overall volume.
Define the hairline, which typically sits on the uppermost horizontal guide. Consider how hair flows and covers parts of the head. This helps to anchor the face to the skull.
Step 7: Refine Features and Begin Shading
Now, erase your initial construction lines. Use a kneaded eraser to lift away pencil marks gently. Start refining the contours of the face and features.
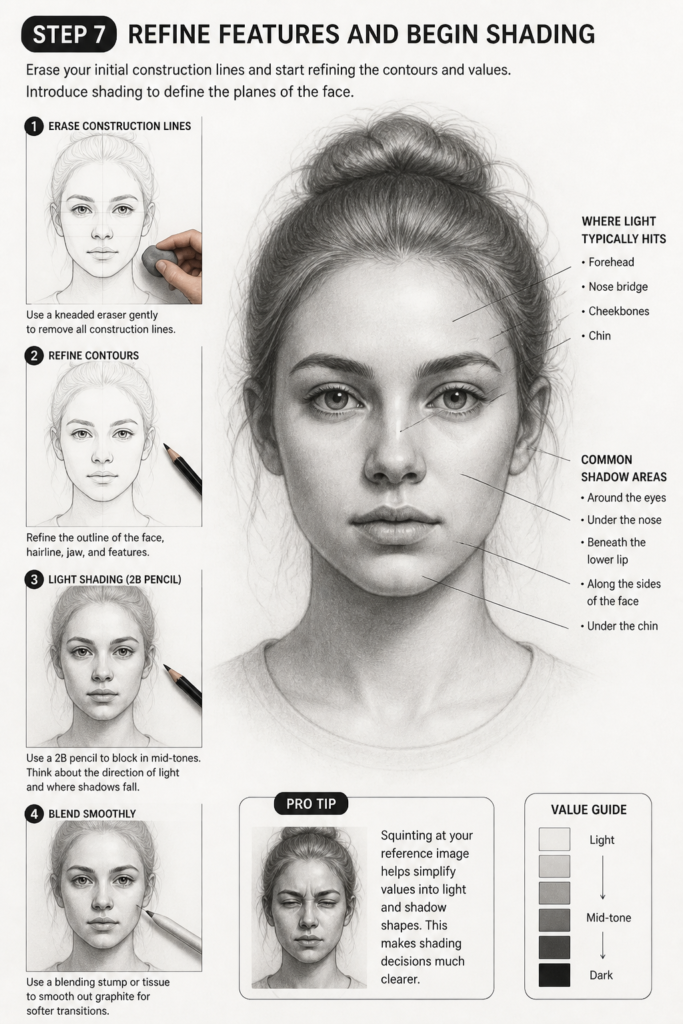
Introduce light shading to define the planes of the face. Use a 2B pencil for mid-tones. Think about where light hits the face and where shadows naturally fall. The forehead, nose bridge, and cheekbones often catch light.
Shade the areas around the eyes, under the nose, and beneath the lower lip. These are common shadow areas. Use a blending stump or tissue to smooth out graphite for a softer transition.
Pro Tip: Squinting at your reference image helps simplify values into light and shadow shapes. This makes shading decisions much clearer.
Step 8: Add Details, Texture, and Deeper Shadows
With a 4B or 6B pencil, gradually build up darker values in the deepest shadow areas. This adds depth and dimension. Think about the shadows cast by the eyelids, the underside of the nose, and the neck.
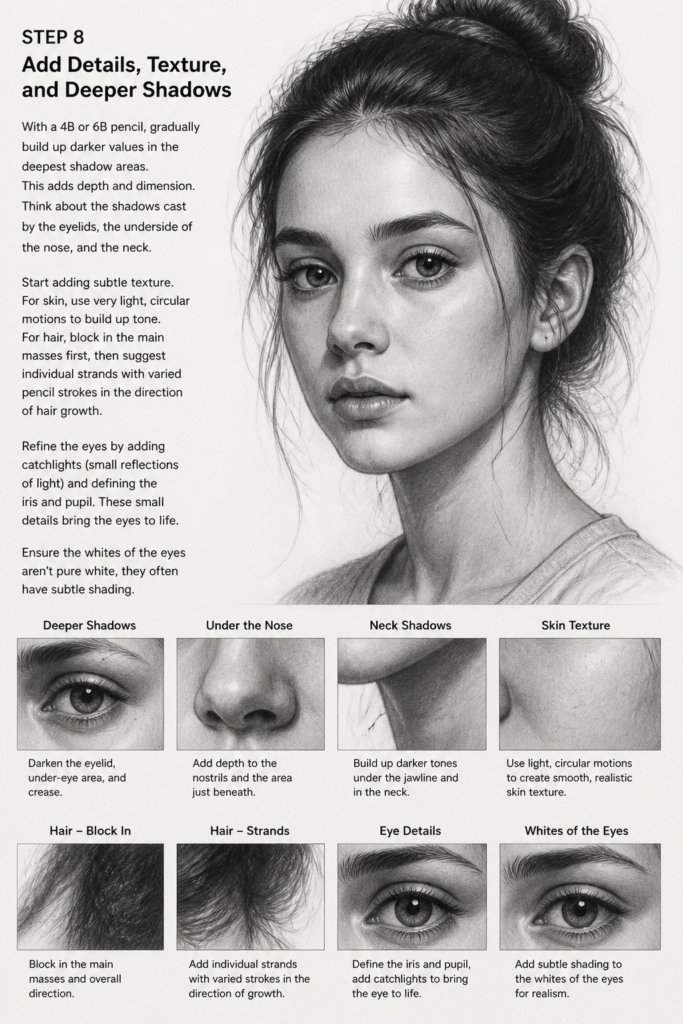
Start adding subtle texture. For skin, use very light, circular motions to build up tone. For hair, block in the main masses first, then suggest individual strands with varied pencil strokes in the direction of hair growth.
Refine the eyes by adding catchlights (small reflections of light) and defining the iris and pupil. These small details bring the eyes to life. Ensure the whites of the eyes aren’t pure white; they often have subtle shading.
Step 9: Review and Final Touches
Step back from your drawing and view it from a distance. This helps you spot inconsistencies in proportions or values. Use a mirror to see your drawing in reverse; it often reveals flaws.
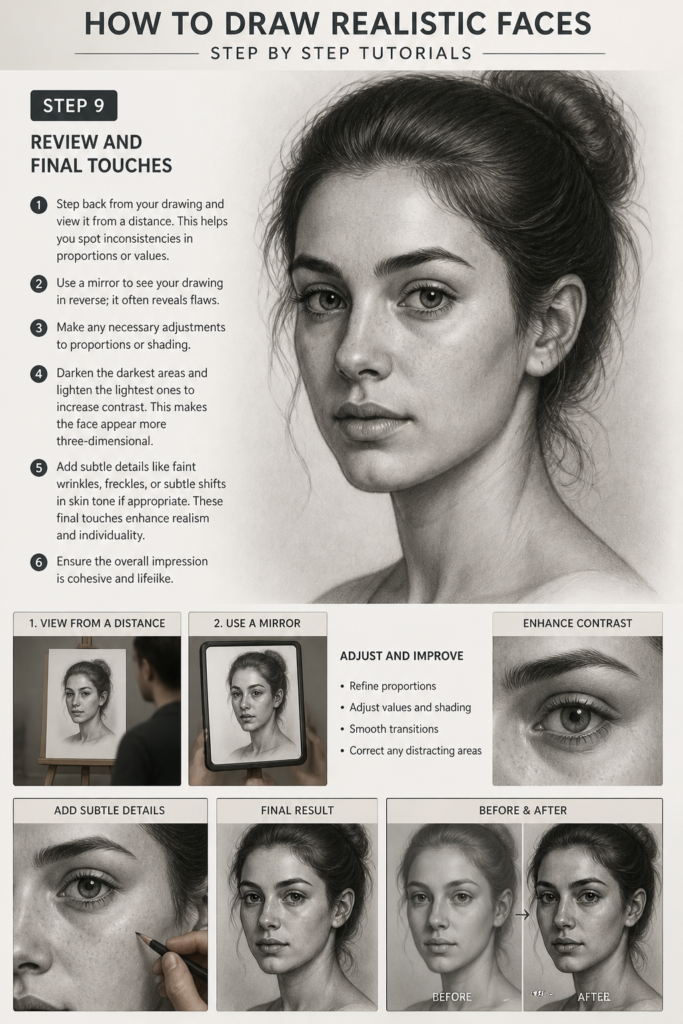
Make any necessary adjustments to proportions or shading. Darken the darkest areas and lighten the lightest ones to increase contrast. This makes the face appear more three-dimensional.
Add subtle details like faint wrinkles, freckles, or subtle shifts in skin tone if appropriate. These final touches enhance realism and individuality. Ensure the overall impression is cohesive and lifelike.
Common Mistakes to Avoid
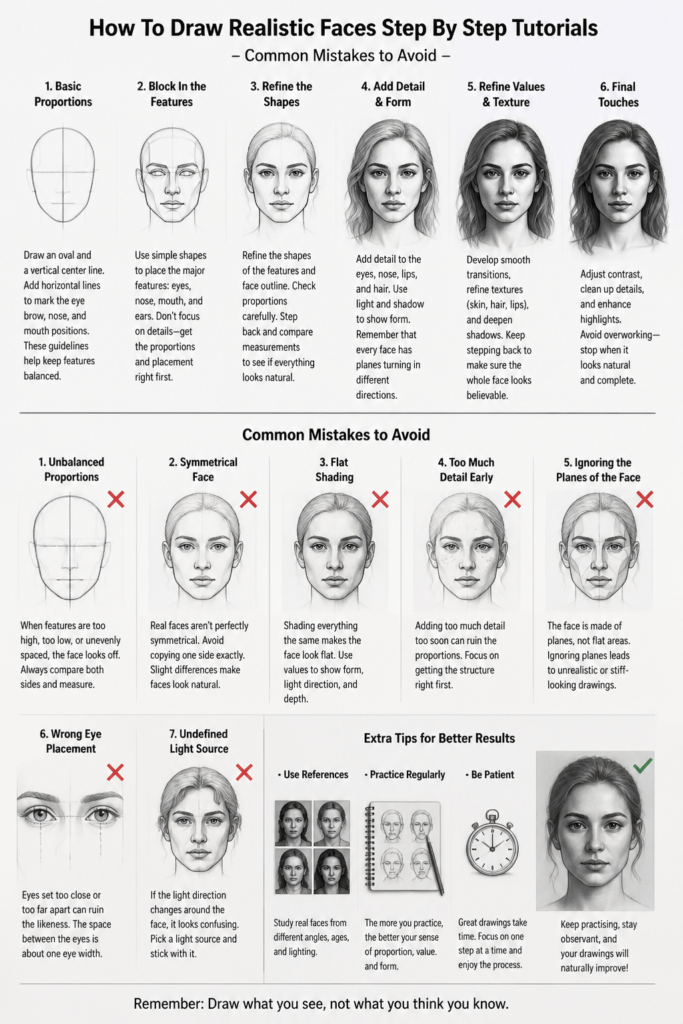
Drawing Symmetrical Faces
Human faces are rarely perfectly symmetrical. Attempting to make both sides identical often results in a rigid, unnatural look. Instead, embrace subtle variations between the left and right sides. Observe how one eye might be slightly larger, or one eyebrow slightly higher. These small differences contribute to a person’s unique character and realism.
Ignoring the Skull Structure
Many beginners focus only on surface features like eyes and lips, neglecting the underlying bone structure. The skull provides the foundation for all facial features. Without understanding its planes and curves, features will appear to float unnaturally. Always start with the basic head shape and guidelines to establish this crucial framework.
Drawing Features in Isolation
Each facial feature influences and relates to its neighbors. Drawing an eye perfectly, then moving to a perfect nose, without considering their relationship can lead to a disjointed face. Think about how the eyes connect to the brow bone, how the nose casts shadows on the upper lip, and how the jawline frames the entire face. Work on the face as a whole, refining all features simultaneously.
Over-Reliance on Outlines
Realistic drawing is less about drawing hard outlines and more about rendering form through light and shadow. Relying too heavily on sharp lines makes a drawing look flat and cartoonish. Instead, use varying pencil pressure and blending to create soft edges and gradual transitions between tones. Let shadows define the edges of forms.
Troubleshooting
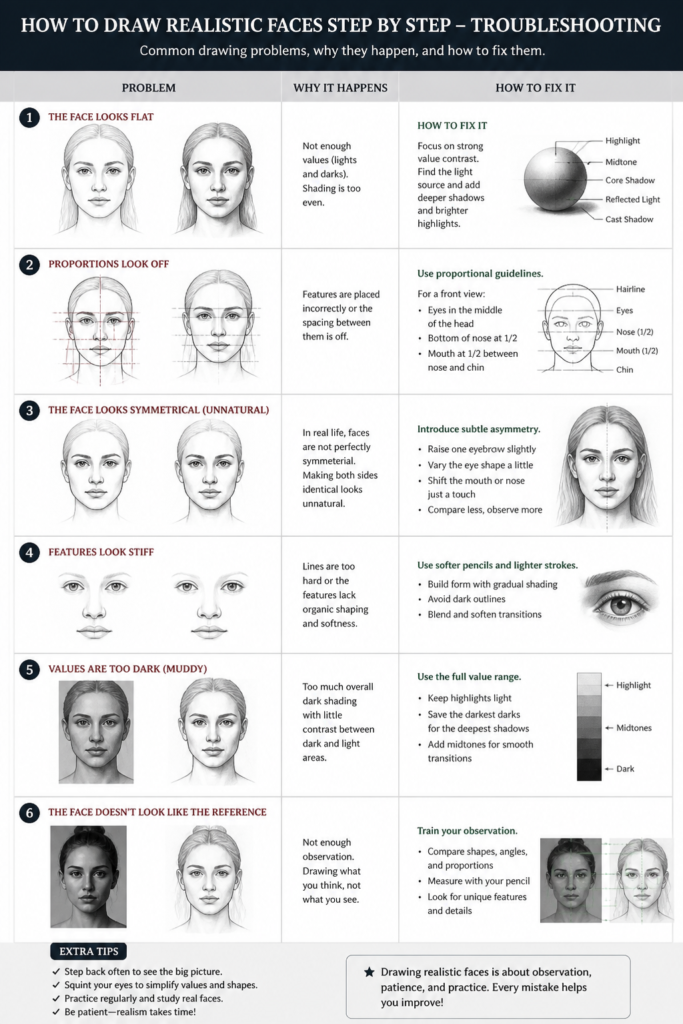
Face Looks Flat and Lacks Depth
If your drawing appears two-dimensional, it’s likely due to insufficient contrast in your shading. You might be using too narrow a range of values.
Push your darkest shadows even darker, using a 4B or 6B pencil. Ensure your highlights are truly light, perhaps by lifting graphite with a kneaded eraser. Adding more distinct light and shadow areas will give the face form and volume.
Features Appear Misaligned or Disproportionate
This often happens when the initial construction lines were not accurate or were ignored too early. Go back to the basic Loomis method and re-establish your guidelines for the brow, nose, and chin.
Measure distances and compare relationships between features. For example, check if the space between the eyes is roughly one eye-width. Don’t be afraid to erase and redraw foundational shapes until they feel correct.
Drawing Looks Stiff or Lifeless
A stiff drawing often results from overly rigid lines and a lack of subtle variations. You might be drawing features too perfectly symmetrical or with too much certainty too early.
Loosen your hand and use lighter, more exploratory strokes in the initial stages. Introduce subtle curves instead of straight lines. Consider the slight asymmetry found in real faces, and allow for natural imperfections that add character and life.
Key Takeaways
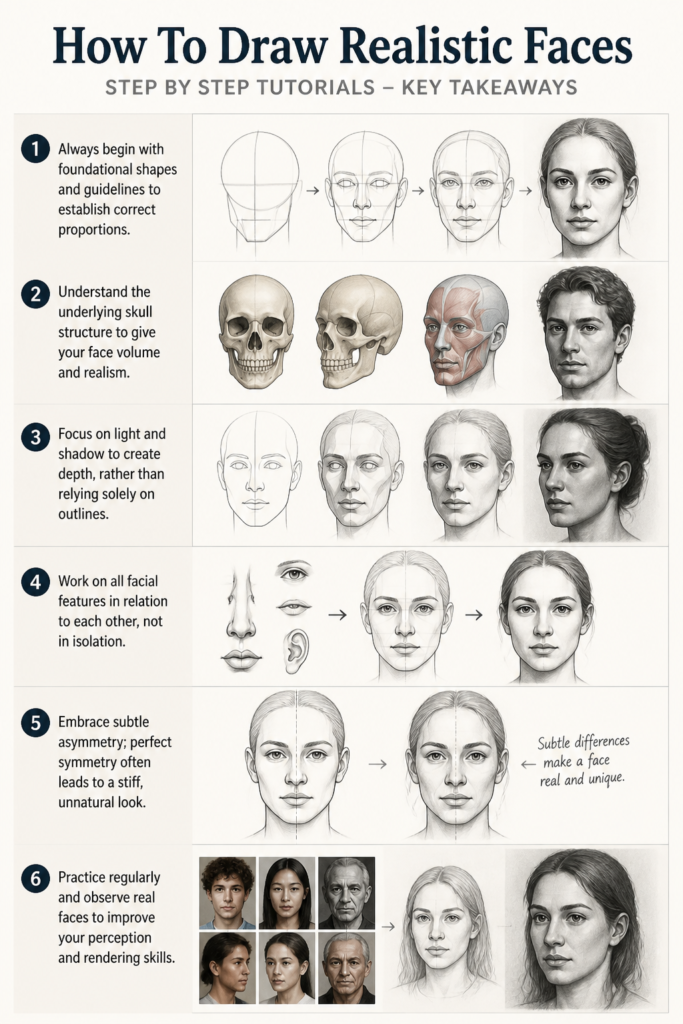
- Always begin with foundational shapes and guidelines to establish correct proportions.
- Understand the underlying skull structure to give your face volume and realism.
- Focus on light and shadow to create depth, rather than relying solely on outlines.
- Work on all facial features in relation to each other, not in isolation.
- Embrace subtle asymmetry; perfect symmetry often leads to a stiff, unnatural look.
- Practice regularly and observe real faces to improve your perception and rendering skills.
Frequently Asked Questions
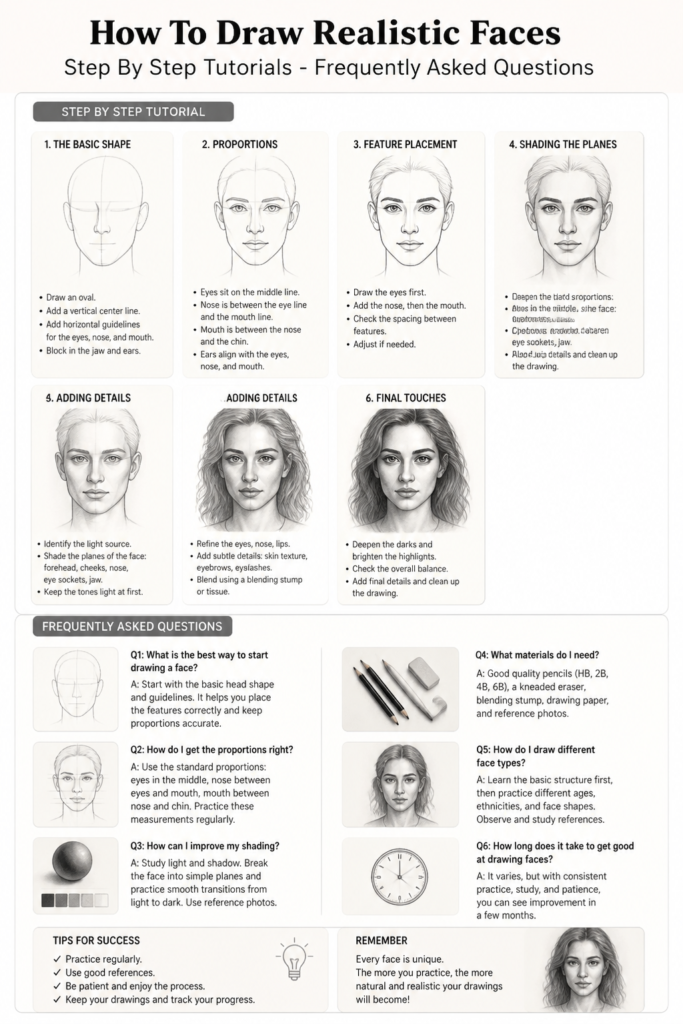
How do I make my drawings look less “cartoony”?
To move beyond a cartoony look, focus on rendering form and volume through shading. Avoid harsh outlines. Pay close attention to subtle shifts in value and texture, and study anatomical references to understand underlying structures. Emphasize realistic proportions and less exaggerated features.
What’s the best way to practice drawing faces?
The best practice involves drawing from life, using reference photos, and studying anatomy. Break down the face into simple shapes first. Focus on one feature at a time, then combine them. Regular sketching and observing people will significantly improve your skills.
How do I draw different ethnicities and ages realistically?
Drawing different ethnicities and ages requires careful observation and understanding of their unique proportional variations and feature characteristics. Study diverse references. Pay attention to bone structure, skin tone variations, hair texture, and how features change with age, such as the prominence of wrinkles or changes in facial fat.
Should I use a grid method for realism?
The grid method can be a helpful tool, especially for beginners or when aiming for high accuracy with a specific reference photo. It helps break down complex images into manageable sections. However, try to eventually move beyond grids to develop your freehand proportional skills, which fosters a deeper understanding of facial structure.
Our Top Recommended Finds
- Graphite Pencil Set (e.g., Faber-Castell, Staedtler): A good set with a range of hardness (HB to 6B) allows for versatile shading and detail.
- Kneaded Eraser: Essential for lifting graphite gently without damaging the paper, perfect for creating highlights and correcting mistakes.
- Blending Stumps or Tortillons: These paper tools help smooth out pencil marks for seamless transitions in your shading.
Your Journey to Lifelike Portraits Begins Now
Drawing realistic faces is a journey of observation, understanding, and consistent practice. You now have the foundational steps and insights to begin. Don’t be discouraged by early attempts; every line you draw builds your skill.
Take these principles and apply them to your sketchbook. Explore different facial expressions, angles, and lighting conditions. Your artistic growth comes from doing. Start your next portrait today.

Excellent. I am a beginner.