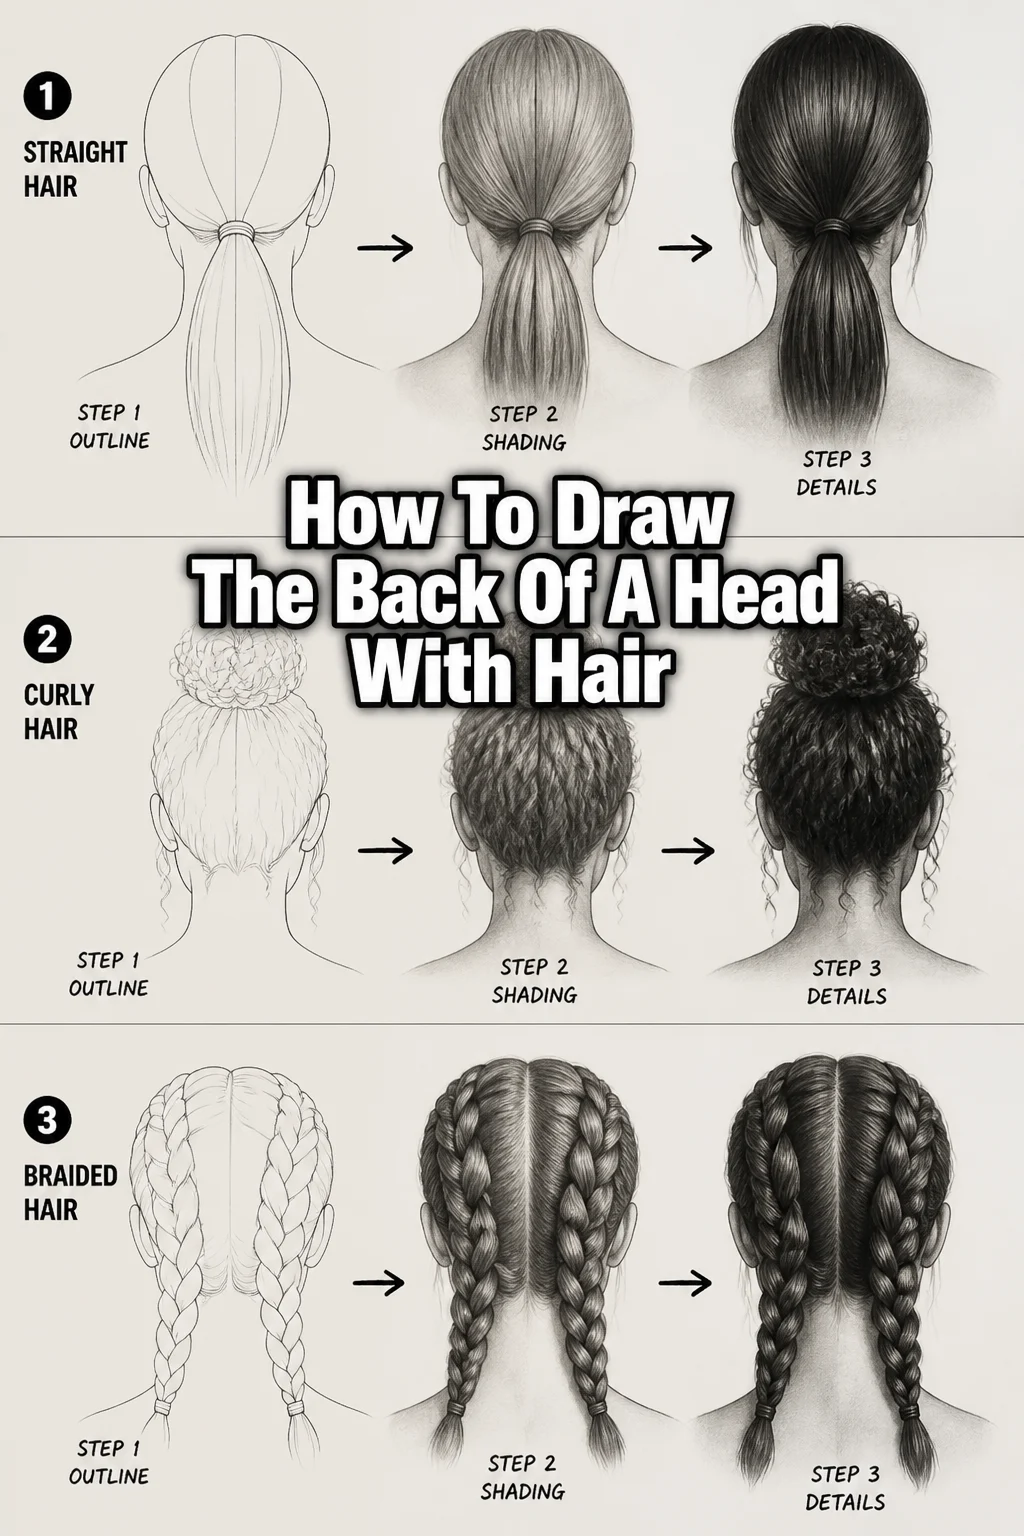
🎨 How To Draw The Back Of A Head With Hair
Have you ever struggled to capture the natural flow of hair from behind? It’s a common challenge for many artists. I remember feeling frustrated by stiff, unrealistic hair in my early sketches.
This guide will help you overcome those hurdles. We’ll break down the process into manageable steps, focusing on both structure and fluidity. You’ll gain the confidence to draw convincing hair from the back view.
Quick Overview
Drawing the back of a head with hair involves understanding basic anatomy and the organic movement of hair. You’ll learn to build from simple shapes to detailed textures. The goal is to create a realistic and dynamic portrayal.
- Time needed: 45-75 minutes
- Difficulty: Intermediate
- What you’ll need: Sketchbook or paper, graphite pencils (HB, 2B, 4B), eraser (kneaded and stick), blending stump or tissue.
Step-by-Step Instructions
Step 1: Establish the Basic Head Shape
Begin by lightly sketching the fundamental form of the head. Think of it as a slightly flattened egg or a sphere for the cranium. This initial shape doesn’t need to be perfect; it’s a guide.
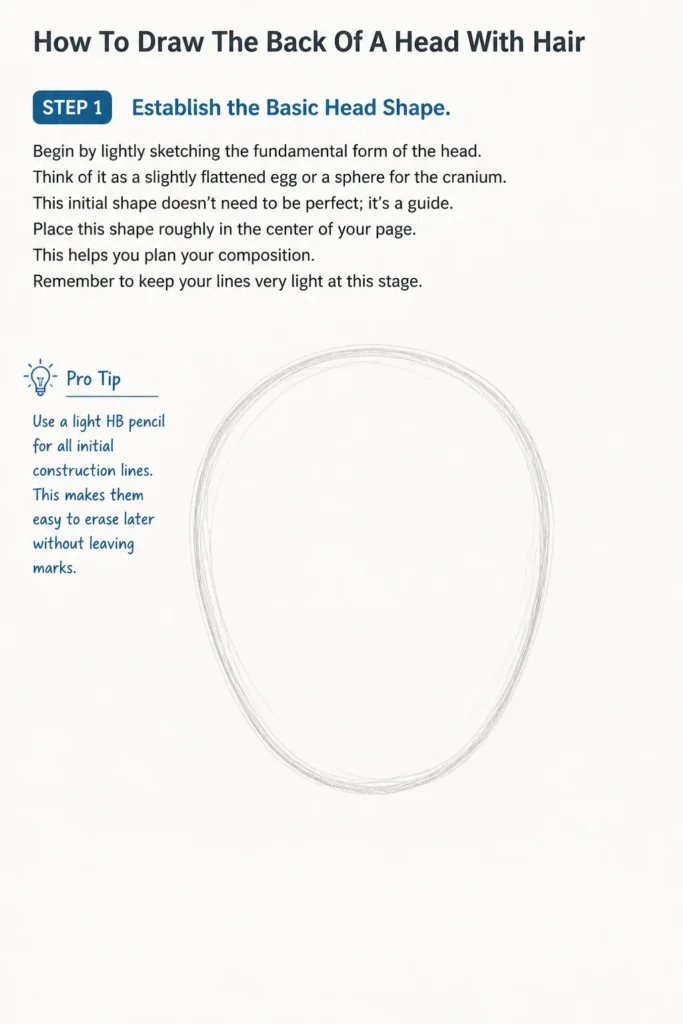
Place this shape roughly in the center of your page. This helps you plan your composition. Remember to keep your lines very light at this stage.
Pro Tip: Use a light HB pencil for all initial construction lines. This makes them easy to erase later without leaving marks.
Step 2: Define the Neck and Shoulder Line
Connect the head shape to the neck and the top of the shoulders. The neck typically tapers down from the base of the skull. It then flares out to meet the trapezius muscles.
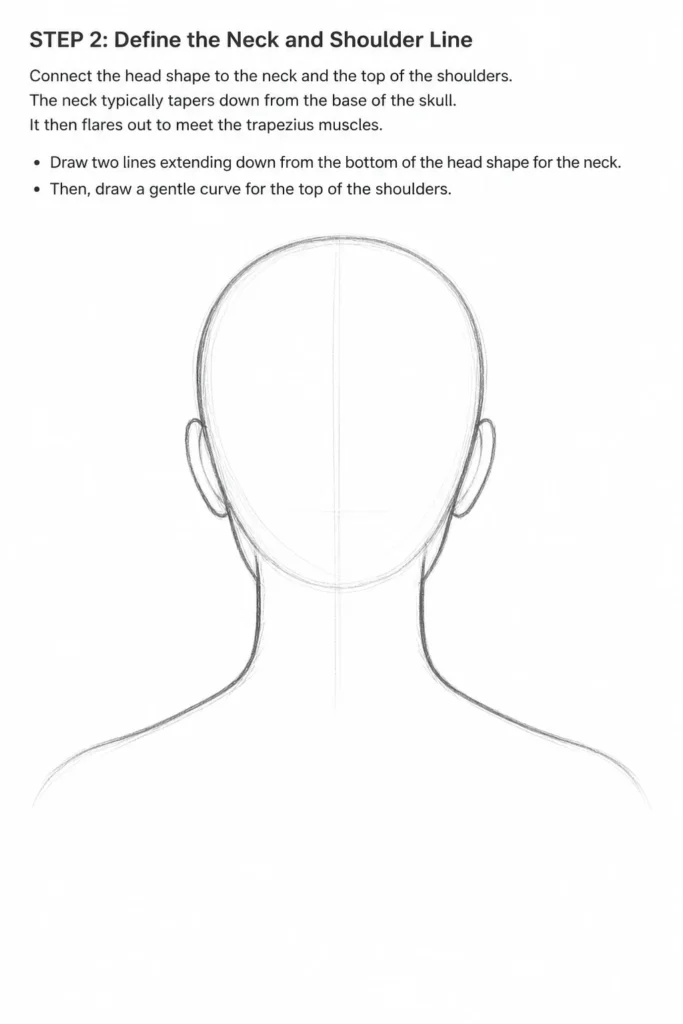
Draw two lines extending down from the bottom of the head shape for the neck. Then, draw a gentle curve for the top of the shoulders. This establishes the overall posture and connection of the head to the body.
Step 3: Locate the Hairline
Consider where the hair would naturally begin on the back of the head. This isn’t a straight line. It usually forms a soft curve or a V-shape at the nape of the neck.
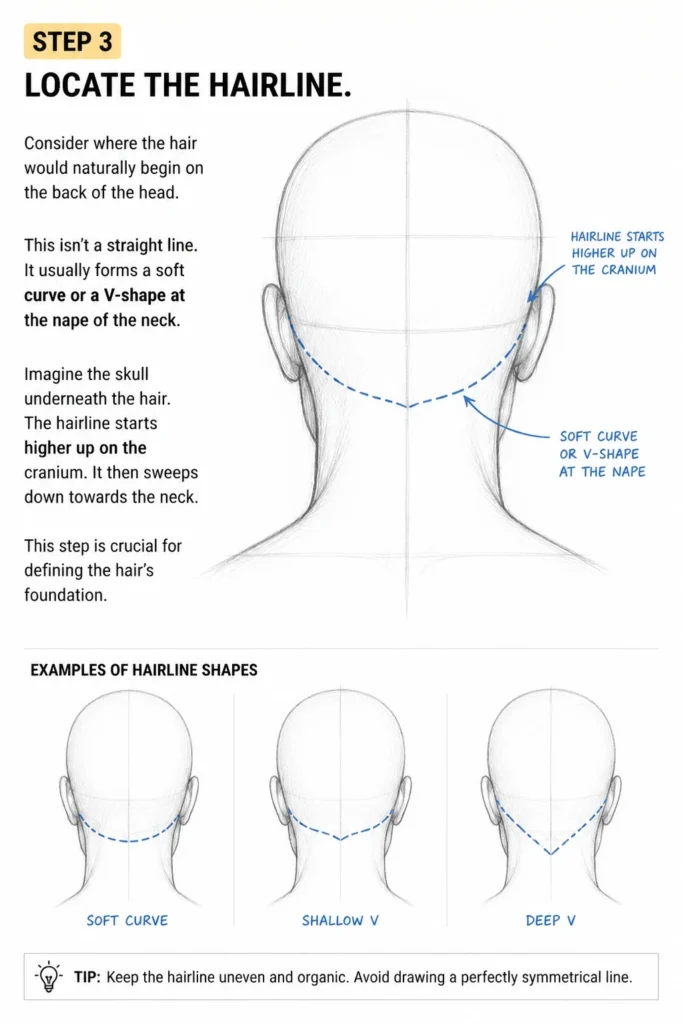
Imagine the skull underneath the hair. The hairline starts higher up on the cranium. It then sweeps down towards the neck. This step is crucial for defining the hair’s foundation.
Step 4: Block In the Overall Hair Mass
Think of the hair as a solid, three-dimensional object first. Don’t worry about individual strands yet. Sketch the general silhouette and volume of the hair.
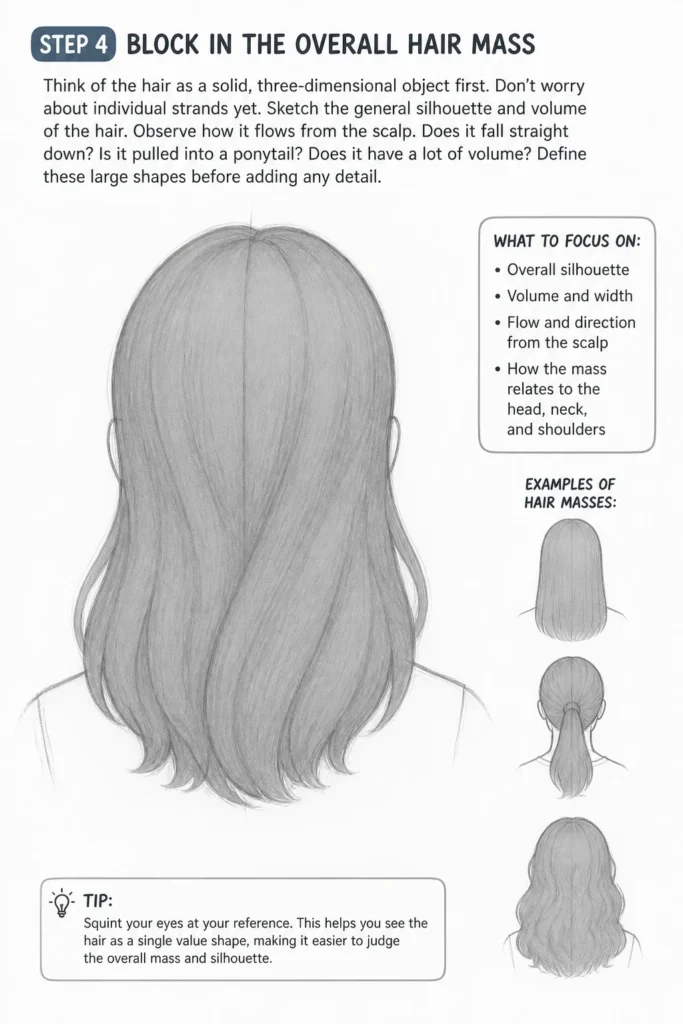
Observe how it flows from the scalp. Does it fall straight down? Is it pulled into a ponytail? Does it have a lot of volume? Define these large shapes before adding any detail.
Step 5: Establish the Hair’s Flow and Direction
Once you have the overall mass, start indicating the main direction of the hair. Use long, curved lines to show how the hair falls or sweeps. Hair rarely falls in a single, uniform direction.
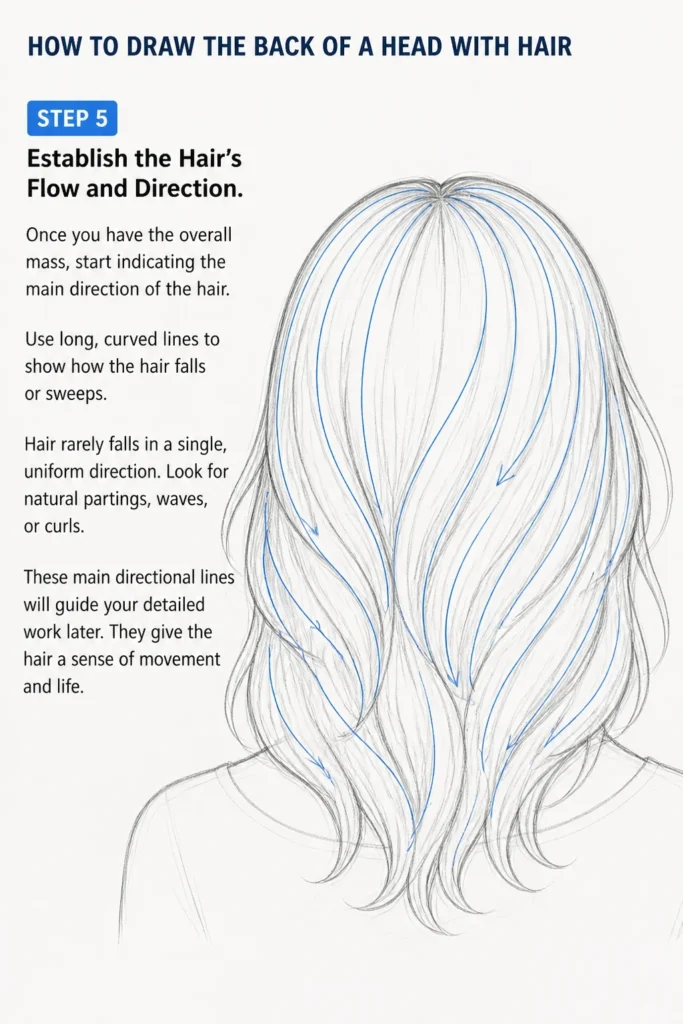
Look for natural partings, waves, or curls. These main directional lines will guide your detailed work later. They give the hair a sense of movement and life.
Step 6: Introduce Hair Strands and Texture
Now, begin to refine the hair mass by adding groups of strands. Don’t draw every single hair. Instead, focus on drawing larger clumps or sections of hair.
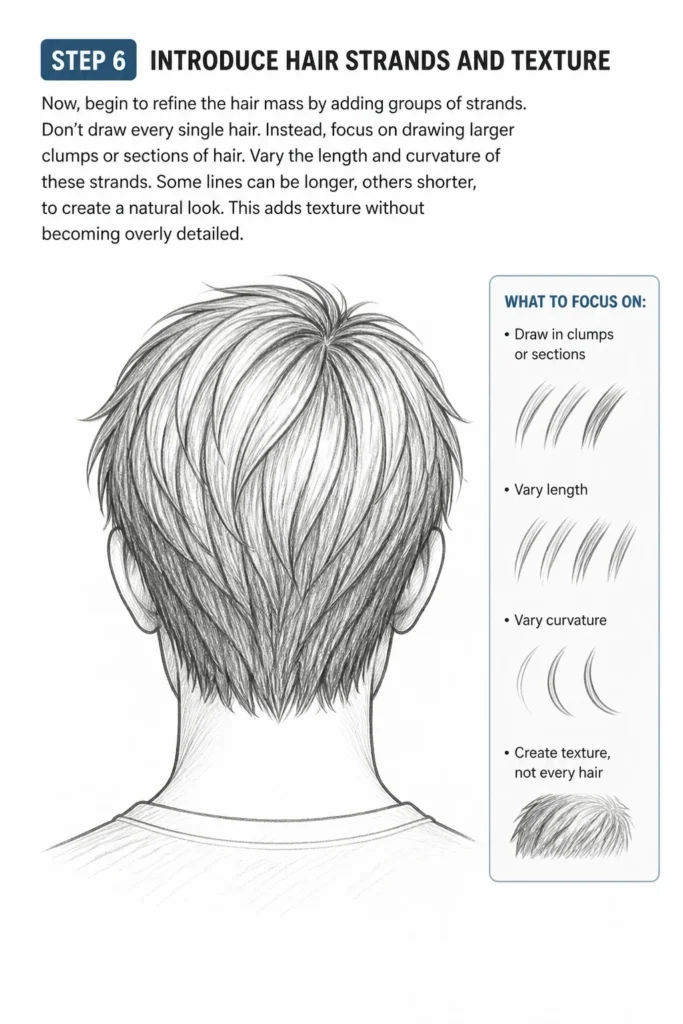
Vary the length and curvature of these strands. Some lines can be longer, others shorter, to create a natural look. This adds texture without becoming overly detailed.
Step 7: Apply Shading for Depth and Volume
Shading is where the hair truly comes to life. Use your darker pencils (2B, 4B) to add shadows. Observe where light hits the hair and where shadows naturally form.
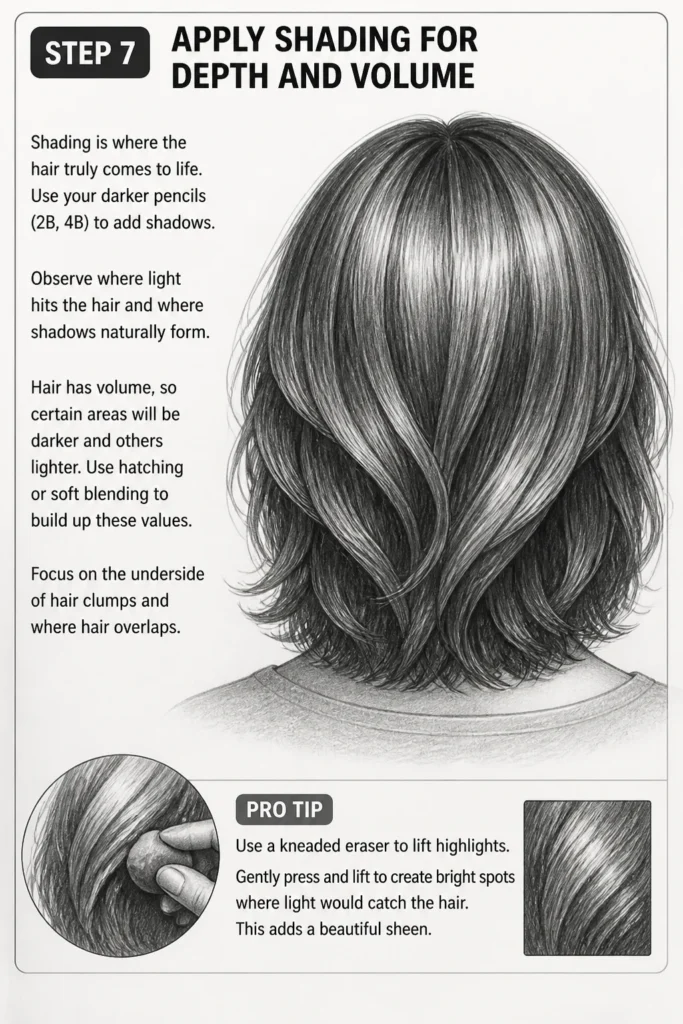
Hair has volume, so certain areas will be darker and others lighter. Use hatching or soft blending to build up these values. Focus on the underside of hair clumps and where hair overlaps.
Pro Tip: Use a kneaded eraser to lift highlights. Gently press and lift to create bright spots where light would catch the hair. This adds a beautiful sheen.
Step 8: Refine and Add Final Details
Take a step back and look at your drawing. Clean up any unnecessary construction lines. Add a few darker accents to deepen shadows and make the hair pop.
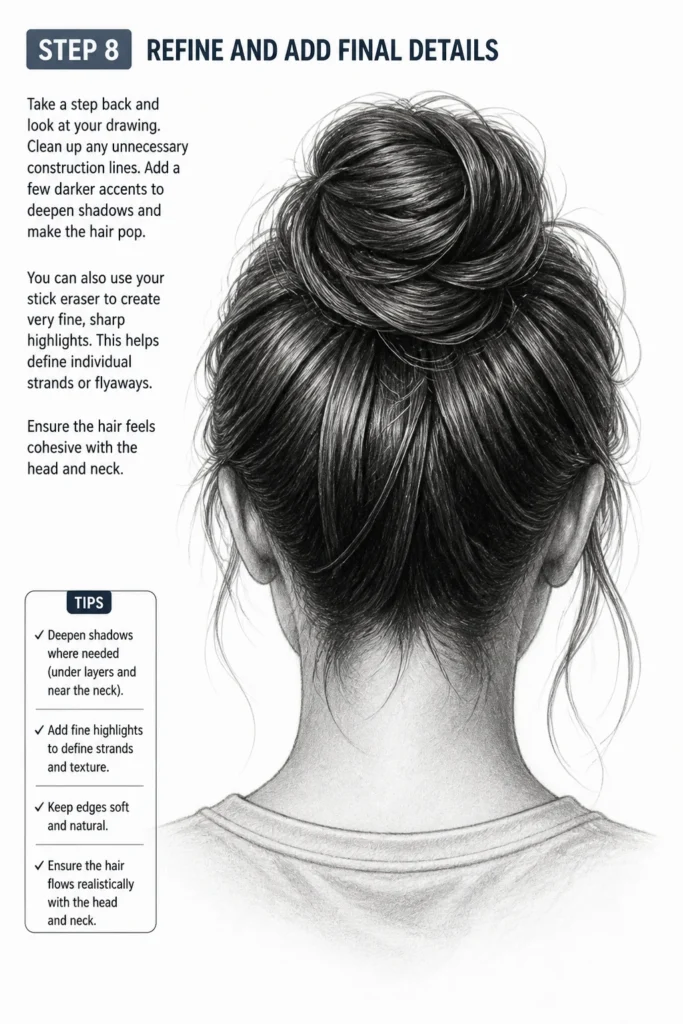
You can also use your stick eraser to create very fine, sharp highlights. This helps define individual strands or flyaways. Ensure the hair feels cohesive with the head and neck.
Common Mistakes to Avoid
Drawing Stiff, Helmet-Like Hair
Many beginners draw hair that looks too rigid or like a solid helmet. This happens when you don’t consider the natural flow and volume of hair. Hair is soft and moves. Always think in terms of curves and natural gravity. Allow for some natural looseness around the edges.
Ignoring the Underlying Head Shape
Forgetting the skull beneath the hair leads to distorted shapes. Always start with the basic head form. This ensures your hair has a realistic foundation. The hair should sit on the head, not replace it.
Drawing Every Single Strand of Hair
Attempting to draw every individual hair strand is time-consuming and often results in a messy, unrealistic look. Instead, focus on drawing clumps or sections of hair. Suggest texture rather than explicitly drawing every single detail.
Lack of Light and Shadow
Without proper shading, hair appears flat and lifeless. Hair has depth and volume. Understand where light sources are coming from. Use a range of values to create highlights, mid-tones, and deep shadows. This gives the hair its three-dimensionality.
Troubleshooting
My Hair Looks Flat
If your hair drawing lacks depth, it’s likely due to insufficient shading. Go back to Step 7. Identify the areas that would be in shadow, such as underneath clumps of hair or where hair overlaps. Use a darker pencil (like 2B or 4B) to build up these darker values. Also, ensure you have clear highlights to contrast with the shadows.
The Hair Doesn’t Look Natural
This often happens when the flow or direction of the hair isn’t well-defined. Revisit Step 5. Use long, sweeping lines to indicate the main movement of the hair. Think about how hair naturally falls and separates. Avoid drawing too many short, choppy lines. Also, check that the hairline in Step 3 is natural and not too straight or harsh.
The Head Shape Seems Off
If the overall head structure feels incorrect, return to Step 1 and 2. Lightly re-sketch the basic egg shape for the cranium and ensure the neck connects smoothly. Sometimes, adjusting the angle or size of the initial head shape can resolve many issues. Remember, the head is a three-dimensional form, not a flat circle.
Key Takeaways
- Always begin with the underlying head and neck structure.
- Treat hair as a three-dimensional mass before detailing individual strands.
- Focus on the overall flow and direction of the hair to create movement.
- Use varying line weights and shading to create depth, volume, and texture.
- Avoid drawing every single hair; instead, suggest clumps and areas of light and shadow.
- Practice observing real hair to understand its natural forms and how light interacts with it.
Frequently Asked Questions
How do I make hair look soft?
To achieve a soft look, use lighter pencil pressure and blend your shading gently. Avoid harsh outlines. Focus on smooth transitions between light and shadow. A kneaded eraser can also help soften edges and create subtle highlights.
What’s the best way to draw curly hair from the back?
For curly hair, instead of long, sweeping lines, focus on smaller, interlocking C and S shapes. Block in the overall volume, then define the individual curl groups. Shading will emphasize the rounded form of each curl. Remember that curls have their own specific flow.
Should I draw the ears when drawing the back of the head?
Generally, no. When viewing the head directly from the back, the ears are usually obscured by the head itself or by the hair. If the head is slightly turned, you might see a sliver of the ear. However, for a direct back view, they are typically not visible.
How can I make the hair look shiny?
To create shine, you need strong contrast. Leave some areas completely white for highlights. Surround these highlights with darker values. The sharper the contrast between your lightest lights and darkest darks, the shinier the hair will appear. Use a stick eraser for crisp, bright lines.
Our Top Recommended Finds
- Graphite Pencil Set: A good range of hardness (HB, 2B, 4B, 6B) allows for versatile shading and line work.
- Kneaded Eraser: Excellent for lifting graphite gently, softening lines, and creating subtle highlights without damaging the paper.
- Blending Stumps: These paper tools help create smooth transitions in your shading, giving hair a softer, more realistic texture.
Embrace the Flow and Texture
Drawing the back of a head with hair is a rewarding artistic journey. It challenges you to think about form, movement, and the interplay of light. Each stroke you make builds confidence and skill.
Keep practicing these steps. Experiment with different hair textures and lengths. Soon, you’ll find yourself creating dynamic and lifelike hair with ease. Don’t be afraid to try new approaches and let your creativity flow!