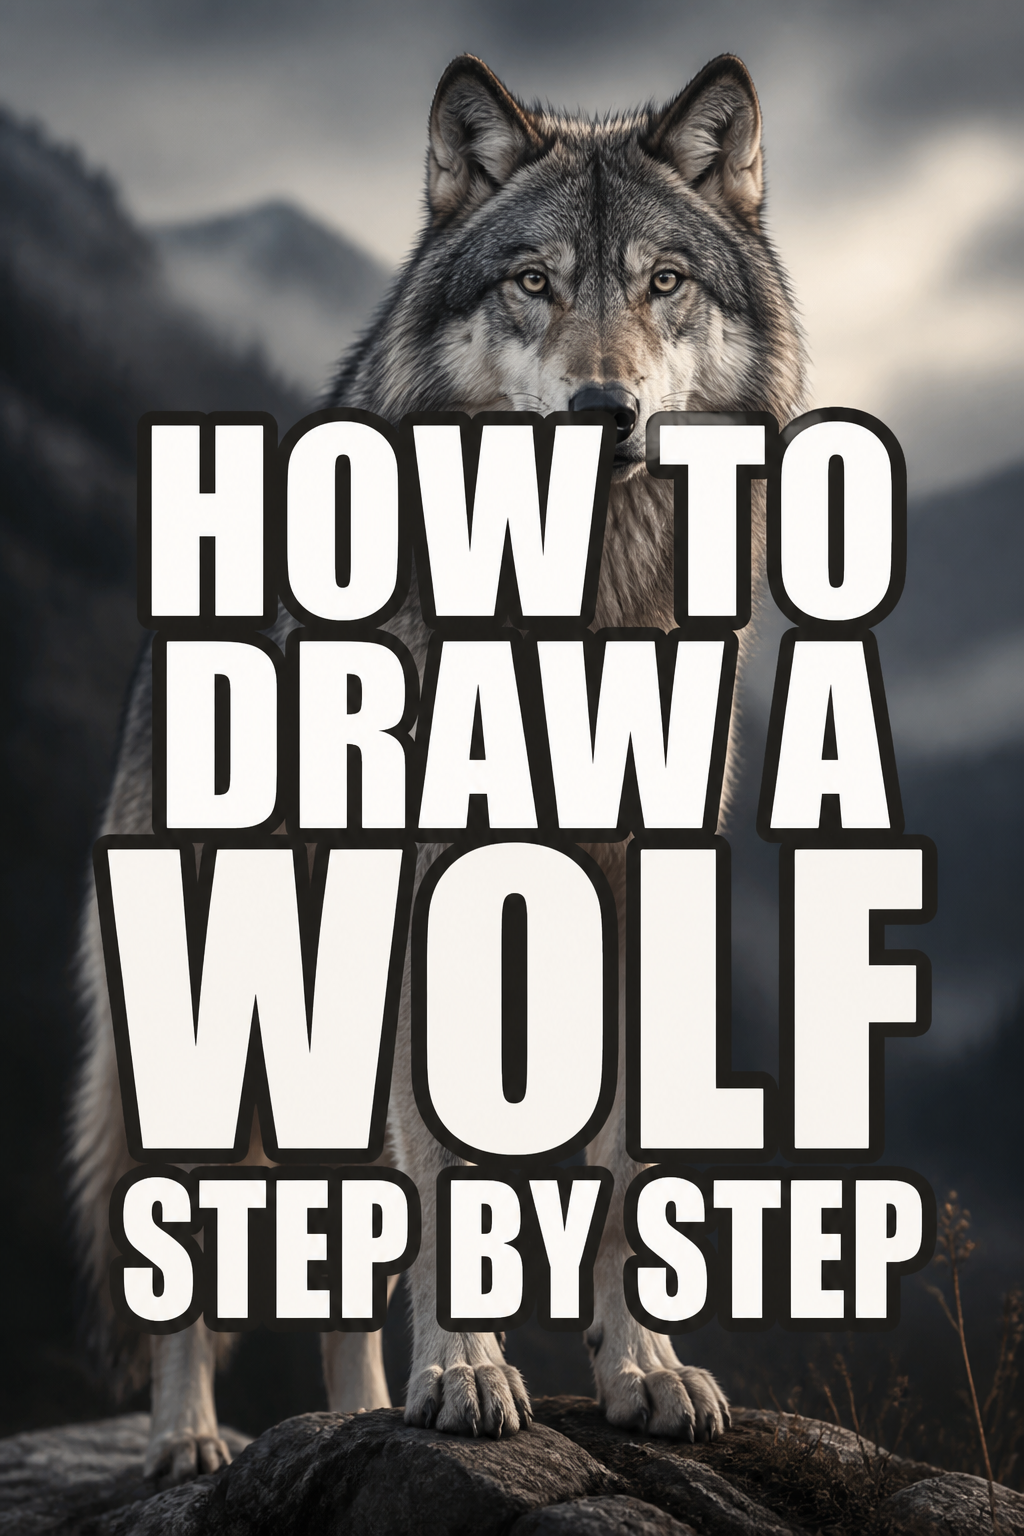
🐺 How To Draw A Wolf Step By Step

& Painting
No rigid rules or pretension. Just practical guides, medium comparisons, and encouraging tips to help you enjoy the drawing & painting process.
Learning to draw a wolf can feel like a big challenge.
Their powerful forms and intricate fur demand attention to detail.
I’ve spent countless hours sketching these magnificent creatures, understanding their unique anatomy and spirit, and I’m excited to share my process with you.
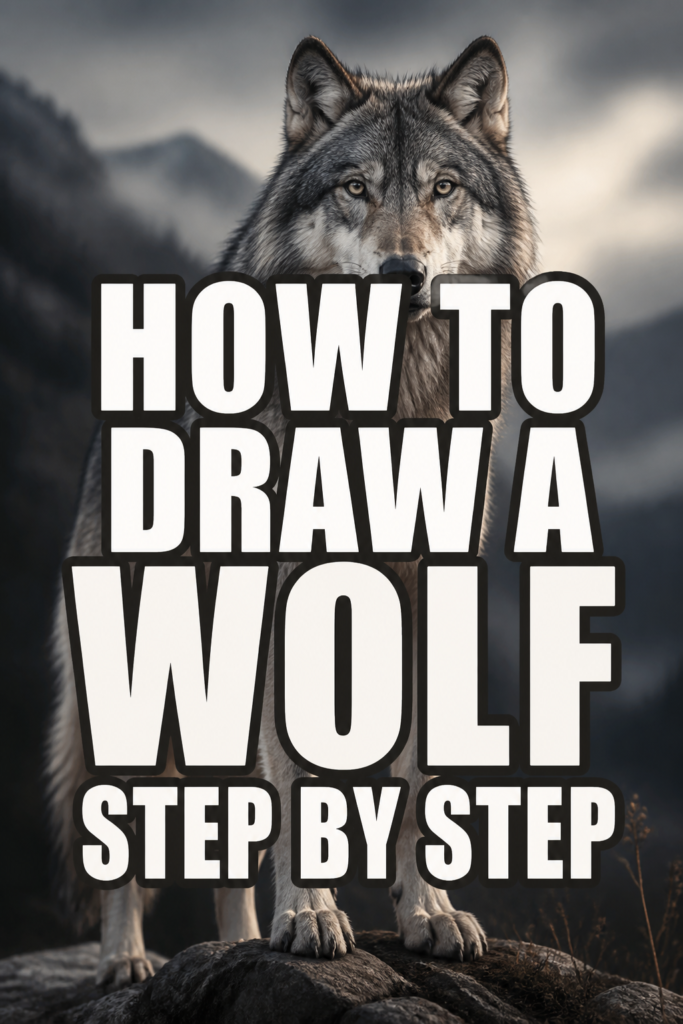
Quick Overview
In this guide, you will learn to construct a wolf drawing from basic shapes to detailed textures.
You’ll gain confidence in capturing their wild essence on paper.
- Time needed: 60-90 minutes
- Difficulty: Intermediate
- What you’ll need: Sketching pencils (HB, 2B, 4B), eraser (kneaded and vinyl), drawing paper, and a reference photo (optional but highly recommended).
Step-by-Step Instructions
Step 1: Laying Down the Basic Shapes
Begin by lightly sketching the primary forms of the wolf’s head and body. Think of simple circles and ovals.
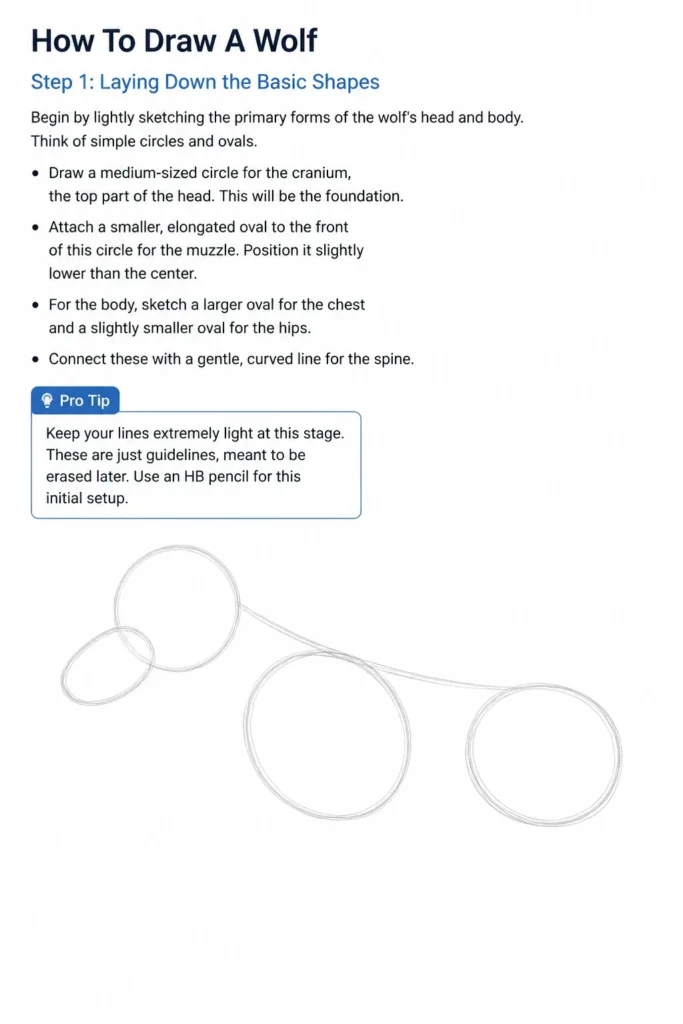
Draw a medium-sized circle for the cranium, the top part of the head. This will be the foundation.
Attach a smaller, elongated oval to the front of this circle for the muzzle. Position it slightly lower than the center.
For the body, sketch a larger oval for the chest and a slightly smaller oval for the hips. Connect these with a gentle, curved line for the spine.
Pro Tip: Keep your lines extremely light at this stage. These are just guidelines, meant to be erased later. Use an HB pencil for this initial setup.
Step 2: Defining the Head and Muzzle
Refine the head shape by connecting the cranium circle and muzzle oval with more angular lines.
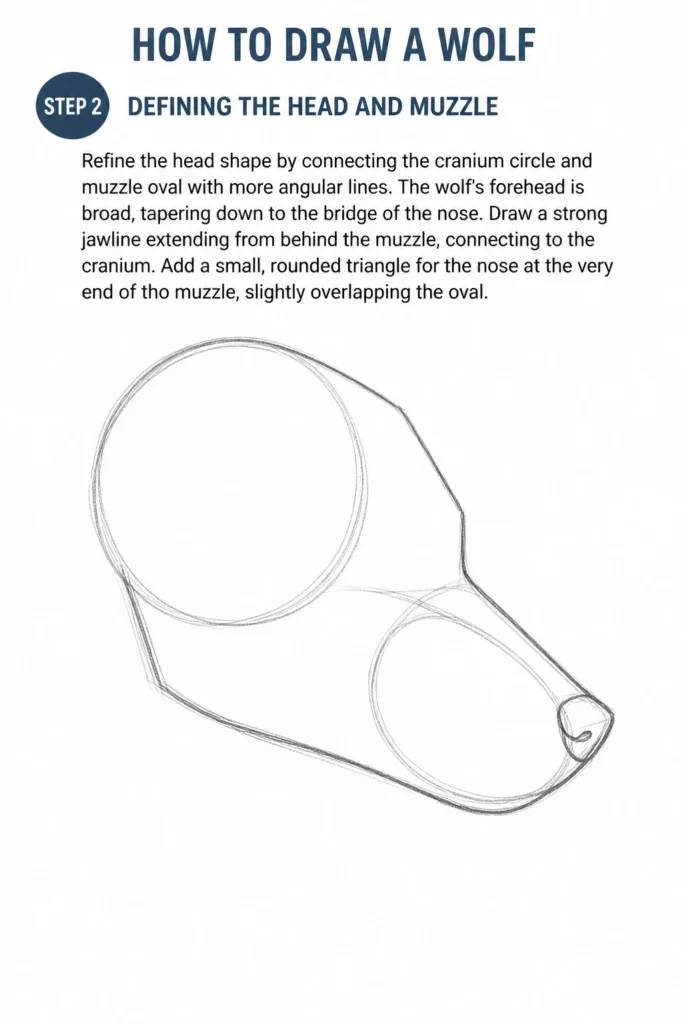
The wolf’s forehead is broad, tapering down to the bridge of the nose.
Draw a strong jawline extending from behind the muzzle, connecting to the cranium.
Add a small, rounded triangle for the nose at the very end of the muzzle, slightly overlapping the oval.
Step 3: Positioning the Ears and Eyes
Now, sketch the ears. Wolves have prominent, triangular ears that are set high on the head.
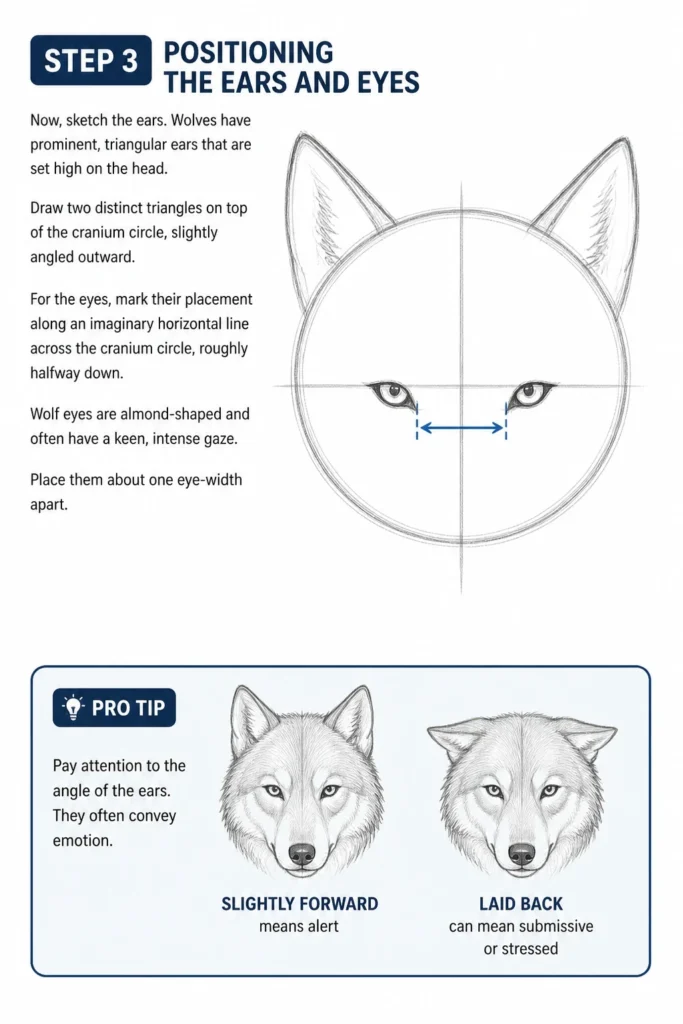
Draw two distinct triangles on top of the cranium circle, slightly angled outward.
For the eyes, mark their placement along an imaginary horizontal line across the cranium circle, roughly halfway down.
Wolf eyes are almond-shaped and often have a keen, intense gaze. Place them about one eye-width apart.
Pro Tip: Pay attention to the angle of the ears. They often convey emotion. Slightly forward means alert, laid back can mean submissive or stressed.
Step 4: Sketching the Neck and Torso
Connect the head to the body with a powerful neck. Wolves have thick, muscular necks that blend smoothly into their shoulders.
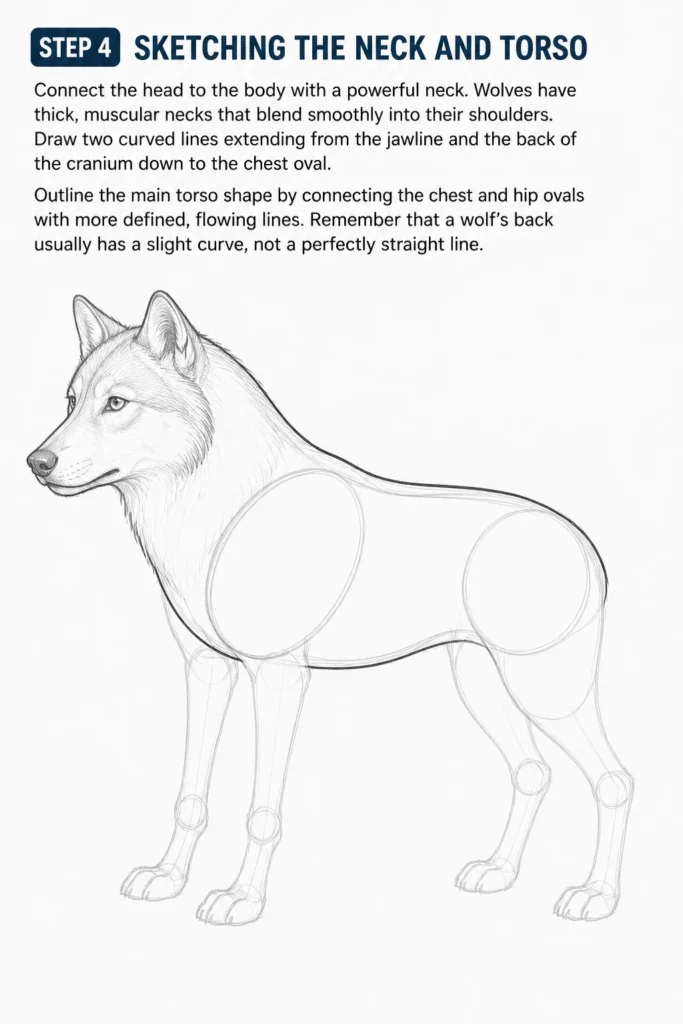
Draw two curved lines extending from the jawline and the back of the cranium down to the chest oval.
Outline the main torso shape by connecting the chest and hip ovals with more defined, flowing lines.
Remember that a wolf’s back usually has a slight curve, not a perfectly straight line.
Step 5: Laying Out the Legs and Paws
Indicate the general direction and length of the legs. Wolves have powerful, agile legs.
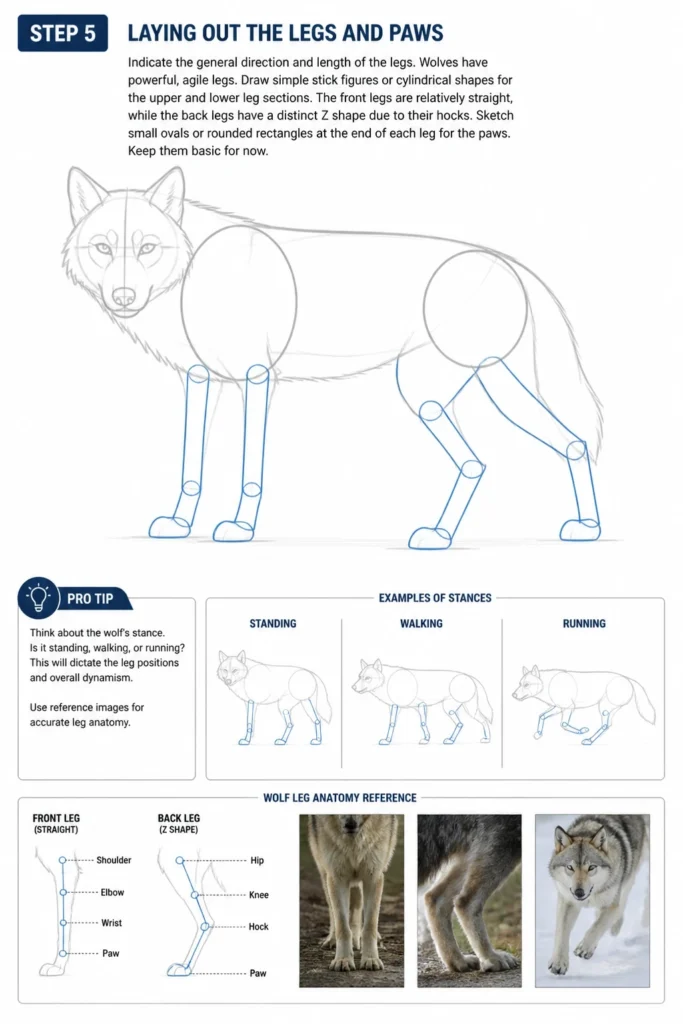
Draw simple stick figures or cylindrical shapes for the upper and lower leg sections.
The front legs are relatively straight, while the back legs have a distinct “Z” shape due to their hocks.
Sketch small ovals or rounded rectangles at the end of each leg for the paws. Keep them basic for now.
Pro Tip: Think about the wolf’s stance. Is it standing, walking, or running? This will dictate the leg positions and overall dynamism. Use reference images for accurate leg anatomy.
Step 6: Refining Anatomy and Adding Fur Lines
Begin to sculpt the muscle structure under the fur. Define the shoulders, chest, and haunches with subtle curves.
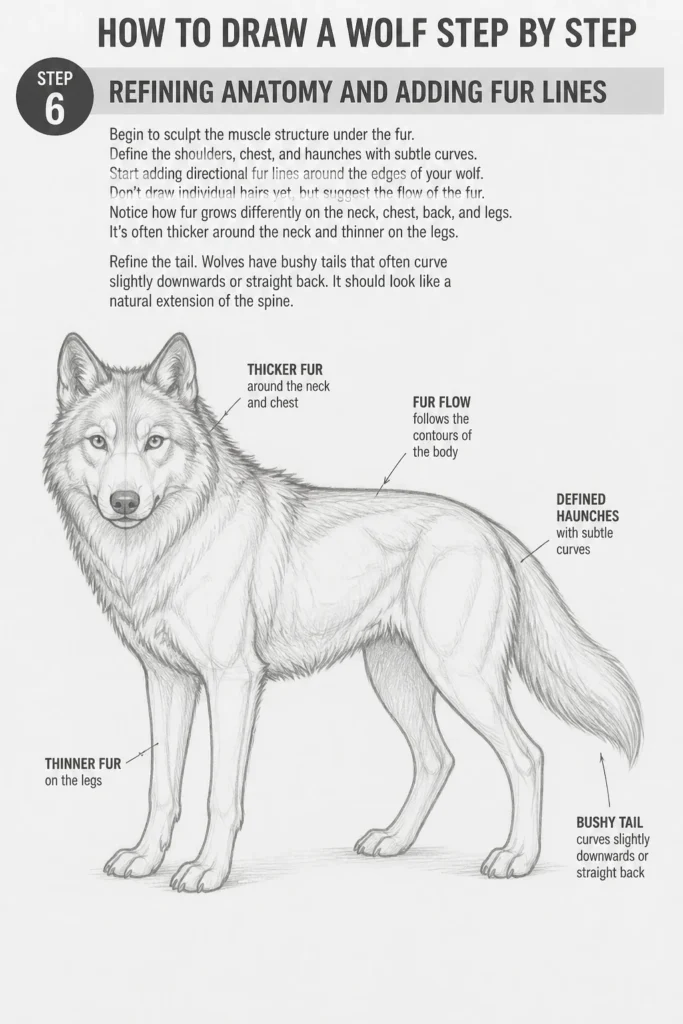
Start adding directional fur lines around the edges of your wolf. Don’t draw individual hairs yet, but suggest the flow of the fur.
Notice how fur grows differently on the neck, chest, back, and legs. It’s often thicker around the neck and thinner on the legs.
Refine the tail. Wolves have bushy tails that often curve slightly downwards or straight back. It should look like a natural extension of the spine.
Step 7: Detailing the Face and Paws
Add detail to the eyes. Draw a dark pupil within the almond shape and perhaps a highlight to give it life.
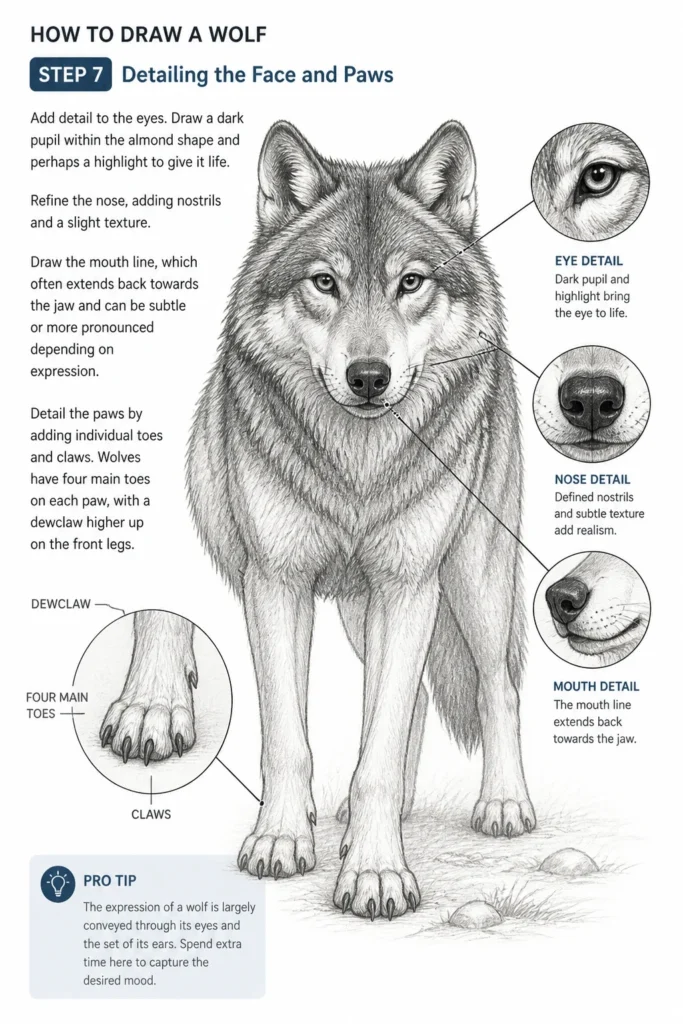
Refine the nose, adding nostrils and a slight texture.
Draw the mouth line, which often extends back towards the jaw and can be subtle or more pronounced depending on expression.
Detail the paws by adding individual toes and claws. Wolves have four main toes on each paw, with a dewclaw higher up on the front legs.
Pro Tip: The expression of a wolf is largely conveyed through its eyes and the set of its ears. Spend extra time here to capture the desired mood.
Step 8: Building Fur Texture and Shading
Start building up the fur texture using short, overlapping strokes. Vary the length and direction of your strokes to mimic natural fur growth.
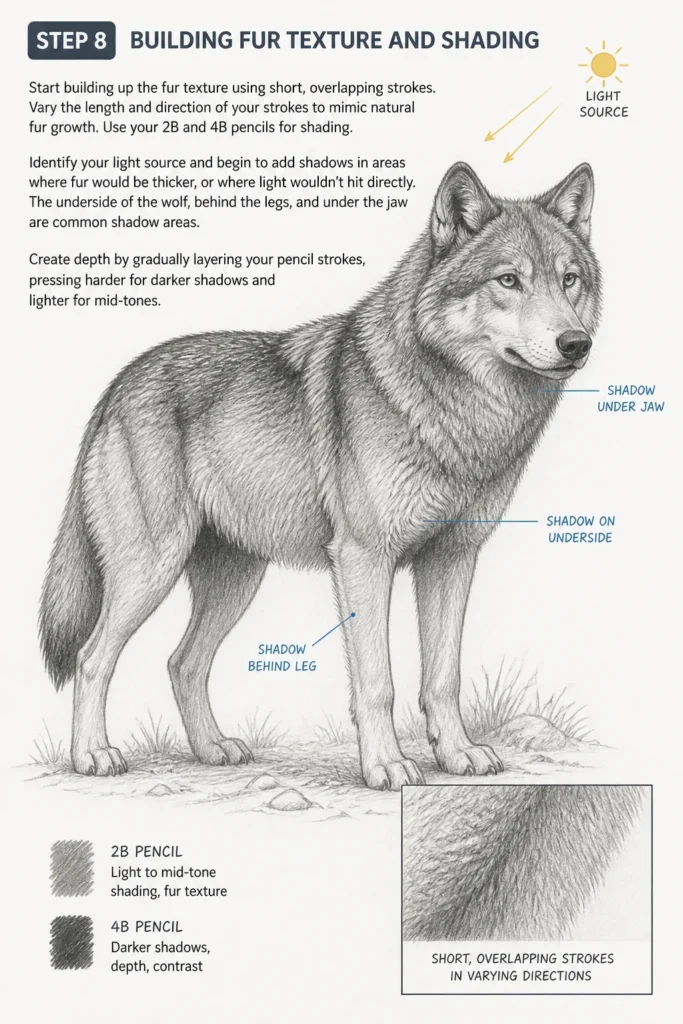
Use your 2B and 4B pencils for shading. Identify your light source and begin to add shadows in areas where fur would be thicker, or where light wouldn’t hit directly.
The underside of the wolf, behind the legs, and under the jaw are common shadow areas.
Create depth by gradually layering your pencil strokes, pressing harder for darker shadows and lighter for mid-tones.
Step 9: Final Touches and Cleanup
Erase all initial guide lines that are no longer needed. Use your kneaded eraser to lift graphite gently without smudging.
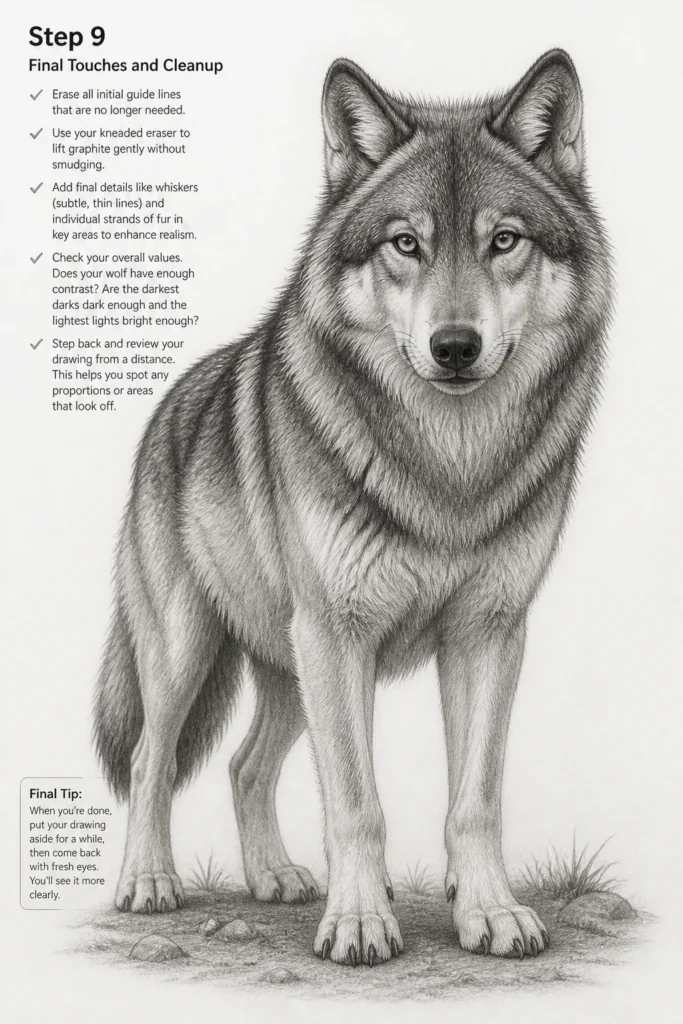
Add final details like whiskers (subtle, thin lines) and individual strands of fur in key areas to enhance realism.
Check your overall values. Does your wolf have enough contrast? Are the darkest darks dark enough and the lightest lights bright enough?
Step back and review your drawing from a distance. This helps you spot any proportions or areas that look off.
Common Mistakes to Avoid
Anatomy Inaccuracies
Many beginners struggle with getting the wolf’s proportions right. Often, legs are too short, the head is too small, or the body is too elongated.
The best way to fix this is by using reference images. Break down the wolf into simple shapes first, focusing on the relative sizes of each part before adding detail. Compare your drawing to the reference frequently.
Stiff Posing
A common pitfall is drawing a wolf that looks rigid and lifeless. This often happens when you focus too much on individual parts without considering the overall flow and balance.
To avoid this, start with a “line of action” — a single curved line that dictates the pose’s energy. Build your basic shapes around this line to ensure natural movement and dynamism.
Flat Fur
Drawing fur as a uniform texture or simply outlining the wolf can make it look two-dimensional. Fur has volume and follows the contours of the body.
Instead of drawing every single hair, use varying stroke lengths and directions. Layer your shading to show the underlying muscle structure and how the fur wraps around the form, creating depth and realism.
Over-reliance on Outlines
Using heavy, continuous outlines can make your wolf look like a cartoon. Real animals don’t have distinct lines around their bodies; their forms are defined by changes in value and texture.
Once your initial sketch is done, try to soften or eliminate harsh outlines. Use shading and fur texture to define edges, allowing areas to blend subtly and appear more natural.
Troubleshooting
My wolf looks too much like a dog.
Wolves have distinct features that differentiate them from domestic dogs. Pay close attention to the muzzle, which is generally longer and narrower than most dogs. Their ears are often more pointed and set higher.
Also, consider the eyes. Wolves typically have yellow or amber eyes with a more intense, wild gaze. Review wolf reference images specifically to internalize these key differences.
The proportions feel off.
This is a very common issue, especially when drawing complex animals. Go back to your basic shapes from Step 1.
Lightly sketch a grid over your reference photo and then a corresponding grid on your drawing paper. This helps you accurately place and size each major component of the wolf.
My drawing lacks depth.
Lack of depth usually stems from insufficient contrast in shading. Your drawing might have too many mid-tones and not enough true darks or bright highlights.
Re-evaluate your light source. Push your darkest shadows further using a softer pencil (like 4B or 6B). Use your kneaded eraser to gently lift graphite and create bright highlights where the light hits directly. This contrast creates a sense of three-dimensionality.
Key Takeaways
- Always start with light, basic shapes to establish accurate proportions and a dynamic pose.
- Use reference images extensively to understand wolf anatomy, fur patterns, and expressions.
- Build up fur texture with varied, directional strokes, rather than drawing individual hairs.
- Shading is crucial for creating depth and volume; pay attention to your light source.
- Refine details like eyes, nose, and paws to bring your wolf to life.
- Practice patience and don’t be afraid to erase and refine as you go.
Frequently Asked Questions
What’s the best pencil for drawing fur?
A range of pencils is best. Start with an HB for light guidelines. For fur texture and shading, a 2B is versatile, and a 4B or 6B is excellent for creating dark shadows and rich, deep fur tones. Experiment to find what works best for your style.
Should I use a reference photo?
Absolutely, yes! Using reference photos is not cheating; it’s a fundamental part of learning and improving. They help you understand anatomy, lighting, and texture. Choose high-quality photos of wolves in various poses to expand your knowledge.
How do I make the wolf look fierce or gentle?
Expression largely comes from the eyes, mouth, and ears. For a fierce look, narrow the eyes slightly, lower the brow, and perhaps show a hint of teeth. For a gentle look, widen the eyes slightly, soften the brow, and keep the mouth closed or slightly parted in a relaxed manner. The angle of the ears also plays a role.
How can I improve my anatomy?
Study, study, study! Beyond drawing, look at photos, watch nature documentaries, and even sketch animal skeletons if you can find them. Understanding the underlying bone and muscle structure will dramatically improve the realism and believability of your animal drawings.
Our Top Recommended Finds
- Derwent Graphic Drawing Pencils: A good set provides a range of hardness for all your sketching and shading needs.
- Faber-Castell Kneaded Eraser: Essential for lifting graphite without damaging paper, perfect for creating highlights and cleaning up.
- Strathmore 400 Series Sketch Pad: A reliable, acid-free paper that holds graphite well and can withstand erasing without pilling.
Unleash Your Inner Artist
Drawing a wolf is a rewarding artistic endeavor that builds many fundamental skills.
Each stroke you make brings you closer to mastering form, texture, and expression.
Don’t stop here – perhaps your next project could be drawing a wolf in motion, or even exploring different animal subjects to further hone your craft!
& Painting
No rigid rules or pretension. Just practical guides, medium comparisons, and encouraging tips to help you enjoy the drawing & painting process.