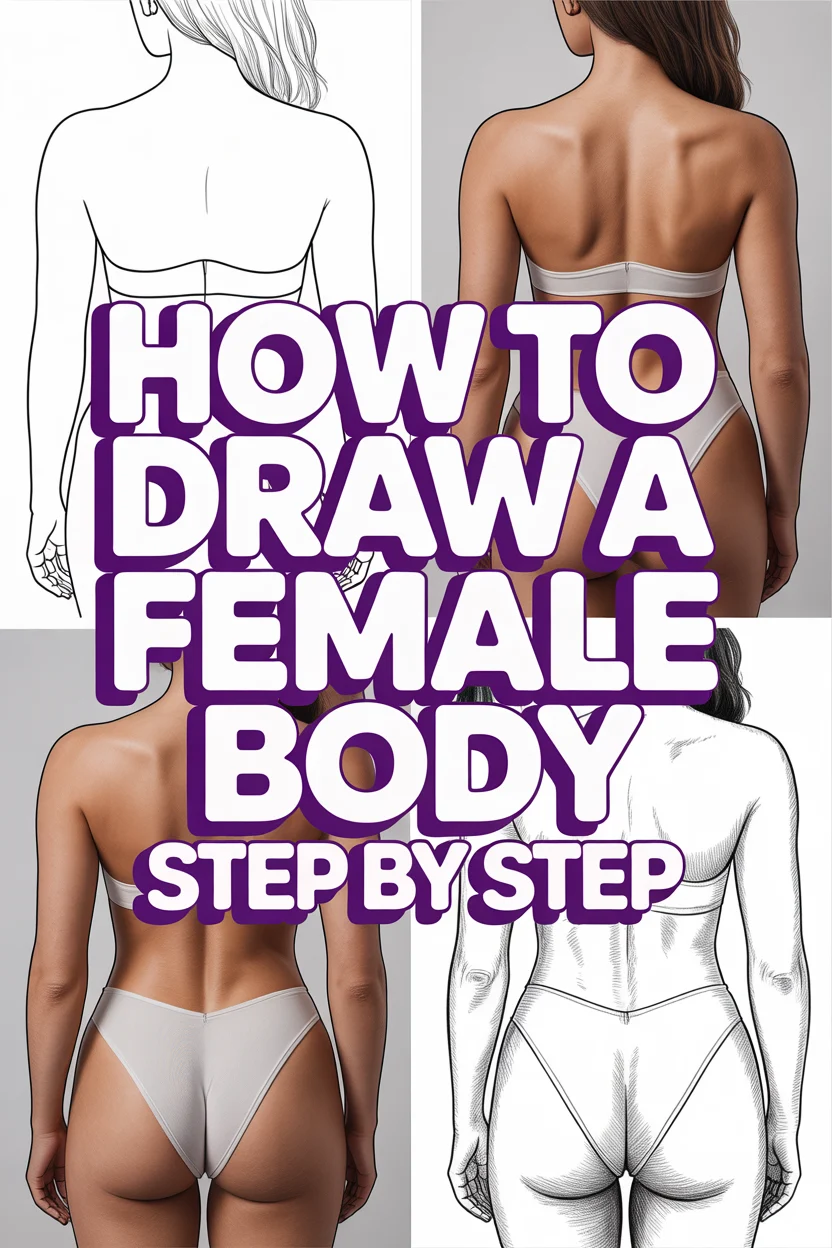
♀️ How To Draw A Female Body Step By Step
Learning to draw the human form can feel daunting, especially when aiming for both accuracy and expressiveness.
I remember my own early struggles, filling sketchbooks with stiff, disproportionate figures before finally grasping the underlying principles.
This guide distills years of practice into a practical, step-by-step approach, helping you build confidence and skill from the ground up.
Quick Overview
This guide will walk you through the foundational steps to construct a dynamic female figure, focusing on proportion, gesture, and basic anatomy.
You’ll learn to see the body in simple shapes before adding detail, making the process much less intimidating.
- Time needed: 1-2 hours for the first attempt, ongoing practice for mastery
- Difficulty: Beginner to Intermediate
- What you’ll need: Pencil (HB or 2B), eraser, sketchbook or paper, reference images (optional but recommended)
Step-by-Step Instructions
Step 1: Capture the Gesture and Flow
Before any detailed anatomy, begin by capturing the overall movement and energy of the pose. This is the soul of your drawing.
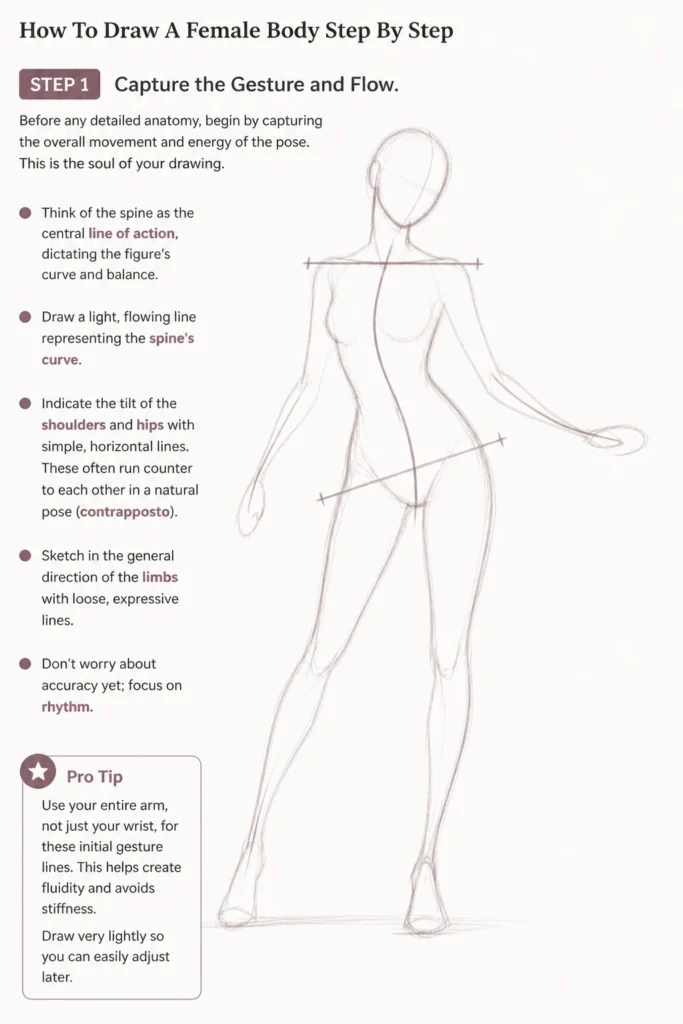
Think of the spine as the central line of action, dictating the figure’s curve and balance.
- Draw a light, flowing line representing the spine’s curve.
- Indicate the tilt of the shoulders and hips with simple, horizontal lines. These often run counter to each other in a natural pose (contrapposto).
- Sketch in the general direction of the limbs with loose, expressive lines. Don’t worry about accuracy yet; focus on rhythm.
Pro Tip: Use your entire arm, not just your wrist, for these initial gesture lines. This helps create fluidity and avoids stiffness. Draw very lightly so you can easily adjust later.
Step 2: Establish Basic Proportions and Head Placement
Now, we’ll use the head as a unit of measurement to block out the figure’s overall height and key landmarks.
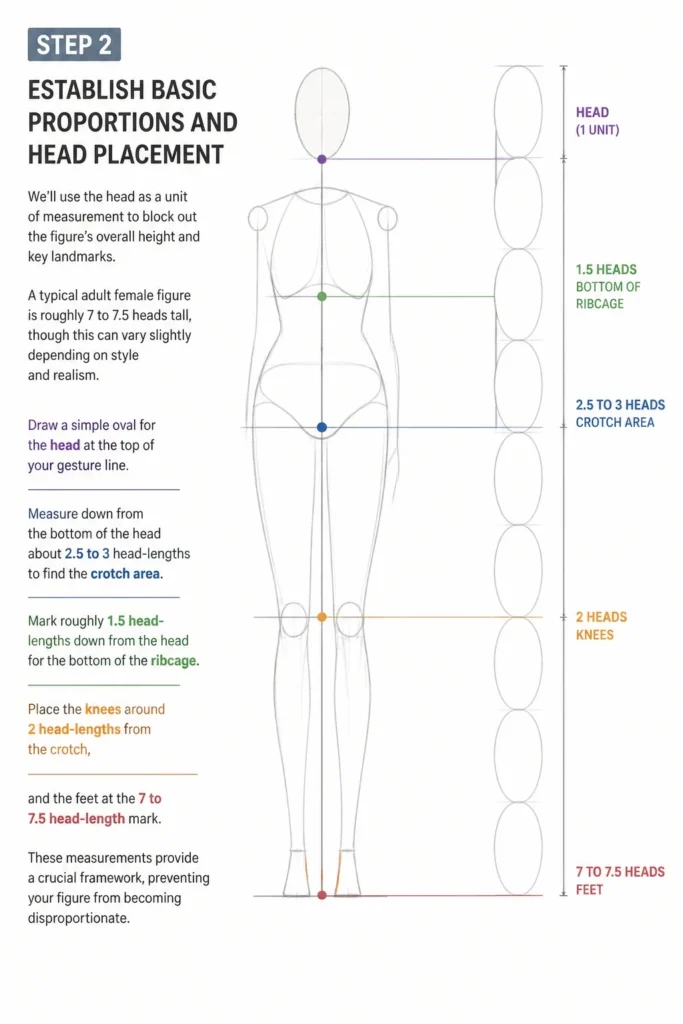
A typical adult female figure is roughly 7 to 7.5 heads tall, though this can vary slightly depending on style and realism.
- Draw a simple oval for the head at the top of your gesture line.
- Measure down from the bottom of the head about 2.5 to 3 head-lengths to find the crotch area.
- Mark roughly 1.5 head-lengths down from the head for the bottom of the ribcage.
- Place the knees around 2 head-lengths from the crotch, and the feet at the 7 to 7.5 head-length mark.
These measurements provide a crucial framework, preventing your figure from becoming disproportionate.
Step 3: Block Out the Torso and Pelvis with Simple Shapes
Think of the torso as two main masses: the ribcage and the pelvis.
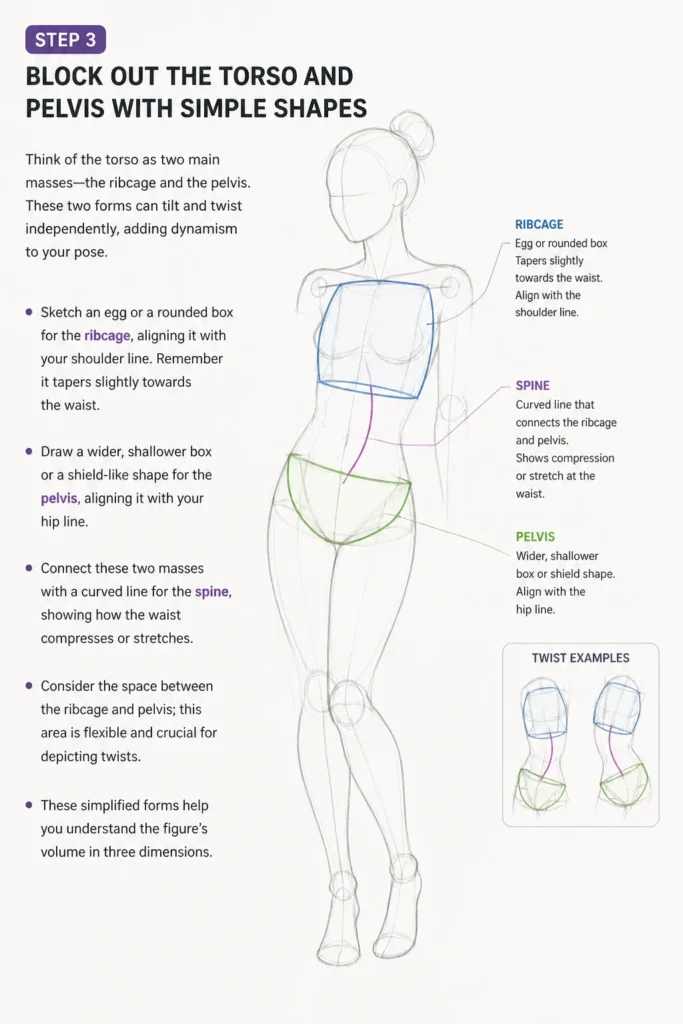
These two forms can tilt and twist independently, adding dynamism to your pose.
- Sketch an egg or a rounded box for the ribcage, aligning it with your shoulder line. Remember it tapers slightly towards the waist.
- Draw a wider, shallower box or a shield-like shape for the pelvis, aligning it with your hip line.
- Connect these two masses with a curved line for the spine, showing how the waist compresses or stretches.
- Consider the space between the ribcage and pelvis; this area is flexible and crucial for depicting twists.
These simplified forms help you understand the figure’s volume in three dimensions.
Step 4: Construct the Limbs with Cylinders and Ovals
Break down the arms and legs into simpler, volumetric forms like cylinders, ovals, and spheres.
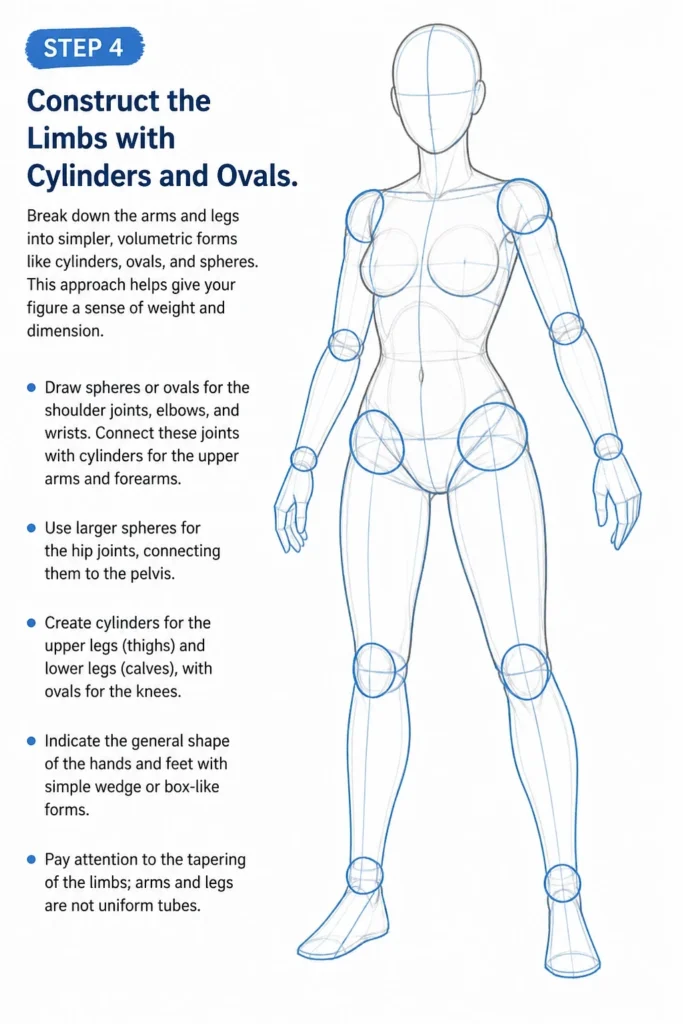
This approach helps give your figure a sense of weight and dimension.
- Draw spheres or ovals for the shoulder joints, elbows, and wrists.
- Connect these joints with cylinders for the upper arms and forearms.
- Use larger spheres for the hip joints, connecting them to the pelvis.
- Create cylinders for the upper legs (thighs) and lower legs (calves), with ovals for the knees.
- Indicate the general shape of the hands and feet with simple wedge or box-like forms.
Pay attention to the tapering of the limbs; arms and legs are not uniform tubes.
Step 5: Refine the Forms and Add Basic Anatomy
With your basic structure in place, begin to sculpt the figure, adding the underlying muscle and bone structure.
Focus on key anatomical landmarks that define the female form.
- Smooth out the connections between your block forms, creating continuous curves.
- Define the collarbones (clavicles) across the top of the chest.
- Mark the breasts, understanding they are fatty tissue resting on the pectoral muscles, influenced by gravity and pose.
- Indicate the slight curve of the deltoids (shoulder muscles) and biceps/triceps.
- Show the gentle curves of the quadriceps and hamstrings in the thighs.
- Define the calf muscles and the ankles.
Pro Tip: Use reference images frequently. Study how muscles attach and flow, and how they change with different poses. Don’t try to memorize every muscle, but understand the major forms.
Step 6: Develop the Head, Hands, and Feet
These areas are often considered the most challenging, so approach them with patience and observation.
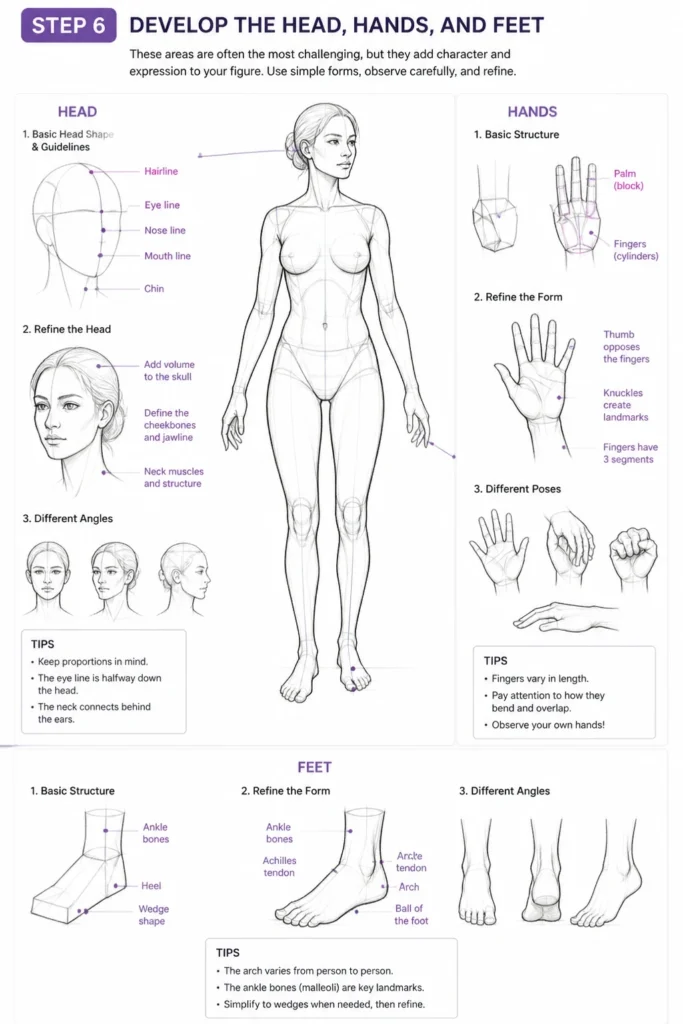
They add significant character and expression to your figure.
- Refine the head shape, adding guidelines for the eyes, nose, and mouth. Consider the jawline and neck muscles.
- Break down the hands into a palm block and finger cylinders. Focus on the overall shape and how the fingers articulate.
- Simplify the feet into wedge-like forms, paying attention to the arch and the ankle bones.
- Remember that hands and feet vary greatly, so practice drawing them from different angles.
Even simplified versions of these elements can significantly enhance your drawing.
Step 7: Introduce Overlapping Forms and Contours
Overlapping lines create a sense of depth and three-dimensionality, making your figure feel less flat.
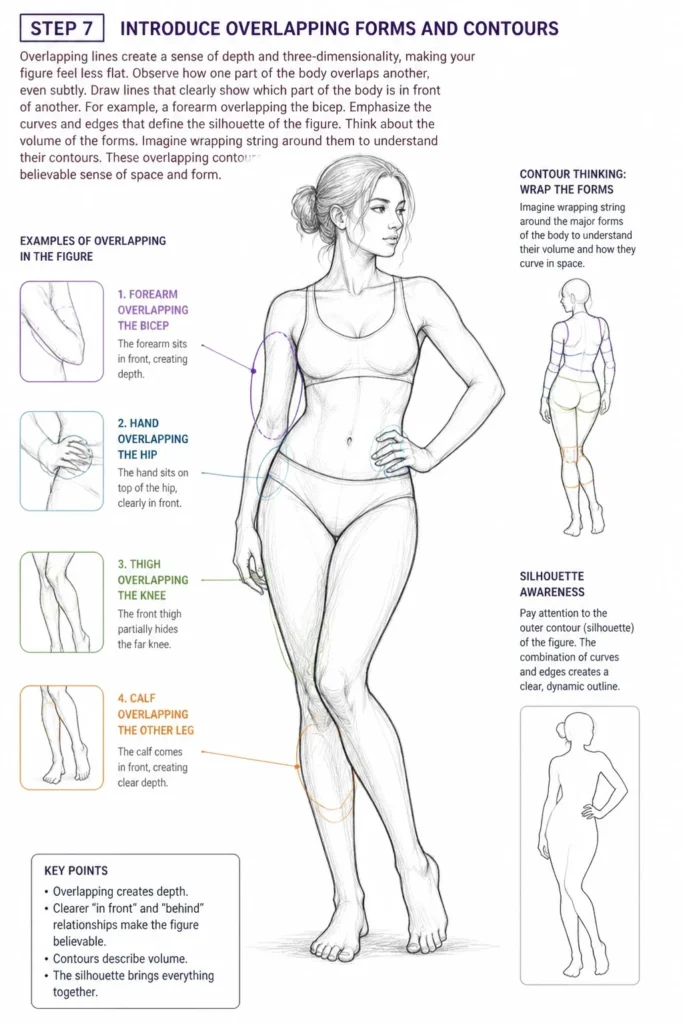
Observe how one part of the body overlaps another, even subtly.
- Draw lines that clearly show which part of the body is in front of another. For example, a forearm overlapping the bicep.
- Emphasize the curves and edges that define the silhouette of the figure.
- Think about the “volume” of the forms. Imagine wrapping string around them to understand their contours.
These overlapping contours are vital for creating a believable sense of space and form.
Step 8: Refine and Add Detail
This is where you bring your figure to life, adding the finishing touches that make it unique.
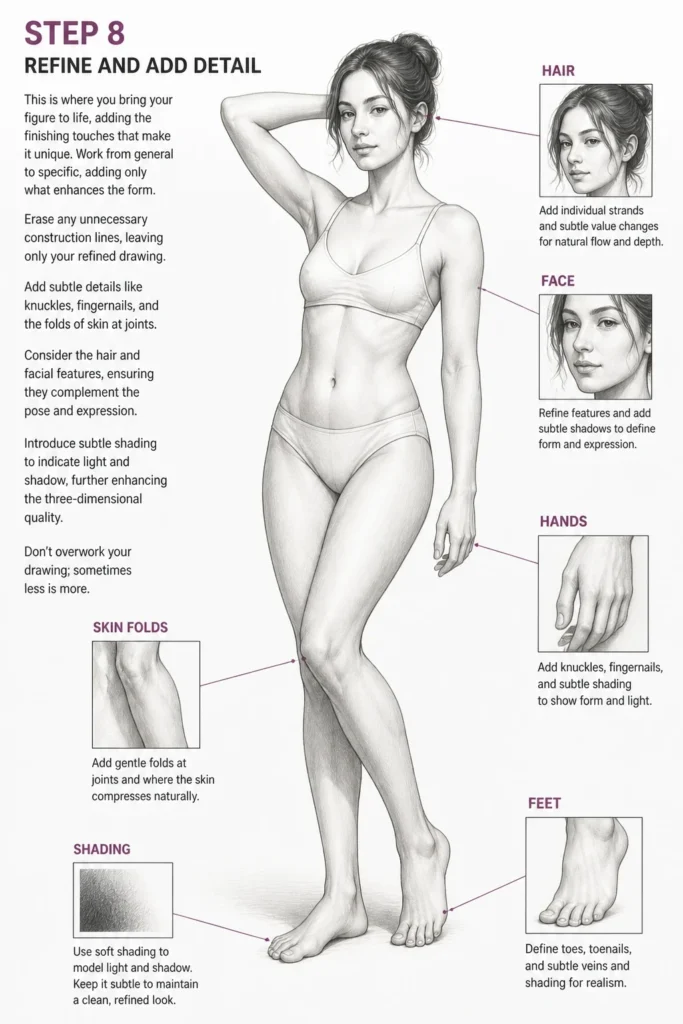
Work from general to specific, adding only what enhances the form.
- Erase any unnecessary construction lines, leaving only your refined drawing.
- Add subtle details like knuckles, fingernails, and the folds of skin at joints.
- Consider the hair and facial features, ensuring they complement the pose and expression.
- Introduce subtle shading to indicate light and shadow, further enhancing the three-dimensional quality.
Don’t overwork your drawing; sometimes less is more.
Common Mistakes to Avoid
Drawing Stiff, Symmetrical Poses
Many beginners draw figures that look rigid, as if standing at attention. This makes the figure appear lifeless and unnatural. Real bodies are rarely perfectly symmetrical, even when standing still. Look for subtle shifts in weight and balance.
Instead, embrace asymmetry and the “line of action.” Use the contrapposto principle (shoulders and hips tilting in opposite directions) to create dynamic, natural-looking poses. Always start with a gesture sketch to capture movement.
Incorrect Proportions
Figures often end up with disproportionately long limbs, tiny heads, or oddly placed features. This can make the drawing look amateurish and distract from any other good qualities it might have. It’s a fundamental error that’s easy to make.
Always use a consistent measurement system, like the “head-length” method, from the very beginning. Block out your major landmarks (crotch, knees, shoulders) before adding detail. Regularly check your proportions against your reference or a mental guide.
Drawing Flat Forms
A common pitfall is drawing the body as a collection of outlines rather than three-dimensional forms. This results in figures that look flat, lacking volume and weight, as if they were cutouts. It’s hard to make them feel real.
Think of the body in terms of simple geometric shapes like spheres, cylinders, and boxes. Imagine these forms rotating in space. Use overlapping lines and subtle shading to convey depth and the roundness of the body parts.
Ignoring Anatomy and Musculature
While you don’t need to be a medical expert, completely ignoring the underlying anatomy can lead to unconvincing forms. Muscles and bones dictate the surface contours of the body. Without understanding them, your figures might look “blobby” or incorrectly formed.
Study basic anatomical landmarks and how major muscle groups attach and flow. Focus on the overall shape and direction of muscles rather than drawing every single fiber. Use simplified anatomical diagrams as references to build your understanding over time.
Troubleshooting
My Figures Look Flat and Lifeless
If your drawings lack depth, it’s likely you’re focusing too much on outlines. The human body is a complex arrangement of volumes, not just a silhouette. This can be a frustrating hurdle to overcome for many artists.
Start by thinking in three dimensions. Use construction shapes like spheres for joints, cylinders for limbs, and boxes for the torso and pelvis. Draw through your forms, imagining what’s on the other side. This helps you understand the volume and how parts connect in space.
I Can’t Get the Proportions Right
Inconsistent proportions are a classic challenge. One part of the body might be too long, another too short, throwing off the entire figure. This often happens when you focus on one area at a time without considering the whole.
Always establish your main proportional guide (e.g., head-lengths) at the very beginning. Mark out the major landmarks (shoulders, crotch, knees) before adding any significant detail. Step back frequently to view your entire drawing and compare parts to each other. Don’t be afraid to use measuring tools or even your pencil to gauge distances on your paper.
My Poses Look Stiff and Unnatural
If your figures resemble mannequins, you might be overlooking the importance of gesture and flow. Stiffness usually comes from drawing parts in isolation or not thinking about the body’s natural movement. It prevents your art from feeling dynamic.
Begin every figure drawing with a very loose, quick gesture sketch. Focus on the “line of action” that runs through the spine and the overall energy of the pose. Introduce contrapposto by tilting the shoulders and hips in opposing directions. Practice drawing quick, timed gesture studies to loosen up your hand and eye.
Key Takeaways
- Start with Gesture: Always begin by capturing the overall flow and movement of the pose before any details.
- Use Proportions: Establish a consistent proportional system (like head-lengths) early on to ensure accuracy.
- Think in Forms: Break down the body into simple 3D shapes (spheres, cylinders, boxes) to build volume.
- Embrace Asymmetry: Avoid stiff, symmetrical poses by incorporating natural tilts and counter-movements.
- Study Anatomy: Learn basic anatomical landmarks and muscle groups to make your figures more convincing.
- Practice Consistently: Drawing the human figure is a skill built over time with regular practice and observation.
Frequently Asked Questions
How often should I practice figure drawing?
Consistency is key. Aim for at least 15-30 minutes of practice daily, or several longer sessions per week. Even quick gesture sketches can significantly improve your understanding of form and movement over time.
Should I use references, or draw from imagination?
Absolutely use references! Especially when starting out, references are invaluable for understanding anatomy, proportions, and how the body moves. As you build a visual library, you can gradually draw more from imagination, but always return to references to refresh your knowledge.
What’s the best way to improve my understanding of anatomy?
Start with simplified anatomical diagrams that show major muscle groups and bone structures. Don’t try to memorize every single muscle. Focus on how these forms affect the surface of the body and how they change with different poses. Drawing from life or photographs of real people is also crucial.
How do I make my figures look more feminine?
Focus on key differences in proportion and fat distribution. Generally, female figures have wider hips relative to shoulders, a more defined waist, and more rounded forms due to subcutaneous fat. Pay attention to the curve of the back, the breasts, and the calves. However, remember that “feminine” can encompass a wide range of body types.
Our Top Recommended Finds
- Graphite Pencils (HB, 2B, 4B): A good range allows for light construction lines and darker, more defined strokes.
- Kneaded Eraser: Perfect for lifting graphite without damaging the paper, and for shaping into fine points for precise erasing.
- Large Sketchbook (9×12 inches or larger): Provides ample space for full figure drawings and allows for broad, flowing arm movements.
Embrace Your Artistic Journey
You now have a solid framework for drawing the female body. Remember, mastery comes not from a single perfect drawing, but from consistent effort and a willingness to learn from every stroke.
Don’t be afraid to make mistakes; they are essential stepping stones in your artistic development.
Keep practicing, keep observing, and consider exploring different artists’ approaches to figure drawing or even attending a life drawing class to further hone your skills.