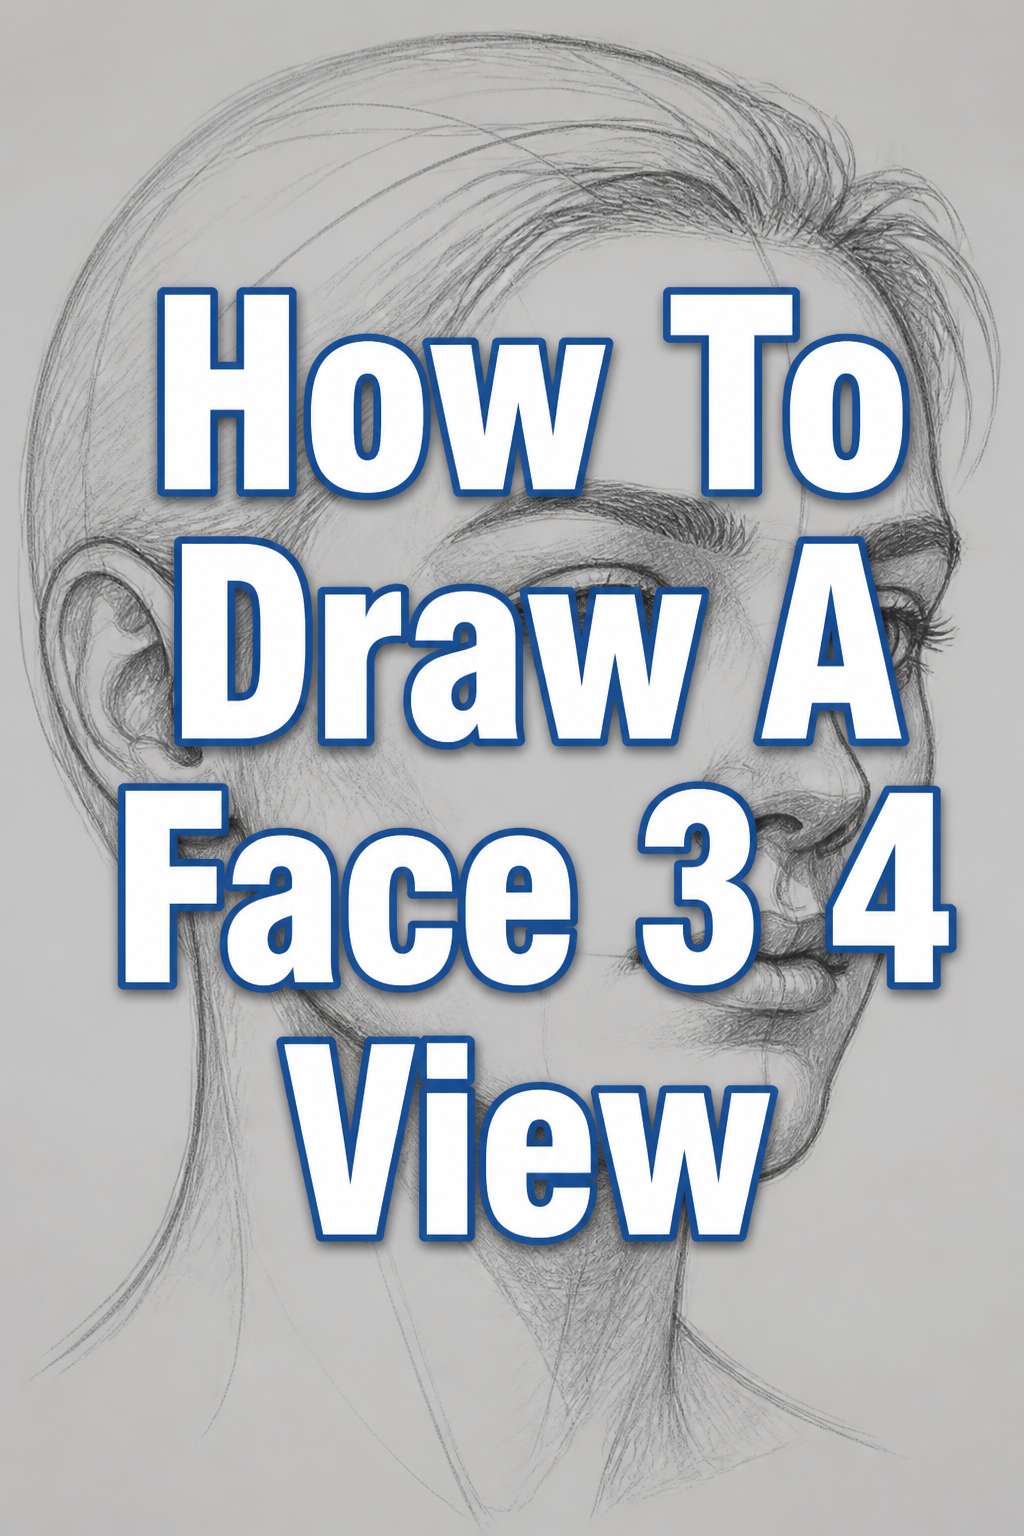
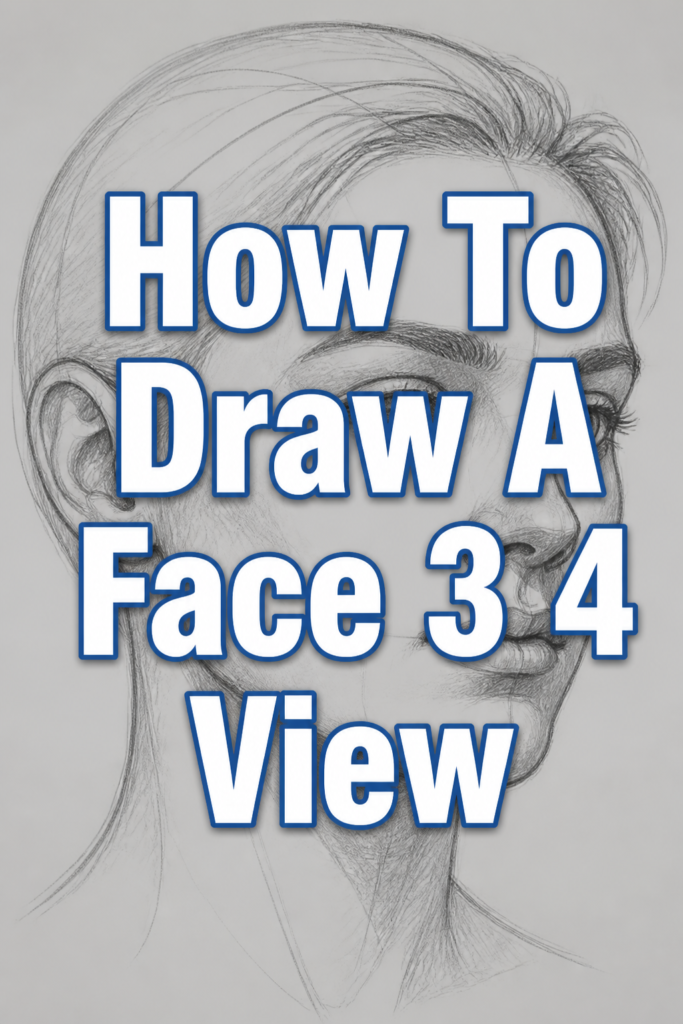
🎨 How To Draw A Face 3 4 View

& Painting
No rigid rules or pretension. Just practical guides, medium comparisons, and encouraging tips to help you enjoy the drawing & painting process.
Drawing a face in 3/4 view can feel like a significant leap from simple front or profile perspectives. I remember struggling to get the proportions right and make the face feel natural. This guide will help you navigate those challenges with confidence.
You’ll soon be creating dynamic, expressive portraits that truly capture depth. Let’s build your skills together, step by logical step.
Quick Overview
Mastering the 3/4 view adds incredible dimension to your character art and portraits. You’ll learn to translate complex angles into convincing forms.
- Time needed: 1-2 hours (per practice session)
- Difficulty: Intermediate
- What you’ll need: Pencil, paper, eraser, optional reference photos
Step-by-Step Instructions
Step 1: Understand the Foundation – The Sphere and Jaw
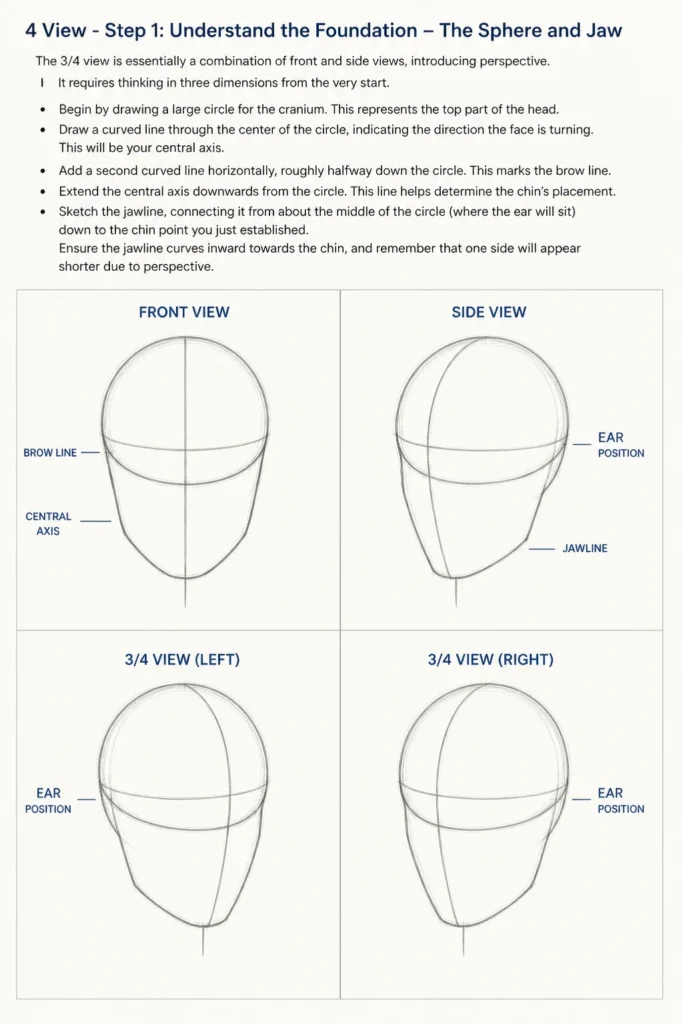
The 3/4 view is essentially a combination of front and side views, introducing perspective. It requires thinking in three dimensions from the very start.
- Begin by drawing a large circle for the cranium. This represents the top part of the head.
- Draw a curved line through the center of the circle, indicating the direction the face is turning. This will be your central axis.
- Add a second curved line horizontally, roughly halfway down the circle. This marks the brow line.
- Extend the central axis downwards from the circle. This line helps determine the chin’s placement.
- Sketch the jawline, connecting it from about the middle of the circle (where the ear will sit) down to the chin point you just established. Ensure the jawline curves inward towards the chin, and remember that one side will appear shorter due to perspective.
Pro Tip: Think of the head as a ball with a box (the jaw) attached. The curve of your initial guidelines dictates the head’s tilt and turn.
Step 2: Establish the Midline and Major Divisions
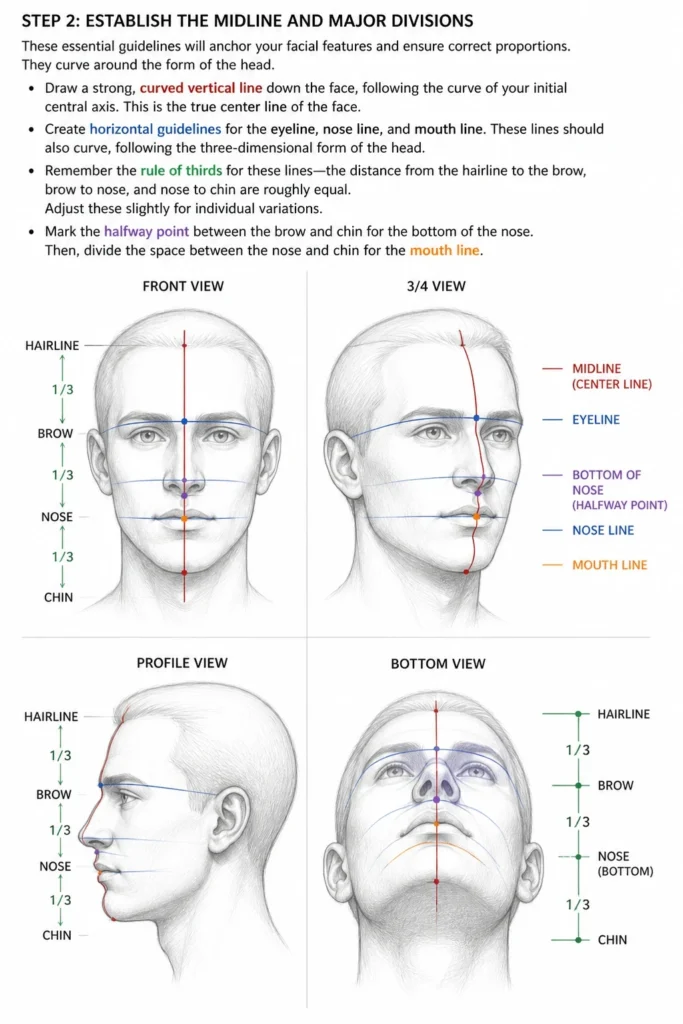
These essential guidelines will anchor your facial features and ensure correct proportions. They curve around the form of the head.
- Draw a strong, curved vertical line down the face, following the curve of your initial central axis. This is the true center line of the face.
- Create horizontal guidelines for the eyeline, nose line, and mouth line. These lines should also curve, following the three-dimensional form of the head.
- Remember the “rule of thirds” for these lines: the distance from the hairline to the brow, brow to nose, and nose to chin are roughly equal. Adjust these slightly for individual variations.
- Mark the halfway point between the brow and chin for the bottom of the nose. Then, divide the space between the nose and chin for the mouth line.
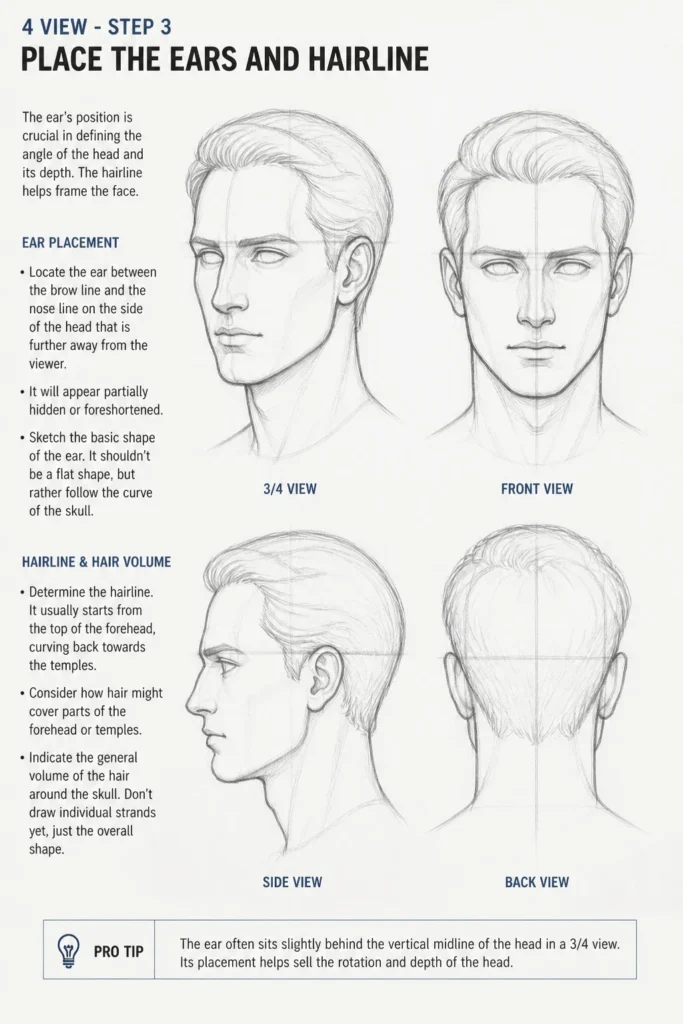
Step 3: Place the Ears and Hairline
The ear’s position is crucial in defining the angle of the head and its depth. The hairline helps frame the face.
- Locate the ear between the brow line and the nose line on the side of the head that is further away from the viewer. It will appear partially hidden or foreshortened.
- Sketch the basic shape of the ear. It shouldn’t be a flat shape, but rather follow the curve of the skull.
- Determine the hairline. It usually starts from the top of the forehead, curving back towards the temples. Consider how hair might cover parts of the forehead or temples.
- Indicate the general volume of the hair around the skull. Don’t draw individual strands yet, just the overall shape.
Pro Tip: The ear often sits slightly behind the vertical midline of the head in a 3/4 view. Its placement helps sell the rotation.
Step 4: Position the Eyes with Perspective
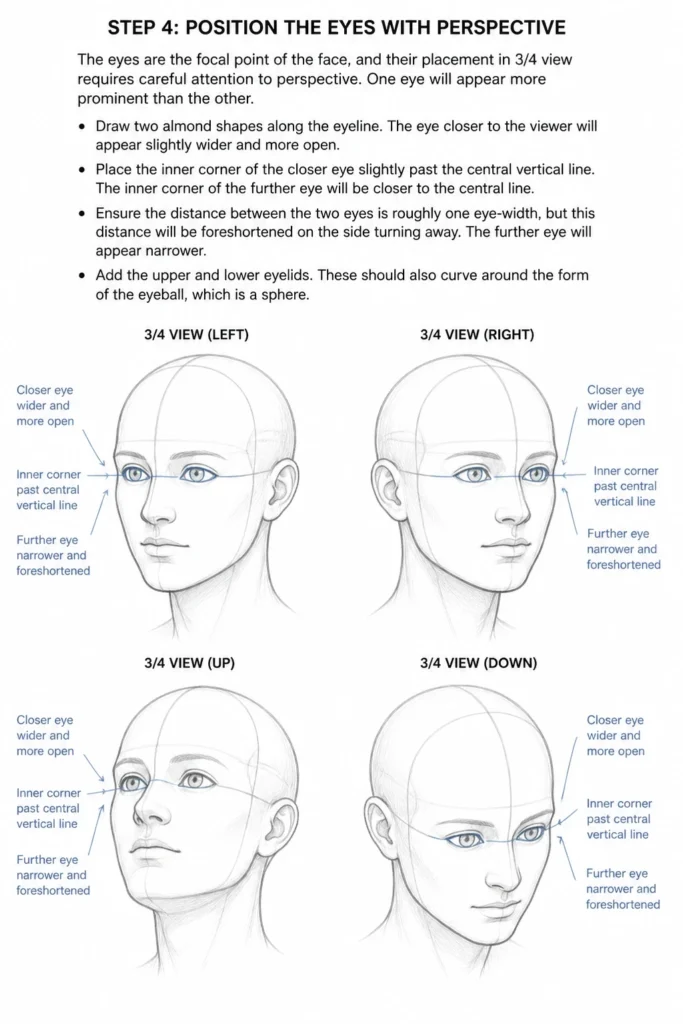
The eyes are the focal point of the face, and their placement in 3/4 view requires careful attention to perspective. One eye will appear more prominent than the other.
- Draw two almond shapes along the eyeline. The eye closer to the viewer will appear slightly wider and more open.
- Place the inner corner of the closer eye slightly past the central vertical line. The inner corner of the further eye will be closer to the central line.
- Ensure the distance between the two eyes is roughly one eye-width, but this distance will be foreshortened on the side turning away. The further eye will appear narrower.
- Add the upper and lower eyelids. These should also curve around the form of the eyeball, which is a sphere.
Step 5: Form the Nose and Mouth
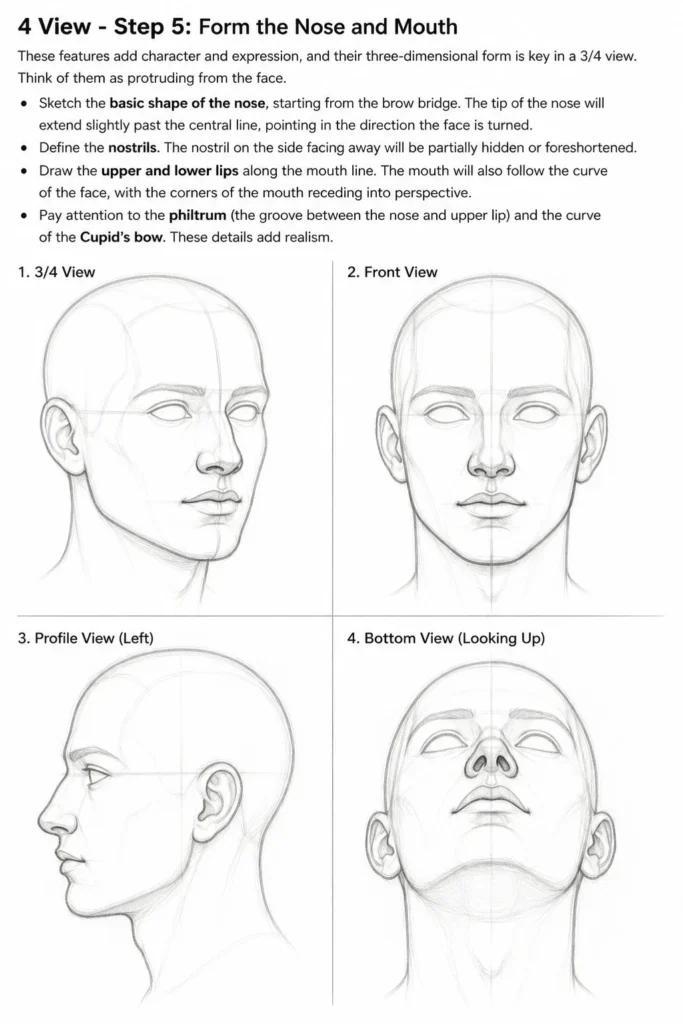
These features add character and expression, and their three-dimensional form is key in a 3/4 view. Think of them as protruding from the face.
- Sketch the basic shape of the nose, starting from the brow bridge. The tip of the nose will extend slightly past the central line, pointing in the direction the face is turned.
- Define the nostrils. The nostril on the side facing away will be partially hidden or foreshortened.
- Draw the upper and lower lips along the mouth line. The mouth will also follow the curve of the face, with the corners of the mouth receding into perspective.
- Pay attention to the philtrum (the groove between the nose and upper lip) and the curve of the Cupid’s bow. These details add realism.
Step 6: Refine the Jawline and Neck
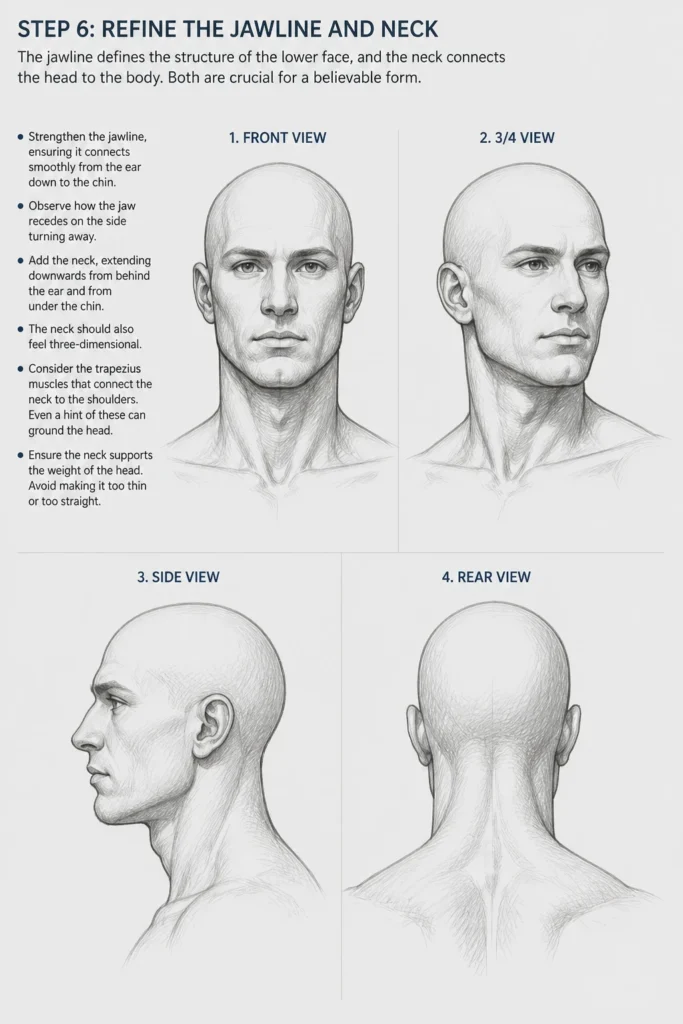
The jawline defines the structure of the lower face, and the neck connects the head to the body. Both are crucial for a believable form.
- Strengthen the jawline, ensuring it connects smoothly from the ear down to the chin. Observe how the jaw recedes on the side turning away.
- Add the neck, extending downwards from behind the ear and from under the chin. The neck should also feel three-dimensional.
- Consider the trapezius muscles that connect the neck to the shoulders. Even a hint of these can ground the head.
- Ensure the neck supports the weight of the head. Avoid making it too thin or too straight.
Step 7: Add Hair and Facial Details
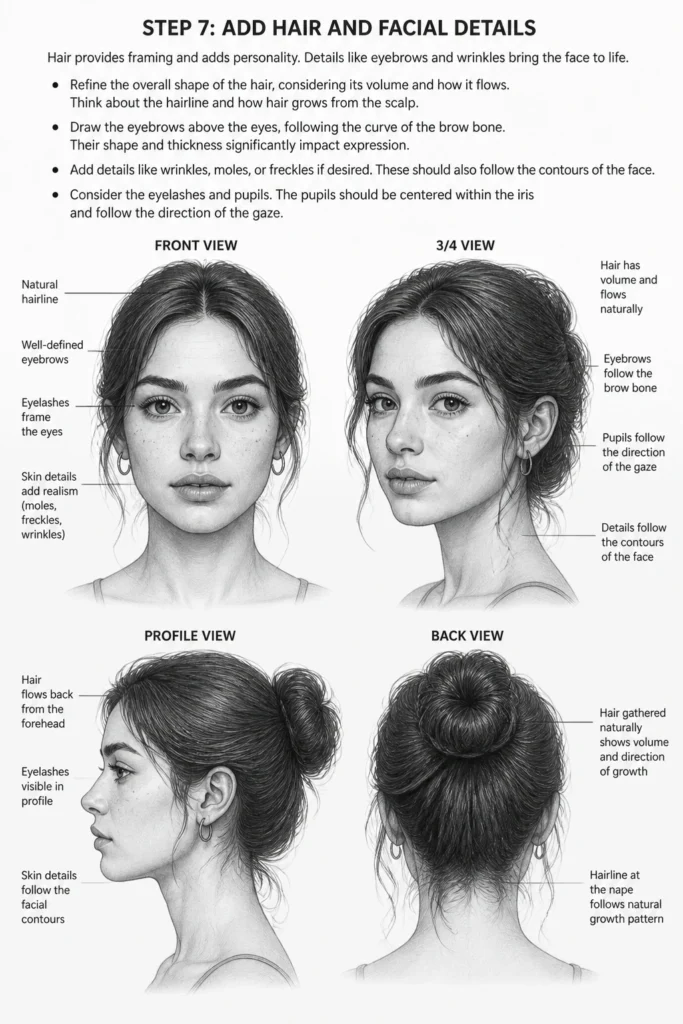
Hair provides framing and adds personality. Details like eyebrows and wrinkles bring the face to life.
- Refine the overall shape of the hair, considering its volume and how it flows. Think about the hairline and how hair grows from the scalp.
- Draw the eyebrows above the eyes, following the curve of the brow bone. Their shape and thickness significantly impact expression.
- Add details like wrinkles, moles, or freckles if desired. These should also follow the contours of the face.
- Consider the eyelashes and pupils. The pupils should be centered within the iris and follow the direction of the gaze.
Step 8: Introduce Shading and Form
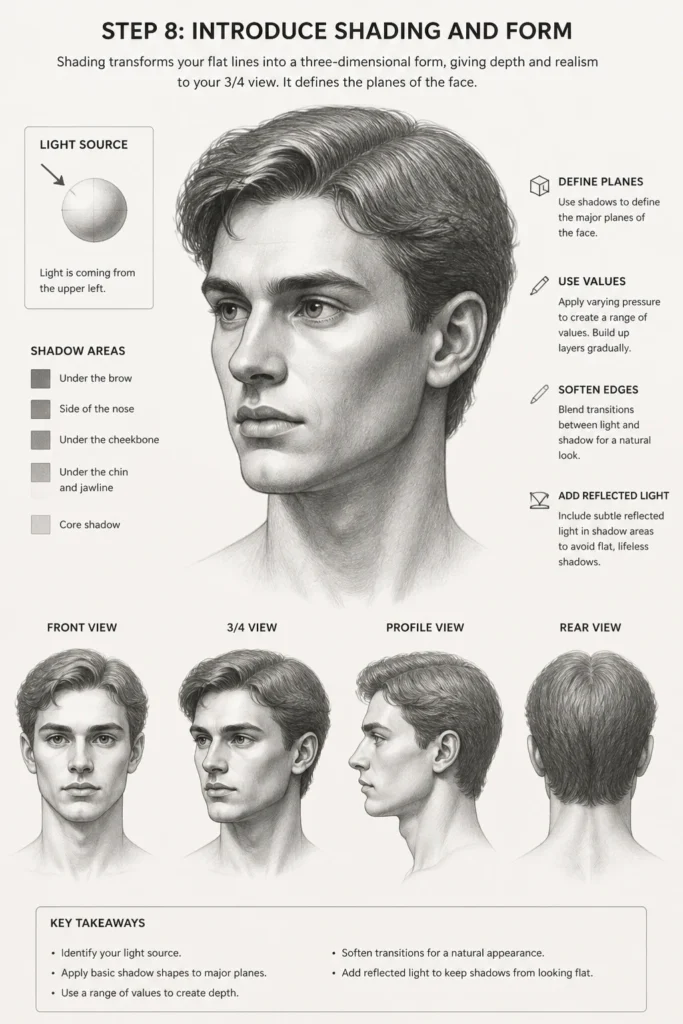
Shading transforms your flat lines into a three-dimensional form, giving depth and realism to your 3/4 view. It defines the planes of the face.
- Identify your light source. This will dictate where shadows fall on the face.
- Apply basic shadow shapes to major planes: under the brow, on the side of the nose, under the chin, and along the cheekbone.
- Use varying pressure with your pencil to create different values (lights and darks). Build up layers gradually.
- Soften transitions between light and shadow. Avoid harsh lines where light meets dark, unless you’re aiming for a very stylized look.
- Add some reflected light in the shadow areas. This prevents them from looking completely flat and dark.
Step 9: Review and Refine
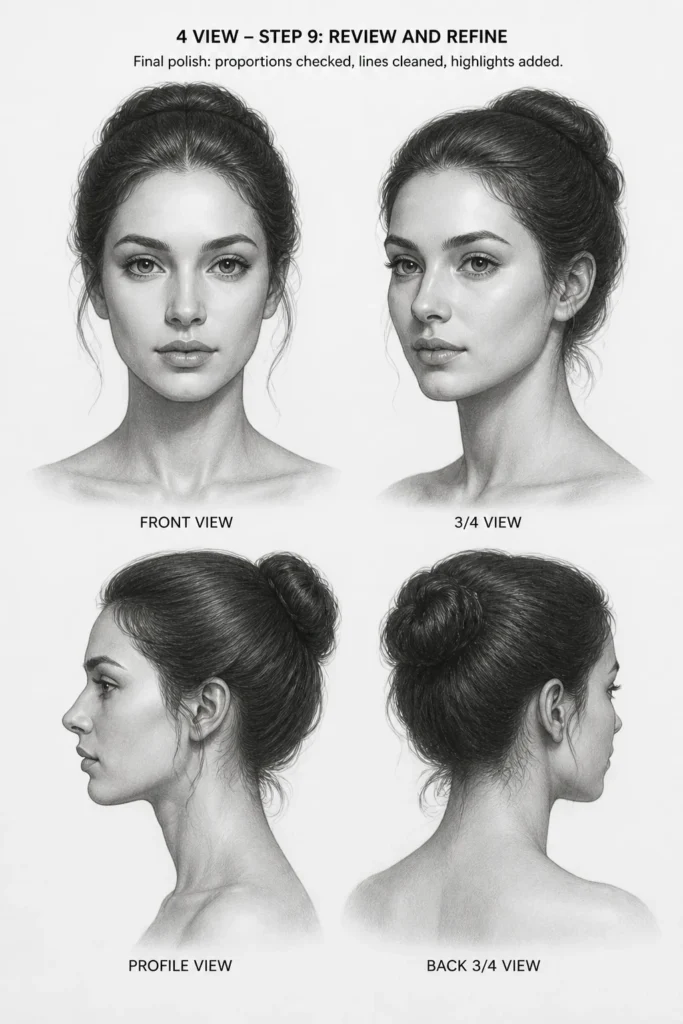
Step back and critically assess your drawing. This final stage is crucial for polishing your work and catching any errors.
- Check proportions. Do the eyes seem correctly spaced? Is the nose too long or short?
- Look for symmetry and balance, especially on the side of the face turning away.
- Erase any visible construction lines. These were guides and are no longer needed.
- Make small adjustments to lines, shapes, or shading. A little tweak can make a big difference.
- Consider adding subtle highlights to areas like the bridge of the nose, cheekbones, and lips.
Common Mistakes to Avoid
Flat Facial Features
Many beginners draw eyes, noses, and mouths as if looking straight on, even when the head is turned. This makes the face look distorted or like a sticker placed on a sphere. Remember that all features must curve around the head’s form and foreshorten appropriately. Think of the nose as a wedge, the eyes as spheres in sockets, and the mouth as wrapping around a cylinder.
Incorrect Eyeline Curvature
A common error is drawing the eyeline as a straight horizontal line. In a 3/4 view, the eyeline (and all horizontal guidelines) must curve around the spherical shape of the head. If the head is tilted, this curve will also tilt. A flat eyeline flattens the entire face, removing the sense of depth.
Symmetrical Eyes
When a face is turned, the eye further from the viewer will appear narrower and slightly smaller due to perspective and foreshortening. Drawing both eyes the same size and shape makes the face look unnatural and flat. Consciously make the further eye more compressed.
Misplaced Ear
The ear is a crucial anchor point for the 3/4 view. Placing it too far back or too far forward, or too high or low, can throw off the entire head’s structure. Remember it generally aligns between the brow and nose lines and sits behind the main facial mass.
Troubleshooting
Face Looks Flat and Lacks Depth
If your 3/4 view drawing looks flat, it’s likely due to insufficient curvature in your guidelines and features. Ensure your central vertical line and horizontal feature lines (eyes, nose, mouth) all curve strongly around the imaginary sphere of the head. Also, exaggerate the foreshortening of the features on the side turning away.
One Side of the Face Appears Too Wide or Too Narrow
This often indicates an issue with establishing the initial head shape and jawline. Revisit Step 1, ensuring your initial sphere and the connecting jawline accurately represent the perspective. The side of the face turning away will appear significantly compressed, while the side closer to the viewer will show more of its width. Check your horizontal measurements for eye spacing and cheek width.
Features Don’t Align Correctly
Misalignment usually stems from inaccurate initial guidelines. Go back to Step 2 and verify your brow, nose, and mouth lines are correctly placed and curved. Also, ensure the ear is correctly positioned relative to these lines. Use a straight edge held against your drawing to check for horizontal and vertical consistency.
Key Takeaways
- Start with a Sphere: Always begin with a basic spherical form for the cranium to establish volume.
- Curve Your Guidelines: All horizontal and vertical guidelines must curve to follow the head’s three-dimensional form.
- Embrace Foreshortening: Features on the side of the face turning away will appear compressed and narrower.
- Place the Ear Carefully: The ear acts as an important anchor for the head’s angle and depth.
- Layer Your Shading: Use shading to define the planes of the face and create a sense of depth and realism.
- Practice Perspective: Understanding how features recede in space is crucial for a convincing 3/4 view.
Frequently Asked Questions
What is the difference between a 3/4 view and a profile view?
A profile view shows the face directly from the side, with only one eye, ear, and nostril visible. A 3/4 view shows the face at an angle, revealing parts of both sides, but with one side more prominent than the other. It’s a more dynamic and complex angle.
How do I make the face look less symmetrical in a 3/4 view?
To avoid symmetry, actively foreshorten the features on the side of the face turning away from the viewer. Make the eye on that side narrower, the nostril partially hidden, and the cheekbone and jawline appear more compressed. This natural asymmetry is key to a convincing 3/4 view.
Should I use reference photos when practicing?
Absolutely, using reference photos is highly recommended. They provide invaluable information about how light falls on a face, how features foreshorten, and how individual variations appear in a 3/4 view. Look for photos with clear lighting and varied angles.
How can I make the drawing look more like a specific person?
Once you master the basic structure, focus on the unique characteristics of that person. Pay attention to the specific shape of their eyes, nose, mouth, and jawline. Observe their hairline, the curve of their eyebrows, and any distinct facial features. Practice makes perfect in capturing likeness.
Our Top Recommended Finds
- Sketchbook with Heavyweight Paper: Provides a sturdy surface that can handle multiple layers and erasing without tearing.
- Set of Graphite Pencils (HB, 2B, 4B, 6B): Offers a range of hardness for light sketching, darker lines, and rich shading.
- Kneaded Eraser: Excellent for lifting graphite gently without damaging the paper, and for creating highlights.
Your Next Artistic Journey Awaits
You’ve now built a solid foundation for drawing faces in 3/4 view. This skill opens up a world of expressive possibilities in your art. Don’t stop here.
Continue to practice these steps with different faces and angles. Experiment with various lighting conditions to deepen your understanding of form and shadow. Pick up your pencil right now and draw another face; each attempt strengthens your artistic muscle.
& Painting
No rigid rules or pretension. Just practical guides, medium comparisons, and encouraging tips to help you enjoy the drawing & painting process.