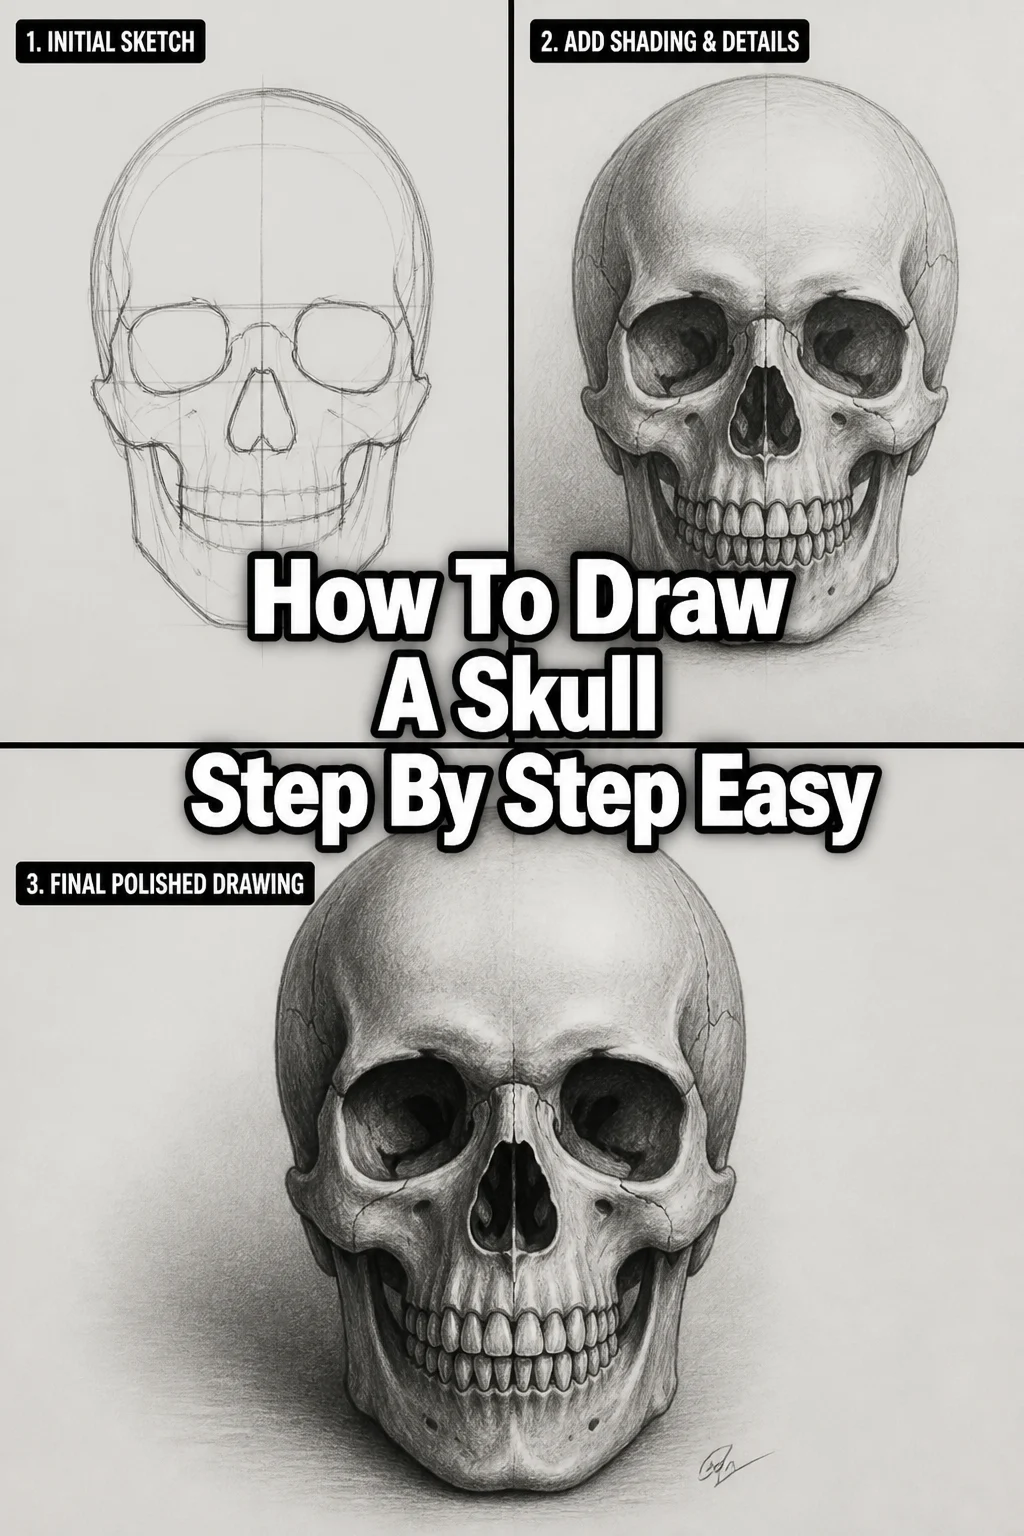
💀 How To Draw A Skull Step By Step Easy
I remember struggling with drawing skulls when I first started out, often getting proportions wrong or making them look too cartoonish. This guide distills years of practice into simple, actionable steps, making it easy for anyone to create a realistic skull drawing. You’ll learn the foundational techniques that professional artists use, broken down into manageable parts.
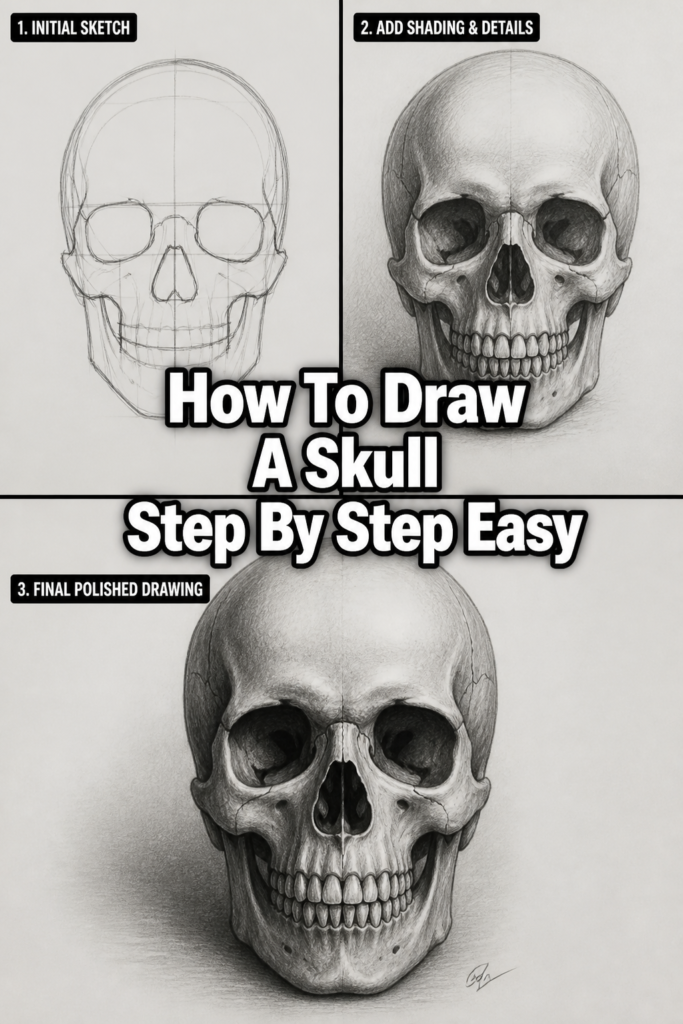
Quick Overview
This guide will walk you through creating a compelling skull drawing from scratch, focusing on clear shapes and accurate proportions. You’ll gain confidence in sketching complex forms.
Time needed: 45-60 minutes (can be longer if you add extensive detail or shading)
Difficulty: Beginner
What you’ll need: Pencil (HB or 2B recommended), eraser, drawing paper, a reference image (optional but helpful)
Step-by-Step Instructions
Step 1: Lay Down the Basic Head Shape
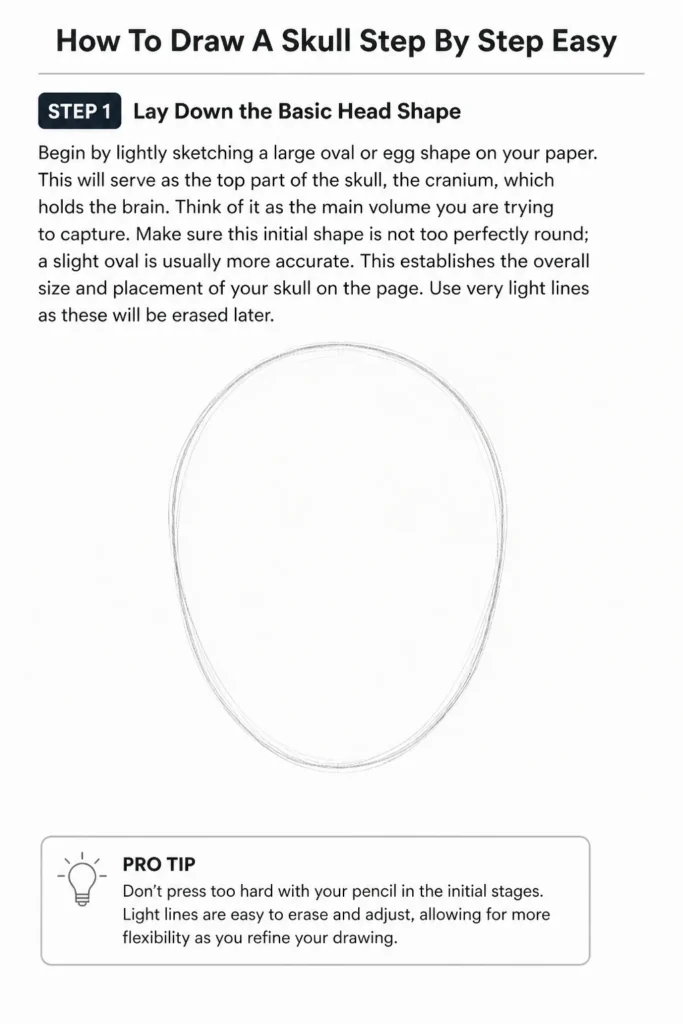
Begin by lightly sketching a large oval or egg shape on your paper. This will serve as the top part of the skull, the cranium, which holds the brain. Think of it as the main volume you are trying to capture.
Make sure this initial shape is not too perfectly round; a slight oval is usually more accurate. This establishes the overall size and placement of your skull on the page. Use very light lines as these will be erased later.
Pro Tip: Don’t press too hard with your pencil in the initial stages. Light lines are easy to erase and adjust, allowing for more flexibility as you refine your drawing.
Step 2: Establish the Center Lines and Proportions
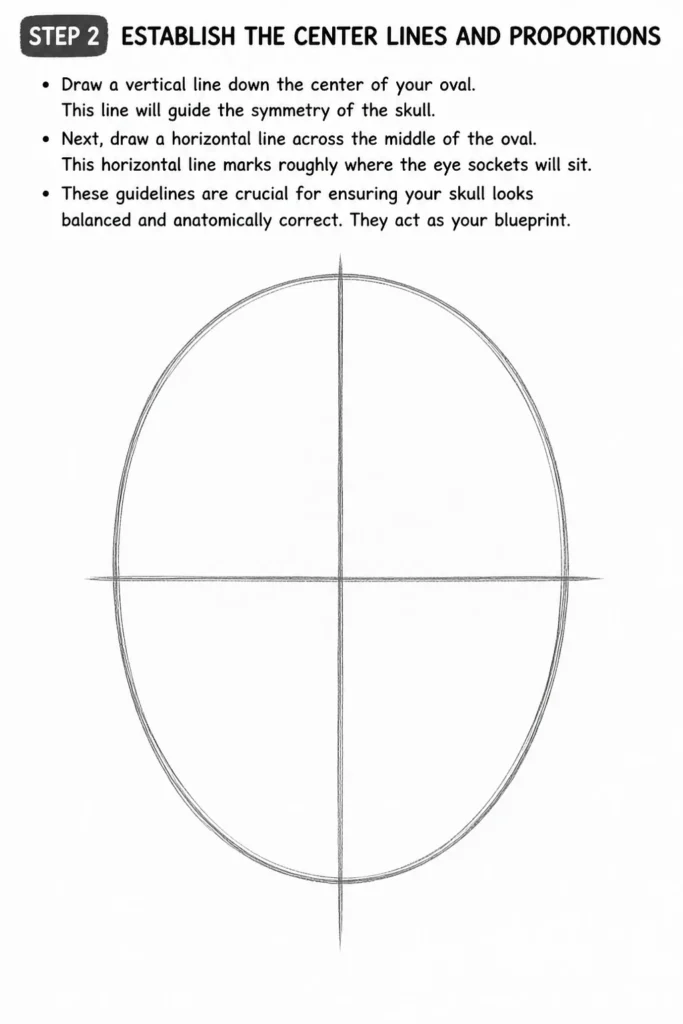
Draw a vertical line down the center of your oval. This line will guide the symmetry of the skull. Next, draw a horizontal line across the middle of the oval.
This horizontal line marks roughly where the eye sockets will sit. These guidelines are crucial for ensuring your skull looks balanced and anatomically correct. They act as your blueprint.
Step 3: Sketch the Eye Sockets and Nasal Cavity
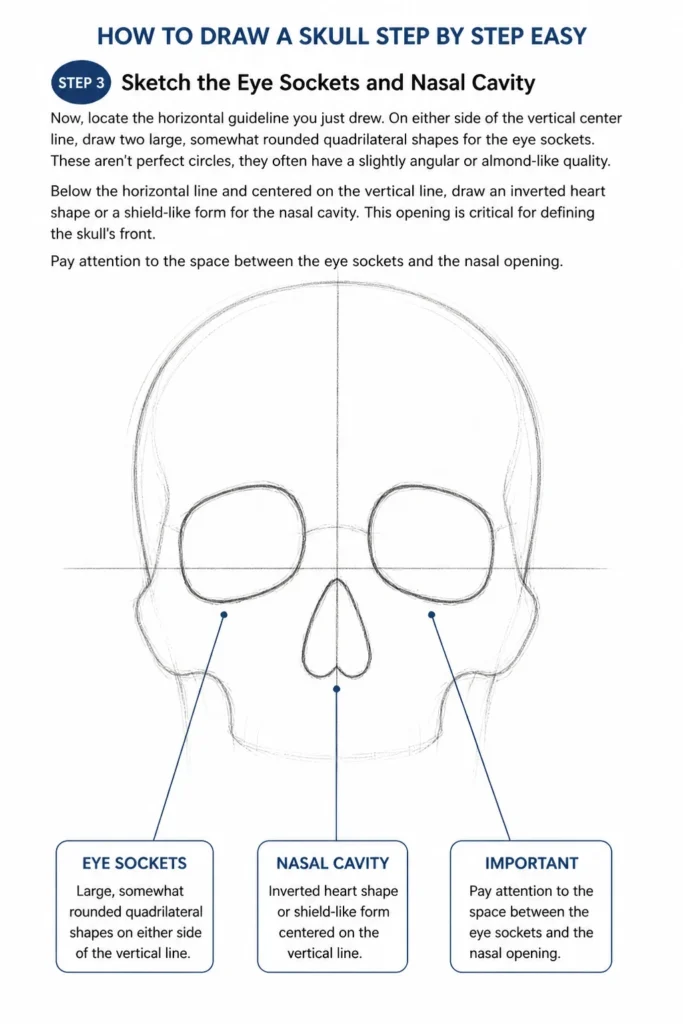
Now, locate the horizontal guideline you just drew. On either side of the vertical center line, draw two large, somewhat rounded quadrilateral shapes for the eye sockets. These aren’t perfect circles; they often have a slightly angular or almond-like quality.
Below the horizontal line and centered on the vertical line, draw an inverted heart shape or a shield-like form for the nasal cavity. This opening is critical for defining the skull’s front. Pay attention to the space between the eye sockets and the nasal opening.
Step 4: Define the Cheekbones (Zygomatic Arches)
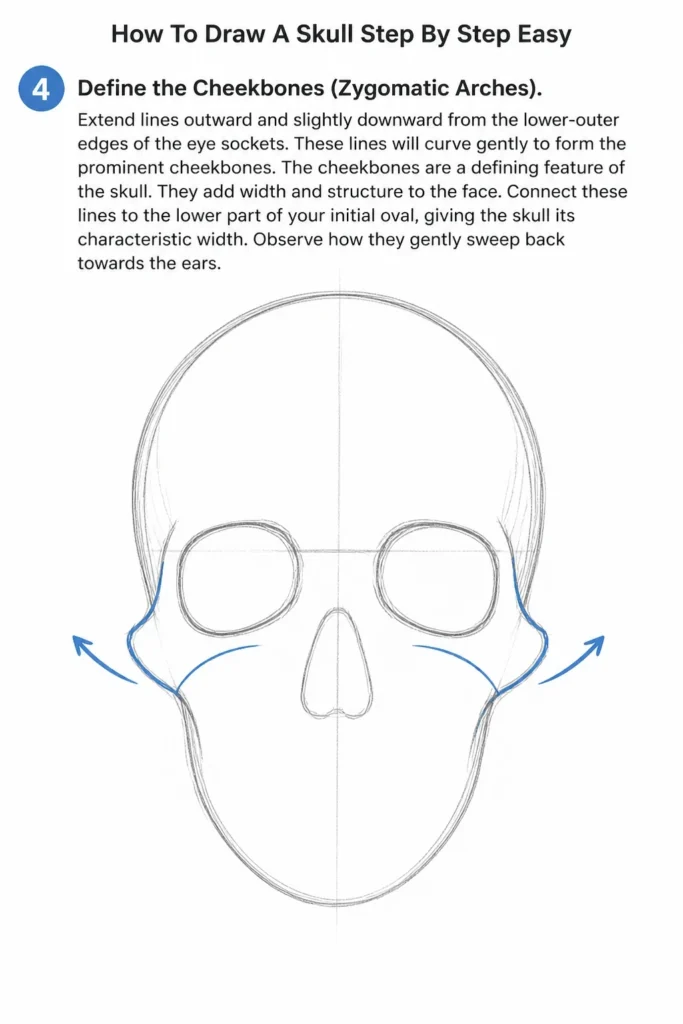
Extend lines outward and slightly downward from the lower-outer edges of the eye sockets. These lines will curve gently to form the prominent cheekbones. The cheekbones are a defining feature of the skull.
They add width and structure to the face. Connect these lines to the lower part of your initial oval, giving the skull its characteristic width. Observe how they gently sweep back towards the ears.
Step 5: Outline the Jawbone (Mandible)
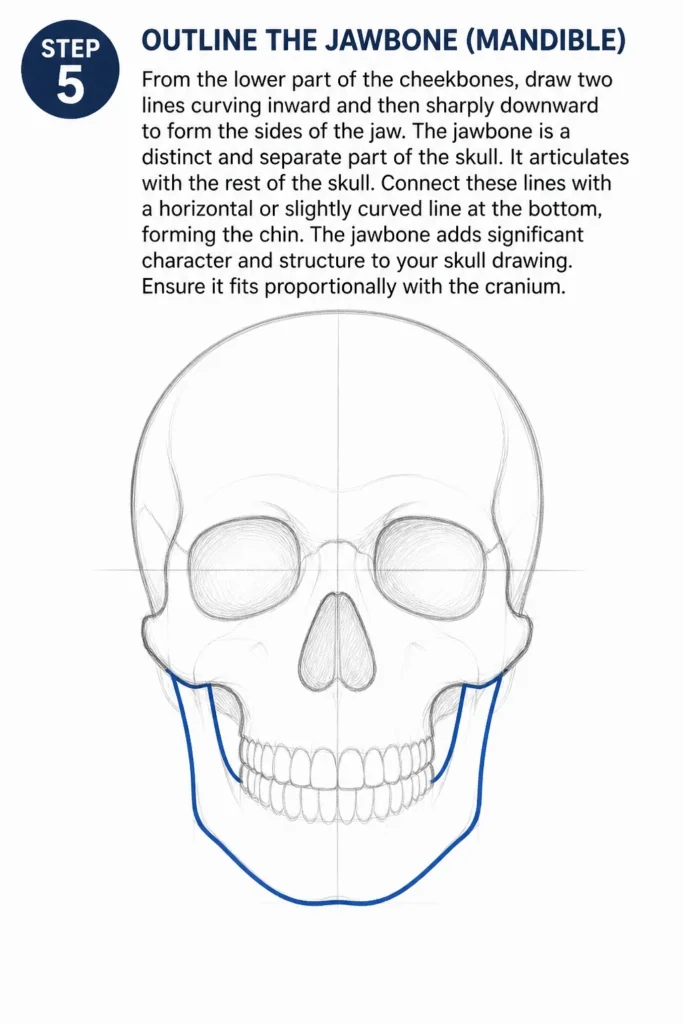
From the lower part of the cheekbones, draw two lines curving inward and then sharply downward to form the sides of the jaw. The jawbone is a distinct and separate part of the skull. It articulates with the rest of the skull.
Connect these lines with a horizontal or slightly curved line at the bottom, forming the chin. The jawbone adds significant character and structure to your skull drawing. Ensure it fits proportionally with the cranium.
Step 6: Add the Teeth and Maxilla
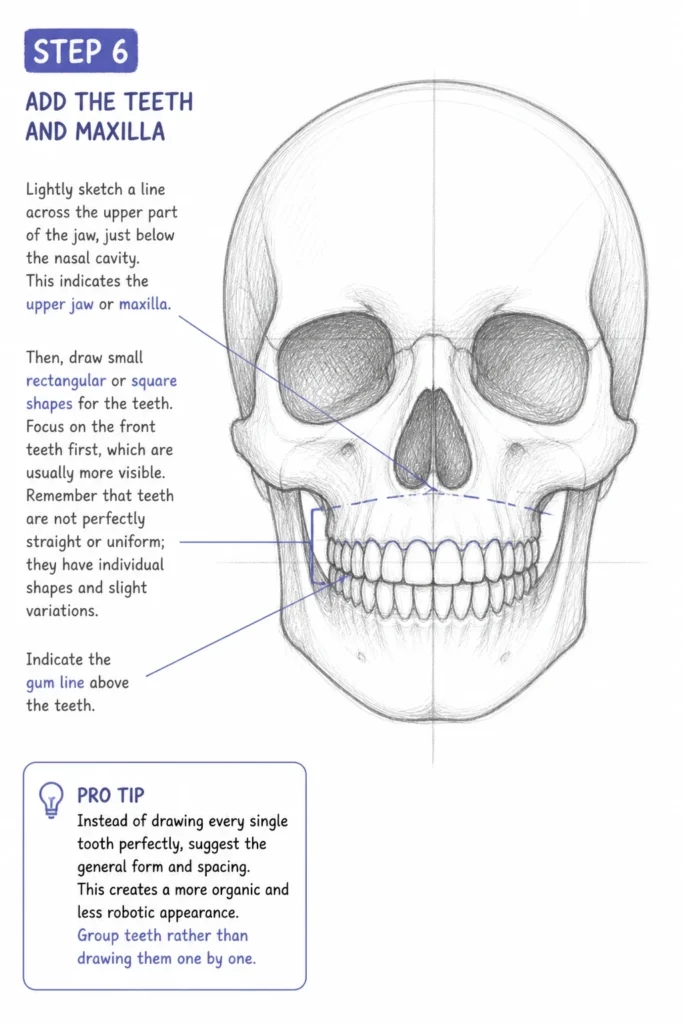
Lightly sketch a line across the upper part of the jaw, just below the nasal cavity. This indicates the upper jaw or maxilla. Then, draw small rectangular or square shapes for the teeth.
Focus on the front teeth first, which are usually more visible. Remember that teeth are not perfectly straight or uniform; they have individual shapes and slight variations. Indicate the gum line above the teeth.
Pro Tip: Instead of drawing every single tooth perfectly, suggest the general form and spacing. This creates a more organic and less robotic appearance. Group teeth rather than drawing them one by one.
Step 7: Refine the Skull’s Contours and Details
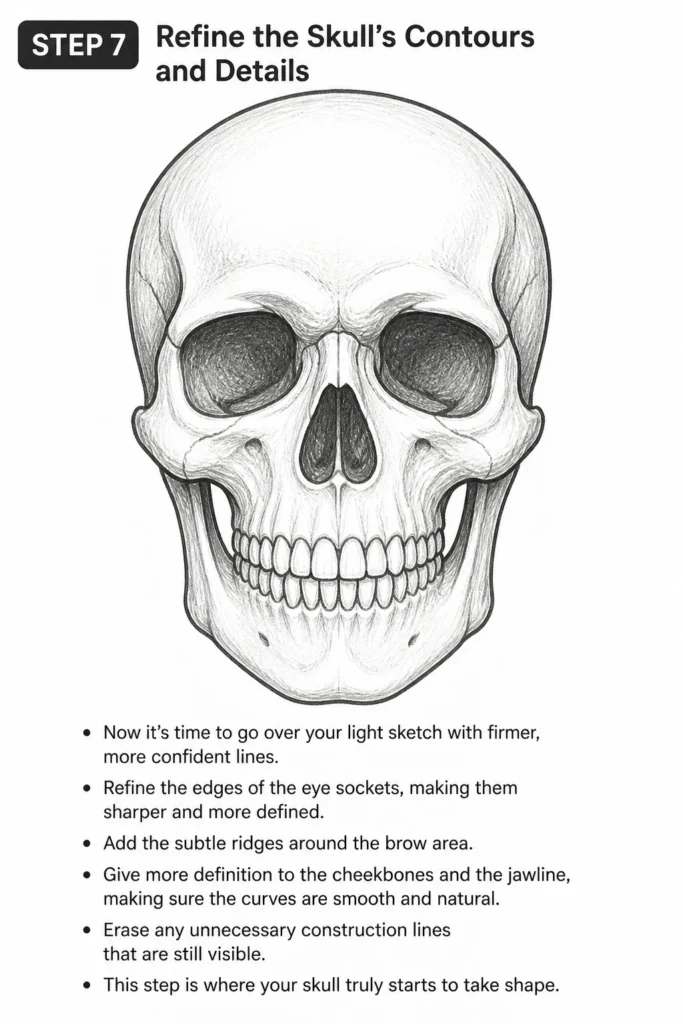
Now it’s time to go over your light sketch with firmer, more confident lines. Refine the edges of the eye sockets, making them sharper and more defined. Add the subtle ridges around the brow area.
Give more definition to the cheekbones and the jawline, making sure the curves are smooth and natural. Erase any unnecessary construction lines that are still visible. This step is where your skull truly starts to take shape.
Step 8: Introduce Basic Shading and Depth
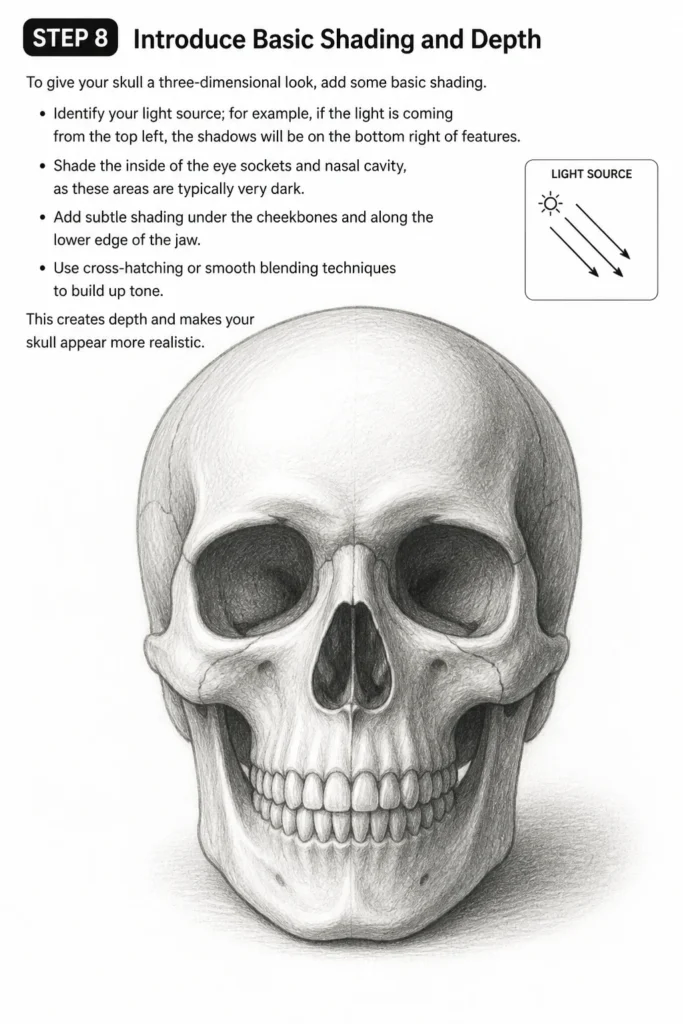
To give your skull a three-dimensional look, add some basic shading. Identify your light source; for example, if the light is coming from the top left, the shadows will be on the bottom right of features. Shade the inside of the eye sockets and nasal cavity, as these areas are typically very dark.
Add subtle shading under the cheekbones and along the lower edge of the jaw. Use cross-hatching or smooth blending techniques to build up tone. This creates depth and makes your skull appear more realistic.
Step 9: Add Final Details and Clean Up
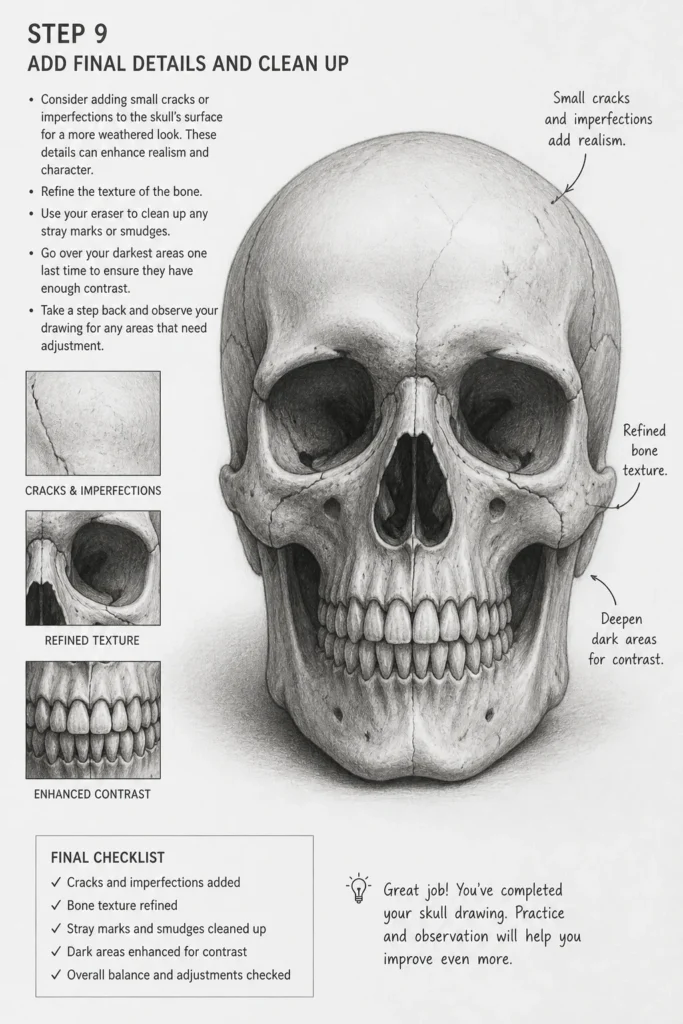
Consider adding small cracks or imperfections to the skull’s surface for a more weathered look. These details can enhance realism and character. Refine the texture of the bone.
Use your eraser to clean up any stray marks or smudges. Go over your darkest areas one last time to ensure they have enough contrast. Take a step back and observe your drawing for any areas that need adjustment.
Common Mistakes to Avoid
Incorrect Proportions
Many beginners make the cranium too small or the jaw too large, leading to an unbalanced skull. Always start with a large, accurate basic head shape before adding features. Regularly compare the size of the cranium to the jaw and the facial features.
Remember that the cranium makes up a significant portion of the entire skull. Use your initial guidelines to maintain balance. If something looks off, it usually comes down to proportional errors in the early stages.
Overly Symmetrical Features
While skulls have bilateral symmetry, they are not perfectly mirrored. Drawing eye sockets or cheekbones as exact duplicates can make the skull look unnatural or robotic. Introduce slight variations.
Minor differences in bone structure or wear and tear can add realism. Observe how real skulls often have subtle asymmetries. Embrace these small imperfections to make your drawing more lifelike.
Flat Appearance
Failing to use shading or not understanding how light interacts with the skull’s curves can result in a flat, two-dimensional drawing. The skull is a complex three-dimensional object. Think about how light wraps around its forms.
Always consider your light source and apply shadows to create depth, particularly within the eye sockets, nasal cavity, and under the cheekbones. Shading is key to making your skull pop off the page.
Neglecting Reference Images
Even experienced artists use reference images. Trying to draw a skull purely from memory can lead to anatomical inaccuracies or generic results. A good reference provides crucial details.
Find high-quality images of human skulls from various angles. Study the subtle curves, the placement of openings, and the intricate details of the bone structure. This will greatly improve the accuracy and realism of your drawing.
Troubleshooting
My Skull Looks Too Flat
If your skull lacks depth, it’s likely due to insufficient shading or a lack of understanding of form. Revisit your light source. Imagine where the light hits and where shadows would naturally fall.
Focus on shading the recessed areas like the eye sockets and nasal cavity very darkly. Add lighter shadows that follow the curves of the cranium and jaw. Gradually build up your tones to create a sense of volume.
The Features Don’t Look Symmetrical
If your skull’s features appear lopsided, your initial vertical center line might be off, or you might not be consistently measuring distances from it. Go back to your basic construction lines. Ensure your vertical center line is truly central.
Use the horizontal line to align the tops and bottoms of the eye sockets. Measure the distance from the center line to the outer edge of each eye socket and cheekbone. Make small adjustments until the balance feels right.
The Skull Looks Unrealistic or Cartoonish
This often happens when proportions are incorrect or details are oversimplified. Review your reference images closely. Pay attention to the subtle angles and curves of a real skull.
Avoid making features like eye sockets or teeth too perfectly geometric. Real bone has slight irregularities and organic shapes. Add subtle textures or imperfections to the bone surface to enhance realism.
Key Takeaways
Always begin with light, basic shapes to establish overall proportions and placement.
Utilize construction lines for symmetry and accurate feature placement.
Pay close attention to the unique shapes of the eye sockets, nasal cavity, and jaw.
Refine your lines gradually, moving from loose sketches to confident contours.
Employ shading effectively to create depth and a three-dimensional appearance.
Don’t be afraid to use reference images to ensure anatomical accuracy and realism.
Frequently Asked Questions
What pencil hardness is best for drawing skulls?
An HB pencil is excellent for initial sketching and general outlines because it’s not too dark and easy to erase. For shading and darker details, a 2B or even 4B pencil works well to achieve richer tones. Using a range of pencils allows for varied line weights and shading intensity.
How do I make the teeth look natural?
Avoid drawing each tooth as a perfect, isolated rectangle. Instead, suggest the overall curve of the dental arch and the general shape of the teeth. Show slight gaps or overlaps. Focus on the front few teeth clearly and then imply the presence of others further back.
Should I draw the entire jawbone or just parts of it?
For a complete skull drawing, you should include the entire jawbone (mandible). It’s a crucial component that defines the lower part of the face. However, if you’re focusing on just the cranium, you might omit it. This guide includes the full jaw for a complete skull.
How can I add more character to my skull drawing?
Once you master the basic anatomy, experiment with different angles and lighting. Consider adding subtle cracks, moss, or other environmental elements to suggest age or context. You can also vary the bone texture or introduce slight stylistic exaggerations for a unique look.
Our Top Recommended Finds
Sketchbook with Quality Paper: A good sketchbook prevents bleed-through and holds pencil marks well. This makes your drawing experience much more enjoyable.
Set of Graphite Pencils: Having a range of hardness (e.g., HB, 2B, 4B, 6B) allows for greater control over line weight and shading. It broadens your artistic capabilities.
Kneaded Eraser: Unlike standard erasers, a kneaded eraser can be molded to lift graphite gently without smudging, perfect for subtle corrections and highlights.
Your Next Creative Journey
You’ve now learned the essential steps to draw a compelling skull. This skill is a fantastic foundation for understanding human anatomy and form. Keep practicing these techniques.
Consider applying these principles to drawing other anatomical structures or even full figures. Pick up your pencil again today and continue exploring the vast world of drawing!