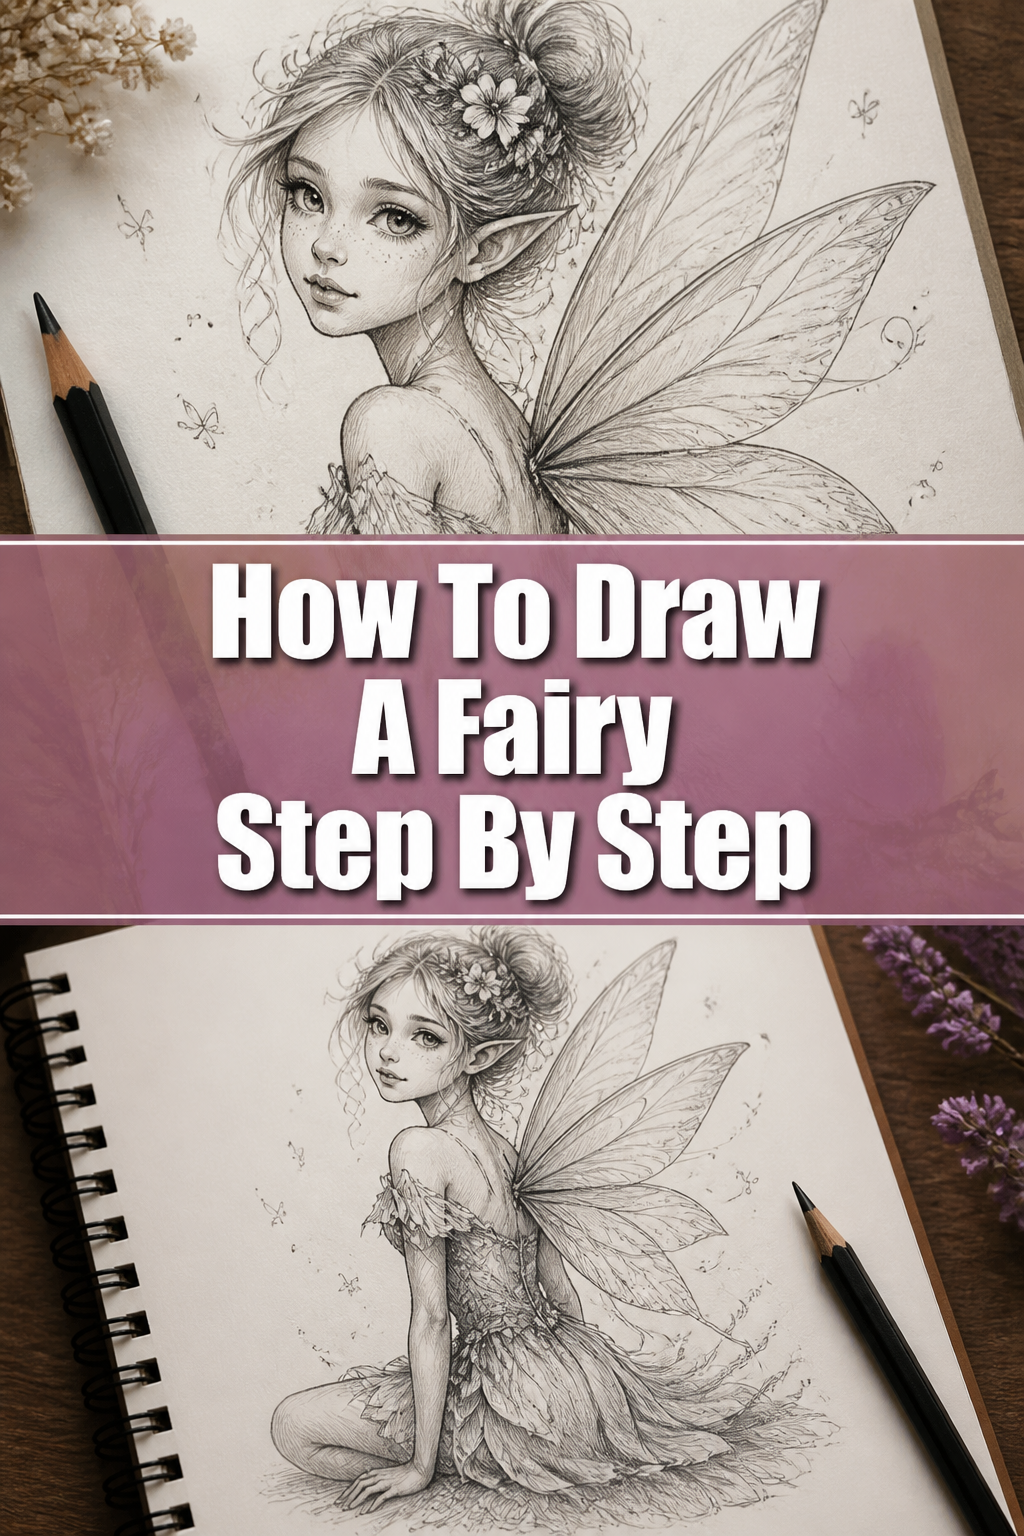
🧚♀️ How To Draw A Fairy Step By Step

& Painting
No rigid rules or pretension. Just practical guides, medium comparisons, and encouraging tips to help you enjoy the drawing & painting process.
Drawing a fairy can feel like stepping into a magical world, but sometimes knowing where to begin is the hardest part. I remember my own frustration trying to capture their delicate grace on paper, often resulting in stiff, uninspired figures.
This guide shares the practical techniques I’ve learned over years of sketching, breaking down the process into easy, manageable steps. You’ll soon be creating your own enchanting fairy illustrations with confidence.
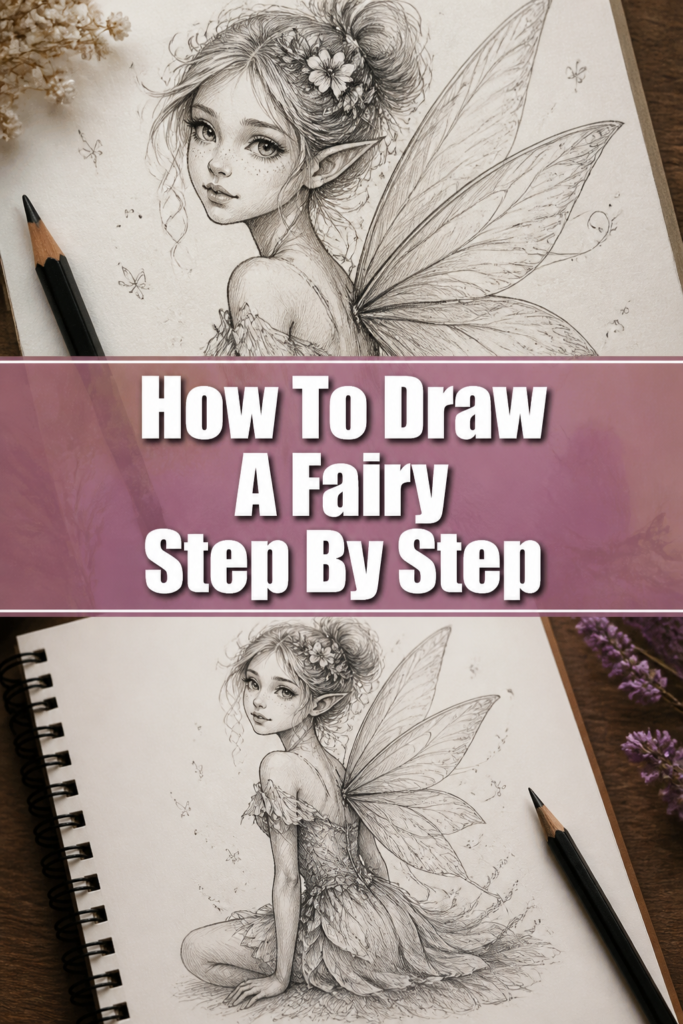
Quick Overview
This guide will walk you through creating a charming fairy illustration from basic shapes to intricate details. You’ll learn fundamental drawing techniques applicable to many other subjects.
- Time needed: 60-90 minutes (can be longer if you add extensive coloring)
- Difficulty: Beginner
- What you’ll need: Pencil (HB or 2B recommended), paper, eraser, optional fine-liner pen, colored pencils or markers
Step-by-Step Instructions
Step 1: Lay Down Basic Shapes for the Pose
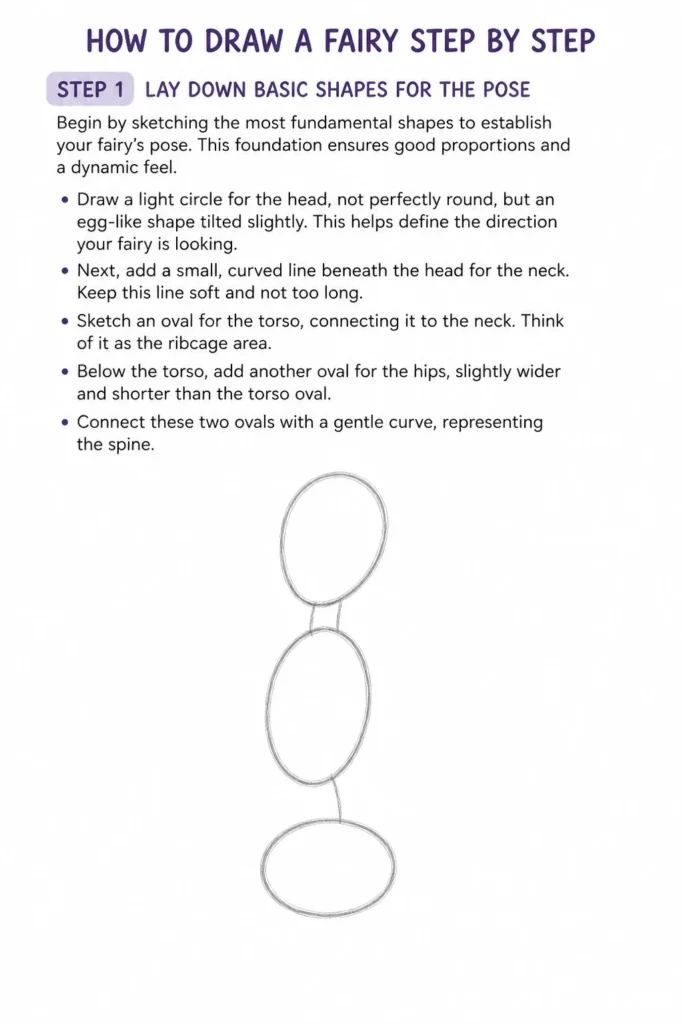
Begin by sketching the most fundamental shapes to establish your fairy’s pose. This foundation ensures good proportions and a dynamic feel.
Draw a light circle for the head, not perfectly round, but an egg-like shape tilted slightly. This helps define the direction your fairy is looking.
Next, add a small, curved line beneath the head for the neck. Keep this line soft and not too long.
Sketch an oval for the torso, connecting it to the neck. Think of it as the ribcage area.
Below the torso, add another oval for the hips, slightly wider and shorter than the torso oval. Connect these two ovals with a gentle curve, representing the spine.
Step 2: Sketch the Limbs and Joint Placement
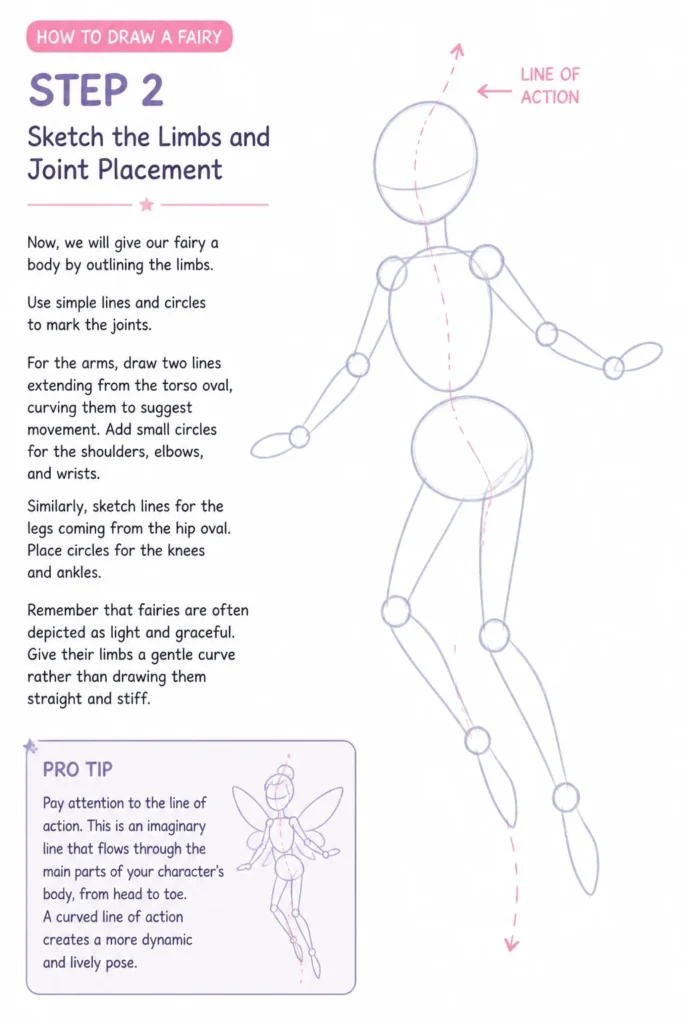
Now, we will give our fairy a body by outlining the limbs. Use simple lines and circles to mark the joints.
For the arms, draw two lines extending from the torso oval, curving them to suggest movement. Add small circles for the shoulders, elbows, and wrists.
Similarly, sketch lines for the legs coming from the hip oval. Place circles for the knees and ankles.
Remember that fairies are often depicted as light and graceful. Give their limbs a gentle curve rather than drawing them straight and stiff.
Pro Tip: Pay attention to the line of action. This is an imaginary line that flows through the main parts of your character’s body, from head to toe. A curved line of action creates a more dynamic and lively pose.
Step 3: Refine the Body and Facial Guidelines
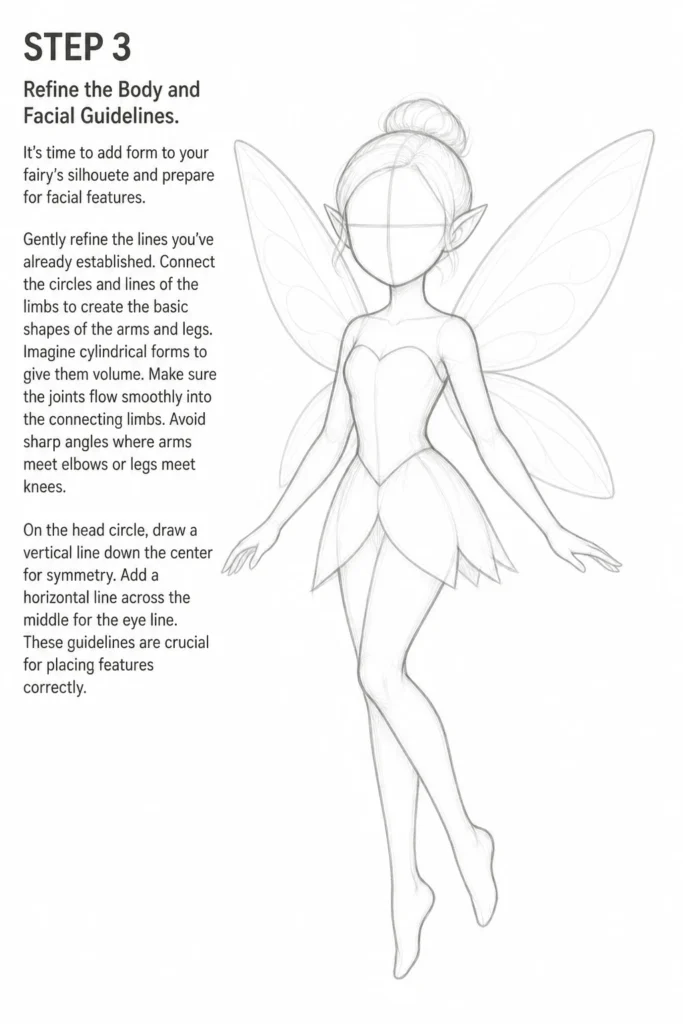
It’s time to add form to your fairy’s silhouette and prepare for facial features. Gently refine the lines you’ve already established.
Connect the circles and lines of the limbs to create the basic shapes of the arms and legs. Imagine cylindrical forms to give them volume.
Make sure the joints flow smoothly into the connecting limbs. Avoid sharp angles where arms meet elbows or legs meet knees.
On the head circle, draw a vertical line down the center for symmetry. Add a horizontal line across the middle for the eye line. These guidelines are crucial for placing features correctly.
Step 4: Detail the Face and Hairline
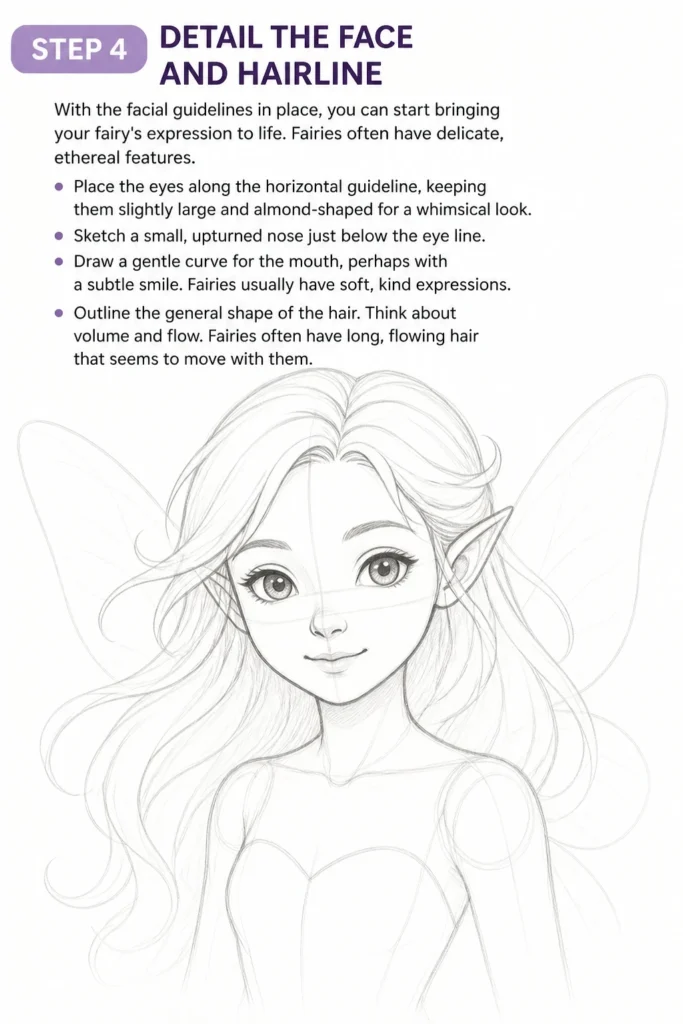
With the facial guidelines in place, you can start bringing your fairy’s expression to life. Fairies often have delicate, ethereal features.
Place the eyes along the horizontal guideline, keeping them slightly large and almond-shaped for a whimsical look. Sketch a small, upturned nose just below the eye line.
Draw a gentle curve for the mouth, perhaps with a subtle smile. Fairies usually have soft, kind expressions.
Outline the general shape of the hair. Think about volume and flow. Fairies often have long, flowing hair that seems to move with them.
Step 5: Add Clothing and Delicate Details
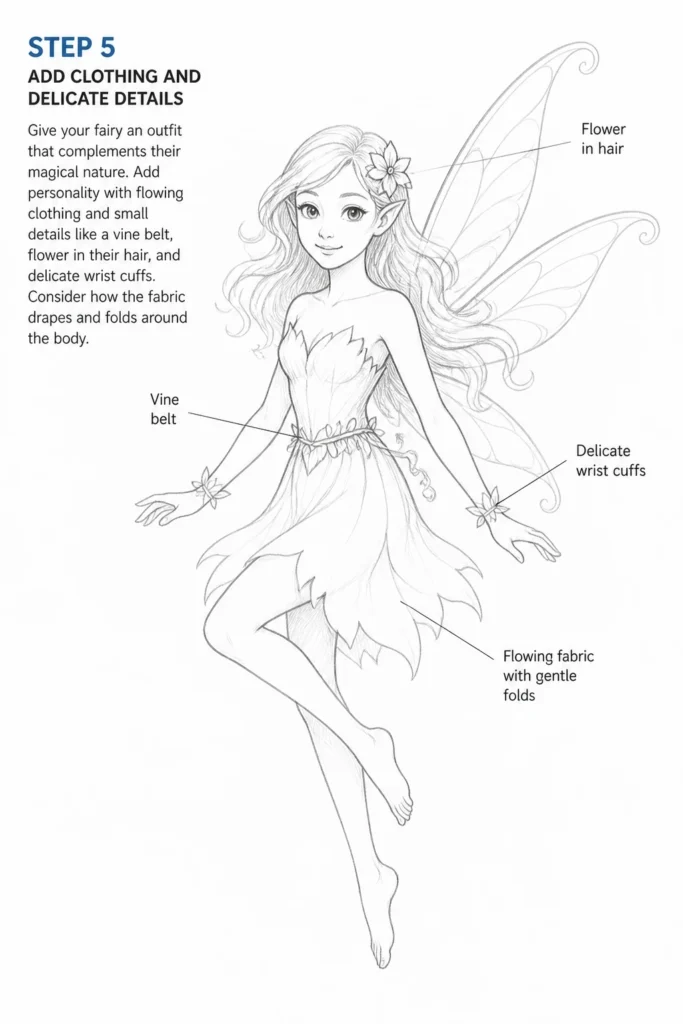
Now, give your fairy an outfit that complements their magical nature. This is where you can add personality.
Sketch the basic lines of a dress or tunic, letting it flow with the body’s pose. Fairies often wear light, natural fabrics or leaf-like attire.
Consider adding small details like a belt made of vines, a flower in their hair, or delicate cuffs on their wrists. Keep the clothing simple and elegant.
Think about how the fabric would drape and fold around the body. Add a few gentle lines to suggest these folds.
Step 6: Draw the Wings and Finish Hair Details
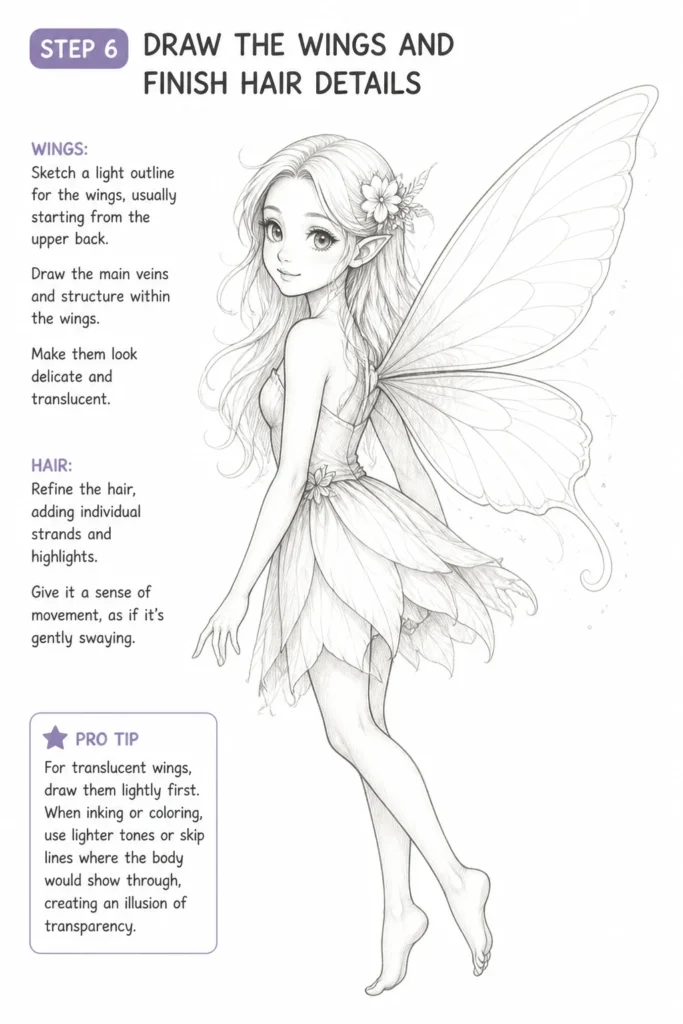
Wings are a defining feature of fairies and add to their enchanting appeal. There are many types, so choose one you like.
Sketch a light outline for the wings, usually starting from the upper back. Butterfly, dragonfly, or even leaf-like wings are popular choices.
Draw the main veins and structure within the wings. Make them look delicate and translucent.
Refine the hair, adding individual strands and highlights. Give it a sense of movement, as if it’s gently swaying.
Pro Tip: For translucent wings, draw them lightly first. When inking or coloring, use lighter tones or skip lines where the body would show through, creating an illusion of transparency.
Step 7: Clean Up and Add Final Touches
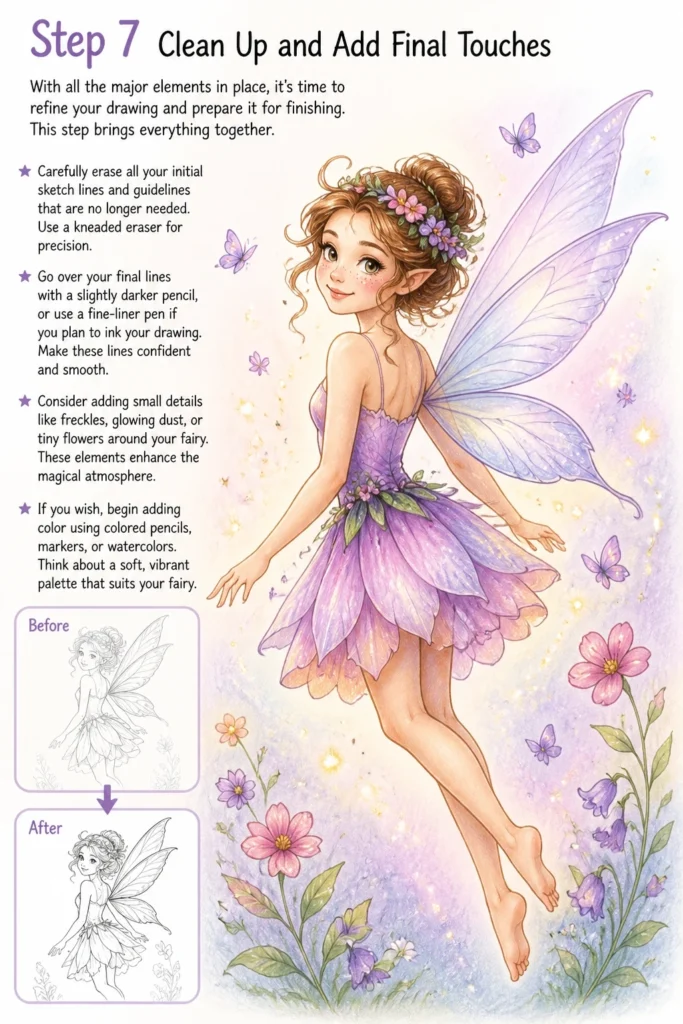
With all the major elements in place, it’s time to refine your drawing and prepare it for finishing. This step brings everything together.
Carefully erase all your initial sketch lines and guidelines that are no longer needed. Use a kneaded eraser for precision.
Go over your final lines with a slightly darker pencil, or use a fine-liner pen if you plan to ink your drawing. Make these lines confident and smooth.
Consider adding small details like freckles, glowing dust, or tiny flowers around your fairy. These elements enhance the magical atmosphere.
If you wish, begin adding color using colored pencils, markers, or watercolors. Think about a soft, vibrant palette that suits your fairy.
Common Mistakes to Avoid
Stiff Poses
A common pitfall for beginners is drawing characters that look rigid and unmoving. This happens when you rely too heavily on straight lines and symmetrical limbs. Fairies are all about grace and fluidity.
To avoid this, always start with a curved line of action. Exaggerate the curves of the spine and limbs slightly. Imagine your fairy dancing or floating to inspire more dynamic poses.
Proportion Problems
Getting the head too big or the limbs too short can make your fairy look awkward. It’s easy to get lost in details and forget the overall body structure.
Always establish your basic shapes and guidelines first. Use the head as a unit of measurement for the rest of the body. For example, a fairy might be 6-7 heads tall, depending on the style.
Messy Sketch Lines
Starting with very dark, heavy lines can make it difficult to erase mistakes and refine your drawing. It also makes the final artwork look less clean.
Always begin with very light, feathery strokes. Use an HB or 2H pencil for your initial sketch. Press lightly so your lines are barely visible, allowing you to easily adjust and clean up.
Flat Wings
Sometimes, wings can look like they are simply stuck onto the fairy’s back, without any dimension. This makes them appear less magical and integrated.
Think of wings as having their own structure and perspective. Draw them slightly overlapping the body, or curving around it, to give them depth. Consider how they would fold or extend.
Troubleshooting
My Fairy Looks Unbalanced
If your drawing feels lopsided or like it’s about to fall over, it’s likely an issue with weight distribution. This often happens when the pose isn’t grounded or centered properly.
Revisit your initial pose sketch. Ensure the weight is distributed evenly, or if the pose is dynamic, that the balance is visually compensated. Imagine a plumb line from the head to the feet.
Lines Are Wobbly or Uneven
Shaky lines are a common frustration, especially when trying to draw smooth curves. This can make your artwork look less polished and professional.
Practice drawing long, confident strokes from your shoulder, not just your wrist. Warm up with line exercises before you start. Try rotating your paper to find the most comfortable angle for your hand.
My Fairy Lacks Personality
Sometimes, a drawing can feel technically correct but still lack charm or a unique spark. This often comes down to expression and subtle details.
Focus on the face – a slight tilt of the head, a specific eyebrow arch, or a gentle smile can convey a lot. Also, consider small accessories or a unique hair flow to give your fairy a distinct character.
Key Takeaways
- Always start with light, basic shapes to establish proportion and pose.
- Use guidelines on the head to accurately place facial features.
- Emphasize curves and flowing lines to capture a fairy’s grace.
- Build up details gradually, from large forms to smaller elements.
- Don’t be afraid to experiment with different wing styles and clothing.
- Practice light sketching and confident linework for a clean finish.
Frequently Asked Questions
What kind of pencil is best for sketching fairies?
An HB pencil is a great all-rounder for initial sketching because it’s neither too hard nor too soft, offering good control. For darker lines and shading, a 2B or 4B pencil can add depth.
How can I make my fairy’s wings look more realistic?
To add realism, study insect wings like butterflies or dragonflies for their vein patterns and translucency. Overlap the wings slightly, vary their size, and consider how light might pass through them.
Can I draw a fairy without a specific pose in mind?
Absolutely! Start with a simple stick figure or a line of action and let the pose evolve as you draw. Sometimes, the most natural-looking poses emerge organically during the sketching process.
How do I add emotion to my fairy’s face?
Subtle changes in the eyebrows, the tilt of the head, and the curve of the mouth are key. Slightly raised eyebrows can suggest curiosity, while downturned lips might convey sadness or shyness. Practice drawing different expressions.
Our Top Recommended Finds
- Sketchbook with smooth paper: A good quality sketchbook provides a pleasant surface for your pencil to glide, making drawing more enjoyable.
- Assorted pencil set: Having a range of hardness (e.g., 2H, HB, 2B, 4B) allows you to create light sketches, firm outlines, and rich shading.
- Kneaded eraser: This type of eraser is excellent for lifting pencil marks gently without damaging the paper, perfect for cleaning up light guidelines.
Embrace Your Inner Artist Today
Drawing a fairy is more than just putting lines on paper; it’s about bringing a piece of magic to life. Each stroke you make builds confidence and skill, opening up new creative possibilities.
Don’t let perfection be the enemy of progress. Pick up your pencil right now and let your imagination take flight. The world of art is waiting for you to create your next masterpiece.
& Painting
No rigid rules or pretension. Just practical guides, medium comparisons, and encouraging tips to help you enjoy the drawing & painting process.