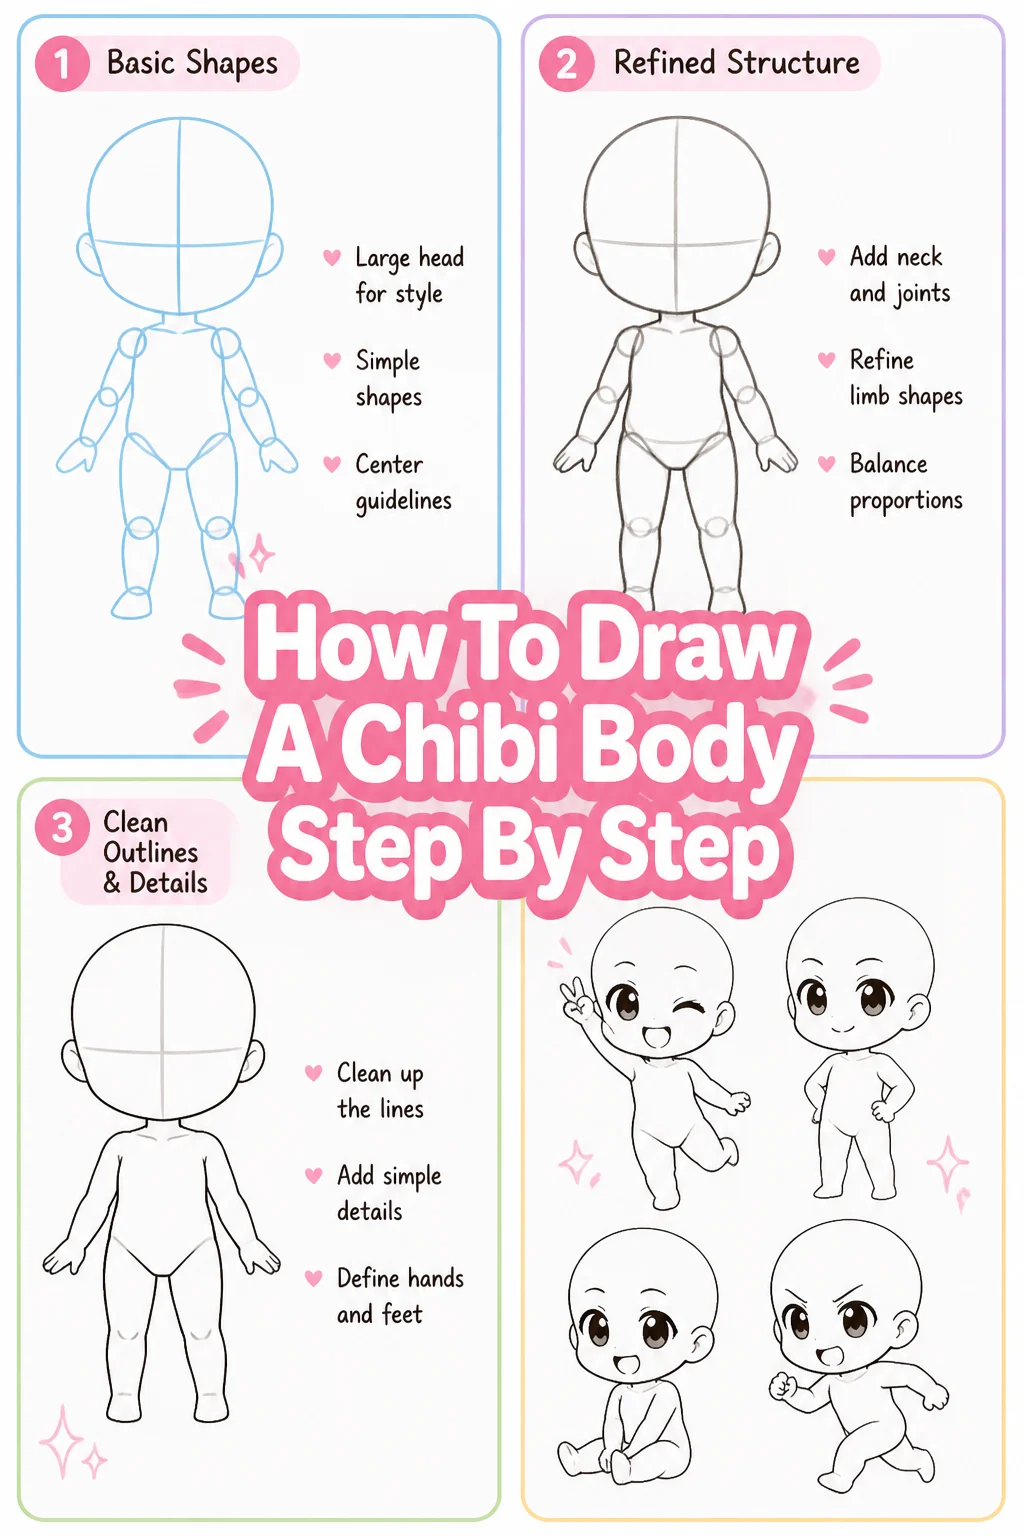
✨ How To Draw A Chibi Body Step By Step
Have you ever wanted to capture that adorable, oversized head, tiny body charm in your drawings? Chibi art is incredibly popular and surprisingly accessible for artists of all levels. I remember my first attempts, struggling to get the proportions just right, but with a few key principles, it quickly clicked into place.
This guide will walk you through the process, building your confidence as you create your own cute characters. You’ll soon be drawing chibis with ease and personal flair.
Quick Overview
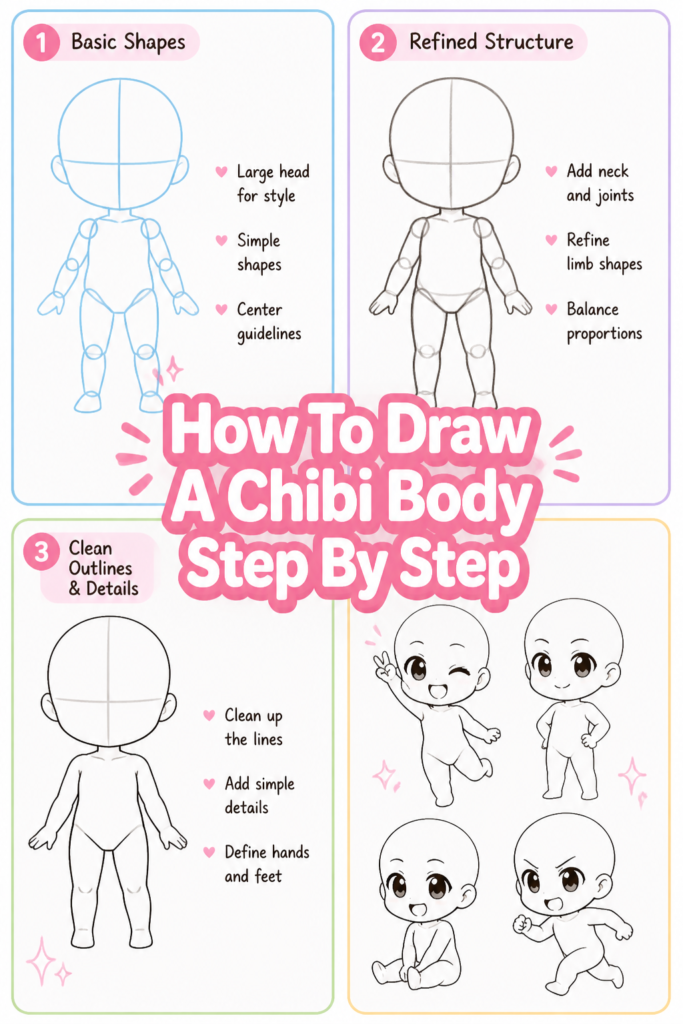
This guide will empower you to sketch a complete chibi body from basic shapes to a refined outline. You’ll learn the unique proportional rules that define this beloved art style.
By the end, you’ll have a solid foundation for creating your own expressive chibi characters.
- Time needed: 45-75 minutes (including practice)
- Difficulty: Beginner
- What you’ll need: Pencil (HB recommended), eraser, paper, optional: fine-liner pen
Step-by-Step Instructions
Step 1: Start with the Head Shape
The head is the most defining feature of any chibi character, so we always begin here. Lightly sketch a large, slightly squashed circle in the center of your paper. This will be the foundation for your character’s oversized head.
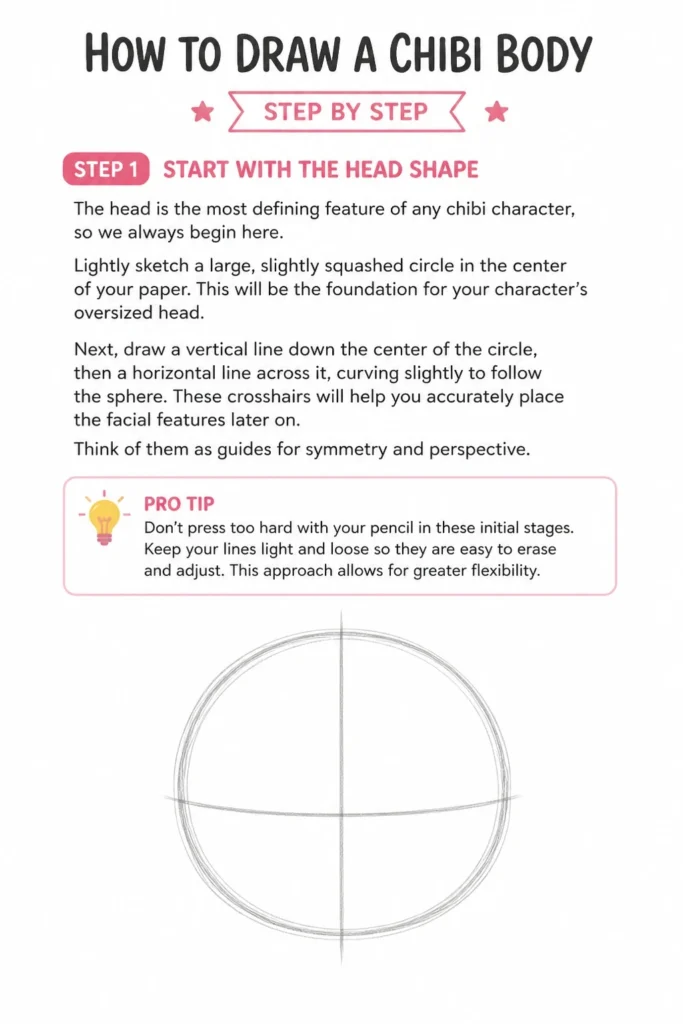
Next, draw a vertical line down the center of the circle, then a horizontal line across it, curving slightly to follow the sphere. These crosshairs will help you accurately place the facial features later on. Think of them as guides for symmetry and perspective.
Pro Tip: Don’t press too hard with your pencil in these initial stages. Keep your lines light and loose so they are easy to erase and adjust. This approach allows for greater flexibility.
Step 2: Sketch the Torso Guideline
Below the head, draw a small, simplified shape for the torso. This can be a small rectangle, a bean shape, or even just a rounded square. The key is to keep it significantly smaller than the head.
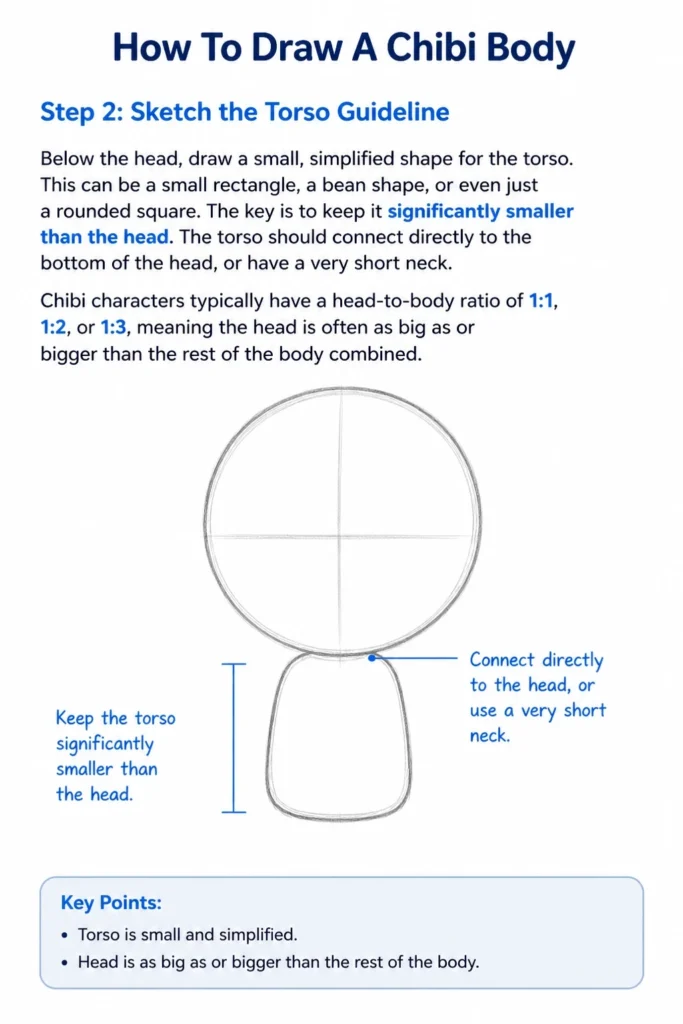
The torso should connect directly to the bottom of the head, or have a very short neck. Chibi characters typically have a head-to-body ratio of 1:1, 1:2, or 1:3, meaning the head is often as big as or bigger than the rest of the body combined.
Step 3: Map out the Limbs
Now, add simple lines and circles to represent the arms and legs. These are your stick figure guidelines for the limbs. Keep them very short and stubby, emphasizing the chibi aesthetic.
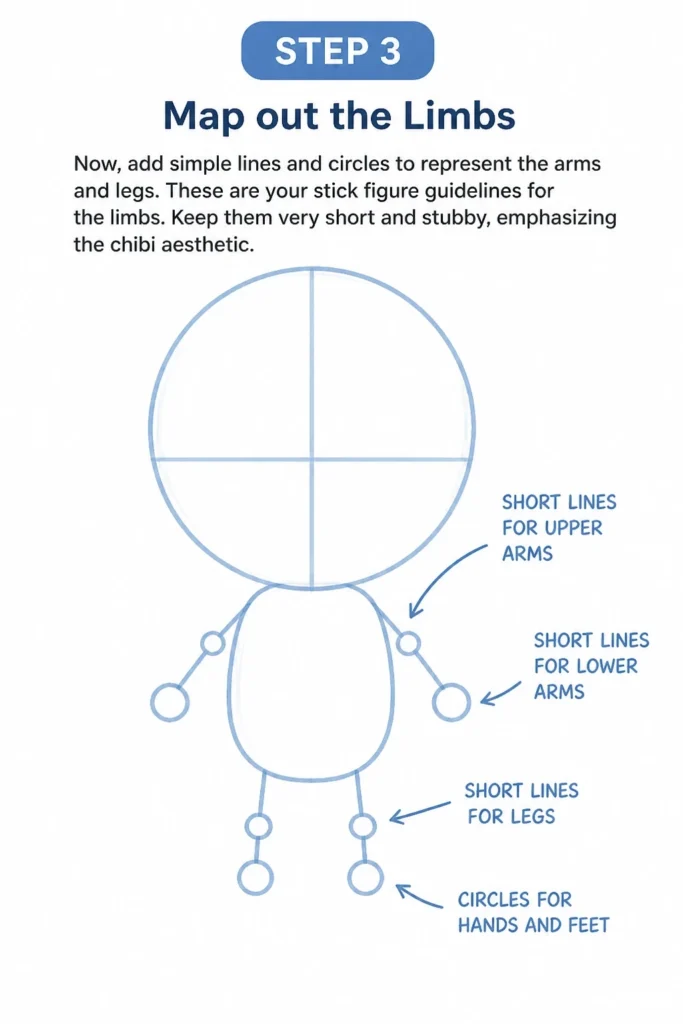
For the upper arms, draw short lines extending from the sides of the torso. For the lower arms, add more short lines, ending with small circles for the hands. Repeat this process for the legs, drawing short lines from the bottom of the torso, with circles for the feet.
Remember, chibi limbs are often disproportionately small compared to the head. This exaggeration is central to the style.
Step 4: Refine the Body Shape
It’s time to connect your guidelines to create a soft, rounded body form. Draw gentle curves around the stick figure limbs and torso, giving your chibi character volume. Think of soft, pillowy shapes rather than angular, realistic anatomy.
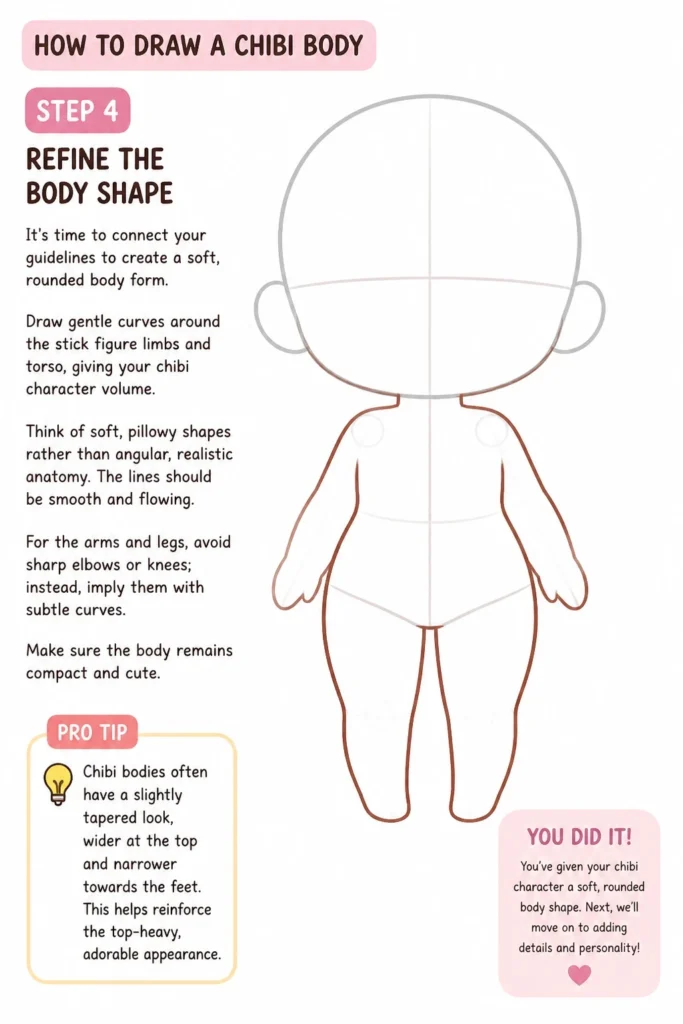
The lines should be smooth and flowing. For the arms and legs, avoid sharp elbows or knees; instead, imply them with subtle curves. Make sure the body remains compact and cute.
Pro Tip: Chibi bodies often have a slightly tapered look, wider at the top and narrower towards the feet. This helps reinforce the top-heavy, adorable appearance.
Step 5: Add the Hands and Feet
Chibi hands and feet are typically simplified to maintain the cute, childlike aesthetic. For hands, draw small, rounded shapes, often resembling mittens or simple blobs. You can indicate fingers with tiny bumps or just leave them as a solid shape.
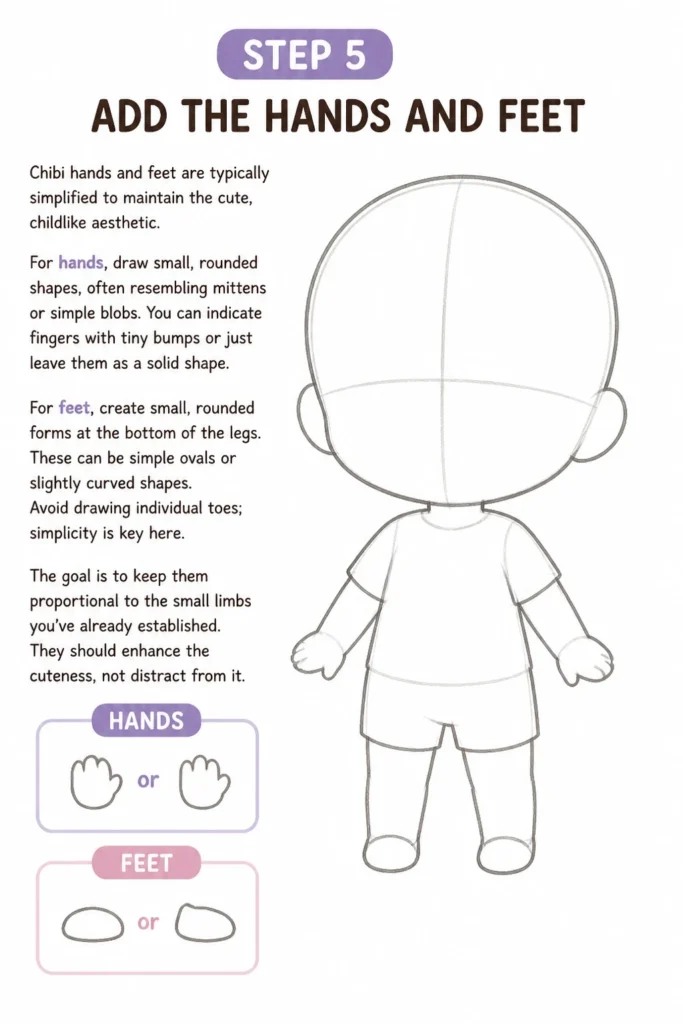
For feet, create small, rounded forms at the bottom of the legs. These can be simple ovals or slightly curved shapes. Avoid drawing individual toes; simplicity is key here.
The goal is to keep them proportional to the small limbs you’ve already established. They should enhance the cuteness, not distract from it.
Step 6: Draw the Facial Features
While this guide focuses on the body, adding basic facial features helps bring your chibi to life. Place large, expressive eyes using the horizontal crosshair as a guide. These are often positioned low on the head, giving a childlike appearance.
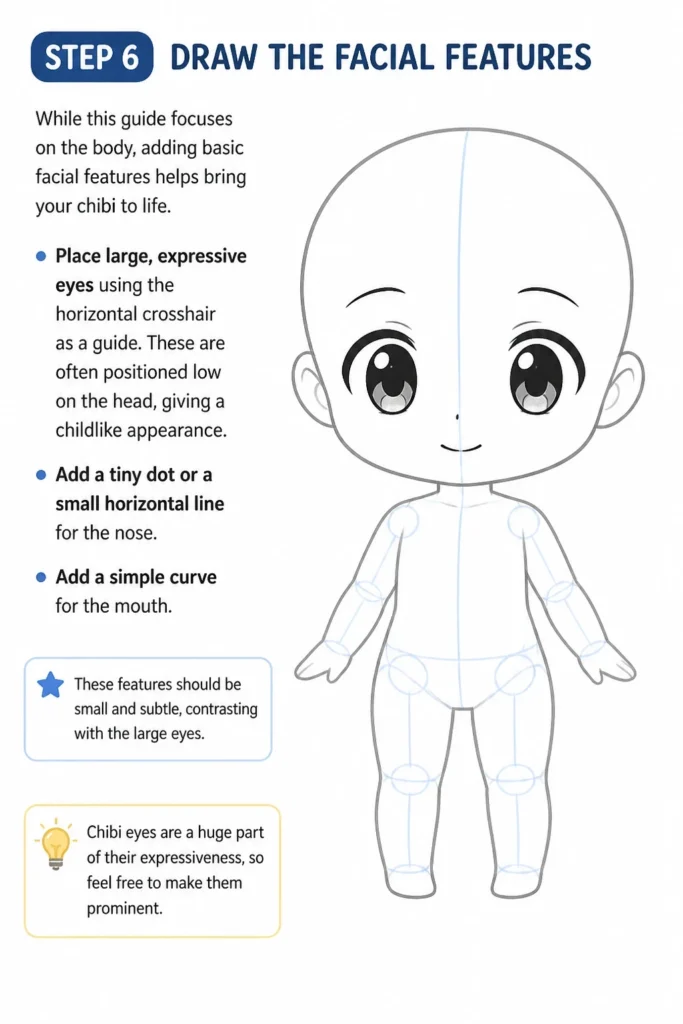
Add a tiny dot or a small horizontal line for the nose, and a simple curve for the mouth. These features should be small and subtle, contrasting with the large eyes. Chibi eyes are a huge part of their expressiveness, so feel free to make them prominent.
Step 7: Outline and Erase
Once you are happy with your chibi’s overall shape, it’s time to solidify your lines. Go over your preferred sketch lines with a slightly darker pencil or a fine-liner pen. This step makes your drawing crisp and clean.
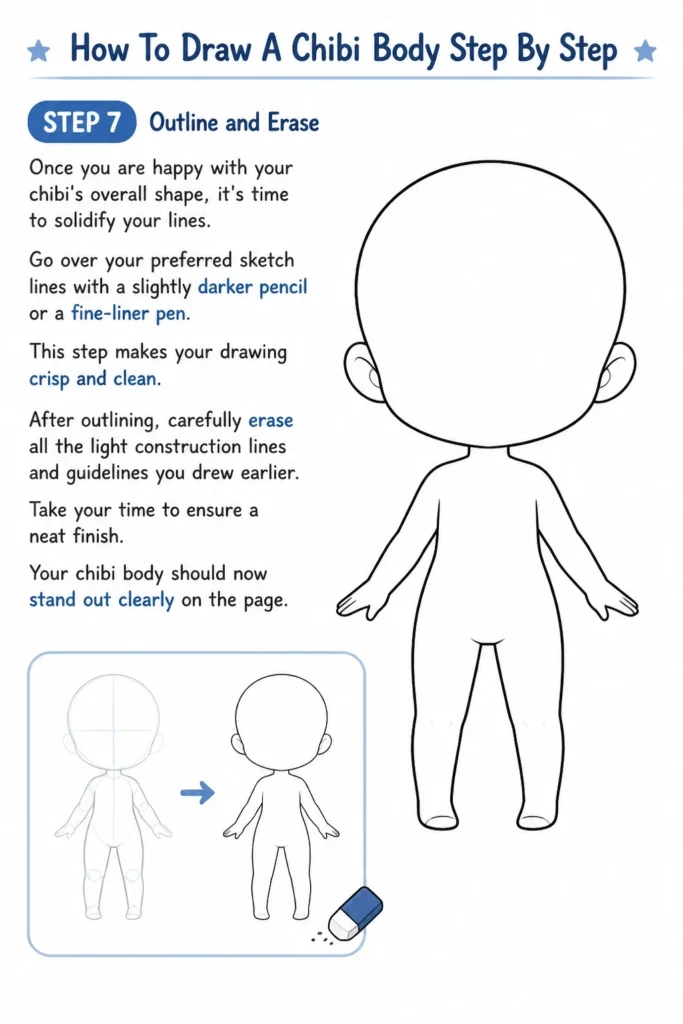
After outlining, carefully erase all the light construction lines and guidelines you drew earlier. Take your time to ensure a neat finish. Your chibi body should now stand out clearly on the page.
Step 8: Detail and Personalize
Now comes the fun part: adding details that make your chibi unique. Draw hair, clothing, and accessories to give your character personality. Remember to keep these details simple and rounded, fitting the chibi style.
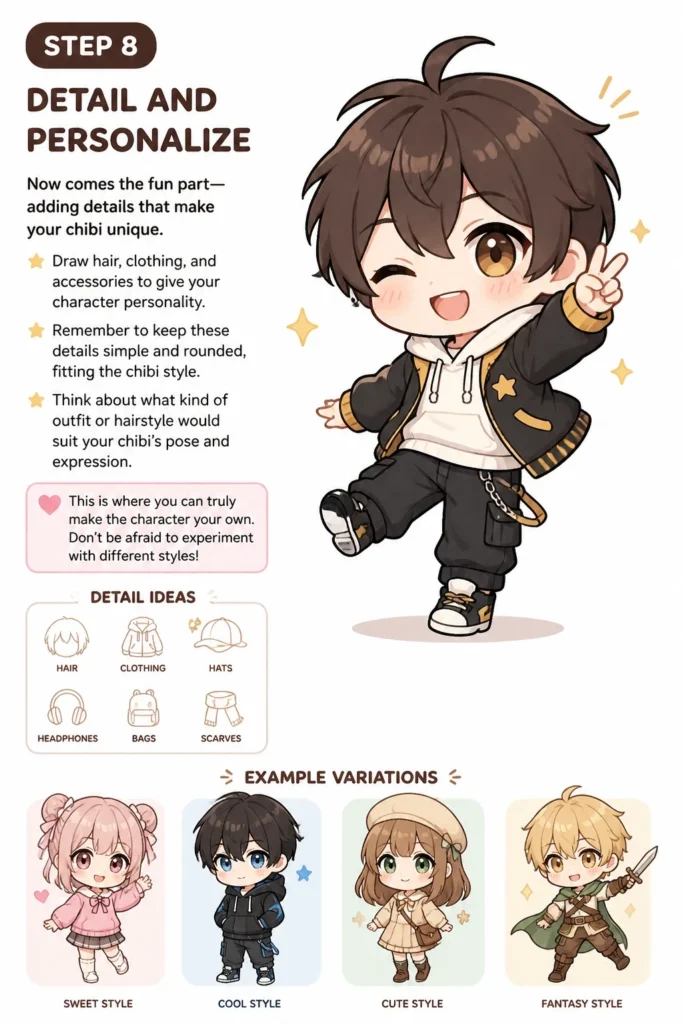
Think about what kind of outfit or hairstyle would suit your chibi’s pose and expression. This is where you can truly make the character your own. Don’t be afraid to experiment with different styles.
Common Mistakes to Avoid
Proportions Too Realistic
A common pitfall is drawing a chibi with proportions that are too close to a regular human body. Chibi is all about exaggeration, especially with a large head and small, stubby limbs. If your character looks like a miniature person rather than an adorable, top-heavy figure, you might be falling into this trap.
To correct this, consciously make the head much larger and the body significantly smaller. Reduce the length of the limbs and keep the torso compact. Embrace the caricature aspect of chibi art.
Neglecting Construction Lines
Skipping the initial light sketches of circles, rectangles, and stick figures can lead to lopsided or unbalanced drawings. These foundational shapes are crucial for establishing correct proportions and symmetry before committing to final lines. Without them, you might find your chibi’s arms are uneven or its head is tilted awkwardly.
Always start with light, basic shapes. They are your blueprint. Think of them as scaffolding that you’ll remove later, leaving a strong structure behind.
Over-Detailing
Chibi art thrives on simplicity and cuteness. Adding too many intricate details, complex clothing folds, or highly realistic anatomical features can detract from its charm. The style aims for a clean, easy-to-read aesthetic.
Focus on conveying personality through minimal lines and broad shapes. Simplify clothing to its essential elements and keep accessories straightforward. Less is often more in chibi drawing.
Stiff Poses
Sometimes, beginners draw chibi characters in very rigid, standing-at-attention poses. While simple, this can make the character look less lively. Chibi characters, despite their small size, can be very dynamic and expressive.
Even a slight tilt of the head, a hand on the hip, or a gentle lean can add a lot of personality. Use your stick figure stage to experiment with different, simple poses before refining the body shape.
Troubleshooting
My Chibi Looks Like a Regular Person
If your chibi isn’t quite hitting that adorable, exaggerated look, the issue is almost certainly with proportions. Chibi characters are defined by their oversized heads and small bodies. You might be making the body too long or the head too small.
To fix this, go back to your initial head and torso shapes. Ensure the head is at least as tall as the entire rest of the body, if not taller. Shorten the torso and limbs drastically. Exaggerate the smallness of everything below the neck.
My Lines Are Messy
Drawing clean lines can be challenging, especially for beginners. Messy lines often result from pressing too hard in the initial sketch phase or trying to draw long lines in one shaky stroke. This makes erasing difficult and final outlines look hesitant.
Practice drawing very light construction lines first, using your whole arm, not just your wrist. When outlining, try to draw confident, swift strokes. If a line isn’t perfect, erase and redraw. Building confidence comes with practice.
I Can’t Get the Pose Right
Struggling with poses is common, even for experienced artists. The problem often lies in trying to draw the full body shape immediately without a foundational structure. Without a clear “skeleton,” your chibi can end up looking unbalanced or unnatural.
Start every pose with the simplest stick figure possible: a circle for the head, a small shape for the torso, and simple lines with joint indicators for the limbs. Only when this basic pose feels balanced and dynamic should you begin to add volume and flesh out the body.
Key Takeaways
- Always begin with the head, as it dictates the entire chibi’s proportions and charm.
- Embrace exaggerated proportions, especially the large head and small, stubby body.
- Utilize light construction lines and basic shapes as a foundation for every drawing.
- Keep details simple and rounded to maintain the signature chibi cuteness.
- Practice regularly, focusing on light sketching and confident outlining.
- Experiment with simple, dynamic poses to add personality to your characters.
Frequently Asked Questions
What’s the best head-to-body ratio for chibi?
There isn’t one single “best” ratio, as it varies with style, but common ratios are 1:1 (head is as tall as the body), 1:2 (head is half the height of the body), or 1:3. For beginners, a 1:1 or 1:2 ratio is often easiest to achieve and gives the most classic chibi look. The key is that the head is always disproportionately large.
Can I draw chibi in different styles?
Absolutely! Chibi is a style in itself, but it can be adapted. You can have chibis with more angular features, rounder forms, or even slightly more realistic hands and feet while retaining the core large-head, small-body principle. Experiment with different eye shapes and expressions to develop your unique take.
How do I make my chibi characters unique?
Uniqueness comes from details beyond the basic body. Hair styles, clothing choices, accessories (like glasses, hats, or props), and especially facial expressions are fantastic ways to differentiate your characters. Think about their personality and reflect it in these elements. Even small variations can make a big impact.
Do chibi characters always have big eyes?
Most chibi characters are characterized by their large, expressive eyes, as they convey a lot of emotion and cuteness. However, it’s not a strict rule. Some chibi styles feature smaller, simpler eyes, or even closed eyes for certain expressions. Feel free to experiment with eye size and shape to match the mood you’re going for.
Our Top Recommended Finds
- Sketchbook: A good quality, acid-free sketchbook with smooth paper provides a pleasant drawing experience and helps your artwork last. Look for one with a durable binding.
- Graphite Pencil Set: A set including HB, 2B, and 4B pencils allows for light sketching (HB) and darker outlining (2B, 4B), giving you more control over line weight.
- Kneaded Eraser: Unlike traditional erasers, a kneaded eraser lifts graphite without smudging or damaging the paper, perfect for cleaning up light construction lines.
Your Chibi Adventure Begins Now!
You’ve just taken the first exciting steps into the adorable world of chibi art. Remember, drawing is a skill that grows with consistent practice and playful experimentation. Don’t be afraid to try new poses, expressions, and outfits for your tiny creations.
Pick up your pencil right now and sketch another chibi. The more you draw, the more natural it will feel, and the more your unique style will emerge. Keep exploring, keep creating, and most importantly, keep having fun with it!