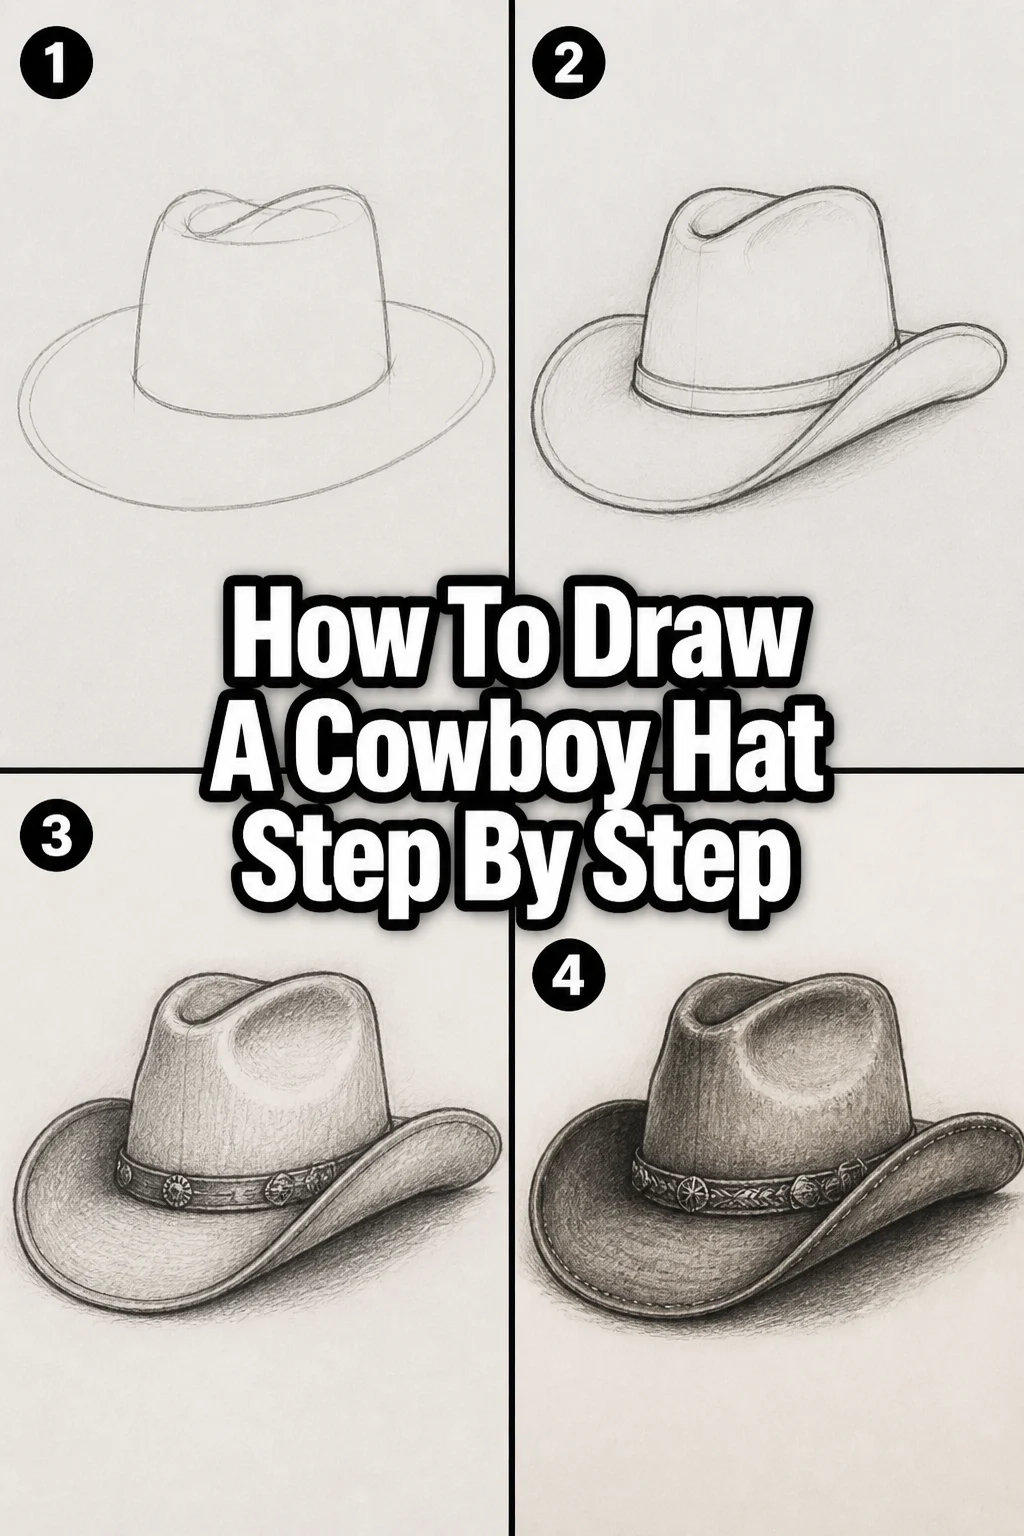
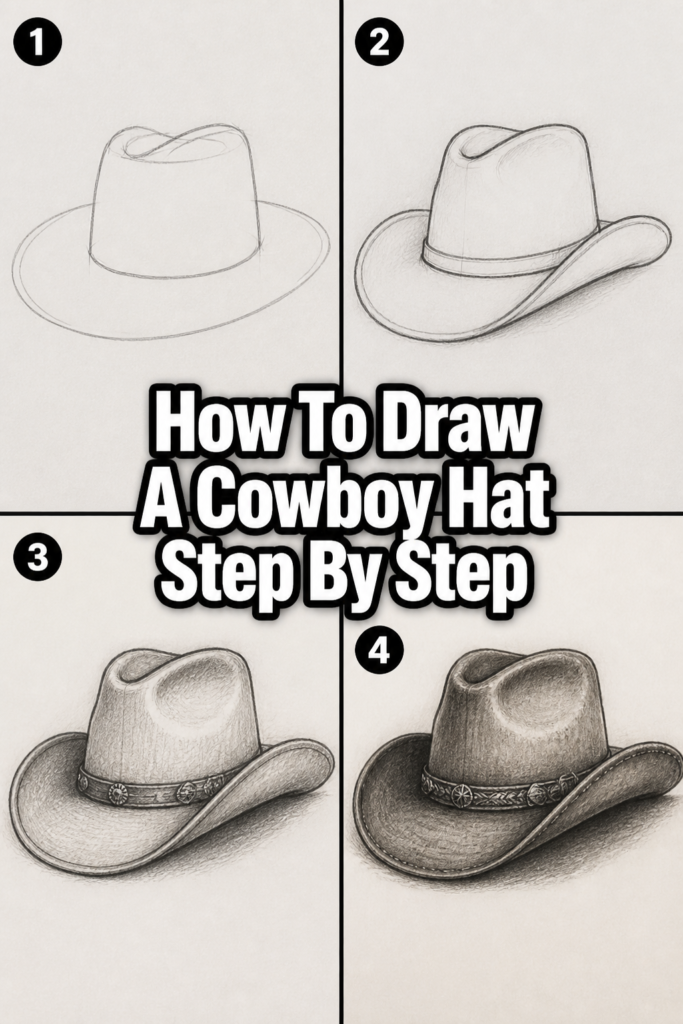
🤠 How To Draw A Cowboy Hat Step By Step
Drawing a cowboy hat might seem tricky at first, with its distinct curves and iconic shape. But with the right guidance, it’s a wonderfully rewarding process. I’ve sketched countless hats over the years, learning the nuances of their form and character. This guide distills that experience, making it simple for you to capture the spirit of the Old West on paper.
Quick Overview
This guide will walk you through creating a classic cowboy hat, breaking down its unique features into manageable steps. You will learn to construct the hat from basic shapes, add characteristic details, and give it dimension. By the end, you’ll have a complete drawing and the confidence to sketch variations.
- Time needed: 30-60 minutes
- Difficulty: Beginner to Intermediate
- What you’ll need: Pencil (HB, 2B), eraser, paper, optional blending stump
Step-by-Step Instructions
Step 1: Lay Down the Foundation – The Crown’s Oval
Begin by lightly sketching an oval shape in the center of your paper. This oval will form the base of the hat’s crown. Think of it as looking down at the hat from a slight angle.
Make sure your lines are very faint at this stage. We will refine them later, so don’t press too hard with your pencil. This initial shape establishes the hat’s overall size and perspective.
Step 2: Define the Top of the Crown
Now, draw a slightly curved line across the top of your initial oval. This line will represent the highest point of the hat’s crown, giving it a rounded appearance. Connect the ends of this curve back down to the sides of your oval, creating a three-dimensional effect for the top of the hat.
Imagine a dome sitting on top of the oval you first drew. This helps visualize the volume.
Pro Tip: Cowboy hats are rarely perfectly symmetrical. Embrace slight imperfections to give your drawing a more natural and authentic feel. A little tilt or unevenness adds character.
Step 3: Shape the Brim’s Underside
From the bottom edge of your crown, draw a wide, sweeping curve that extends outwards on both sides. This curve will form the underside of the hat’s brim, giving it its iconic, upturned shape. The curve on the left side might be slightly different from the right, reflecting the hat’s angle.
Ensure the curve is gentle and elegant, not too sharp or flat. It should feel like a natural extension of the crown.
Step 4: Connect the Brim to the Crown
Next, draw a second, slightly flatter curve underneath your initial brim line. This connects the outer edge of the brim back to the crown. It should appear as if the brim is wrapping around the hat.
Consider the thickness of the brim here; don’t make it too thin. This line helps establish the brim’s depth.
Step 5: Create the Characteristic Crown Crease
Most cowboy hats have a distinct crease or dent along the top of the crown. Sketch a subtle ‘V’ or ‘U’ shape on the top surface of the crown. This indentation adds significant character and realism to your hat.
You can also add smaller, subtle indentations on the sides, known as “pinches,” where the hat would be gripped. These details truly bring the hat to life.
Step 6: Add the Hatband
Draw a narrow band around the base of the crown, just above where it meets the brim. This hatband can be simple or detailed with a buckle or decorative elements. It adds a touch of authenticity and breaks up the large surface of the crown.
Think about the material of the hatband. Is it leather, braided rope, or something else?
Pro Tip: For a more weathered look, add subtle, irregular lines and tiny smudges around the hatband or on the brim. These suggest wear and tear, making the hat feel lived-in.
Step 7: Refine and Darken Your Lines
Now that you have all the main components, go back over your drawing and darken the lines you want to keep. Erase any construction lines or stray marks that are no longer needed. Pay attention to the edges, ensuring they are clean and crisp where appropriate.
This step is about solidifying your drawing. Make sure the curves flow smoothly.
Step 8: Introduce Basic Shading for Depth
Shading is essential for making your cowboy hat look three-dimensional. Imagine a light source coming from one direction, perhaps the upper left. Add darker shading under the brim, inside the crown’s interior if visible, and on the side of the hat opposite your light source.
Use soft, even strokes with your pencil. Gradually build up the shadows to create depth and volume. A blending stump can help smooth out your shading.
Step 9: Add Texture and Details
This is where you make your hat unique. Consider adding stitching lines along the brim or hatband. You could include a feather tucked into the hatband, a small buckle, or even some subtle scuffs and dents on the hat’s surface to show its history.
These small details elevate your drawing from a basic shape to a characterful object. Think about the material – felt, leather, straw – and how its texture might appear.
Common Mistakes to Avoid
Drawing a Flat Brim
Many beginners draw the brim as a flat, two-dimensional line. A real cowboy hat brim has a distinct curve, often dipping in the front and back and rising on the sides. Failing to capture this curvature makes the hat look unrealistic and lacking in dimension. Always think of the brim as a three-dimensional plane, not just a flat line.
Disproportionate Crown
Another common error is making the crown too tall, too wide, or too narrow in relation to the brim. A cowboy hat’s crown has a specific relationship with its brim. If the crown is too small, the hat looks like a cap; if it’s too large, it appears unwieldy. Take time to eye the proportions carefully, ensuring the crown and brim complement each other.
Ignoring the Crease and Pinches
The characteristic crease and pinches on a cowboy hat’s crown are crucial identifiers. Without them, the hat can look like any generic felt hat. These details immediately tell the viewer it’s a cowboy hat. Always include these subtle yet significant features to enhance authenticity.
Troubleshooting
My Hat Looks Flat and Lifeless
If your drawing lacks depth, revisit your curves and shading. Ensure your brim has a noticeable upward curve on the sides and a gentle dip. Add more contrast with your shading, making shadows darker and highlights lighter. Thinking of the hat as a series of overlapping forms, rather than just outlines, helps create dimension.
It Doesn’t Quite Look Like a Cowboy Hat
This usually comes down to missing key features. Double-check that you’ve included the distinct crown crease and the characteristic upturned brim. The hatband also plays a role in identification. Compare your drawing to reference images to pinpoint what specific element might be missing or incorrectly proportioned.
I Can’t Get the Perspective Right
Perspective can be challenging. Start by drawing very light construction lines for your basic oval and then build upon it. If you’re struggling, try drawing the hat from a simpler, more direct angle first. Practice drawing ellipses from various viewpoints, as these are fundamental to getting curved objects like hats right in perspective.
Key Takeaways
- Always start with light, basic shapes like ovals to establish the foundation of your hat.
- Focus on the unique curves of the brim and the distinct crease of the crown to define a cowboy hat.
- Shading is critical for adding depth and making your drawing appear three-dimensional.
- Incorporate small details like a hatband, stitching, or a feather to add character and authenticity.
- Don’t be afraid to add subtle imperfections; they often make the hat look more realistic and lived-in.
- Practice is key; drawing multiple hats from different angles will improve your skill and understanding.
Frequently Asked Questions
What materials are best for drawing a cowboy hat?
A standard graphite pencil set (HB for light sketches, 2B-4B for darker lines and shading), an eraser, and good quality drawing paper are ideal. A blending stump or cotton swab can also be helpful for smooth shading. You don’t need fancy tools to get started.
How do I draw a cowboy hat on a head?
When drawing a hat on a head, first establish the head’s basic shape. Then, draw the hat sitting on top, ensuring the crown follows the curve of the skull. The brim will extend out from the head, casting a shadow over the face. Pay attention to how the hat’s perspective changes with the head’s angle.
Can I draw different styles of cowboy hats?
Absolutely! Cowboy hats come in many variations, from wide-brimmed cattleman hats to smaller, more pinched styles. Once you master the basic structure, you can experiment by changing the brim’s curve, the crown’s height, or the crease’s shape. Use reference photos to explore different styles.
Our Top Recommended Finds
- Strathmore 400 Series Sketch Pad: Excellent all-purpose paper that handles pencil well without smudging too much.
- Faber-Castell Graphite Pencil Set (HB, 2B, 4B, 6B): A versatile set that gives you a good range of hardness for sketching and shading.
- Kneaded Eraser: Perfect for lifting graphite gently without damaging the paper and for creating highlights.
Embrace Your Inner Artist
You now have the steps and insights to draw a compelling cowboy hat. Each line you draw tells a story, and every shadow adds character. Don’t stop here; let this be the beginning of your artistic journey.
Try drawing your hat from different angles, or imagine it on a character. Explore other Western-themed elements like boots or lassos. The more you practice and experiment, the more your unique style will shine through. Grab your pencil and start sketching today!