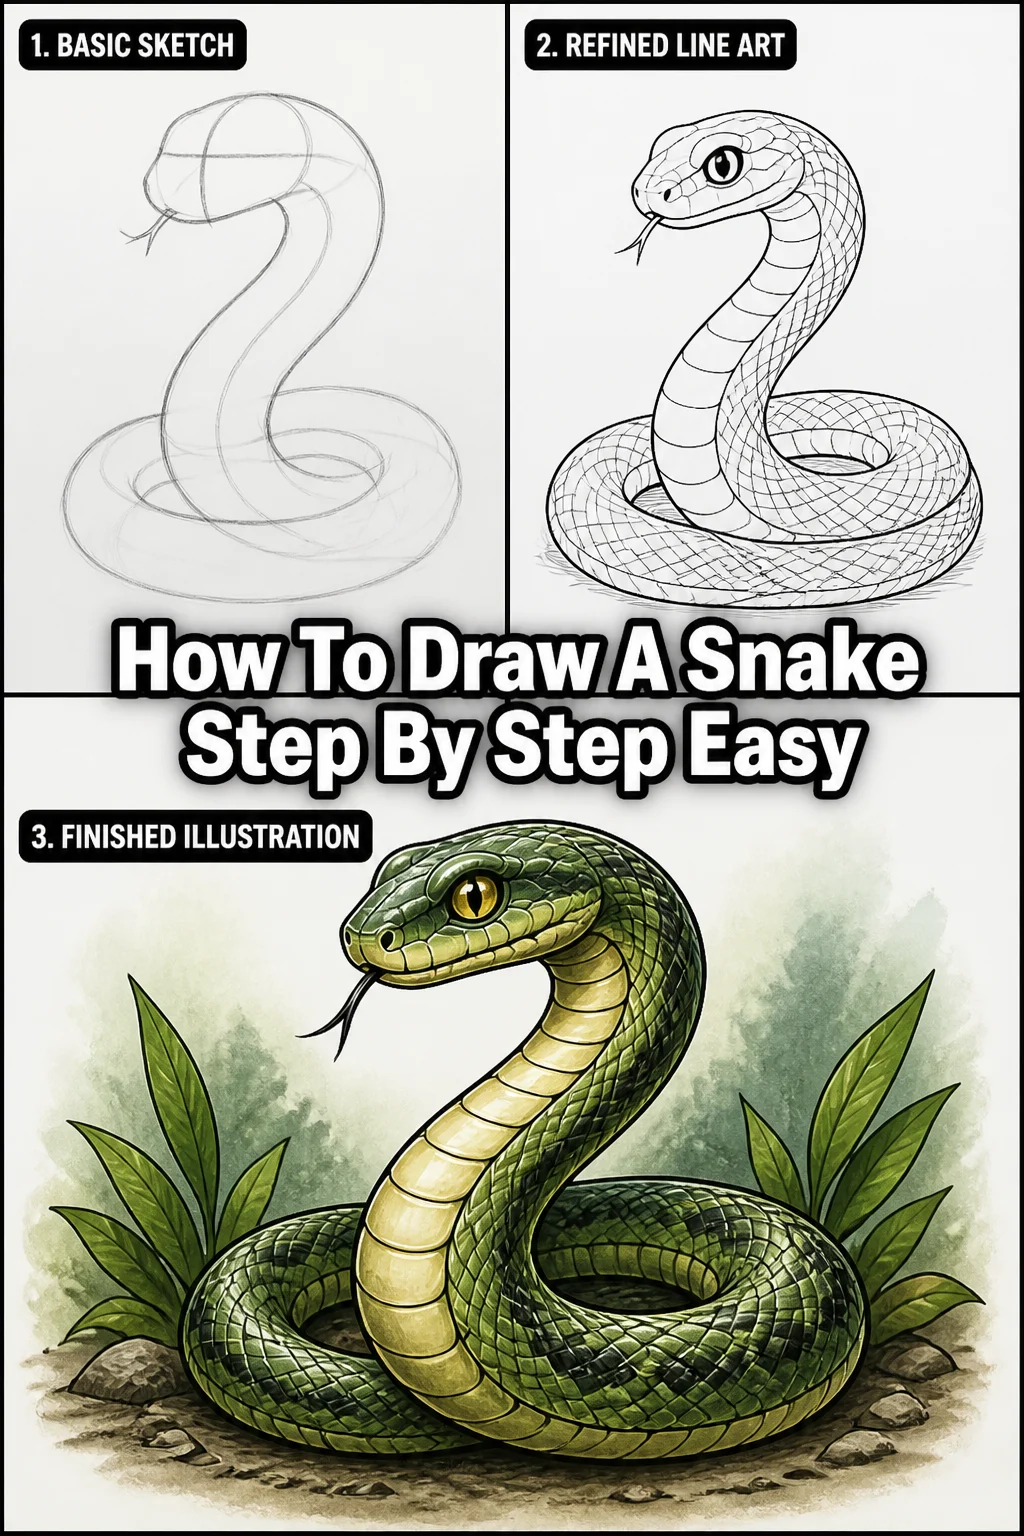
🐍 How To Draw A Snake Step By Step Easy
Drawing can feel intimidating, especially when you want to capture the grace of a creature like a snake. I remember struggling with the fluidity of their bodies, making them look more like rigid tubes than living beings.
This guide is designed to simplify the process, breaking down complex forms into easy, manageable steps. By following along, you’ll discover how rewarding it is to bring these fascinating reptiles to life on paper.
You’ll soon be drawing snakes with confidence and a natural flow.
Quick Overview
This guide will walk you through creating a simple yet dynamic snake drawing. You’ll learn to capture its movement and key features without getting bogged down in intricate details initially.
By the end, you’ll have a complete snake illustration you can be proud of.
- Time needed: 45-75 minutes (depending on detail)
- Difficulty: Beginner
- What you’ll need: Pencil (HB or 2B recommended), eraser, paper, optional reference image.
Step-by-Step Instructions
Step 1: Sketch the Basic Movement Line
Every great drawing starts with a foundation, and for a snake, that’s its core movement. Think of this as the spine of your snake.
Draw a flowing, S-shaped, or wavy line across your paper. This line dictates the snake’s pose and direction.
Vary the curves slightly to give it a more natural, less uniform appearance. Avoid making it too stiff or too perfectly symmetrical.
Pro Tip: Use a very light hand for this initial line. It’s meant to be a guide and will be refined later, so you want it easy to erase.
Step 2: Outline the Head Shape
Now, let’s give our snake a head. The head is crucial for establishing its character.
Sketch a simple oval or a rounded trapezoid shape at one end of your movement line. This will be the top of the head.
Consider the angle of the head relative to the body. Is it looking forward, or turning to the side?
Add a slightly narrower, curved shape underneath for the jawline. Connect it gently to the main head shape.
Step 3: Establish the Body’s Width and Volume
With the movement line and head in place, we can now give the snake its body. This step adds volume.
Draw a second line parallel to your initial movement line, mirroring its curves. This will form one side of the snake’s body.
Create a third line on the opposite side, also parallel to the movement line. Ensure the lines widen slightly towards the middle of the body and narrow towards the tail.
Connect these outer lines to the head shape you drew. Make sure the lines flow smoothly into the head.
Step 4: Refine the Body and Tail
Now we will smooth out the body’s contours and define the tail. This step is about creating a natural silhouette.
Refine the outer lines of the body, making them less angular and more organic. Think about how a real snake’s body flows.
Taper the body gradually towards the tail end. The tail should become progressively thinner and end in a pointed or rounded tip, depending on the snake species you envision.
Erase any overlapping lines from your initial movement guide within the body. You should now have a clean, flowing outline of your snake.
Step 5: Add Facial Features
Bringing the face to life is one of the most exciting parts. Small details make a big difference here.
Place two small circles or ovals for the eyes on the upper part of the head. Think about the snake’s expression – is it alert or calm?
Draw tiny nostrils near the tip of the snout. These are usually small dots or slits.
Sketch a subtle line for the mouth, curving slightly to suggest a gentle smile or a more serious expression. Don’t make it too prominent at this stage.
Step 6: Introduce Basic Scales and Patterns
Scales are a defining feature of snakes, but you don’t need to draw every single one. Suggestion is key.
Draw a series of slightly curved lines across the snake’s back, following the curve of its body. These lines represent the general direction of the scales.
Add some simple shapes or patterns along the body, like diamonds, stripes, or spots. These can be very basic at first.
Vary the size and spacing of these patterns to add visual interest. Don’t make them perfectly uniform.
Step 7: Add Texture and Dimension with Shading
Shading is what truly makes your snake pop off the page. It adds depth and realism.
Identify a light source. This will help you decide where shadows and highlights fall on the snake’s body.
Apply light shading to the underside of the snake’s body, where it would naturally be in shadow. Use smooth, even strokes.
Darken areas where the body curves away from the light or overlaps itself. This creates a sense of three-dimensionality.
Add subtle texture to the scales by drawing very light, short lines or dots within the patterns you sketched earlier.
Step 8: Final Touches and Erasing
The last step is about cleaning up and enhancing the details. This brings everything together.
Carefully erase any remaining guide lines or stray marks. Your drawing should look clean and refined.
Strengthen the outline of your snake slightly where needed, especially in areas that define its form.
Add any final small details to the eyes, mouth, or patterns to give your snake more character. Step back and admire your finished work!
Common Mistakes to Avoid
Stiff, Blocky Shapes
Many beginners tend to draw snakes with rigid, straight lines or overly geometric shapes. This makes the snake look unnatural and lifeless, more like a pipe than a living creature.
Instead, always prioritize curves and fluidity. Think about the natural movement of a snake, how it slithers and bends. Use gentle, sweeping lines for the body and head, ensuring a continuous, organic flow from head to tail.
Symmetrical Patterns
It’s tempting to draw perfectly symmetrical patterns or scales across the entire body. While some snakes have very regular patterns, making them too uniform can look robotic and flat.
Aim for slight variations in size, shape, and spacing of your patterns. This adds realism and visual interest. Remember that a snake’s body is three-dimensional, so patterns will distort and change perspective as the body curves.
Ignoring Reference
Trying to draw a snake purely from imagination without ever looking at real snakes can lead to inaccuracies. You might misremember head shapes, scale patterns, or body proportions.
Always use reference images, even if you’re aiming for a stylized drawing. Observe how different snake species look, how their heads connect to their bodies, and how their patterns wrap around their form. This builds your visual library and improves your drawings.
Rushing Details
Jumping straight into drawing individual scales or intricate eye details before establishing the overall form is a common pitfall. You might end up with a very detailed section on a poorly constructed foundation.
Work from general to specific. First, get the overall movement, body shape, and head right. Once the basic structure is solid, then you can gradually add details like eyes, nostrils, and eventually, the suggested scales and patterns. This ensures a cohesive and well-proportioned drawing.
Troubleshooting
My snake looks flat/lifeless.
A common issue is a lack of dimension, making the snake appear two-dimensional. This often happens when shading is uniform or non-existent.
To fix this, go back to your shading. Identify a clear light source and apply shadows to the areas that would naturally be in darkness, such as the underside of the body or where the body overlaps itself. Use a range of pencil pressures to create darker shadows and lighter mid-tones. Adding subtle highlights to areas directly facing the light can also enhance the sense of volume.
I can’t get the scales right.
Drawing individual scales can be tedious and overwhelming, often leading to frustration or an unrealistic look. The key is suggestion, not perfection.
Instead of drawing every scale, focus on implying them. Use light, curved lines that follow the contours of the body to suggest the direction and layering of scales. For texture, you can use very light cross-hatching or stippling in shaded areas. Practice drawing simple, overlapping shapes rather than intricate details. Remember that the overall pattern and form are more important than individual scale accuracy for an “easy” drawing.
The head doesn’t look like a snake’s.
The head is often the most challenging part to get right, as it defines the snake’s identity. If it looks off, it can throw off the whole drawing.
Review reference images of real snake heads. Pay attention to the subtle curves of the snout, the placement of the eyes, and how the jaw connects. Often, the issue is making the head too round or too pointed. Try sketching the head as a series of simple, overlapping shapes – perhaps an oval for the top, and a curved triangle for the jaw. Practice these basic shapes until you feel more confident before adding details.
Key Takeaways
- Always start with a light, flowing movement line to establish the snake’s pose.
- Build the snake’s form from general shapes (head, body outline) before adding details.
- Prioritize curves and organic lines for a natural, fluid appearance.
- Suggest scales and patterns rather than drawing every single detail.
- Use shading effectively to add dimension and make your snake look three-dimensional.
- Don’t be afraid to use reference images to improve accuracy and understanding.
Frequently Asked Questions
What kind of snake should I draw first?
For beginners, starting with a simpler snake species like a garter snake or a basic garden snake is ideal. They often have less complex patterns and more straightforward body shapes, making them easier to outline and detail. Avoid highly textured or vividly patterned snakes until you’re more comfortable.
How do I make it look realistic?
Realism comes from observing actual snakes and applying those observations to your drawing. Pay attention to their muscle definition, the way light hits their scales, and the subtle variations in their body thickness. Shading, consistent light sources, and accurate proportions are crucial for achieving a realistic look.
Can I use markers or paint?
Absolutely! Once you’re comfortable with the pencil sketch, you can certainly experiment with other mediums. Markers can create bold lines and vibrant patterns, while paints offer opportunities for blending and texture. Just be sure to do your initial sketch lightly in pencil so it can be easily covered or erased.
How important is scale detail?
For an “easy” drawing, scale detail is less critical than conveying the overall form and texture. You don’t need to draw every individual scale. Instead, focus on suggesting the presence of scales through light lines, patterns, and careful shading that implies their overlapping nature. As you advance, you can gradually add more scale detail.
Our Top Recommended Finds
- Sketch Pencils Set (HB, 2B, 4B): Having a range of hardness allows you to create light guides and dark, rich shadows.
- Good Quality Sketchbook: A smooth paper surface makes erasing easier and allows for better blending of graphite.
- Kneaded Eraser: Perfect for lifting graphite gently without smudging, and for shaping into fine points for small corrections.
Unleash Your Inner Reptile Artist
You’ve just completed your first easy snake drawing, and that’s a fantastic achievement! This guide has provided you with the fundamental tools and techniques to capture the essence of these magnificent creatures. But the journey doesn’t end here.
Consider trying different poses next, perhaps a coiled snake or one rearing up. Experiment with various patterns and species. The more you practice, the more intuitive the process will become. Grab your pencil and paper, and let your creativity slither onto the page today!