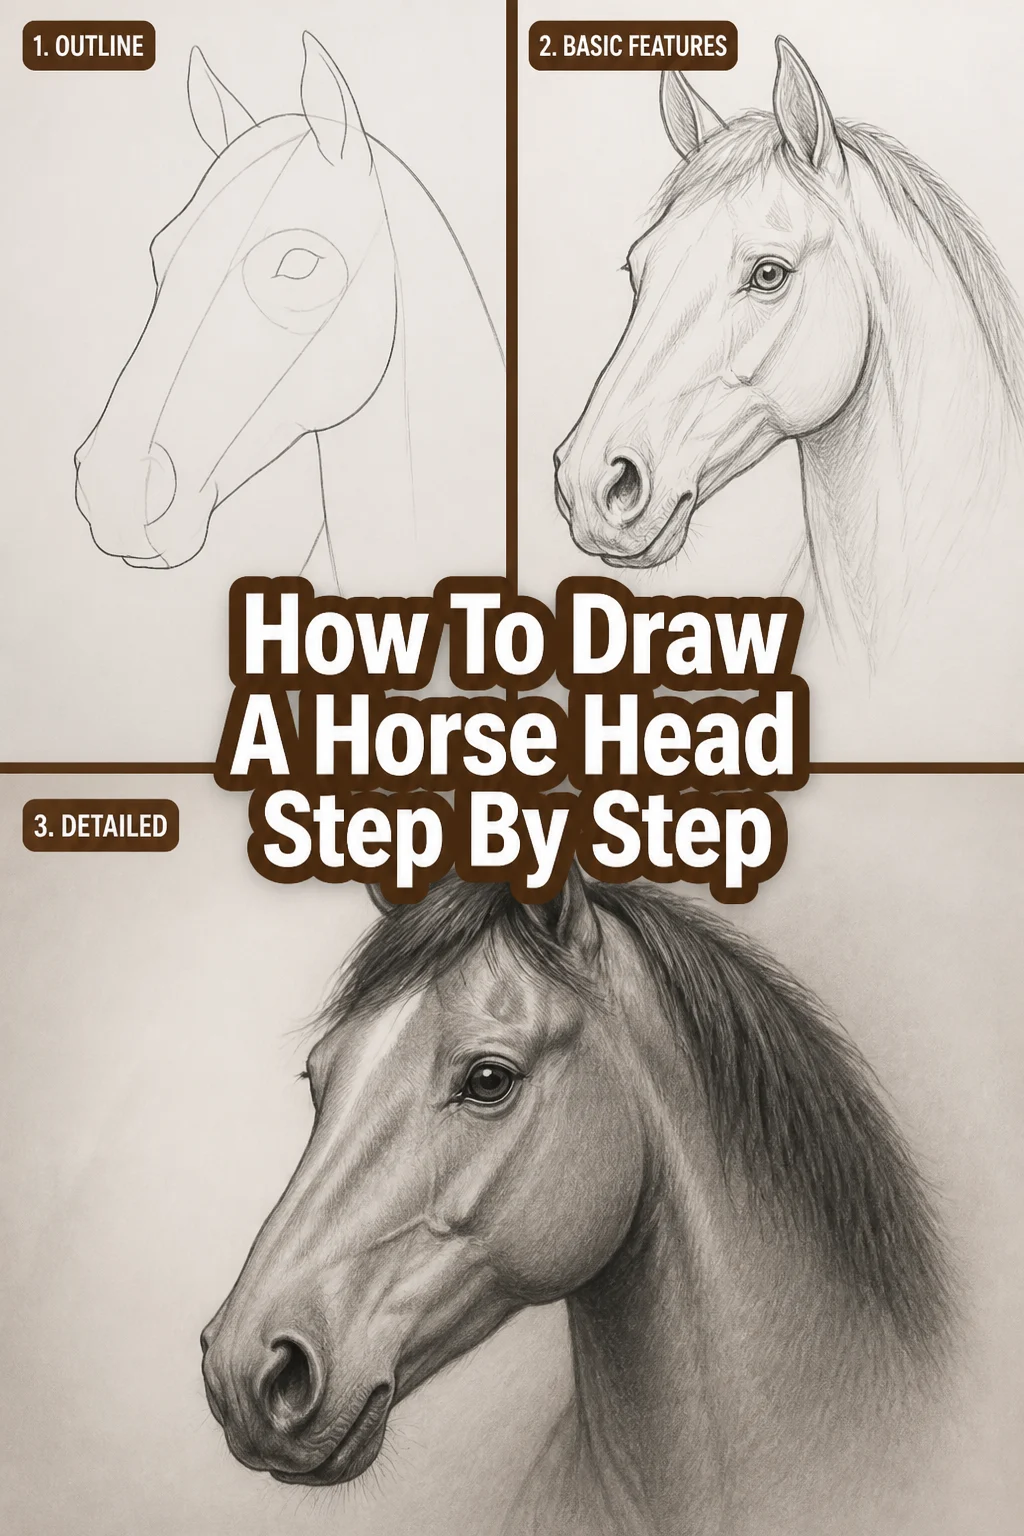
🐴 How To Draw A Horse Head Step By Step
Learning to draw a horse head can feel like a big challenge at first.
I remember my early attempts, often ending up with something more like a dog or a deer.
But with the right approach and a bit of patience, you can absolutely capture the majestic beauty of these animals.
Quick Overview
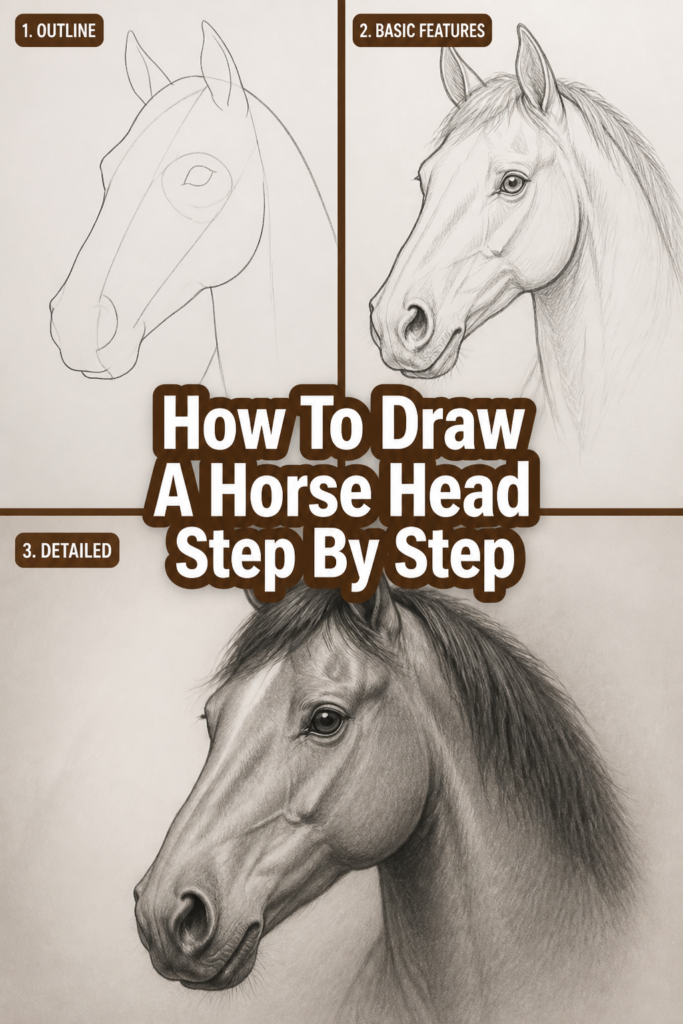
This guide will walk you through the process of drawing a realistic horse head, building your skills from basic shapes to detailed shading.
You’ll gain confidence in rendering complex animal anatomy.
- Time needed: 45-60 minutes
- Difficulty: Intermediate
- What you’ll need: Paper, graphite pencils (HB, 2B, 4B), eraser (kneaded and regular), blending stump (optional), reference photo of a horse head.
Step-by-Step Instructions
Step 1: Understand Basic Anatomy and Establish Major Shapes
Every great drawing begins with understanding the underlying structure.
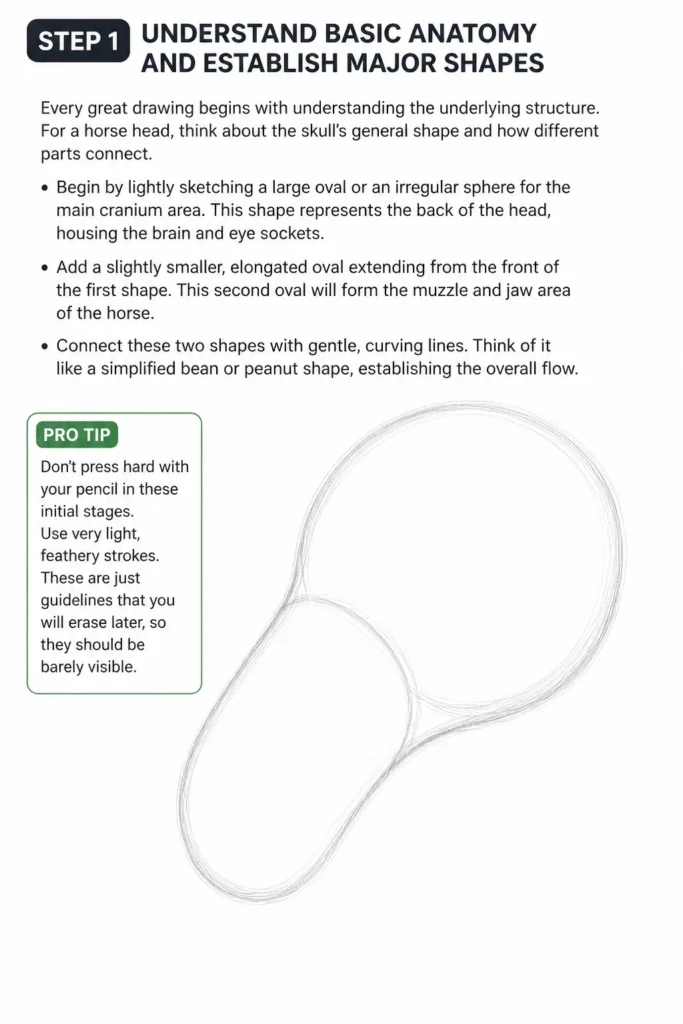
For a horse head, think about the skull’s general shape and how different parts connect.
Begin by lightly sketching a large oval or an irregular sphere for the main cranium area.
This shape represents the back of the head, housing the brain and eye sockets.
Add a slightly smaller, elongated oval extending from the front of the first shape.
This second oval will form the muzzle and jaw area of the horse.
Connect these two shapes with gentle, curving lines.
Think of it like a simplified bean or peanut shape, establishing the overall flow.
Pro Tip: Don’t press hard with your pencil in these initial stages. Use very light, feathery strokes. These are just guidelines that you will erase later, so they should be barely visible.
Step 2: Define the Muzzle and Jawline
Now that you have the basic head shape, let’s refine the lower facial structure.
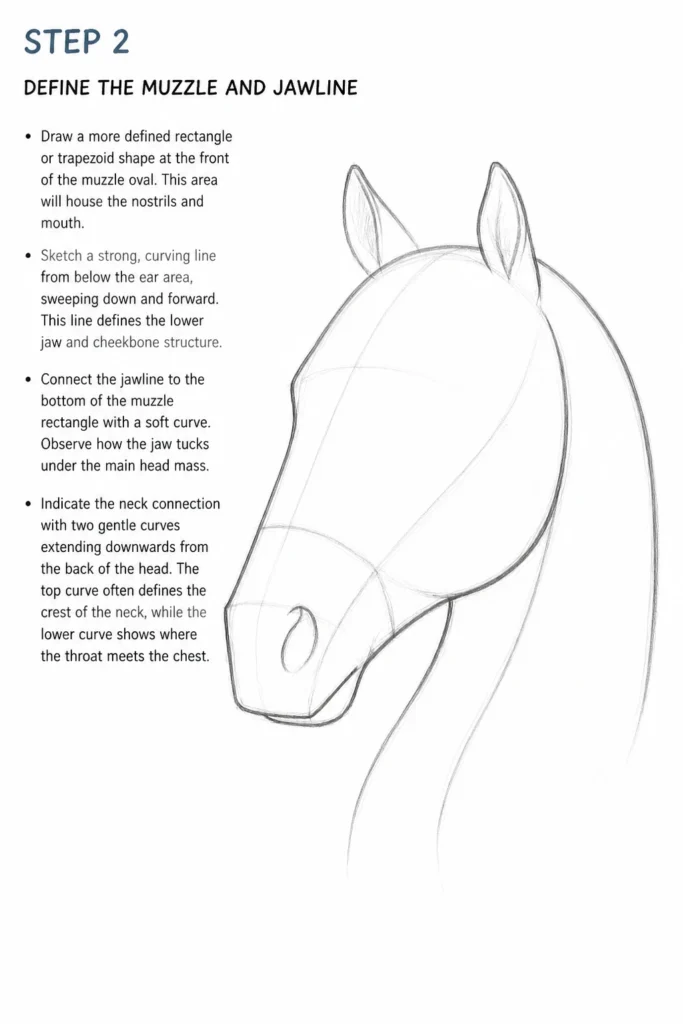
This is where the horse’s unique character starts to emerge.
Draw a more defined rectangle or trapezoid shape at the front of the muzzle oval.
This area will house the nostrils and mouth.
Sketch a strong, curving line from below the ear area, sweeping down and forward.
This line defines the lower jaw and cheekbone structure.
Connect the jawline to the bottom of the muzzle rectangle with a soft curve.
Observe how the jaw tucks under the main head mass.
Indicate the neck connection with two gentle curves extending downwards from the back of the head.
The top curve often defines the crest of the neck, while the lower curve shows where the throat meets the chest.
Step 3: Position the Eyes and Ears
The eyes and ears are critical for conveying emotion and realism in your horse drawing.
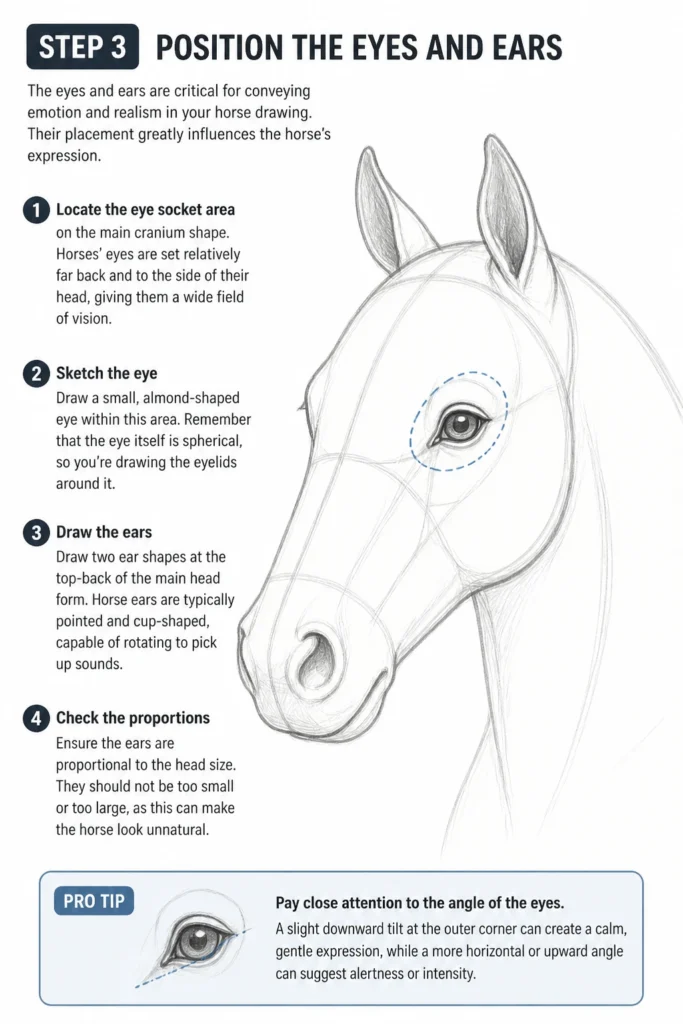
Their placement greatly influences the horse’s expression.
Locate the eye socket area on the main cranium shape.
Horses’ eyes are set relatively far back and to the side of their head, giving them a wide field of vision.
Sketch a small, almond-shaped eye within this area.
Remember that the eye itself is spherical, so you’re drawing the eyelids around it.
Draw two ear shapes at the top-back of the main head form.
Horse ears are typically pointed and cup-shaped, capable of rotating to pick up sounds.
Ensure the ears are proportional to the head size.
They should not be too small or too large, as this can make the horse look unnatural.
Pro Tip: Pay close attention to the angle of the eyes. A slight downward tilt can convey a gentle expression, while a more direct, forward gaze might suggest alertness.
Step 4: Refine Facial Features and Proportions
With the major components in place, it’s time to refine the details that bring the horse to life.
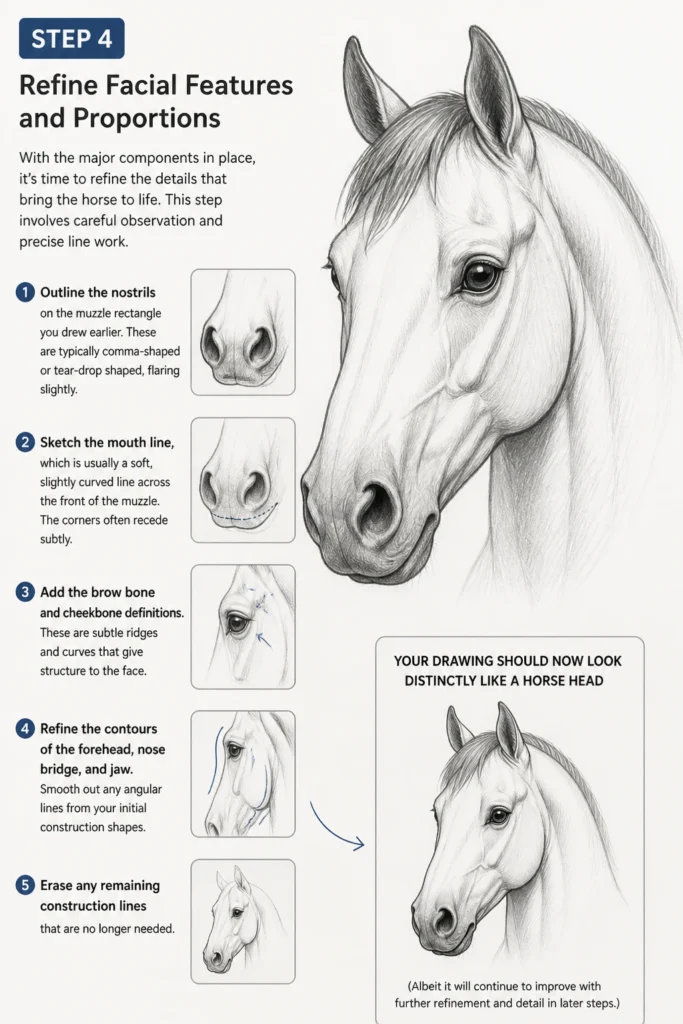
This step involves careful observation and precise line work.
Outline the nostrils on the muzzle rectangle you drew earlier.
These are typically comma-shaped or tear-drop shaped, flaring slightly.
Sketch the mouth line, which is usually a soft, slightly curved line across the front of the muzzle.
The corners often recede subtly.
Add the brow bone and cheekbone definitions.
These are subtle ridges and curves that give structure to the face.
Refine the contours of the forehead, nose bridge, and jaw.
Smooth out any angular lines from your initial construction shapes.
Erase any remaining construction lines that are no longer needed.
Your drawing should now look distinctly like a horse head, albeit without much shading.
Step 5: Develop the Mane and Forelock
The mane and forelock add character, texture, and a sense of movement to your horse drawing.
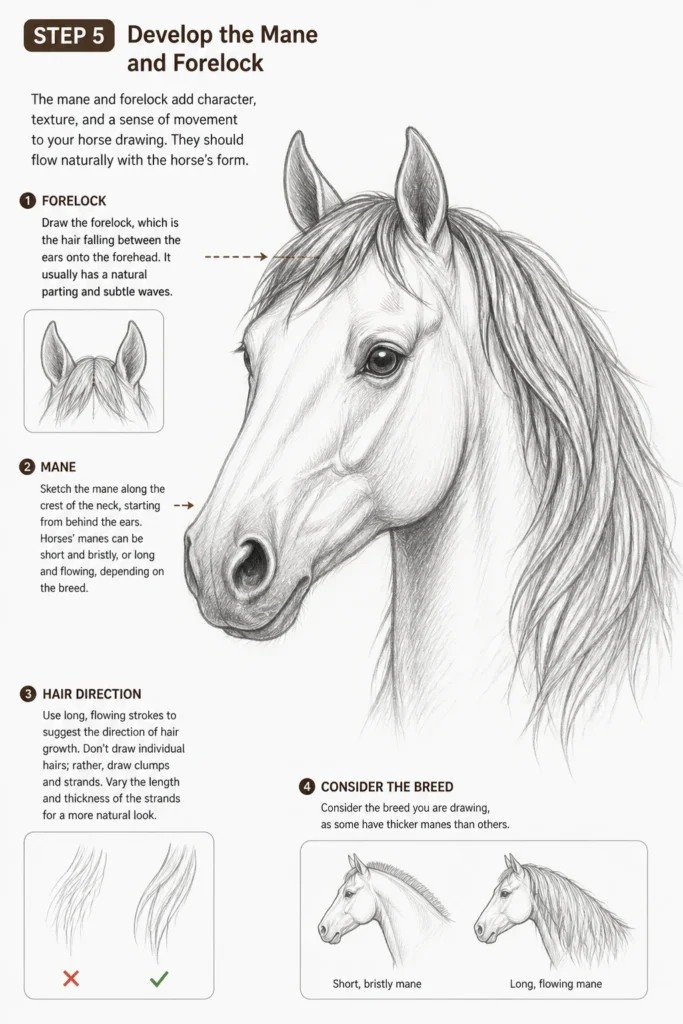
They should flow naturally with the horse’s form.
Draw the forelock, which is the hair falling between the ears onto the forehead.
It usually has a natural parting and subtle waves.
Sketch the mane along the crest of the neck, starting from behind the ears.
Horses’ manes can be short and bristly, or long and flowing, depending on the breed.
Use long, flowing strokes to suggest the direction of hair growth.
Don’t draw individual hairs; rather, draw clumps and strands.
Vary the length and thickness of the strands for a more natural look.
Consider the breed you are drawing, as some have thicker manes than others.
Step 6: Add Shading and Depth
Shading is crucial for transforming your line drawing into a three-dimensional form.
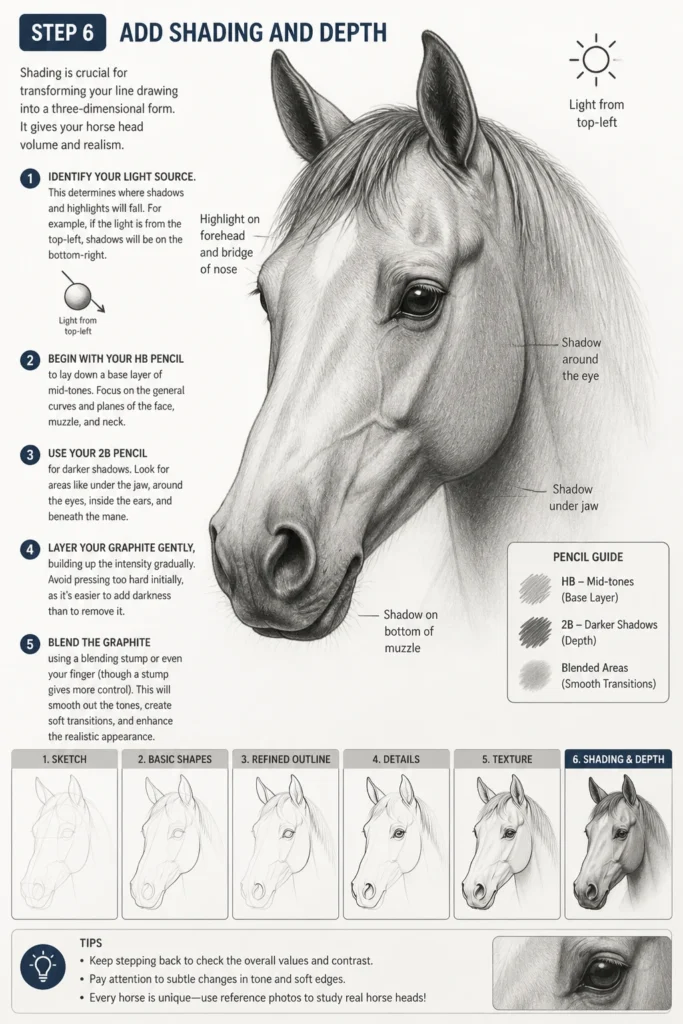
It gives your horse head volume and realism.
Identify your light source. This determines where shadows and highlights will fall.
For example, if the light is from the top-left, shadows will be on the bottom-right.
Begin with your HB pencil to lay down a base layer of mid-tones.
Focus on the general curves and planes of the face, muzzle, and neck.
Use your 2B pencil for darker shadows.
Look for areas like under the jaw, around the eyes, inside the ears, and beneath the mane.
Layer your graphite gently, building up the intensity gradually.
Avoid pressing too hard initially, as it’s easier to add darkness than to remove it.
Blend the graphite using a blending stump or even your finger (though a stump gives more control).
This creates smooth transitions between tones and eliminates harsh lines.
Pro Tip: Pay special attention to the deep shadows within the eye and nostril areas. These dark accents add significant depth and realism. Leave a tiny highlight in the eye to make it sparkle.
Step 7: Detail and Final Touches
The final step involves refining details and adding textures to bring your horse head drawing to its full potential.
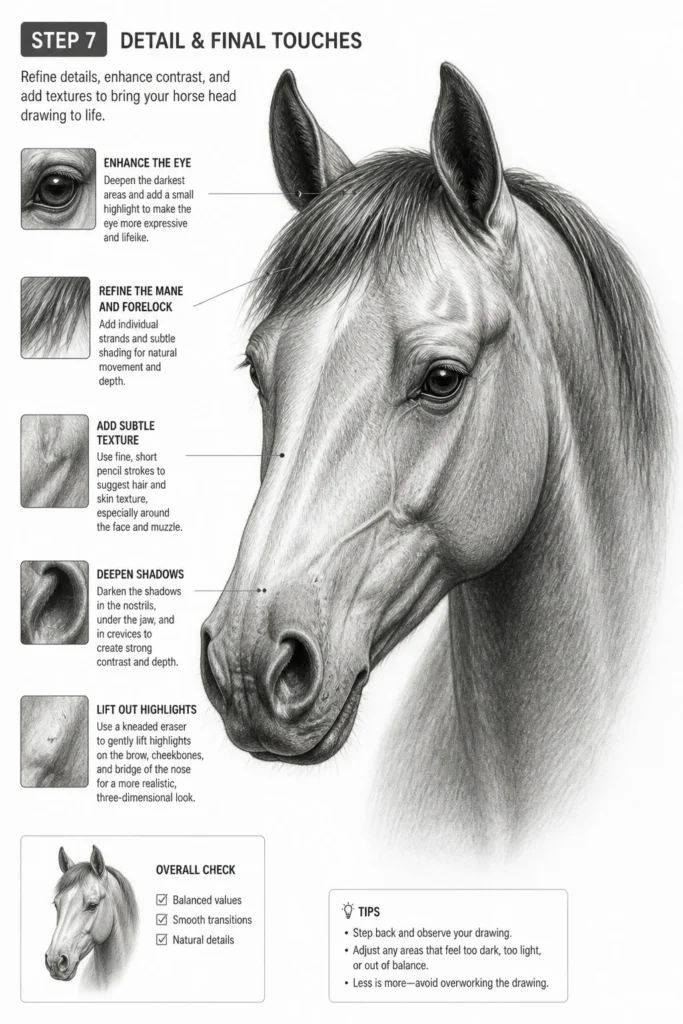
This is where you make it truly shine.
Sharpen your 4B pencil and deepen the darkest shadows.
These are often found in crevices, under the jaw, and inside the ears, creating strong contrast.
Add subtle textural details, such as short, fine hairs around the muzzle or a slight texture on the skin.
Don’t overdo it; a few well-placed details are more effective than drawing every hair.
Use your kneaded eraser to lift out highlights on the brow, cheekbones, and the bridge of the nose.
This creates reflective surfaces and adds brilliance.
Refine any outlines that seem too harsh or too soft.
Ensure the overall form feels cohesive and three-dimensional.
Step back and observe your drawing from a distance.
This helps you spot any areas that might need further adjustment or balancing.
Common Mistakes to Avoid
Disproportionate Features
One common pitfall is drawing eyes that are too large or too small, or a muzzle that doesn’t fit the head.
This can make your horse look alien or cartoonish, losing its majestic quality.
Always start with basic shapes and consistently compare the size of features to each other. Use a reference photo and measure mentally or with your pencil to maintain accurate proportions.
Flat, Lifeless Drawing
Many beginners struggle with making their drawings look three-dimensional, resulting in a flat image.
This usually happens when shading is neglected or applied without understanding light and shadow.
To avoid this, always identify your light source and build up layers of graphite, using different pencil grades to create a full range of values from light to dark. Blending helps create smooth transitions.
Stiff, Unnatural Pose
Sometimes, a horse head can look rigid or like a statue rather than a living creature.
This often stems from not considering the subtle curves and natural flow of the horse’s neck and head.
When starting, think about the horse’s posture. Even a slight tilt of the head or a gentle curve of the neck can add immense life and dynamism to your drawing.
Ignoring Anatomy
Drawing without understanding the underlying bone and muscle structure can lead to inaccurate forms.
A horse’s head is complex, with prominent bone structures like the jaw, brow, and cheekbones.
Take a moment to study horse anatomy, even briefly. Knowing where these structures lie will inform your initial sketches and help you place features more accurately, making your drawing more believable.
Troubleshooting
My Horse Looks Cartoonish
If your horse head lacks realism, it often points to a simplification of features or proportions.
Go back to your reference photo and meticulously compare every detail.
Pay close attention to the subtle curves of the muzzle, the exact placement of the eyes, and the bony structures. Avoid overly exaggerated features and focus on realistic subtle nuances.
Struggling with Perspective
Drawing a horse head from an angle can be tricky, making features seem distorted.
The key is to break the head down into very simple three-dimensional forms like cubes and cylinders first.
Use light guidelines to establish the central axis of the head and the planes of the face, ensuring all features recede correctly into space. Practice drawing these basic forms from different angles.
My Shading Looks Muddy
Muddy shading occurs when graphite is applied too heavily or blended too much without clear light and shadow areas.
To fix this, ensure you’re using a range of pencil grades, from light HB for base tones to dark 4B for deep shadows.
Apply graphite in light layers, building up intensity gradually. Use a kneaded eraser to lift out accidental darkness and create clean highlights, which will add crispness to your values.
Key Takeaways
- Always start with light, basic geometric shapes to establish the overall form and proportions.
- Understanding basic horse anatomy significantly improves accuracy and realism.
- Use a variety of pencil grades to create a full range of values, from bright highlights to deep shadows.
- Shading is essential for giving your drawing three-dimensional depth and volume.
- Pay close attention to details like eye placement, nostril shape, and mane flow for character.
- Practice is paramount; the more you draw, the more intuitive the process becomes.
Frequently Asked Questions
What kind of pencils are best for drawing a horse head?
A good range of graphite pencils is ideal. An HB pencil is great for initial sketches and mid-tones, while 2B and 4B (or even 6B) are excellent for deepening shadows and adding rich contrast.
How do I make the mane look realistic?
Focus on drawing clumps and strands of hair rather than individual hairs. Observe the direction of growth, how light hits it, and how it flows. Use varying line weights and subtle shading to give it texture and volume.
Should I use reference photos?
Absolutely! Reference photos are invaluable. They help you understand proportions, anatomy, and how light interacts with the horse’s features. Don’t copy exactly, but use them as a guide to learn and inform your drawing.
How do I draw different horse breeds?
Different breeds have distinct facial characteristics – some have dished faces (Arabians), others have very straight profiles (Thoroughbreds), or heavy brows (draft horses). Study photos of specific breeds to capture these unique traits in your drawing.
Our Top Recommended Finds
- Sketchbook with quality paper: A good sketchbook provides a smooth surface that holds graphite well, making blending easier and preventing smudging.
- Graphite pencil set: A set with a range of hardness (e.g., HB, 2B, 4B, 6B) allows for greater control over values and shading in your drawings.
- Kneaded eraser: This versatile eraser can lift graphite without damaging the paper, allowing you to create subtle highlights and clean up areas gently.
Embrace Your Artistic Journey
You’ve just taken a significant step in capturing the beauty of a horse head on paper.
Remember that drawing is a skill that grows with consistent practice and observation.
Don’t be afraid to experiment with different angles, expressions, and even various horse breeds.
Perhaps your next artistic adventure could involve drawing the entire horse body or exploring dynamic action poses.
Pick up your pencil again today and let your creativity flow.