👤 How To Draw Heads In Different Angles Step By Step
Learning to draw heads from every angle once felt like an impossible challenge for me.
I remember feeling frustrated by distorted features and flat-looking portraits.
Through dedicated practice and understanding foundational principles, I discovered a clear, actionable path, and I’m eager to share that journey with you.
Quick Overview
This guide will help you confidently approach drawing heads from various perspectives.
You’ll gain a solid understanding of proportion, form, and how to adapt features to different angles, moving beyond flat, static drawings.
- Time needed: Consistent practice over several weeks to build muscle memory and understanding.
- Difficulty: Intermediate, building on basic drawing skills.
- What you’ll need: Sketchbook, graphite pencils (HB, 2B, 4B), kneaded eraser, reference images.
Step-by-Step Instructions
Step 1: Understand the Basic Head Form
Begin by thinking of the head as a simple 3D shape. It’s not just a flat circle or oval.
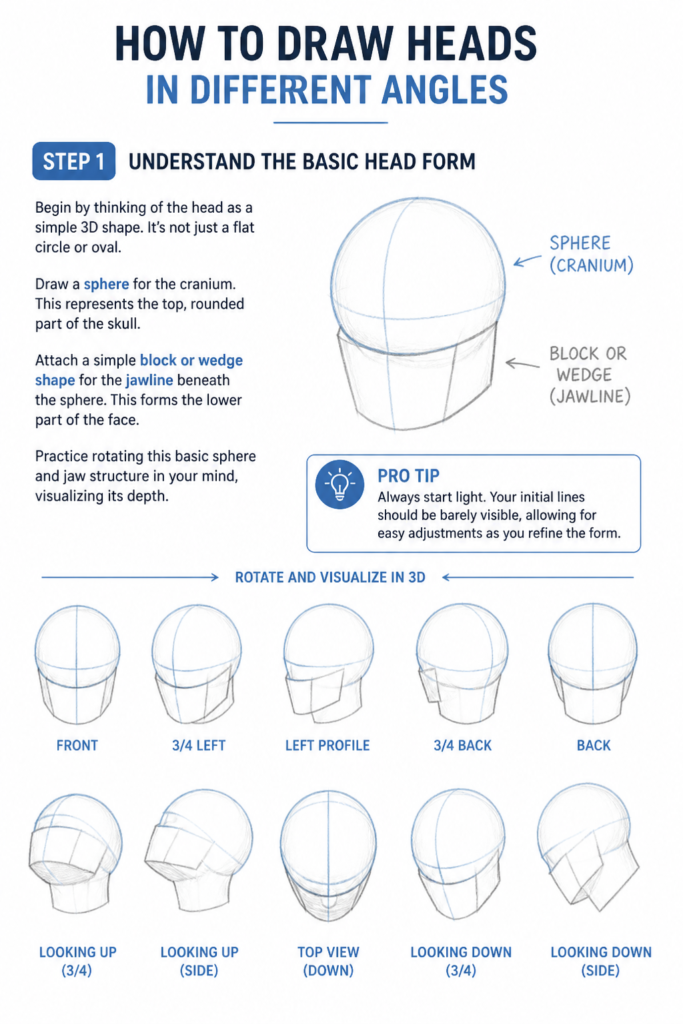
Draw a sphere for the cranium. This represents the top, rounded part of the skull.
Attach a simple block or wedge shape for the jawline beneath the sphere. This forms the lower part of the face.
Practice rotating this basic sphere and jaw structure in your mind, visualizing its depth.
Pro Tip: Always start light. Your initial lines should be barely visible, allowing for easy adjustments as you refine the form.
Step 2: Establish the Centerline and Eyeline
Draw a vertical centerline that wraps around the sphere and down the jaw block. This line indicates the direction the head is facing.
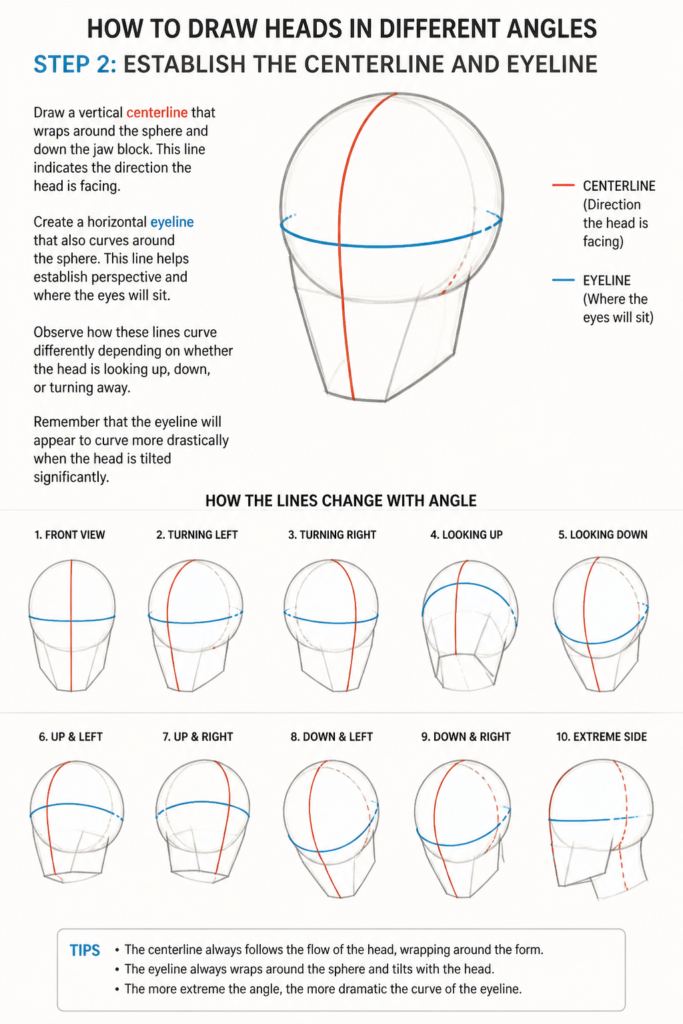
Create a horizontal eyeline that also curves around the sphere. This line helps establish perspective and where the eyes will sit.
Observe how these lines curve differently depending on whether the head is looking up, down, or turning away.
Remember that the eyeline will appear to curve more drastically when the head is tilted significantly.
Step 3: Position Key Facial Features
Divide the face into approximate thirds using horizontal lines. The eyeline is usually around the middle of the head’s total height, from chin to crown.
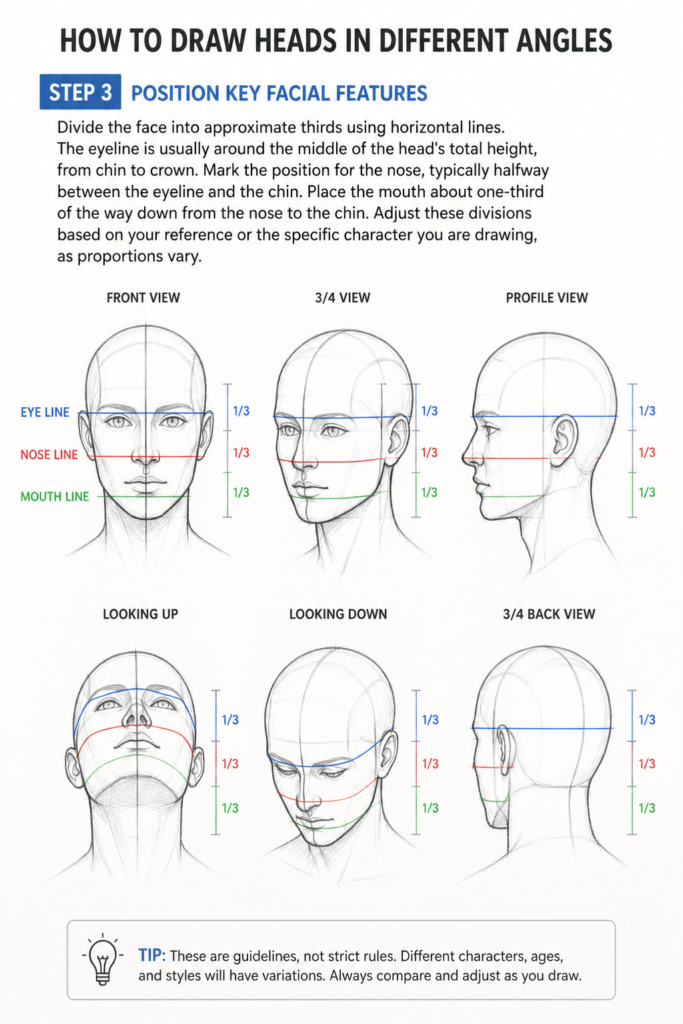
Mark the position for the nose, typically halfway between the eyeline and the chin.
Place the mouth about one-third of the way down from the nose to the chin.
Adjust these divisions based on your reference or the specific character you are drawing, as proportions vary.
Step 4: Refine the Jawline and Cranium
Carve out the cheekbones and jaw angles from your initial block shape. Think about the bone structure underneath.
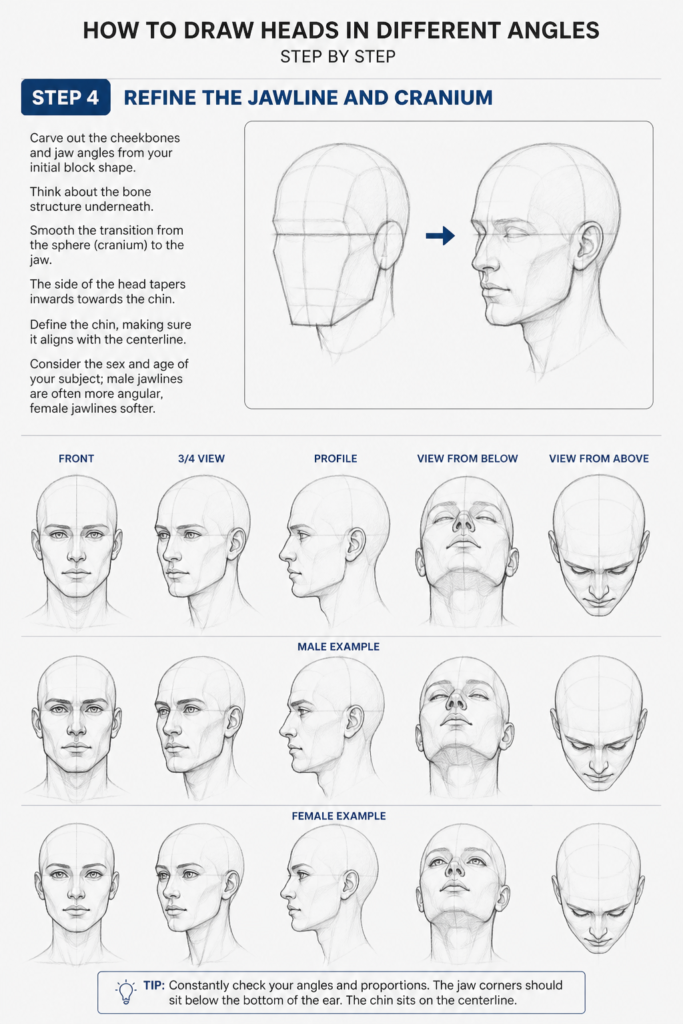
Smooth the transition from the sphere (cranium) to the jaw. The side of the head tapers inwards towards the chin.
Define the chin, making sure it aligns with the centerline.
Consider the sex and age of your subject; male jawlines are often more angular, female jawlines softer.
Step 5: Add Ears and Hairline
Place the ears between the eyeline and the nose line on the side of the head. They generally align with these major landmarks.
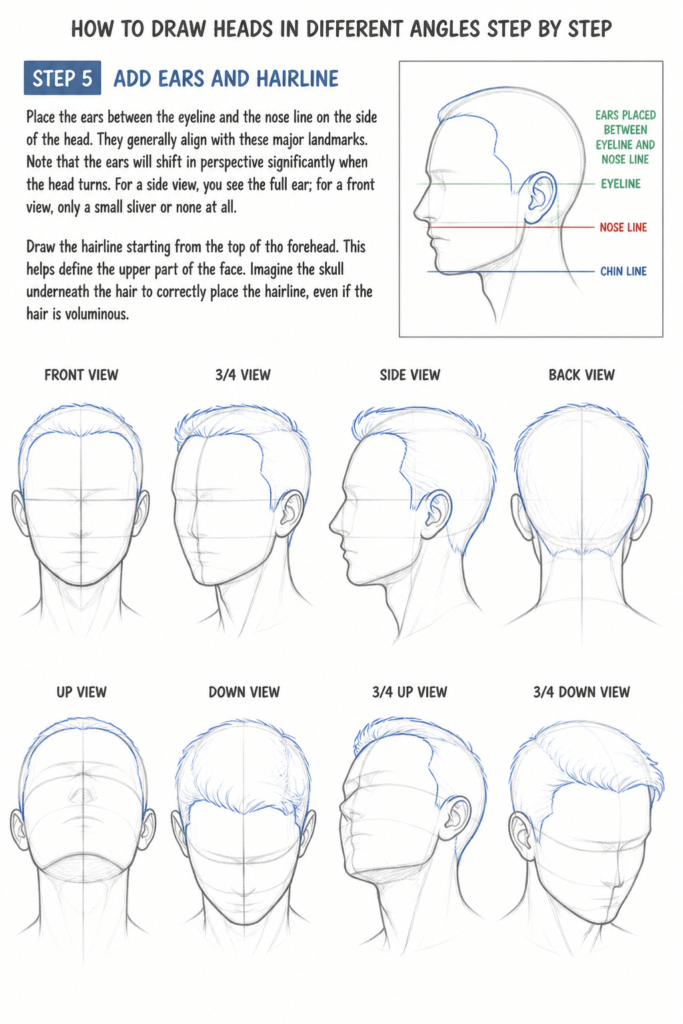
Note that the ears will shift in perspective significantly when the head turns. For a side view, you see the full ear; for a front view, only a small sliver or none at all.
Draw the hairline starting from the top of the forehead. This helps define the upper part of the face.
Imagine the skull underneath the hair to correctly place the hairline, even if the hair is voluminous.
Step 6: Block in Hair and Neck
Sketch the general volume and shape of the hair. Don’t draw individual strands yet; focus on the overall mass.
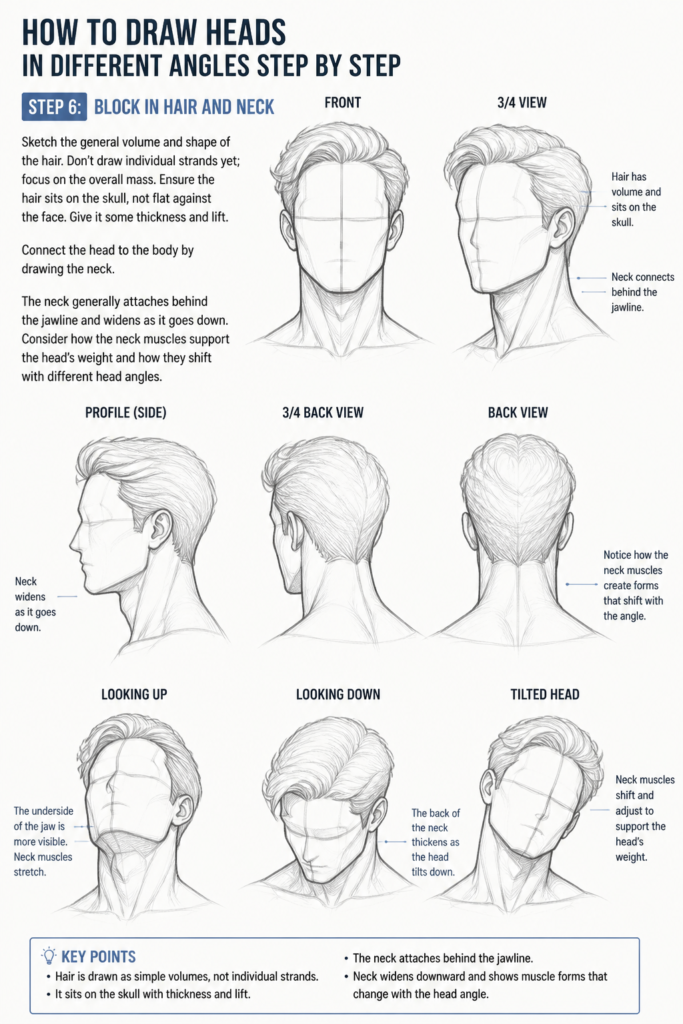
Ensure the hair sits on the skull, not flat against the face. Give it some thickness and lift.
Connect the head to the body by drawing the neck. The neck generally attaches behind the jawline and widens as it goes down.
Consider how the neck muscles support the head’s weight and how they shift with different head angles.
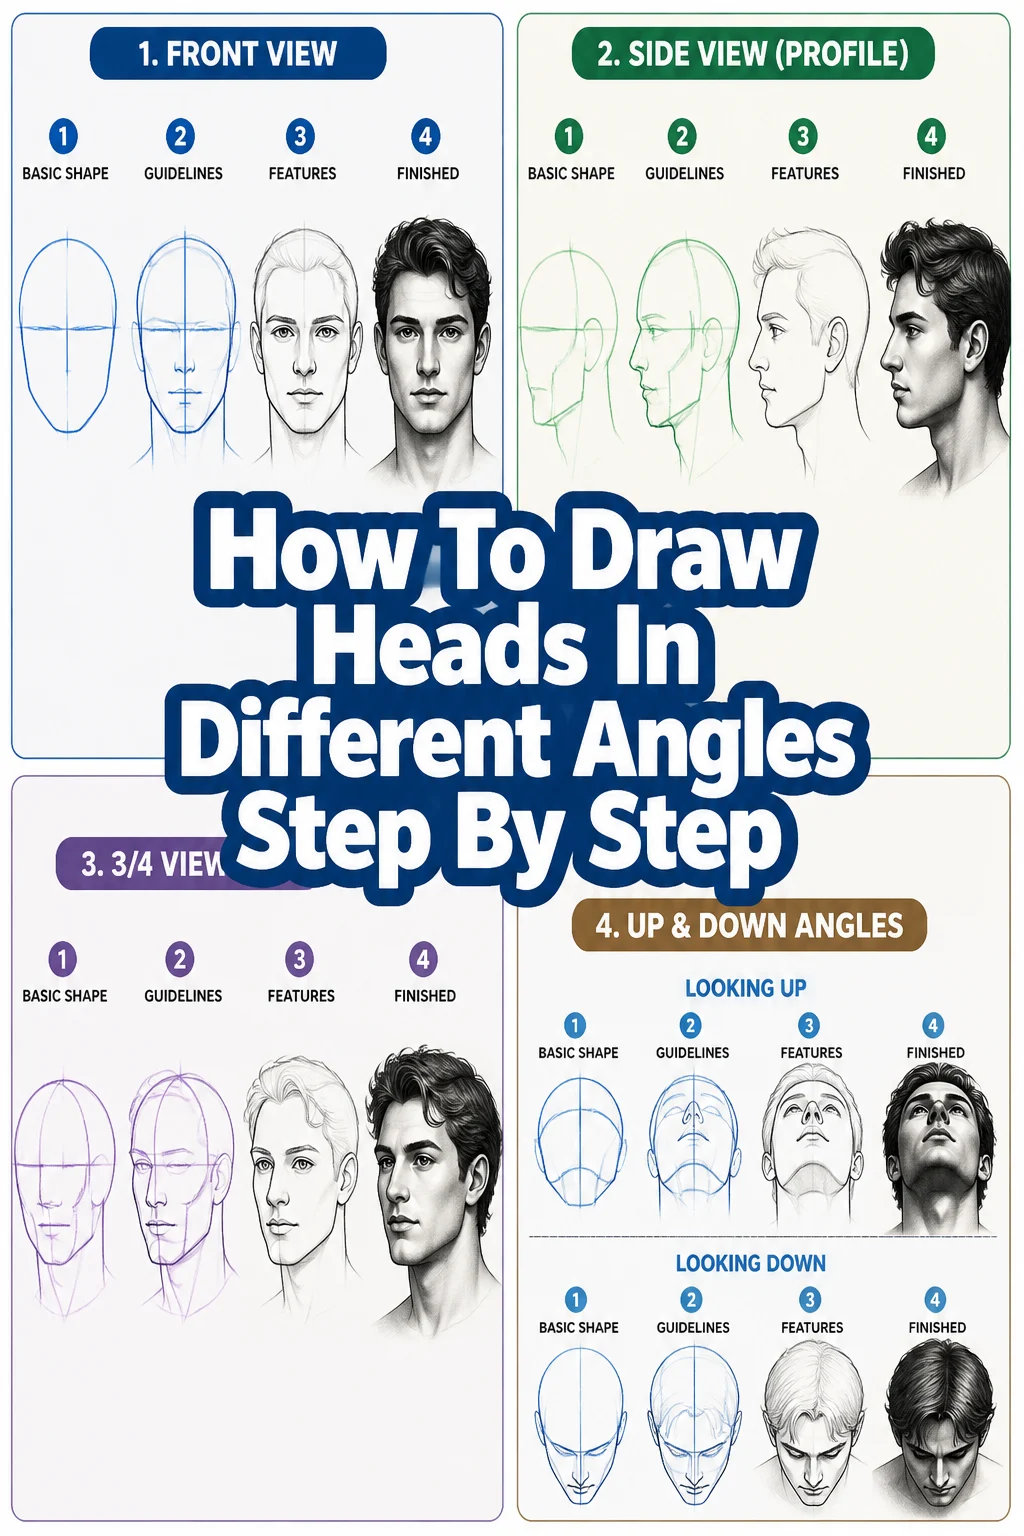
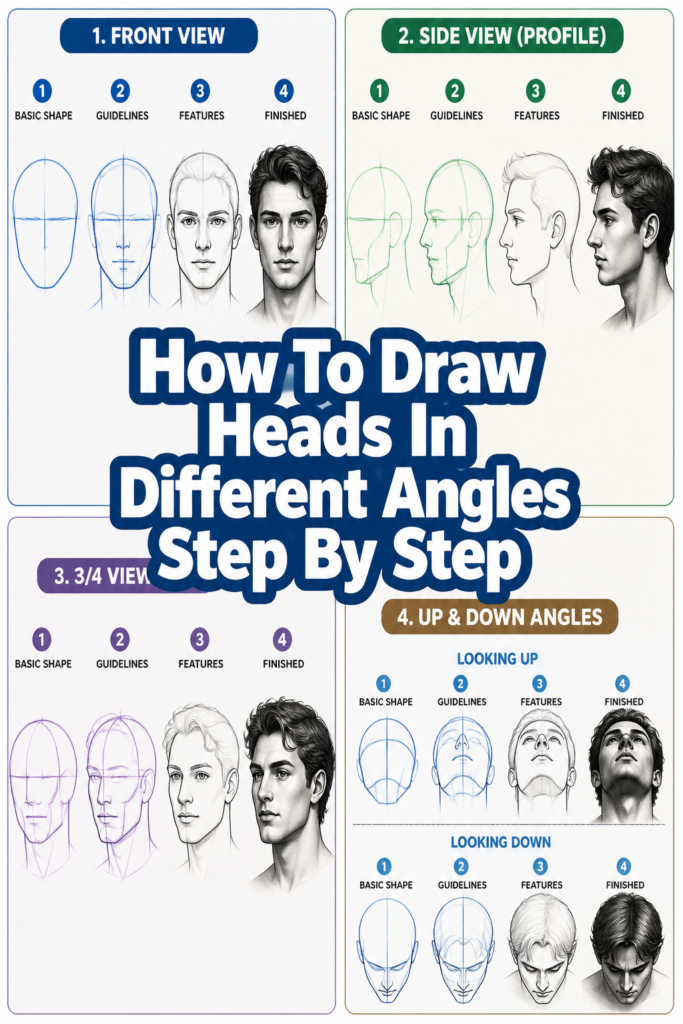
Step 7: Adjust for Different Angles
Front View: The centerline is straight down the middle. Eyeline and other feature lines are mostly horizontal, curving slightly if the head tilts.
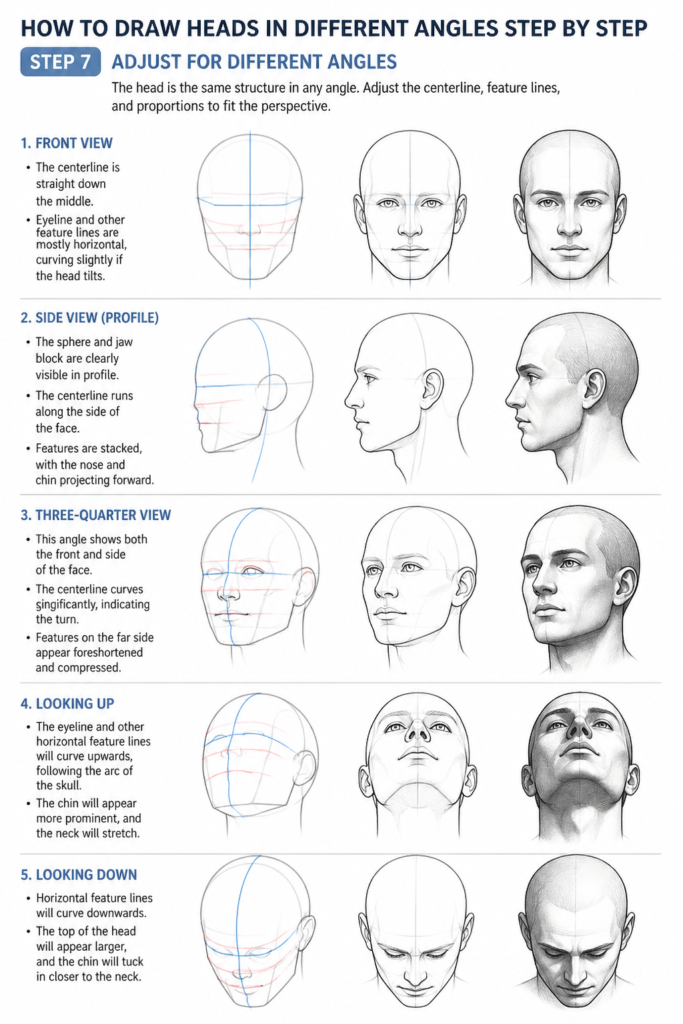
Side View (Profile): The sphere and jaw block are clearly visible in profile. The centerline runs along the side of the face. Features are stacked, with the nose and chin projecting forward.
Three-Quarter View: This angle shows both the front and side of the face. The centerline curves significantly, indicating the turn. Features on the far side appear foreshortened and compressed.
Looking Up: The eyeline and other horizontal feature lines will curve upwards, following the arc of the skull. The chin will appear more prominent, and the neck will stretch.
Looking Down: Horizontal feature lines will curve downwards. The top of the head will appear larger, the chin will recede, and the neck will compress.
Practice each angle individually, focusing on how the basic sphere and jaw structure changes, and how the guidelines wrap around.
Pro Tip: Use a physical model or a 3D head reference online. Being able to rotate an actual head and see how features change in perspective is invaluable.
Step 8: Refine Details and Clean Up
Darken your final lines and erase any construction lines that are no longer needed.
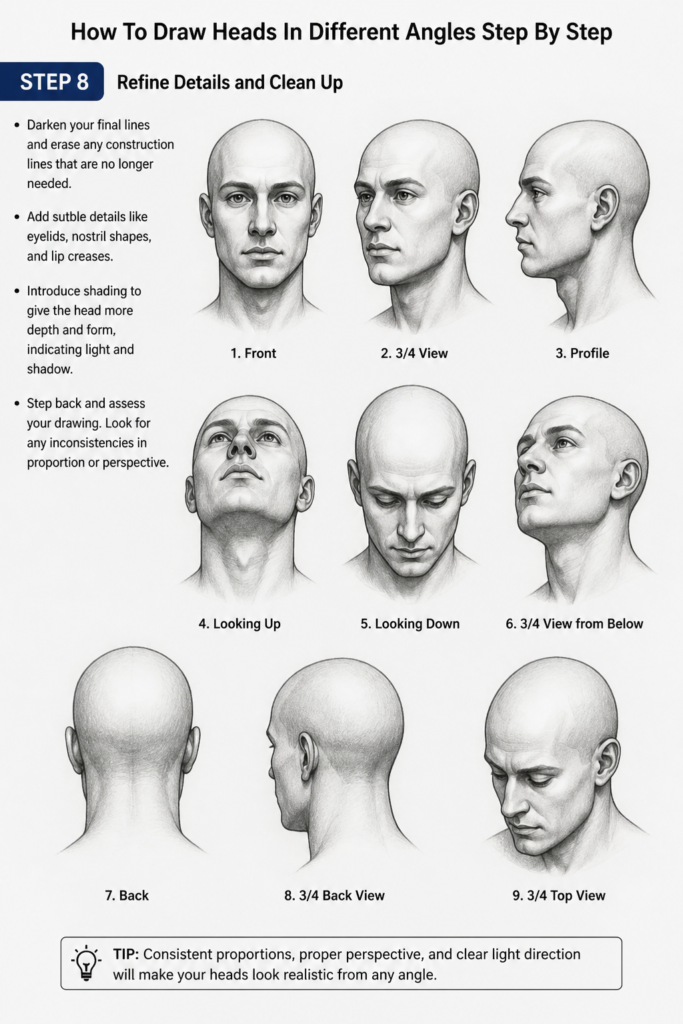
Add subtle details like eyelids, nostril shapes, and lip creases.
Introduce shading to give the head more depth and form, indicating light and shadow.
Step back and assess your drawing. Look for any inconsistencies in proportion or perspective.
Common Mistakes to Avoid
Drawing Flat Shapes Instead of Forms
Many beginners treat the head as a flat silhouette rather than a three-dimensional object.
This results in drawings that lack depth and look unrealistic, especially at angles.
Always start with the sphere and jaw block. Think about how light would wrap around these forms.
Neglecting Foreshortening
When a part of the head or a feature is closer to the viewer, it appears larger, and parts further away appear smaller or compressed.
Failing to apply foreshortening makes angled heads look stretched or distorted.
Consciously compress features on the side of the head turning away from you, and expand those turning towards you.
Inconsistent Eyeline and Centerline Curves
The curvature of your eyeline and centerline dictates the head’s angle and tilt.
If these lines are not curved correctly or consistently, the entire head will look off-kilter or flat.
Draw these guidelines as if they are elastic bands wrapping tightly around a sphere, following its contours precisely.
Symmetrical Features on Angled Heads
Drawing both eyes, nostrils, or sides of the mouth identically when the head is at an angle is a common error.
This makes the head look unnatural and breaks the illusion of depth.
Remember that features on the far side will be foreshortened, partially hidden, or appear smaller due to perspective.
Troubleshooting
Heads Look Flat or Lack Depth
If your heads appear two-dimensional, you’re likely not thinking in three dimensions from the start.
Go back to the basic sphere and jaw block. Practice drawing these forms from many angles before adding features.
Focus on how your guidelines (centerline, eyeline) wrap around the form, not just drawn across it.
Features Don’t Align Correctly
Misaligned features often stem from incorrect placement of your initial guidelines.
Ensure your eyeline, nose line, and mouth line are consistently spaced and curve appropriately for the head’s angle.
Use horizontal and vertical alignments as checks: do the inner corners of the eyes align with the sides of the nose? Does the mouth fit between the pupils?
Difficulty with Extreme Angles
Extreme angles (like looking sharply up or down) are challenging because foreshortening is most pronounced.
Simplify the head even further into core geometric shapes. Exaggerate the curvature of your guidelines to match the dramatic tilt.
Work with strong references, even using a mirror to observe your own head at these angles.
Key Takeaways
- Always start with a simple 3D form: a sphere for the cranium and a block for the jaw.
- Use the centerline and eyeline as crucial guides that wrap around the head’s form.
- Understand how perspective and foreshortening affect feature placement and size at different angles.
- Practice drawing the head’s basic structure from various angles before adding details.
- Consistency in your guidelines is key to achieving believable head turns and tilts.
- Regularly use references to observe real-world proportions and angles.
Frequently Asked Questions
How often should I practice to see improvement?
Consistent practice is more important than long, infrequent sessions. Aim for at least 15-30 minutes daily, or several times a week, focusing on specific angles or problems.
What if I want to draw different head types or ethnicities?
The foundational sphere and jaw method remains the same, but you’ll adjust the proportions and feature shapes. Study references of the specific head types you wish to draw, paying attention to variations in jawline, nose bridge, eye shape, and cheekbones.
Where can I find good reference images?
High-quality photos, 3D model apps (like “ArtPose” or “Easy Pose”), and even your own reflection in a mirror are excellent resources. Pinterest, ArtStation, and dedicated anatomy sites offer vast libraries of references.
How do I add emotion and expression to angled heads?
Once the basic form and angle are solid, you can layer in expressions. Focus on how eyebrows, eyelids, mouth corners, and the muscles around them shift. Remember that these shifts will also be affected by perspective, appearing differently on each side of an angled face.
Our Top Recommended Finds
- Strathmore 400 Series Sketch Pad: A reliable, versatile paper that handles graphite well for all your practice drawings.
- Faber-Castell Graphite Pencil Set: Provides a range of hardness (HB to 6B), essential for sketching light construction lines and darker finished details.
- Mannequin Head or 3D Reference App: Invaluable for understanding how light and shadow fall on a 3D head and how features change from every angle.
Mastering the Head: Your Artistic Challenge
Drawing heads from different angles is a journey, not a destination.
It demands patience, observation, and a willingness to learn from every stroke.
Embrace the process, keep your sketchbook handy, and challenge yourself with new perspectives.
Start applying these steps today, and watch your understanding and skill truly transform.