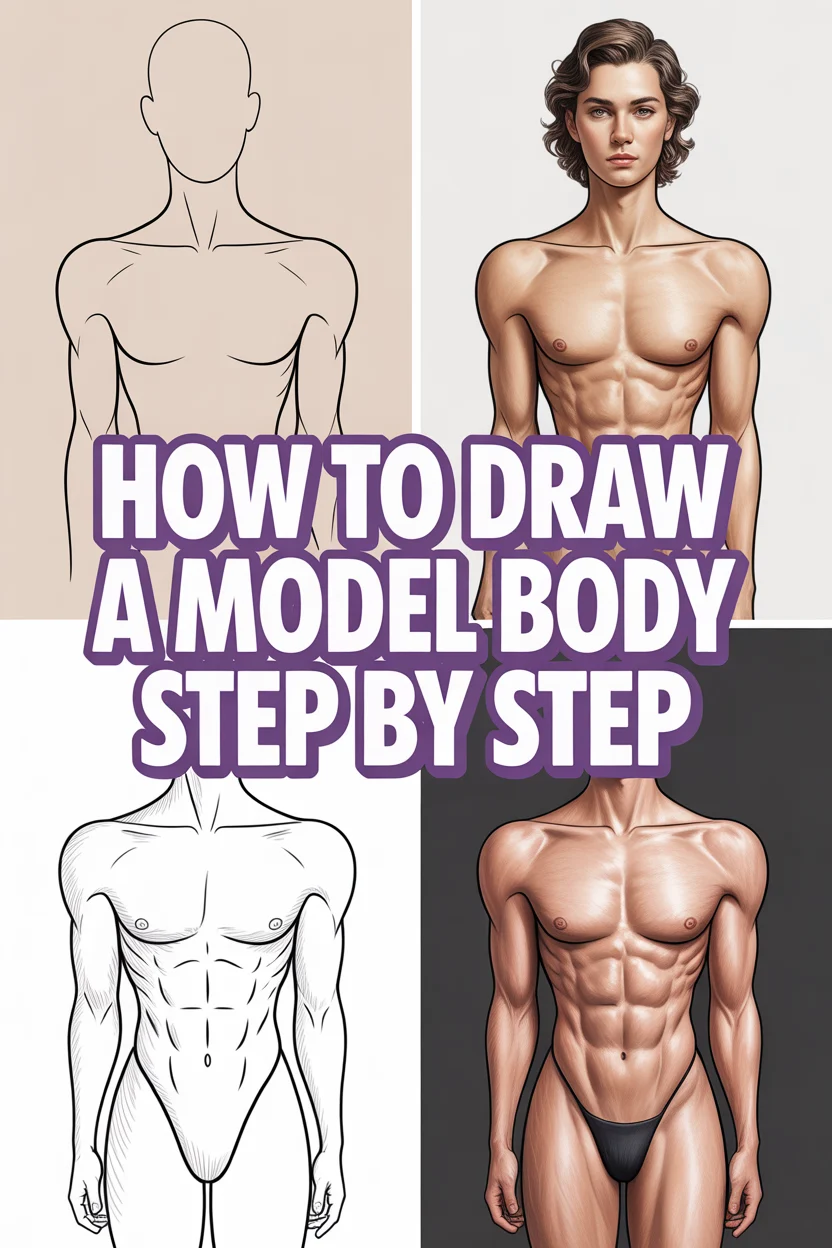
✏️ How To Draw A Model Body Step By Step
Learning to draw the human figure can feel daunting at first. I remember struggling endlessly with proportions and dynamic poses. It felt like my figures always looked stiff or oddly proportioned.
But with a structured approach, the process becomes much clearer and more enjoyable. This guide will walk you through the essential steps to create balanced and expressive model bodies on paper. You’ll gain a foundational understanding that empowers you to draw diverse figures with confidence.
Quick Overview
This guide will equip you with the fundamental techniques for drawing a well-proportioned model body from scratch. You’ll learn to build a figure using simple shapes and guidelines, progressively adding detail.
- Time needed: 1-2 hours for a first attempt, less for subsequent practice.
- Difficulty: Beginner-Intermediate. Assumes basic drawing familiarity but no prior figure drawing experience.
- What you’ll need: Sketchbook or drawing paper, graphite pencils (HB, 2B, 4B recommended), an eraser (kneaded and plastic), and optional reference photos.
Step-by-Step Instructions
Step 1: Capture the Gesture and Action Line
Begin your drawing by focusing on the overall flow and movement of the pose. Do not worry about details or perfect anatomy yet. This initial stage is about energy.
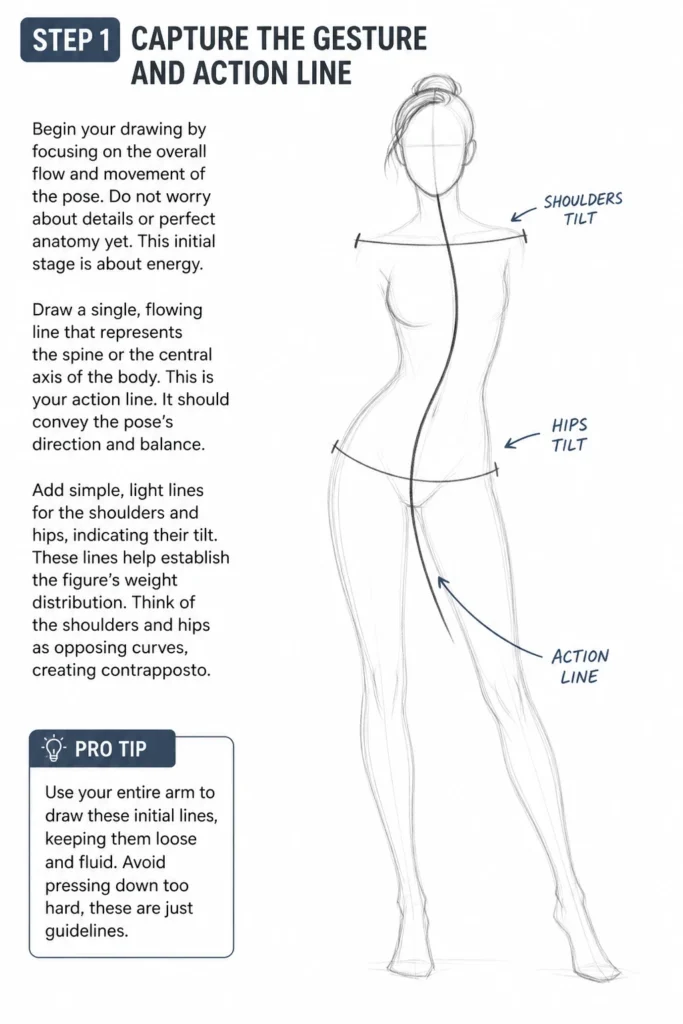
Draw a single, flowing line that represents the spine or the central axis of the body. This is your action line. It should convey the pose’s direction and balance.
Add simple, light lines for the shoulders and hips, indicating their tilt. These lines help establish the figure’s weight distribution. Think of the shoulders and hips as opposing curves, creating contrapposto.
Pro Tip: Use your entire arm to draw these initial lines, keeping them loose and fluid. Avoid pressing down too hard; these are just guidelines.
Step 2: Establish Proportions with Head Units
The human body is often measured in “head units,” which is the length of the head itself. For a fashion model, this is typically 8 to 8.5 heads tall, making them appear elongated.
Measure and mark out these head units along your action line. The first head unit is for the head itself. The second typically ends around the nipples, the third at the navel, and the fourth at the crotch.
Continue marking units down the legs. The knees usually fall around the sixth head unit, and the feet extend to the eighth or eighth-and-a-half unit. This framework ensures your figure is proportionally balanced.
Step 3: Block Out the Torso and Pelvis
Now, we’ll give structure to the core of the body. Think of the torso as two main masses: the rib cage and the pelvis.
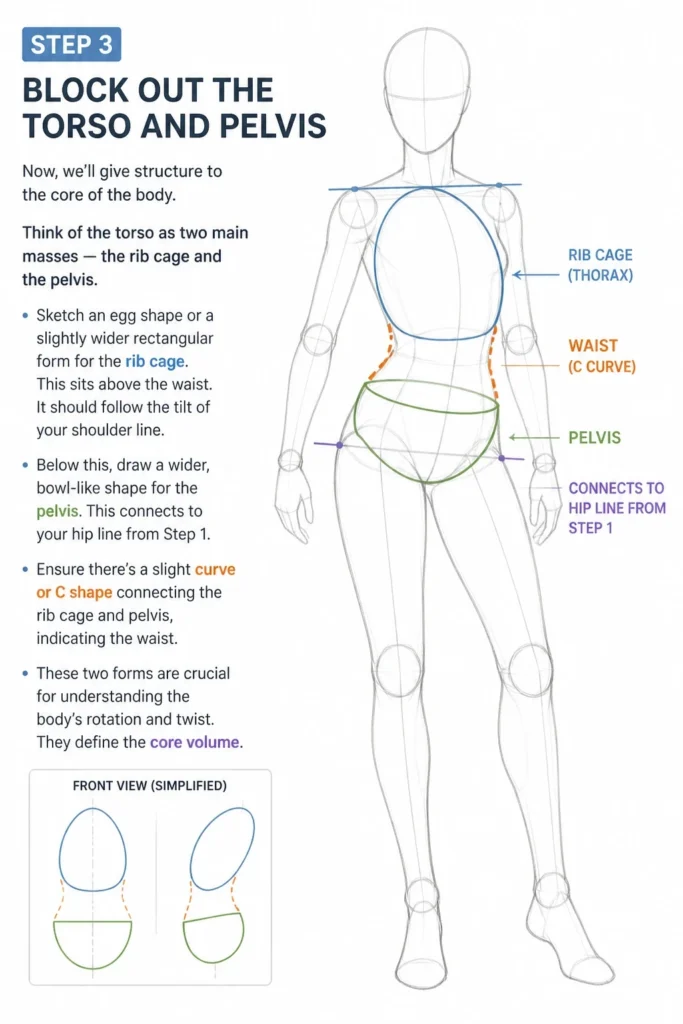
Sketch an egg shape or a slightly wider rectangular form for the rib cage. This sits above the waist. It should follow the tilt of your shoulder line.
Below this, draw a wider, bowl-like shape for the pelvis. This connects to your hip line from Step 1. Ensure there’s a slight curve or “C” shape connecting the rib cage and pelvis, indicating the waist.
These two forms are crucial for understanding the body’s rotation and twist. They define the core volume.
Step 4: Sketch the Limbs with Simple Shapes
With the torso established, we can attach the limbs. Again, keep these initial shapes very basic and loose.
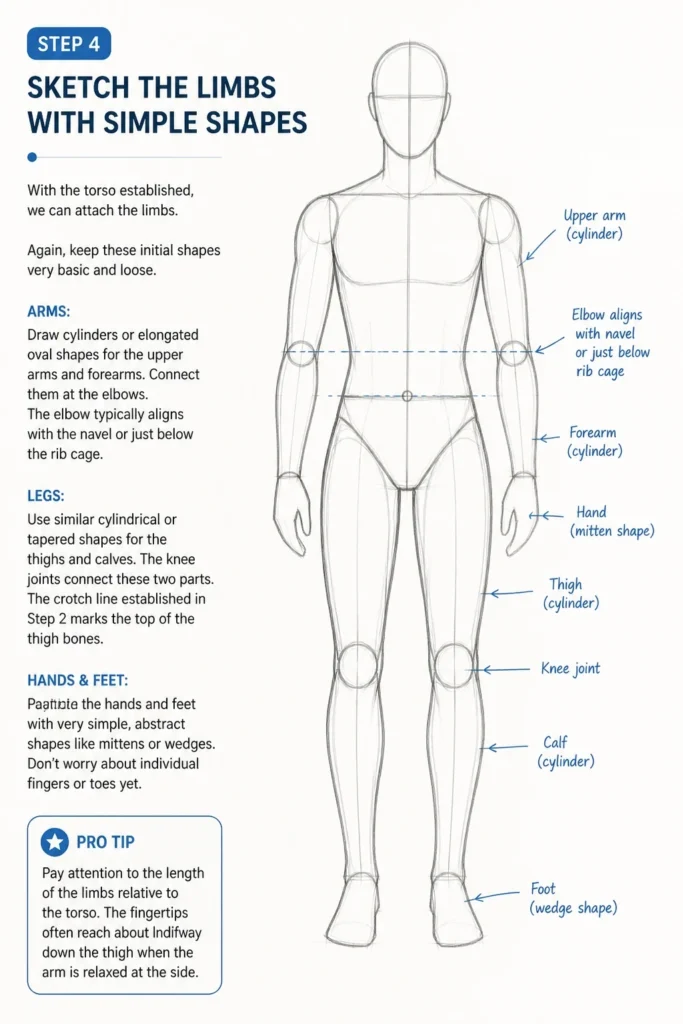
For the arms, draw cylinders or elongated oval shapes for the upper arms and forearms. Connect them at the elbows. The elbow typically aligns with the navel or just below the rib cage.
For the legs, use similar cylindrical or tapered shapes for the thighs and calves. The knee joints connect these two parts. The crotch line established in Step 2 marks the top of the thigh bones.
Indicate the hands and feet with very simple, abstract shapes like mittens or wedges. Don’t worry about individual fingers or toes yet.
Pro Tip: Pay attention to the length of the limbs relative to the torso. The fingertips often reach about halfway down the thigh when the arm is relaxed at the side.
Step 5: Connect and Refine the Forms
Now it’s time to smooth out the blocky shapes and start hinting at the musculature and curves of the body.
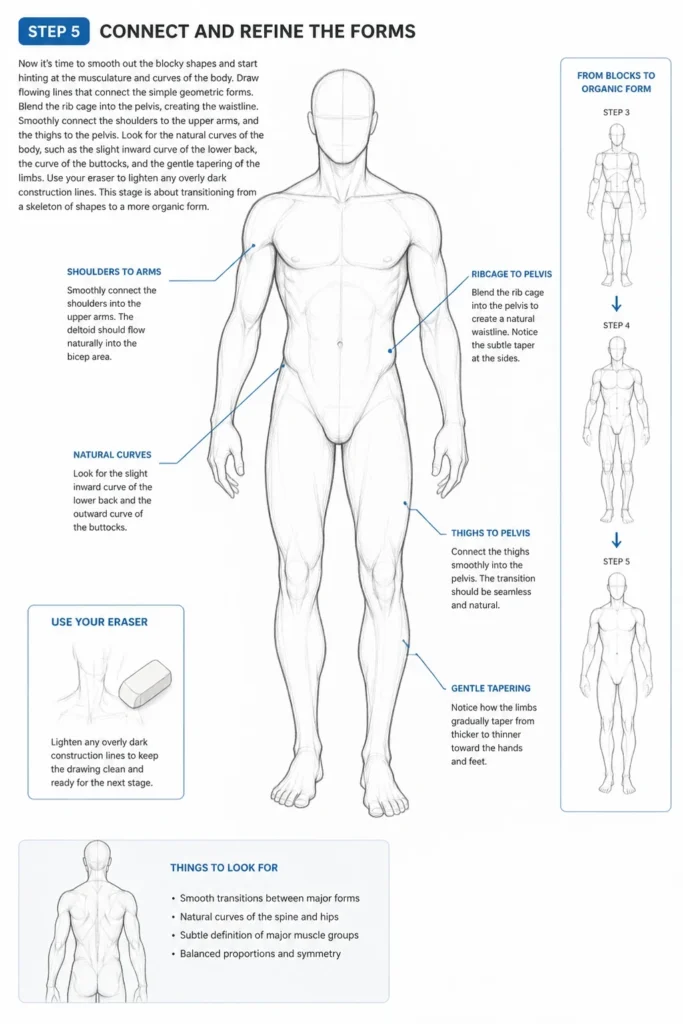
Draw flowing lines that connect the simple geometric forms. Blend the rib cage into the pelvis, creating the waistline. Smoothly connect the shoulders to the upper arms, and the thighs to the pelvis.
Look for the natural curves of the body, such as the slight inward curve of the lower back, the curve of the buttocks, and the gentle tapering of the limbs. Use your eraser to lighten any overly dark construction lines.
This stage is about transitioning from a skeleton of shapes to a more organic form.
Step 6: Add Details and Define Features
With the overall form in place, you can now begin to add more specific details to make your model body come alive.
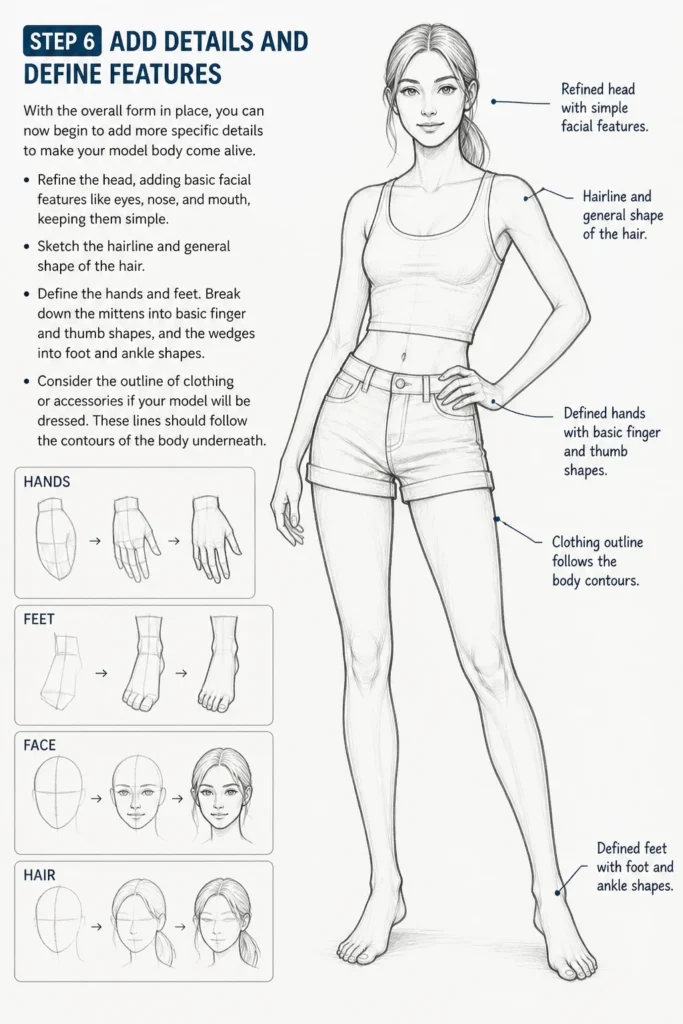
Refine the head, adding basic facial features like eyes, nose, and mouth, keeping them simple. Sketch the hairline and general shape of the hair.
Define the hands and feet. Break down the “mittens” into basic finger and thumb shapes, and the “wedges” into foot and ankle shapes.
Consider the outline of clothing or accessories if your model will be dressed. These lines should follow the contours of the body underneath.
Step 7: Clean Up and Add Basic Shading
The final steps involve refining your lines and adding depth.
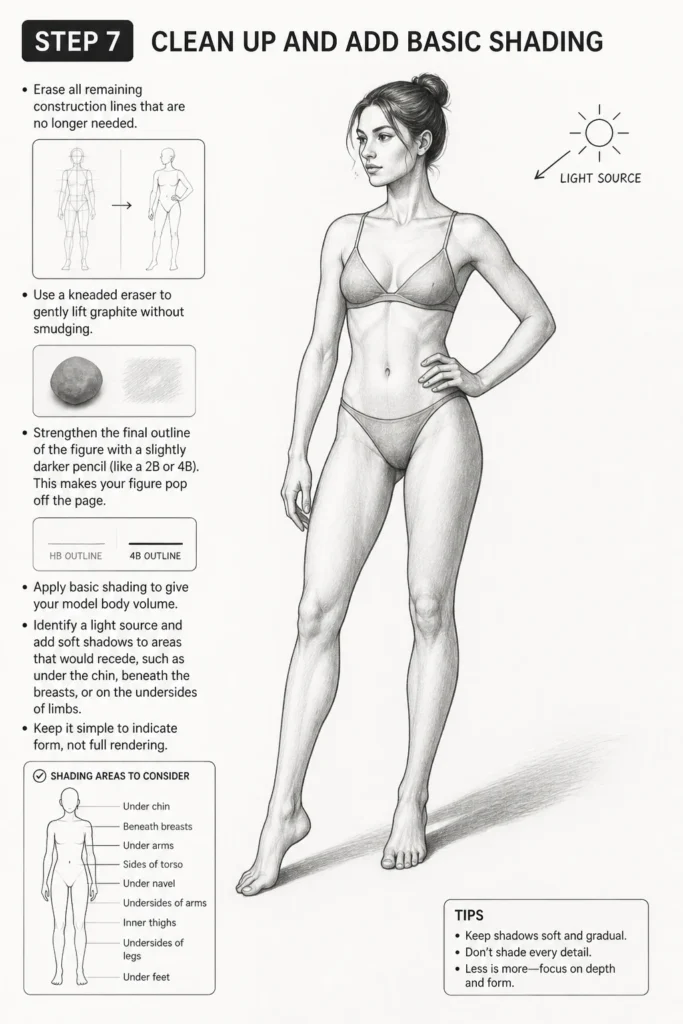
Erase all remaining construction lines that are no longer needed. Use a kneaded eraser to gently lift graphite without smudging.
Strengthen the final outline of the figure with a slightly darker pencil (like a 2B or 4B). This makes your figure pop off the page.
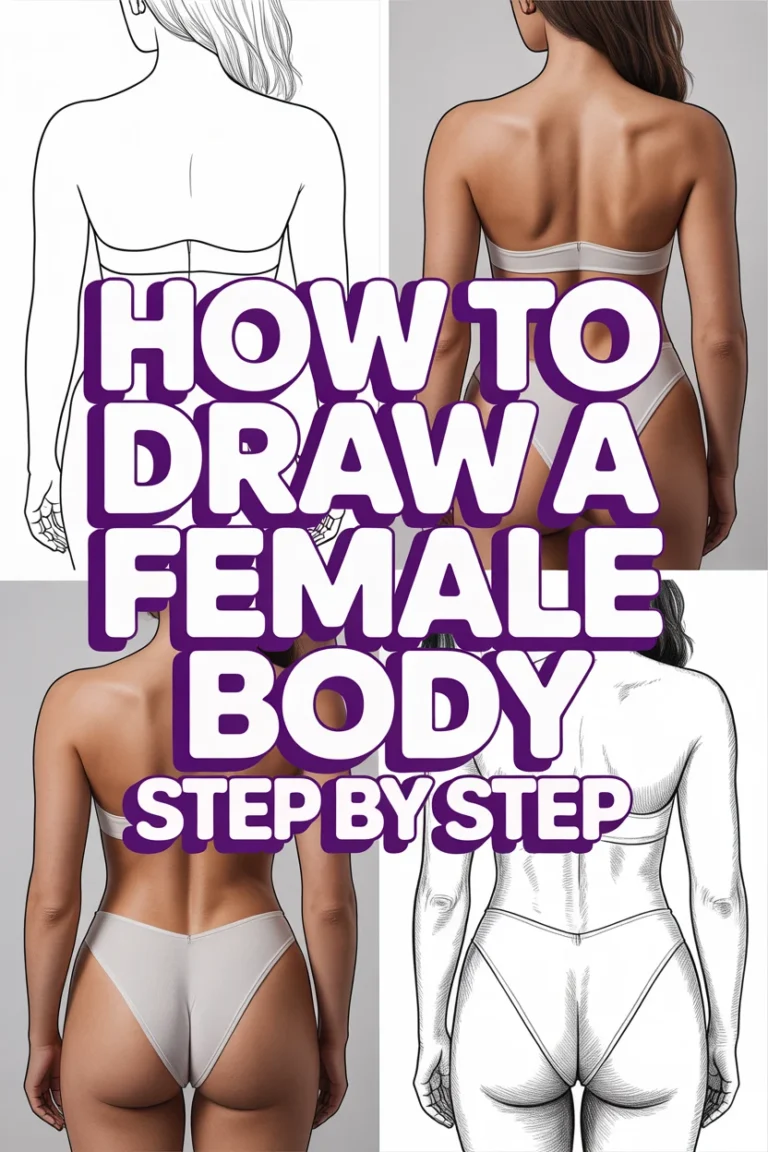
Apply basic shading to give your model body volume. Identify a light source and add soft shadows to areas that would recede, such as under the chin, beneath the breasts, or on the undersides of limbs. Keep it simple to indicate form, not full rendering.
Common Mistakes to Avoid
Stiff or Symmetrical Poses
Many beginners draw figures standing perfectly straight, facing forward, with limbs mirrored on both sides. This makes the figure look lifeless and unnatural. Real bodies have curves, shifts in weight, and dynamic balances. Always start with an action line to introduce movement and tilt the shoulders and hips in opposing directions to create a more organic pose.
Incorrect Proportions
One of the most common errors is making limbs too short or the torso too long. Without a consistent measuring system like head units, it’s easy for proportions to go awry. Skipping the head unit step often leads to figures that don’t look like models, or even humans. Always establish your proportional guidelines early on and refer back to them throughout your drawing process.
Rushing to Details
Jumping straight to drawing facial features, fingers, or toes before the overall body structure is solid is a recipe for frustration. You’ll end up with a beautifully rendered eye on a poorly constructed head, or intricate fingers on a disproportionate hand. Build your figure from the general to the specific, ensuring the foundation is strong before adding the finer points.
Lack of Overlap and Depth
When drawing limbs or body parts, failing to show how they overlap or recede in space can make your figure look flat. For instance, if one arm is slightly behind the torso, ensure its outline is interrupted by the torso’s outline. This creates an illusion of three-dimensionality. Think about which parts are closer to you and which are further away.
Troubleshooting
My Figure Looks Flat and Lacks Dimension
This usually happens when you only focus on the outline and don’t think about the body as a collection of 3D forms. Try to visualize the rib cage, pelvis, and limbs as cylinders and boxes in space. When you connect them, think about how they turn. Adding basic, consistent shading from a single light source can also dramatically improve the sense of volume.
Limbs Seem Too Short or Too Long
This is almost always a proportion issue. Go back to your head unit measurements. Did you accurately mark out the 8-8.5 head units? Are the elbows at the correct height relative to the navel? Are the fingertips reaching about halfway down the thigh? Re-establish your guidelines with a light pencil and adjust the lengths of your initial limb shapes before adding detail.
My Model Body Looks Stiff, Not Dynamic
The problem likely lies in your initial gesture and action line. If you started with a straight, vertical line, your figure will naturally look rigid. Practice drawing many quick gesture sketches to get a feel for movement. Exaggerate the action line and the tilt of the shoulders and hips. Even a standing figure has a subtle shift of weight and curve to its spine.
Key Takeaways
- Start with Gesture: Always begin by capturing the overall movement and flow of the pose with a light action line.
- Master Proportions: Use head units (8-8.5 for models) as your foundational measuring tool to ensure accurate body lengths.
- Build with Simple Shapes: Construct the body using basic forms like eggs, cylinders, and boxes before refining contours.
- Work General to Specific: Establish the entire body’s structure and pose before moving onto intricate details like facial features or fingers.
- Practice Observation: Regularly study real human figures and use reference photos to understand anatomy, weight distribution, and dynamic poses.
- Embrace Imperfection: Your first few attempts won’t be perfect. Every drawing is a learning opportunity. Keep sketching!
Frequently Asked Questions
How long does it take to get good at figure drawing?
Learning figure drawing is a continuous journey. You can see significant improvement in a few weeks with consistent daily practice of 30 minutes to an hour. Mastery, however, takes years of dedicated study and practice, like any complex skill. Focus on consistent effort over immediate perfection.
Should I always use reference photos?
Yes, especially when you’re starting out. Reference photos are invaluable for understanding anatomy, foreshortening, and varied poses. They help you observe how muscles stretch and compress, and how light falls on the body. As you gain experience, you can draw more from memory, but references remain a powerful tool for accuracy and inspiration.
What’s the difference between drawing a model body and a regular human figure?
A “model body” often implies a more stylized, elongated, and idealized figure, common in fashion illustration. This usually means a taller figure (8 to 8.5 head units) with slender limbs and a graceful posture. A “regular human figure” might adhere to more average proportions (7 to 7.5 head units) and encompass a wider range of body types and realistic anatomies. The underlying principles of gesture and proportion remain the same.
How do I make my figures look more feminine or masculine?
Subtle differences in proportion and form define gender. For feminine figures, emphasize wider hips, a narrower waist, softer curves, and typically a slightly shorter rib cage. For masculine figures, focus on broader shoulders, a more defined and angular rib cage, narrower hips, and more pronounced musculature. These are general guidelines, and individual variation is vast.
Our Top Recommended Finds
- Strathmore 400 Series Sketch Pad: An excellent all-purpose, acid-free paper that holds graphite well without too much tooth. Perfect for practice.
- Staedtler Mars Lumograph Graphite Pencils Set: A reliable set of varying hardness (HB, 2B, 4B, 6B) that allows you to create light guidelines and darker, more defined lines.
- Faber-Castell Kneaded Eraser: Essential for lifting graphite without damaging the paper, allowing you to lighten guidelines and clean up mistakes.
Embrace Your Artistic Journey
Drawing the model body is a fundamental skill that unlocks countless creative possibilities. It’s a journey of observation, understanding, and continuous practice. Each line you draw teaches you something new about form, balance, and human expression.
Don’t be afraid to experiment with different poses and body types. Challenge yourself to draw quickly, then to refine slowly. The more you draw, the more intuitive the process will become. Pick up your pencil today and bring your figures to life!