🔥 How To Draw A Face Step By Step

& Painting
No rigid rules or pretension. Just practical guides, medium comparisons, and encouraging tips to help you enjoy the drawing & painting process.
Learning to draw a face can feel incredibly daunting at first.
I remember my early attempts, often resulting in lopsided features or proportions that just didn’t look quite right.
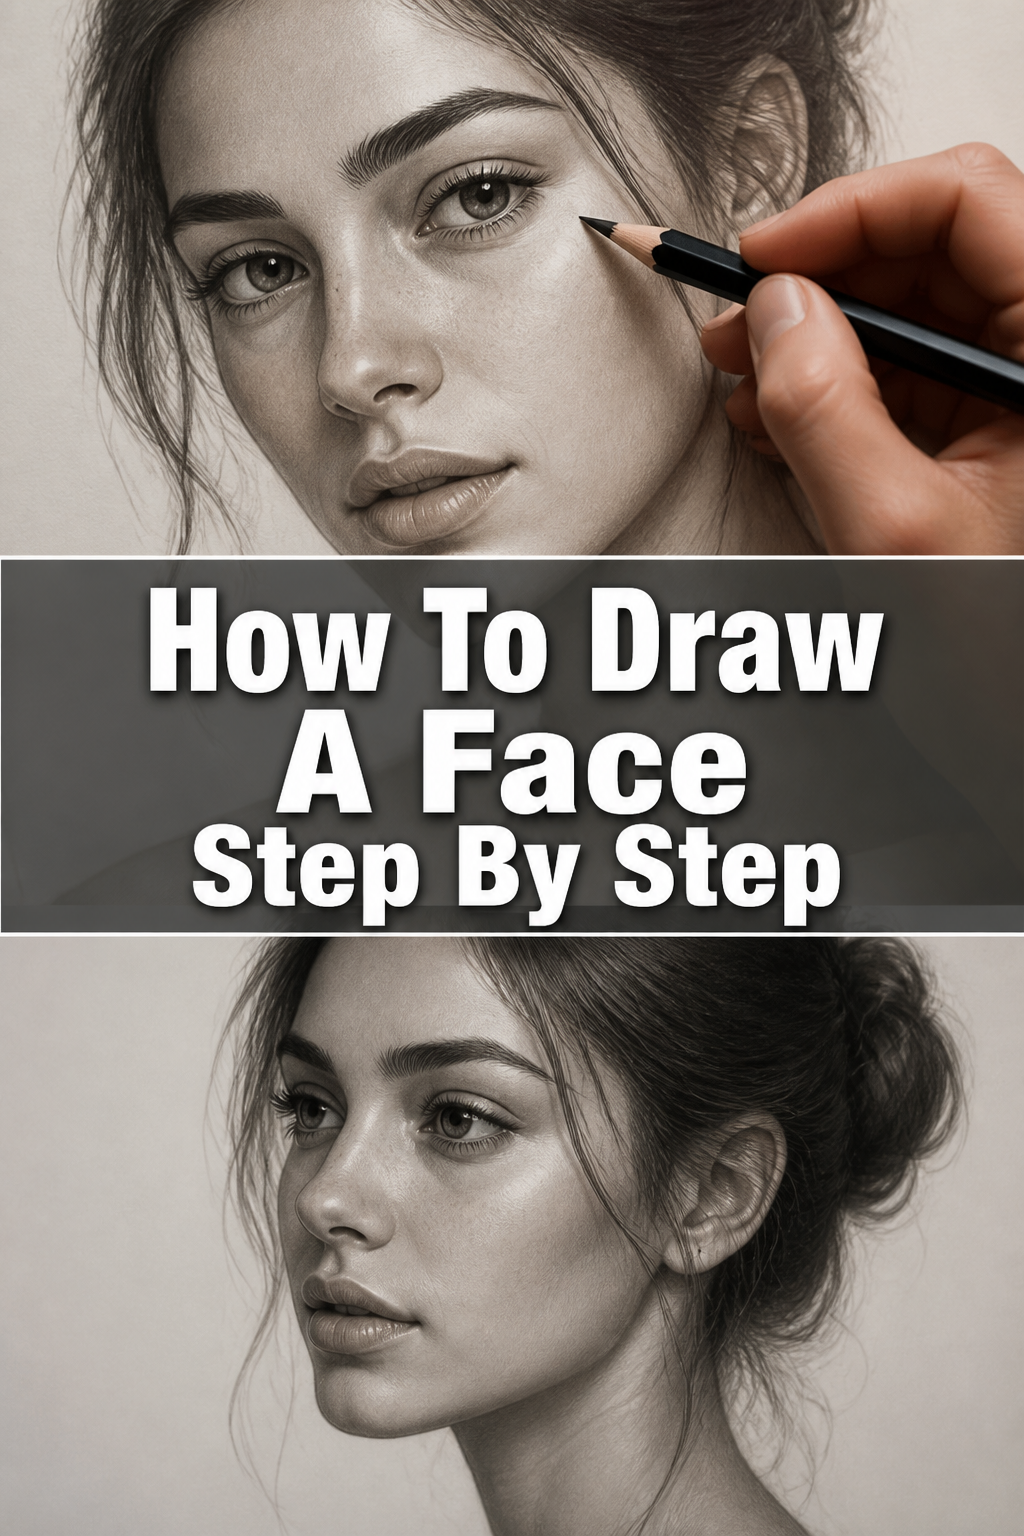
This guide breaks down the complex process into simple, manageable steps, sharing the techniques I’ve refined over years of practice to help you create convincing and expressive portraits.
Quick Overview
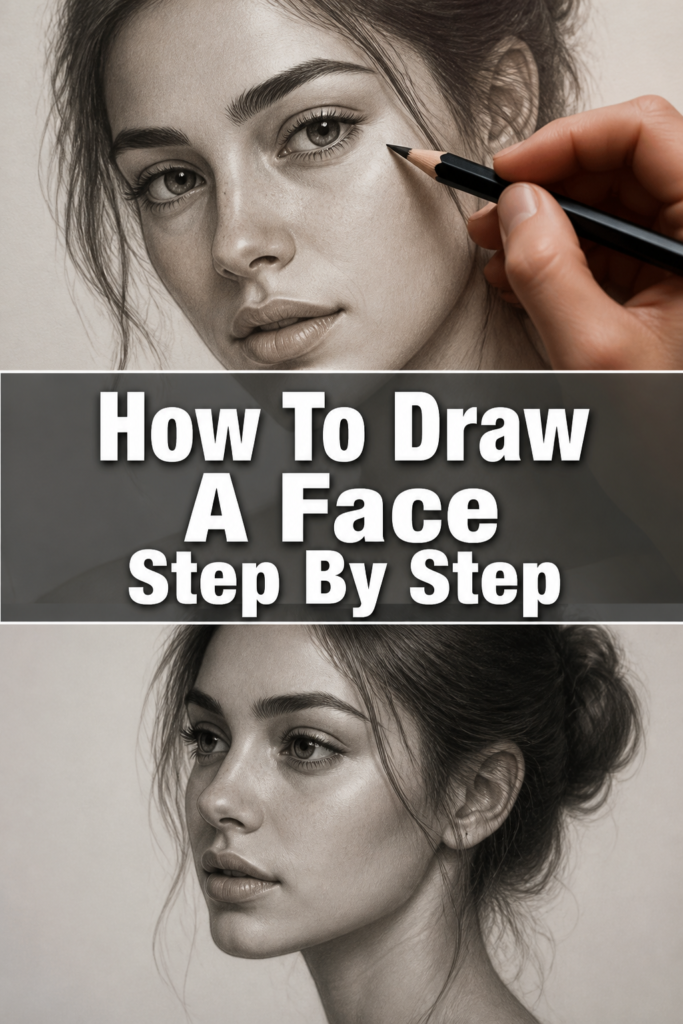
Drawing a face is a journey of understanding proportions and form. This guide will walk you through building a face from basic shapes to detailed features, providing a solid foundation for your artistic growth.
- Time needed: 1-2 hours for your first complete drawing, with ongoing practice for mastery.
- Difficulty: Beginner
- What you’ll need: Pencil (HB, 2B), eraser, drawing paper, a ruler (optional but helpful for initial guidelines).
Step-by-Step Instructions
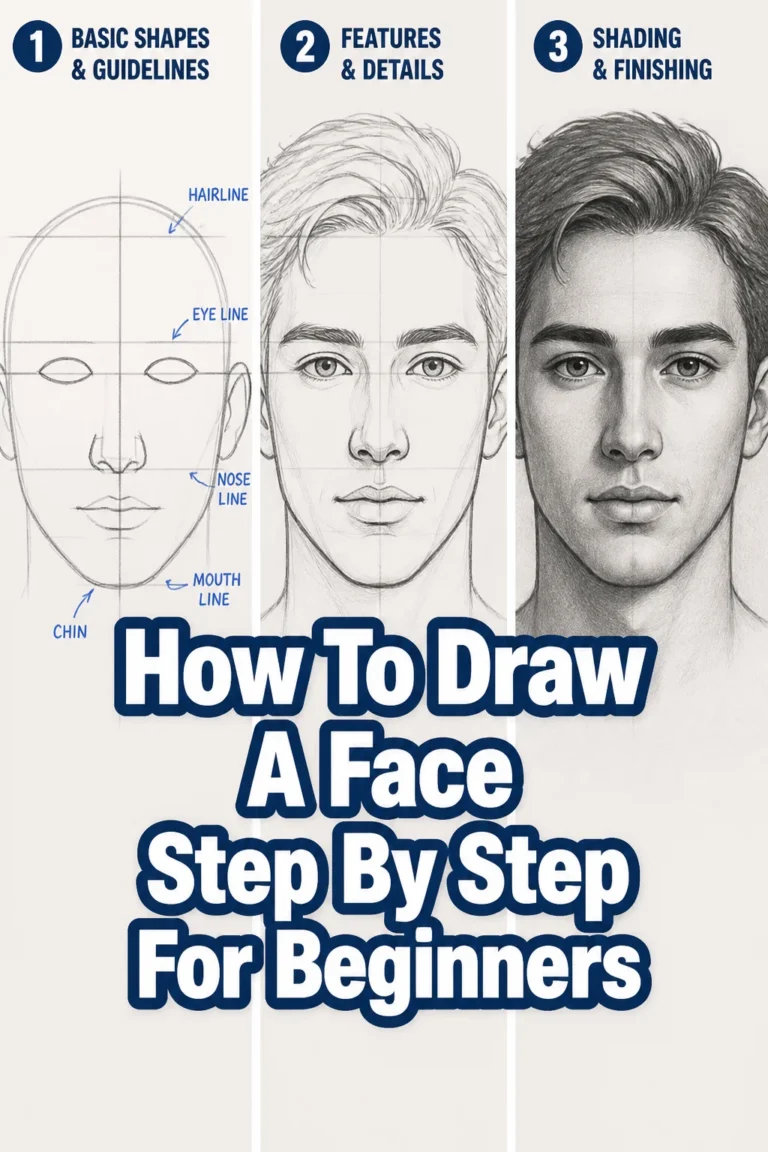
Step 1: Lay the Foundation with a Circle and Cross
Begin by lightly sketching a perfect circle on your paper. This circle will serve as the top portion of the skull. Don’t press too hard; these are just guidelines.
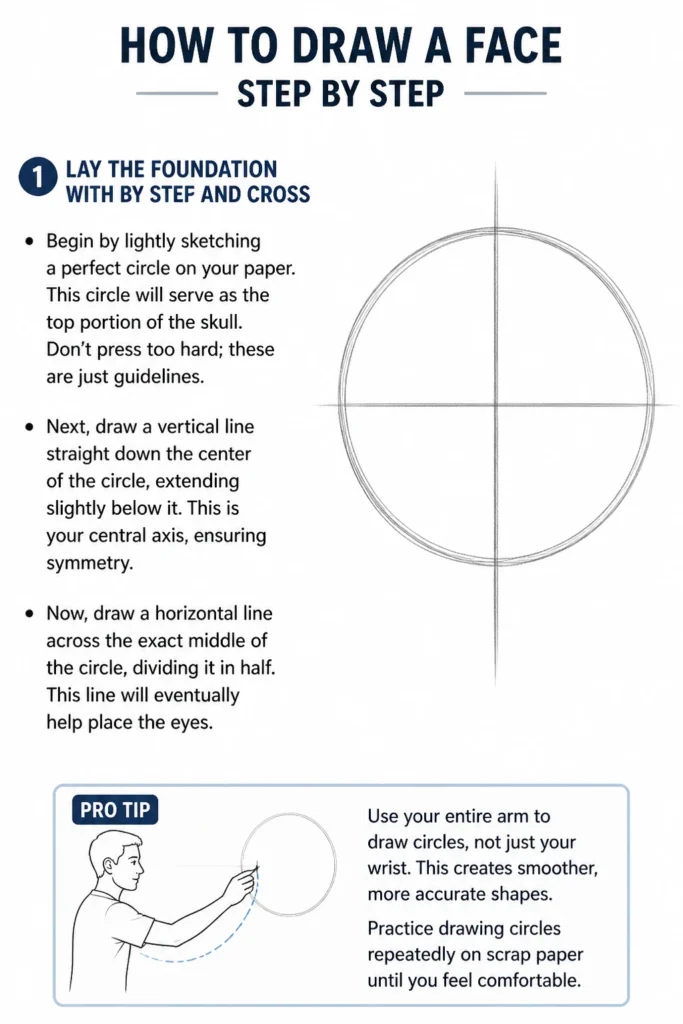
Next, draw a vertical line straight down the center of the circle, extending slightly below it. This is your central axis, ensuring symmetry.
Now, draw a horizontal line across the exact middle of the circle, dividing it in half. This line will eventually help place the eyes.
Pro Tip: Use your entire arm to draw circles, not just your wrist. This creates smoother, more accurate shapes. Practice drawing circles repeatedly on scrap paper until you feel comfortable.
Step 2: Define the Jawline and Chin
From the horizontal centerline of your initial circle, measure down approximately one full circle’s radius. This marks the bottom of the chin.
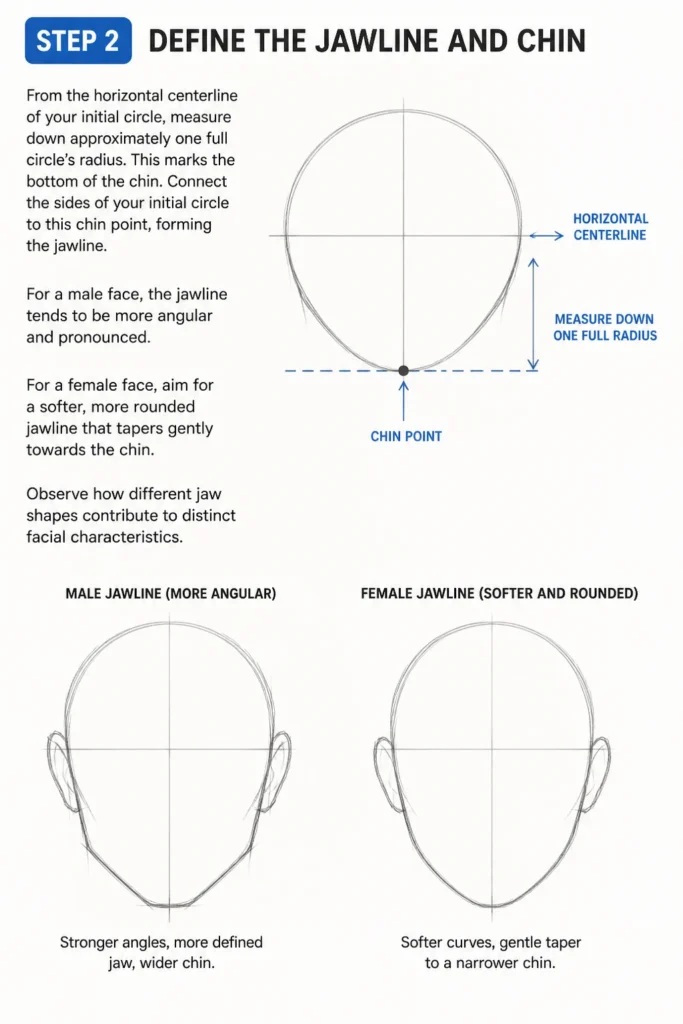
Connect the sides of your initial circle to this chin point, forming the jawline. For a male face, the jawline tends to be more angular and pronounced.
For a female face, aim for a softer, more rounded jawline that tapers gently towards the chin. Observe how different jaw shapes contribute to distinct facial characteristics.
Step 3: Establish Key Proportional Guidelines
Your horizontal centerline in the circle is for the eyes. Now, let’s find the nose and mouth.
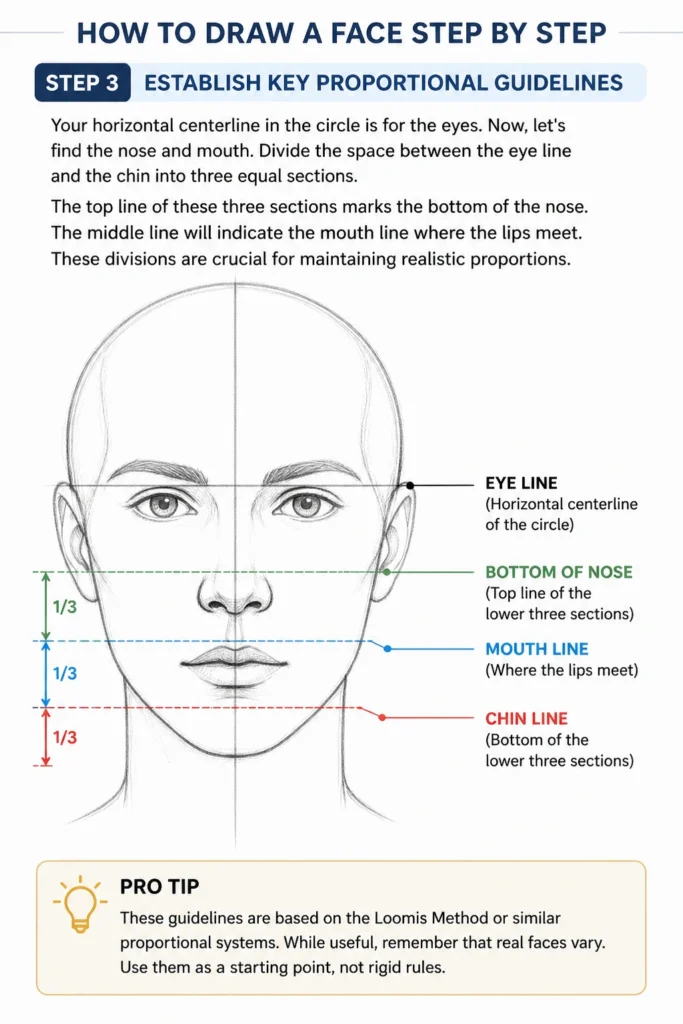
Divide the space between the eye line and the chin into three equal sections. The top line of these three sections marks the bottom of the nose.
The middle line will indicate the mouth line where the lips meet. These divisions are crucial for maintaining realistic proportions.
Pro Tip: These guidelines are based on the “Loomis Method” or similar proportional systems. While useful, remember that real faces vary. Use them as a starting point, not rigid rules.
Step 4: Place the Eyes
The eyes are typically positioned on that initial horizontal centerline you drew. Imagine dividing the entire width of the head (from temple to temple) into five equal sections.
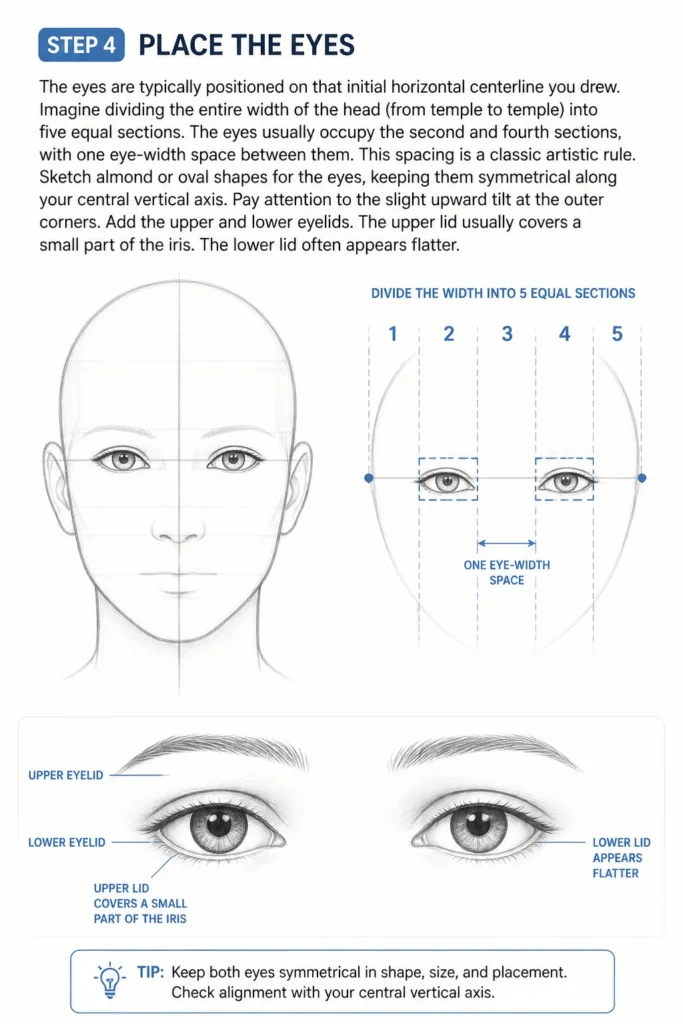
The eyes usually occupy the second and fourth sections, with one eye-width space between them. This spacing is a classic artistic rule.
Sketch almond or oval shapes for the eyes, keeping them symmetrical along your central vertical axis. Pay attention to the slight upward tilt at the outer corners.
Add the upper and lower eyelids. The upper lid usually covers a small part of the iris. The lower lid often appears flatter.
Step 5: Draw the Nose
The bottom of the nose rests on the guideline you established earlier. Start by sketching the ball of the nose, which is often the widest part.
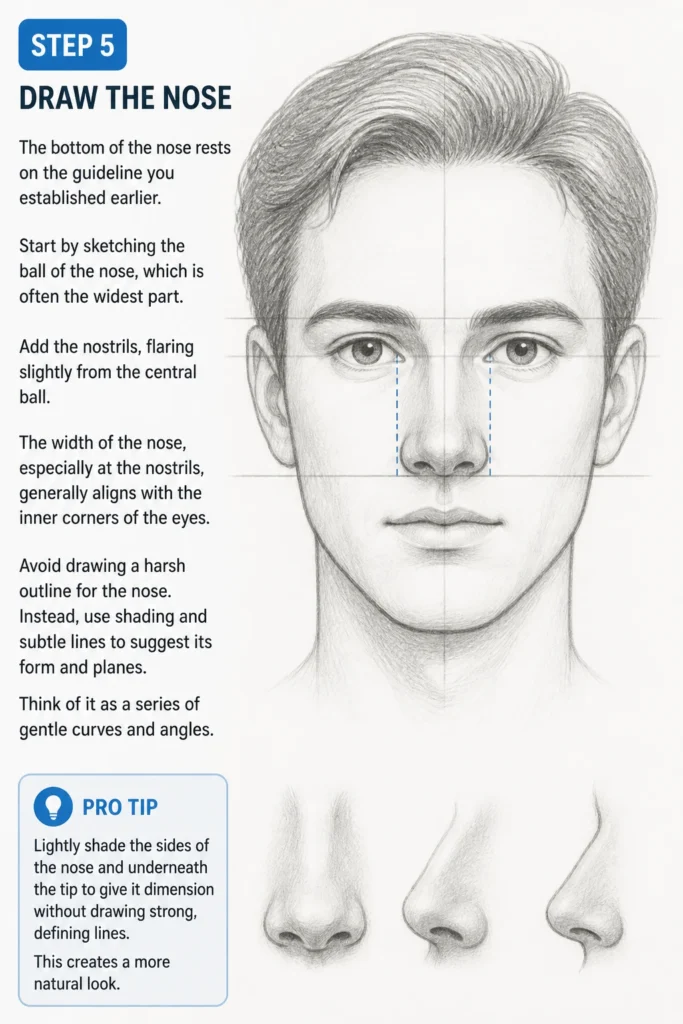
Add the nostrils, flaring slightly from the central ball. The width of the nose, especially at the nostrils, generally aligns with the inner corners of the eyes.
Avoid drawing a harsh outline for the nose. Instead, use shading and subtle lines to suggest its form and planes. Think of it as a series of gentle curves and angles.
Pro Tip: Lightly shade the sides of the nose and underneath the tip to give it dimension without drawing strong, defining lines. This creates a more natural look.
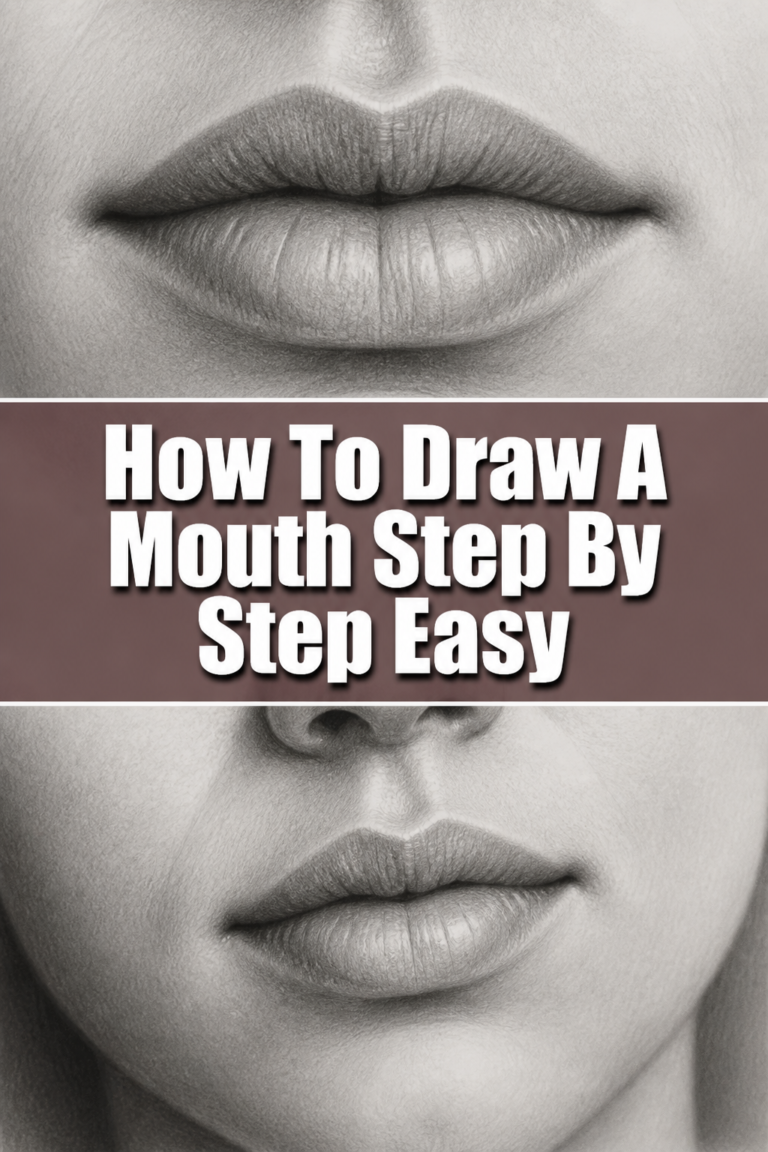
Step 6: Form the Mouth and Lips
The mouth line sits on the guideline between the nose and chin. The corners of the mouth typically align with the pupils of the eyes when the face is relaxed.
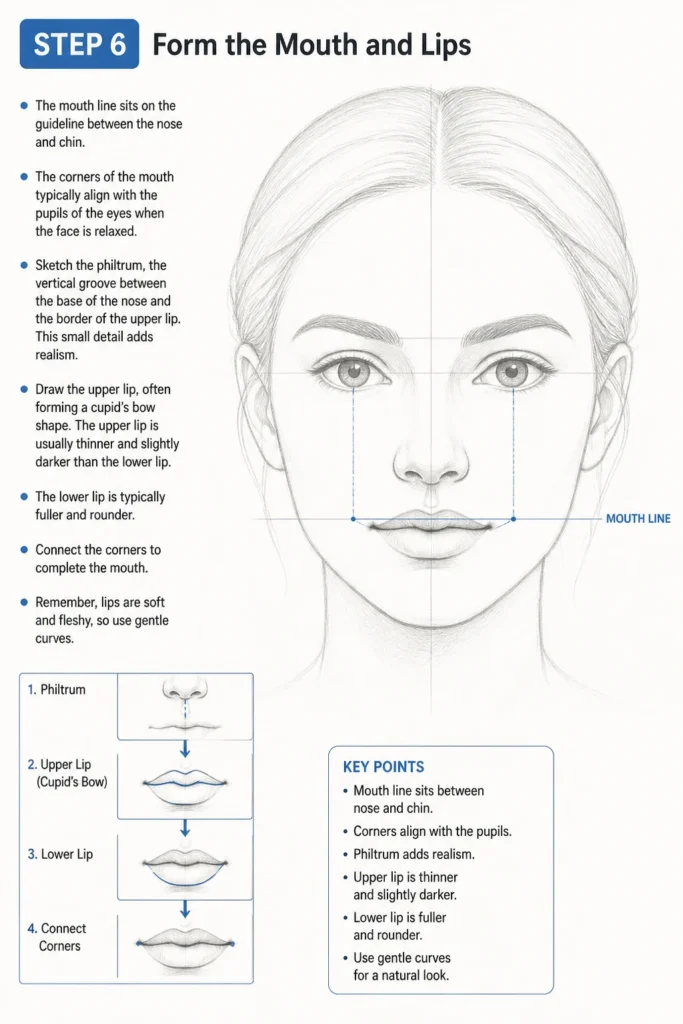
Sketch the philtrum, the vertical groove between the base of the nose and the border of the upper lip. This small detail adds realism.
Draw the upper lip, often forming a cupid’s bow shape. The upper lip is usually thinner and slightly darker than the lower lip.
The lower lip is typically fuller and rounder. Connect the corners to complete the mouth. Remember, lips are soft and fleshy, so use gentle curves.
Step 7: Position the Ears
The ears are often overlooked but are essential for a complete face. They typically sit between the eye line and the nose line.
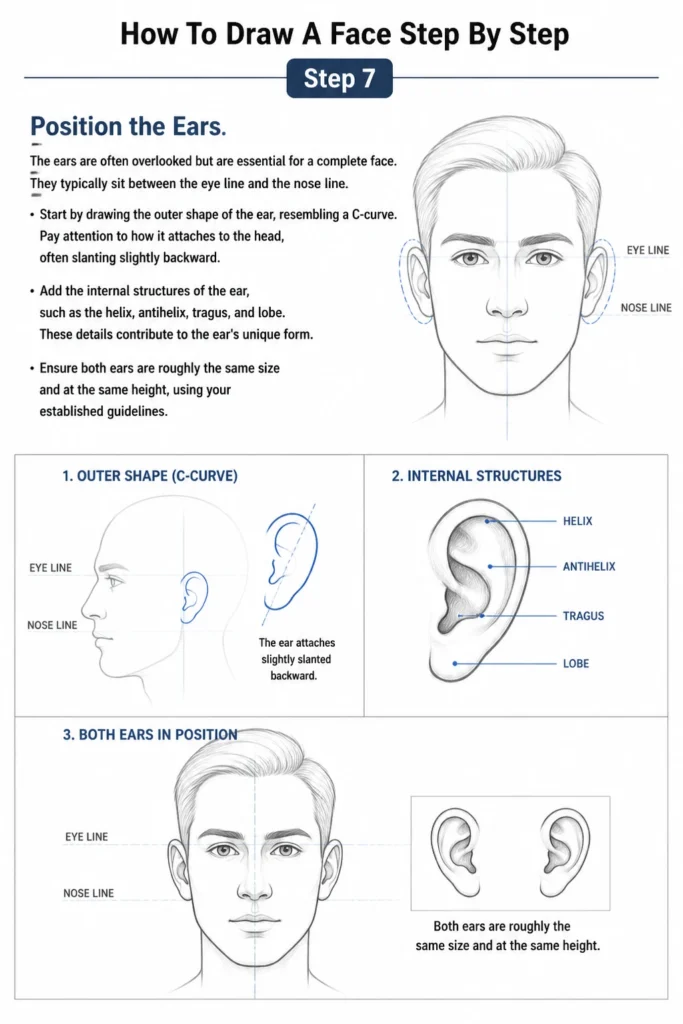
Start by drawing the outer shape of the ear, resembling a C-curve. Pay attention to how it attaches to the head, often slanting slightly backward.
Add the internal structures of the ear, such as the helix, antihelix, tragus, and lobe. These details contribute to the ear’s unique form.
Ensure both ears are roughly the same size and at the same height, using your established guidelines.
Step 8: Sketch the Hairline and Hair
The hairline typically starts around the top of your initial circle, or slightly below it, depending on the individual. Avoid drawing it too low or too high.
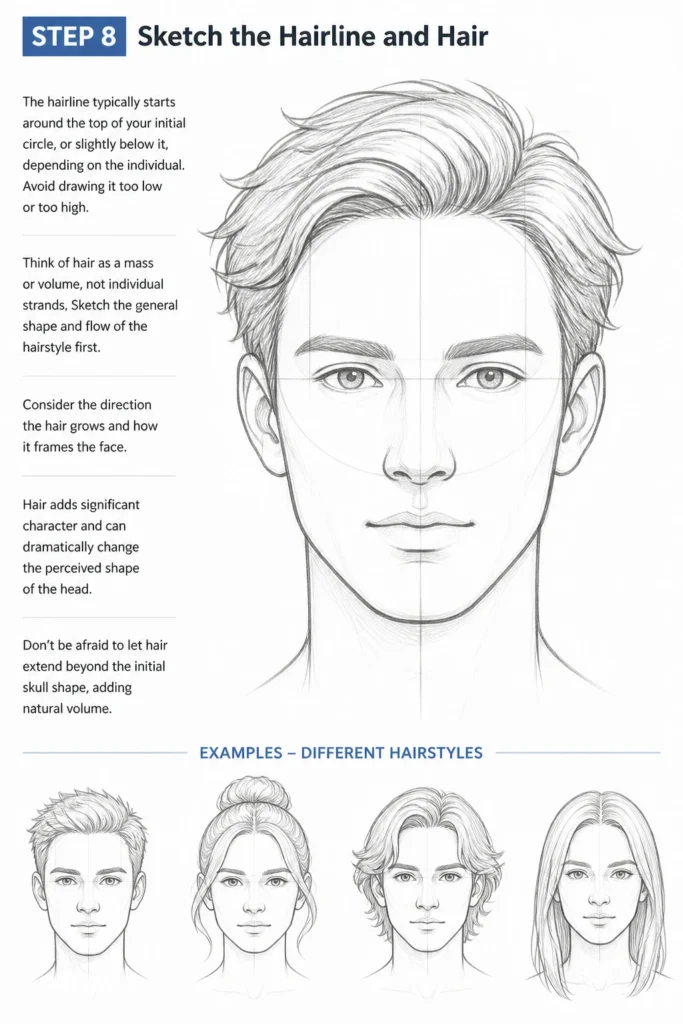
Think of hair as a mass or volume, not individual strands. Sketch the general shape and flow of the hairstyle first.
Consider the direction the hair grows and how it frames the face. Hair adds significant character and can dramatically change the perceived shape of the head.
Don’t be afraid to let hair extend beyond the initial skull shape, adding natural volume.
Step 9: Refine and Add Details
Now that the basic features are in place, it’s time to refine your drawing. Soften any harsh guidelines with your eraser.
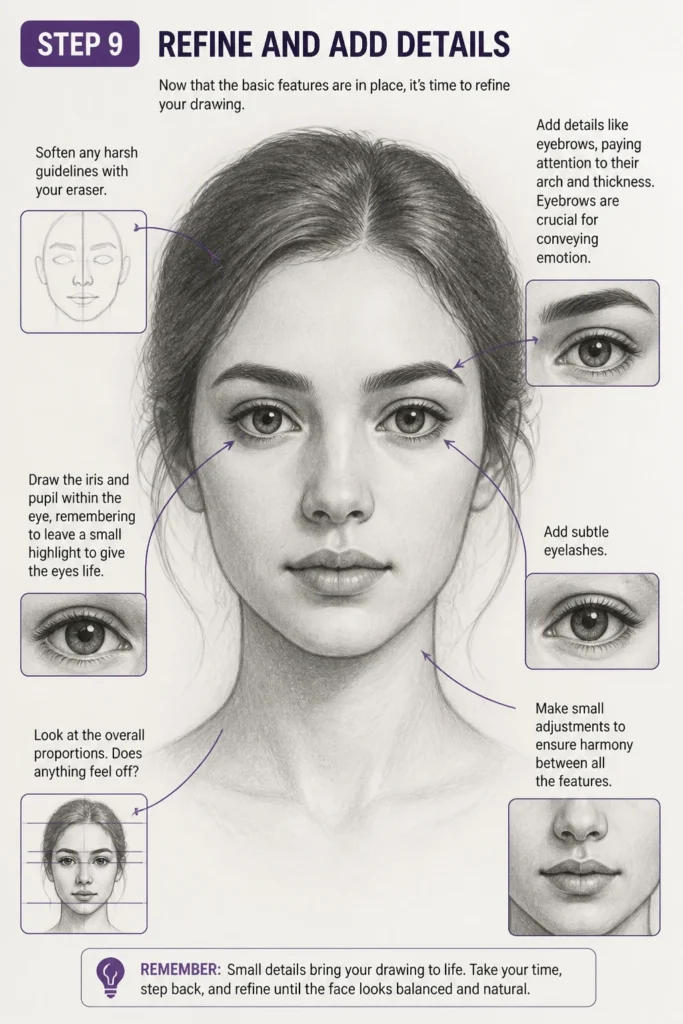
Add details like eyebrows, paying attention to their arch and thickness. Eyebrows are crucial for conveying emotion.
Draw the iris and pupil within the eye, remembering to leave a small highlight to give the eyes life. Add subtle eyelashes.
Look at the overall proportions. Does anything feel off? Make small adjustments to ensure harmony between all the features.
Step 10: Introduce Shading and Form
Shading brings your drawing to life by creating depth and form. Identify your light source; this will dictate where shadows fall.
Lightly shade the areas that recede, such as under the chin, beneath the nose, and in the eye sockets. Build up layers of graphite for darker values.
Use a blending stump or even your finger (carefully!) to smooth out transitions between light and shadow. This creates a softer, more realistic look.
Remember that a face is a three-dimensional object, not flat. Shading helps to convey the roundness of the head and the curves of the features.
Common Mistakes to Avoid
Incorrect Proportions
Many beginners struggle with getting the size and placement of features right. A common error is making the eyes too large or placing the nose too high. This makes the face look distorted and unrealistic. Always double-check your initial guidelines and use them diligently.
The solution lies in consistently measuring and comparing. Use your pencil to gauge distances on your reference or apply the proportional rules discussed earlier. Trust your guidelines before adding detail.
Symmetry Issues
Faces are rarely perfectly symmetrical, but significant imbalances can make a drawing look off. One eye higher than the other, or a jawline that’s noticeably wider on one side, can detract from the overall likeness. This often happens when rushing or focusing too much on one side.
Periodically flip your drawing upside down or hold it up to a mirror. This simple trick can reveal glaring symmetry problems that you might otherwise miss. Make small adjustments as you go.
Drawing Features in Isolation
It’s tempting to perfect one eye before moving to the next. However, focusing too much on a single feature without considering its relationship to the others often leads to a disjointed drawing. The features need to work together as a cohesive whole.
Instead, work on all features simultaneously, building them up in layers. Sketch the basic shapes for both eyes, then the nose, then the mouth. Constantly compare their sizes, angles, and distances from each other.
Harsh Outlines
Drawing a face with strong, dark outlines around every feature can make it look flat and cartoonish. Real faces are defined by subtle shifts in light and shadow, not by thick lines. This flattens the form and removes depth.
Practice using varying line weights and relying more on shading to define form. Use lighter lines for areas that catch light and darker, softer lines for shadows or creases. Think of edges as transitions rather than hard boundaries.
Troubleshooting
My Face Looks Flat
If your drawing lacks depth and appears two-dimensional, it’s likely a shading issue. You might not be using a sufficient range of values, or your light source isn’t clearly defined. Without distinct lights and shadows, forms cannot emerge.
Focus on establishing a clear light source and then applying a full spectrum of values, from the lightest highlights to the darkest shadows. Build up layers of graphite slowly, and use blending to create smooth transitions that suggest the roundness of the head.
Features Don’t Look Aligned
When eyes seem to drift or the nose is crooked, it’s almost always a problem with your initial guidelines. If the central vertical axis isn’t straight, or the horizontal lines aren’t parallel, everything built upon them will inherit that error. This is a foundational issue.
Go back to your basic construction. Re-check your central vertical line with a ruler if necessary. Ensure your eye line, nose line, and mouth line are perfectly parallel to each other and perpendicular to the central axis. Correct these early on to save frustration later.
The Face Lacks Expression
A face without expression can look lifeless or generic. This often happens when you draw features neutrally without considering the subtle muscle movements that convey emotion. The eyes and mouth are key areas for expression.
Study how different emotions affect the eyebrows, the shape of the eyes, and the corners of the mouth. Practice drawing various expressions. Even a slight tilt of an eyebrow or a subtle curve of the lip can dramatically change the mood of your portrait.
Key Takeaways
- Always start with basic shapes and construction lines to establish proportion and symmetry.
- Understand the general rules of facial proportion, but be prepared to adapt them for individual unique characteristics.
- Work on all features simultaneously, constantly comparing their relationships to each other.
- Use a range of pencil values and careful shading to create depth and make the face appear three-dimensional.
- Avoid harsh outlines; let light and shadow define the forms of the face.
- Practice regularly and don’t be afraid to make mistakes – they are essential for learning and improvement.
Frequently Asked Questions
How do I make my drawings look less stiff?
To avoid stiffness, focus on capturing the organic curves and subtle shifts in a face. Avoid rigid, straight lines where curves should be. Also, vary your line weight; some lines should be lighter and softer, while others can be a bit more pronounced. Practice drawing quickly and loosely to warm up.
What’s the best way to practice facial proportions?
The best way to practice is to draw many faces, both from reference photos and real life. Start by strictly applying the proportional guidelines every time. As you gain confidence, begin to observe how real faces subtly deviate from these rules, and incorporate those observations into your art.
Should I use reference photos or draw from imagination?
For beginners, using reference photos is highly recommended. References provide accurate information about proportions, lighting, and anatomy. Once you’ve developed a strong understanding of facial structure and proportions through observation, you can gradually start experimenting with drawing from imagination.
How do I make my faces look more like real people?
To achieve more realistic faces, pay close attention to the subtle details and nuances. Observe the slight asymmetry in real faces, the specific curve of a lip, or the unique shape of an ear. Also, mastering shading to convey the subtle planes and forms of the face is crucial for realism.
Our Top Recommended Finds
- Sketching Pencils Set: A good set with a range of hardness (HB, 2B, 4B, 6B) allows you to achieve varied line weights and a full spectrum of values for shading.
- Kneaded Eraser: Unlike standard erasers, a kneaded eraser can be molded to lift graphite gently without smudging, perfect for subtle highlights and corrections.
- Blending Stumps/Tortillons: These paper tools are excellent for smoothing out graphite, creating soft transitions in your shading, and achieving a professional finish.
Embrace Your Artistic Journey
You’ve just taken a significant step toward mastering the art of portraiture. Drawing a face is a skill that develops with patience, observation, and consistent practice. Don’t worry if your first few attempts aren’t perfect; every line you draw is a lesson learned.
Keep experimenting with different angles, expressions, and lighting. Consider exploring resources on facial anatomy to deepen your understanding of the underlying structure. Pick up your pencil today and continue to bring your artistic visions to life.
& Painting
No rigid rules or pretension. Just practical guides, medium comparisons, and encouraging tips to help you enjoy the drawing & painting process.