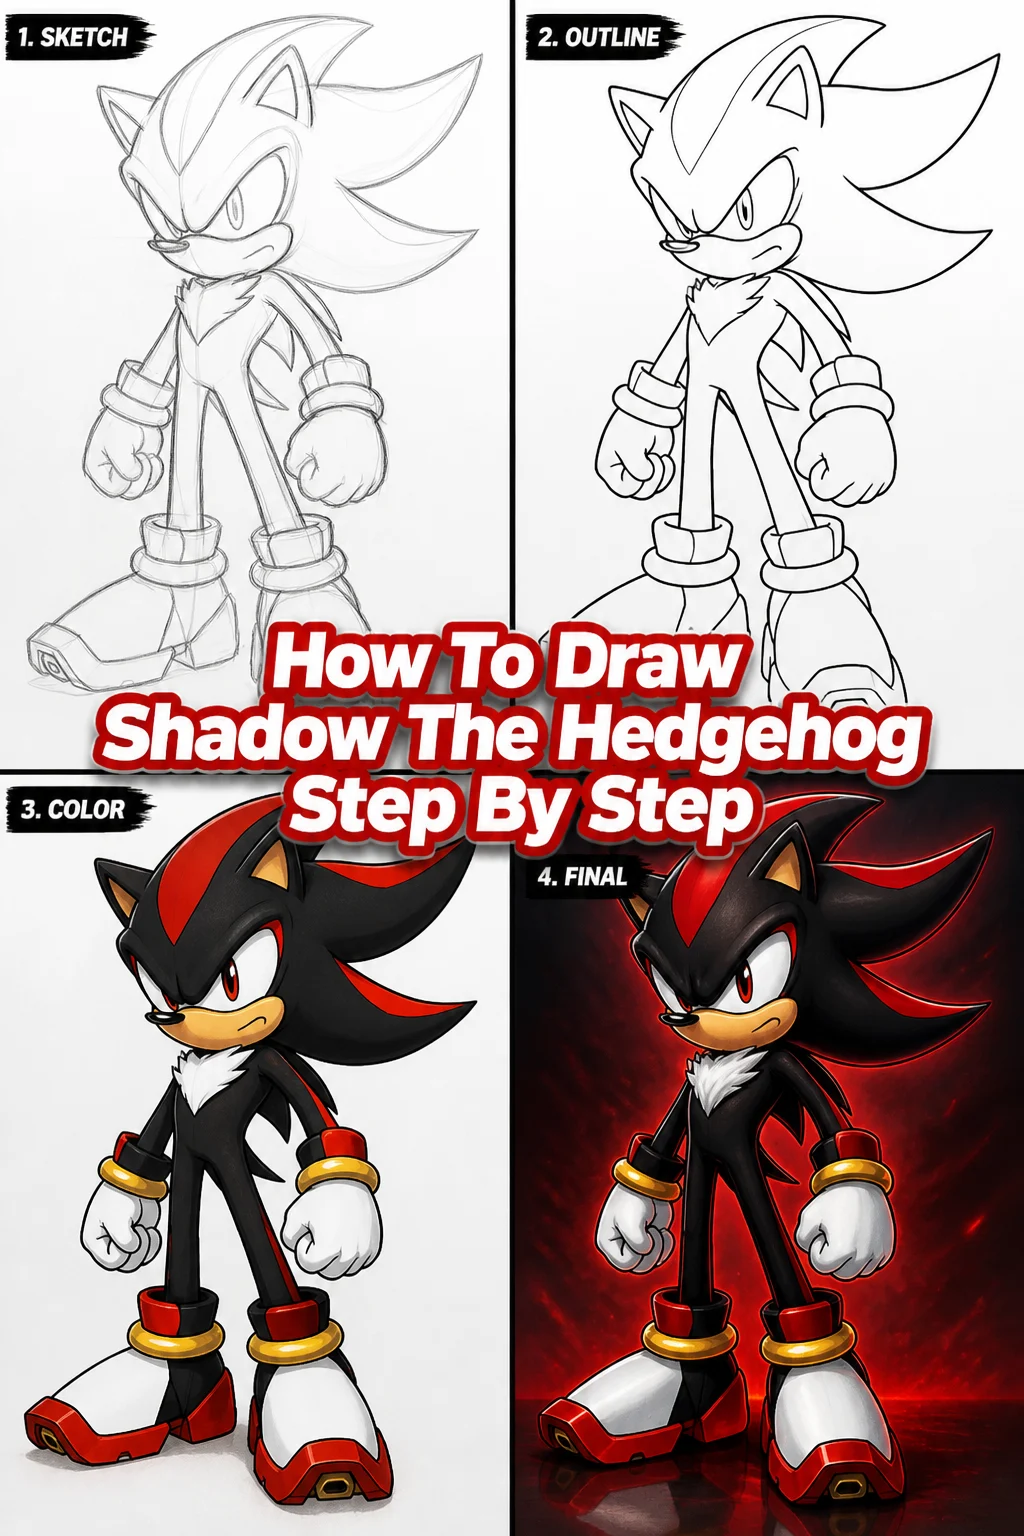
🦔 How To Draw Shadow The Hedgehog Step By Step
Have you ever wanted to capture the fierce intensity and cool demeanor of Shadow the Hedgehog on paper? It’s a rewarding challenge that brings one of gaming’s most iconic characters to life. As a long-time fan of the Sonic universe, I’ve sketched Shadow countless times, learning the nuances of his design. This guide will walk you through every detail, helping you draw the Ultimate Life Form with confidence.
Quick Overview
This guide will empower you to create a fantastic drawing of Shadow the Hedgehog, focusing on his distinct features and powerful stance. You’ll learn to break down complex shapes into manageable steps. By the end, you’ll have a complete illustration ready for inking or coloring.
- Time needed: 60-90 minutes
- Difficulty: Intermediate
- What you’ll need: Pencil (HB, 2B), Eraser (kneaded and vinyl), Drawing paper, Reference image of Shadow (optional but recommended)
Step-by-Step Instructions
Step 1: Lay Down Your Basic Shapes and Pose
Every great drawing starts with fundamental forms. We begin by establishing Shadow’s head, body, and limb placement using simple circles and lines. This initial sketch dictates the overall pose and proportions.
Sketch a medium-sized circle for Shadow’s head. Below it, draw an oval for his chest, connecting the two with a short, curved line for the neck.
Add guidelines for his spine and limbs. Think about the action you want to convey; Shadow is often in dynamic poses. Lightly mark where his hands and feet will be.
Pro Tip: Keep your initial lines very light. This allows for easy corrections later without leaving heavy indentations on your paper. Think of these as your building blocks.
Step 2: Define the Head and Muzzle
Shadow’s head is instantly recognizable, with its angular muzzle and prominent quills. We’ll focus on shaping these features now.
Refine the head circle, adding a distinct snout or muzzle shape extending from the lower part of the circle. This should be a slightly pointed, forward-facing oval.
Draw two almond-shaped eyes, spaced slightly apart, within the head circle above the muzzle. Add small, triangular ears to the top sides of the head.
Step 3: Sculpt the Iconic Quills
Shadow’s quills are a crucial part of his design, giving him his sharp, edgy look. They define the silhouette of his head and back.
Sketch the large, upward-curving quills that extend from the back of his head. There are typically three main quills, with the middle one being the longest and most prominent.
Ensure the quills have a sharp, pointed quality, reflecting Shadow’s intense personality. They should flow dynamically, suggesting movement even in a static pose.
Step 4: Outline the Body and Limbs
Now, we’ll give volume to Shadow’s torso and limbs, building upon the skeletal lines from Step 1. Remember his athletic build.
Connect the head and chest with a defined neck. Draw the outline of his torso, making it lean and muscular, tapering slightly towards the waist.
Flesh out the arms and legs around your initial guidelines. His limbs are strong but not overly bulky, suitable for speed and agility. Pay attention to the joints at the elbows and knees.
Pro Tip: Use curved lines to suggest muscle definition rather than straight, stiff lines. This makes the drawing feel more alive and less robotic.
Step 5: Detail the Hands and Gloves
Shadow’s hands are often gloved, featuring his signature inhibitor rings. These details add to his powerful appearance.
Draw his hands, often depicted in a clenched fist or open, ready-for-action pose. Ensure they are proportionate to his body.
Add the distinct white gloves, extending up his forearms. Include the gold inhibitor rings on his wrists, which are a key part of his design.
Step 6: Construct the Signature Rocket Shoes
Shadow’s Air Shoes are an iconic element, allowing him to glide and move at incredible speeds. They are quite complex, so take your time.
Sketch the basic shape of his shoes, which are large and somewhat bulky, especially at the back where the jets are. Define the white cuff at the top of each boot.
Add the prominent red stripe that runs along the side of the shoe. Include the circular jet exhaust ports at the heels, giving them their rocket-powered look.
Pro Tip: Use a reference image for the shoes specifically. They have many small details that are easy to miss, and getting them right adds significant authenticity.
Step 7: Refine Facial Features and Body Details
With the main structure in place, it’s time to bring Shadow’s face to life and add the smaller, yet critical, body details.
Draw the pupils and irises within his eyes, often giving him a focused or intense gaze. Add his characteristic angry or determined expression by shaping the brow and mouth.
Add the white chest fur that extends from his neck down his torso. Draw the additional quills on his back, ensuring they align with the flow of his head quills.
Step 8: Clean Up and Ink Your Lines
This is where your drawing truly starts to pop. Erasing construction lines and solidifying your artwork makes a huge difference.
Carefully erase all the light construction lines you made in the initial steps. Only your desired outlines should remain.
Go over your refined pencil lines with a darker pencil (like a 2B) or an inking pen. Ensure your lines are clean and confident. Vary line weight for depth – thicker lines for outlines, thinner for internal details.
Step 9: Add Color and Shading (Optional)
Color and shading give your Shadow drawing dimension and personality. This step transforms your line art into a finished piece.
Apply Shadow’s signature colors: black for his fur, red for his stripes and shoes, white for his gloves and chest fur, and gold for his inhibitor rings. Use a reference for accurate color placement.
Introduce shading to create depth. Think about where your light source is coming from and add darker tones to areas that would be in shadow. This makes the drawing three-dimensional.
Common Mistakes to Avoid
Inconsistent Proportions
One common pitfall is making parts of Shadow too large or too small relative to others. This can make him look awkward or unbalanced. Always start with basic shapes to establish your proportions before adding details. Constantly compare the size of his head to his body, or his hands to his feet, to maintain consistency.
Muddy or Overworked Lines
Pressing too hard with your pencil during the initial sketch phases or erasing too aggressively can damage the paper’s surface. This leads to lines that are difficult to erase completely or a drawing that looks messy. Keep your initial lines light and use a kneaded eraser for gentle lifting.
Forgetting Dynamic Poses
Shadow is a character of action and speed. Drawing him in a stiff, static pose can strip away his personality. Avoid making him look like a cardboard cutout. Think about movement and energy when you’re laying down your initial guidelines and experiment with different angles and action lines.
Neglecting Reference Images
While drawing from imagination is great, especially for a character with specific details like Shadow, ignoring reference images can lead to inaccuracies. His shoes, quills, and facial expressions have very particular forms. Use official art or screenshots to guide you, especially for complex elements.
Troubleshooting
My drawing looks flat and lacks depth.
If your Shadow drawing appears two-dimensional, you’re likely not incorporating enough shading or varying your line weight. To fix this, identify a light source for your drawing. Then, add darker shading to areas that would naturally be in shadow, such as under quills, beneath limbs, or on the underside of his shoes. Additionally, use thicker lines for the outer contours of Shadow and thinner lines for internal details to create visual separation and depth.
I can’t get the quills to look sharp and dynamic.
Shadow’s quills are a key feature, and making them look stiff can detract from his design. The issue might be drawing them too straight or too uniformly. To improve this, practice drawing long, sweeping curves that come to a sharp point. Think about the flow of energy. Observe how the quills overlap and interact with each other in reference images, and try to replicate that organic, yet angular, movement.
My lines are shaky or not confident.
Shaky lines often come from drawing too slowly or from using your wrist instead of your whole arm. To achieve smoother, more confident lines, practice drawing quick, continuous strokes. Try to draw from your elbow or shoulder for longer lines, which gives you more control and a smoother arc. Don’t be afraid to redo a line several times until you get it right; that’s part of the drawing process.
Key Takeaways
- Start with basic shapes: Build Shadow’s structure using simple circles and ovals to establish proportions and pose.
- Keep lines light initially: This allows for easy adjustments and clean-up without damaging your paper.
- Focus on iconic details: Pay close attention to his quills, inhibitor rings, and rocket shoes, as these define his character.
- Use reference images: Don’t hesitate to consult official art for accurate details and proportions.
- Practice line variation: Employ different line weights and shading to add depth and make your drawing pop.
- Embrace dynamic poses: Shadow is an active character; convey movement and energy in your illustration.
Frequently Asked Questions
What kind of paper is best for drawing Shadow?
For pencil drawing, a smooth, medium-weight paper (around 80-100 gsm) works well. If you plan to ink or use markers, opt for a heavier paper (120 gsm or more) or Bristol board to prevent bleed-through and buckling. Sketchbooks designed for mixed media are also a great choice.
Should I use a ruler for any parts of Shadow?
Generally, freehand drawing helps develop your artistic skill and makes the drawing feel more organic. However, for perfectly straight lines on elements like the red stripes on his shoes or very specific geometric details, a ruler can be used. It’s often better to try freehand first to maintain a consistent style.
How do I make Shadow look more aggressive or intense?
To give Shadow a more aggressive look, focus on his eyes and brow. Draw his eyebrows lower and angled inwards, creating a furrowed brow. Make his pupils smaller or more intense. A slightly downturned mouth or a clenched jawline can also convey determination or anger. His pose, with clenched fists or a forward lean, contributes greatly to this intensity.
What’s the best way to color Shadow after inking?
After inking, you have many options for coloring. Colored pencils offer good control and blendability. Markers provide vibrant, smooth coverage, but require practice to avoid streaks. Digital coloring allows for endless experimentation with layers and effects. Whichever medium you choose, start with lighter layers and build up the color and shadows gradually.
Our Top Recommended Finds
- Strathmore 400 Series Sketch Pad: Excellent all-around paper for practice and finished pencil drawings.
- Staedtler Mars Lumograph Pencil Set: A range of graphite pencils (HB to 8B) for versatile shading and line work.
- Faber-Castell Kneaded Eraser: Perfect for gently lifting graphite without smudging or damaging your paper.
Your Ultimate Life Form Awaits!
You’ve just completed a journey into drawing one of the coolest characters in gaming history. From basic shapes to intricate details, you’ve developed the skills to bring Shadow the Hedgehog to life on your page. This isn’t just about drawing Shadow; it’s about building confidence in your artistic abilities.
Keep practicing, and don’t be afraid to experiment with different poses or expressions. Why not try drawing Shadow alongside Sonic, or perhaps in an action scene? The more you draw, the more your unique style will emerge. Grab your pencil and create another masterpiece today!