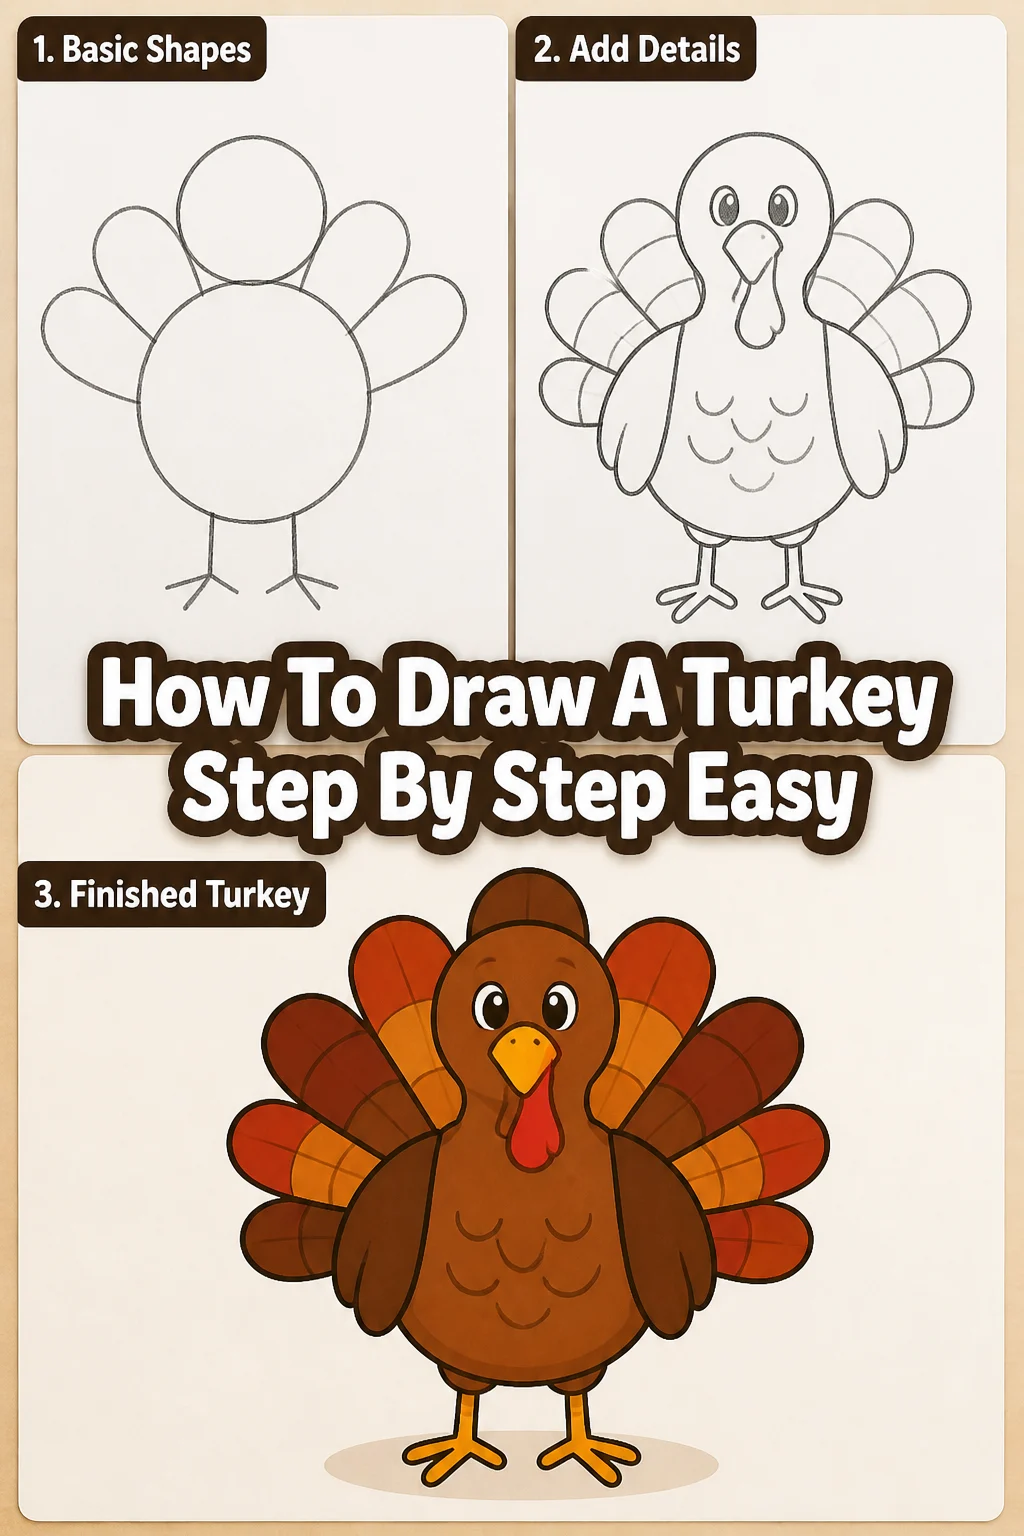
🦃 How To Draw A Turkey Step By Step Easy
Drawing can feel intimidating, especially if you think you lack artistic talent. But what if I told you drawing a charming turkey is simpler than you imagine? I’ve guided countless beginners through basic art projects, and this one consistently brings smiles. This guide breaks down the process into effortless steps, ensuring a delightful result every time.
Quick Overview
You’re about to create a friendly, cartoon-style turkey that’s perfect for cards, decorations, or just for fun. It’s a wonderfully rewarding project.
Time needed: 20-40 minutes
Difficulty: Beginner
What you’ll need: Pencil, eraser, paper, optional colored pencils or crayons
Step-by-Step Instructions
Step 1: Sketch the Body Base
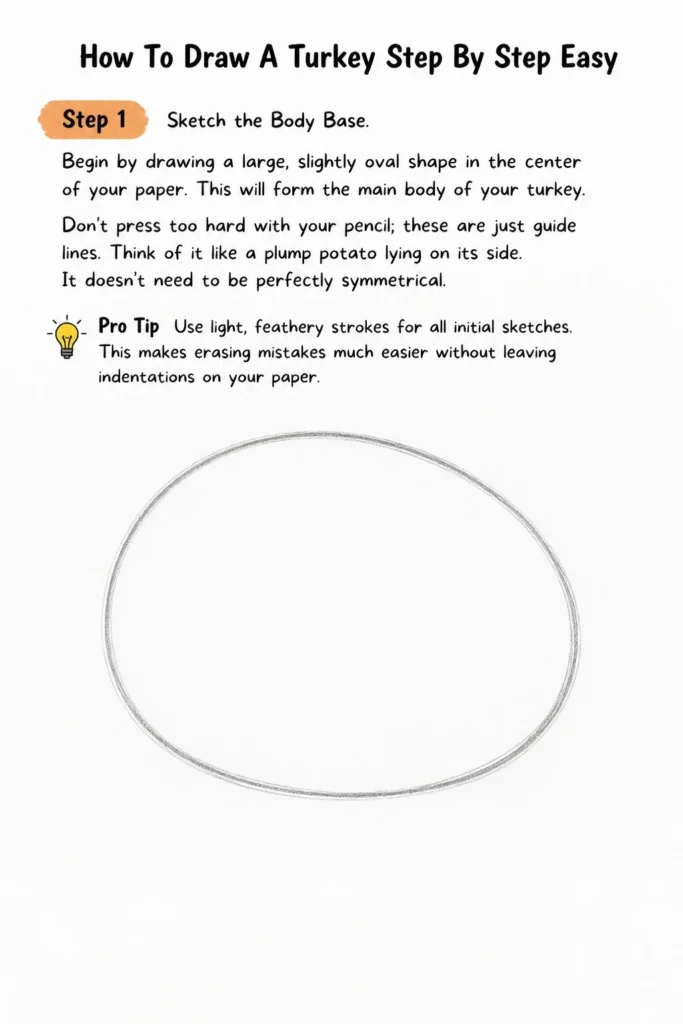
Begin by drawing a large, slightly oval shape in the center of your paper. This will form the main body of your turkey. Don’t press too hard with your pencil; these are just guide lines.
Think of it like a plump potato lying on its side. It doesn’t need to be perfectly symmetrical.
Pro Tip: Use light, feathery strokes for all initial sketches. This makes erasing mistakes much easier without leaving indentations on your paper.
Step 2: Add the Head and Neck
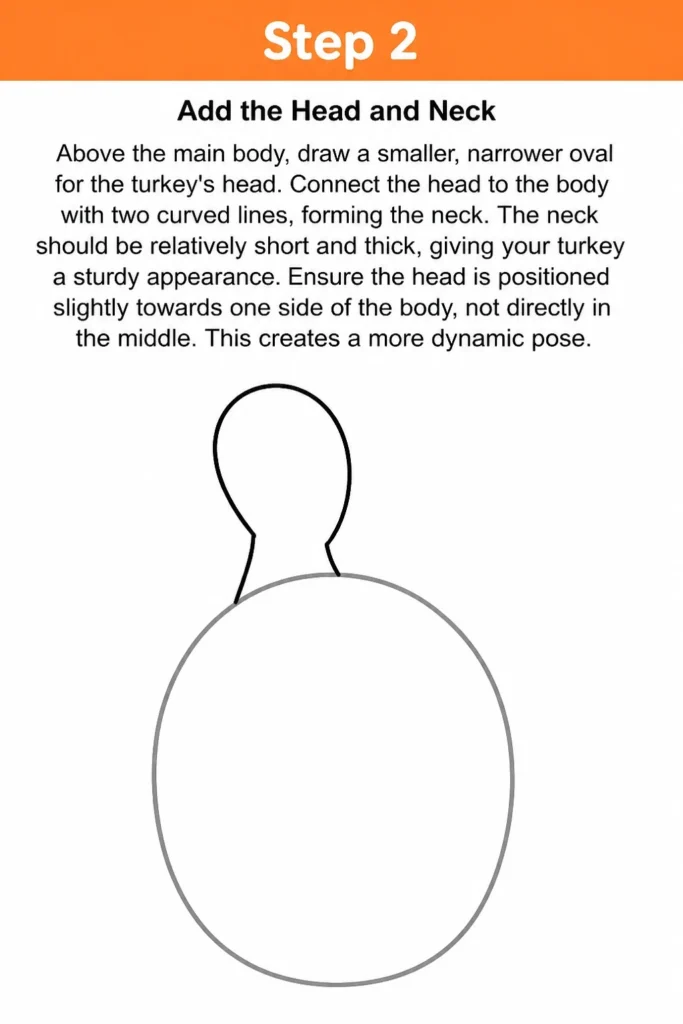
Above the main body, draw a smaller, narrower oval for the turkey’s head. Connect the head to the body with two curved lines, forming the neck. The neck should be relatively short and thick, giving your turkey a sturdy appearance.
Ensure the head is positioned slightly towards one side of the body, not directly in the middle. This creates a more dynamic pose.
Step 3: Draw the Feathers Outline
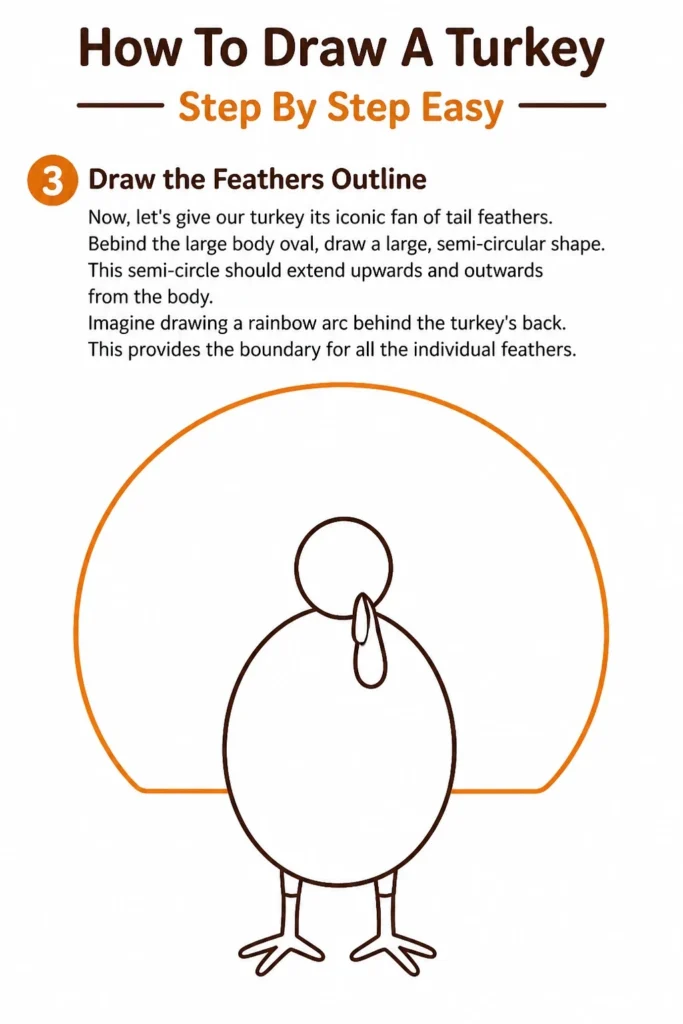
Now, let’s give our turkey its iconic fan of tail feathers. Behind the large body oval, draw a large, semi-circular shape. This semi-circle should extend upwards and outwards from the body.
Imagine drawing a rainbow arc behind the turkey’s back. This provides the boundary for all the individual feathers.
Step 4: Define Individual Tail Feathers
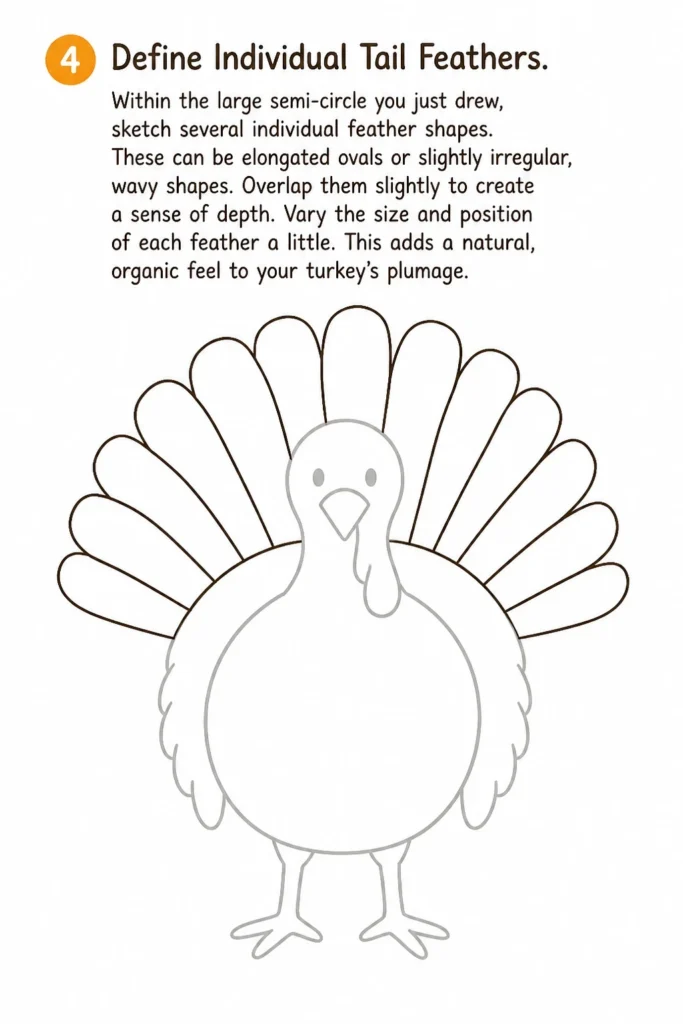
Within the large semi-circle you just drew, sketch several individual feather shapes. These can be elongated ovals or slightly irregular, wavy shapes. Overlap them slightly to create a sense of depth.
Vary the size and position of each feather a little. This adds a natural, organic feel to your turkey’s plumage.
Step 5: Add the Legs and Feet
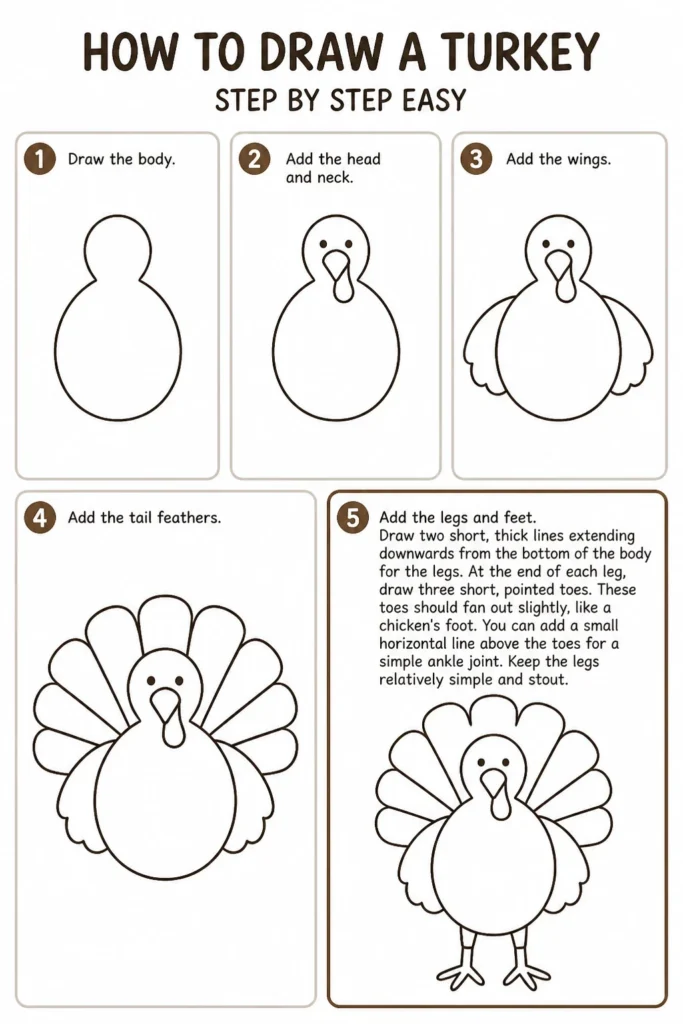
Draw two short, thick lines extending downwards from the bottom of the body for the legs. At the end of each leg, draw three short, pointed toes. These toes should fan out slightly, like a chicken’s foot.
You can add a small horizontal line above the toes for a simple ankle joint. Keep the legs relatively simple and stout.
Step 6: Sketch the Face Details
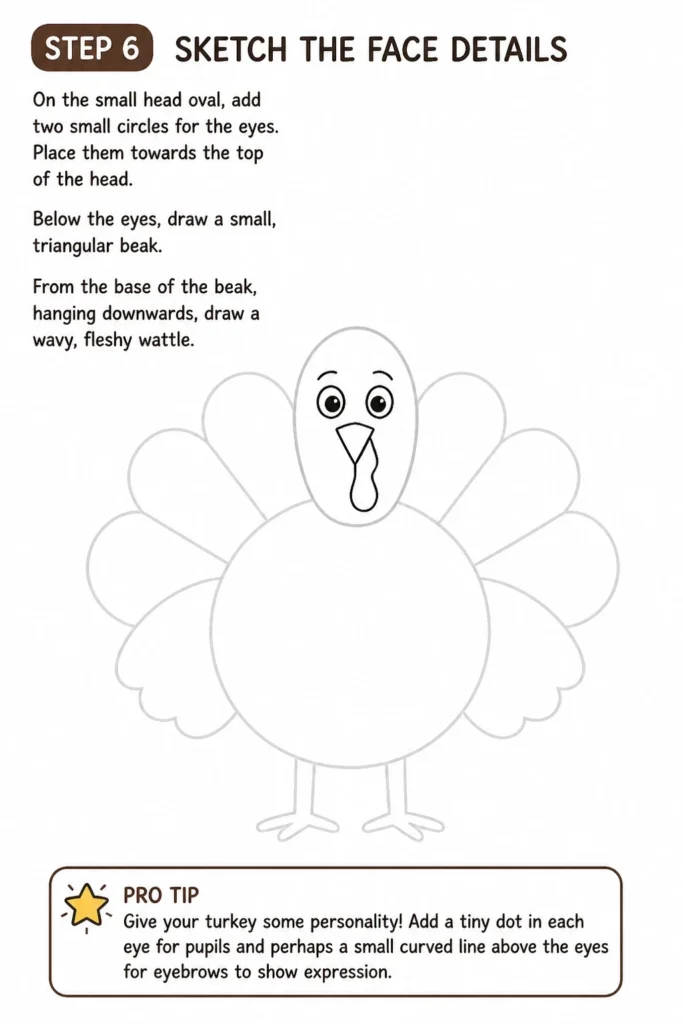
On the small head oval, add two small circles for the eyes. Place them towards the top of the head. Below the eyes, draw a small, triangular beak.
From the base of the beak, hanging downwards, draw a wavy, fleshy wattle. This distinctive feature gives a turkey its character.
Pro Tip: Give your turkey some personality! Add a tiny dot in each eye for pupils and perhaps a small curved line above the eyes for eyebrows to show expression.
Step 7: Refine and Erase
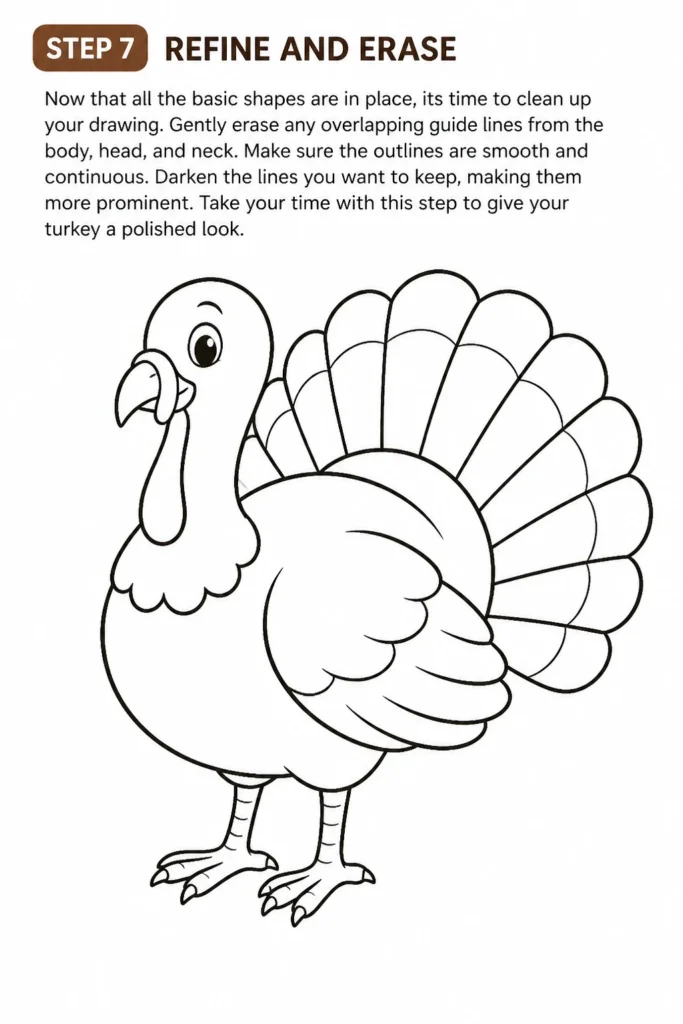
Now that all the basic shapes are in place, it’s time to clean up your drawing. Gently erase any overlapping guide lines from the body, head, and neck. Make sure the outlines are smooth and continuous.
Darken the lines you want to keep, making them more prominent. Take your time with this step to give your turkey a polished look.
Step 8: Add Final Touches and Color (Optional)
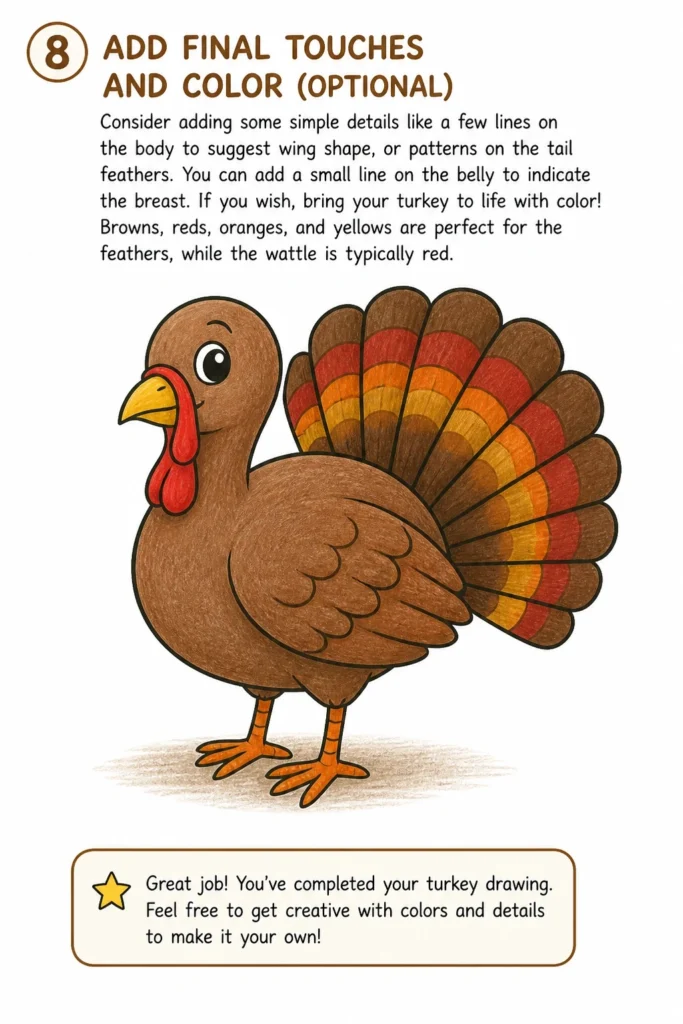
Consider adding some simple details like a few lines on the body to suggest wing shape, or patterns on the tail feathers. You can add a small line on the belly to indicate the breast.
If you wish, bring your turkey to life with color! Browns, reds, oranges, and yellows are perfect for the feathers, while the wattle is typically red.
Common Mistakes to Avoid
Making the Head Too Large
A common pitfall is drawing a head disproportionately large compared to the body. This can make your turkey look less like a turkey and more like a different bird. Keep the head a smaller, distinct oval atop a sturdy neck.
Always check the proportions against the main body. The head should be noticeably smaller, creating a balanced silhouette.
Drawing Flat Tail Feathers
Resist the urge to draw the tail feathers as a single, flat shape. This makes the turkey look two-dimensional and lifeless. Instead, layer individual feather shapes.
Overlapping the feathers creates depth and movement, making the tail appear full and vibrant. Think of them as individual leaves on a fan.
Forgetting the Wattle
The wattle, that fleshy growth under the beak, is a key characteristic of a turkey. Omitting it makes the turkey less recognizable. Always include this distinctive feature.
A simple wavy line or two under the beak is all it takes to make your turkey unmistakably a turkey. It adds charm and authenticity.
Over-Complicating the Legs
Beginners sometimes try to draw too much detail in the legs and feet. This can quickly become frustrating and messy. Keep the legs simple and sturdy.
Three basic toes fanning out are perfectly sufficient. Focus on clarity and simplicity for this part of the drawing.
Troubleshooting
My Turkey Looks Unbalanced
If your turkey appears to be tipping over or leaning too much, it’s often due to the body shape or leg placement. Check if your initial body oval is centered on the page. Ensure the legs are positioned directly beneath the body, spaced apart evenly.
Adjust the body oval slightly or redraw the legs to be more symmetrical. A solid base makes the whole drawing feel stable.
The Feathers Don’t Look Like Feathers
If your tail feathers resemble more of a solid fan than individual plumes, revisit Step 4. The key is to draw distinct, slightly overlapping shapes within the main semi-circle. Each shape should have a rounded or pointed end.
Focus on creating varied, individual feather forms. You can even add a central line down each feather for more definition.
My Lines Are Too Dark and Hard to Erase
This happens when you press too hard with your pencil during the initial sketching phases. Remember to use a very light touch for all preliminary lines. These are just guides.
If your lines are too dark, you can try using a kneaded eraser, which lifts graphite gently without smudging. Next time, start even lighter.
Key Takeaways
Start with light, basic shapes for the body, head, and tail outline.
Build details gradually, refining each section.
Overlap tail feathers to create depth and a natural look.
Don’t forget the distinctive wattle for true turkey character.
Practice makes perfect; every drawing improves your skill.
Use an eraser to clean up guide lines and create a polished finish.
Frequently Asked Questions
Can I draw this turkey with a pen instead of a pencil?
While you can, it’s generally recommended to start with a pencil. Pencil lines are easily erasable, allowing you to correct mistakes and refine your shapes before committing. If you’re confident, you can sketch lightly with pencil and then ink over it.
What kind of paper is best for drawing?
Standard printer paper works perfectly fine for this easy turkey drawing. If you want a slightly better experience, art sketch pads offer paper with a bit more tooth, which can hold graphite and color better.
How can I make my turkey look more realistic?
To add realism, focus on texture and shading. Incorporate more detailed feather patterns, add subtle shading to suggest curves and shadows, and observe real turkey photos for accurate proportions and coloring. However, for an “easy” guide, we prioritize simplicity.
Is it okay if my turkey doesn’t look exactly like the example?
Absolutely! Art is about personal expression. Your turkey might have a slightly different head tilt, unique feather shapes, or a different expression. Embrace your own style; it makes your drawing unique and personal.
Our Top Recommended Finds
Sketching Pencil Set: A basic set provides various lead hardnesses for sketching, detailing, and shading. It offers versatility as you grow.
Kneaded Eraser: Unlike standard erasers, a kneaded eraser lifts graphite without residue, making it ideal for light corrections and highlights.
Sketchbook: Having a dedicated sketchbook encourages regular practice and keeps all your drawings in one place. It’s perfect for tracking your progress.
Your Next Artistic Adventure Awaits
You’ve successfully drawn a charming turkey! This simple project builds fundamental drawing skills you can apply anywhere. Don’t let your artistic journey end here.
Consider trying other easy animal drawings, like a playful cat or a friendly dog. Each new subject you tackle strengthens your hand-eye coordination and confidence. Grab your pencil and paper right now and keep that creative spark burning!