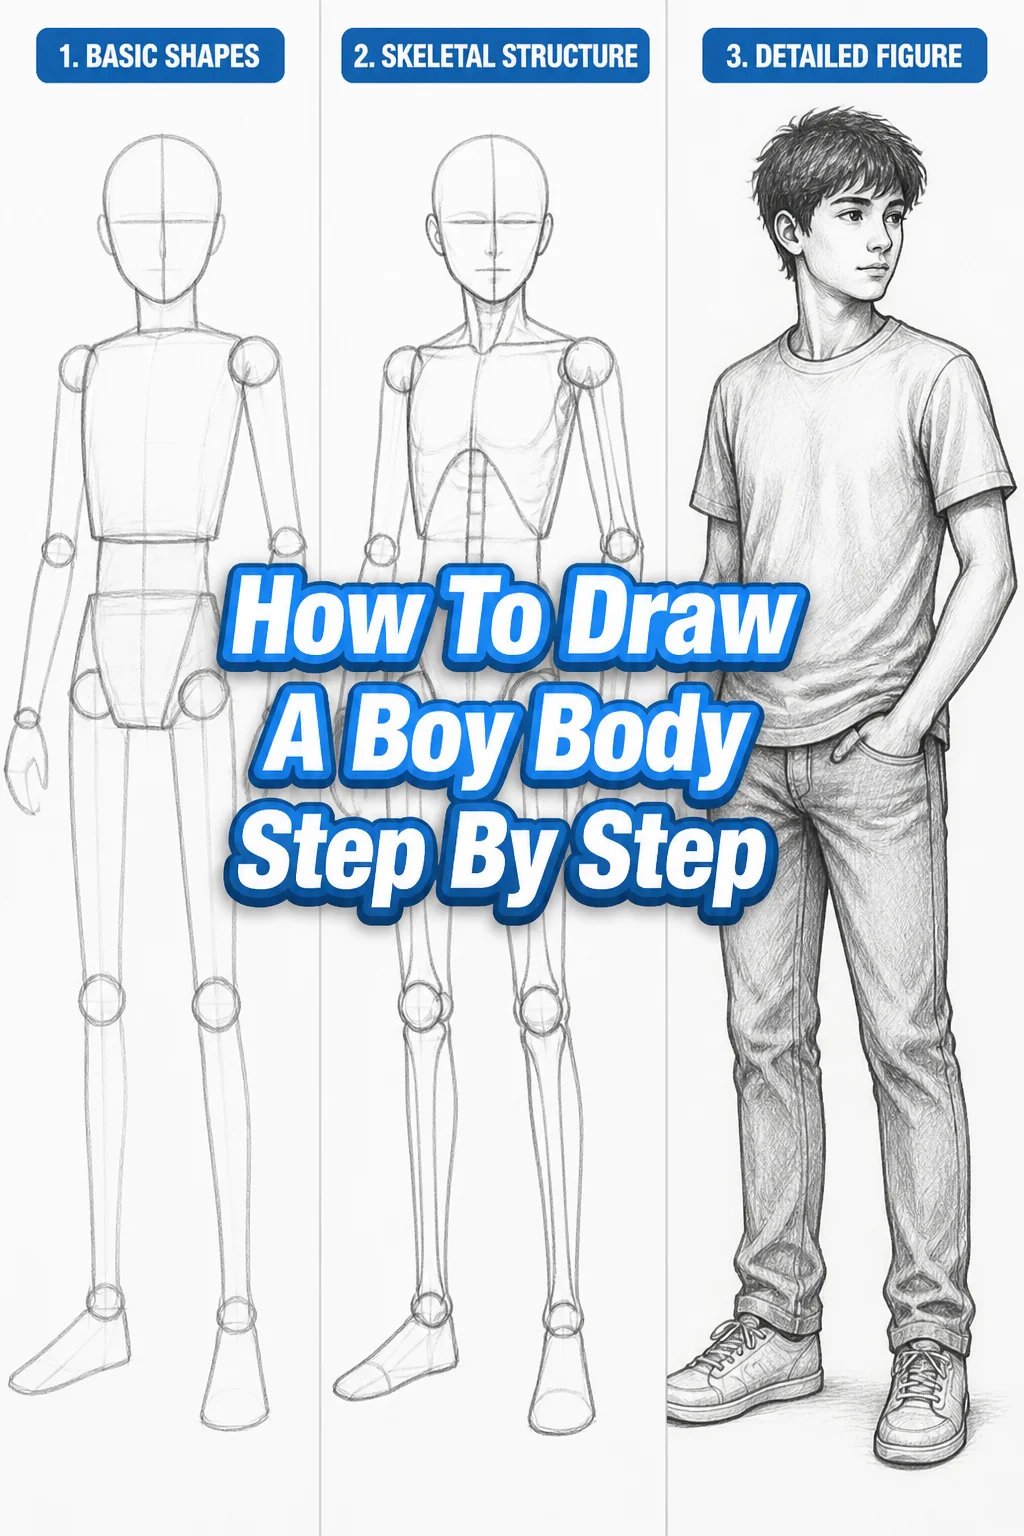
🧑🎨 How To Draw A Boy Body Step By Step
Learning to draw human figures can feel daunting at first.
I remember struggling with proportions and making bodies look stiff.
This guide breaks down the process into manageable steps, drawing from my own experience to help you create dynamic, realistic boy bodies with confidence.
Quick Overview
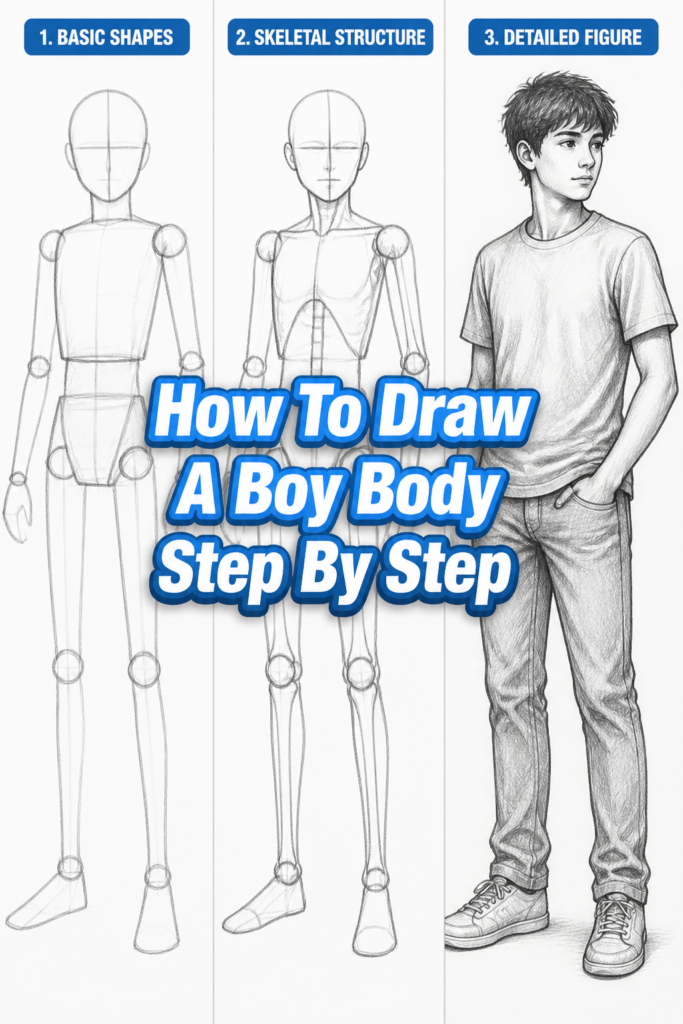
This guide will walk you through building a boy’s body from basic shapes to refined forms. You’ll learn essential proportions and techniques to bring your characters to life.
- Time needed: 60-90 minutes (can be broken into shorter sessions)
- Difficulty: Beginner to Intermediate
- What you’ll need: Pencil (HB, 2B), eraser, paper, optional reference images
Step-by-Step Instructions
Step 1: Establish the Foundation: Stick Figure & Proportions
Begin by lightly sketching a simple stick figure. This acts as the skeleton for your boy.
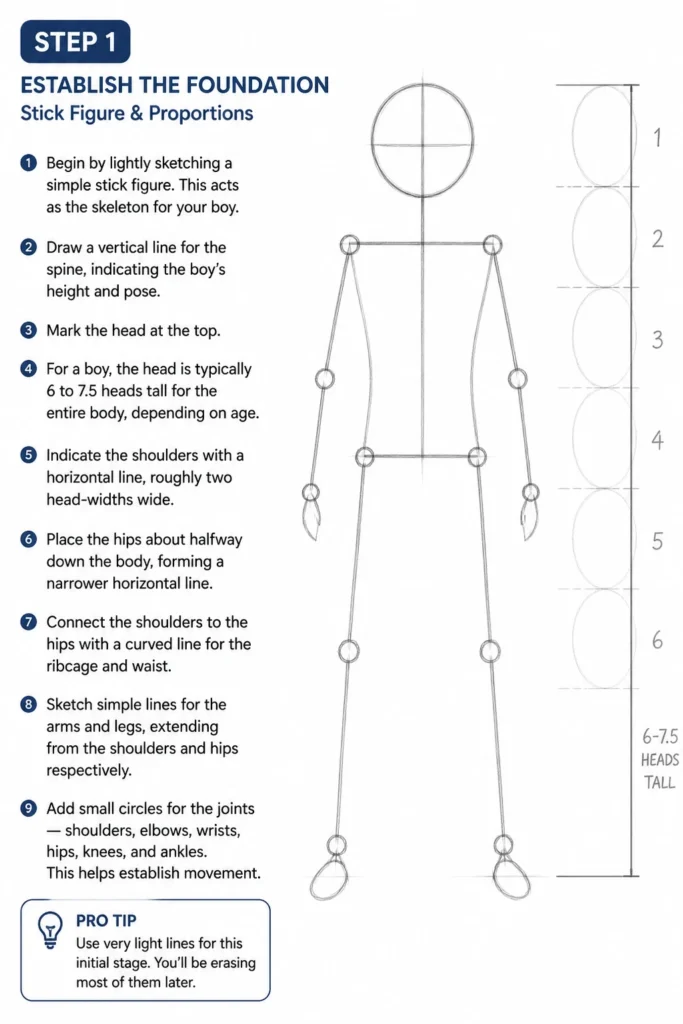
Draw a vertical line for the spine, indicating the boy’s height and pose.
Mark the head at the top. For a boy, the head is typically 6 to 7.5 heads tall for the entire body, depending on age.
Indicate the shoulders with a horizontal line, roughly two head-widths wide.
Place the hips about halfway down the body, forming a narrower horizontal line.
Connect the shoulders to the hips with a curved line for the ribcage and waist.
Sketch simple lines for the arms and legs, extending from the shoulders and hips respectively.
Add small circles for the joints: shoulders, elbows, wrists, hips, knees, and ankles. This helps establish movement.
Pro Tip: Use very light lines for this initial stage. You’ll be erasing and refining a lot. Think of it as a blueprint.
Step 2: Build the Core: Torso and Pelvis
Now, we will add volume to the boy’s core, focusing on the ribcage and pelvic area.
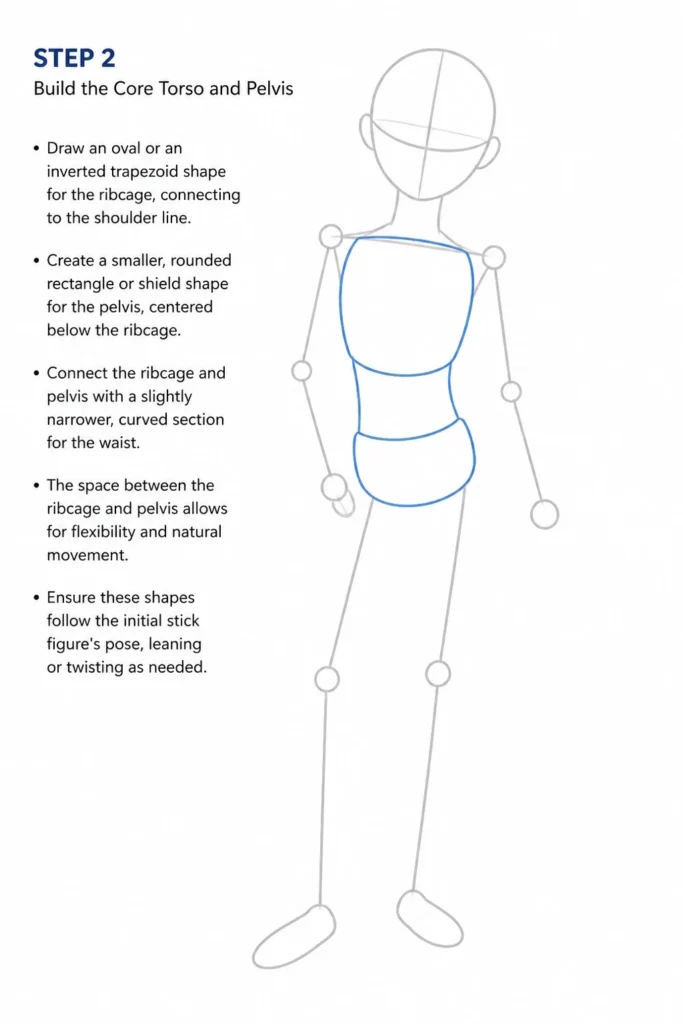
Draw an oval or an inverted trapezoid shape for the ribcage, connecting to the shoulder line.
Create a smaller, rounded rectangle or shield shape for the pelvis, centered below the ribcage.
Connect the ribcage and pelvis with a slightly narrower, curved section for the waist.
The space between the ribcage and pelvis allows for flexibility and natural movement.
Ensure these shapes follow the initial stick figure’s pose, leaning or twisting as needed.
Step 3: Sketch the Limbs: Arms and Legs
Let’s give the limbs some basic form using simple cylindrical shapes.
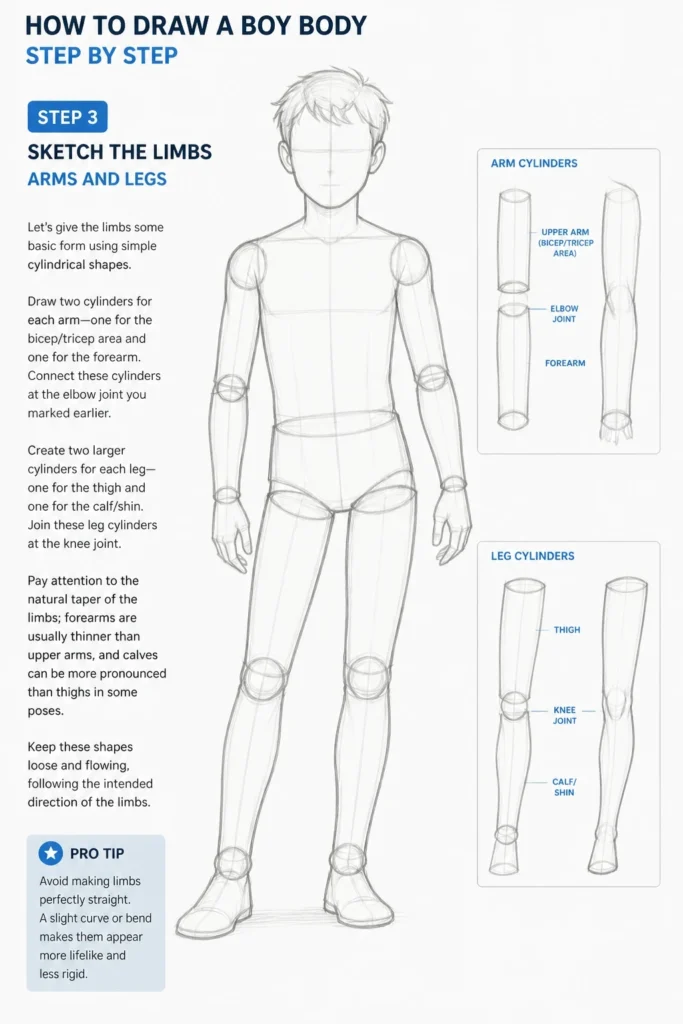
Draw two cylinders for each arm: one for the bicep/tricep area and one for the forearm.
Connect these cylinders at the elbow joint you marked earlier.
Create two larger cylinders for each leg: one for the thigh and one for the calf/shin.
Join these leg cylinders at the knee joint.
Pay attention to the natural taper of the limbs; forearms are usually thinner than upper arms, and calves can be more pronounced than thighs in some poses.
Keep these shapes loose and flowing, following the intended direction of the limbs.
Pro Tip: Avoid making limbs perfectly straight. A slight curve or bend makes them appear more lifelike and less rigid.
Step 4: Define the Joints: Shoulders, Elbows, Knees
Refining the joints adds crucial realism and helps the body move naturally.
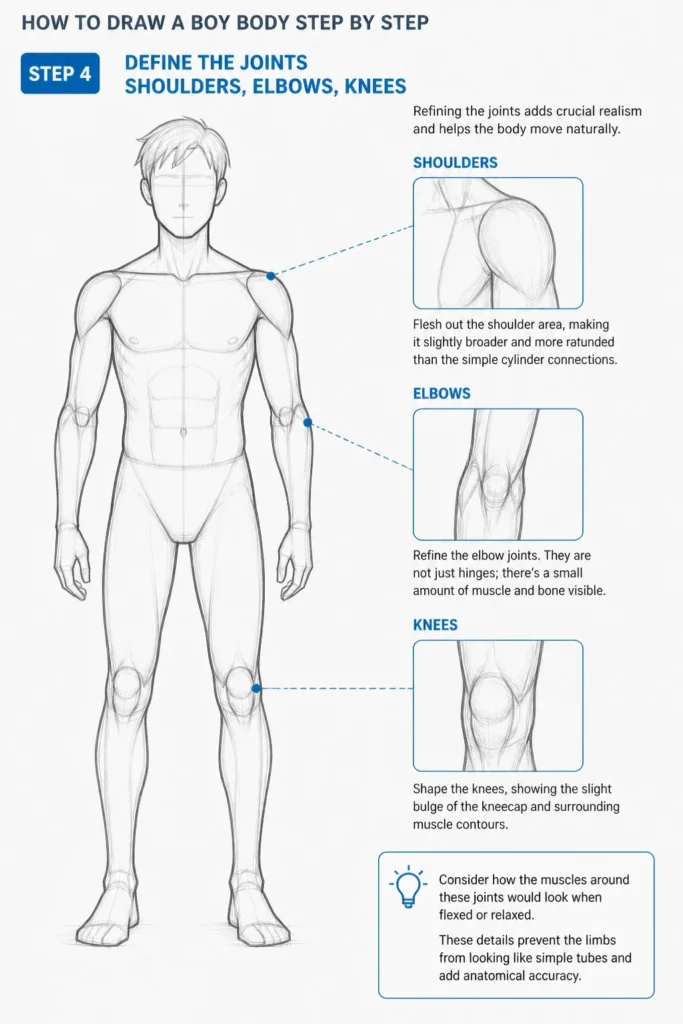
Flesh out the shoulder area, making it slightly broader and more rounded than the simple cylinder connections.
Refine the elbow joints. They are not just hinges; there’s a small amount of muscle and bone visible.
Shape the knees, showing the slight bulge of the kneecap and surrounding muscle contours.
Consider how the muscles around these joints would look when flexed or relaxed.
These details prevent the limbs from looking like simple tubes and add anatomical accuracy.
Step 5: Connect the Neck and Head Placeholder
The neck is vital for connecting the head to the body and conveying posture.
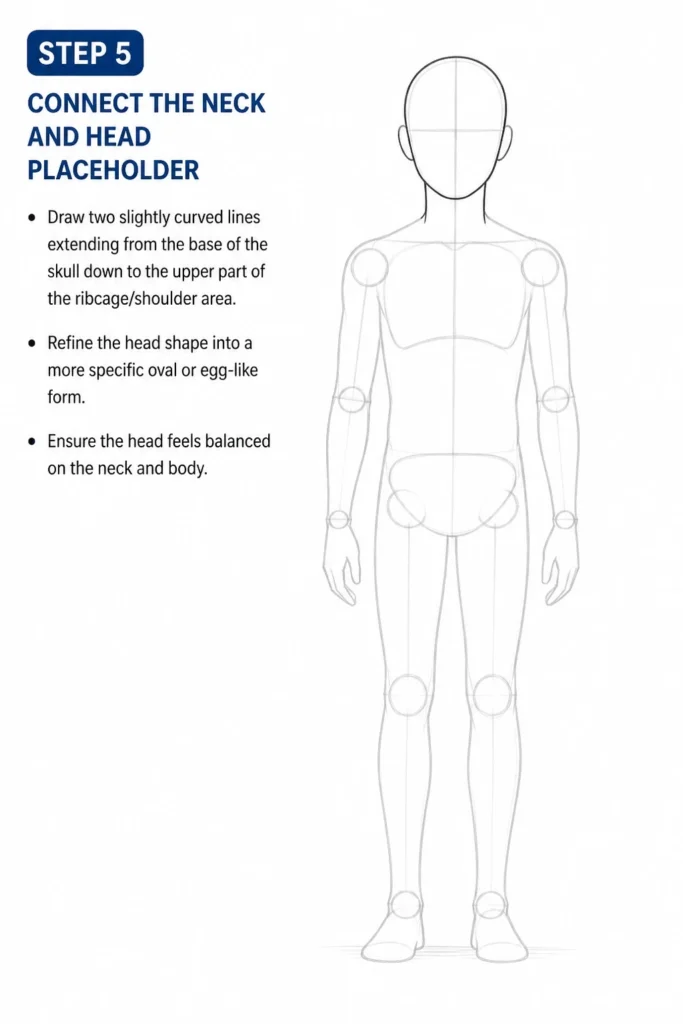
Draw two slightly curved lines extending from the base of the skull (your head placeholder) down to the upper part of the ribcage/shoulder area.
The neck should be thick enough to support the head but not overly muscular for a typical boy.
Refine the head shape into a more specific oval or egg-like form, depending on the boy’s age and features.
For now, focus on the overall shape and placement of the head in relation to the body.
Ensure the head feels balanced on the neck and body.
Step 6: Flesh Out the Form: Basic Volume
Now, it’s time to connect all the basic shapes and give the body more organic volume.
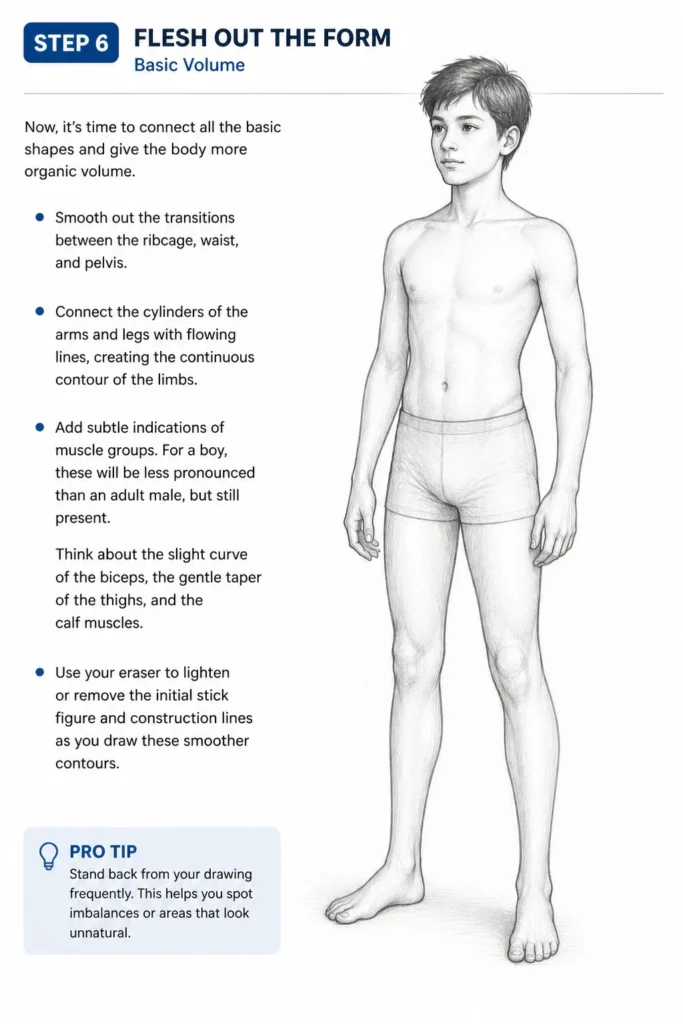
Smooth out the transitions between the ribcage, waist, and pelvis.
Connect the cylinders of the arms and legs with flowing lines, creating the continuous contour of the limbs.
Add subtle indications of muscle groups. For a boy, these will be less pronounced than an adult male, but still present.
Think about the slight curve of the biceps, the gentle taper of the thighs, and the calf muscles.
Use your eraser to lighten or remove the initial stick figure and construction lines as you draw these smoother contours.
Pro Tip: Stand back from your drawing frequently. This helps you spot imbalances or areas that look unnatural.
Step 7: Refine and Detail: Contours and Subtle Anatomy
This step involves cleaning up your lines and adding more specific anatomical details.
Draw the final, darker outline of the boy’s body, making sure your lines are confident and clean.
Add subtle details like collarbones, a slight indentation for the belly button, and the definition of the ribcage if visible.
Indicate the hands and feet with simplified shapes. For hands, a mitten shape can work initially, and for feet, a wedge or block shape.
Consider the age of the boy you are drawing. Younger boys have softer, rounder forms with less muscle definition.
Older boys might show more lean muscle and sharper angles.
Step 8: Clean Up and Prepare for Final Lines
The final step is to prepare your drawing for inking or shading.
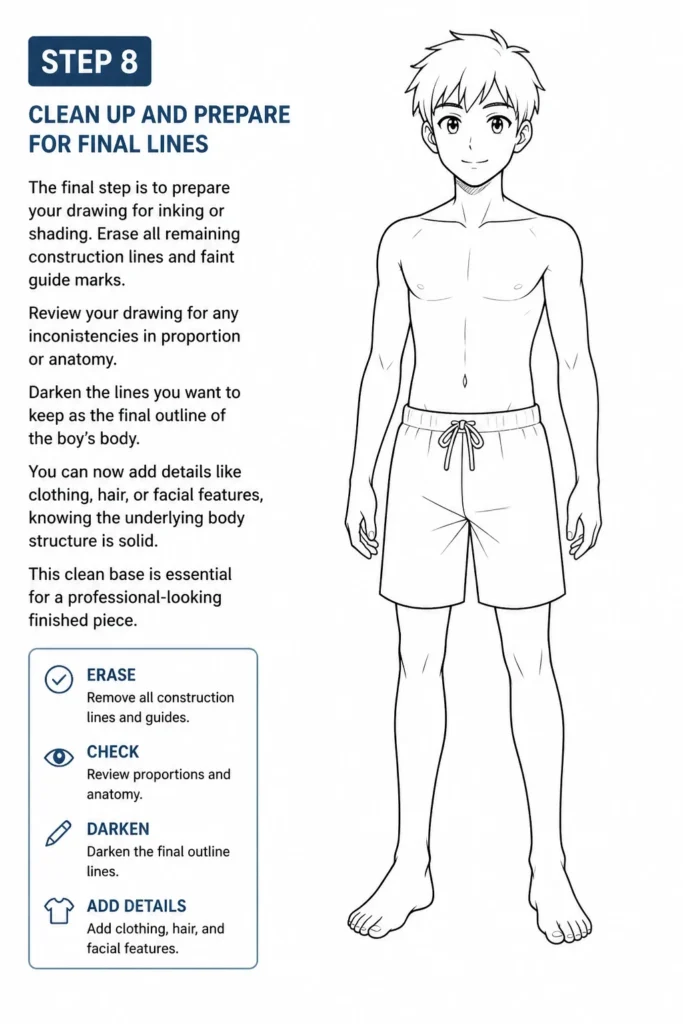
Erase all remaining construction lines and faint guide marks.
Review your drawing for any inconsistencies in proportion or anatomy.
Darken the lines you want to keep as the final outline of the boy’s body.
You can now add details like clothing, hair, or facial features, knowing the underlying body structure is solid.
This clean base is essential for a professional-looking finished piece.
Common Mistakes to Avoid
Stiff Poses
Many beginners draw figures that look rigid and unnatural. This often happens from relying too heavily on straight lines for the initial stick figure.
Instead, introduce curves and dynamic angles from the very first step. Imagine the boy’s spine as a flexible rod, not a straight stick. Allow for natural bends in the limbs, even when standing.
Incorrect Proportions
A common error is making the head too large or small, or limbs disproportionate to the torso. This instantly makes the drawing look “off.”
Always use the head as a unit of measurement. Measure and compare limb lengths and torso size against the head height. Practice observing real people or using anatomical references to internalize correct proportions.
Flat Forms
Drawing bodies without considering their three-dimensional nature can lead to flat, lifeless figures. Ignoring the cylindrical or spherical nature of body parts is a frequent oversight.
Think of the body as a collection of forms: cylinders for limbs, ovals for the torso. Imagine you can see through the body. This helps you draw overlapping forms correctly and creates a sense of depth.
Over-Muscling a Young Boy
It’s easy to accidentally give a boy the musculature of an adult male, especially when learning anatomy. This can make the character look older or less childlike than intended.
Remember that boys typically have softer, less defined musculature. Focus on general contours and smooth transitions rather than sharp muscle definition. Keep the forms rounded and less angular.
Troubleshooting
My Figure Looks Too Stiff
If your boy body feels rigid, it’s likely due to a lack of natural curves and dynamic flow.
Go back to your initial stick figure. Try drawing an “S” curve or a “C” curve for the spine instead of a straight line. Bend the knees and elbows slightly, even in a standing pose. Exaggerate these curves a little to break the stiffness, then tone them down.
The Proportions Are Off, But I Can’t Tell Where
It can be frustrating when something looks wrong, but you can’t pinpoint it. This usually means a foundational proportional error.
Use a ruler or your pencil to measure head heights. Compare the length of the torso to the legs, or the upper arm to the forearm. Hold your drawing up to a mirror; this often reveals hidden errors. Don’t be afraid to redraw sections if necessary.
My Lines Are Messy and Unconfident
Messy lines can make a drawing look unpolished and difficult to read. This often stems from hesitancy or trying to get it perfect on the first try.
Practice drawing long, confident strokes from your shoulder, not just your wrist. Start with very light construction lines and build up gradually. Don’t be afraid to make several light passes before committing to a final line. A light touch allows for easy corrections.
Key Takeaways
- Always start with a light stick figure to establish pose and proportions.
- Break the body down into simple 3D shapes like ovals, cylinders, and boxes.
- Use the head as a consistent unit of measurement for the entire body.
- Introduce natural curves and dynamic angles to avoid stiff-looking figures.
- Focus on smooth transitions between body parts rather than sharp, disconnected forms.
- Regularly step back and review your drawing for overall balance and proportion.
Frequently Asked Questions
How do I make my boy look younger or older?
To adjust age, focus on proportions and body fat. Younger boys have larger heads in proportion to their bodies (around 5-6 heads tall), shorter limbs, and softer, rounder forms with more baby fat. Older boys (pre-teen/teen) will have proportions closer to adults (6.5-7.5 heads tall), longer limbs, and leaner, more defined musculature, though still less than an adult.
Should I draw clothes or the body first?
It’s always best to draw the underlying body first, even if lightly. Clothes drape over the form, and understanding that form ensures the clothing looks natural and believable. Drawing the body first prevents clothes from looking like they’re floating or lacking an underlying structure.
What if I struggle with a specific body part, like hands or feet?
Hands and feet are notoriously challenging. Don’t let them discourage you. Treat them as separate studies. Break them down into simpler geometric shapes first. Use plenty of reference images, draw them repeatedly, and simplify them until you gain confidence. You can always start with simplified “mitten” or “wedge” shapes and refine them later.
How can I make my drawing look more dynamic?
To add dynamism, focus on the “line of action” in your initial stick figure. This is an imaginary line that conveys the main thrust of the pose. Introduce contrapposto (a natural weight shift where hips and shoulders tilt in opposite directions). Exaggerate curves and twists slightly, and consider perspective to make parts closer to the viewer appear larger.
Our Top Recommended Finds
- Good Quality Sketchbook: A dedicated sketchbook encourages consistent practice and keeps your progress organized. Look for paper that can handle erasing well.
- Variety Pack of Pencils (HB, 2B, 4B): Different lead hardness allows for lighter construction lines (HB) and darker, more confident final lines (2B, 4B).
- Kneaded Eraser: This type of eraser is excellent for lifting pencil marks without damaging the paper and can be shaped for precise erasing.
Embark on Your Artistic Journey
You now have a clear roadmap to drawing compelling boy bodies. Remember that practice is the true master key.
Each sketch refines your eye and strengthens your hand.
Don’t be afraid to experiment with different poses and ages. Pick up your pencil today and start bringing your characters to life on paper.