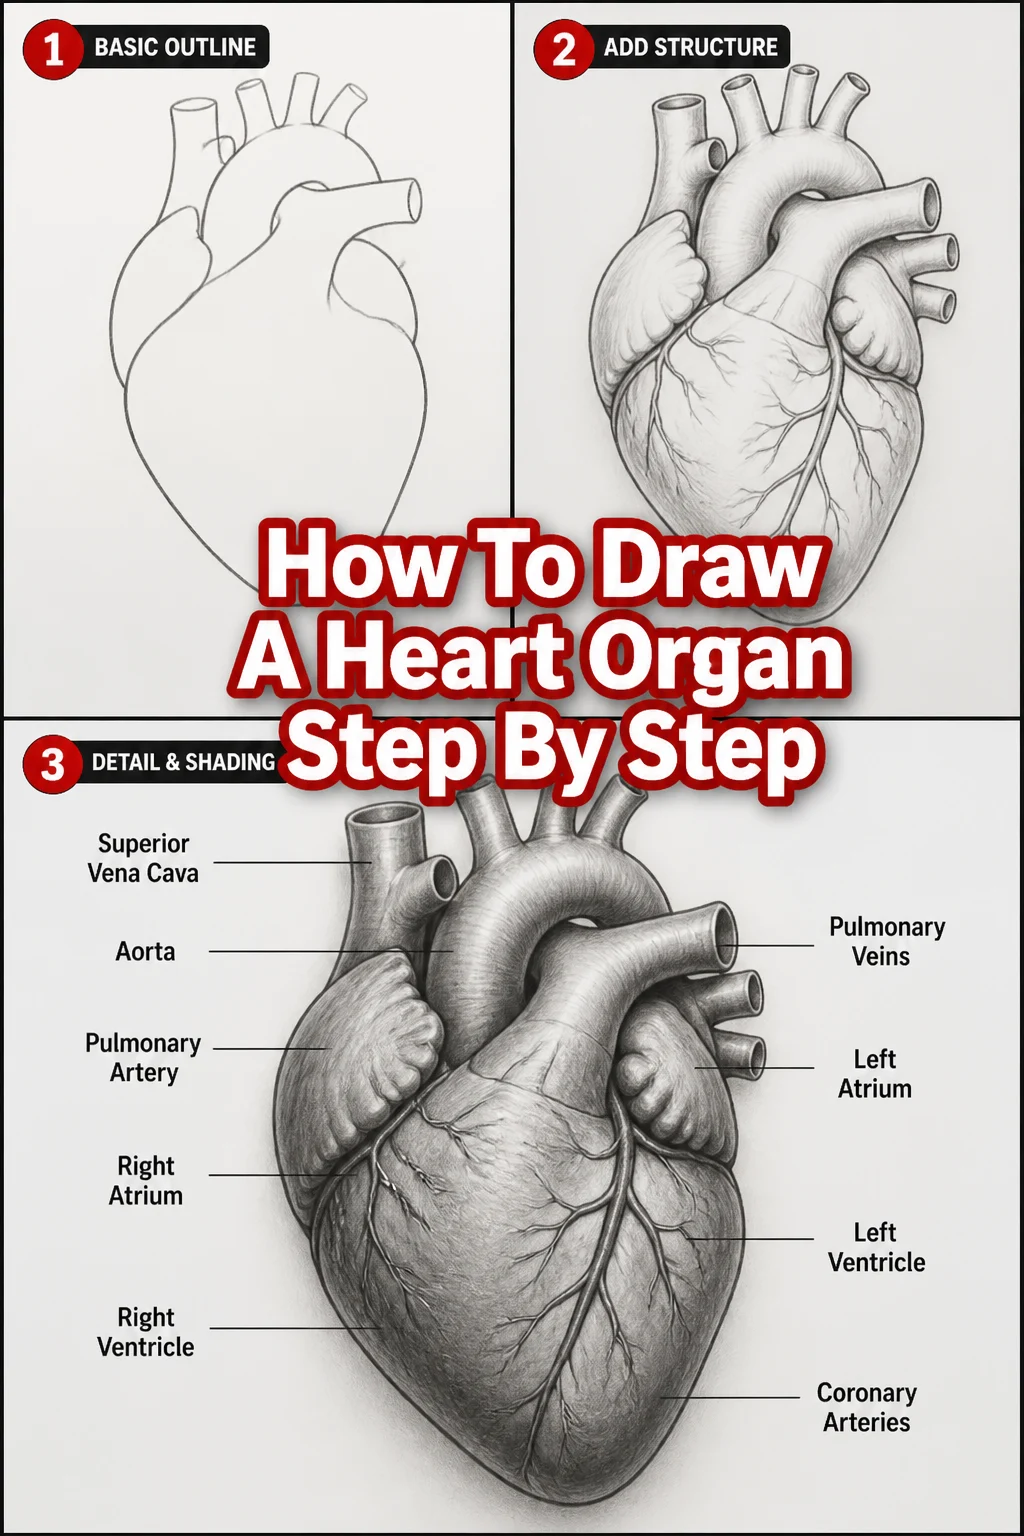
How To Draw A Heart Organ Step By Step
Drawing the human heart can seem like a daunting task. It’s a complex, vital organ with intricate details. Yet, breaking it down makes it incredibly approachable for any artist.
I’ve spent countless hours studying anatomy, understanding how structure informs function. This guide distills that knowledge into practical, easy-to-follow steps. You can absolutely master this drawing.
Quick Overview
This guide will walk you through creating an anatomically accurate heart organ drawing. You will learn to build the structure from basic shapes, adding key vessels and chambers. The process emphasizes understanding as you draw.
- Time needed: 60-90 minutes
- Difficulty: Intermediate
- What you’ll need: Pencil (HB, 2B), paper, eraser, fine-tip pen (optional), colored pencils (red, blue, purple – optional)
Step-by-Step Instructions
Step 1: Establish the Basic Shape
Begin by lightly sketching a large, rounded oval on your paper. This will form the general mass of the heart. Think of it as a slightly lopsided pear, with the wider part at the top.
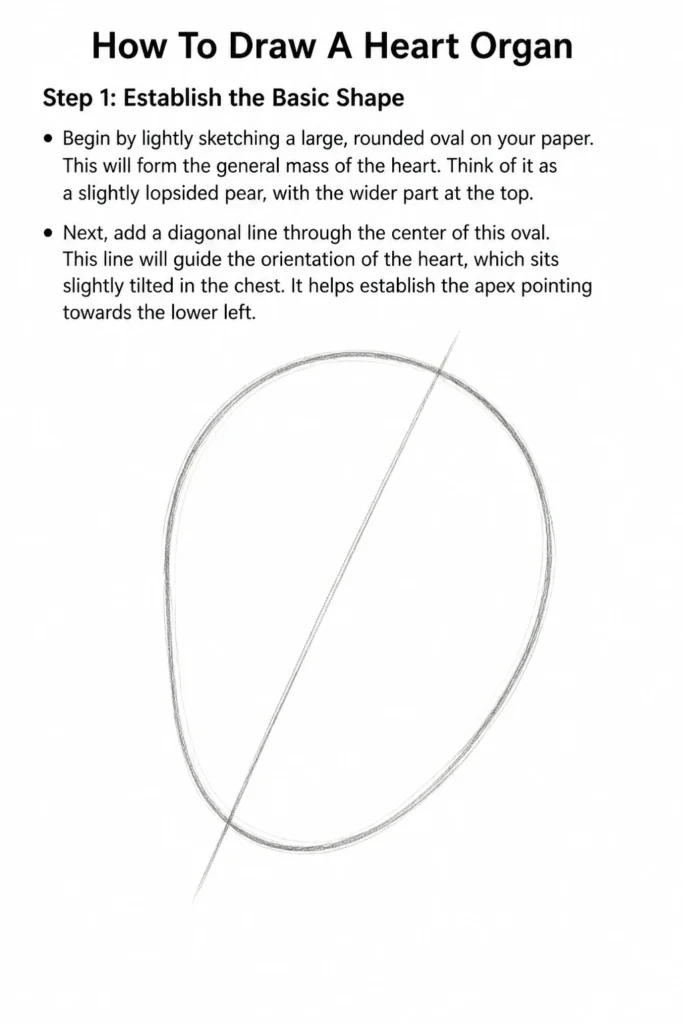
Next, add a diagonal line through the center of this oval. This line will guide the orientation of the heart, which sits slightly tilted in the chest. It helps establish the apex pointing towards the lower left.
Step 2: Define the Four Chambers
Visualize the heart divided into four main sections. Lightly draw a vertical line down the middle, slightly to the right of your diagonal guide. This represents the septum.
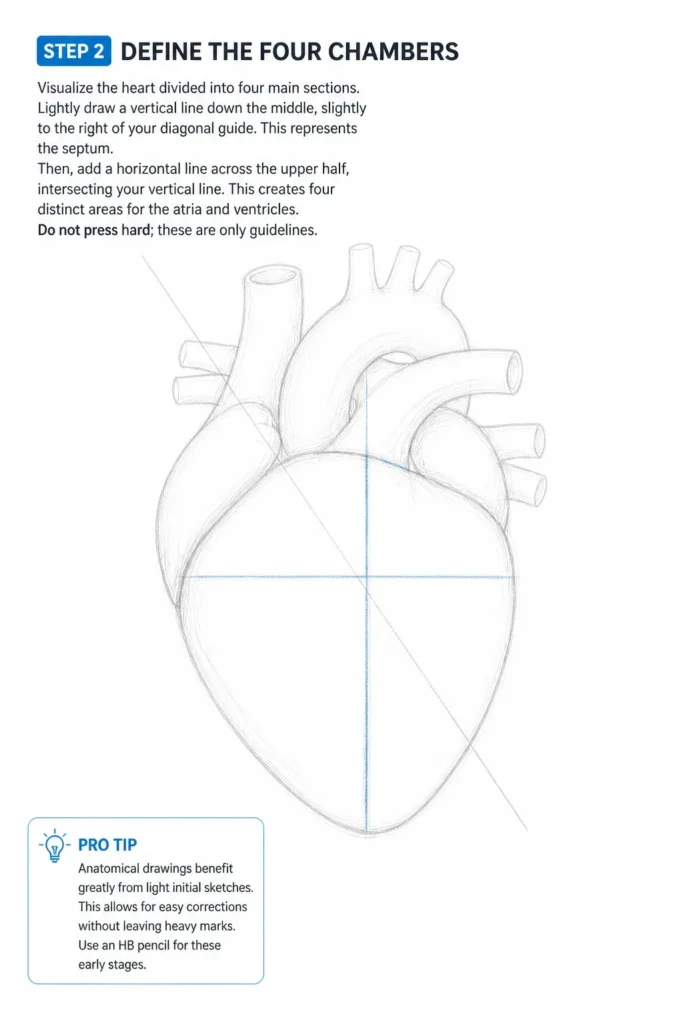
Then, add a horizontal line across the upper half, intersecting your vertical line. This creates four distinct areas for the atria and ventricles. Do not press hard; these are only guidelines.
Pro Tip: Anatomical drawings benefit greatly from light initial sketches. This allows for easy corrections without leaving heavy marks. Use an HB pencil for these early stages.
Step 3: Outline the Major Vessels from the Top
Now, focus on the large blood vessels emerging from the top of the heart. Start with the aorta, which is the largest artery. Draw a thick, curved tube arching upwards and to the right from the upper left chamber.
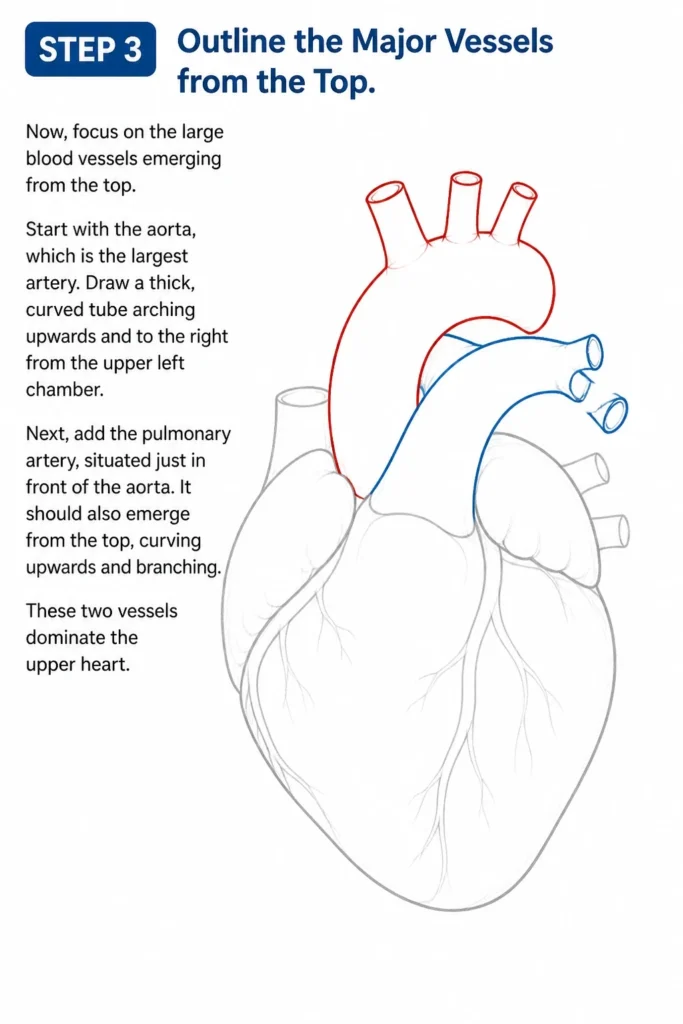
Next, add the pulmonary artery, situated just in front of the aorta. It should also emerge from the top, curving upwards and branching. These two vessels dominate the upper heart.
Step 4: Sketch the Vena Cava and Pulmonary Veins
Draw the superior vena cava entering the upper right chamber. It should appear as a wide vessel descending from above. Also, include the inferior vena cava, entering the lower right chamber from below.
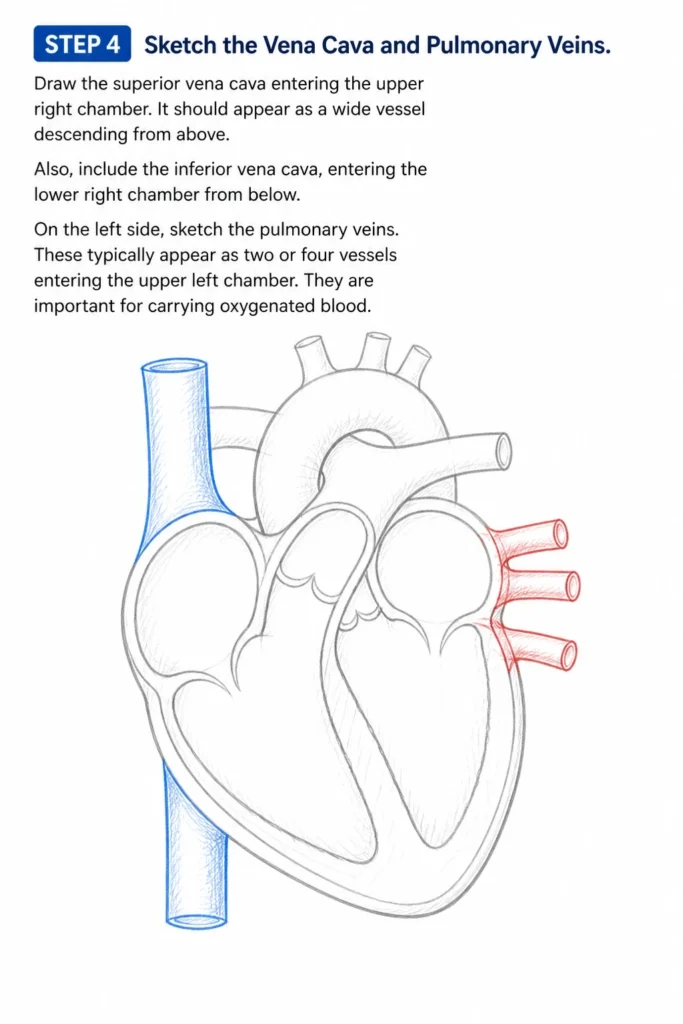
On the left side, sketch the pulmonary veins. These typically appear as two or four vessels entering the upper left chamber. They are important for carrying oxygenated blood.
Step 5: Refine the Heart’s Outer Contour
Connect the major vessels to the main body of the heart with smoother, more organic curves. The heart isn’t perfectly symmetrical. The right side tends to be broader, while the left side is more pointed.
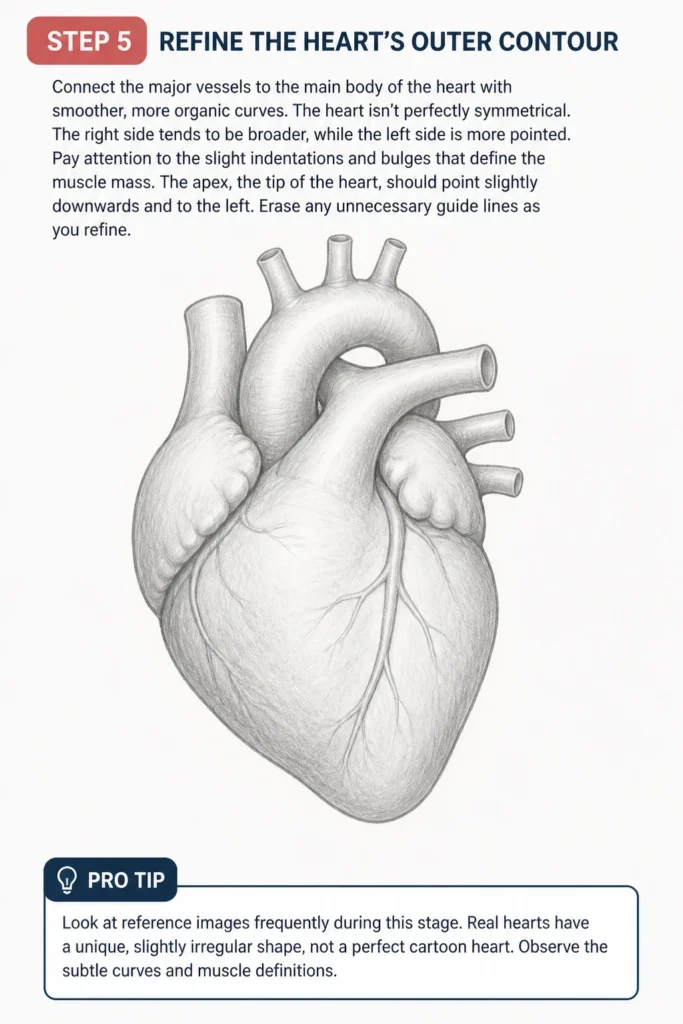
Pay attention to the slight indentations and bulges that define the muscle mass. The apex, the tip of the heart, should point slightly downwards and to the left. Erase any unnecessary guide lines as you refine.
Pro Tip: Look at reference images frequently during this stage. Real hearts have a unique, slightly irregular shape, not a perfect cartoon heart. Observe the subtle curves and muscle definitions.
Step 6: Indicate the Coronary Arteries and Veins
These vital vessels wrap around the surface of the heart. Lightly sketch the main coronary arteries descending from the aorta. They often run in grooves between the chambers.
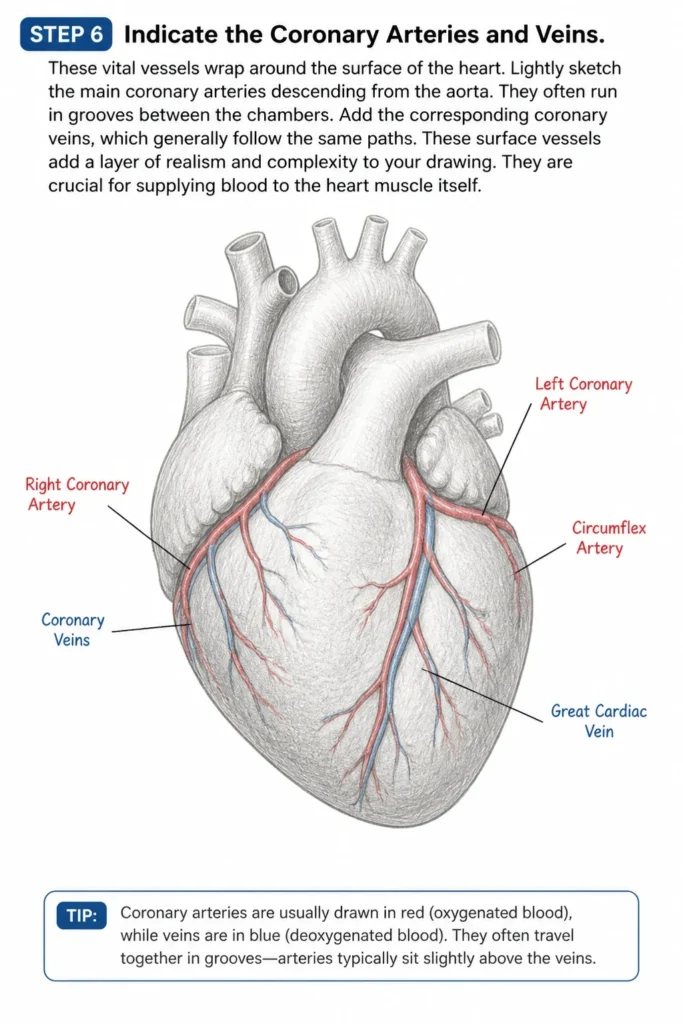
Add the corresponding coronary veins, which generally follow the same paths. These surface vessels add a layer of realism and complexity to your drawing. They are crucial for supplying blood to the heart muscle itself.
Step 7: Detail the Internal Chambers and Valves (Optional but Recommended)
If you’re aiming for a more advanced drawing, lightly sketch the internal divisions. Show the thickness of the ventricular walls, particularly the left ventricle, which is thicker.
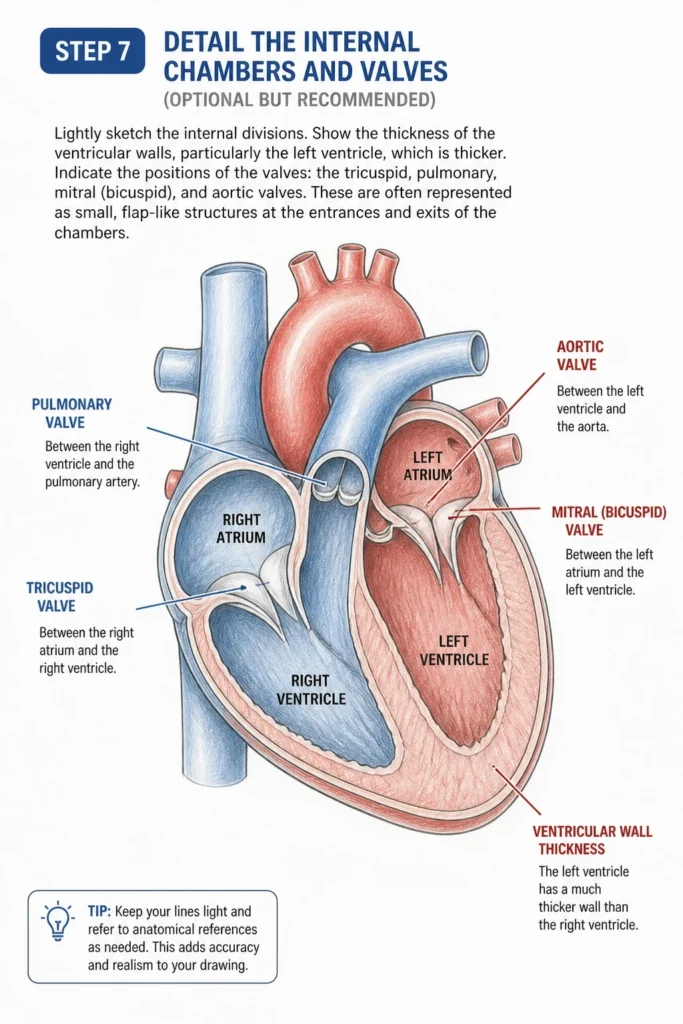
Indicate the positions of the valves: the tricuspid, pulmonary, mitral (bicuspid), and aortic valves. These are often represented as small, flap-like structures at the entrances and exits of the chambers. This step truly deepens anatomical understanding.
Step 8: Add Shading and Definition
Use your softer pencil (2B) to add depth and dimension. Focus on areas where vessels overlap or where the heart muscle curves inwards. Shading helps separate the different parts and makes the drawing appear three-dimensional.
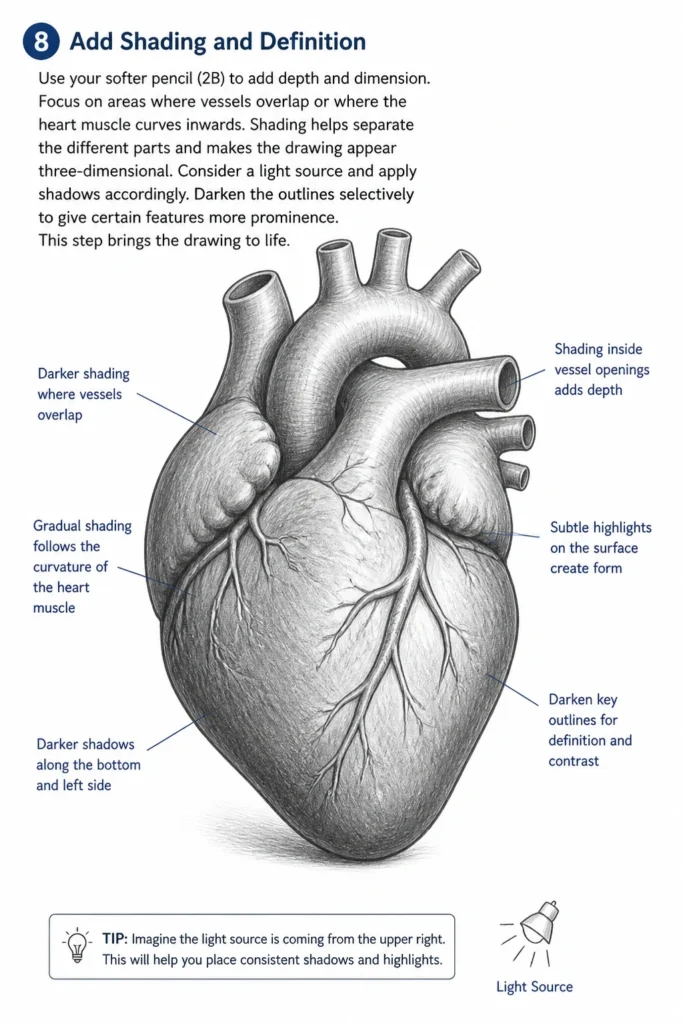
Consider a light source and apply shadows accordingly. Darken the outlines selectively to give certain features more prominence. This step brings the drawing to life.
Step 9: Introduce Color (Optional)
If using colored pencils, apply red for oxygenated blood (left side, aorta, pulmonary veins) and blue for deoxygenated blood (right side, vena cava, pulmonary artery). Use a purple or brown for the heart muscle itself.
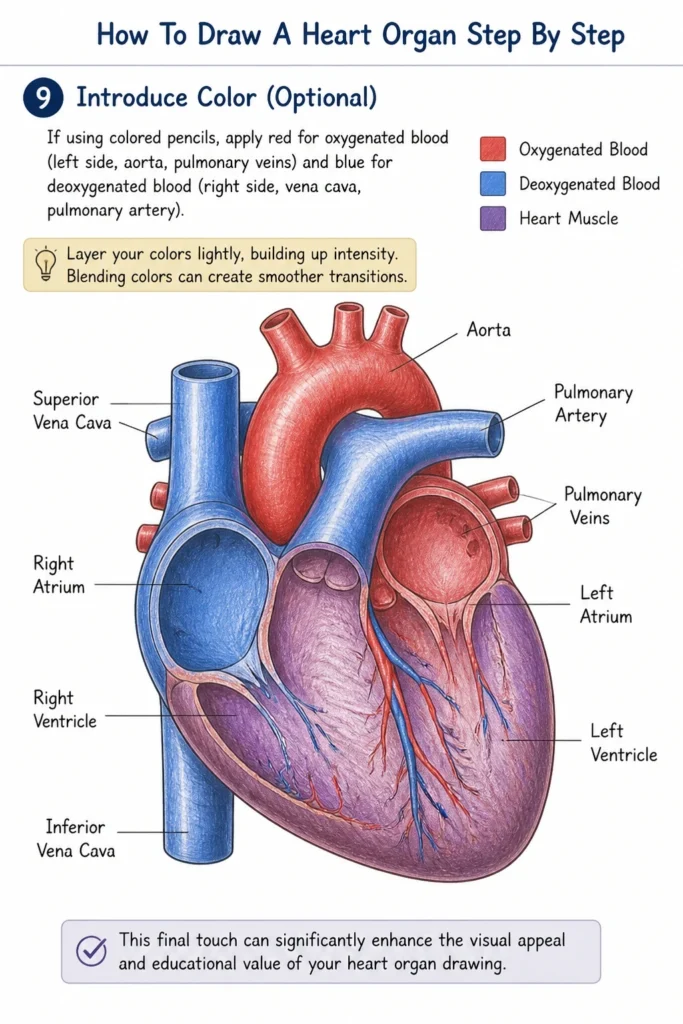
Layer your colors lightly, building up intensity. This final touch can significantly enhance the visual appeal and educational value of your heart organ drawing. Blending colors can create smoother transitions.
Common Mistakes to Avoid
Drawing a Symmetrical Heart
Many beginners draw the heart as a perfectly symmetrical shape. The human heart is asymmetrical, with the left ventricle being larger and more muscular, and the apex pointing downwards and to the left. Avoid making both sides mirror images. Focus on the natural tilt and unevenness.
Incorrect Vessel Placement
Misplacing the major arteries and veins is a common error. The aorta and pulmonary artery emerge from the top, but their specific positions relative to each other and the chambers are crucial. Always double-check where the vena cava and pulmonary veins connect to the atria.
Neglecting Surface Details
Ignoring the coronary arteries and veins makes the heart look smooth and unrealistic. These vessels are prominent on the surface of the organ. Failing to include them reduces the anatomical accuracy and overall realism of your drawing. They add texture and depth.
Over-Complicating Early Stages
Trying to draw every detail from the very beginning can be overwhelming. Start with simple shapes and gradually add complexity. Building the structure layer by layer prevents frustration and allows for easier corrections. Resist the urge to go straight for intricate details.
Troubleshooting
My Heart Looks Too Flat
If your drawing lacks dimension, you might not be using enough shading or varying line weight. Try this: Identify areas where vessels overlap or where one part of the heart recedes behind another. Add darker shadows in these areas. Also, use a slightly thicker line for features in the foreground and lighter lines for those in the background.
The Vessels Don’t Connect Properly
This often happens if the initial guidelines for the chambers were not clear enough, or if you rushed the connection points. Try this: Go back to your basic chamber outlines. Ensure the atria and ventricles are clearly defined before attaching the vessels. Use lighter lines to sketch the path of each vessel before finalizing its connection. Use a reference image to verify each entry and exit point.
I Can’t Get the Apex Pointing Correctly
The heart’s apex points downwards and towards the left. If yours is off, it’s likely due to an initial misorientation of your core oval or diagonal guide. Try this: Redraw your initial oval with a clear understanding of its slightly lopsided nature. Ensure your diagonal guide line correctly dictates the lower-left tilt. This foundational step is critical for the overall orientation.
Key Takeaways
- Always begin with light, foundational shapes to establish the overall structure.
- Break down the heart into its four main chambers before adding vessels.
- Pay close attention to the placement and curvature of the major arteries and veins.
- Embrace the natural asymmetry of the human heart, avoiding perfectly mirrored sides.
- Utilize shading and varying line weights to create depth and a three-dimensional effect.
- Reference real anatomical images frequently to ensure accuracy and detail.
Frequently Asked Questions
Is it necessary to draw the internal structures and valves?
For a basic understanding and drawing, focusing on the external anatomy is sufficient. However, including internal structures and valves significantly enhances anatomical accuracy and demonstrates a deeper comprehension of the heart’s function. It’s recommended for those seeking a more advanced drawing.
What’s the best way to make the drawing look realistic?
Realism comes from observing subtle details, accurate proportions, and effective shading. Use multiple reference images, pay attention to muscle texture, and layer your shading to create smooth transitions and depth. Don’t be afraid to add small imperfections that mimic natural forms.
How can I improve my understanding of heart anatomy while drawing?
Labeling your drawing as you go is an excellent way to reinforce learning. As you draw each chamber or vessel, mentally (or physically) name it. Consider researching the function of each part to gain a deeper appreciation for its structure. This active learning approach makes the drawing process more meaningful.
Should I use a specific type of paper?
While any paper works for practice, a slightly thicker, smoother drawing paper (like Bristol board or medium-weight sketch paper) will hold pencil marks better and allow for smoother blending and layering, especially if you plan to add color or significant shading.
Our Top Recommended Finds
- High-Quality Sketch Pencil Set: A good set with varying lead hardness (HB, 2B, 4B, 6B) allows for greater control over line weight and shading. These pencils are essential for creating depth.
- Kneaded Eraser: Unlike standard erasers, a kneaded eraser can lift graphite without smudging or damaging the paper. It’s perfect for subtle corrections and lightening areas.
- Anatomy for Artists Reference Book: A visual guide specifically designed for artists will provide detailed, accurate anatomical illustrations. This helps immensely with understanding complex structures like the heart.
Embracing the Journey of Anatomical Art
You’ve just completed a detailed drawing of the human heart. This achievement goes beyond simple lines on paper; it deepens your understanding of this incredible organ. Each stroke was a step in learning anatomy through art.
Continue to explore other complex organs or refine this drawing further. Practice is the key to mastery in any artistic endeavor. Pick up your pencil again today and keep drawing.