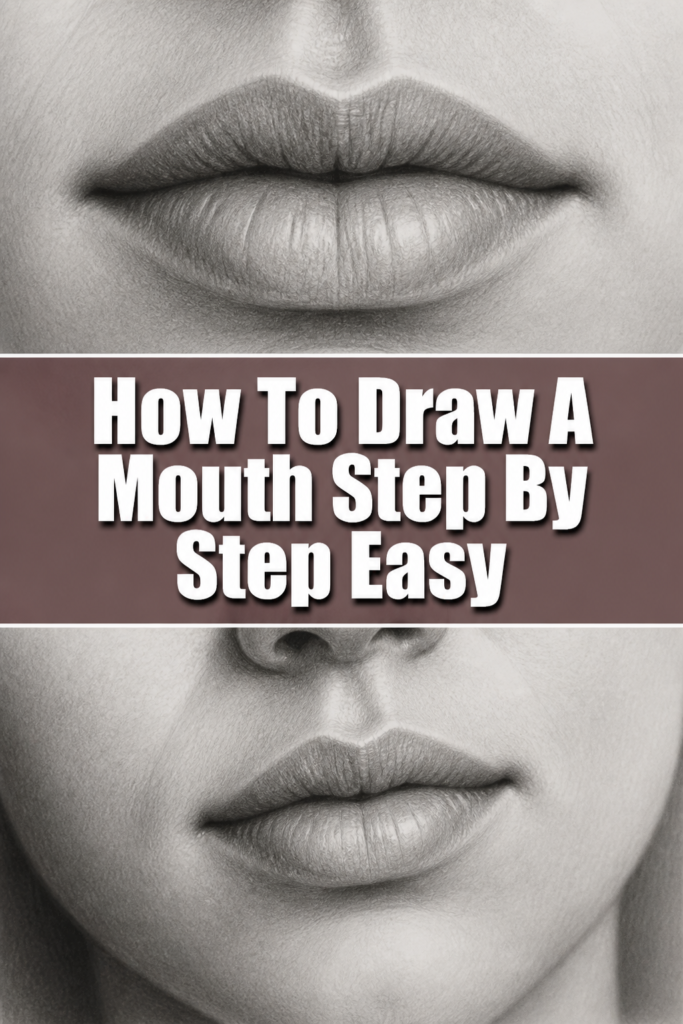
👄 How To Draw A Mouth Step By Step Easy

& Painting
No rigid rules or pretension. Just practical guides, medium comparisons, and encouraging tips to help you enjoy the drawing & painting process.
Learning to draw a mouth can feel daunting at first. I remember my own early attempts often looked stiff or unnatural.
But with a structured approach, you can quickly build confidence and skill. This guide will walk you through creating expressive, realistic mouths, making the process simple and enjoyable.
You’ll soon be drawing mouths that truly bring your characters to life.
Quick Overview
This guide will empower you to draw a convincing mouth from scratch. We’ll cover basic shapes, proportions, and essential detailing.
You’ll gain a solid foundation for creating various lip types and expressions.
- Time needed: 30-60 minutes for a detailed study
- Difficulty: Beginner
- What you’ll need: Pencil (HB, 2B), paper, eraser (kneaded and vinyl), ruler (optional)
Step-by-Step Instructions
Step 1: Establish Your Basic Guidelines
Begin by drawing a horizontal line across your paper. This will be the center line for your mouth.
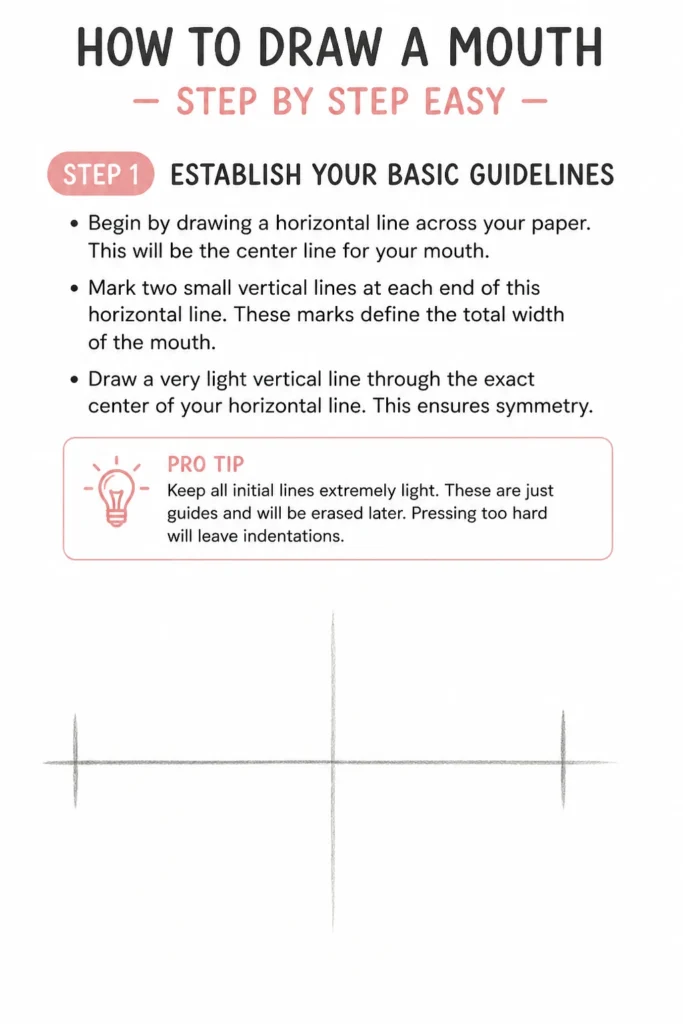
Mark two small vertical lines at each end of this horizontal line. These marks define the total width of the mouth.
Draw a very light vertical line through the exact center of your horizontal line. This ensures symmetry.
Pro Tip: Keep all initial lines extremely light. These are just guides and will be erased later. Pressing too hard will leave indentations.
Step 2: Outline the Cupid’s Bow and Upper Lip Curve
Locate the center vertical line. Slightly above the horizontal center line, draw two small, gentle curves meeting at the top of the vertical line. This creates the ‘cupid’s bow’.
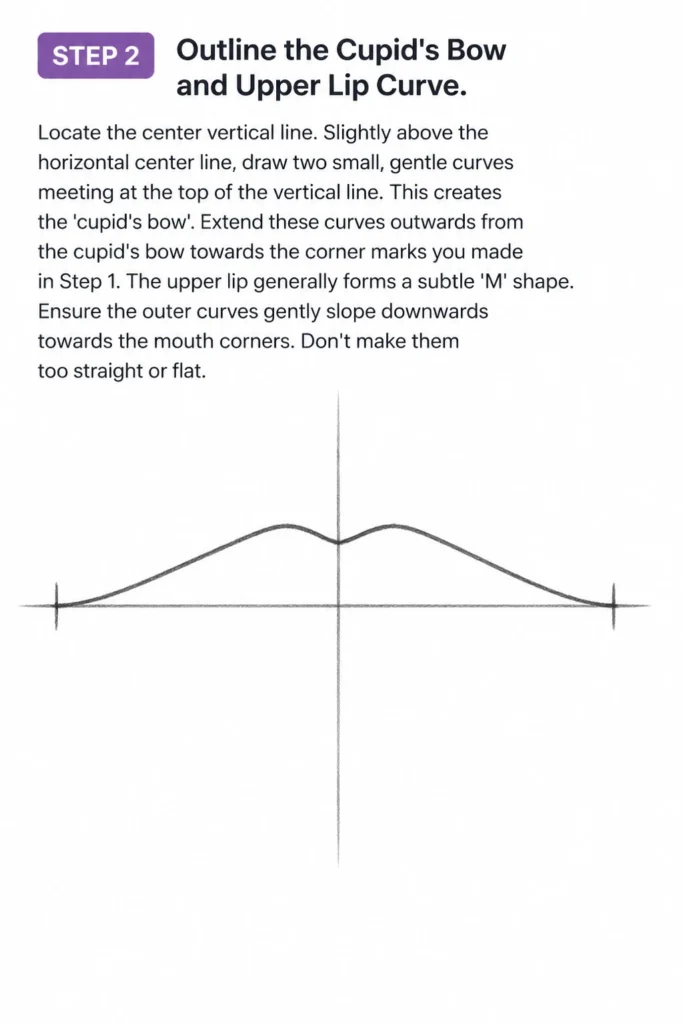
Extend these curves outwards from the cupid’s bow towards the corner marks you made in Step 1. The upper lip generally forms a subtle ‘M’ shape.
Ensure the outer curves gently slope downwards towards the mouth corners. Don’t make them too straight or flat.
Step 3: Shape the Lower Lip
Draw a gentle, wider curve directly below the main horizontal line. This forms the base of the lower lip.
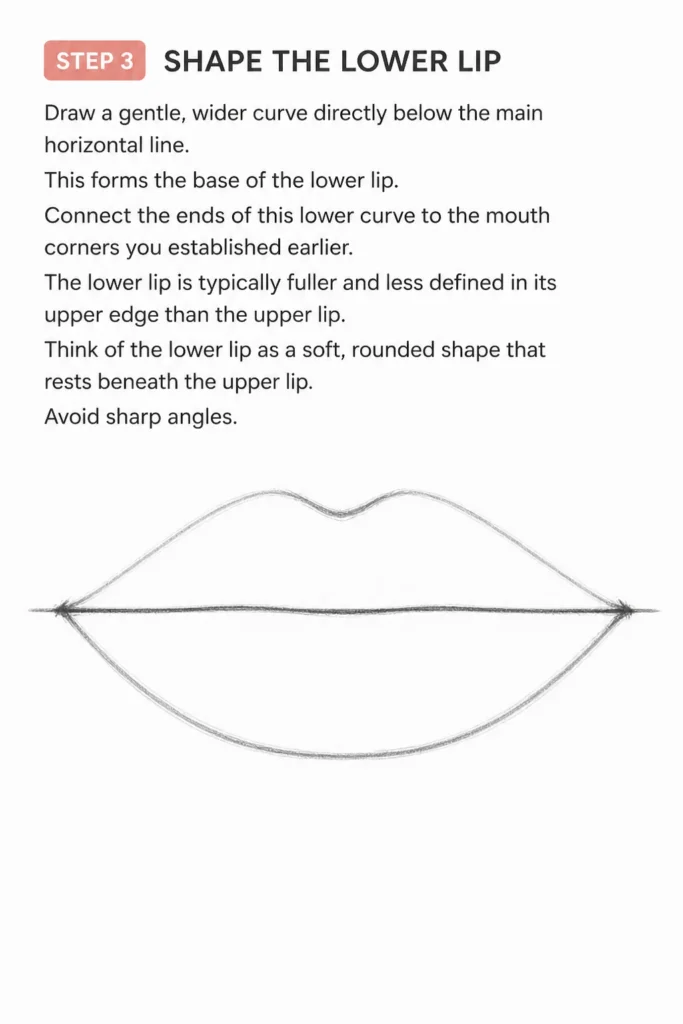
Connect the ends of this lower curve to the mouth corners you established earlier. The lower lip is typically fuller and less defined in its upper edge than the upper lip.
Think of the lower lip as a soft, rounded shape that rests beneath the upper lip. Avoid sharp angles.
Step 4: Define the Mouth Opening
Refine the line where the upper and lower lips meet. This is often the darkest and most defined line of the mouth.
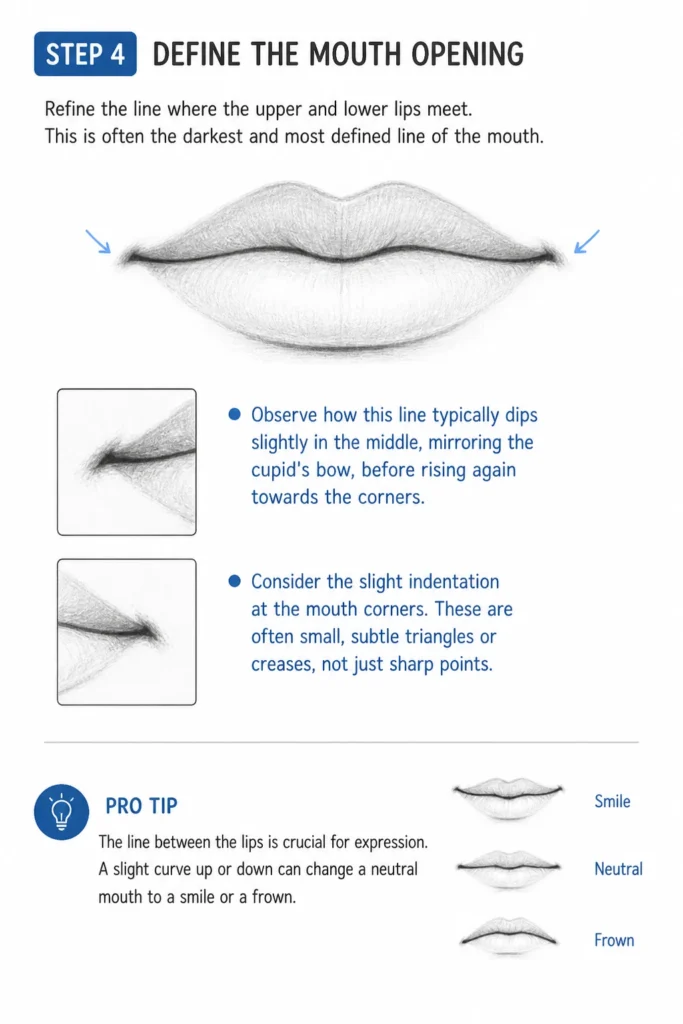
Observe how this line typically dips slightly in the middle, mirroring the cupid’s bow, before rising again towards the corners. It’s rarely a perfectly straight line.
Consider the slight indentation at the mouth corners. These are often small, subtle triangles or creases, not just sharp points.
Pro Tip: The line between the lips is crucial for expression. A slight curve up or down can change a neutral mouth to a smile or a frown.
Step 5: Add Volume and Form with Shading
Begin to shade the lips to give them a three-dimensional quality. Lips are not flat surfaces.
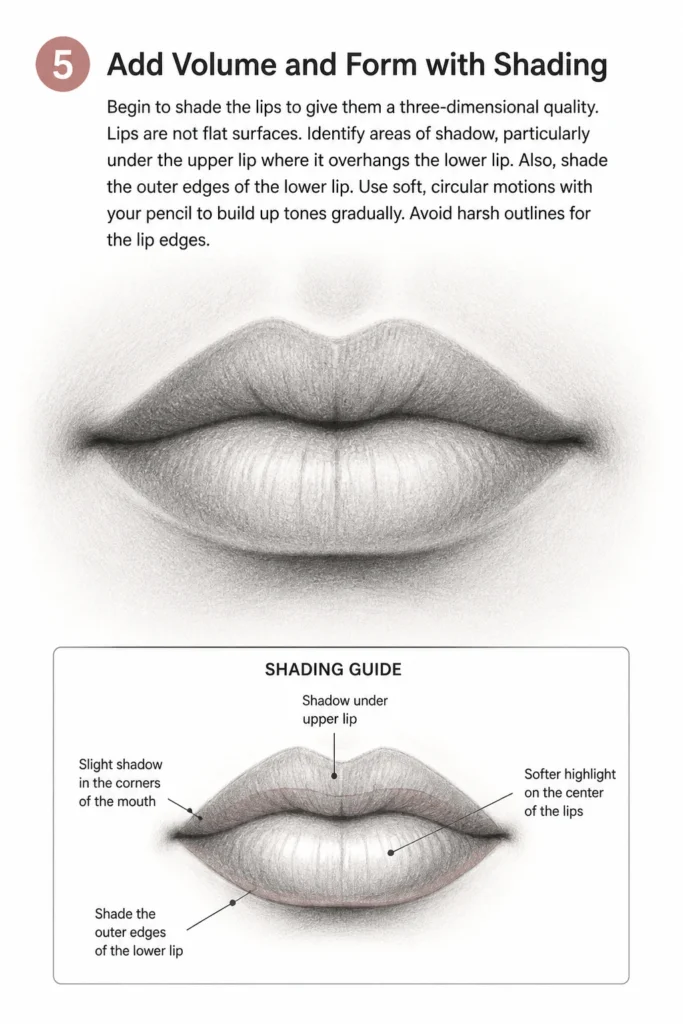
Identify areas of shadow, particularly under the upper lip where it overhangs the lower lip. Also, shade the outer edges of the lower lip.
Use soft, circular motions with your pencil to build up tones gradually. Avoid harsh outlines for the lip edges.
Step 6: Introduce Subtle Creases and Texture
Draw very light, vertical lines or short dashes on the lips. These represent the natural creases and texture of the skin.
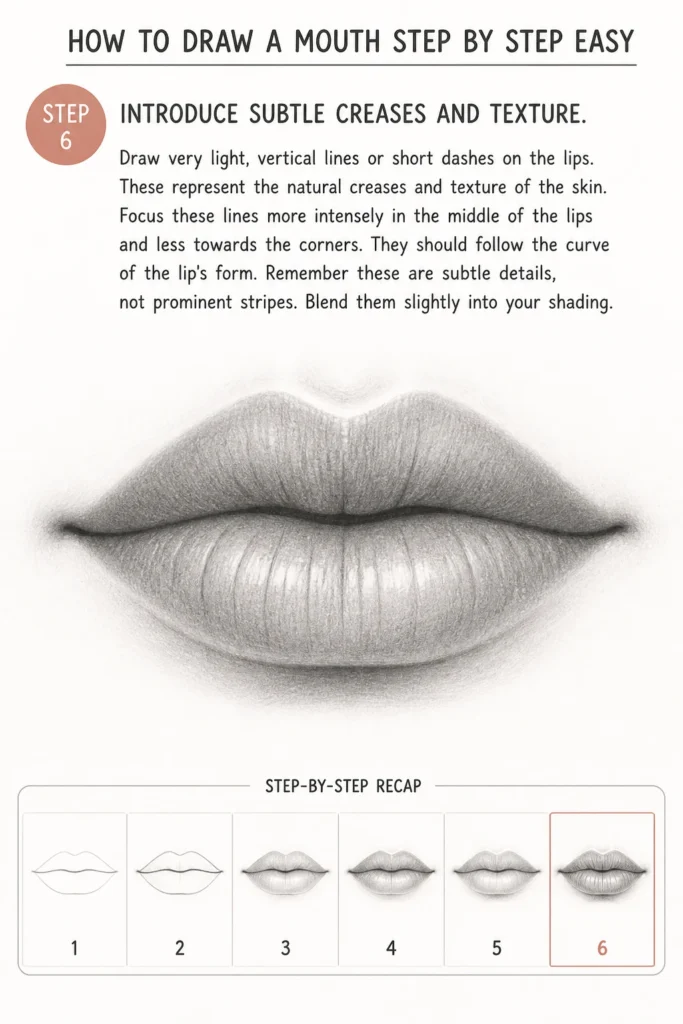
Focus these lines more intensely in the middle of the lips and less towards the corners. They should follow the curve of the lip’s form.
Remember these are subtle details, not prominent stripes. Blend them slightly into your shading.
Step 7: Refine and Erase Guidelines
Carefully erase any remaining initial guidelines that are no longer needed. Use a kneaded eraser to lift graphite gently.
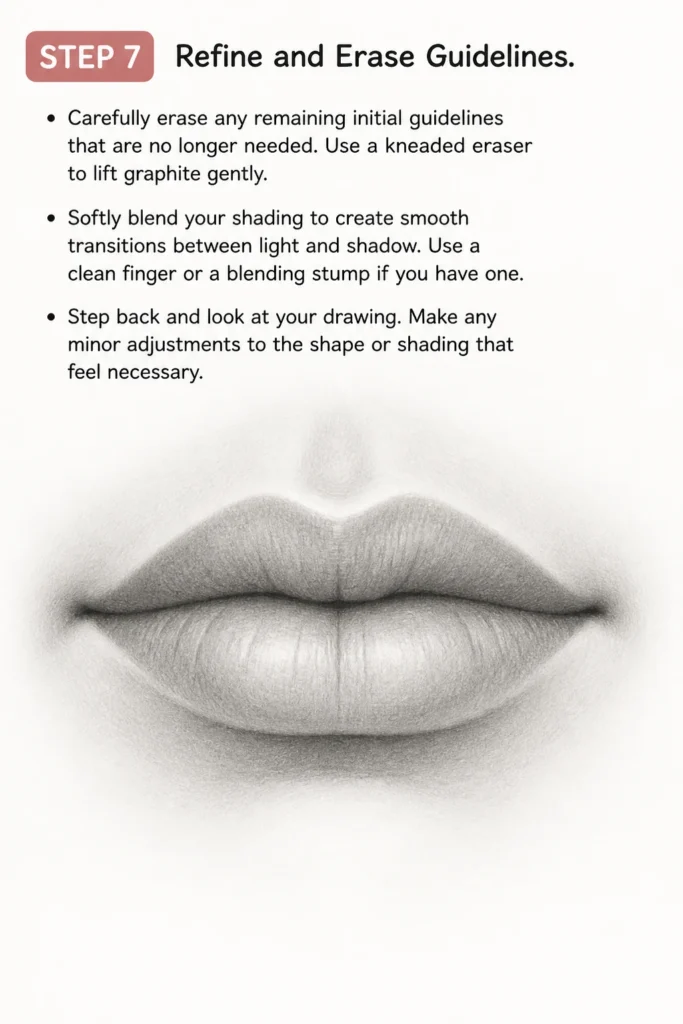
Softly blend your shading to create smooth transitions between light and shadow. Use a clean finger or a blending stump if you have one.
Step back and look at your drawing. Make any minor adjustments to the shape or shading that feel necessary.
Step 8: Add the Philtrum and Chin Shadow
Lightly sketch the philtrum, which is the vertical groove between the base of the nose and the upper lip. It’s a subtle ‘M’ or ‘Y’ shape.
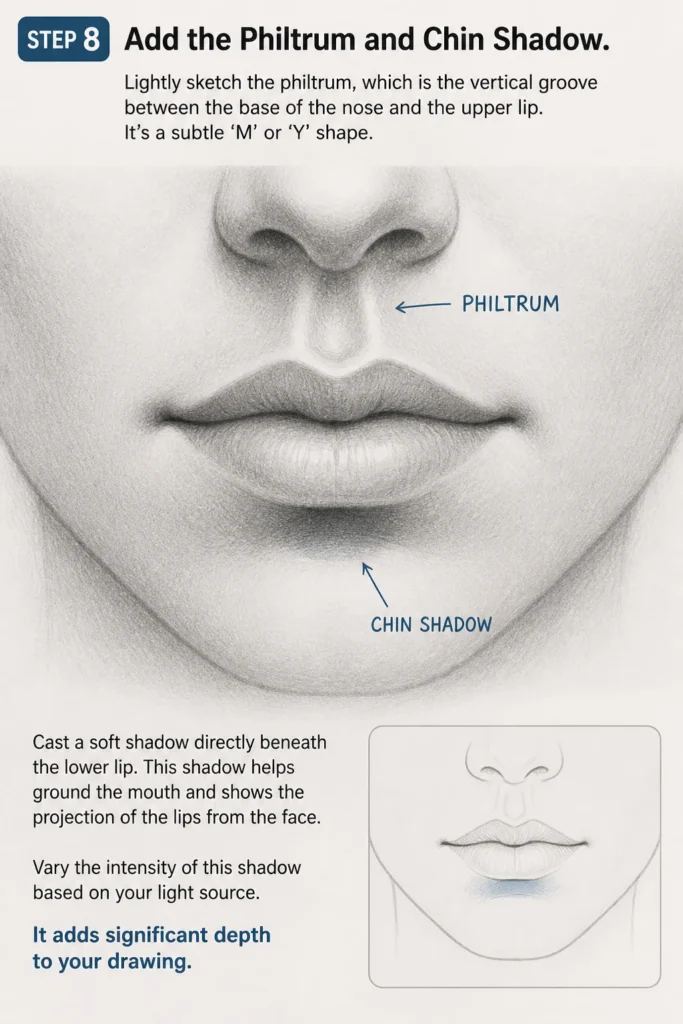
Cast a soft shadow directly beneath the lower lip. This shadow helps ground the mouth and shows the projection of the lips from the face.
Vary the intensity of this shadow based on your light source. It adds significant depth to your drawing.
Step 9: Practice Different Expressions
Experiment with slightly altering your initial horizontal line and the curve of the mouth opening. A slight upward curve creates a smile.
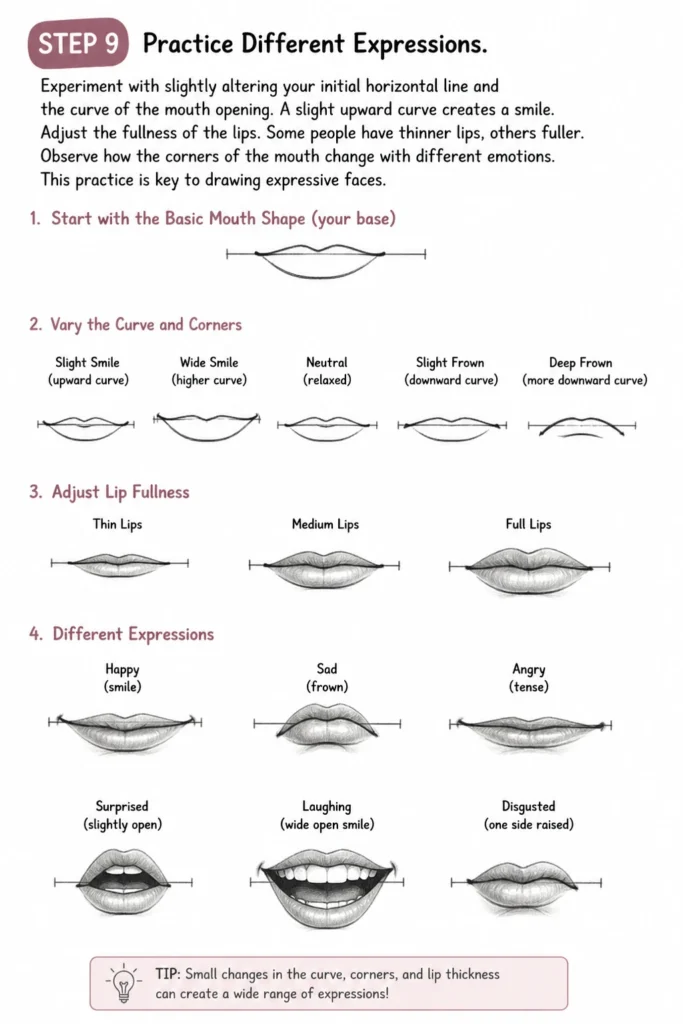
Adjust the fullness of the lips. Some people have thinner lips, others fuller. Practice both.
Observe how the corners of the mouth change with different emotions. This practice is key to drawing expressive faces.
Common Mistakes to Avoid
Drawing Flat Lips
A common issue is drawing lips that look like flat cutouts on the face. This happens when artists focus only on the outline without considering volume. Remember that lips are fleshy, three-dimensional forms that protrude from the face. Always shade to show their curve and depth, especially under the upper lip and on the outer edges of the lower lip.
Making Lips Too Symmetrical
While you strive for balance, perfectly symmetrical lips can look unnatural or robotic. Real human faces have subtle asymmetries. Allow for slight variations in the curve of the cupid’s bow or the fullness of each side of the lower lip to add realism and character.
Over-detailing Teeth
When drawing an open mouth, resist the urge to draw every single tooth with a dark outline. This often makes the mouth look creepy or like a denture advertisement. Instead, suggest the teeth with subtle highlights and shadows, focusing more on the overall shape and the shadows cast by the lips. Often, only the front teeth are clearly visible.
Heavy Outlines
Using dark, thick lines for the entire perimeter of the lips can make them appear stiff and unnatural. Lips are soft tissue. Use lighter lines for the general form and reserve darker lines for areas of shadow or where lips meet, such as the line between the upper and lower lip. Blend your lines into your shading for a softer, more organic look.
Troubleshooting
My Mouth Looks Stiff and Unnatural
If your mouth looks too rigid, you might be relying too much on straight lines and sharp angles. Lips are soft and rounded. Try to introduce more gentle curves and avoid making the mouth opening a perfectly straight line. Practice drawing from reference photos to better understand natural lip shapes and subtle asymmetries.
I Can’t Get the Lips to Look Full Enough
Lack of fullness often comes from not giving the lips enough volume through shading. Ensure you’re showing the curve of the lips, especially the lower lip, by adding appropriate highlights and shadows. The middle of the lower lip and the peaks of the cupid’s bow are often highlight areas, while the areas under the upper lip and the outer edges of the lower lip recede into shadow.
My Mouth Doesn’t Convey Any Emotion
To add emotion, focus on the corners of the mouth and the line where the lips meet. A slight upward curve at the corners suggests happiness, while a downward curve suggests sadness. The tension or relaxation around the mouth also plays a big role. Observe how the lips change shape and tension in different expressions on real faces, then exaggerate these features slightly in your drawing.
Key Takeaways
- Start with light guidelines to establish overall width and symmetry before detailing.
- Focus on volume and form, not just the outer outline, by using shading effectively.
- The line between the lips is crucial for expression; it’s rarely perfectly straight.
- Add subtle details like lip creases and the philtrum to enhance realism.
- Avoid heavy outlines and over-detailing teeth for a more natural appearance.
- Practice observing real mouths and experimenting with different expressions to improve.
Frequently Asked Questions
How do I draw different lip shapes, like thin or full lips?
To draw different lip shapes, adjust your initial curves in Step 2 and 3. For thinner lips, make the curves less pronounced and the overall height of the lips smaller. For fuller lips, exaggerate the curves, making the lower lip especially more rounded and voluminous. Always remember to maintain the basic structure, just modify the proportions.
What’s the best way to draw teeth without making them look creepy?
When drawing teeth, focus on the overall shape and the shadows they cast. Only lightly suggest the outlines of the front teeth, and use soft shading to show their form and the shadows from the lips above. Avoid drawing every individual tooth; instead, hint at them, especially those further back in the mouth, with subtle tones.
How can I make the mouth look like it’s smiling or frowning?
To convey emotion, primarily adjust the curve of the mouth opening and the corners. For a smile, curve the mouth line upwards and lift the corners slightly. For a frown, curve the line downwards and lower the corners. Also, consider the slight creases that form around the mouth with these expressions.
Should I draw the entire lip outline dark?
No, it’s generally best to avoid drawing the entire lip outline with a dark, uniform line. Lips are soft and blend into the skin. Use lighter lines for the general shape and reserve darker, more defined lines for areas of shadow, such as under the upper lip or where the lips meet. This approach creates a more natural and realistic effect.
Our Top Recommended Finds
- Sketching Pencil Set: A good set with various lead hardnesses (HB, 2B, 4B, 6B) allows for a wider range of tones and details.
- Smooth Drawing Paper: Paper with a slight tooth but a smooth surface helps with blending and achieving soft transitions in your shading.
- Kneaded Eraser: Essential for lifting graphite gently, creating highlights, and cleaning up without damaging the paper surface.
Your Path to Expressive Artistry
Mastering the mouth is a significant step in your drawing journey. It allows you to inject personality and emotion into your portraits and characters.
Don’t be afraid to experiment with the techniques you’ve learned today. Each drawing is an opportunity to improve.
Pick up your pencil right now and try drawing a mouth using these steps. Your artistic growth starts with that first line.
& Painting
No rigid rules or pretension. Just practical guides, medium comparisons, and encouraging tips to help you enjoy the drawing & painting process.