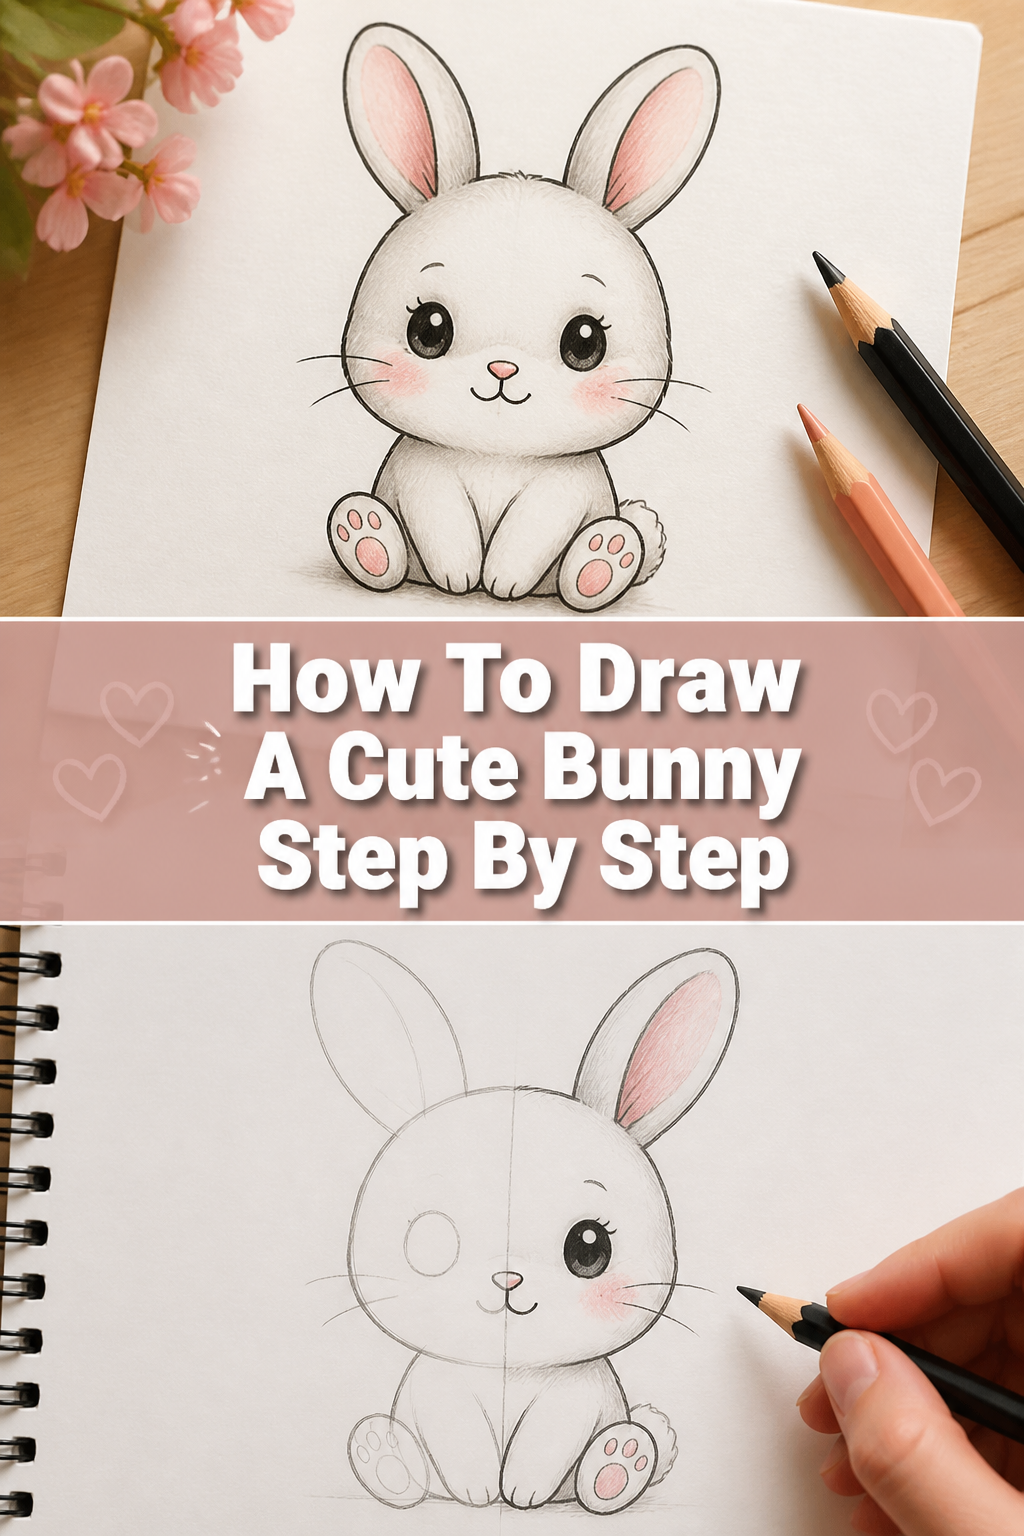
🐰 How To Draw A Cute Bunny Step By Step

& Painting
No rigid rules or pretension. Just practical guides, medium comparisons, and encouraging tips to help you enjoy the drawing & painting process.
Ever wanted to draw something undeniably sweet and charming? I’ve spent countless hours sketching adorable creatures, and bunnies are a personal favorite for their simple, heartwarming appeal. This guide will help you create your own fluffy friend, even if you’re just starting out.
You’ll discover how to transform basic shapes into a delightful bunny, building your confidence with every stroke. Get ready to bring some cuteness to your sketchbook today.
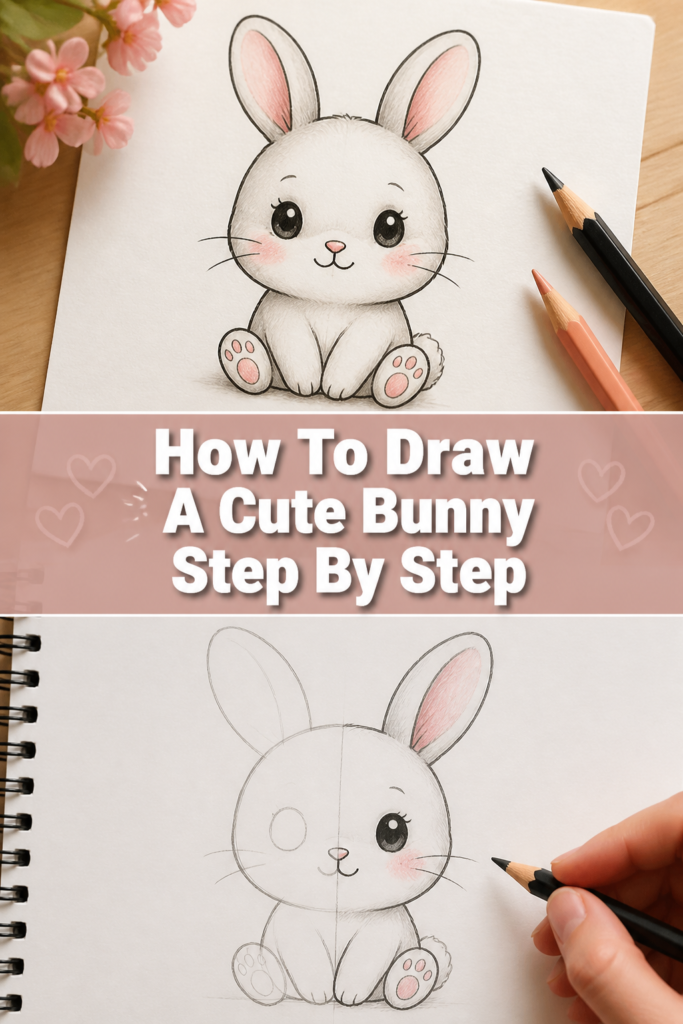
Quick Overview
This guide will walk you through the process of drawing an endearing bunny from scratch. You’ll learn how to build your drawing with simple shapes, refine details, and add character. By the end, you’ll have a complete, charming bunny illustration.
- Time needed: 30-45 minutes
- Difficulty: Beginner
- What you’ll need: Pencil (HB or 2B), eraser (kneaded is best), drawing paper, optional: colored pencils or markers
Step-by-Step Instructions
Step 1: Sketch the Basic Shapes for the Head and Body
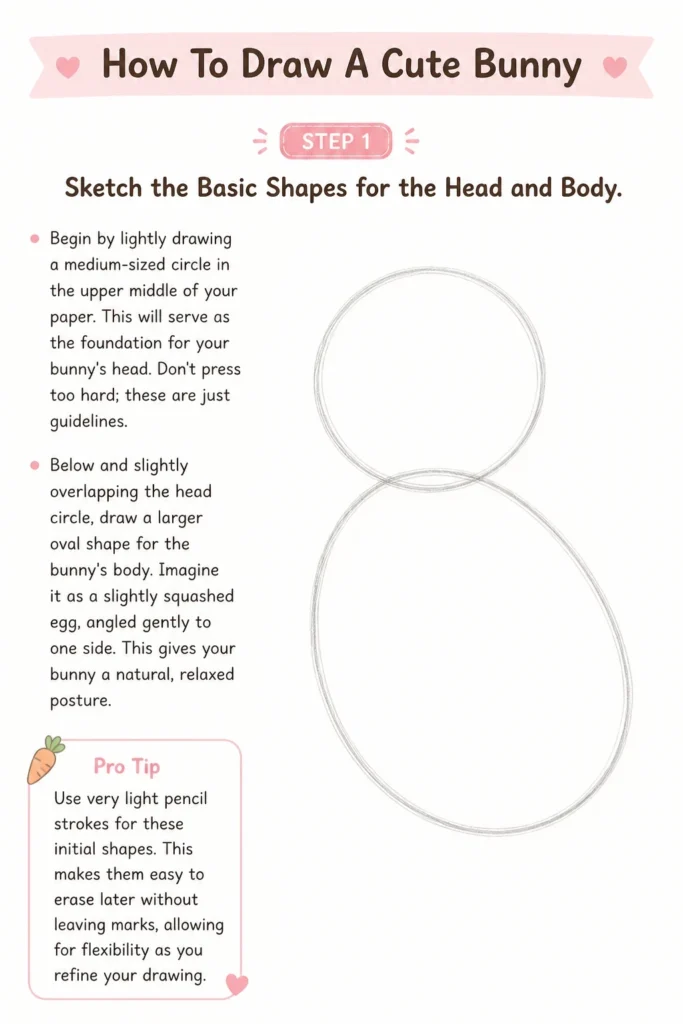
Begin by lightly drawing a medium-sized circle in the upper middle of your paper. This will serve as the foundation for your bunny’s head. Don’t press too hard; these are just guidelines.
Below and slightly overlapping the head circle, draw a larger oval shape for the bunny’s body. Imagine it as a slightly squashed egg, angled gently to one side. This gives your bunny a natural, relaxed posture.
Pro Tip: Use very light pencil strokes for these initial shapes. This makes them easy to erase later without leaving marks, allowing for flexibility as you refine your drawing.
Step 2: Connect the Shapes and Add the Ears
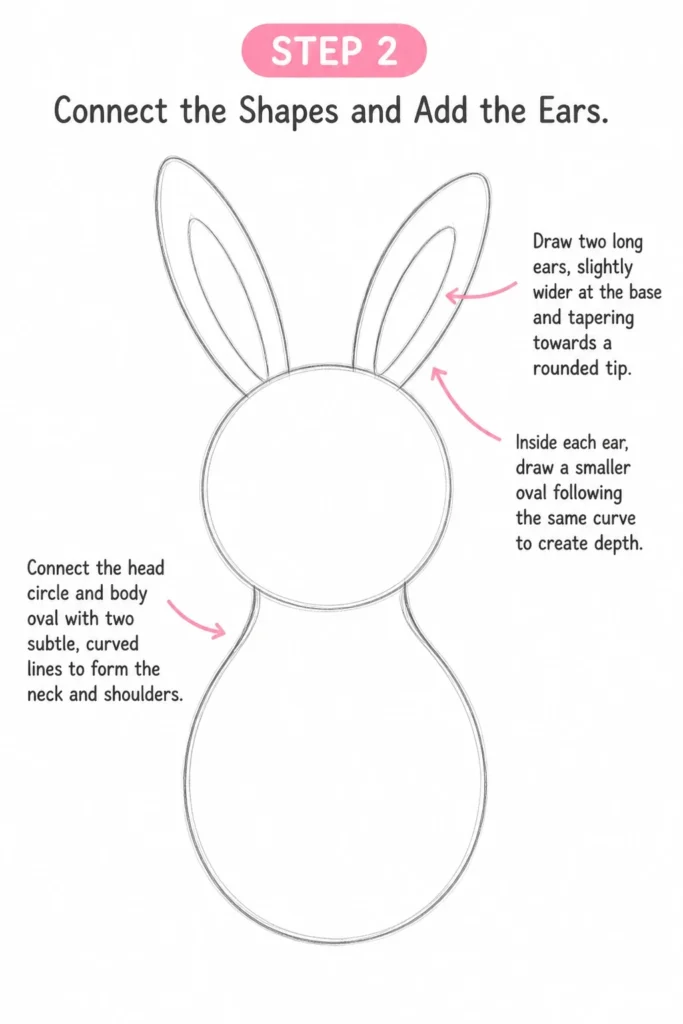
Now, gently connect the head circle and body oval with two subtle, curved lines. These lines will form the neck and shoulders, making the transition smooth and organic. Think of a soft “S” curve.
For the ears, draw two long, graceful ovals extending upwards from the top of the head. Make them slightly wider at the base and gently tapering towards a rounded tip. Bunnies often have expressive ears, so give them a slight bend or tilt.
Inside each ear, draw a smaller, narrower oval following the same curve. This inner line will create depth and define the soft, inner part of the ear.
Step 3: Position the Facial Features
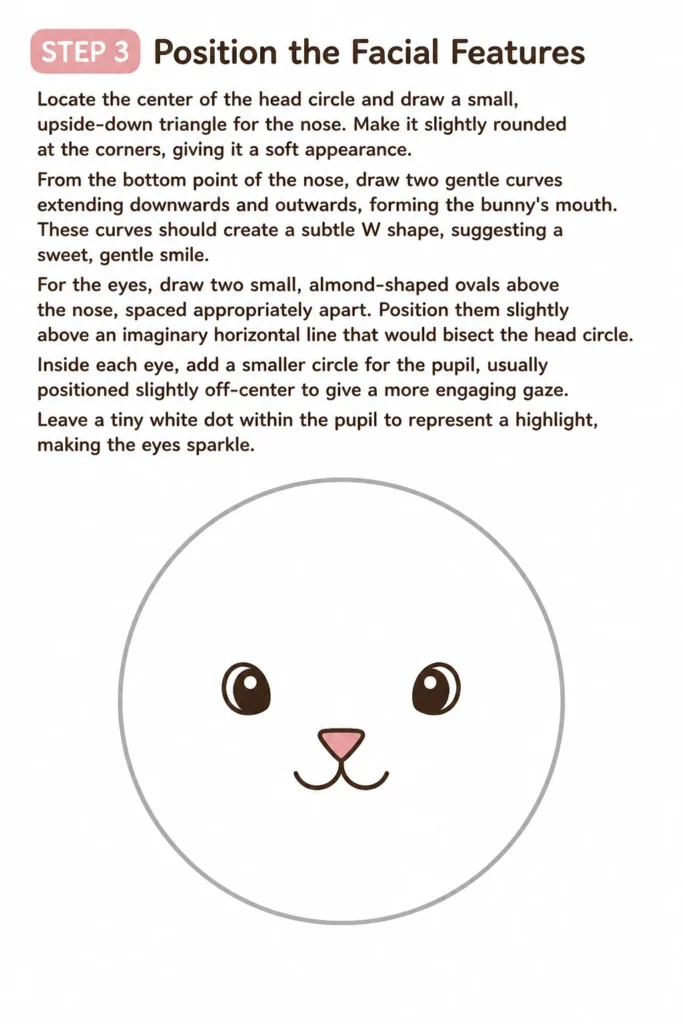
Locate the center of the head circle and draw a small, upside-down triangle for the nose. Make it slightly rounded at the corners, giving it a soft appearance.
From the bottom point of the nose, draw two gentle curves extending downwards and outwards, forming the bunny’s mouth. These curves should create a subtle “W” shape, suggesting a sweet, gentle smile.
For the eyes, draw two small, almond-shaped ovals above the nose, spaced appropriately apart. Position them slightly above an imaginary horizontal line that would bisect the head circle.
Inside each eye, add a smaller circle for the pupil, usually positioned slightly off-center to give a more engaging gaze. Leave a tiny white dot within the pupil to represent a highlight, making the eyes sparkle.
Step 4: Draw the Paws and Tail
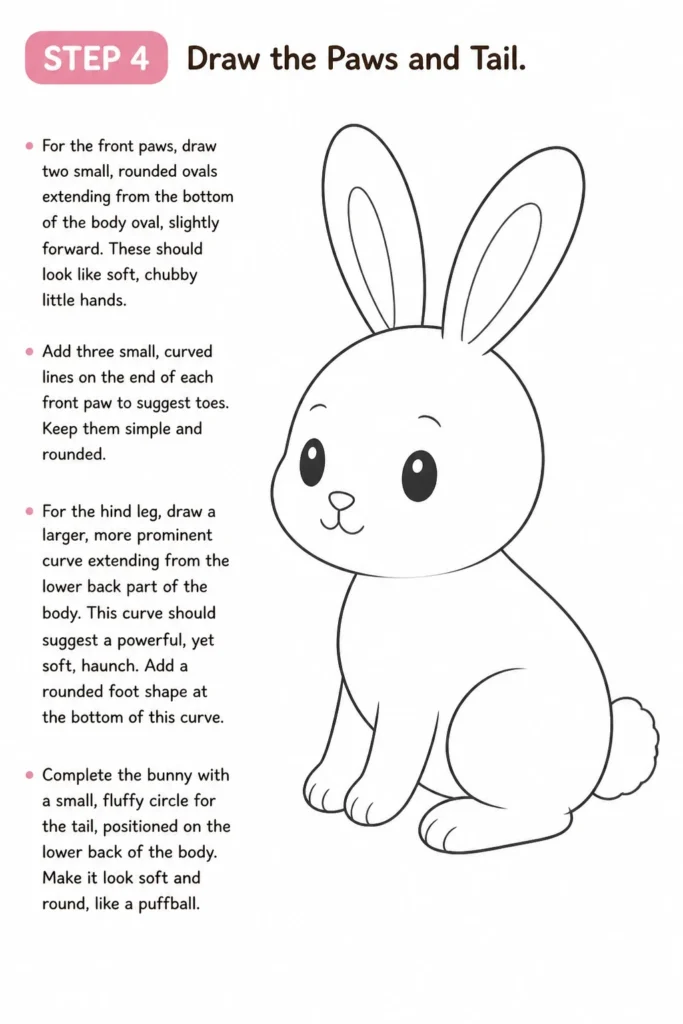
Let’s move to the paws. For the front paws, draw two small, rounded ovals extending from the bottom of the body oval, slightly forward. These should look like soft, chubby little hands.
Add three small, curved lines on the end of each front paw to suggest toes. Keep them simple and rounded.
For the hind leg, draw a larger, more prominent curve extending from the lower back part of the body. This curve should suggest a powerful, yet soft, haunch. Add a rounded foot shape at the bottom of this curve.
Complete the bunny with a small, fluffy circle for the tail, positioned on the lower back of the body. Make it look soft and round, like a puffball.
Step 5: Refine the Outline and Add Fur Texture
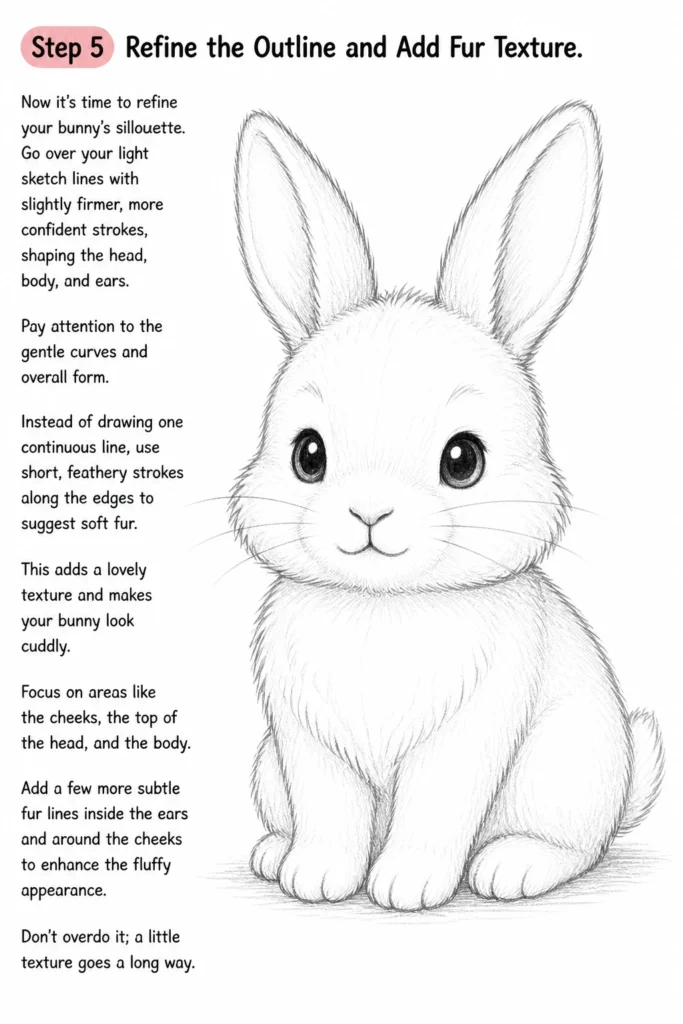
Now it’s time to refine your bunny’s silhouette. Go over your light sketch lines with slightly firmer, more confident strokes, shaping the head, body, and ears. Pay attention to the gentle curves and overall form.
Instead of drawing one continuous line, use short, feathery strokes along the edges to suggest soft fur. This adds a lovely texture and makes your bunny look cuddly. Focus on areas like the cheeks, the top of the head, and the body.
Add a few more subtle fur lines inside the ears and around the cheeks to enhance the fluffy appearance. Don’t overdo it; a little texture goes a long way.
Step 6: Erase Guidelines and Add Details
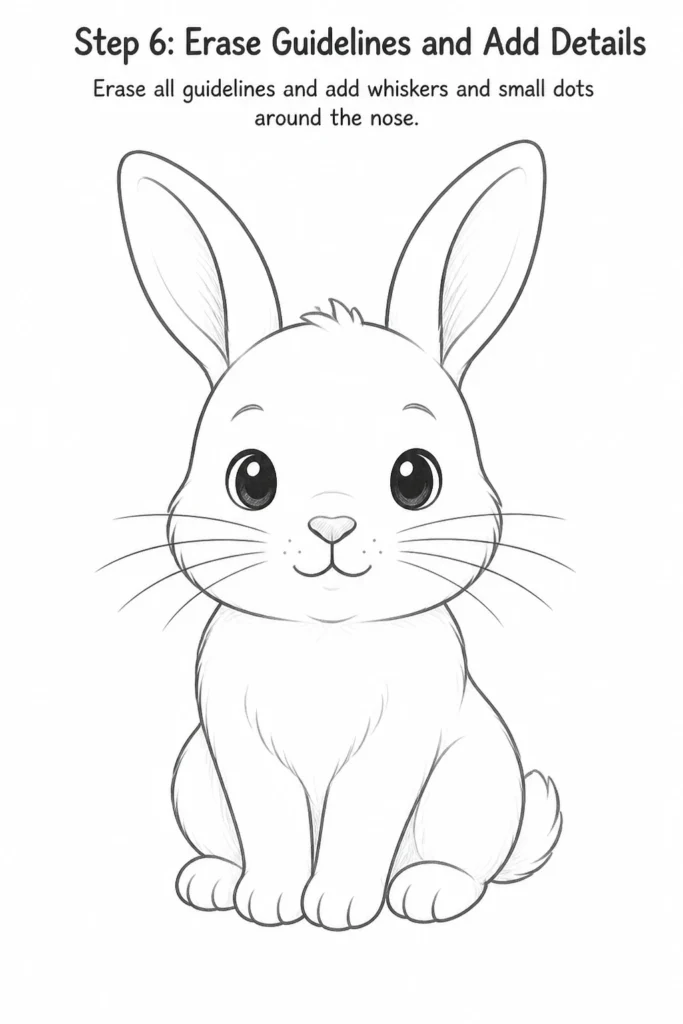
Carefully erase all the initial light guideline circles and ovals you drew in the first few steps. Take your time to ensure your main bunny outline remains clear and crisp. A kneaded eraser works wonderfully here, as it lifts graphite without smudging.
Add whiskers by drawing a few thin, slightly curved lines extending from the sides of the nose. Keep them delicate and varied in length.
You might also add a few dots around the nose area where the whiskers emerge. This adds a touch of realism and charm to your bunny’s face.
Step 7: Add Shading or Color (Optional)
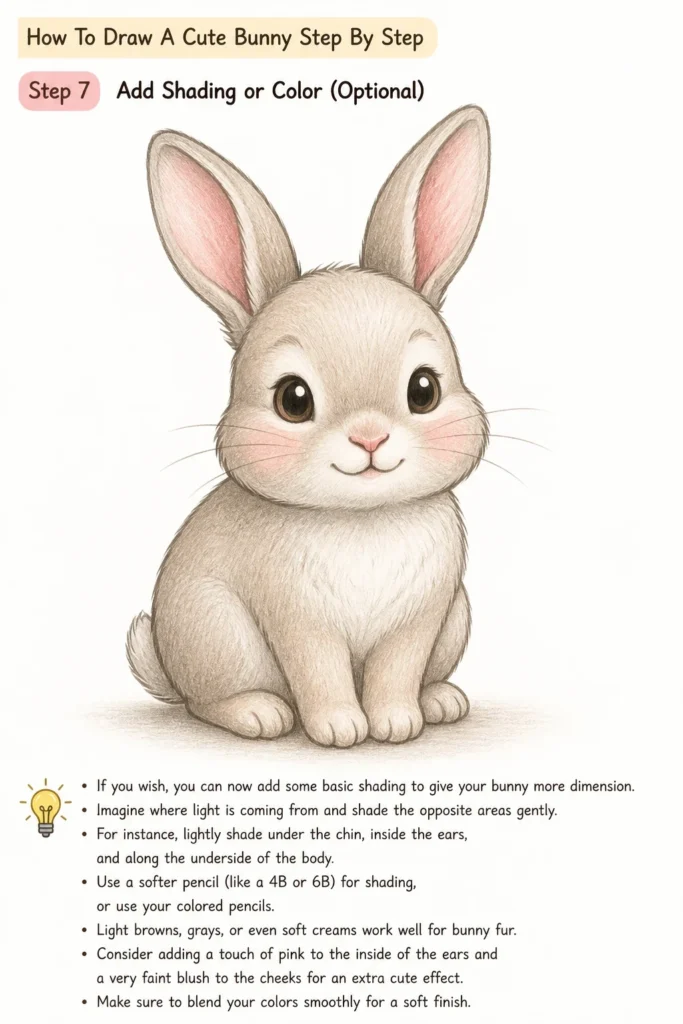
If you wish, you can now add some basic shading to give your bunny more dimension. Imagine where light is coming from and shade the opposite areas gently. For instance, lightly shade under the chin, inside the ears, and along the underside of the body.
Use a softer pencil (like a 4B or 6B) for shading, or use your colored pencils. Light browns, grays, or even soft creams work well for bunny fur.
Consider adding a touch of pink to the inside of the ears and a very faint blush to the cheeks for an extra cute effect. Make sure to blend your colors smoothly for a soft finish.
Common Mistakes to Avoid
Proportion Problems
One common pitfall is making the head too large or too small in relation to the body. An imbalanced bunny can look awkward rather than cute. Always start with your basic shapes, comparing their sizes to each other before adding details.
If your bunny looks a bit off, revisit your initial head and body circles. Adjust their sizes or positions slightly until they feel harmonious. Remember, a cute bunny often has a slightly larger head for its body, but not disproportionately so.
Stiff or Unnatural Poses
Drawing a bunny that looks rigid or frozen can detract from its appeal. Bunnies are naturally fluid and expressive creatures. Avoid perfectly straight lines and symmetrical poses.
Instead, introduce gentle curves and a slight tilt to the head or body. Imagine your bunny in motion or resting comfortably, and let those natural postures guide your lines. A subtle lean can add so much character.
Overdoing Fur Texture
While fur texture is important for a fluffy look, over-texturing can make your bunny appear messy or spiky. Too many short lines can quickly become overwhelming and lose the soft quality.
Focus on suggesting fur with short, directional strokes along the edges and in key areas like the cheeks. Less is often more when it comes to fur, allowing the viewer’s imagination to fill in the softness.
Ignoring Guidelines
Skipping the initial light guideline shapes can lead to struggles with symmetry and overall form. Trying to draw a perfect bunny freehand from the start is much harder than building it up.
Always begin with your light circles and ovals. These serve as a crucial framework, ensuring your bunny has a solid foundation before you commit to final lines. They are your safety net for getting proportions right.
Troubleshooting
My Bunny Looks Flat
If your bunny appears two-dimensional, it likely needs more depth and form. This often comes from a lack of subtle curves and shading.
Try adding more gentle curves to the body and limbs, suggesting their roundness. Also, introduce some light shading under the chin, along the belly, and inside the ears, as if light is hitting from one direction. This creates the illusion of volume.
I Can’t Get the Eyes Right
Eyes are crucial for conveying cuteness, and they can be tricky. If your bunny’s eyes look lifeless or off, focus on their shape, placement, and highlights.
Ensure the eyes are almond-shaped and positioned symmetrically. The small white highlight dot within the pupil is essential for making the eyes sparkle and look alive. Experiment with its placement to find the most engaging gaze.
My Lines Are Messy
Messy lines can make your drawing look unpolished, even if the underlying structure is good. This often happens when you press too hard initially or don’t erase thoroughly.
Practice drawing with a very light touch for your initial sketches. Once you’re happy with the form, go over your lines with a firmer, more confident stroke. Use a good quality eraser (like a kneaded eraser) to clean up all your preliminary marks without smudging.
Key Takeaways
- Always start with basic, light geometric shapes to build your bunny’s foundation.
- Use gentle curves and subtle angles to give your bunny a natural, soft, and cute appearance.
- Pay close attention to facial features, especially the eyes and nose, as they convey much of the bunny’s charm.
- Suggest fur texture with short, feathery strokes rather than drawing every single hair.
- Erase your initial guidelines carefully to achieve a clean and polished final drawing.
- Practice makes perfect; don’t be afraid to draw multiple bunnies to improve your skills.
Frequently Asked Questions
What kind of pencil is best for drawing a cute bunny?
An HB pencil is a great all-around choice for initial sketching and general lines, offering a good balance of hardness and darkness. For softer shading, a 2B or 4B pencil can be very helpful. A harder pencil like 2H is excellent for very light guidelines that are easy to erase.
How do I make my bunny look more realistic?
To add realism, focus on subtle details like varying fur length and direction, adding more defined muscle structure in the hind legs, and observing real bunny photos. More detailed shading and subtle color variations can also enhance realism. However, for a “cute” bunny, a simplified, stylized approach often works best.
Can I draw my bunny in different poses?
Absolutely! Once you’re comfortable with the basic structure, experiment with different poses. Start by sketching the head and body ovals in various positions – sitting, hopping, or looking over its shoulder. Remember to adjust the limbs and tail accordingly to match the new pose.
How do I add shadows to my drawing?
To add shadows, first decide on a consistent light source. Then, gently shade the areas that would naturally be in shadow, such as under the chin, on the opposite side of the light source, and under the paws. Use a softer pencil or build up layers with an HB pencil for smooth transitions.
Our Top Recommended Finds
- Sketching Pencil Set: A good set with varying lead hardness (e.g., 2H to 6B) gives you versatility for sketching, outlining, and shading.
- Kneaded Eraser: This type of eraser is fantastic for lifting graphite cleanly without smudging, perfect for refining your lines and removing guidelines.
- Smooth Drawing Paper: Opt for paper with a slightly smooth texture, which allows for clean lines and smooth blending of graphite or colored pencils.
Your Bunny Art Journey Begins!
You’ve just taken the first delightful steps into the world of drawing cute bunnies. Remember that every artist starts somewhere, and practice is your most valuable tool. Don’t be afraid to experiment with different expressions, poses, or even adding little accessories to your bunny.
Now that you’ve mastered the basics, why not try drawing a whole family of bunnies? Or perhaps explore adding a simple background like a patch of grass or a carrot. Grab your pencil and paper, and let your creativity hop free!
& Painting
No rigid rules or pretension. Just practical guides, medium comparisons, and encouraging tips to help you enjoy the drawing & painting process.